Kaufland (Setup via Channel Control Centre)
Kaufland is one of the largest fixed price markets in Germany. You can sell items from various product categories on Kaufland. Kaufland also processes payments for you. In other words, you are neither charged with payment costs nor do you have to worry about debt collection.
|
Channel Control Centre
This page explains the setup process for Kaufland via the menu Sales Channels » Channel Control Centre. If your system features the Setup » Markets menu instead, then you can find instructions on how to set up Kaufland via the menu Setup » Markets here. |
1. Registering with Kaufland
In order to use the Kaufland interface, you have to register your Kaufland user account as a seller account. To do so, log into the Kaufland back end and save your VAT number.
2. Frequency of data exchange
After setting up Kaufland in PlentyONE, the automatic processes described below are available.
| Data | Interval |
|---|---|
Price synchronisation |
every 15 minutes |
Stock synchronisation |
every 15 minutes |
Item export |
once a day |
Updating offers |
hourly |
Deleting offers |
hourly |
Updating products |
once a day |
Status of product creation |
hourly |
3. Setting up the data exchange
In order for the interface to successfully carry out the different data exchange routines for the marketplace, at least the settings in the following table are required.
| Settings section | Settings |
|---|---|
Item export |
|
Basic settings for the sales channel in the Channel Control Centre |
|
Catalogue settings |
|
Listing settings |
|
Variation settings |
|
Order import |
|
Basic settings for the sales channel in the menu Sales Channels » Channel Control Centre: |
|
4. Workflow of a Kaufland order
-
Your items are listed on Kaufland. The name of your company is shown with your items.
-
Customers place an order on Kaufland.
-
Customers make their payments to Kaufland.
-
The order is imported into PlentyONE right after it was placed on Kaufland.
Notes on the Kaufland order import:
-
Orders with the Kaufland status OPEN are imported into PlentyONE without address details and with the status [1] Incomplete data. These are orders that can still be cancelled by the customer. The orders remain in this status for 15 minutes so that customers still have the possibility to cancel the order.
|
Reserve stock for orders with the payment method cash in advance
Important: No stock is reserved for orders in status [1] Incomplete data by default. To make sure that stock is reserved for these orders, go to Setup » Orders » Settings. Go to the setting Status for order reservation from and select the status [1] Incomplete data. Go to the setting Status for order reservation to and select the status up to which stocks are to be reserved. |
-
When the order status on Kaufland changes after 15 minutes, the order automatically moves to status [5] Cleared for shipping in PlentyONE. All missing order data is added to the order.
-
Orders that are processed by Kaufland (FbK = Fulfillment by Kaufland) are imported into PlentyONE with the order referrer 170.01 Kaufland FBK DE.
|
Save the Kaufland settings after a new sales channel was added
Every time you add a new sales channel (= a new country) for Kaufland, you have to save the settings for Kaufland again to ensure that the order import for the new sales channel works properly. To save the settings, proceed as follows: Saving the settings for Kaufland:
Once you have saved the settings, new orders will be imported into PlentyONE. If you want to import existing orders for added sales channels, the import must be initiated by our support team. To do so, create a ticket in Service Desk and provide the following data:
|
5. Deemed Supplier Model
In July 2021, the new EU Digital Package came into force. This package results in changes to the regulations regarding VAT in EU countries. Due to these legal changes, Kaufland becomes a deemed supplier and is thus partially liable for VAT. Kaufland has reacted to this by introducing the Deemed Supplier model. The model is based on the location of the company, the location of warehouses and the value of a delivery. As such, the model is relevant for the following types of deliveries:
-
Deliveries sent from a location in the EU to a customer in the EU, even if the seller is not located in the EU.
-
Deliveries sent from a location outside the EU to a customer in the EU if the value of the delivery does not exceed € 150.
Some special rules for order processing and invoice creation apply for orders covered by the Deemed Supplier model:
-
During the import of Kaufland orders to your PlentyONE system, an automatic check determines if these orders are covered by the Deemed Supplier model. Information about these orders are provided to you by Kaufland via the seller portal, CSV reports and via the API.
-
In cases where not all order items of an order are subject to the model, the order is split. Both orders get an individual order ID and are simultaneously imported into your PlentyONE system. This ensures that the handling of individual orders and order items can proceed correctly.
Important: Kaufland is obliged to withhold and pay VAT for Deemed Supplier orders. As such, Kaufland issues invoices for these orders. As a result, you cannot create invoices for these orders.
Also note the required warehouse settings for warehouses outside of the EU. If items are delivered from outside the EU, the corresponding warehouses have to be linked to Kaufland warehouses. This is done directly within the catalogue for Kaufland.
|
Pay attention to warehouse linking for Kaufland.de
When updating offers, pay attention to linked warehouses for Kaufland. |
6. Beta: Fulfillment by Kaufland (FbK): Using the FbK service
Kaufland offers the service FbK (= Fulfillment by Kaufland). With this service, Kaufland takes care of the storage and ships your items. If you want to use FbK, get in touch with your contact person at Kaufland. However, note that Kaufland FbK is currently in the beta phase. Kaufland continues to develop this feature.
Currently, you cannot carry out any settings for FbK in your PlentyONE system. Kaufland FbK orders are only imported into PlentyONE. Items that you want to sell via FbK have to be created in the Kaufland Seller Portal. FbK orders can be retrieved, but not processed in PlentyONE.
Workflow of an FbK order:
-
Your items are listed on Kaufland. The name of your company is shown with your items.
-
Customers place an order on Kaufland.
-
Customers make their payments to Kaufland.
-
Kaufland ships the order.
-
FbK orders are imported into PlentyONE with the order referrer 170.01 Kaufland FBK DE.
7. Setting up Kaufland in PlentyONE
First, add Kaufland as a sales channel in your system and carry out the basic settings to set up the sales channel in PlentyONE. To do so, proceed as described below.
With PlentyONE, you can offer your items on Kaufland in Austria, the Czech Republic, France, Germany, Italy, Poland, and Slovakia.
7.1. Channel Control Centre
In the Channel Control Centre, you can manage all sales channels that you added to your system.
Table 3 explains the different tiles visible in the Sales Channels » Channel Control Centre menu.
| Component | Explanation | ||||||
|---|---|---|---|---|---|---|---|
Name |
The name of the sales channel. |
||||||
more_vert More |
Click here to display more actions for a sales channel.
|
7.2. Adding the sales channel
First, add Kaufland as a sales channel in the Channel Control Centre.
Adding a sales channel:
-
Open the Sales Channels » Channel Control Centre menu.
-
Click Add sales channel (add).
→ The menu Add sales channel opens. -
Click Continue in the tile of Kaufland.
-
Enter a name for the sales channel.
-
If asked to, select the Client (Shop) from the drop-down list.
-
Click add Add Kaufland.
→ The sales channel for Kaufland is added.
7.3. Carrying out the settings for Kaufland
Next, carry out the basic settings for Kaufland.
Carrying out the channel settings for Kaufland:
-
Go to Sales Channels » Channel Control Centre.
-
Click on the Kaufland tile.
→ The tab Settings opens. -
Click on the line of the Kaufland account for which you want to carry out the settings.
→ The account settings open. -
Carry out the settings. Pay attention to the explanations given in [channel-einstellungen-kaufland].
-
Click Save (save).
| Setting | Explanation |
|---|---|
General |
|
Shop name |
Enter the name of your Kaufland shop. |
Data sync |
Activate to exchange data with Kaufland. |
Client API Key |
Enter the client API key. You will receive the key from Kaufland. |
Secret API Key |
Enter the secret API key. You will receive the key from Kaufland. |
Order settings |
|
Client |
Select the plentyShop that you want to use for this configuration from the drop-down list. |
Book incoming payment |
Activated = All orders are imported as paid. Regardless of this setting, items will immediately be cleared for shipping when they have sufficient stock. |
Match shipping service providers |
Match your shipping service providers in PlentyONE with the shipping service providers from Kaufland in the drop-down list. After the shipment has been confirmed, this option allows Kaufland to use the package number in order to send the customer an email with the correct tracking link. Important: You have to assign each of your service providers to one of the service providers from the drop-down list. Tip: Click open_in_new to set up new shipping service providers in PlentyONE. Go to Setup » Orders » Shipping » Settings » Tab: Shipping service providers. |
Status for orders with failed shipping confirmations |
Select a status. If no shipping confirmation could be sent to Kaufland, the order is moved to this status. If necessary, create a new status. Background: The flow Send shipping confirmation to Kaufland automatically informs Kaufland that the items of an order have been shipped. If the flow cannot be completed, the order is moved to the status that you selected for the setting Status for orders with failed shipping confirmations. |
7.4. Account overview
The Sales Channels » Channel Control Centre » [Open your Kaufland sales channel] » Settings menu provides an overview of your Kaufland accounts. Table 5 lists the columns and available actions in the account overview.
| Column | Explanation | ||
|---|---|---|---|
arrow_forward_ios |
Expand the account settings. The Client key and the Secret key are shown here. |
||
Account ID |
The ID of your Kaufland account. |
||
Shop name |
The name that you entered for the configuration of your Kaufland account. |
||
Active |
circle = The account is active and data is exchanged with Kaufland. |
||
more_vert More |
Click here to display more actions.
|
7.5. Changing the name
In the General settings tab, you can adjust the account’s name.
Changing the name:
-
Go to Sales Channels » Channel Control Centre.
-
Click on the Kaufland tile.
→ The tab Settings opens. -
Open the menu General settings.
-
Enter the name.
-
Click Save (save).
7.6. Activating the order referrer
Go to Setup » Orders » Order referrer to activate the order referrer. This ensures that orders are assigned to the correct sales channel.
An order referrer tags an order with the sales channel on which the order was generated. Sales channels can be e.g. your online shop or markets on which you sell your items. Each sales channel has an individual order referrer. Some order referrers are available by default in your PlentyONE system. Further order referrers are added e.g. if you install a new plugin. For further information about the order referrer, see the page Order referrer of the PlentyONE manual.
Activating the order referrer for Kaufland.de:
-
Go to Setup » Orders » Order referrer.
-
Click Search (search).
-
In the list, navigate to the option Kaufland.de with ID 102.01.
-
On the right of the referrer’s line, click Edit (edit).
→ The window Edit referrer opens. -
Activate the option Visible in selection (toggle_on).
-
Click SAVE (save).
→ The referrer is active.
Note: If you want to sell your items on all Kaufland country platforms, then you only have to activate the order referrer 102 Kaufland. Your items will then be available on all Kaufland country platforms.
If you only want to sell your items on specific Kaufland country platforms, then only activate those referrers.
-
102.00 Kaufland = Parent referrer for Kaufland
-
102.01 Kaufland DE = Kaufland Germany
-
102.02 Kaufland CZ = Kaufland Czech Republic
-
102.03 Kaufland SK = Kaufland Slovakia
-
102.04 Kaufland PL = Kaufland Poland
-
102.05 Kaufland AT = Kaufland Austria
-
102.06 Kaufland FR = Kaufland France
-
102.07 Kaufland IT = Kaufland Italy
-
170.00 Kaufland FBK = Parent referrer for Kaufland when using Fulfillment by Kaufland
-
170.01 Kaufland DE FBK = Kaufland Germany when using Fulfillment by Kaufland
-
170.02 Kaufland CZ FBK = Kaufland Czech Republic when using Fulfillment by Kaufland
-
170.03 Kaufland SK FBK = Kaufland Slovakia when using Fulfillment by Kaufland
-
170.04 Kaufland PL FBK = Kaufland Poland when using Fulfillment by Kaufland
-
170.05 Kaufland AT FBK = Kaufland Austria when using Fulfillment by Kaufland
-
170.06 Kaufland FR FBK = Kaufland France when using Fulfillment by Kaufland
-
170.07 Kaufland IT FBK = Kaufland Italy when using Fulfillment by Kaufland
|
Do not group Kaufland orders
During the order import, Kaufland orders are synchronised by the external order number. However, in grouped orders, the external order number no longer exists. As such, grouping orders might result in orders being created anew when they are retrieved again. |
8. Preparing variations
Now, prepare your variations.
8.1. Setting the variation availability
You need to activate the variations you want to sell on Kaufland and enable them for the relevant sales channel. This is done in the Item » Items » [Open variation] menu.
Making a variation available for Kaufland:
-
Go to Item » Items » [Open variation].
Tip: To sell all variations of an item on Kaufland, carry out the settings for the item’s main variation. If the inheritance function is active for the variations, then this activates the availability of all variations of the item. -
In the Availability and visibility section, enable the option Active (toggle_on).
-
Click the Sales channels tab.
-
In the Sales channels section, activate the sales channel Kaufland in the Status column (toggle_on).
Tip: You can activate multiple sales channels at once. To do so, activate the checkboxes to the left of the desired sales channels. Then activate the toggle above the checkbox column (toggle_on). Click ACTIVATE to confirm the activation.
Note: If you want to offer your items on all Kaufland country platforms, then only activate the sales channel Kaufland. If you only want to offer your items on specific country platforms, then only activate those sales channels. -
Save (save) the settings.
→ The variation is available for Kaufland.
Use the variation group function to edit multiple variations at once. You select the variations that you want to edit.
Making several variations available for Kaufland using the variation group function:
-
Go to Item » Items.
-
Select () the variations to be edited.
-
In the toolbar, click on layers » layers Variation group function.
→ The Variation group function window opens. -
Select the action Sales channels from the drop-down list Actions.
→ The action is added to the lower part of the window. -
Select (check_box) the option Kaufland from the drop-down list Sales channels.
→ The sales channel is added below the drop-down list Sales channels.
Note: If you want to offer your items on all Kaufland country platforms, then only activate the sales channel Kaufland. If you only want to offer your items on specific country platforms, then only activate those sales channels. Note: If you export your items to Kaufland via catalogue export, then you do not have to add WEB API. -
Activate (toggle_on) the toggles to the left of the sales channels.
-
Click EXECUTE & CLOSE to apply the settings.
Batch processing allows you to edit several variations at once. You use filters to limit which variations are edited.
Making several variations available for Kaufland using batch processing:
-
Navigate to the area Market availability.
-
Activate the checkbox to the left of the option Kaufland.
-
Activate the checkbox to the right of the option Kaufland.
Note: If you want to offer your items on all Kaufland country platforms, then only activate the availability Kaufland. If you only want to offer your items on specific country platforms, then only activate those availabilities. Note: If you export your items to Kaufland using the catalogue export, then you do not need to activate the option Web API. -
Navigate to the area Availability.
-
Activate the checkbox to the left of the option Active.
-
Activate the checkbox to the right of the option Active.
-
Click on Apply to apply the settings to the variations.
8.2. Linking variations to a Kaufland product category
After you created a catalogue for Kaufland, the property Kaufland.de category is created in your PlentyONE system. With this property, you define in which category your variations are offered on Kaufland.
Note: If you want to sell your items on other Kaufland sales channels, you have to create separate catalogues for each sales channel for the respective product category. Select the Kaufland sales channel on which you want to offer your items in the Kaufland - Creating catalogues assistant. The corresponding property Kaufland.at category, Kaufland.cz category, Kaufland.fr category, Kaufland.it category, Kaufland.pl category, or Kaufland.sk category is created in your PlentyONE system. The next steps are carried out for the Kaufland category of the selected country platform.
In the assistant Kaufland - Creating catalogues, you select a Kaufland product category for each catalogue that you create. Each of these product categories is added as a selection value to the property Kaufland.de category.
In order for your variations to be offered in the desired category on Kaufland, they have to be linked to the Kaufland.de category property in the Properties tab of the variation. Afterwards, select the product category in which your variations should be offered as selection value for this property.
|
Naming of the Kaufland product categories
To offer the variations in the desired category on Kaufland, the properties (e.g. Kaufland.de category) and the values for these properties (e.g. T-Shirts_DE) must not be renamed. |
Linking a variation to a product category:
-
Go to Item » Items.
-
Open the variation that you want to link.
→ The General tab opens. -
Open the Properties tab.
-
In the Properties section, click Add properties (add).
→ The window Add properties opens. -
Select the property Kaufland.de category and click ADD.
→ The property is added. -
Select a category from the drop-down list Value for the property Kaufland.de category.
→ The variation will be exported in this catalogue.
Example: If you select the value T-Shirts_DE, then the variation will be offered in the product category T-Shirts on Kaufland.
Note: Kaufland may list items in other product categories. -
Repeat the steps for all categories in which you want to offer the variation.
-
Click Save (save).
8.3. Optional: Saving SKU
SKU are generated automatically when your variations are exported. However, you can also save market specific SKU for variations that you want to sell on this market instead.
-
Go to Item » Items » [Open variation].
→ The General tab opens. -
Switch to the Sales channels tab.
-
Expand the section SKU (chevron_right).
-
Click Add SKU (add).
→ The Add SKU window opens. -
From the drop-down list Referrer, select the referrer of the desired Kaufland sales channel.
-
Select the corresponding Account.
-
Click Apply.
-
Enter the SKU.
-
Enter the Parent SKU, if necessary.
-
Click Save (save).
| Only the most important settings for the import are described here. Is this your first time working with the import tool? Then get familiar with how data imports work in PlentyONE first. |
| Column in CSV file | Explanation | PlentyONE data field for mapping |
|---|---|---|
Variation ID |
Enter the variation ID in this column. |
Variation ID |
Marketplace ID |
Enter the referrer ID 102 in this column. |
SKU > Marketplace ID |
Account ID |
Enter the plenty ID of the client in this column. |
SKU > Account-ID |
SKU |
Enter the SKU that you want to save for the variation for this market in this column. |
SKU > SKU |
9. Exporting product data
Product data is exported to Kaufland using catalogues. Catalogues are usually managed via the Data » Catalogues menu. However, you can create catalogues for Etsy via the Channel Control Centre as well.
Catalogues are used to export data from your PlentyONE system. There are two different catalogue formats:
-
Marketplace formats are used to export item data to markets.
-
Standard formats are used to export data from your PlentyONE system into a file.
Catalogues with marketplace formats allow you to tailor your item information exactly to the needs of the market. Because here, you assign a suitable PlentyONE data field to each of the data fields of the market. When your variation data is exported to the market, the market’s data fields are then filled with the correct PlentyONE data.
-
Is this your first time working with catalogues? Then read up on the basic concept of catalogues first.
9.1. Creating a product catalogue
Product data is exported to Kaufland using catalogues. In each product catalogue, you map the Kaufland data fields to the corresponding product data saved in PlentyONE. To simplify product data mapping, you can create Channel maps for Kaufland in the Channel Control Centre. Next, add the relevant product catalogues to these Channel maps and map the data fields required by Kaufland to the product data saved in PlentyONE.
Once you have activated the Channel map, catalogue, account, listing and variations, the product data is automatically exported to Kaufland once a day.
Note: There is a separate catalogue format for each Kaufland product category. Different product data is exported in the different catalogue formats, depending on which information Kaufland requires for each product category.
This means that you have to create a separate catalogue for each Kaufland product category that you want to sell your items in.
First, create a Channel map to map product data for Kaufland. To do so, proceed as follows:
Creating a product channel map:
-
Open the menu Sales Channels » Channel Control Centre » [Name of your Kaufland Sales Channel] » Mapping » Product mapping.
-
Click on Create Channel map (add).
-
Enter a name for the channel map.
-
In the drop-down list Marketplace, select the option Kaufland.
-
In the drop-down list Catalogue type, select the option Product.
-
In the drop-down list Categories, select the product categories you want to sell on Kaufland.
-
Click on CREATE CHANNEL MAP.
→ The channel map is created.
Once you have created a Channel map for Kaufland, you can create catalogues for the different product categories in which you want to sell your items on Kaufland and link them to the Channel map.
Note: You have to create a separate catalogue for each product category and for each country in which you want to offer your items on Kaufland.
|
Create catalogues in the assistant
Although Kaufland catalogues can be created under Data » Catalogues, we recommend using the assistant Kaufland - Creating catalogues in the Channel Control Centre under Mapping » Product mapping. |
Creating a product catalogue:
-
Go to Sales Channels » Channel Control Centre » [Open sales channel for Kaufland] » Mapping » Product mapping.
-
In the row of the channel map you want to edit, click on more_vert More and select Connect catalogues.
-
In the drop-down list Select catalogues, click Create catalogue.
→ You are forwarded to the assistant Kaufland - Creating catalogues. -
Select the Kaufland account.
-
Select the Kaufland country platform on which you want to offer your items.
-
Select the Kaufland product category for which you want to create a catalogue.
-
Enter a name for the catalogue.
-
Click on NEXT.
-
Check the settings in the Summary step. If everything is correct, click FINALISE.
→ The catalogue is created.
Now, link the catalogues with the Channel map.
Linking a product catalogue to the channel map:
-
Go to Sales Channels » Channel Control Centre » [Open sales channel for Kaufland] » Mapping » Product mapping.
-
In the row of the channel map you want to edit, click on more_vert More and select Connect catalogues.
-
From the drop-down list Catalogues, select the catalogues which you want to link with the Channel map.
-
Click link CONNECT TO CHANNEL MAP.
→ The selected catalogues are linked with the Channel map.
9.1.1. Mapping data fields in a Channel map:
After you have created a Channel map, map the sales channel’s data fields to item data saved in PlentyONE. This chapter describes how you map data fields and what particularities apply for exports to Kaufland.
-
The market expects product data that cannot be saved in the PlentyONE item menu? Then create a property for this data. Link this property with your variations. The actual values are saved as property values for this property. Is this your first time working with properties? Then read up on the principles of properties first.
| Availability | Explanation | ||||||
|---|---|---|---|---|---|---|---|
Navigation bar |
You can use the navigation at the left edge of the menu to switch to the catalogue or channel map overviews, or to switch to other channel maps you opened previously. |
||||||
Toolbar |
The toolbar contains useful actions for your channel maps:
|
||||||
Tabs |
While common mappings appear in several catalogues and are carried out for all of them at once, catalogue-specific mappings are only done for one specific catalogue. You can use the two tabs at the top of the detail view to switch between views of the different mapping types. Any changes are applied automatically to all catalogues with the respective mapping types. |
||||||
Sales Channel data fields |
On the left-hand side of the mapping list all data fields available for the sales channel are listed. Mandatory fields are labeled with an asterisk (✱). |
||||||
PlentyONE data fields |
On the right-hand side of the mapping list you can map suitable PlentyONE data fields to the sales channel data fields. |
As soon as you have created a Channel map and the status Ready to use is shown in the overview, you can open the Channel map for further editing. A Channel map identifies all common fields, which are all fields that exist in at least two of the selected categories. The mapping of these fields only needs to be done once and automatically applies to all categories.
In order to carry out data field mappings, proceed as follows.
Mapping data fields in a Channel map:
-
Go to Sales Channels » Channel Control Centre.
-
Click on the tile of your Kaufland Sales Channel.
-
Navigate to Mapping » Product mapping.
→ The catalogue overview opens. -
In the side navigation on the left, click Channel maps.
→ The Channel maps overview for that sales channel opens. -
Click on the Channel map that you want to edit.
→ The detail view of the Channel map opens. -
Next to a data field, click Add data source +.
-
Select the desired data field from the available categories on the left.
Or: Select an Own value (edit) and enter the respective value. -
At the bottom left, click CONFIRM to apply the mappings.
-
At the top, click Save (save).
→ The changes are saved and all connected catalogues with this mapping are adjusted accordingly.
Note: A blue dot in the side navigation on the left indicates unsaved changes.
|
Mapping key as distinctive feature
Via the so-called mapping keys that are available in the tooltip next to the data field names in the mapping, it is possible to differentiate between data fields with the same name. Thus, the individual mapping key shows to which catalogue the data field belongs so the respective mapping can be carried out. |
|
Changes in mapping affect all connected catalogues
If you change mappings in a Channel map, all connected catalogues with this mapping are updated accordingly. |
|
Removing inherited mapping from a catalogue
If a catalogue is connected to a channel map and there are common fields in the mapping, you can still adjust the mapping for this catalogue and remove the mapping from the Channel map for specific data fields. After the changes, the catalogue is still connected to the Channel map. The changes that have been carried out will only apply to the modified catalogue. Remove inherited mapping from catalogue:
|
In a simple 1:1 mapping, you map a PlentyONE data field to the marketplace data field. If no suitable setting exists in PlentyONE. you can map a property instead.
As such, simple 1:1 mappings allow you to:
-
I want to fill this marketplace data field with the data from this PlentyONE setting.
-
If the data field is empty for a variation, no value is exported for this variation.
Creating a simple 1:1 mapping:
-
Next to the marketplace data field, click on + Add data field.
→ To the left, the list of available PlentyONE data fields are shown in groups. -
Click on the group you need.
→ The PlentyONE data fields of the group are shown. -
Click on the plus to the right of the PlentyONE data field you want to select.
→ The PlentyONE data field is added to the right. -
Click on Confirm.
Example: Sales price and RRP for Otto Market
This gif shows you how to map the marketplace data fields Sales price and RRP for Otto Market to PlentyONE data fields:
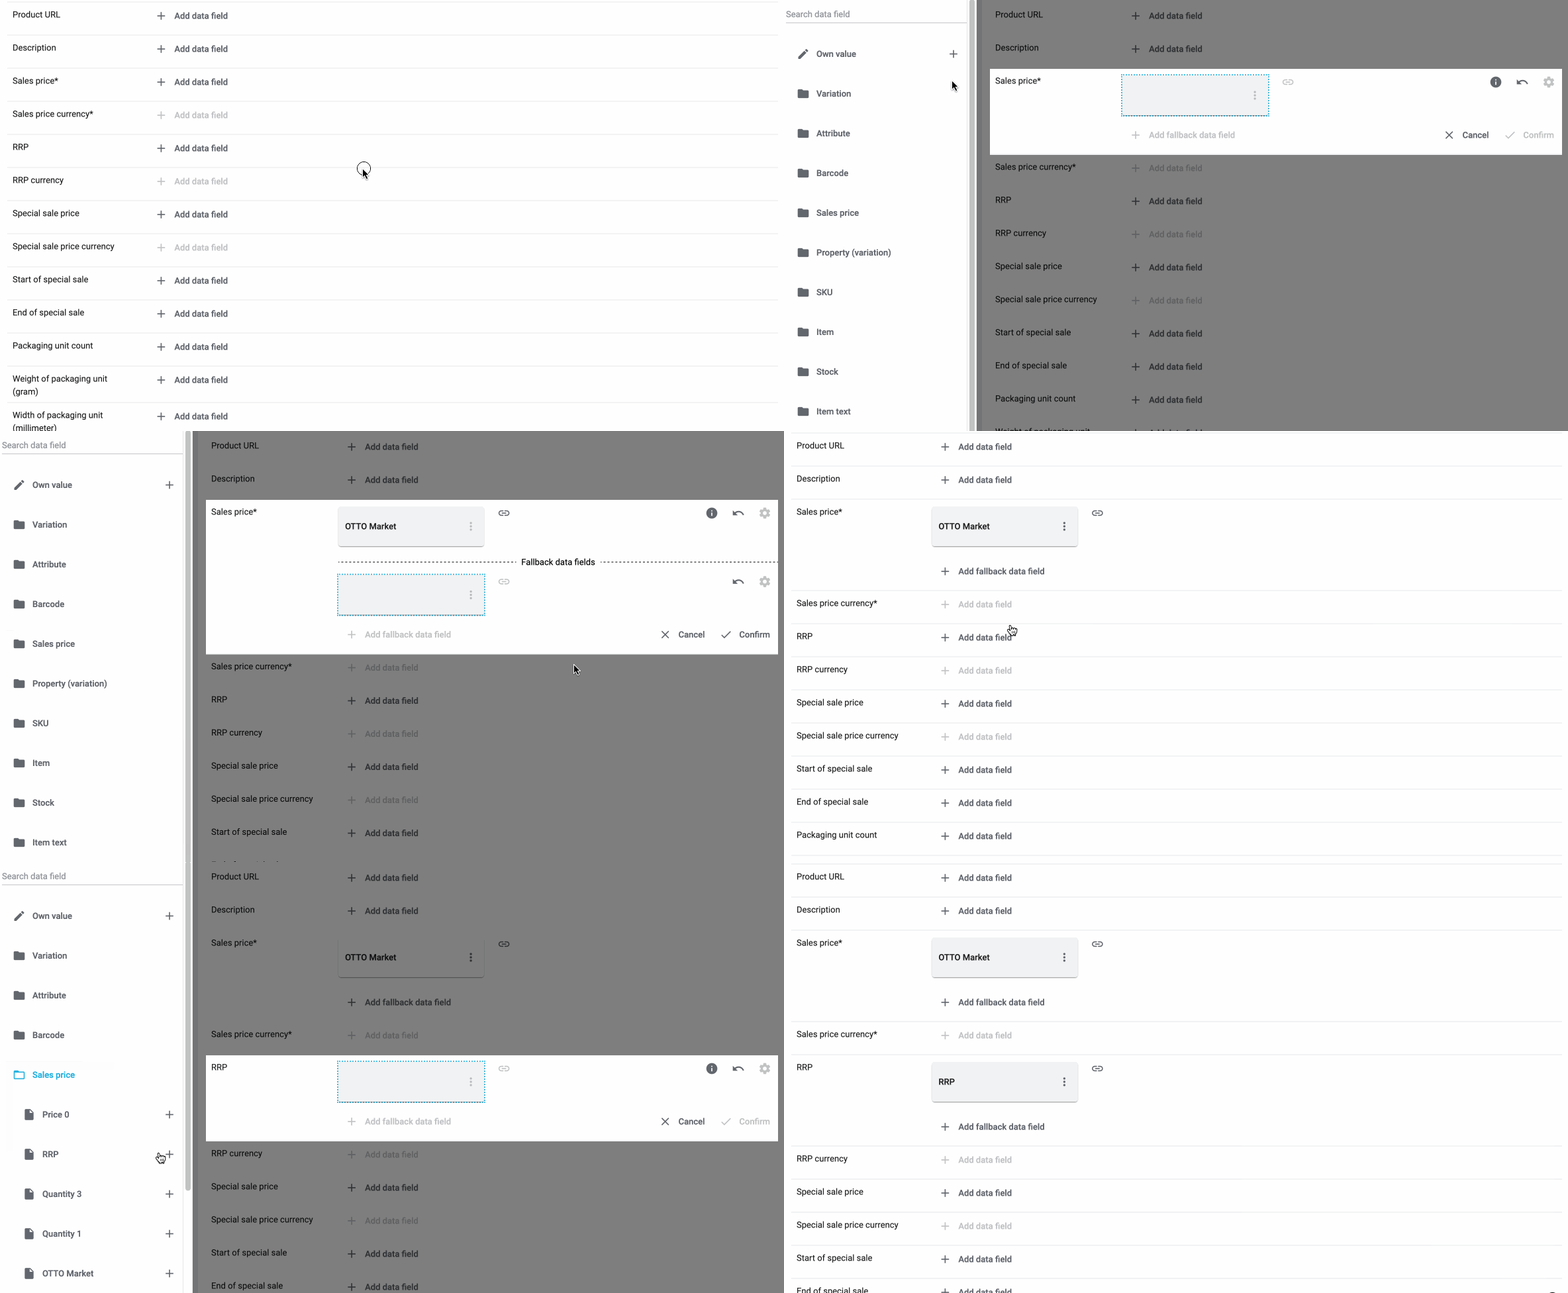
Reminder: In a simple 1:1 mapping, you map a PlentyONE data field to the marketplace data field. However, what can you do if PlentyONE does not offer a suitable data field? Then it’s the properties' moment to shine. Properties allow you to save any kind of information in your properties.
-
Is this your first time working with properties? Then read up on the principles of properties first.
Creating a property:
-
Create a property with the necessary values.
Tip: Find out how to do that here.
Creating a simple 1:1 mapping with properties:
-
Next to the marketplace data field, click on + Add data field.
→ To the left, the list of available PlentyONE data fields are shown in groups. -
Expand the group Property.
→ The property groups are shown. -
Expand the group you need.
-
Click on the Plus sign on the right of the property you want.
-
From the drop-down list Language, select the language in which you send the data to the market.
-
Click on Confirm.
→ The property is mapped to the marketplace data field.
Like with the simple 1:1 mappings, you map a PlentyONE setting or property to a marketplace data field. Complex mappings are necessary whenever a marketplace data field has more than one possible value. Instead of mapping data fields, for complex mappings you map individual values of these data fields. For example, you cannot simply map the PlentyONE data field Shipping profile to the marketplace data field Shipping method. Why? The market cannot know which of your shipping profiles in PlentyONE corresponds to which of their shipping methods.
| Do not enter own values for complex mappings. All values that you enter must be saved for the variations, either in a setting or as a property value. This also applies if the value Comparative value is shown. You still need to enter exactly the value of the setting or property that you mapped. |
In complex mappings, the value of the market is always exported. Only when you map an own value, the own value that you enter is exported.
You can recognise complex mappings from the field that is shown below the name of the marketplace data field. Click on the field to show the values available for the marketplace data field.

Examples for complex 1:1 mappings are:
-
Categories
-
Brands
-
Shipping setting
Important: For complex mappings, do not map own values or properties of the type None.
Creating a complex 1:1:n mapping:
-
Click on the field for the marketplace data field.
→ A list of the available values is shown. -
Select the value that you want to map a PlentyONE data field to.
→ The value is mapped. -
Next to the marketplace data field, click on + Add data field.
→ To the left, the available PlentyONE data fields are listed in groups. -
Click on a group.
→ The PlentyONE data fields of the group are shown. -
Click on the PlentyONE data field for which you want to map values.
Important: Do not map own values or properties of the type None. -
Your next steps depend on the PlentyONE data field you selected:
-
Alternative 1: The available values for the PlentyONE data value are shown on the left.
-
Next to the value you want to select, click on the plus.
→ The value is added to the field on the right. -
Click on Confirm.
-
-
Alternative 2: The PlentyONE data field is inserted and the field Comparative value is shown.
-
In the field Comparative value, enter a value that is saved in the setting or the property of the mapped PlentyONE data field.
-
Click on Confirm.
-
-
Alternative 3: The PlentyONE data field is inserted and a drop-down list is shown.
-
Select a value from the drop-down list.
-
Click on Confirm.
→ The value of the marketplace data field is exported, not the value of the PlentyONE data field.
Exception: Only when you map an own value, the own value that you enter is exported.
-
-
Example: Delivery time in days for Otto Market
This gif shows you how to map suitable PlentyONE values to the values of the marketplace data fields Delivery time in days for Otto Market:
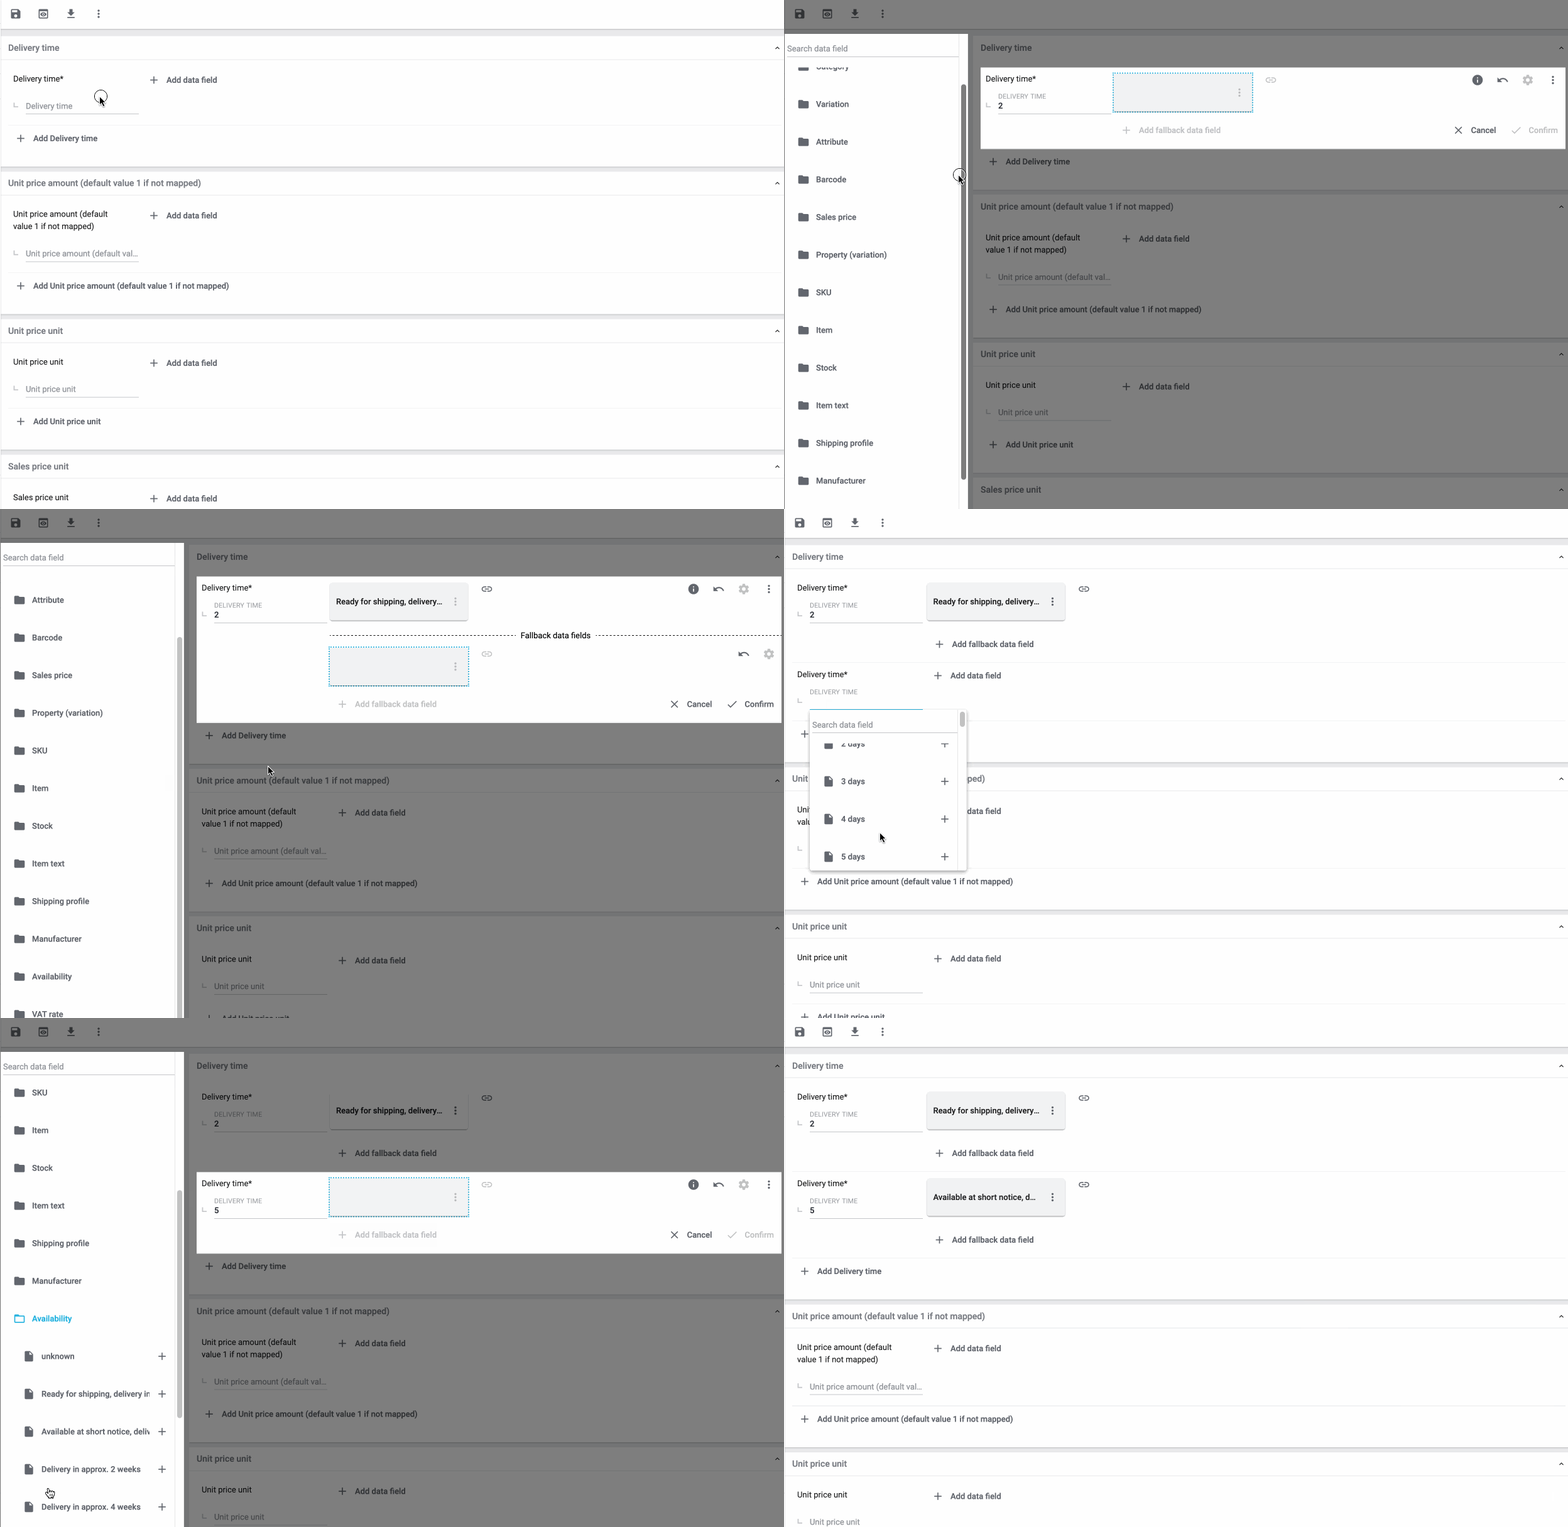
In a 1:1 mapping with one or more fallback data fields, you map a PlentyONE data field to the marketplace data field. In addition, you specify one or more fallback data fields. This ensures that the system keeps looking if the first PlentyONE data field is missing or empty.
So this mapping specifies:
-
I want to fill the marketplace data field with the data from the selected PlentyONE setting.
-
If that data field is missing or empty for a variation, the first fallback data field is checked. The value of that fallback data field is exported instead.
-
If the first fallback data field is also missing or empty for the variation, the second fallback data field is checked. If a value is found, the value of the second fallback data field is exported for the variation etc.
Two separate fallback conditions are available:
Null (default) |
The fallback data field is used if the data field above is mapped in the catalogue but not linked to the variation. The condition "Null" is useful when you want to map fallback data fields for the following types of PlentyONE data fields:
Important: When you add a fallback data field, the fallback condition "null" is selected automatically. To apply the fallback condition "leer", you need to change the default setting. |
Empty |
The fallback data field is used if the data field above is mapped in the catalogue and linked to the variation, but is empty. The condition "Empty" is useful when you want to map fallback data fields for the following type of PlentyONE data fields:
Important: When you add a fallback data field, the fallback condition "null" is selected automatically. To apply the fallback condition "leer", you need to change the default setting. |
Note: Even if you assign one or more fallback data fields, the value of only one of those fields is exported. For each variation, the mapped PlentyONE data fields are checked in the order in which you mapped them. This means that if the first data field does not provide a value for a variation, the first fallback data field is exported etc.
Creating a 1:1 mapping with fallback data fields:
-
Next to the marketplace data field, click on + Add data field.
→ To the left, the list of available PlentyONE data fields are shown in groups. -
Click on the group you need.
→ The PlentyONE data fields of the group are shown. -
Click on the plus to the right of the PlentyONE data field you want to select.
→ The PlentyONE data field is added to the right. -
In the list of PlentyONE data fields, click on the plus icon next to the PlentyONE data field that you want to map.
→ The fallback data field is added with the fallback condition "null". -
Alternative 1: To add the fallback data field with the fallback condition "null":
-
Click on Confirm.
→ The fallback data field is exported if the data field above is not linked to the variation.
-
-
Alternative 2: To add the fallback data field with the fallback condition "empty":
-
To the left of the fallback data field, click on the cog ().
→ The window Data column settings is shown. -
For the setting Fallback condition, select the option Empty.
-
Click on Save.
→ The fallback data field is added with the fallback condition "empty". -
Click on Confirm.
→ The fallback data field is exported if the data field above is empty for the variation.
-
Example: Fallback data field for SKU for Otto Market
This GIF shows you the mapping for the OTTO Market marketplace data field SKU. The PlentyONE data field SKU is mapped to this marketplace data field. The PlentyONE data field Variation ID is mapped as the fallback data field. The fallback condition "null" is applied automatically.
Result: The fallback data field Variation ID is exported if the data field SKU is not linked to the variation.
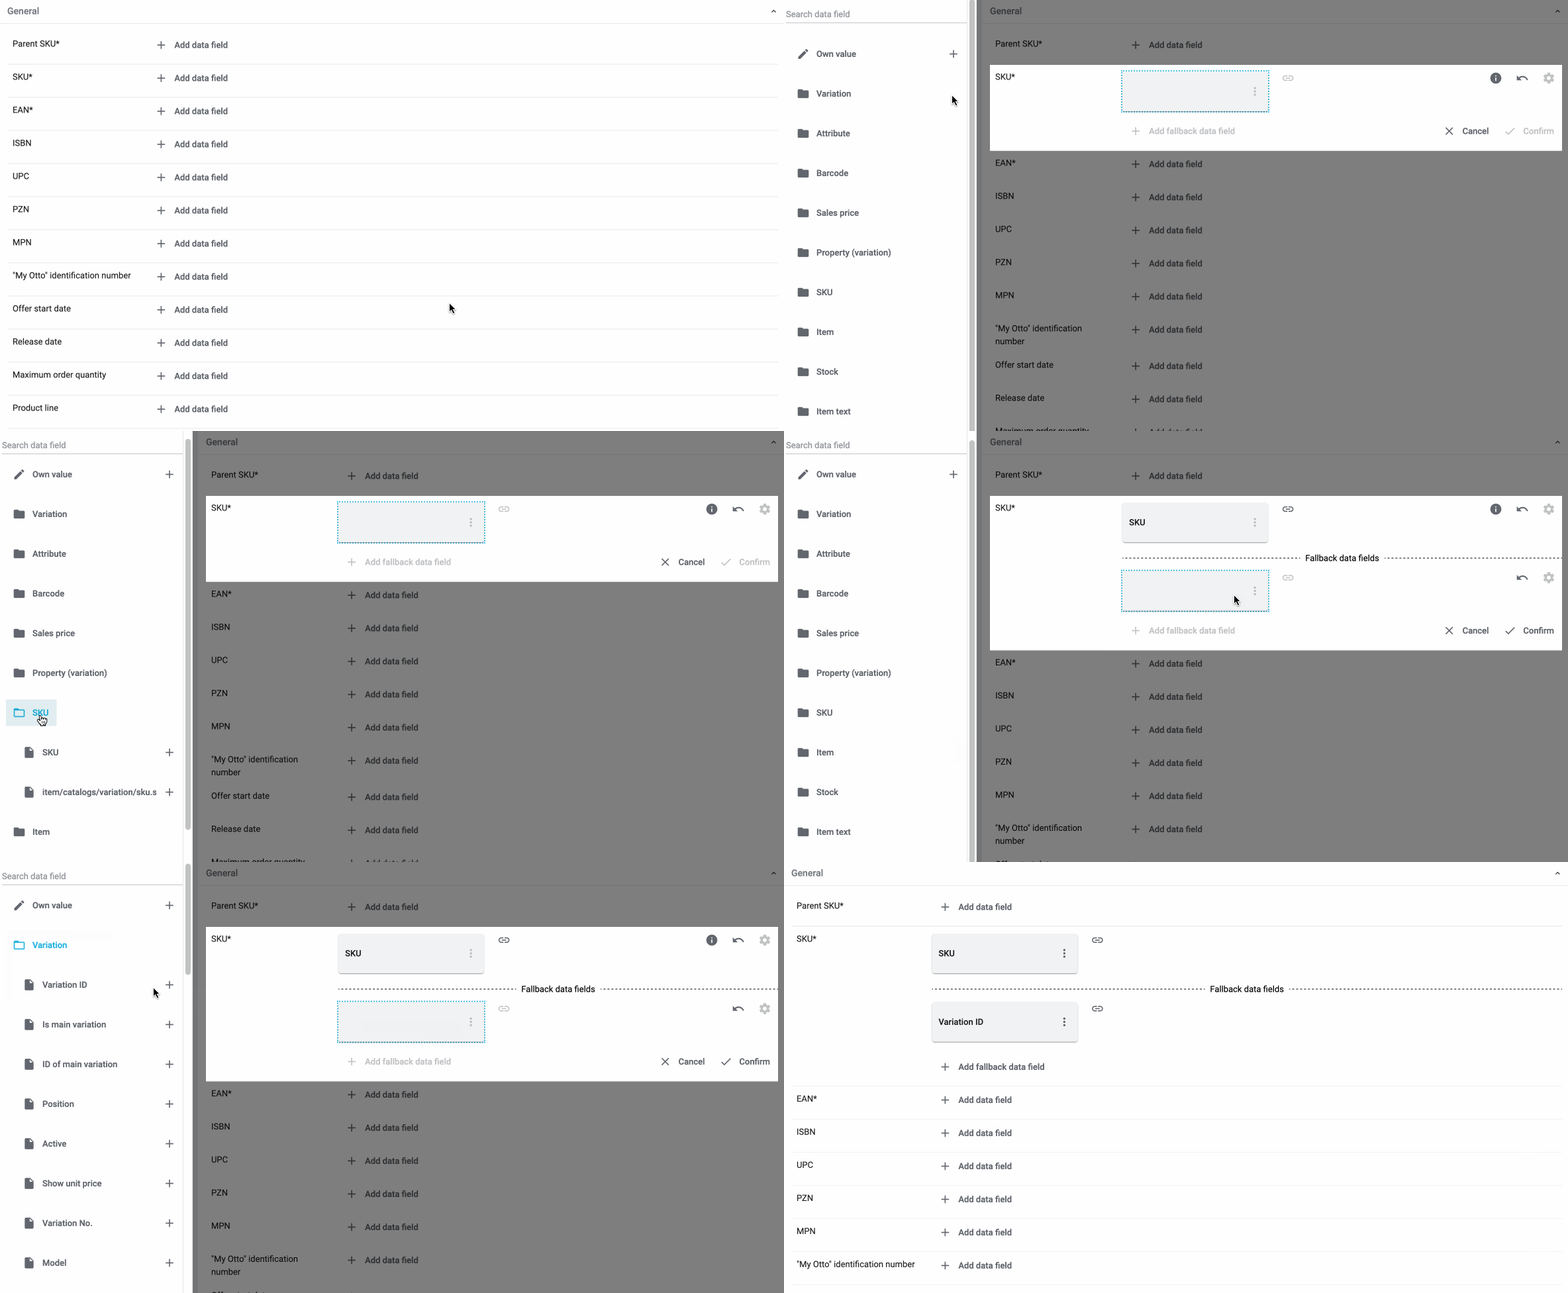
In a 1:n mapping, you map several PlentyONE data fields to the marketplace data field. You can link these data fields with a separator.
So this mapping specifies:
-
I want to combine these PlentyONE data fields during export so that the marketplace data field is filled with the data of these two or more PlentyONE settings.
Creating a 1:n mapping:
-
Next to the marketplace data field, click on + Add data field.
→ To the left, the list of available PlentyONE data fields are shown in groups. -
Click on the group you need.
→ The PlentyONE data fields of the group are shown. -
Click on the plus to the right of the PlentyONE data field you want to select.
→ The PlentyONE data field is added to the right. -
Click on Confirm.
-
To the right of the mapped PlentyONE data field, click on Add data field ().
→ To the left, the list of available PlentyONE data fields again are shown in groups. -
Map one or several additional PlentyONE data fields to the marketplace data field as described above.
-
Click on Confirm.
-
To the very right of the row, click on Settings ().
-
Select a separator from the drop-down list Separator or add a custom separator.
-
Click on Save.
-
Save () the catalogue.
→ The mappings are saved.
→ During the export, the content of the PlentyONE data fields is combined and exported as one field.
You are sure that you want to export the same value for all variations of a catalogue for a marketplace data field? Then specify an own value. This own value is then exported for all variations.
So this mapping specifies:
-
For this marketplace data field, I want to export the value that I entered in the field Own value for all variations of this catalogue. The value you enter is always exported. The value overwrites the market value also in complex mappings where usually the value of the market is exported. As such, make sure you enter an own value that the market accepts for this marketplace data field.
Creating an own value mapping:
-
Next to the marketplace data field, click on + Add data field.
→ To the left, the list of available PlentyONE data fields are shown in groups. -
Click on the plus next to Own value at the top of the list.
→ The field for the own value is added to the view. -
Enter a value into the input field.
→ This value is exported for all variations.
Example: Diameter information
You want to export diameter information for some of your variations. The diameter is saved in centimetres for all your variations. Instead of creating a property for the unit and linking this property to the variations, you can enter the own value cm.
This is an example of how you can map an own value for the diameter unit:
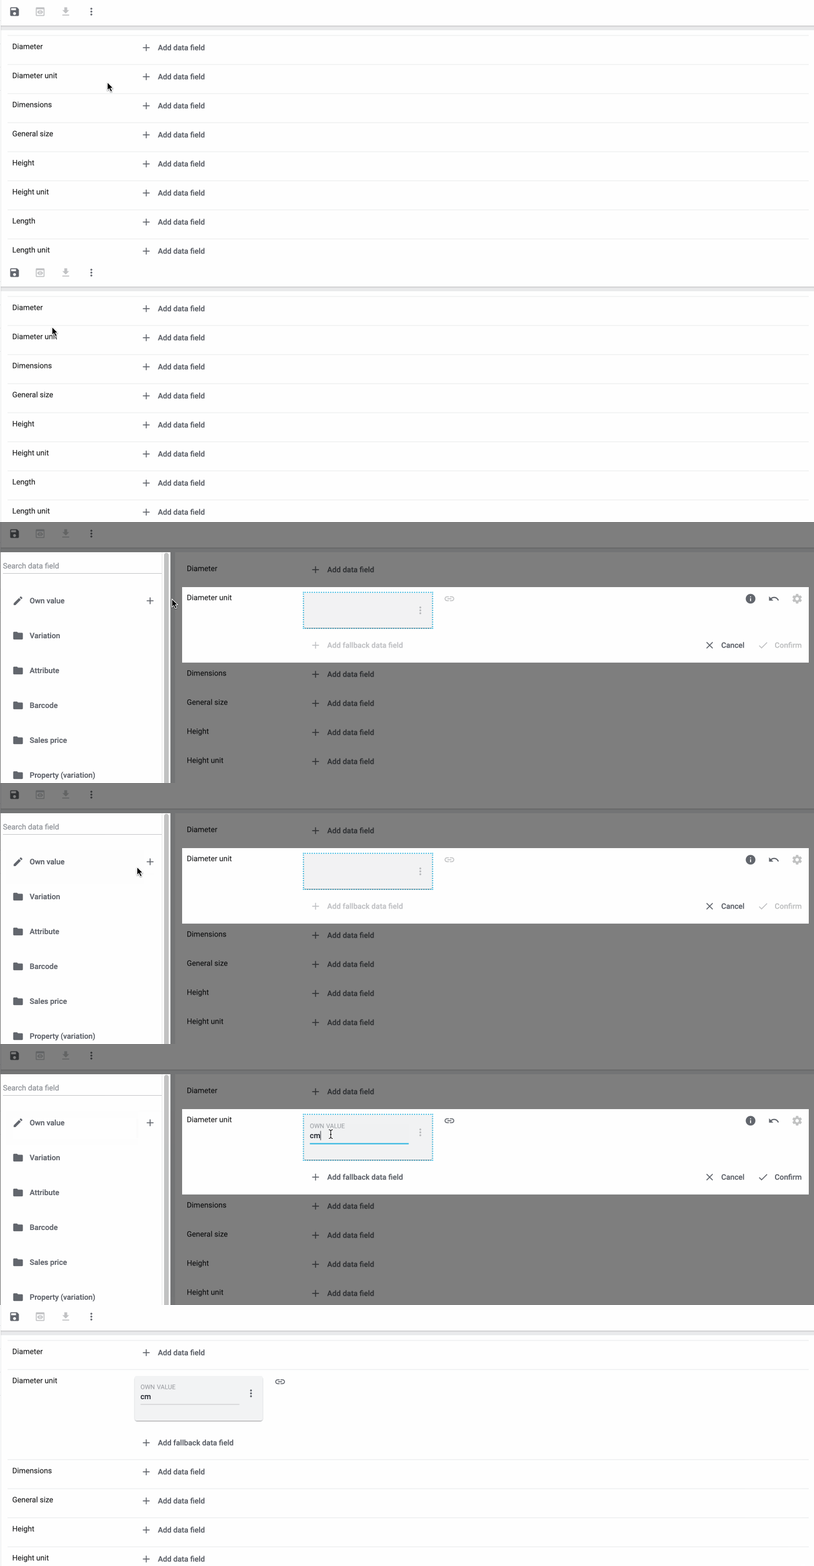
Mathematical calculations allow you to change numerical values automatically during the export.
-
This function only works for data fields that contain numerical values.
-
This functionality is new and not available for all catalogue formats.
So this mapping specifies:
-
I want the numerical value of a PlentyONE data field to be recalculated during the export. Basic arithmetic operations are available for the formulas.
Recalculating numerical values:
-
Next to the marketplace data field, click on + Add data field.
→ To the left, the list of available PlentyONE data fields are shown in groups. -
At the very top of the list, click on the plus icon next to Formula (calculate).
→ The data field Formula is added to the field on the right. -
Click into the data field.
→ The window Modify value is shown. -
Enter a numerical value or select a PlentyONE data field at the bottom right of the window to add it to the calculation (add).
Tip: Use the search function. This helps you to find data fields quickly. -
Optional: If the symbol more_vert is shown in the data field, select the correct assignment for the data field.
Tip: A number tells you how many assignments are necessary for the data field.-
Click on the icon more_vert.
-
In the window shown, select the assignments from the drop-down list.
-
Save the settings.
-
-
Enter numbers and mathematical operators with the on-screen calculator or the keyboard.
-
Save the settings.
→ The entered formula is displayed in the overview.
→ The calculation will be carried out in the next export.
9.1.1.1. Notes on using Channel maps
Note the following particularities if you use Channel maps for Kaufland.
9.1.1.2. Language-specific data fields
You can sell your items on different platforms, that is, different countries on Kaufland. Depending on the platform, some data fields have to be exported in different languages, for example German text for Kaufland.de and Czech text for Kaufland.cz. Those data fields are mostly data fields containing text.
-
Language-specific data fields, for example the title, will appear multiple times in a Channel map because the title has to be exported in different languages to the sales channels.
-
Language-specific data fields will only appear in the Channel map if the Channel map contains at least two categories for the same sales channel.
-
Language-specific data fields will automatically be displayed in the correct language in the catalogues.
-
Note: Note that those data fields are language-specific and not platform-specific. For example, the same title is exported to Kaufland.de and Kaufland.at. Kaufland.de and Kaufland.at are different sales channels, but both use the same language.
Example for language-specific data fields:
-
You created a Channel map with these categories: Clocks_DE, Clocks_CZ, Clocks_SK, Sofas_DE, and Sofas_CZ
-
The data field title will appear twice in this Channel map: once in German and once in Czech because the Channel map contains at least two categories in each language (Clocks_DE, Sofas_DE and Clocks_CZ, Sofas_CZ).
-
However, the data field title will not appear in Slovak because the Channel map contains only one category in Slovak (Clocks_SK).
9.1.1.3. Platform-specific data fields
Platform-specific data fields are data fields which have to be mapped differently, depending on the sales channel. For example the VAT rate which differs in each country.
-
Platform-specific data fields will only appear in the Channel map if the Channel map contains at least two categories for the same sales channel.
-
Platform-specific data fields will automatically be displayed in the correct language in the catalogues.
-
Note: Note that those data fields are platform-specific and not language-specific. Sales channels that use the same language, for example Kaufland.de and Kaufland.at, may have different VAT rates.
9.1.1.4. Account-specific data fields
You can add multiple account to offer your items on Kaufland. Account-specific data fields are data fields which depend both on the Kaufland account and on the sales channel. Examples for account-specific data fields for Kaufland are the shipping group ID and the warehouse ID.
-
Account-specific data fields will only appear in the Channel map if the Channel map contains at least two categories for the same sales channel.
-
Account-specific data fields are shown for each account and for each sales channel with at least two categories in the Channel map.
Example for account-specific data fields:
-
You have set up two accounts for Kaufland: account A and account B.
-
You created a Channel map with these categories: Clocks_DE, Clocks_CZ, Clocks_SK, Sofas_DE, and Sofas_CZ
-
Because there are two categories for each sales channel in the Channel map (Clocks_DE, Sofas_DE and Clocks_CZ, Sofas_CZ) and because there are two accounts for Kaufland (account A and account B), the data field Kaufland shipping group ID is displayed four times in this Channel map:
-
once for the Kauflande.de sales channel and account A
-
once for the Kauflande.de sales channel and account B
-
once for the Kauflande.cz sales channel and account A
-
once for the Kauflande.cz sales channel and account B
-
The data field Kaufland shipping group ID is not displayed for the channel Kaufland.sk because the Channel map contains only one category for Kaufland.sk (Clocks_SK).
9.1.2. Mapping data fields in the catalogue
After you have created a catalogue, map the sales channel’s data fields to item data saved in PlentyONE. This chapter describes how you map data fields and what particularities apply for item exports to Kaufland.
|
Map your own data fields
You want to transfer item data to Kaufland that does not have a designated data field in the channel’s catalogue? In the Kaufland catalogues, you have the possibility to create own data fields and assign them to item data saved in PlentyONE. How to map your own data fields is described here. |
-
The market expects product data that cannot be saved in the PlentyONE item menu? Then create a property for this data. Link this property with your variations. The actual values are saved as property values for this property. Is this your first time working with properties? Then read up on the principles of properties first.
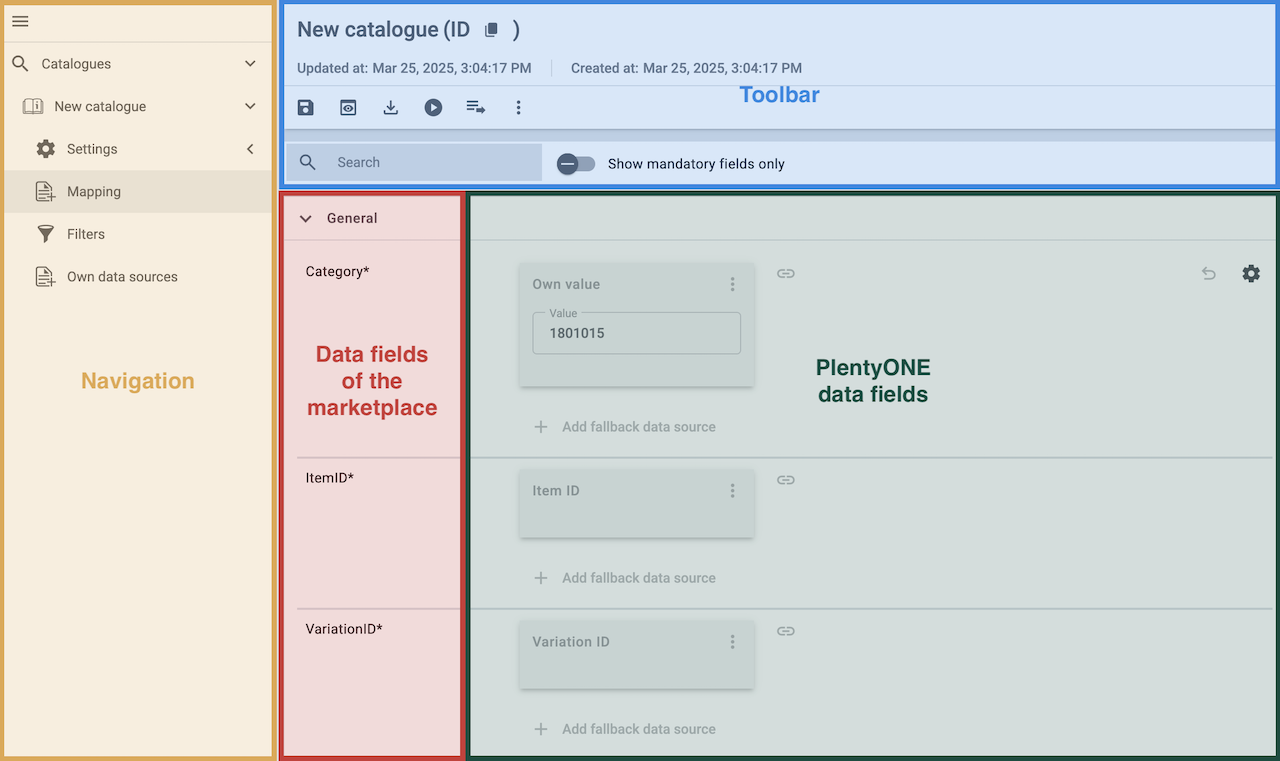
| Availability | Explanation |
|---|---|
Navigation |
When you open a catalogue, the view Mapping is shown. On the very left is the navigation.
|
Toolbar |
The toolbar provides actions for the catalogue. For example, save your mappings, restore an older version of the catalogue or hide or show optional marketplace data fields. |
Live preview |
You can use the Live preview feature to display which values of a given variation would be exported to the marketplace by each mapping. Simply activate the toggle and enter the ID of the variation you want to use in order to show live previews for that variation. |
Marketplace data field |
To the right of the navigation, all data fields available for the market are listed. Mandatory fields are marked with an asterisk (✱). |
PlentyONE data sources |
On the right side of the catalogue, you map the marketplace data fields to appropriate PlentyONE data sources. In the screenshot above, a few of the fields are already mapped. |
Mapping catalogue fields:
-
Go to Data » Catalogues.
-
Click on the catalogue.
→ The Mapping tab opens.
→ In the left-hand column, the market’s data fields are listed.
Tip: Mandatory fields are flagged with an asterisk (*).
→ In the right-hand column, you can map your PlentyONE data sources. Any PlentyONE data sources that you already mapped are also shown in this column. -
Map suitable PlentyONE data sources to the market data fields.
For each marketplace data field, you have a number of mapping options. Expand the info boxes below to get more information about each of these mapping options.-
Simple 1:1 mapping
-
Simple 1:1 mapping with properties
-
Complex 1:1 mapping
-
1:1 mapping with fallback data sources
-
1:n mapping
-
Own value mapping
-
Mapping with mathematical calculations
-
Mapping own data fields
-
-
Save () the catalogue.
→ The mappings are saved.
In a simple 1:1 mapping, you map a PlentyONE data source to the marketplace data field. If no suitable setting exists in PlentyONE. you can map a property instead.
As such, simple 1:1 mappings are useful if you want to achieve the following:
-
I want to fill this marketplace data field with the data from this PlentyONE setting.
-
If the data field is empty for a variation, no value is exported for this variation.
Creating a simple 1:1 mapping:
-
Next to the marketplace data field, click on + Add data source.
→ To the left, the list of available PlentyONE data sources are shown in groups. -
Select a PlentyONE data source in the list.
→ The data source is added to the right, but not yet confirmed or saved. -
Click on Confirm.
In a simple 1:1 mapping, you map a PlentyONE data source to the marketplace data field. But PlentyONE does not always offer a suitable data source. In such cases you can create the data source in your system yourself by setting up a property. Properties allow you to save any kind of information in your properties.
-
Is this your first time working with properties? Then read up on the principles of properties first.
Creating a simple 1:1 mapping with properties:
-
Next to the marketplace data field, click on + Add data source.
→ To the left, the list of available PlentyONE data sources are shown in groups. -
Expand the group Property.
→ The property groups are shown. -
Expand the group you need.
-
Click on the Plus sign on the right of the property you want. → The property is added as a data source, but not yet confirmed or saved.
-
From the drop-down list Language, select the language in which you send the data to the market.
-
Click on Confirm.
→ The property is mapped to the marketplace data field.
Complex mappings are necessary whenever a marketplace data field only has a select number of possible values. Like the name implies, they cannot be resolved by simply mapping the whole data field to one of your PlentyONE data sources. Instead, you map the individual values that can be entered in the data field to PlentyONE data sources.
For example, a marketplace may only allow for the color of an item to be described using a limited selection of terms such as "Blue", while the variations saved in your system may use more distinct terms such as "Sky blue" or "Royal blue". In such cases the marketplace data field for item colors will be a complex mapping that allows you to map the colors "Sky blue" and "Royal blue" saved in your variations to the value "Blue" used by the marketplace.
| Do not enter own values for complex mappings. All values that you enter must be saved for the variations, either in a setting or as a property value. This also applies if the value Comparative value is shown. You still need to enter exactly the value of the setting or property that you mapped. |
A complex mapping will always export the value selected for the marketplace data field, regardless of what kind of data source you mapped it to. The only exception are own values, which will be exported as-is.
You can recognise complex mappings from the field that is shown below the name of the marketplace data field. Click on the field to show the values available for the marketplace data field.
Examples for complex 1:1 mappings are:
-
Categories
-
Brands
-
Shipping settings
Important: For complex mappings, do not map own values or properties of the type None.
Creating a complex 1:1:n mapping:
-
Click on the field for the marketplace data field.
→ A list of the available values is shown. -
Select the value that you want to map a PlentyONE data source to.
→ The value is added as a mappable field. -
Next to the added field, click on + Add data source.
→ To the left, the available PlentyONE data sources are listed in groups. -
Select the PlentyONE data source you want to map tho the marketplace value.
Important: Do not map own values or properties of the type None. -
Your next steps depend on the PlentyONE data source you selected:
-
Alternative 1: The available values for the PlentyONE data value are shown on the left.
-
Next to the value you want to select, click on the plus.
→ The value is added to the field on the right. -
Click on Confirm.
-
-
Alternative 2: The PlentyONE data source is inserted and the field Comparative value is shown.
-
In the field Comparative value, enter a value that is saved in the setting or the property of the mapped PlentyONE data source.
-
Click on Confirm.
-
-
Alternative 3: The PlentyONE data source is inserted and a drop-down list is shown.
-
Select a value from the drop-down list.
-
Click on Confirm.
→ The value of the marketplace data field is exported, not the value of the PlentyONE data source.
Exception: If you map an own value to a marketplace data field, the own value that you enter is exported directly.
-
-
You can use fallback data sources in a 1:1 mapping to ensure that a value is provided for a marketplace data field even when the preferred data source is missing or empty.
In other words, this mapping specifies:
-
I want to fill the marketplace data field with the data from the selected primary PlentyONE data source.
-
If that data source is missing or empty for a variation, then the first fallback data source for this field is checked. If this fallback data source contains usable data, then that data is used to fill the marketplace data field.
-
If the first fallback data source is also missing or empty and other fallback data sources are mapped to this data field, then this process is repeated for the other fallback data sources in sequence until either usable data is found or all fallback data sources have been checked.
Two separate fallback conditions are available:
Null (default) |
The fallback data source is used if the data field above is mapped in the catalogue but not linked to the variation. The condition "Null" is useful when you want to map fallback data sources for the following types of PlentyONE data sources:
|
Empty |
The fallback data source is used if the data field above is mapped in the catalogue and linked to the variation, but is empty. The condition "Empty" is useful when you want to map fallback data sources for the following type of PlentyONE data sources:
Important: When you add a fallback data source, the fallback condition "Null" is selected automatically. To apply the fallback condition "Empty", you need to change the default setting. |
Note: If you assign multiple fallback data sources to a single data field, the value of only one of those fallback data sources is exported, i.e. the first mapped fallback data source that provides a usable value.
Creating a 1:1 mapping with fallback data sources:
-
Next to the marketplace data field, click on + Add data source.
→ To the left, the list of available PlentyONE data sources are shown in groups. -
Click on the plus to the right of the PlentyONE data source you want to use as the primary data source.
→ The PlentyONE data source is added to the right. -
Click on + Add fallback data source below the primary data source.
→ The fallback data source is added with the fallback condition Null. -
(Optional) If you want to use the fallback condition Empty instead:
-
Hover over the fallback data source with your cursor and click on the Settings () option that appears to the right.
→ The window Data column settings is shown. -
For the setting Fallback condition, select the option Empty.
-
Click on Save.
→ The fallback data source’s fallback condition is changed to Empty.
-
-
Click on Confirm.
→ The fallback data source is exported if the fallback condition is fulfilled.
In a 1:n mapping, you map several PlentyONE data sources to the same marketplace data field. Unlike fallback data sources, these data sources are combined using a specified separator and used as a single value.
In other words, this mapping specifies:
-
I want to combine these PlentyONE data sources during export so that the marketplace data field is filled with the data of these two or more PlentyONE settings.
Creating a 1:n mapping:
-
Next to the marketplace data field, click on + Add data source.
→ To the left, the list of available PlentyONE data sources are shown in groups. -
Click on the plus to the right of the PlentyONE data source you want to select.
→ The PlentyONE data source is added to the right. -
Click on Confirm.
-
To the right of the mapped PlentyONE data source, click on Add data source ().
→ To the left, the list of available PlentyONE data sources again are shown in groups. -
Map the desired number of additional PlentyONE data sources to the marketplace data field as described above.
-
Click on Confirm.
-
To the very right of the row, click on Settings ().
-
Select a separator from the drop-down list Separator or add a custom separator.
-
Click on Save.
-
Save () the catalogue.
→ The mappings are saved.
→ During the export, the content of the PlentyONE data sources is combined and exported as one field.
If you want to export the exact same value for all of your variations to a particular marketplace data field, then you can map this value to the data field using the Own value data source.
This kind of mapping specifies:
-
For this marketplace data field, I want to export the value that I entered in the data source Own value for all variations of this catalogue.
Creating an own value mapping:
-
Next to the marketplace data field, click on + Add data source.
→ To the left, the list of available PlentyONE data sources are shown in groups. -
Select the Own value option at the top of the list.
→ The data source Own value is mapped to the data field. -
Enter a value into the input field in the Own value.
-
Click on Confirm.
→ The entered value is exported for all variations.
|
Be especially careful when using Own value mappings
The value you enter in an Own value mapping is always exported for every variation tied to the catalogue. The value also overwrites the market value in complex mappings where usually the value of the market would be exported. As such, only use an Own value mapping for a marketplace data field when you are certain that the value you entered will be accepted for that data field by the marketplace for all of your variations in order to ensure that your variations are exported to the marketplace successfully. |
Mathematical formulas allow you to change numerical values automatically during the export. In other words, this mapping specifies:
-
I want the numerical value of a PlentyONE data source to be recalculated during the export. Basic arithmetic operations are available for the formulas.
Recalculating numerical values:
-
Next to the marketplace data field, click on + Add data source.
→ To the left, the list of available PlentyONE data sources are shown in groups. -
At the very top of the list, click on the + icon next to Formula (calculate).
→ The data field Formula is added to the field on the right. -
Click into the data field.
→ The window Modify value is shown. -
Enter a numerical value or select a PlentyONE data source at the bottom right of the window to add it to the calculation (add).
Tip: Use the search function. This helps you to find data fields quickly. -
Optional: If the symbol more_vert is shown in the data field, select the correct assignment for the data field.
Tip: A number tells you how many assignments are necessary for the data field.-
Click on the icon more_vert.
-
In the window shown, select the assignments from the drop-down list.
-
Save the settings.
-
-
Enter numbers and mathematical operators with the on-screen calculator or the keyboard.
-
Save the settings.
→ The entered formula is displayed in the overview.
→ When an export is carried out, the formula is used to calculate the value that is exported for each variation.
Keep in mind that this mapping type only works with PlentyONE data sources that provide numerical values and for marketplace data fields that accept numerical values. Additionally, this mapping type is relatively new and not available for all catalogue formats yet.
You want to export item data that does not have a designated data field in the market’s catalogue? Then you have the possibility to create own data fields and assign them to item data saved in PlentyONE.
Note: Own data fields are not automatically transferred to the market. During the export, the market itself decides whether the data field should be included in the product catalogue.
Creating an own data field:
-
In the navigation, click on Own data fields ().
→ To the left, the list of available PlentyONE data sources are shown in groups. -
Click on the PlentyONE data source that you want to assign.
→ Tip: It is possible to assign more than one data field. The data fields assigned here will then be combined during the export. -
Enter a name for the own data field into the Export key field.
→ The data field will be exported to the market with this name. -
Optional: Enter a value for Comparative value.
→ Comparative values can be entered for most, but not for all PlentyONE data sources. Comparative values are only required in specific cases. However, in most cases, you can leave the field empty.
Example: If you map a property Brand, you could for example enter the brand name as Comparative value. -
*Optional: Select a fallback data sources, if desired.
→ The fallback data sources is exported when the first data field does not exist or is empty. -
Save () the settings after you have created your own data fields.
9.1.3. Recommendations for data field mappings
To help you with mapping your data fields for the catalogue, we have created a list of recommended data field mappings. Note that these mappings are recommendations only. Depending on how you manage your item data, other mappings may be more appropriate than the recommendations given here.
-
Need more information about the PlentyONE data fields? All data fields are described on the manual page for the standard format Item (new).
Different data fields in the Kaufland product categories
You have to create a separate catalogue for each Kaufland product category that you want to offer your items in.
Catalogues for different product categories contain different data fields. This is because different item data has to be specified in each product category. For example, you export different item data in a catalogue for TVs than in a catalogue for Cameras.
However, some data fields are the same in each category. Only the recommended mappings for those data fields are described here.
|
Export multiple values for one data field
In Kaufland catalogues, you can export multiple values for one data field if the data field accepts multiple values. To export multiple values for one Kaufland data field, link the assigned PlentyONE data fields (link). In addition, you have to set a separator. Exporting multiple values:
Note: You can add multiple PlentyONE data fields to the data field Image. However, you do not have to enter a separator here because this field is based on a different background logic. |
| Marketplace data field | Mandatory? | Recommended PlentyONE mapping |
|---|---|---|
Category |
||
Category |
yes |
The Kaufland product category. |
Offer data |
||
SKU |
yes |
This data field is assigned automatically. |
SKU base |
yes |
This data field is assigned automatically. |
SKU status |
yes |
This data field is assigned automatically. |
Sales price |
yes |
Note: In catalogues for the country platform Kaufland.cz (Czech Republic), you have to set the Currency Czech koruna. In catalogues for the country platform Kaufland.pl (Poland), you have to set the Currency Zloty. |
Minimum price |
yes |
|
Stock |
yes |
The stock of the variation.
Tip: Use the data fields in the group Virtual warehouse to export the stock quantity sum of all sales warehouses. |
Additional description of condition |
no |
Additional information about the condition of the variation (for used items).
|
Processing time |
yes |
The processing time in days.
|
Condition |
||
Condition |
yes |
Indicates the condition of the variation. This data field contains a complex mapping. This means that you can select from different values of the marketplace data field. In this case, the values are the Kaufland item statuses. The values are then assigned to a PlentyONE data field. recommended mapping:
Note: Enter a PlentyONE condition ID in the Comparative value field. or
|
Shipping profiles 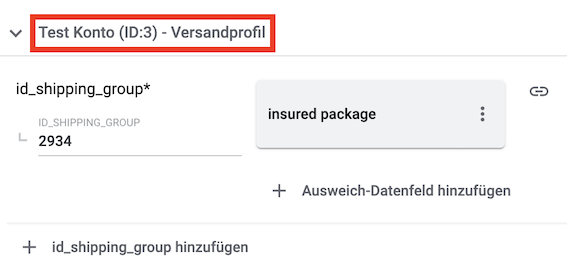
|
||
Kaufland shipping group ID |
yes |
Here you assign Kaufland shipping groups. This data field contains a complex mapping. This means that you can select from different values of the marketplace data field. The values are then assigned to a PlentyONE data field. For Kaufland shipping group ID, first select the Kaufland shipping group and then assign the appropriate item data saved in PlentyONE. recommended mapping: If only one Kaufland shipping group is displayed in the catalogue:
Enter the ID of the Kaufland shipping group as value. Example: If the ID of the Kaufland shipping group is If more than one Kaufland shipping groups are displayed in the catalogue:
For example, the value of the property can be the ID of the selected Kaufland shipping group. Note: In some cases, it can be useful to assign a Kaufland shipping group to a PlentyONE shipping profile. |
Warehouse 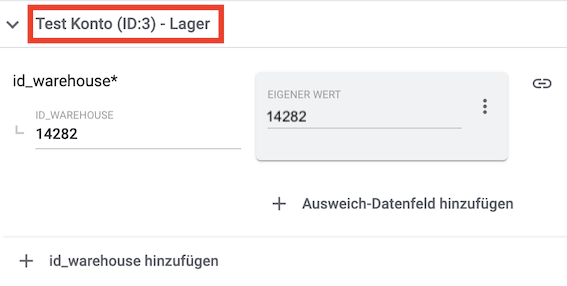
|
||
Kaufland warehouse ID |
yes |
Here you map Kaufland warehouses. This data field contains a complex mapping. This means that you can select from different values of the marketplace data field. In this case, the values are your Kaufland warehouses. The values are then assigned to a PlentyONE data field. In this case, you have to use a property. recommended mapping:
|
VAT Rate
|
||
VAT Rate |
yes |
|
Product data |
||
EAN |
yes |
|
Title |
yes |
or
or
|
Description |
yes |
|
Image |
yes |
or
or for several images:
or
Note: Enter a maximum number of images for the image list. Tip: For the order referrer, select the referrer which is saved in the Availability tab of an item. You can only select one order referrer. or for images with alternative text:
or
Note: Enter a maximum number of images for the image list. Tip: For the order referrer, select the referrer which is saved in the Availability tab of an item. You can only select one order referrer. Note: The alternative text for images is transferred in the language selected for the catalogue. |
Category |
yes |
|
Manufacturer |
yes |
|
Material composition |
yes |
Kaufland can only process values with "%" or the value "Keine Angaben erforderlich" [”No information required”]. |
Manufacturer name / Person responsible for the EU |
||
Name |
yes |
|
Email address |
yes |
|
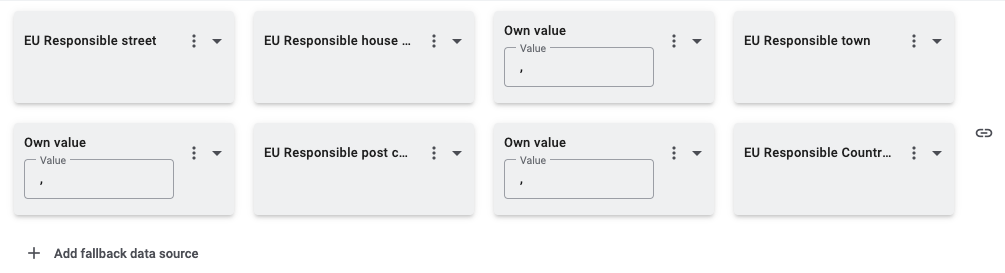
Address |
yes |
Combine the following data fields via Add data source (link):
Additionally select the separator space in the Settings (settings ).
|
Phone number |
no |
Note: Use a + when entering the country code. For example +49 for Germany. |
9.1.4. Notes on mapping data fields
Every sales channel structures item data differently. As such, there are some particularities for each market when mapping data fields. This chapter contains mapping information for important data fields for Kaufland.
9.1.4.1. Stock buffer
In the catalogues for Kaufland, you can use a stock buffer. A stock buffer is the amount of an item that should not be sold, but kept as a buffer.
In order to use a stock buffer for Kaufland, map the data field Stock buffer in your Kaufland catalogues. The stock buffer is applied when the stock is updated and when a new offer is created.
Recommended mappings for the data field Stock buffer:
-
Own value: Enter a value that should be used as stock buffer. For example, if you enter the value 5 here, then the stock for Kaufland is reduced by 5 items which are kept as a buffer.
or
-
Property linked to variation, type Text or whole number
9.1.4.2. Specifying the size unit as own value for Length, Width, Height, and Weight
In many Kaufland catalogues, the data fields Length, Width, Height, and Weight are mandatory and have to be mapped. We recommend the following mappings for these data fields:
-
Length: Variation » Length, specify size unit
-
Width: Variation » Width, specify size unit
-
Height: Variation » Height, specify size unit
-
Weight: Variation » Gross weight in g, specify size unit
For these data fields, only the value is transferred to Kaufland. The size unit is not transferred to Kaufland. However, in order for your variations to be correctly exported to Kaufland, you have to specify the size unit. You should therefore additionally specify the size unit as an own value.
An example of how to specify the size unit as own value for the data field Length is provided below.
Specifying the size unit as own value:
-
Go to Data » Catalogues.
-
Open the Kaufland catalogue.
-
Map the Kaufland data field Length with the value Variation » Length.
-
Click Add data field (link).
→ Another data field is added. -
Enter the size unit in the data field Own value.
→ For example, you can enter mm, cm, or m, depending on which size unit you want to transfer. -
Click on the Settings (settings) for this data field.
→ The window Data column settings opens. Here you can configure the separator. -
Select Null as Fallback condition.
-
Select Space as Separator.
-
Click Save (save).
-
Repeat the steps above for the data fields Width, Height, and Weight.
9.1.4.3. Language of product data
For sales on the international markets Kaufland CZ (Czech Republic), Kaufland FR (France), Kaufland IT (Italy), Kaufland PL (Poland) and Kaufland SK (Slovakia), the field Language of PlentyONE product data was added to the Kaufland catalogues.
This field is not mandatory. However, it is relevant for the Kaufland sales channels CZ, FR, IT, PL, and SK if the product data in PlentyONE is saved in German.
-
If the field Language of PlentyONE product data is not mapped and remains empty, then the system assumes that the product data in PlentyONE is saved in the language of each sales channel.
-
Thus, if the product data in PlentyONE is saved in German, this field must be mapped so that the product data will be translated into the channel’s language when it is exported.
-
If the Language of PlentyONE product data is set to
dein the catalogue, then the system checks using the EAN whether a product with the language German already exists. If yes, an offer for the sales channel CZ, FR, IT, PL, or SK is created and the product data is translated into the appropriate language.
If no product with the language German exists, then the product is created in German and translated into the appropriate language afterwards. -
Product data will also be updated on the sales channels Kaufland CZ, Kaufland FR, Kaufland IT, Kaufland PL, and Kaufland SK if the product language is either set to
czorfr`or `it`or `plorsk. Hence, the language in the catalogue does not necessarily have to be the language of the country platform. Products will be updated anyway. -
allowed values:
de = product data are saved in German and are translated into the language of the catalogue
cz = Product data are saved in Czech and are transferred in Czech
fr = Product data are saved in French and are transferred in French
it = Product data are saved in Italian and are transferred in Italian
pl = Product data are saved in Polish and are transferred in Polish
sk = product data are saved in Slovak and are transferred in Slovak
9.1.5. Providing information on the manufacturer and the EU-responsible person (GPSR)
The General Product Safety Regulation of the EU (GPSR) requires manufacturers and sellers to ensure the product safety of certain goods and to provide certain information for this purpose. This information includes details about the manufacturer and, in the case of manufacturers without an establishment in the EU, details about the responsible person within the EU. The GPSR regulation ensures that products are safe and comply with consumer protection requirements before being placed on the market.
In this chapter, you will learn how to add information on the manufacturer and the responsible person within the EU in PlentyONE to comply with the GPSR regulation.
If you export your items to Kaufland via catalogues, you can add the information on the manufacturer and the EU-responsible person directly via the data field mappings.
9.1.6. Providing alternative text for images (EAA)
On 28 June 2025, the national implementations of the European Accessibility Act (EAA) come into force. The EAA requires EU-based companies to improve the accessibility of certain products and services. It aims to harmonise national accessibility laws in order to facilitate the free movement of accessible products and services while improving accessibility for people with disabilities and older individuals.
The EAA applies to manufacturers, importers, distributors and service providers who offer products or services in the EU, as well as to the Member States, which are obliged to transpose the Directive into national law.
Products and services covered in the EU Accessibility Act include (among others):
-
Computers and operating systems
-
Smartphones, tablets, and other mobile devices
-
TVs with internet access
-
E-books and e-readers
-
Self-service terminals (e.g. ATMs, ticket machines)
-
Telecommunications services
-
Access to audiovisual media services (e.g. video-on-demand, streaming platforms)
-
Banking and financial services
-
E-commerce platforms
-
Emergency number 112
The directive outlines specific accessibility requirements for these products and services in Annex I of the EAA, focusing on:
-
Perceivability: Content must be accessible to users with visual and/or hearing impairments (e.g. screen reader compatibility, subtitles, audio description).
-
Operability: Products and services must be usable without complex manual interaction (e.g. via keyboard or assistive technologies).
-
Understandability: Information and navigation must be clearly structured and easy to understand.
-
Robustness: Products and their interfaces must be compatible with a variety of technologies and assistive devices.
-
Provision of information on accessibility features
-
Use of open standards
-
Documentation and technical support for accessibility (e.g. help desk)
As part of this legislation, sales channels such as Kaufland are increasingly requiring product data to be accessible. This also includes the use of alternative texts for images to support screen readers and thus improve accessibility for people with visual impairments.
To comply with these requirements, PlentyONE now supports the transfer of alternative texts for images both when creating and updating items on Kaufland.
In this chapter you will learn how to provide alternative texts for images in PlentyONE when you export your items to Kaufland via catalogues.
9.1.6.1. Adding alternative text for images in the item data
First, add the alternative text for images in the image details of the item.
-
Go to Item » Items » [Open item] » Tab: Images » Details.
Note: If you provide your item data in several languages, go to Item » Items » [Open item] » Tab: Images » Translations. -
Enter the alternative text for each image in the respective language in the Alternativer text field.
-
Click Save (save).
9.1.6.2. Mapping alternative text for images in the catalogue
Next, add the alternative text for images via the data field mappings.
-
Go to Data » Catalogues.
-
Open the Kaufland catalogue.
-
Carry out the following mapping for the image data field in the Product data section:
-
Image » Item images » Image list, image information Complete image information
or -
Image » Variation images » Image list, image information Complete image information
Note: Enter a maximum number of images for the image list.
Note: The alternative text for images is transferred in the language selected for the catalogue.
-
-
Click Save (save).
9.1.7. Activating the catalogue export
Creating a catalogue:
-
Go to Sales Channels » Channel Control Centre.
-
Click on the Kaufland tile.
-
Click Create catalogue (add).
-
Enter a name for the catalogue.
-
In the drop-down list Marketplace, select the option Kaufland.
-
In the drop-down list Export type, select the option {export-type}.
-
In the drop-down list Category, select a category of the sales channel for which you want to create a catalogue.
-
Save () the settings.
→ The catalogue is created.
→ The catalogue is opened for editing.
Other catalogue settings
Other catalogue settings are optional. Once you carried out the settings described on this page, your catalogue is automatically exported to Kaufland. That means you can ignore the catalogue settings for Format settings, Export settings and Download settings.
The Format settings, Export settings, and Download settings allow you to create a file with the variation data contained in the catalogue. However, this file does not contain information about whether the data export to Kaufland was successful.
|
Do not change the format in the catalogue’s Format settings. To ensure that the export to the sales channel works, all required settings are already configured when you create a catalogue. If you change the settings, errors might occur during the export. |
10. Managing listings
You create and manage offers for Kaufland via listings. You can access the product and offer listings for Kaufland by navigating to Sales Channels » Channel Control Centre » [Open Kaufland sales channel] and then opening the Offer listings or Product listings menu.
| Right now, only product listings can be created for Kaufland. |
10.1. Product listings
In the list Product listings menu of the account you gain an overview of your product listings.
Tip: You can switch between specific views of product listings and the listing group view via menu and folder.
-
menu gives you an overview of all the product listings.
-
folder shows you the listing groups of the product listings. Extend a listing group by clicking chevron_right, to see all listings within the group.
| If you only want to take a look at certain product listings, apply filters and narrow down the listings which are displayed. To do so, click on Filters (tune) at the top of the menu. |
Applying filters:
-
Go to Sales Channels » Channel Control Centre » [Open sales channel] »Product listings.
-
Click Filters (tune) at the top of the menu.
-
Select one or multiple filters.
-
Click Search (search).
→ The selected filters are applied and the appropriate product listings are displayed.
→ The filters that were applied are displayed at the top of the menu.
Tip: You can also reset (refresh) the selected filters. Then all product listings will be displayed again.
Table 8 offers an overview of the single listing view of product listings.
| Column | Explanation | ||||||
|---|---|---|---|---|---|---|---|
Data sync |
This column indicates whether data exchange for the product listing is active or paused. |
||||||
Group ID |
The ID of the listing group to which the product listing is assigned. By clicking on the ID, you can open the listing group view. |
||||||
Listing Name |
Name of the listing. |
||||||
Variation ID |
ID of the variation. |
||||||
Channel |
The sales channel to which the listing is exported. |
||||||
Status on Channel |
Displays the listing status on the sales channel, for example if the listing is already listed on the sales channel. Possible statuses are:
Note: For platforms with multiple sales channels, the number after the status icon indicates on how many sales channels the offer listing has this status. |
||||||
List on |
The sales channels on which the product listing is to be offered are displayed here. |
||||||
Errors |
Indicates whether the listing is incorrect. Click to open the overview of listing errors. |
||||||
Template |
The template selected for the listing. |
||||||
Catalogue |
The catalogue selected for the listing. |
||||||
Creation date |
The date and time on which the listing was created. |
||||||
more_vert |
Click here to display more actions.
|
Table 9 offers an overview of the group view of product listings.
| Column | Explanation | ||||||
|---|---|---|---|---|---|---|---|
Data sync |
This column indicates whether data exchange for the listing group is active or paused. |
||||||
Group name |
Name of the listing group |
||||||
Channel |
The sales channel to which the listing group is exported. |
||||||
Errors |
The error overview. |
||||||
Template |
The template selected for the listing group. |
||||||
Catalogue |
The catalogue selected for the listing group. |
||||||
Creation date |
The date and time on which the listing group was created. |
||||||
more_vert |
Click here to display more actions.
|
10.2. Creating product listings
Offers are transferred to Kaufland as product listings. Carry out the following steps to create product listings for Kaufland.
-
If the item you want to sell is not listed on the sales channel yet you will need to create a product listing for it first. Creating a product listing sends the product data to the sales channel and allows for the item to be listed.
In order to actually be able to sell the item on the sales channel you will need to additionally create an offer listing. The offer listing contains data related to the sale of the item, such as its price and stock. In other words, a product listing allows you to list an item on a sales channel that did not previously exist on that sales channel, but in order to sell that item on that sales channel you also need an offer listing for that item. -
If the item you want to sell is already listed on the sales channel you only need to create an offer listing. Offer listings send the data related to your offer, such as the price, stock, shipping costs etc., to the sales channel.
In most cases you will only need an offer listing in order to offer a product on a sales channel. Many sales channels do not differentiate between product and offer listings. You only need to send offer listings to these kinds of sales channels.
Product listings are created in three steps:
-
First, you enter listing details, meaning you select the platform, template, and catalogue for the listing.
-
Next, you select the variations from which the product listings are created.
-
Lastly, check and confirm your selection and create the listings.
|
Create product listings using the group function
You can also create product listings directly in the Items menu using the variation group function. You can find more information about the variation group function here. |
Step 1: Specify listing details:
-
Go to Sales Channels » Channel Control Center.
-
Open the account for Kaufland.
→ The Settings menu opens. -
Open the menu format_list_bulleted Product listings.
-
Click on add Create products.
→ The view Create products opens. -
Select the platform Kaufland.
-
Select the template for the catalogue.
-
Select a catalogue with your mapping for item data.
Tip: If you have no fitting catalogue yet, click on add Create catalogue. You will be forwarded to the Data » Catalogues menu and can create a catalogue. -
Optional: Activate Automatically activate listings after creation, if listing data should be automatically transferred to Kaufland after the listing is created.
-
Click arrow_forward NEXT.
→ The Select variations view opens. Next, select the variations you want to add to the listing.
Step 2: Select variations:
-
Select the variations you want to create the product listing for.
Tip: Use the search to filter for variations.
Note: Only variations that are linked to Kaufland in the Item » Items » [Open item] » [Open variation] menu are displayed.
Tip: If you want to create a product listing for all available variations, click on Click here to create listings for all [] variations above. You will be automatically redirected to the Preview and confirmation step. Product listings can be created for a maximum of 50,000 variations at a time. -
Click add ADD TO SELECTED VARIATIONS.
→ The selected variations are displayed in the Selected variations section.
Note: If you check a variation in the Selected variations section, you can remove the variation from the selection by clicking Remove from list. -
Click arrow_forward NEXT.
→ The selected variations will be displayed in a new view. In the last step, you preview and confirm your selection.
Step 3: Preview and confirm selection:
-
Preview your settings in the Listing details section.
-
Preview your selected variations in the Listing preview section. The listings are grouped by items. Extend a listing group (chevron_right) to see which variations are contained in the respective listing group.
-
If everything is set and done, click save CREATE PRODUCT LISTINGS.
Note: If you activated Automatically activate listings after creation a window with a summary of your settings opens. Click check CONFIRM to create the product listings.
10.3. Activating product listings
After you have created the product listings, you have to activate the listings so that they can be transferred to Kaufland.
To do so, activate the individual listings and the listing group. The listing can only be transferred to the sales channel if both the listing and the listing group are activated.
Note: You can also activate listings immediately after creation by activating the option Automatically activate listings after creation. If you activate the option to automatically activate listings after creation, you still have to activate the data exchange for the listing group.
Activating product listings:
-
Go to Sales Channels » Channel Control Center » [Open Kaufland].
→ The Settings menu opens. -
Open the Product listings menu.
-
In the line of the product listing you want to activate, click more_vert.
-
Click toggle_on Activate data sync.
Tip: If you want to activate multiple product listings at once, place a check mark next to the desired product listings and click toggle_on arrow_drop_down » Activate data sync at the top of the toolbar.
→ The data exchange for the listing is activated. The listing can only be transferred to the sales channel if the listing group is also activated.
Activating a listing group:
-
Go to Sales Channels » Channel Control Center » [Open Kaufland].
→ The Settings menu opens. -
Open the Product listings menu.
-
Open the listing group view (folder).
-
In the line of the listing group you want to activate, click more_vert.
-
Click toggle_on Activate data sync.
Tip: If you want to activate multiple listing groups at once, place a check mark next to the desired listing groups and click toggle_on arrow_drop_down » Activate data sync at the top of the toolbar.
→ The data exchange for the listing group is activated.
10.4. Viewing listing errors
The Errors tab of the Sales Channels » Channel Control Centre » [Open sales channel] » Offer listings / Product listings menu provides an overview of all errors that occurred in PlentyONE when exporting your product and offer listings.
Tip: The overview of listing errors is only displayed if at least one error has occurred when exporting the listings.
Here you can see:
-
the affected listings
-
error details
For each error, you can download a CSV file containing the affected listings by clicking the download button. You can correct the errors directly in the CSV file. You can then re-import the corrected CSV file.
Table 10 contains an overview of listing errors.
| Column | Explanation |
|---|---|
keyboard_arrow_down [Information about the error] |
Information about the error is provided here. It contains the affected field of the data record, a brief description of the error and the number of listings for which this error has occurred. |
download Download data as CSV |
The CSV file with the data records is downloaded. |
Listing name |
The name of the listing. |
Parent SKU |
The parent SKU of the main variation. |
SKU |
The SKU of the sub-variation. |
Variation ID |
The ID of the variation. |
Channel |
The sales channel to which the listing is exported. |
Export activity |
Shows whether the variation is being exported.
|
Status |
The listing’s status on the sales channel. Possible statuses are:
|
Errors |
The error overview. |
Template |
The template selected for the listing. |
Catalogue |
The catalogue selected for the listing. |
11. Automating order processing
Create event-based flows to automatically inform Kaufland about changes to the order status. The following actions are available for Kaufland in the PlentyONE Flow Studio:
With PlentyONE Flow (short: "Flow"), you can automate workflows for your business processes. Flow provides you with two functions in the Automation menu:
-
In Flow Studio, you create and configure automated workflows. Depending on the trigger type, there are three flow types: event-based, time-based or manual.
-
In the Flow Tracker, you can monitor running or completed workflows.
The central element in both functions is the Canvas – a graphical interface on which the workflows are visualised with Actions and Controls. In Flow Studio the canvas can be edited, in Flow Tracker it is only used for visualisation and is therefore read-only.
-
Is this your first time working with PlentyONE Flow? Then read up on the basic concept of Flow first.
11.1. Report shipping confirmation to Kaufland
Create an event-based flow to automatically inform Kaufland when you have shipped the items of an order.
-
Go to Automation » Flow Studio.
-
Click Create flow (add).
→ A stepper opens and guides you through the following three steps.-
General
-
Enter a unique name and, if necessary, a description for the new flow.
-
Click Next.
-
-
Trigger
-
Select Event-based as the trigger.
-
Click Next.
-
-
Settings
-
If desired, select a UI from the optional drop-down list Flow available in.
→ The option to manually trigger the flow directly from the selected UI is added to the group functions in that UI.
Note: UIs currently selectable: Order UI. -
From the drop-down list Trigger selection, select the event according to Table 11.
Note: If the trigger event has additional settings, then these are invariably mandatory. Without performing these settings, you will not be able to save the flow. -
Save () the settings.
→ The flow is created.
→ The Flow Studio Canvas appears, on which two elements are already displayed: The trigger type and the placeholder for the next step.
Note: With some event-based flows you cannot save the flow if it consists of only a trigger. In such cases, you need to add at least one further step.
-
-
-
Configure the new flow according to Table 11.
-
Save () the settings.
Note: The selected statuses, controls and filters in Table 11 only serve as an example. Select the statuses, controls and filters for the flow which best suit your workflow.
| Setting | Option | Selection | ||||||
|---|---|---|---|---|---|---|---|---|
Trigger selection |
Select a trigger, for example:
or
|
Select an order status, for example:
|
||||||
Controls |
Branch |
|
||||||
Actions |
Plugin (Legacy) > Kaufland |
Report shipping confirmation to Kaufland Note: If no shipping confirmation could be sent to Kaufland, the order is moved to the status that you selected for the option Order status for orders with failed shipping confirmations. Go to Setup » Markets » Kaufland » Settings to set this option. |
11.2. Uploading invoices to Kaufland
Create an event-based flow to automatically upload invoices to Kaufland.
-
Go to Automation » Flow Studio.
-
Click Create flow (add).
→ A stepper opens and guides you through the following three steps.-
General
-
Enter a unique name and, if necessary, a description for the new flow.
-
Click Next.
-
-
Trigger
-
Select Event-based as the trigger.
-
Click Next.
-
-
Settings
-
If desired, select a UI from the optional drop-down list Flow available in.
→ The option to manually trigger the flow directly from the selected UI is added to the group functions in that UI.
Note: UIs currently selectable: Order UI. -
From the drop-down list Trigger selection, select the event according to Table 12.
Note: If the trigger event has additional settings, then these are invariably mandatory. Without performing these settings, you will not be able to save the flow. -
Save () the settings.
→ The flow is created.
→ The Flow Studio Canvas appears, on which two elements are already displayed: The trigger type and the placeholder for the next step.
Note: With some event-based flows you cannot save the flow if it consists of only a trigger. In such cases, you need to add at least one further step.
-
-
-
Configure the new flow according to Table 12.
-
Save () the settings.
Note: The selected statuses, controls and filters in Table 12 only serve as an example. Select the statuses, controls and filters for the flow which best suit your workflow.
| Setting | Option | Selection | ||||||
|---|---|---|---|---|---|---|---|---|
Trigger selection |
Select a trigger, for example:
|
Select a document type, for example:
|
||||||
Controls |
Branch |
|
||||||
Actions |
Multichannel > Kaufland |
Uploading invoices to Kaufland |
11.3. Automatically reporting cancellations
Create an event-based flow to automatically inform Kaufland about cancellations.
-
Go to Automation » Flow Studio.
-
Click Create flow (add).
→ A stepper opens and guides you through the following three steps.-
General
-
Enter a unique name and, if necessary, a description for the new flow.
-
Click Next.
-
-
Trigger
-
Select Event-based as the trigger.
-
Click Next.
-
-
Settings
-
If desired, select a UI from the optional drop-down list Flow available in.
→ The option to manually trigger the flow directly from the selected UI is added to the group functions in that UI.
Note: UIs currently selectable: Order UI. -
From the drop-down list Trigger selection, select the event according to Table 13.
Note: If the trigger event has additional settings, then these are invariably mandatory. Without performing these settings, you will not be able to save the flow. -
Save () the settings.
→ The flow is created.
→ The Flow Studio Canvas appears, on which two elements are already displayed: The trigger type and the placeholder for the next step.
Note: With some event-based flows you cannot save the flow if it consists of only a trigger. In such cases, you need to add at least one further step.
-
-
-
Configure the new flow according to Table 13.
-
Save () the settings.
Note: Whenever you are dealing with cancellations, you need to send Kaufland a reason for the cancellation. The following cancellation reasons can be transferred to Kaufland:
-
Cancellation by customer
-
No response from customer
-
Item not as described
-
Delivery to this region not supported
-
Customer did not receive item
-
Item out of stock
-
Wrong sales price
-
Delivery to specified address not possible
-
Other reason
-
Delivery delayed by supplier
It is recommended that you create multiple branches or flows to report different cancellation reasons to Kaufland. You can create additional order statuses in the Setup » Orders » Status menu to facilitate this.
Note: The selected statuses, controls and filters in Table 13 only serve as an example. Select the statuses, controls and filters for the flow which best suit your workflow.
| Setting | Option | Selection | ||||||
|---|---|---|---|---|---|---|---|---|
Trigger selection |
Select a trigger, for example:
|
Select a status, for example:
or
|
||||||
Controls |
Branch |
|
||||||
Actions |
Multichannel > Kaufland |
Send cancellation to Kaufland |
12. Viewing the log
The Data » Log menu contains a history of processes that run via the Kaufland interface.
Note that integrations and identifiers are only shown in the drop-down lists as filters after the process has run at least once.
For Kaufland, the following filters are recommended:
-
Identifier » Kaufland
-
Go to Data » Log.
-
In the toolbar, click on tune.
-
Select appropriate filters from the drop-down lists.
-
Optional: Select filters for dates and/or times to only show entries from a specific period.
Tip: For information about the filters, refer to the Data log page of the manual. -
Click on Search ().
→ The results are shown. -
Check all entries for the levels warning and error.
Tip: Click on the entry to see details.
Use the reference types and reference values listed in Table 14 to limit the search results:
| Reference type | Explanation | Reference value |
|---|---|---|
action |
Filters by events. |
Select a reference type to filter for specific events. |
orderId |
Filters by the order ID of the order in PlentyONE. |
|
externalOrderId |
Filters by the Kaufland order number of the order. |
|
externalOrderItemId |
Filters by the ID of the Kaufland order item. |
13. Price and stock export logs
In the menu Sales Channels » Channel Control Centre » [Open your Kaufland sales channel] » Data exchange » Price & stock export logs, you can find the logs for price and stock export. The overview shows whether price and stock updates were successfully sent from PlentyONE to Kaufland or whether errors occurred during data transmission. You can use Filters (tune) to search the log specifically for a certain time period, a specific transmission type (e.g. price or stock), entries with errors or a specific SKU.
Unlike the data log in the Data » Log menu, this overview not only shows whether the processes in PlentyONE were executed successfully. It also directly displays the price and stock values transferred to Kaufland, as well as additional information about the data transmission. This means you don’t need to open the log files and extract the information from the JSON file.
Important: This log only shows whether the data was transferred to Kaufland. The log does not contain any information on whether Kaufland accepted the price or stock updates or has already applied them to your offers.
Table 15 contains an overview of the price and stock export logs.
| Column | Explanation |
|---|---|
Platform |
The Kaufland platform to which the data was transferred. |
Account |
The ID of your Kaufland seller account. |
Export type |
The type of data transmission. Possible values:
|
Transmission ID |
The unique ID of the data transmission. A separate transmission ID is generated for each data transmission to Kaufland. |
Transmission type |
The type of transferred data. Possible values:
|
SKU |
The SKU of the variation for which data was transferred. |
Value |
The value transferred to Kaufland for the stock or price. |
Error response |
The error message, if an error occurred during data transmission. |
Transmitted at |
Date and time of the data transmission. |
Retrieving the price and stock export log:
-
Go to Sales Channels » Channel Control Centre » [Open your Kaufland sales channel] » Data exchange » Price & stock export logs.
-
Optional: Narrow down the search using Filters (tune).
-
Click Search (search).
→ The log entries are displayed.