Shop Apotheke
Shop Apotheke is one of the leading online pharmacies in Europe. The sales channel operates in Germany, Austria, Italy and Belgium, giving external sellers the opportunity to offer their health, beauty and wellbeing products to a customer base of over 13 million people.
1. Becoming a seller at Shop Apotheke
First, register as a seller with Shop Apotheke in order to be able to offer items on Shop Apotheke.
After registering, you will receive login details from Shop Apotheke. You need these login details to set up Shop Apotheke in PlentyONE.
2. Frequency of data exchange
After you have set up Shop Apotheke in PlentyONE, data is exchanged with the sales channel in the intervals described in Table 1.
| Data | Interval |
|---|---|
Item export |
hourly |
Offer export (price + stock) |
every 20 minutes |
Order acceptance |
every 5 minutes |
Order import |
every 15 minutes |
3. Workflow of an order
-
Your items are listed on Shop Apotheke. Your company name will appear on your items with the note Verkauf und Versand durch (Sold and shipped by).
-
Customers place an order on Shop Apotheke.
-
Customers make their payments to Shop Apotheke.
-
The order is accepted.
-
The order is imported into PlentyONE.
-
You ship the order to the customer.
Note: Shop Apotheke does not offer a fulfilment service. -
You send the shipping confirmation, including the tracking number, to Shop Apotheke via flow.
4. Installing the plugin in PlentyONE
To connect to Shop Apotheke in PlentyONE, first install the Shop Apotheke plugin in your PlentyONE system. You can download this and other plugins in the plentyMarketplace.
Important: Install the plugin in the plugin set of the main client.
Adding plugin to the system:
-
Go to Plugins » plentyMarketplace.
→ The marketplace opens in a new tab. -
Navigate to the plugin ShopApotheke.
Tip: Either use the search function or open the category Plugins » Sales » Marketplaces. -
Open the detail view of the plugin.
-
In the column to the right, click Go to checkout.
→ The Checkout window opens. -
Read and accept the General Terms and Conditions.
-
Click Order now.
→ Wait a few minutes before installing the plugin.
Installing plugins:
-
Go to Plugins » Plugin set overview.
-
Click on the plugin set of your main client.
Important: In other words: The plugin set must be linked to the main client.
→ The plugin set opens. -
Click add Add plugin.
-
Select ShopApotheke from the plugin list.
-
Click Install.
→ The plugin is installed.
→ The plugin set is shown. -
Switch the plugin to active (toggle_on).
-
Save (save) the plugin set.
Tip: Problems saving the plugin set? Click Open details to show additional information.
5. Setting up Shop Apotheke in PlentyONE:
Next, set up Shop Apotheke in PlentyONE.
5.1. Completing the setup assistant
Use the ShopApotheke assistant in the Setup » Assistants » Plugins » [Select plugin set] menu to set up your ShopApotheke account in PlentyONE. Make sure you have your API key and ShopID ready, which you received from Shop Apotheke.
Important:
-
The assistant is only visible after you have installed the plugin.
-
You need to add a new configuration (add) for each sales channel (DE, AT, BE, IT).
Carrying out settings in the assistant:
-
Go to Setup » Assistants » Plugins.
-
Click on the assistant Shop-Apotheke.
-
Follow the instructions on the screen. If you need additional information about one of the options, expand the info boxes below this description ().
-
In the Summary step, check your settings to make sure they are correct.
Tip: In the Summary step, click on the arrow () to show the settings.
Tip: You can run through the assistant again at any time to update settings.
In the Authentication step, you establish the basic connection between PlentyONE and Shop Apotheke.
| Setting | Explanation |
|---|---|
Token |
|
Token |
Enter your API key from Shop Apotheke. |
ShopID |
Enter your ShopID from Shop Apotheke. |
Receive Error Email |
|
Error Email |
Enter one or more comma-separated email addresses to be notified of errors. |
The order settings are configured separately for each sales channel (DE, AT, BE, IT).
| Setting | Explanation |
|---|---|
Order import |
|
Import Orders |
Activate (toggle_on) to import orders from Shop Apotheke into PlentyONE every 15 minutes. |
Accept Orders |
Activate (toggle_on) to automatically accept all new, paid orders every 5 minutes. |
Book payment |
|
Book payment |
Activate (toggle_on) to automatically book payments during order import. |
Variant Matching for Items |
|
Variant Matching |
Select the value used to link your offer SKU on Shop Apotheke to a variation in PlentyONE for orders. |
Client for Order Import |
|
Client for Order Import |
Select the client that your orders should be assigned to. |
Document Language for the Marketplace |
|
Document Language |
Select the language for the documents related to the imported orders. |
Which documents should be used for the upload? |
|
Invoice |
Select Internal Invoice Document if you create invoices in PlentyONE. |
Credit Note |
Select Internal Credit Note Document if you create credit notes in PlentyONE. |
Shop Apotheke distinguishes between product data and offer data. Product data is transferred to Shop Apotheke via product catalogues. You need a separate product catalogue for each product category. For information on how to create product catalogues for Shop Apotheke, refer to chapter Exporting item data.
| Setting | Explanation |
|---|---|
Catalog Export Active |
|
Active Export |
Activate (toggle_on) to export product catalogues to Shop Apotheke hourly. |
Catalogs for Product Upload |
|
add Add new entry |
Add the activated product catalogues via add Add new entry. |
Shop Apotheke distinguishes between product data and offer data. Offer data is transferred to Shop Apotheke via offer catalogues. You need one offer catalogue for each sales channel (DE, AT, BE, IT). For information on how to create offer catalogues for Shop Apotheke, refer to chapter Exporting offer data.
| Setting | Explanation |
|---|---|
Offer Export Active |
|
Active Export |
Activate (toggle_on) to export offer catalogues to Shop Apotheke every 20 minutes. |
Catalog for Offers |
|
Offer Catalog |
Select the activated offer catalogues. |
Offer Upload Mode |
Normal = New offers are created and existing offers are updated. |
Shop Apotheke provides a wide range of shipping carriers. In this step, you can link them to your PlentyONE shipping profiles.
Important: The shipping carriers must be correctly mapped to ensure that the shipping confirmation works properly.
| Setting | Explanation |
|---|---|
Shipping Mapping |
|
Mirakl Carrier |
Select a shipping carrier from Shop Apotheke from the Mirakl carrier drop-down list. |
PlentyONE Shipping Profile |
Select the appropriate PlentyONE shipping profile for the shipping carrier from the PlentyONE Shipping Profile drop-down list. |
Name (Custom Carrier) |
If you use a shipping carrier that is not part of the Shop Apotheke range, you can enter the name of that carrier here. The shipping carrier is then created in Shop Apotheke. |
Custom Tracking URL |
Enter the tracking URL from your custom shipping carrier here. |
add Add new entry |
Click add Add new entry to link additional Shop Apotheke shipping carriers to PlentyONE shipping profiles. |
delete Remove entry |
Click delete Remove entry to delete existing mappings. |
Shop Apotheke requires a credit note with a credit note reason for refunds. In the Setup » Orders » Order types » Credit note menu, you can create your own credit note reasons, which you can then use in credit notes.
Via flow, you can automatically initiate refunds and either submit a fallback reason or your own credit note reasons, which you assign in this step.
Note:
-
Under Select the reason to use when no reason is specified in the credit note, you define a fallback reason. It is always transmitted when no credit note reason is specified in the credit note.
-
Via add Add new entry, you can create additional mappings and assign individual credit note reasons.
| Setting | Explanation |
|---|---|
Refund Mappings |
|
Select the reason to use when no reason is specified in the credit note. |
From the Marketplace drop-down list, select a credit note reason that will always be transmitted when no reason is specified in the credit note. |
add Add new entry |
Click add Add new entry to assign additional credit note reasons. |
delete Remove entry |
Click delete Remove entry to delete existing mappings. |
Marketplace |
From the Marketplace drop-down list, select a credit note reason in Shop Apotheke. |
PlentyONE |
From the PlentyONE drop-down list, select the corresponding credit note reason in PlentyONE. |
6. Activating the order referrer
Go to Setup » Orders » Order referrer to activate the order referrer. This ensures that orders are assigned to the correct sales channel.
An order referrer tags an order with the sales channel on which the order was generated. Sales channels can be e.g. your online shop or markets on which you sell your items. Each sales channel has an individual order referrer. Some order referrers are available by default in your PlentyONE system. Further order referrers are added e.g. if you install a new plugin. For further information about the order referrer, see the page Order referrer of the PlentyONE manual.
Activating the order referrer for Shop Apotheke:
-
Go to Setup » Orders » Order referrer.
-
Click Search (search).
-
In the list, navigate to the option Shop-apotheke.com - Shop Apotheke with the ID 190.00.
-
On the right of the referrer’s line, click Edit (edit).
→ The window Edit referrer opens. -
Activate the option Visible in selection (toggle_on).
-
Click SAVE (save).
→ The referrer is active.
Note: If you want to sell your items on Shop Apotheke, then the parent referrer for Shop Apotheke must also be activated (190.00 Shop-apotheke.com - Shop Apotheke). In addition, you have to activate the referrer for the Shop Apotheke country platform on which you want to sell your items. The following order referrers are available for Shop Apotheke:
-
190.00 Shop-apotheke.com - Shop Apotheke = Parent referrer for Shop Apotheke
-
190.01 Shop-apotheke.com - Shop Apotheke DE = Shop Apotheke Germany
-
190.02 Shop-apotheke.com - Shop Apotheke AT = Shop Apotheke Austria
-
190.03 farmaline.be - Farmaline BE = Farmaline Belgium
-
190.04 redcare.it - Redcare IT = Redcare Italy
Example 1: If you want to sell your items on Shop Apotheke Germany, you have to activate the parent referrer for Shop Apotheke (190.00 Shop-apotheke.com - Shop Apotheke) as well as the referrer for Shop Apotheke Germany (190.01 Shop-apotheke.com - Shop Apotheke DE).
Example 2: If you want to sell your items on Shop Apotheke Germany and Redcare Italy, then activate the parent referrer for Shop Apotheke (190.00 Shop-apotheke.com - Shop Apotheke) as well as the referrer for Shop Apotheke Germany (190.01 Shop-apotheke.com - Shop Apotheke DE) and the referrer for Redcare Italy (190.04 redcare.it - Redcare IT).
7. Preparing variations
Now, prepare your variations.
7.1. Setting the variation availability
You need to activate the variations you want to sell on Shop-apotheke.com - Shop Apotheke and enable them for the relevant sales channel. This is done in the Item » Items » [Open variation] menu.
Making a variation available for Shop-apotheke.com - Shop Apotheke:
-
Go to Item » Items » [Open variation].
Tip: To sell all variations of an item on Shop-apotheke.com - Shop Apotheke, carry out the settings for the item’s main variation. If the inheritance function is active for the variations, then this activates the availability of all variations of the item. -
In the Availability and visibility section, enable the option Active (toggle_on).
-
Click the Sales channels tab.
-
In the Sales channels section, activate the sales channel Shop-apotheke.com - Shop Apotheke in the Status column (toggle_on).
Tip: You can activate multiple sales channels at once. To do so, activate the checkboxes to the left of the desired sales channels. Then activate the toggle above the checkbox column (toggle_on). Click ACTIVATE to confirm the activation. -
Save (save) the settings.
→ The variation is available for Shop-apotheke.com - Shop Apotheke.
Use the variation group function to edit multiple variations at once. You select the variations that you want to edit.
Making several variations available for Shop-apotheke.com - Shop Apotheke using the variation group function:
-
Go to Item » Items.
-
Select () the variations to be edited.
-
In the toolbar, click on layers » layers Variation group function.
→ The Variation group function window opens. -
Select the action Sales channels from the drop-down list Actions.
→ The action is added to the lower part of the window. -
Select (check_box) the option Shop-apotheke.com - Shop Apotheke from the drop-down list Sales channels.
→ The sales channel is added below the Sales channels drop-down list. -
Activate (toggle_on) the toggles to the left of the sales channels.
-
Click EXECUTE & CLOSE to apply the settings.
Batch processing allows you to edit several variations at once. You use filters to limit which variations are edited.
Making several variations available for Shop-apotheke.com - Shop Apotheke using batch processing:
-
Navigate to the area Market availability.
-
Activate the checkbox to the left of the option Shop-apotheke.com - Shop Apotheke.
-
Activate the checkbox to the right of the option Shop-apotheke.com - Shop Apotheke.
-
Navigate to the area Availability.
-
Activate the checkbox to the left of the option Active.
-
Activate the checkbox to the right of the option Active.
-
Click on Apply to apply the settings to the variations.
8. Exporting item data
In the following chapters, you will learn how to prepare your item data for Shop Apotheke and transfer it to Shop Apotheke via catalogues.
The process consists of the following steps:
-
Adding product categories for Shop Apotheke.
-
Linking variations to the appropriate product categories.
-
Creating a product catalogue in PlentyONE.
-
Mapping data fields in the product catalogue.
-
Carrying out export settings in the product catalogue.
-
Exporting product data and (once) mapping it in the Shop Apotheke backend (Mirakl).
-
Activating the product catalogue in PlentyONE.
-
Adding the product catalogue in the assistant and activating the export.
8.1. Exporting item data via product catalogues
Item data is exported to Shop Apotheke using catalogues. Go to Data » Catalogues to create catalogues for Shop Apotheke. You need to create a separate catalogue for each Shop Apotheke product category that you want to sell your items in.
Catalogues are used to export data from your PlentyONE system. There are two different catalogue formats:
-
Marketplace formats are used to export item data to markets.
-
Standard formats are used to export data from your PlentyONE system into a file.
Catalogues with marketplace formats allow you to tailor your item information exactly to the needs of the market. Because here, you assign a suitable PlentyONE data field to each of the data fields of the market. When your variation data is exported to the market, the market’s data fields are then filled with the correct PlentyONE data.
-
Is this your first time working with catalogues? Then read up on the basic concept of catalogues first.
8.2. Adding product categories
Before you can create catalogues for Shop Apotheke, you have to add the product categories in which you want to offer your items on Shop Apotheke. This is done in the Setup » Markets » Shop-Apotheke » Catalog Manager menu.
After you added a Shop Apotheke product category in the Catalog Manager menu, you can create a catalogue for this product category in the Data » Catalogues menu.
Adding product categories:
-
Go to Setup » Markets » Shop-Apotheke » Catalog Manager.
-
Click the appropriate main category.
-
Navigate to the appropriate subcategory.
Note: Continue selecting subcategories until the Attributauswahl (attribute selection) and the message Ende erreicht (end reached) appear in the window. -
In the Attributauswahl (attribute selection) drop-down list, select Alle Attribute (all attributes).
Note: You can also load only mandatory fields or mandatory and recommended fields into the catalogue by selecting Nur Pflichtfelder (mandatory fields only) or Pflichtfelder und empfohlene (mandatory and recommended fields).
Tip: The more recommended attributes you maintain, the higher the visibility of the item on the sales channel. Check the current attribute requirements in the Shop Apotheke partner manual. -
Click Attribute laden (load attributes).
→ The list of selected attributes is displayed. -
Click Alle aktivieren (activate all).
-
Click Katalog anlegen (create catalogue).
→ The category was added. You can now create a catalogue for this category in the Data » Catalogues menu.
→ The activated attributes are loaded as data fields into this catalogue and can be mapped.
→ The property Shop-Apotheke is created automatically and must be added to the variations in this category.
8.3. Linking variations to Shop Apotheke categories
When you add a product category for Shop Apotheke in the Setup » Markets » Shop-Apotheke » Catalog Manager menu, the property Shop-Apotheke is created automatically in your PlentyONE system. With this property, you define in which category your variations are offered on Shop Apotheke.
In order for your variations to be offered in the desired category on Shop Apotheke, they have to be linked to the Shop-Apotheke property in the tab Properties of the variation. Afterwards, select the product category in which your variations should be offered as selection value for this property.
Linking a variation to a product category:
-
Go to Item » Items » [Open variation].
-
Select Properties in the navigation on the left.
-
Click Add properties (add).
→ The available properties are shown. -
Select (check_box) the Shop-Apotheke property and click ADD.
→ The property is added in the Selection and multi selection section. -
Select the desired category from the Value drop-down list for the Shop-Apotheke property.
-
Save (save) the settings.
→ The variation is exported in the corresponding catalogue and offered on Shop Apotheke in the selected category.
8.4. Creating a product catalogue
Item data is exported to Shop Apotheke using catalogues. To export your items to Shop Apotheke, create a catalogue in the Data » Catalogue menu. Afterwards, link the Shop Apotheke data fields with item data saved in PlentyONE in the catalogue.
Note: There is a separate catalogue format for each Shop Apotheke product category. Different item data is exported in each format, depending on which information Shop Apotheke requires for a product category.
This means that you have to create a separate catalogue for each Shop Apotheke product category that you want to sell your items in. Go to Setup » Markets » Shop-Apotheke » Catalog Manager to add product categories.
Creating a catalogue:
-
Go to Data » Catalogues.
-
Click Create catalogue (add).
-
Enter a name for the catalogue.
-
In the drop-down list Marketplace, select the option Shop Apotheke.
-
In the drop-down list Export type, select the option Item (new).
-
In the drop-down list Category, select a category of the sales channel.
-
Save () the settings.
→ The catalogue is created.
→ The catalogue is opened for editing.
|
Do not change the format in the catalogue’s Format settings. To ensure that the export to the sales channel works, all required settings are already configured when you create a catalogue. If you change the settings, errors might occur during the export. |
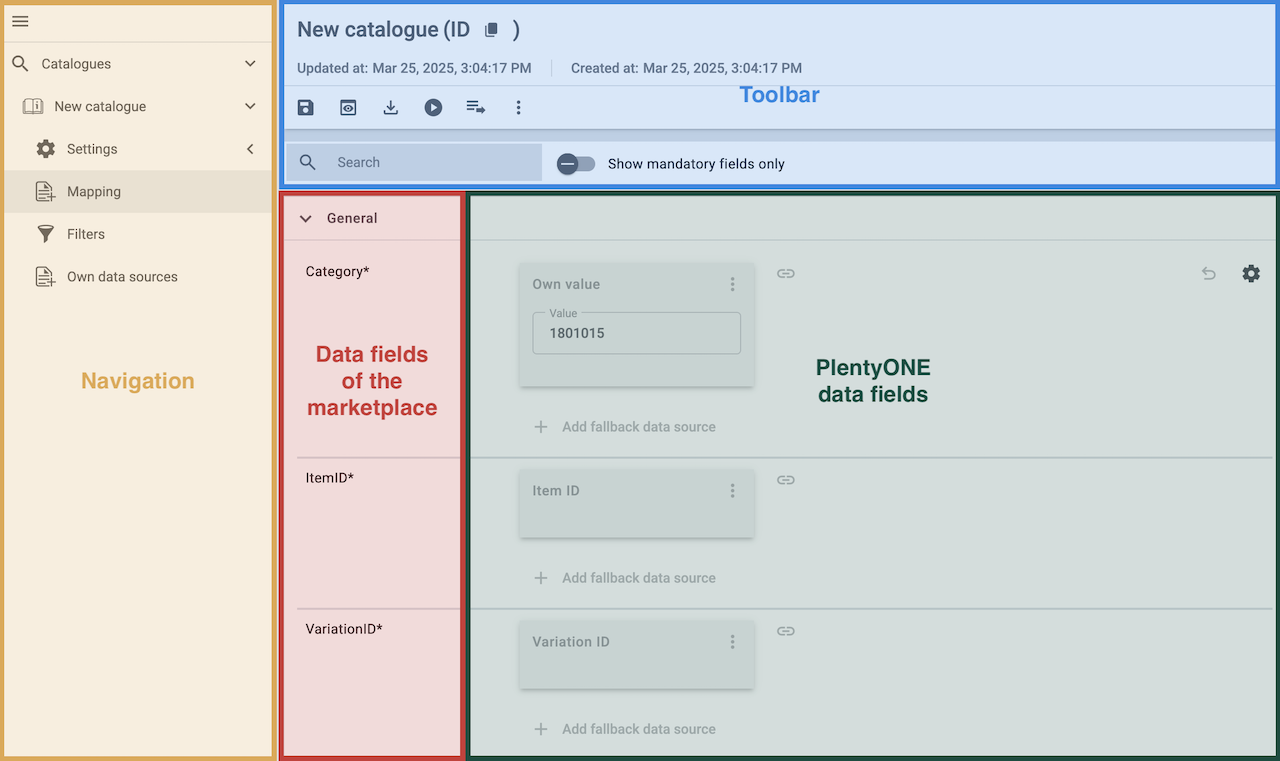
8.5. Mapping data fields in the product catalogue
After you have created a catalogue, map the market’s data fields to item data saved in PlentyONE. This chapter describes how you map data fields and what particularities apply for item exports to Shop Apotheke.
-
The market expects product data that cannot be saved in the PlentyONE item menu? Then create a property for this data. Link this property with your variations. The actual values are saved as property values for this property. Is this your first time working with properties? Then read up on the principles of properties first.
| Availability | Explanation |
|---|---|
Navigation |
When you open a catalogue, the view Mapping is shown. On the very left is the navigation.
|
Toolbar |
The toolbar provides actions for the catalogue. For example, save your mappings, restore an older version of the catalogue or hide or show optional marketplace data fields. |
Live preview |
You can use the Live preview feature to display which values of a given variation would be exported to the marketplace by each mapping. Simply activate the toggle and enter the ID of the variation you want to use in order to show live previews for that variation. |
Marketplace data field |
To the right of the navigation, all data fields available for the market are listed. Mandatory fields are marked with an asterisk (✱). |
PlentyONE data sources |
On the right side of the catalogue, you map the marketplace data fields to appropriate PlentyONE data sources. In the screenshot above, a few of the fields are already mapped. |
Mapping catalogue fields:
-
Go to Data » Catalogues.
-
Click on the catalogue.
→ The Mapping tab opens.
→ In the left-hand column, the market’s data fields are listed.
Tip: Mandatory fields are flagged with an asterisk (*).
→ In the right-hand column, you can map your PlentyONE data sources. Any PlentyONE data sources that you already mapped are also shown in this column. -
Map suitable PlentyONE data sources to the market data fields.
For each marketplace data field, you have a number of mapping options. Expand the info boxes below to get more information about each of these mapping options.-
Simple 1:1 mapping
-
Simple 1:1 mapping with properties
-
Complex 1:1 mapping
-
1:1 mapping with fallback data sources
-
1:n mapping
-
Own value mapping
-
Mapping with mathematical calculations
-
-
Save () the catalogue.
→ The mappings are saved.
In a simple 1:1 mapping, you map a PlentyONE data source to the marketplace data field. If no suitable setting exists in PlentyONE. you can map a property instead.
As such, simple 1:1 mappings are useful if you want to achieve the following:
-
I want to fill this marketplace data field with the data from this PlentyONE setting.
-
If the data field is empty for a variation, no value is exported for this variation.
Creating a simple 1:1 mapping:
-
Next to the marketplace data field, click on + Add data source.
→ To the left, the list of available PlentyONE data sources are shown in groups. -
Select a PlentyONE data source in the list.
→ The data source is added to the right, but not yet confirmed or saved. -
Click on Confirm.
In a simple 1:1 mapping, you map a PlentyONE data source to the marketplace data field. But PlentyONE does not always offer a suitable data source. In such cases you can create the data source in your system yourself by setting up a property. Properties allow you to save any kind of information in your properties.
-
Is this your first time working with properties? Then read up on the principles of properties first.
Creating a simple 1:1 mapping with properties:
-
Next to the marketplace data field, click on + Add data source.
→ To the left, the list of available PlentyONE data sources are shown in groups. -
Expand the group Property.
→ The property groups are shown. -
Expand the group you need.
-
Click on the Plus sign on the right of the property you want. → The property is added as a data source, but not yet confirmed or saved.
-
From the drop-down list Language, select the language in which you send the data to the market.
-
Click on Confirm.
→ The property is mapped to the marketplace data field.
Complex mappings are necessary whenever a marketplace data field only has a select number of possible values. Like the name implies, they cannot be resolved by simply mapping the whole data field to one of your PlentyONE data sources. Instead, you map the individual values that can be entered in the data field to PlentyONE data sources.
For example, a marketplace may only allow for the color of an item to be described using a limited selection of terms such as "Blue", while the variations saved in your system may use more distinct terms such as "Sky blue" or "Royal blue". In such cases the marketplace data field for item colors will be a complex mapping that allows you to map the colors "Sky blue" and "Royal blue" saved in your variations to the value "Blue" used by the marketplace.
| Do not enter own values for complex mappings. All values that you enter must be saved for the variations, either in a setting or as a property value. This also applies if the value Comparative value is shown. You still need to enter exactly the value of the setting or property that you mapped. |
A complex mapping will always export the value selected for the marketplace data field, regardless of what kind of data source you mapped it to. The only exception are own values, which will be exported as-is.
You can recognise complex mappings from the field that is shown below the name of the marketplace data field. Click on the field to show the values available for the marketplace data field.

Examples for complex 1:1 mappings are:
-
Categories
-
Brands
-
Shipping settings
Important: For complex mappings, do not map own values or properties of the type None.
Creating a complex 1:1:n mapping:
-
Click on the field for the marketplace data field.
→ A list of the available values is shown. -
Select the value that you want to map a PlentyONE data source to.
→ The value is added as a mappable field. -
Next to the added field, click on + Add data source.
→ To the left, the available PlentyONE data sources are listed in groups. -
Select the PlentyONE data source you want to map tho the marketplace value.
Important: Do not map own values or properties of the type None. -
Your next steps depend on the PlentyONE data source you selected:
-
Alternative 1: The available values for the PlentyONE data value are shown on the left.
-
Next to the value you want to select, click on the plus.
→ The value is added to the field on the right. -
Click on Confirm.
-
-
Alternative 2: The PlentyONE data source is inserted and the field Comparative value is shown.
-
In the field Comparative value, enter a value that is saved in the setting or the property of the mapped PlentyONE data source.
-
Click on Confirm.
-
-
Alternative 3: The PlentyONE data source is inserted and a drop-down list is shown.
-
Select a value from the drop-down list.
-
Click on Confirm.
→ The value of the marketplace data field is exported, not the value of the PlentyONE data source.
Exception: If you map an own value to a marketplace data field, the own value that you enter is exported directly.
-
-
You can use fallback data sources in a 1:1 mapping to ensure that a value is provided for a marketplace data field even when the preferred data source is missing or empty.
In other words, this mapping specifies:
-
I want to fill the marketplace data field with the data from the selected primary PlentyONE data source.
-
If that data source is missing or empty for a variation, then the first fallback data source for this field is checked. If this fallback data source contains usable data, then that data is used to fill the marketplace data field.
-
If the first fallback data source is also missing or empty and other fallback data sources are mapped to this data field, then this process is repeated for the other fallback data sources in sequence until either usable data is found or all fallback data sources have been checked.
Two separate fallback conditions are available:
Null (default) |
The fallback data source is used if the data field above is mapped in the catalogue but not linked to the variation. The condition "Null" is useful when you want to map fallback data sources for the following types of PlentyONE data sources:
|
Empty |
The fallback data source is used if the data field above is mapped in the catalogue and linked to the variation, but is empty. The condition "Empty" is useful when you want to map fallback data sources for the following type of PlentyONE data sources:
Important: When you add a fallback data source, the fallback condition "Null" is selected automatically. To apply the fallback condition "Empty", you need to change the default setting. |
Note: If you assign multiple fallback data sources to a single data field, the value of only one of those fallback data sources is exported, i.e. the first mapped fallback data source that provides a usable value.
Creating a 1:1 mapping with fallback data sources:
-
Next to the marketplace data field, click on + Add data source.
→ To the left, the list of available PlentyONE data sources are shown in groups. -
Click on the plus to the right of the PlentyONE data source you want to use as the primary data source.
→ The PlentyONE data source is added to the right. -
Click on + Add fallback data source below the primary data source.
→ The fallback data source is added with the fallback condition Null. -
(Optional) If you want to use the fallback condition Empty instead:
-
Hover over the fallback data source with your cursor and click on the Settings () option that appears to the right.
→ The window Data column settings is shown. -
For the setting Fallback condition, select the option Empty.
-
Click on Save.
→ The fallback data source’s fallback condition is changed to Empty.
-
-
Click on Confirm.
→ The fallback data source is exported if the fallback condition is fulfilled.
In a 1:n mapping, you map several PlentyONE data sources to the same marketplace data field. Unlike fallback data sources, these data sources are combined using a specified separator and used as a single value.
In other words, this mapping specifies:
-
I want to combine these PlentyONE data sources during export so that the marketplace data field is filled with the data of these two or more PlentyONE settings.
Creating a 1:n mapping:
-
Next to the marketplace data field, click on + Add data source.
→ To the left, the list of available PlentyONE data sources are shown in groups. -
Click on the plus to the right of the PlentyONE data source you want to select.
→ The PlentyONE data source is added to the right. -
Click on Confirm.
-
To the right of the mapped PlentyONE data source, click on Add data source ().
→ To the left, the list of available PlentyONE data sources again are shown in groups. -
Map the desired number of additional PlentyONE data sources to the marketplace data field as described above.
-
Click on Confirm.
-
To the very right of the row, click on Settings ().
-
Select a separator from the drop-down list Separator or add a custom separator.
-
Click on Save.
-
Save () the catalogue.
→ The mappings are saved.
→ During the export, the content of the PlentyONE data sources is combined and exported as one field.
If you want to export the exact same value for all of your variations to a particular marketplace data field, then you can map this value to the data field using the Own value data source.
This kind of mapping specifies:
-
For this marketplace data field, I want to export the value that I entered in the data source Own value for all variations of this catalogue.
Creating an own value mapping:
-
Next to the marketplace data field, click on + Add data source.
→ To the left, the list of available PlentyONE data sources are shown in groups. -
Select the Own value option at the top of the list.
→ The data source Own value is mapped to the data field. -
Enter a value into the input field in the Own value.
-
Click on Confirm.
→ The entered value is exported for all variations.
|
Be especially careful when using Own value mappings
The value you enter in an Own value mapping is always exported for every variation tied to the catalogue. The value also overwrites the market value in complex mappings where usually the value of the market would be exported. As such, only use an Own value mapping for a marketplace data field when you are certain that the value you entered will be accepted for that data field by the marketplace for all of your variations in order to ensure that your variations are exported to the marketplace successfully. |
Mathematical formulas allow you to change numerical values automatically during the export. In other words, this mapping specifies:
-
I want the numerical value of a PlentyONE data source to be recalculated during the export. Basic arithmetic operations are available for the formulas.
Recalculating numerical values:
-
Next to the marketplace data field, click on + Add data source.
→ To the left, the list of available PlentyONE data sources are shown in groups. -
At the very top of the list, click on the + icon next to Formula (calculate).
→ The data field Formula is added to the field on the right. -
Click into the data field.
→ The window Modify value is shown. -
Enter a numerical value or select a PlentyONE data source at the bottom right of the window to add it to the calculation (add).
Tip: Use the search function. This helps you to find data fields quickly. -
Optional: If the symbol more_vert is shown in the data field, select the correct assignment for the data field.
Tip: A number tells you how many assignments are necessary for the data field.-
Click on the icon more_vert.
-
In the window shown, select the assignments from the drop-down list.
-
Save the settings.
-
-
Enter numbers and mathematical operators with the on-screen calculator or the keyboard.
-
Save the settings.
→ The entered formula is displayed in the overview.
→ When an export is carried out, the formula is used to calculate the value that is exported for each variation.
Keep in mind that this mapping type only works with PlentyONE data sources that provide numerical values and for marketplace data fields that accept numerical values. Additionally, this mapping type is relatively new and not available for all catalogue formats yet.
8.5.1. Recommendations for data field mappings in the product catalogue
To help you with mapping your data fields for the catalogue, we have created a list of recommended data field mappings. Note that these mappings are recommendations only. Depending on how you manage your item data, other mappings may be more appropriate than the recommendation given here.
-
Need more information about the PlentyONE data fields? All data fields are described on the manual page for the standard format Item (new).
Note: You have to create a separate catalogue for each Shop Apotheke product category that you want to offer your items in.
Catalogues for different product categories contain different data fields. This is because different item data has to be specified in each Shop Apotheke product category.
However, some data fields are the same in each category. Only the recommended mappings for those data fields are described here.
| Sales channel field | Mandatory? | Recommended PlentyONE mapping |
|---|---|---|
Produktkategorie |
yes |
or
|
Product-ID/Shop SKU |
yes |
The variation number is a value that you can customise. Each variation number in your system is unique. |
Produktname Shop |
yes |
or
or
or
|
EAN |
no |
|
Marke |
yes |
|
Hauptbild |
yes |
|
Langbeschreibung (HTML) |
yes |
or
|
8.6. Carrying out the export settings
To ensure that the product catalogue is transferred to Shop Apotheke hourly via the plugin, you must set an appropriate transfer interval in the export settings.
Carrying out the export settings:
-
Go to Data » Catalogues.
→ The catalogues are listed. -
Click on your Shop Apotheke catalogue.
→ The catalogue opens. -
Click on the Settings (settings) tab in the navigation on the left.
→ The available settings are displayed. -
Navigate to the section Export settings.
-
In the drop-down list Provisioning, select the option None.
→ The export file is not saved automatically. -
In the drop-down list Transfer, select the option Every 20 minutes.
Note: The plugin exports the product catalogue to Shop Apotheke once per hour. The transfer interval selected here must therefore be shorter than one hour. -
Select (check_box) all weekdays in the Weekdays drop-down list.
-
Save (save) the settings.
8.7. Carrying out the data field mapping in the Shop Apotheke backend
Each product category requires an initial data field mapping to be carried out in the Shop Apotheke backend. You can do this via the following process:
Mapping data fields in the Shop Apotheke backend:
-
In PlentyONE, go to Data » Catalogues.
-
Click on your Shop Apotheke catalogue.
-
In the toolbar at the top, click on Live download (play_circle_outline).
Or: Even quicker: Start the download from the Additional actions (more_vert) in the catalogue overview.
→ A new browser tab opens. PlentyONE and the Tab Data export are displayed.
No new tab? Then you are probably using a pop-up blocker. Allow pop-ups for your system to continue.
→ The export starts.
Important: Do not close or reload the browser tab or the PlentyONE tab Data export while the export is in progress. If you do, the export stops and is cancelled.
→ The progress is shown in real time.
→ The file is automatically saved on your computer as a CSV file when the export is finished. -
Log in to your Shop Apotheke backend.
-
Go to Catalog » Product imports.
-
Click on Import products.
-
Click on Manual mapping wizard » Edit mapping with the wizard.
-
Click on Select file.
-
Select the CSV file you saved to your computer earlier and upload it here.
-
Complete the assistant.
Note: Mappings for data fields used in multiple categories are saved to all of those categories. Once the mapping has been carried out your product data is updated in PlentyONE every hour.
8.8. Activating the catalogue export
When you are done carrying out the data field mappings in the Shop Apotheke backend you can activate the catalogue export in PlentyONE.
|
Follow the proper order of steps
Only activate the catalogue export after:
You should only activate the catalogue once both of these steps have been completed.
|
Activating the catalogue export to Shop Apotheke:
-
Go to Data » Catalogues.
→ The catalogues are listed. -
Navigate to your Shop Apotheke catalogue.
-
In the Active/Inactive column, move the toggle button () to the right.
→ The catalogue is active.
8.9. Adding the product catalogue in the assistant and activating the export
Next, add the activated catalogue in the step Settings | Products of the assistant and activate the toggle*Active Export.
Adding the product catalogue in the assistant and activating the export:
-
Go to Setup » Assistants » Plugins.
-
Click on the Shop-Apotheke assistant.
-
Click on the step Settings | Products.
-
In the section Catalogs for Product Upload, click on addAdd new entry.
-
In the drop-down list Product Catalogs, select the activated Shop Apotheke catalog.
-
In the section Catalog Export Active, activate (toggle_on) the toggle Active Export.
-
Click on the step Summary.
-
Check your settings to make sure they are correct.
-
Click on FINALISE.
9. Exporting offer data
In the following chapters, you will learn how to prepare your offer data for Shop Apotheke and transfer it to Shop Apotheke via catalogues.
The process consists of the following steps:
-
Creating an offer catalogue in PlentyONE.
-
Mapping data fields in the offer catalogue.
-
Carrying out export settings in the offer catalogue.
-
Activating the offer catalogue.
-
Adding the offer catalogue in the assistant and activating the export.
9.1. Offer export via offer catalogues
Offer data is exported to Shop Apotheke using catalogues. Go to Data » Catalogues to create catalogues for Shop Apotheke.
-
Product data (such as titles, descriptions and images) gives information on the product itself. This product-specific data is the same for all sellers. It is transferred to Shop Apotheke via a product catalogue.
-
Offer data (e.g. price, stock, delivery time, condition) is specific to each seller and can differ. It is transferred to Shop Apotheke via an offer catalogue.
Catalogues are used to export data from your PlentyONE system. There are two different catalogue formats:
-
Marketplace formats are used to export item data to markets.
-
Standard formats are used to export data from your PlentyONE system into a file.
Catalogues with marketplace formats allow you to tailor your item information exactly to the needs of the market. Because here, you assign a suitable PlentyONE data field to each of the data fields of the market. When your variation data is exported to the market, the market’s data fields are then filled with the correct PlentyONE data.
-
Is this your first time working with catalogues? Then read up on the basic concept of catalogues first.
9.2. Creating an offer catalogue
Offer data is exported to Shop Apotheke using catalogues. Go to Data » Catalogues to create catalogues for Shop Apotheke. Afterwards, link the Shop Apotheke data fields with offer data saved in PlentyONE in the catalogue you created.
Creating a catalogue:
-
Go to Data » Catalogues.
-
Click Create catalogue (add).
-
Enter a name for the catalogue.
-
In the drop-down list Marketplace, select the option Shop-Apotheke.
-
In the drop-down list Export type, select the option Item (new).
-
In the drop-down list Category, select ShopApotheke Offers.
-
Save () the settings.
→ The catalogue is created.
→ The catalogue is opened for editing.
|
Do not change the format in the catalogue’s Format settings. To ensure that the export to the sales channel works, all required settings are already configured when you create a catalogue. If you change the settings, errors might occur during the export. |
9.3. Mapping data fields in the offer catalogue
After you have created an offer catalogue, map the channel’s data fields to item data saved in PlentyONE. This chapter describes how you map data fields and what particularities apply for item exports to Shop Apotheke.
-
The market expects product data that cannot be saved in the PlentyONE item menu? Then create a property for this data. Link this property with your variations. The actual values are saved as property values for this property. Is this your first time working with properties? Then read up on the principles of properties first.
| Availability | Explanation |
|---|---|
Navigation |
When you open a catalogue, the view Mapping is shown. On the very left is the navigation.
|
Toolbar |
The toolbar provides actions for the catalogue. For example, save your mappings, restore an older version of the catalogue or hide or show optional marketplace data fields. |
Live preview |
You can use the Live preview feature to display which values of a given variation would be exported to the marketplace by each mapping. Simply activate the toggle and enter the ID of the variation you want to use in order to show live previews for that variation. |
Marketplace data field |
To the right of the navigation, all data fields available for the market are listed. Mandatory fields are marked with an asterisk (✱). |
PlentyONE data sources |
On the right side of the catalogue, you map the marketplace data fields to appropriate PlentyONE data sources. In the screenshot above, a few of the fields are already mapped. |
Mapping catalogue fields:
-
Go to Data » Catalogues.
-
Click on the catalogue.
→ The Mapping tab opens.
→ In the left-hand column, the market’s data fields are listed.
Tip: Mandatory fields are flagged with an asterisk (*).
→ In the right-hand column, you can map your PlentyONE data sources. Any PlentyONE data sources that you already mapped are also shown in this column. -
Map suitable PlentyONE data sources to the market data fields.
For each marketplace data field, you have a number of mapping options. Expand the info boxes below to get more information about each of these mapping options.-
Simple 1:1 mapping
-
Simple 1:1 mapping with properties
-
Complex 1:1 mapping
-
1:1 mapping with fallback data sources
-
1:n mapping
-
Own value mapping
-
Mapping with mathematical calculations
-
-
Save () the catalogue.
→ The mappings are saved.
In a simple 1:1 mapping, you map a PlentyONE data source to the marketplace data field. If no suitable setting exists in PlentyONE. you can map a property instead.
As such, simple 1:1 mappings are useful if you want to achieve the following:
-
I want to fill this marketplace data field with the data from this PlentyONE setting.
-
If the data field is empty for a variation, no value is exported for this variation.
Creating a simple 1:1 mapping:
-
Next to the marketplace data field, click on + Add data source.
→ To the left, the list of available PlentyONE data sources are shown in groups. -
Select a PlentyONE data source in the list.
→ The data source is added to the right, but not yet confirmed or saved. -
Click on Confirm.
In a simple 1:1 mapping, you map a PlentyONE data source to the marketplace data field. But PlentyONE does not always offer a suitable data source. In such cases you can create the data source in your system yourself by setting up a property. Properties allow you to save any kind of information in your properties.
-
Is this your first time working with properties? Then read up on the principles of properties first.
Creating a simple 1:1 mapping with properties:
-
Next to the marketplace data field, click on + Add data source.
→ To the left, the list of available PlentyONE data sources are shown in groups. -
Expand the group Property.
→ The property groups are shown. -
Expand the group you need.
-
Click on the Plus sign on the right of the property you want. → The property is added as a data source, but not yet confirmed or saved.
-
From the drop-down list Language, select the language in which you send the data to the market.
-
Click on Confirm.
→ The property is mapped to the marketplace data field.
Complex mappings are necessary whenever a marketplace data field only has a select number of possible values. Like the name implies, they cannot be resolved by simply mapping the whole data field to one of your PlentyONE data sources. Instead, you map the individual values that can be entered in the data field to PlentyONE data sources.
For example, a marketplace may only allow for the color of an item to be described using a limited selection of terms such as "Blue", while the variations saved in your system may use more distinct terms such as "Sky blue" or "Royal blue". In such cases the marketplace data field for item colors will be a complex mapping that allows you to map the colors "Sky blue" and "Royal blue" saved in your variations to the value "Blue" used by the marketplace.
| Do not enter own values for complex mappings. All values that you enter must be saved for the variations, either in a setting or as a property value. This also applies if the value Comparative value is shown. You still need to enter exactly the value of the setting or property that you mapped. |
A complex mapping will always export the value selected for the marketplace data field, regardless of what kind of data source you mapped it to. The only exception are own values, which will be exported as-is.
You can recognise complex mappings from the field that is shown below the name of the marketplace data field. Click on the field to show the values available for the marketplace data field.
Examples for complex 1:1 mappings are:
-
Categories
-
Brands
-
Shipping settings
Important: For complex mappings, do not map own values or properties of the type None.
Creating a complex 1:1:n mapping:
-
Click on the field for the marketplace data field.
→ A list of the available values is shown. -
Select the value that you want to map a PlentyONE data source to.
→ The value is added as a mappable field. -
Next to the added field, click on + Add data source.
→ To the left, the available PlentyONE data sources are listed in groups. -
Select the PlentyONE data source you want to map tho the marketplace value.
Important: Do not map own values or properties of the type None. -
Your next steps depend on the PlentyONE data source you selected:
-
Alternative 1: The available values for the PlentyONE data value are shown on the left.
-
Next to the value you want to select, click on the plus.
→ The value is added to the field on the right. -
Click on Confirm.
-
-
Alternative 2: The PlentyONE data source is inserted and the field Comparative value is shown.
-
In the field Comparative value, enter a value that is saved in the setting or the property of the mapped PlentyONE data source.
-
Click on Confirm.
-
-
Alternative 3: The PlentyONE data source is inserted and a drop-down list is shown.
-
Select a value from the drop-down list.
-
Click on Confirm.
→ The value of the marketplace data field is exported, not the value of the PlentyONE data source.
Exception: If you map an own value to a marketplace data field, the own value that you enter is exported directly.
-
-
You can use fallback data sources in a 1:1 mapping to ensure that a value is provided for a marketplace data field even when the preferred data source is missing or empty.
In other words, this mapping specifies:
-
I want to fill the marketplace data field with the data from the selected primary PlentyONE data source.
-
If that data source is missing or empty for a variation, then the first fallback data source for this field is checked. If this fallback data source contains usable data, then that data is used to fill the marketplace data field.
-
If the first fallback data source is also missing or empty and other fallback data sources are mapped to this data field, then this process is repeated for the other fallback data sources in sequence until either usable data is found or all fallback data sources have been checked.
Two separate fallback conditions are available:
Null (default) |
The fallback data source is used if the data field above is mapped in the catalogue but not linked to the variation. The condition "Null" is useful when you want to map fallback data sources for the following types of PlentyONE data sources:
|
Empty |
The fallback data source is used if the data field above is mapped in the catalogue and linked to the variation, but is empty. The condition "Empty" is useful when you want to map fallback data sources for the following type of PlentyONE data sources:
Important: When you add a fallback data source, the fallback condition "Null" is selected automatically. To apply the fallback condition "Empty", you need to change the default setting. |
Note: If you assign multiple fallback data sources to a single data field, the value of only one of those fallback data sources is exported, i.e. the first mapped fallback data source that provides a usable value.
Creating a 1:1 mapping with fallback data sources:
-
Next to the marketplace data field, click on + Add data source.
→ To the left, the list of available PlentyONE data sources are shown in groups. -
Click on the plus to the right of the PlentyONE data source you want to use as the primary data source.
→ The PlentyONE data source is added to the right. -
Click on + Add fallback data source below the primary data source.
→ The fallback data source is added with the fallback condition Null. -
(Optional) If you want to use the fallback condition Empty instead:
-
Hover over the fallback data source with your cursor and click on the Settings () option that appears to the right.
→ The window Data column settings is shown. -
For the setting Fallback condition, select the option Empty.
-
Click on Save.
→ The fallback data source’s fallback condition is changed to Empty.
-
-
Click on Confirm.
→ The fallback data source is exported if the fallback condition is fulfilled.
In a 1:n mapping, you map several PlentyONE data sources to the same marketplace data field. Unlike fallback data sources, these data sources are combined using a specified separator and used as a single value.
In other words, this mapping specifies:
-
I want to combine these PlentyONE data sources during export so that the marketplace data field is filled with the data of these two or more PlentyONE settings.
Creating a 1:n mapping:
-
Next to the marketplace data field, click on + Add data source.
→ To the left, the list of available PlentyONE data sources are shown in groups. -
Click on the plus to the right of the PlentyONE data source you want to select.
→ The PlentyONE data source is added to the right. -
Click on Confirm.
-
To the right of the mapped PlentyONE data source, click on Add data source ().
→ To the left, the list of available PlentyONE data sources again are shown in groups. -
Map the desired number of additional PlentyONE data sources to the marketplace data field as described above.
-
Click on Confirm.
-
To the very right of the row, click on Settings ().
-
Select a separator from the drop-down list Separator or add a custom separator.
-
Click on Save.
-
Save () the catalogue.
→ The mappings are saved.
→ During the export, the content of the PlentyONE data sources is combined and exported as one field.
If you want to export the exact same value for all of your variations to a particular marketplace data field, then you can map this value to the data field using the Own value data source.
This kind of mapping specifies:
-
For this marketplace data field, I want to export the value that I entered in the data source Own value for all variations of this catalogue.
Creating an own value mapping:
-
Next to the marketplace data field, click on + Add data source.
→ To the left, the list of available PlentyONE data sources are shown in groups. -
Select the Own value option at the top of the list.
→ The data source Own value is mapped to the data field. -
Enter a value into the input field in the Own value.
-
Click on Confirm.
→ The entered value is exported for all variations.
|
Be especially careful when using Own value mappings
The value you enter in an Own value mapping is always exported for every variation tied to the catalogue. The value also overwrites the market value in complex mappings where usually the value of the market would be exported. As such, only use an Own value mapping for a marketplace data field when you are certain that the value you entered will be accepted for that data field by the marketplace for all of your variations in order to ensure that your variations are exported to the marketplace successfully. |
Mathematical formulas allow you to change numerical values automatically during the export. In other words, this mapping specifies:
-
I want the numerical value of a PlentyONE data source to be recalculated during the export. Basic arithmetic operations are available for the formulas.
Recalculating numerical values:
-
Next to the marketplace data field, click on + Add data source.
→ To the left, the list of available PlentyONE data sources are shown in groups. -
At the very top of the list, click on the + icon next to Formula (calculate).
→ The data field Formula is added to the field on the right. -
Click into the data field.
→ The window Modify value is shown. -
Enter a numerical value or select a PlentyONE data source at the bottom right of the window to add it to the calculation (add).
Tip: Use the search function. This helps you to find data fields quickly. -
Optional: If the symbol more_vert is shown in the data field, select the correct assignment for the data field.
Tip: A number tells you how many assignments are necessary for the data field.-
Click on the icon more_vert.
-
In the window shown, select the assignments from the drop-down list.
-
Save the settings.
-
-
Enter numbers and mathematical operators with the on-screen calculator or the keyboard.
-
Save the settings.
→ The entered formula is displayed in the overview.
→ When an export is carried out, the formula is used to calculate the value that is exported for each variation.
Keep in mind that this mapping type only works with PlentyONE data sources that provide numerical values and for marketplace data fields that accept numerical values. Additionally, this mapping type is relatively new and not available for all catalogue formats yet.
9.3.1. Recommendations for data field mappings in the offer catalogue
To help you with mapping your data fields for the catalogue, we have created a list of recommended data field mappings. Note that these mappings are recommendations only. Depending on how you manage your item data, other mappings may be more appropriate than the recommendation given here.
-
Need more information about the PlentyONE data fields? All data fields are described on the manual page for the export type Item (new).
| Sales channel field | Mandatory? | Recommended PlentyONE mapping |
|---|---|---|
Mandatory fields |
||
Angebots-SKU |
yes |
or
or
|
Produkt-ID |
yes |
|
Produkt-ID-Typ |
yes |
|
Angebotspreis |
yes |
The sales price of the item.
|
Status des Angebots |
yes |
The item’s condition, for example new or used.
or
|
Produktsteuer |
yes |
or
|
Bestand & Verfügbarkeit |
||
Angebotsmenge |
no |
The stock of the variation.
Tip: Use the data fields in the group Virtual warehouse to export the stock quantity sum of all sales warehouses. |
Logistik & Versand |
||
Lieferfrist (in Tagen) |
no |
The item’s delivery time in working days.
|
9.4. Carrying out the export settings
To ensure that the offer catalogue is transferred to Shop Apotheke every 20 minutes via the plugin, you must set an appropriate transfer interval in the export settings.
Carrying out the export settings:
-
Go to Data » Catalogues.
→ The catalogues are listed. -
Click on your Shop Apotheke catalogue.
→ The catalogue opens. -
Click on the Settings (settings) tab in the navigation on the left.
→ The available settings are displayed. -
Navigate to the section Export settings.
-
In the drop-down list Provisioning, select the option None.
→ The export file is not saved automatically. -
In the drop-down list Transfer, select the option Every 20 minutes.
-
Select (check_box) all weekdays in the Weekdays drop-down list.
-
Save (save) the settings.
9.5. Activating the catalogue export
You have set up Shop Apotheke in PlentyONE and created a catalogue for exporting your offer data? Then activate the catalogues you want to export to Shop Apotheke in the Data » Catalogues menu and add them in the assistant.
Activating the catalogue export to Shop Apotheke:
-
Go to Data » Catalogues.
→ The catalogues are listed. -
Scroll to the Shop Apotheke catalogue.
-
In the Active column, move the toggle button to the right ().
→ The catalogue is active.
→ The catalogue data is exported to Shop Apotheke every 20 minutes.
Tip: Go to Data » Catalogue export status for information about the status of the export.
9.6. Adding the offer catalogue in the assistant
Next, add the activated catalogue in the step Settings | Offers of the assistant and activate the toggle*Active Export.
Adding the offer catalogue in the assistant and activating the export:
-
Go to Setup » Assistants » Plugins.
-
Click on the Shop-Apotheke assistant.
-
Click on the step Settings | Offers.
-
In the drop-down list Offer Catalog, select the activated Shop Apotheke catalog.
-
In the section Offer Export Active, activate (toggle_on) the toggle Active Export.
-
Click on the step Summary.
-
Check your settings to make sure they are correct.
-
Click on FINALISE.
10. Order management
Orders from Shop Apotheke are imported into PlentyONE every 15 minutes if you selected the respective settings in the Settings | Orders step of the setup assistant. The orders can be identified by the order referrer Shop-apotheke.com - Shop Apotheke.
10.1. Payment methods on Shop Apotheke
The processing of payments for Shop Apotheke orders is done exclusively via Shop Apotheke’s Payment Service Provider. As a seller, you cannot change the payment methods being offered there. Customers have access to the following payment methods on Shop Apotheke:
-
Credit card
-
PayPal
-
Debit
-
Cash in advance
-
Invoice (depending on customer status)
10.2. Automating order processing
Create event-based flows to automatically inform Shop Apotheke about changes to the order status. The following actions are available for Shop Apotheke in the PlentyONE Flow Studio:
-
Automatically inform Shop Apotheke that the items have been shipped. (How?)
-
Automatically upload invoices to Shop Apotheke. (How?)
-
Automatically upload credit notes to Shop Apotheke. (How?)
-
Automatically initiate a refund for an order. (Section 10.2.4)
With PlentyONE Flow (short: "Flow"), you can automate workflows for your business processes. Flow provides you with two functions in the Automation menu:
-
In Flow Studio, you create and configure automated workflows. Depending on the trigger type, there are three types of flows: event-based, time-based or manual.
-
In the Flow Tracker, you can monitor running or completed workflows.
The central element in both functions is the Canvas – a graphical interface on which the workflows are visualised with Actions and Controls. In Flow Studio the canvas can be edited, in Flow Tracker it is only used for visualisation and is therefore read-only.
-
Is this your first time working with PlentyONE Flow? Then read up on the basic concept of Flow first.
10.2.1. Sending shipping confirmations to Shop Apotheke
Create an event-based flow to automatically inform Shop Apotheke when you have shipped the items of an order.
Important:
-
An order cannot be marked as shipped until a shipping confirmation has been sent. This can lead to negative reviews and sanctions by Bauhaus. Therefore you should ensure that this flow is configured correctly and active.
-
Shop Apotheke supports partial deliveries (MultiShipping). As such, multiple package numbers may be included in the shipping confirmation for an order.
*Example:*An order consists of multiple positions:-
Position 1 contains 2 items (A1 and A2).
-
Position 2 contains 1 item (B).
The order is shipped in 3 partial shipments. A separate package number is sent for each partial shipment.
-
Position 1, item A1 (shipment 1): Package number 1
-
Position 1, item A2 (shipment 2): Package number 2
-
Position 2, item B (shipment 3): Package number 3
This information is additionally included as an order note in the order.
-
-
Go to Automation » Flow Studio.
-
Click Create flow (add).
→ A stepper opens and guides you through the following three steps.-
General
-
Enter a unique name and, if necessary, a description for the new flow.
-
Click Next.
-
-
Trigger
-
Select Event-based as the trigger.
-
Click Next.
-
-
Settings
-
If desired, select a UI from the optional drop-down list Flow available in.
→ The option to manually trigger the flow directly from the selected UI is added to the group functions in that UI.
Note: UIs currently selectable: Order UI. -
From the drop-down list Trigger selection, select the event according to Table 2.
Note: If the trigger event has additional settings, then these are invariably mandatory. Without performing these settings, you will not be able to save the flow. -
Save () the settings.
→ The flow is created.
→ The Flow Studio Canvas appears, on which two elements are already displayed: The trigger type and the placeholder for the next step.
Note: With some event-based flows you cannot save the flow if it consists of only a trigger. In such cases, you need to add at least one further step.
-
-
-
Configure the new flow according to Table 2.
-
Save () the settings.
Note: The selected statuses, controls and filters in Table 2 only serve as an example. Select the statuses, controls and filters for the flow which best suit your workflow.
| Setting | Option | Selection | |||||||||
|---|---|---|---|---|---|---|---|---|---|---|---|
Trigger selection |
Select a trigger, for example:
or
|
Select an order status, for example:
|
|||||||||
Controls |
Branch |
Note: If there is more than one filter, add the others as conditions (playlist_add). Select AND as the relationship between the conditions.
|
|||||||||
Actions |
Plugin (Legacy) > ShopApotheke |
Shop-Apotheke order shipped |
10.2.2. Automatically uploading invoices to Shop Apotheke
Create an event-based flow to automatically upload invoices to Shop Apotheke.
-
Go to Automation » Flow Studio.
-
Click Create flow (add).
→ A stepper opens and guides you through the following three steps.-
General
-
Enter a unique name and, if necessary, a description for the new flow.
-
Click Next.
-
-
Trigger
-
Select Event-based as the trigger.
-
Click Next.
-
-
Settings
-
If desired, select a UI from the optional drop-down list Flow available in.
→ The option to manually trigger the flow directly from the selected UI is added to the group functions in that UI.
Note: UIs currently selectable: Order UI. -
From the drop-down list Trigger selection, select the event according to Table 3.
Note: If the trigger event has additional settings, then these are invariably mandatory. Without performing these settings, you will not be able to save the flow. -
Save () the settings.
→ The flow is created.
→ The Flow Studio Canvas appears, on which two elements are already displayed: The trigger type and the placeholder for the next step.
Note: With some event-based flows you cannot save the flow if it consists of only a trigger. In such cases, you need to add at least one further step.
-
-
-
Configure the new flow according to Table 3.
-
Save () the settings.
Note: The selected statuses, controls and filters in Table 3 only serve as an example. Select the statuses, controls and filters for the flow which best suit your workflow.
| Setting | Option | Selection | ||||||
|---|---|---|---|---|---|---|---|---|
Trigger selection |
Select an event, for example:
Note: Select an event after which the items have already been shipped. |
Select a document type, for example:
|
||||||
Controls |
Branch |
Note: If there is more than one filter, add the others as conditions (playlist_add). Select AND as the relationship between the conditions.
|
||||||
Actions |
Plugin (Legacy) > ShopApotheke |
Shop-Apotheke invoice upload |
10.2.3. Automatically uploading credit notes to Shop Apotheke
Create an event-based flow to automatically upload credit notes to Shop Apotheke.
-
Go to Automation » Flow Studio.
-
Click Create flow (add).
→ A stepper opens and guides you through the following three steps.-
General
-
Enter a unique name and, if necessary, a description for the new flow.
-
Click Next.
-
-
Trigger
-
Select Event-based as the trigger.
-
Click Next.
-
-
Settings
-
If desired, select a UI from the optional drop-down list Flow available in.
→ The option to manually trigger the flow directly from the selected UI is added to the group functions in that UI.
Note: UIs currently selectable: Order UI. -
From the drop-down list Trigger selection, select the event according to Table 4.
Note: If the trigger event has additional settings, then these are invariably mandatory. Without performing these settings, you will not be able to save the flow. -
Save () the settings.
→ The flow is created.
→ The Flow Studio Canvas appears, on which two elements are already displayed: The trigger type and the placeholder for the next step.
Note: With some event-based flows you cannot save the flow if it consists of only a trigger. In such cases, you need to add at least one further step.
-
-
-
Configure the new flow according to Table 4.
-
Save () the settings.
Note: The selected statuses, controls and filters in Table 4 only serve as an example. Select the statuses, controls and filters for the flow which best suit your workflow.
| Setting | Option | Selection | |||||||||
|---|---|---|---|---|---|---|---|---|---|---|---|
Trigger selection |
Select an event, for example:
|
Select a document type, for example:
|
|||||||||
Controls |
Branch |
Note: If there is more than one filter, add the others as conditions (playlist_add). Select AND as the relationship between the conditions.
|
|||||||||
Actions |
Plugin (Legacy) > ShopApotheke |
Shop-Apotheke Creditnote upload |
10.2.4. Issuing refunds
Create an event-based flow to automatically initiate a refund for a Shop Apotheke order after receiving a return and coming to an agreement with the customer.
*Important:*The exact amount listed in the credit note will be refunded. You can also issue partial refunds. Make sure that you have sufficient funds in your Shop Apotheke account to cover the refund.
-
Go to Automation » Flow Studio.
-
Click Create flow (add).
→ A stepper opens and guides you through the following three steps.-
General
-
Enter a unique name and, if necessary, a description for the new flow.
-
Click Next.
-
-
Trigger
-
Select Event-based as the trigger.
-
Click Next.
-
-
Settings
-
If desired, select a UI from the optional drop-down list Flow available in.
→ The option to manually trigger the flow directly from the selected UI is added to the group functions in that UI.
Note: UIs currently selectable: Order UI. -
From the drop-down list Trigger selection, select the event according to Table 5.
Note: If the trigger event has additional settings, then these are invariably mandatory. Without performing these settings, you will not be able to save the flow. -
Save () the settings.
→ The flow is created.
→ The Flow Studio Canvas appears, on which two elements are already displayed: The trigger type and the placeholder for the next step.
Note: With some event-based flows you cannot save the flow if it consists of only a trigger. In such cases, you need to add at least one further step.
-
-
-
Configure the new flow according to Table 5.
-
Save () the settings.
Note: The selected statuses, controls and filters in Table 5 only serve as an example. Select the statuses, controls and filters for the flow which best suit your workflow.
| Setting | Option | Selection | |||||||||
|---|---|---|---|---|---|---|---|---|---|---|---|
Trigger selection |
Select a trigger, for example:
|
Select an order status, for example:
|
|||||||||
Controls |
Branch |
Note: If there is more than one filter, add the others as conditions (playlist_add). Select AND as the relationship between the conditions.
|
|||||||||
Actions |
Plugin (Legacy) > ShopApotheke |
Shop-Apotheke send refund |
11. Helper
In the menu Setup » Markets » Shop-Apotheke » Helper you can manually trigger the execution of certain processes. For example, you can trigger an order import or the export of your product and offer catalogues. This can be helpful if you want to test the export or if you have to import missing orders.
11.1. Manually accepting and importing orders
In the Orders area you can manually accept orders and/or import them into PlentyONE.
Manually accepting and importing orders:
-
Go to Setup » Markets » Shop-Apotheke » Helper.
-
In the top left corner, click Orders.
-
Select the desired sales channel (in this case Shop-apotheke.com - Shop Apotheke DE) from the Channel drop-down list.
-
Execute one of the actions described in Table 6.
| Procedure | Explanation |
|---|---|
Orders Import |
Imports all orders that have already been accepted but are not in your PlentyONE system yet. |
Orders Import (Parameter) |
Imports a specific order with the specified order ID. |
Order Acceptance (Parameter) |
Accepts a specific order in Shop Apotheke. |
Orders Cron Import |
Imports all orders that have already been accepted but are not in your PlentyONE system yet. |
11.2. Manually exporting product and offer catalogues
In the Offers & Products area you can manually export your product and offer catalogues to Shop Apotheke.
Manually exporting product and offer catalogues:
-
Go to Setup » Markets » Shop-Apotheke » Helper.
-
In the top left corner, click Offers & Products.
-
Select the desired sales channel (in this case Shop-apotheke.com - Shop Apotheke DE) from the Channel drop-down list.
-
Execute one of the actions described in Table 7.
| Procedure | Explanation |
|---|---|
Offers Catalog senden |
Manually exports the offer catalogue specified in the assistant to Shop Apotheke. |
Products Catalog senden |
Manually exports the product catalogue specified in the assistant to Shop Apotheke. |
Logistic Classes |
Shows the API codes of the logistics classes that can be used in the offer catalogue. |
11.3. Overview of recent Cron runs
In the Cron Report area you can review an overview of the most recent runs of each cron.
Checking the cron overview:
-
Go to Setup » Markets » Shop-Apotheke » Helper.
-
In the top left, click Cron Report.
-
Select the desired sales channel (in this case Shop-apotheke.com - Shop Apotheke DE) from the Channel drop-down list.
→ An overview of the most recent runs of each cron (e.g. Orders Import and Order Acceptance) is shown.
12. Frequent error messages
Table 8 provides an explanation of the most frequent error messages and their possible causes.
| Error message | Possible reasons |
|---|---|
|
The Shopn Apotheke servers are currently undergoing maintenance. |
The shop does not have a sufficient PAYABLE balance for the refund |
Your Bauhaus account balance is too low to issue a refund. |
Order upload: |
Your product was not approved by Bauhaus yet. |
Cannot mark the order with id “xxx” to a new status. Current status is “SHIPPED”, expected is one of “Shipping” |
Bauhaus has already received a shipping confirmation for this order. |