Editing a contact
Once you have created a contact, you can add further details to the various areas of the contact data record. To do so, you can create your own view or use one of the templates that are available in your system by default.
Note also the group function that you can use to easily and quickly carry out different actions for multiple contacts at once.
|
Individually adjusting the width of the table columns
You can adjust the columns’ width in the overview according to your needs. When hovering over the respective table columns, blue lines appear which allow you to adjust the size as desired. |
1. Creating a view
The user interface to edit a contact allows a high degree of flexibility for positioning content and data. This works by intuitively positioning areas for content and elements on the dashboard via drag-and-drop. Each area and each element can be further edited by clicking on Edit view () in the top right of the contact data record. Table 1 contains an overview on the functions available in the editing mode of the contact data record.
Element |
Symbol |
Explanation |
Edit view |
Opens the contact data record for editing. |
|
Undo |
undo |
Undoes the last change, unless this change has already been saved. |
Redo |
redo |
Restores the previously undone change. |
Default view |
This area displays the view that is currently opened. Click on arrow_drop_down to switch to another view or to create a new view. |
|
Restoring the previously saved state |
restore |
Resets the contact data record to the state that was last saved. |
Save |
save |
Saves the changes made to the contact data record. By doing so, you can save as many different views as you like. |
more_vert |
Click on this symbol between the components to add or remove columns and lines or to reduce or enlarge the column sizes. |
|
Edit |
edit |
When you edit the component, you can see in the Elements area on the right side which elements have not been used yet and are therefore still available. Elements that are already in use are disabled and cannot be used a second time. |
Delete |
delete |
Deletes the component. |
Close |
close |
Closes the editing mode. If you have not saved the changes yet, a security inquiry appears. |
Available templates for editing a contact data record
If you do not want to create your own view to edit a contact data record, you can simply use one of the existing default templates in your system.
Select (arrow_drop_down) a template via the view on the top right within the contact data record. Three views are available in your system by default:
-
Standard - All
-
Standard - B2B
-
Standard - B2C
Of course, you can adjust these default views every time according to your needs and add or delete individual fields or create a new view.
|
Activating views for users
If a user without admin rights is not able to see the available templates in your system, you might have to activate the view in the Setup » Account management » Roles menu in the Role-defined views area. Note the explanations on the Carrying out the preparatory settings page. |
|
Default view “Starter UI” in all new systems starting from December 2022
In all systems that are booked as of the middle of December 2022, the 3 above mentioned default views are no longer available. Only the default view Starter UI will be available. The starter UI contains the following areas and fields:
Of course, you can adjust this default view any time according to your needs and add or delete individual fields or create a new view. |
2. Functions in the toolbar
When you open a data record in the CRM » Contacts menu, different functions are available in the toolbar, depending on whether the data record is a contact or a guest order.
In general, you can recognise a guest order by the symbol done in the Guest column in the overview. If you open the data record of a guest order, you can see in the side navigation on the left in addition the symbol badge and in brackets behind the name the word Guest
Table 2 lists the available functions in the toolbar of a contact. Table 3 lists the available functions in the toolbar of a guest order.
2.1. Functions in the toolbar of contacts
| Setting | Element | Explanation |
|---|---|---|
Save |
save |
Saves the data record. |
Reload |
refresh |
Reloads the data record. |
Download all data saved in this data record |
download |
Downloads all data that is saved for this data record. |
Anonymising a data record |
Anonymises the data record. Anonymising data is only possible when the data record is a "real" contact and not a guest order. |
|
Download contact as vCard |
contact_mail |
Downloads the data of the contact as electronic business card in VCF format. |
Send newsletter opt-in email |
outgoing_mail |
Sends the email for the newsletter opt-in respectively the confirmation for the newsletter opt-in to the customer. |
Delete |
delete |
Deletes the data record after you have confirmed your decision. |
2.2. Functions in the toolbar of guest orders
| Setting | Element | Explanation |
|---|---|---|
Save |
save |
Saves the data record. |
Reload |
refresh |
Reloads the data record. |
Download all data saved in this data record |
download |
Downloads all data that is saved for this data record. |
Convert guest into contact |
sync_alt |
Converts the address data from a guest order into a regular contact data record. In the History area of the newly created contact data record, the entry Converted by as well as the name of the person who converted the data record are added. |
Delete |
delete |
Deletes the data record after you have confirmed your decision. |
2.3. Reloading the data record
Reloading the data record:
-
Go to CRM » Contacts.
-
Search for the contact that you want to reload by means of the filter settings. Note the explanations about the filters on the Searching for a contact page.
→ The data records that correspond to the search criteria entered are displayed. -
Click in the line of the data record.
→ The detail view opens. -
In the toolbar on the top, click on Reload (refresh).
→ The data record is reloaded.
2.4. Downloading all data of a contact or guest order
In the CRM » Contacts menu, you can download with just one click all data that is saved for a contact or the address data belonging to a guest order as a ZIP file. The ZIP file contains an HTML file and a machine-parsable file in JSON format.
Downloading all data of a contact or guest order:
-
Go to CRM » Contacts.
-
Search for the data record that you want to download by means of the filter settings. Note the explanations about the filters on the Searching for a contact page.
→ The data records that correspond to the search criteria entered are shown in the overview. -
Click in the line of the data record.
→ The data record opens. -
In the toolbar, click on Download all data saved in this data record (download).
→ A dialogue window appears. Determine a location on your computer where the ZIP file is saved. -
Download the file.
2.5. Anonymising a data record
You can delete data of a contact respectively make this data illegible in such way that no reference to this person is given any longer.
| Anonymising data is only possible when the data record is a "real" contact and not a guest order. |
|
Which data is anonymised and deleted?
By clicking on Anonymise (), the following data in the data record of the contact is anonymised and deleted:
|
Anonymising a data record:
-
Go to CRM » Contacts.
-
Search for the data record that you want to download by means of the filter settings. Note the explanations about the filters on the Searching for a contact page.
→ The data records that correspond to the search criteria entered are shown in the overview. -
Click in the line of the data record.
→ The data record opens. -
In the toolbar, click on Anonymise data record ().
→ A window appears and you need to confirm your decision. -
Enter the ID of the contact that you would like to anonymise.
-
Click on Anonymise.
→ The data record is anonymised.
2.6. Downloading the vCard
You can download the contact data as electronic business card in VCF format and save it, for example, in the address register of your email programme.
Downloading the vCard:
-
Go to CRM » Contacts.
-
Search for the contact that you want to edit by means of the filter settings. Note the explanations about the filters on the Searching for a contact page.
→ The contacts that correspond to the search criteria entered are displayed. -
Click in the line of the contact to open the data record.
-
In the toolbar on the top, click on Download contact as vCard (contact_mail).
→ A window opens. Select the storage location on your computer. -
The vCard is available at the selected storage location.
2.7. Converting a plentyShop and marketplace guest order into a contact data record
The CRM » Contacts menu allows you to convert with just one click the address data from a guest order that came into your system either via your plentyShop or via a marketplace into a regular contact data record.
-
In case of a guest order via the plentyShop, the saved data record only consists of the address and the corresponding order; a contact ID is not saved. However, the symbol done is shown in the overview’s Guest column.
-
In case of a guest order via a marketplace, a contact ID is assigned and the symbol done is shown in the overview’s Guest column.
If a company name is additionally contained in the address, a company data record is also created when converting the data record.
Converting a plentyShop and marketplace guest order into a contact data record:
-
Go to CRM » Contacts.
-
Search for the contact that you want to edit by means of the filter settings. Note the explanations about the filters on the Searching for a contact page.
→ The data records that correspond to the search criteria entered are shown in the overview. -
Click in the line of the data record.
→ The data record opens. -
In the toolbar, click on Convert guest to contact (sync_alt).
→ A window appears and you need to confirm your decision. -
If you have worked in compliance with GDPR, click on Convert.
→ The data record is converted into a contact data record and automatically obtains the next free contact ID. In the History area of the contact data record, the entry Converted by as well as the name of the person who converted the data record are added.
|
plentyShop guest orders and marketplace guest orders
plentyShop guest orders get the symbol done in the overview’s Guest column, but no contact ID. Marketplace guest orders get the symbol done in the overview’s Guest column and in addition a contact ID. Notes about converting a guest order into a contact data record
|
2.8. Converting a guest order into a regular contact data record
In general, you can recognise a guest order by the symbol done in the Guest column in the overview. If you open the data record of a guest order, you can see in the side navigation on the left in addition the symbol badge and in brackets behind the name the word Guest
In order to be able to work GDPR-compliant, no contact data record is created for guest orders that are coming into your system via the plentyShop.
Guest orders coming into your system via a marketplace receive a contact ID. Proceed as described below to convert a marketplace guest order into a regular contact data record.
Converting a guest order into a regular contact data record:
-
Go to CRM » Contacts.
-
Search for the contact by means of the filter settings. Note the explanations about the filters on the Searching for a contact page.
→ The contacts that correspond to the search criteria entered are displayed. -
Click in the line of the contact to open the data record.
-
Click on Options on the left side.
→ In the Options area, you can the entry Access, guest with the value 1. 1 means that it’s a guest. -
In the line Access, guest, click on close to remove the option.
-
Save (save) the settings.
→ The guest has been converted into a contact data record. The symbol done is removed from the Guest column in the overview.
Note: If you cannot see the change immediately, it might be necessary to reload the CRM » Contacts menu.
warning Send an email to the contact and inform them that the guest order was converted into a regular contact data record. They can then create a password to be able to log into your plentyShop.
Further information about converting plentyShop and marketplace guest orders into regular contact data records can be found in the Converting a plentyShop and marketplace guest order into a contact data record chapter.
3. Editing fields directly in the Messenger overview
You can edit some fields directly in the Contact overview. This is called inline editing.
At the moment this feature is available for the following fields:
-
First name
-
Last name
-
Tags
-
Class
-
Client
-
Language
-
Owner
-
Rating
-
Type
Proceed as follows to edit the fields in the overview.
Edit fields directly in the Messenger overview:
-
Open the CRM » Contacts menu.
-
Search for the contact by means of the filter settings. Note the explanations about the filters on the Searching for a contact page.
-
Click on edit in the overview header next to the field you want to edit.
→ Above the header several icons are shown in the editing mode. Note Table 4.

| Symbol | Element | Explanation |
|---|---|---|
save |
Save |
Saves the changes. |
undo |
Undo |
Undoes the last change, unless this change has already been saved. |
redo |
Redo |
Restores the previously undone change. |
app_registration |
Activate the editing mode for all columns |
If you click on edit at a field that has editing mode available, you can click on app_registration to activate the editing mode for all columns. |
playlist_remove |
Deactivate the editing mode for all columns |
Click on playlist_remove to deactivate the editing mode for all columns and return to the overview. |
4. Details about the individual areas
All areas and their functions that are available in the contact data record are described in the following sub-chapters. By clicking on an entry in the following list, you will be directly forwarded to the corresponding sub-chapter where you can find further details.
|
How is data being loaded in the individual areas?
If you click in the contact data record on the left side in the navigation on the corresponding area that you want to edit, this area will shortly be highlighted in blue, the available data for this area will be loaded and you can directly start editing it. |
|
Would you like to expand or collapse certain areas by default?
You can determine for each MyView which areas should be expanded and collapsed by default. To do so, open a contact data record and click on Edit view () in the top right. Then, click on Edit (edit) in every section. In the *Setting*area you determine if the section is expanded or not. Afterwards, click on Close (close) and carry out the settings in every other area. Save the view by clicking on Save view (save). |
|
Users without admin rights: Missing rights for certain areas, buttons and functions in contact data record?
If a person without admin rights is not able to see certain areas and/or buttons and functions contained in the contact data record, a person with Admin access rights needs to activate further rights in the Setup » Account management » Roles menu. |
4.1. Contact overview / Guest overview
In this area, you see an overview of the contact or the guest. The data in this area are determined by default and cannot be adjusted.
If it’s a regular contact data record, the following details are visible:
-
Company
-
Private email address
-
You can directly send an email to the contact (email) or copy the email address to the clipboard (content_copy).
-
-
Type
-
Number of orders
-
Invoice address
If it’s a regular guest order, the following details are visible:
-
Company
-
Email address
-
You can directly send an email to the person (email) or copy the email address to the clipboard (content_copy).
-
-
Full name
-
Type
-
Number of orders
4.2. Contact details
When you open the contact data record, this area is opened by default and the available data is loaded. Table 5 lists all fields that are available in the Contact details area of the contact data record.
| Setting | Explanation |
|---|---|
Form of address |
Select a form of address from the drop-down list. This selection is optional. |
Title |
Enter the title of the contact, if required. |
First name / |
Enter the first name and last name of the contact. |
Type |
Select a type. The Customer, Sales representative, Supplier, Partners, Manufacturers and Interested party types can be selected by default. Create further types in the Setup » CRM » Types menu. |
Country of the type “Sales representative” |
This field is only visible if you selected the option Sales representative as type. |
Postcode area of the type “Sales representative” |
This field is only visible if you selected the option Sales representative as type. |
Class |
Select a class. Classes serve as an internal distinction between customers and determine, for example, which discount is granted. Classes are created in the Setup » CRM » Classes menu. |
Client |
Select the client from the drop-down list in order to assign the contact to this client. |
Language |
Select the language for the contact. If you have created a template in the CRM » EmailBuilder menu or the Setup » Client » [Select client] » Email » Templates menu in the same language that you have selected here, email templates are sent to the contact in this language. |
Customer number |
Enter the customer number of the contact, if required. Customer numbers can be assigned for internal purposes. They are not saved automatically. You decide whether and how you would like to use customer numbers. |
Debtor account |
Enter additional, separate customer numbers, if required. Generally, this number corresponds to the customer number or the debtor number in your financial accounting. It can be helpful to you or your tax accountant when further processing your receipts. This field can also be filled in automatically, if required. |
External number |
Enter an external number for the contact, if required. External numbers can be used for internal purposes and are not saved automatically. |
Owner |
Select the owner for the contact. Enter at least one letter of the owner name. Your system then suggests owners that have already been saved. If you do not want to select an owner, select the empty option. |
Sales representative that is assigned to the contact |
Here, you can assign a sales representative to the contact. Enter the first 3 characters of the name to see a suggestion list of all sales representatives that are already saved in your system. By clicking on the name or the ID of the sales representative, the sales representative is assigned to the contact. |
Rating |
Save a rating for the contact. This settings serves for internal purposes only. |
Date of birth |
Enter the date of birth of the contact in the format |
Job position |
Select a job position from the list. |
Newsletter |
Shows if the contact receives the newsletter (toggle_on). To deactivate the newsletter subscription for the contact, click on toggle_off. |
Contact not blocked |
By default, the contact is not blocked (toggle_on). This means that the contact is not blocked for the selected client and is able to log into your plentyShop. |
Allow invoice / Allow debit |
If you have already allowed the two payment methods Invoice and Debit in the class, you don’t need to carry out any settings here. Because: The settings in the class have priority over the settings in the contact data record. toggle_on = The contact can pay using this payment method, even if you do not offer this payment method in your plentyShop. Example: A contact who has bought in your online shop multiple times, should be allowed to buy items on invoice. Necessary settings: - The payment method Invoice or Debit has to be available in at least one shipping profile, i.e. the payment method may not be blocked in the shipping profile. - Activate the shipping profile for the items. Check the necessary settings that are listed here and activate (toggle_on) the payment method. This allows the contact to use the payment method. |
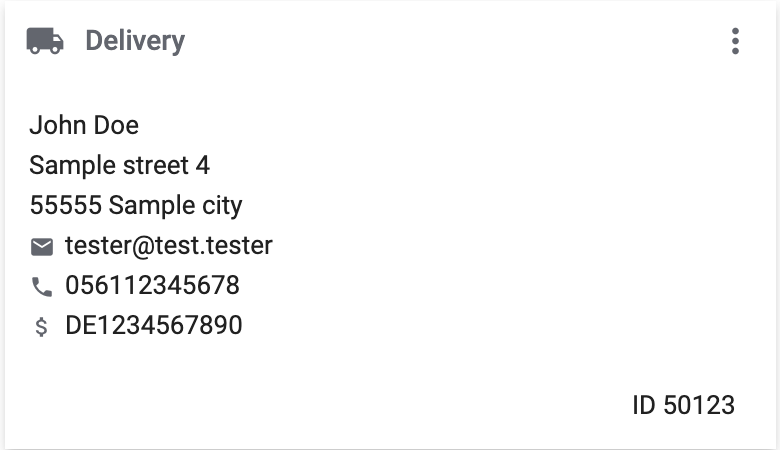
4.3. Primary address
Here, the contact’s primary addresses are shown if you selected Yes, primary for the invoice address and/or the delivery address in the Addresses area. When you open the contact data record, this area is opened by default and the available data is loaded.
Click on New address (add) to create a new address. Click on more_vert to edit (edit) or delete (delete) the address. Next to the email address or next to the phone number, click on content_copy to copy these values to the clipboard. In front of the phone number, click on Call number (phone) to open the default phone app on your computer and directly call the contact. In front of the email address, click on Send email (mail) to open the default email programme on your computer and directly write an email to the contact.
Click on the following link and note the explanations on the Creating a contact page if the delivery address is a DHL Packstation or DHL post office.
4.3.1. Logic when creating a new address
-
If the first address is created in a contact data record where no addresses exist so far, both the invoice address and the delivery address will be set to Yes, primary by default.
-
If an address already exists in the contact data record and another address is created
-
the invoice address will be set to No by default.
-
the delivery address will be set to Yes in case the contact already has a primary delivery address.
-
the delivery address will be set to Yes, primary in case the contact does not have a primary delivery address yet.
-
4.3.2. Using the address layout in the primary address
You can decide whether you want to use in the primary address an address layout that you created in the Setup » CRM » Address layout menu.
Using the address layout in the primary address:
-
Go to CRM » Contacts.
-
Search for the contact that you want to edit by means of the filter settings. Note the explanations about the filters on the Searching for a contact page.
→ The contacts that correspond to the search criteria entered are displayed. -
Click in the line of the contact to open the data record.
-
Click on Edit view () at the top right.
-
In the Primary address area on Edit (edit).
→ The Settings area opens. -
Activate the toggle button (toggle_on).
→ The text changes to Use address layout. -
From the drop-down list Layout type, select the option Always use the same address layout.
→ The drop-down list Address layouts becomes visible. -
From the list Address layouts, select an address layout that you created so that this address layout will be used in the primary address.
-
At the top, click on Save view (save).
|
Next to toggle_on Use address layout, click on edit to directly open the Setup » CRM » Address layout menu and create a new address layout, if needed. For more information about creating an address layout, refer to the to the Setting up the address layout for location-based order documents page. |
4.4. Documents
Here, you can upload and manage the documents and files saved for the contact. Create also folders to be able to keep an overview of all uploaded documents.
4.4.1. Creating a folder
The folder Main folder is visible once you have created a new folder (add). The main folder cannot be deleted. You can, however, create as many sub-folders as you like on further levels.
By clicking on more_vert in the line of the folder, you can delete the folder again after having confirmed your decision. In this case, the folder as well as all sub-folders and the files contained therein will be deleted.
4.4.2. Uploading documents
Click on Upload documents (file_upload) to select a file from your computer or use drag-and-drop to place the documents in the corresponding area. If the document has been uploaded successfully, the symbol of the file type, the name, the date and time of the last change as well as the file size are shown in the overview.
4.4.3. Searching for documents
Use the search in the Documents area to quickly and easily find all documents that were uploaded in the contact data record.
Note that the search is always limited to the currently selected folder. Carrying out a search across all folders that you created is not possible.
Searching for documents:
-
Go to CRM » Contacts.
-
Search for the contact by means of the filter settings. Note the explanations about the filters on the Searching for a contact page.
→ The contacts that correspond to the search criteria entered are displayed. -
Click in the line of the contact to open the data record.
-
Click on Documents on the left side.
-
Alternative 1: Click on Search (search) to get a list of all the contact’s documents.
-
Alternative 2: Click on filter_alt to narrow down the search results with filters.
→ In this area, the filters Name and Type are available.
-
4.4.4. Downloading a document
You can download the uploaded documents at any time. In the line of the document, click on more_vert and on file_download Download. A window opens and you can save the document at the desired location on your computer.
4.5. Properties
Here, you can assign properties to the contact. You can see all properties here that you have already created in the Setup » Settings » Properties » Configuration menu for the Contact area.
Click on edit_note Select properties to select (check_box) exactly those properties from the list that you really need.
Click on Add new property (add) and you will directly be forwarded to the Setup » Settings » Properties » Configuration menu. You can create additional properties there.
4.6. Tags
Here, you assign tags to the contact. You can later use filters in the search to quickly find all contacts with this tag.
The area Assigned tags shows all tags that have already been assigned to the contact. Click in the list to assign more available tags. The list shows all tags that you created in the Setup » Settings » Tags menu for the Contact area.
Click on Add new tag (add) and you will directly be forwarded to the Setup » Settings » Tags menu. You can create further tags there.
4.7. plentyShop login
Here you can manually change the password for your contact, send an email to the contact containing a link to change the password,unlock the login and open the My account area of the contact via the login URL.
Click on Reload (refresh) to reload the plentyShop login area.

4.7.1. Manually changing the password
Proceed as described below to manually change the password for the contact.
Manually changing the password:
-
Go to CRM » Contacts.
-
Search for the contact that you want to edit by means of the filter settings. Note the explanations about the filters on the Searching for a contact page.
→ The contacts that correspond to the search criteria entered are displayed. -
Click in the line of the contact to open the data record.
-
Click on plentyShop on the left side.
-
Click on edit Change password.
→ The New password window opens. -
Enter the new password.
-
Repeat the new password.
-
Click on Save.
4.7.2. Sending an email to reset the password
Send an email template to your contact containing a link to change the password in your plentyShop. It is required that you have linked an email template from the EmailBuilder containing the variable URL to change password with the event Send customer email to change password. Carry out this setting in the Setup » Client » Global » Email accounts menu in the Automatic despatch step.
For further information, refer to the EmailBuilder page.
Sending an email to reset the password:
-
Go to CRM » Contacts.
-
Search for the contact that you want to edit by means of the filter settings. Note the explanations about the filters on the Searching for a contact page.
→ The contacts that correspond to the search criteria entered are displayed. -
Click in the line of the contact to open the data record.
-
Click on plentyShop on the left side.
-
Click on forward_to_inbox Send email to reset password.
→ The contact receives an email to reset the password in his My account area. Note the information in the following box.
|
Save appropriate variable in template for automatic despatch
To ensure that the email to reset the password will be correctly sent to your customers, you have to save the appropriate variable in the template that you selected for the option Send customer email to change password in the Setup » Client » Global » Email accounts menu in the Automatic despatch step. |
4.7.3. Unlocking the contact’s login
If the contact enters the wrong password in your plentyShop 4 times in a row, the contact will be blocked for the login for 24 hours and receives the message in the plentyShop to contact the administrator. With one click, you unlock the contact’s login and your contact is able to log into the your plentyShop again as usual.
Unlocking the contact’s login:
-
Go to CRM » Contacts.
-
Search for the contact that you want to edit by means of the filter settings. Note the explanations about the filters on the Searching for a contact page.
→ The contacts that correspond to the search criteria entered are displayed. -
Click in the line of the contact to open the data record.
-
Click on plentyShop on the left side.
-
Click on Unlock login.
→ The contact’s login is unlocked and the contact is able to log into your plentyShop again.
4.8. Orders
Here, you can see all orders of the contact. When you open the contact data record, this area is opened by default and the available data is loaded. Click in the line of the order to open the order in the Orders » Edit order menu.
Select (check_box) one or multiple order types from the drop-down list Order type and click on Reload data (refresh) to only show these order types of the contact in the list. Click on Options (add) in the top right to create a new order, a new offer, a new subscription or a new multi-order. For further information about this context menu, refer to the Context menu in the overview chapter on the Searching for a contact page.
Click on Configure columns (settings) on the top right and decide which columns to show in the Orders area. Click on drag_indicator to change the order of the columns with drag-and-drop. The following columns are available:
-
Order ID
-
Main (order)
-
Order status
-
Order type
-
Invoice number
-
Payment method
-
Gross order value
-
Order date
-
Referrer ID
-
Referrer name
-
Client
-
Incoming payment
-
Outgoing items
-
Shipping date
Click on Refresh data (refresh) in the top right to refresh the Orders area.
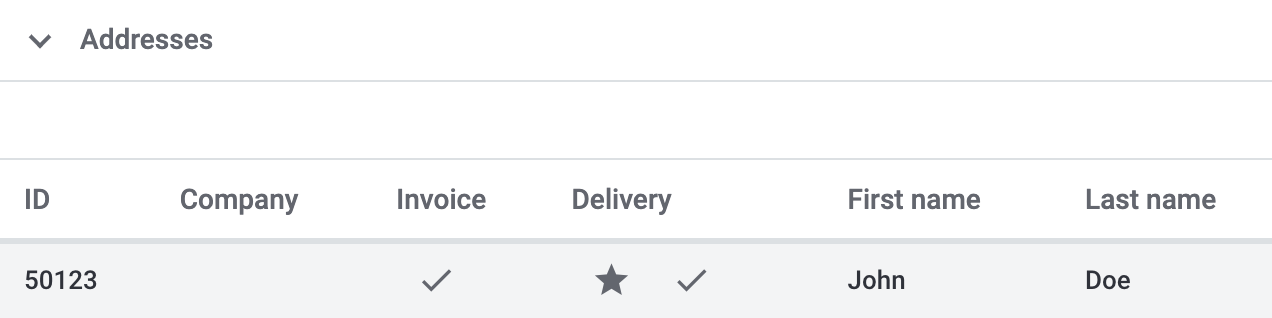
4.9. Addresses
Here, you can see the addresses that are saved for the contact. Note that only 25 address data records can be shown.
Click on Configure columns (settings) on the top right and decide which columns to show in the Addresses area. Click on drag_indicator to change the order of the columns with drag-and-drop. The following columns are available:
-
ID
-
Company
-
Invoice
-
Delivery
-
First name
-
Last name
-
Street
-
House number
-
Postcode
-
Town
-
Country
-
Phone
-
Next to the phone number, click on Call number (phone) to open the default phone app on your computer and directly call the contact.
-
-
Email
-
Next to the email address, click on Send email (mail) to open the default email programme on your computer and directly write an email to the contact.
-
Click on Refresh data (refresh) in the top right to refresh the Addresses area.
Click in the line of the address to open the address for further editing. Note Table 6.
Figure 4 shows as an example that the address is an invoice address (done) and the primary delivery address (star done).
Click on New address (add) to save a new address for the contact. Table 6 lists the available fields of the address.
Note: After saving, the address data record is given a consecutive ID that cannot be changed. The ID is, however, not consecutive for each contact, but for all address data records that you create in your system.
|
Not possible to edit addresses that are linked with orders
If the address is linked with an order, you cannot edit the address. You can, however, create a new address of course. |
| Setting | Explanation |
|---|---|
Toolbar |
|
Save |
Click on save to save the changes. |
Delete |
By clicking on delete, a window with a security question appears. You need to confirm your decision to delete the address. |
Reload |
Click on refresh to reload the data record. |
Derive new invoice address |
This function is only available if it is an existing address data record. |
Derive new delivery address |
This function is only available if it is an existing address data record. |
New address / Address + ID |
|
Invoice address |
Which type does the new address have? Select one of the following options:
When selecting the option Yes, primary, the invoice address will then be shown in the Primary address area in the overview as attach_money Invoice. Note: If the address is an invoice address (Yes) or a primary invoice address (Yes, primary), but not a delivery address (No), all EU countries are available in the drop-down list Country. Displaying all EU countries and not only the countries that are activated in the system is required due to the Geoblocking regulation. |
Delivery address |
Which type does the new address have? Select one of the following options:
When selecting the option Yes, primary, the delivery address will then be shown in the Primary address area in the overview as local_shipping Delivery. Tip: Click on the following link and note the explanations on the Creating a contact page if the delivery address is a DHL Packstation or DHL post office. |
Company (Name 1) |
What’s the name of the company? |
Form of address |
Select a form of address from the drop-down list. |
First name (Name 2) |
What’s the first name of the contact? |
Last name (Name 3) |
What’s the last name of the contact? |
Additional information (Name 4) |
Do you want to enter any additional information for the contact? Enter the information, e.g. c/ o Mr. John Doe. |
Address 1 (Street) |
Enter the street and/or house number. |
Address 3 (Additional address information) |
Do you want to enter an additional address information? Enter the information, e.g. Apartment 12a. |
Address 4 (Free) |
You can enter whatever you want. |
Postcode |
Enter the postcode, if available, and the town of the contact. Town is a mandatory field. |
Country |
Select the values from the drop-down list. |
Address options |
|
Email address of the contact. |
|
Phone |
Telephone number of the contact. |
More |
|
VAT number |
What’s the contact’s VAT number? |
External address ID |
Did you save an external address ID? |
External customer ID |
Did you save an external customer ID? |
Entry certificate (Gelangensbestätigung) |
An entry certificate is related to the VAT exemption in the context of intra-community supplies. In order to be exempted from paying the value-added tax when sending items in another EU country, sellers have to prove by means of the entry certificate that the items from Germany arrived safely in another participating EU member state. |
Post number |
What’s the contact’s DHL post number? |
Personal number |
Is a personal number available for the contact? |
Age restriction |
Is there an age rating for this contact? |
Date of birth |
Enter the contact’s date of birth in the format |
Title |
What’s the title of the contact? |
Contact person |
Do you want to enter an additional contact person? |
Buyer reference |
Is the recipient of the electronic invoice a public authority of the federal administration? Then, the buyer reference must always be transferred as a mandatory input. You find further information about buyer reference on the website of the federal ministry of the interior and community. |
Deleting an address
Click in the line of the address to open the address data record. You can delete it by clicking on Delete (delete) and after confirming the security question.
|
Not possible to delete addresses that are linked with orders
If the address is linked with an order, you cannot delete the address. An error message appears. However, the relation between address and contact is removed in the background. |
4.10. History
When creating the contact data record, the history of a contact is saved. The history includes e.g. how long the contact has been registered and when they have been logged into your plentyShop for the last time and when the last order was generated. This data is automatically updated and cannot be changed.
Looking at the history:
-
Go to CRM » Contacts.
-
Search for the contact that you want to edit by means of the filter settings. Note the explanations about the filters on the Searching for a contact page.
→ The contacts that correspond to the search criteria entered are displayed. -
Click in the line of the contact to open the data record.
-
Click on History on the left side.
-
Note the explanations about the history in Table 7.
| Setting | Explanation |
|---|---|
Registered since |
Date and time when the contact has first registered. |
Updated |
Date and time when the data record of the contact has been updated for the last time. |
Access type |
Account via which the contact has registered. |
Last order |
Date and time when the last order was placed. If no order has been placed, No data is displayed in this field. |
Last login |
Date and time when the contact was logged in for the last time. If the contact was not logged in, No data is displayed in this field. |
4.11. Bank details
Here, you can see the contact’s bank details. In total, up to 50 bank data records are shown in this area.
When the contact has more than 2 bank data records, the data is displayed in a table. With a click on Column Configuration (settings) you determine the order of displayed columns and show or hide designated columns.
Click on more_vert to edit or delete the bank details. Click on Reload (refresh) to reload the Bank details area. By clicking on Add new bank details (add), you will be forwarded to a new bank data record and create a new one there.
Note: After saving, the bank data record is given a consecutive ID that cannot be changed. The ID is, however, not consecutive for each contact, but for all bank data records that you create in your system.
Table 8 lists the fields available in the bank data record.
| Setting | Explanation |
|---|---|
IBAN, BIC, Account holder, Account number, Bank code |
What are the contact’s bank details? |
Bank name, street, postcode and town of the bank |
What’s the name and address of the bank? |
Country of the bank |
Select the country from the drop-down list. |
SEPA direct debit mandate |
By default, the SEPA direct debit mandate is not activated (toggle_off). Therefore, activate the button (toggle_on) as soon as the contact has signed the SEPA direct debit mandate. |
SEPA direct debit mandate granted on |
Only visible when the option SEPA direct debit mandate has been activated (toggle_on). |
Type of mandate |
Only visible when the option SEPA direct debit mandate has been activated (toggle_on). |
Payment frequency |
Only visible when the option SEPA direct debit mandate has been activated (toggle_on). |
4.12. Company
Here, you can see the company assigned to the contact or you can assign a company to the contact.
4.12.1. No company has been linked yet
If no company has been assigned to the contact, you have 2 options:
-
In the search field Search company, enter the name of a company that already exists and click afterwards on Create link (domain_add) to assign the selected company to the contact (see Figure 5).

-
Click on Add new company (add) to create a new company that will then be automatically linked with the contact.
For further information about how to create company data records, refer to the Companies page.
4.12.2. Company has already been linked
4.12.2.1. Editing the company
Click in the line of the company to open the company data record in the CRM » Companies menu and edit the company details.
4.12.2.2. Deleting the relation to the company
In the line of the company, click on more_vert and then on delete Delete relation to company to remove the relation between contact and company.
4.12.2.3. Linking a new company
By clicking on Add new company (add), a new window opens in which you add a new company. After you have filled all the fields in the new company data record and saved the settings, the contact will be automatically assigned to the company.
Important: The relation to the previously saved company will be removed.
After you have reloaded the contact data record, the new company will be visible in the overview.
Important: The relation to the previously saved company will be removed.
4.12.3. Configuring the columns in the company overview
Click on Configure columns (settings) on the top right and decide which columns to show in the Company area. Click on drag_indicator to change the order of the columns with drag-and-drop. The following columns are available:
-
ID
-
Name
-
VAT number
-
Valuta in days
-
Early payment discount in days
-
Percentage for early payment discount
-
Payment due date in days
-
Delivery time in days
-
Minimum order value
-
Currency
-
Owner
-
Procedure
4.13. Payment overview
Here, you can see all the revenues of the contact, for example the total sum of the invoice amounts of all invoices that the contact has already paid and the sum that the contact still needs to pay. Proceed as follows to have the payment overview of the contact displayed.
Displaying the payment overview:
-
Go to CRM » Contacts.
-
Search for the contact that you want to edit by means of the filter settings. Note the explanations about the filters on the Searching for a contact page.
→ The contacts that correspond to the search criteria entered are displayed. -
Click in the line of the contact to open the data record.
-
On the left side, click on Payment overview.
→ All data that is available for the account of the contact is displayed.
The revenues of the contact are displayed in detail above the table. Apart from the balance, you can also find information about invoices and credit notes. Note Table 9. You can also go directly to the AR list by clicking on Open AR list (open_in_new).
| Setting | Explanation |
|---|---|
Balance |
Shows the customer’s payment overview. |
Credit note amounts ÷ invoice amounts |
Ratio of credit notes to the invoices. |
Paid |
Total sum of the invoice amounts of all invoices that the contact has already paid. |
Outstanding |
Total sum of the invoice amounts of all orders that the contact still has to pay. |
Credit notes paid |
Total sum of credit notes that you have already paid to the contact. |
Credit notes outstanding |
Total sum of credit notes that you still have to pay to the contact. |
Further down in the table of the Payment overview you find orders with the type Order, Return, Credit note, Warranty, Repair and Advance order of the contact. The table rows Payment status, Outstanding and Payment due date each refer to the individual order type.
If a payment for the order type Order is listed in the Outstanding column, the contact still has to pay the amount to you. If a payment for the order type Credit note is listed in the Outstanding column, you still have to pay this amount to the contact.
This table is customisable. This means that you can decide which information is displayed in the table columns. To do so, proceed as follows:
Configuring columns:
-
Click in the Payment overview area on Configure columns (settings).
→ The Column configuration window will open. -
Select which columns you want to be displayed. Note Table 10.
-
Move (drag_indicator) the columns so they are displayed in the order you need them in.
-
Click on Confirm to save your settings.
Once you have customized the table, this selection will be saved. A list of the available columns can be found in Table 10.
| Setting | Explanation |
|---|---|
Payment status colour |
Depicts the payment status by colours: |
Order type |
Type of the order, for example order or credit note. |
Order ID |
ID of the order. Click on the ID to open the detailed view of the order. |
Order date |
Date when the order was created. |
Order status |
Status of the order, for example Waiting for payment. |
Payment method |
Payment method of the order. |
Document no. |
Document number, e.g. invoice number, of the current main document of the order. |
Payment due date |
Date on which payment is due for the order To have a payment due date displayed here, the payment terms of the corresponding order have to be filled in and an invoice has to be created. |
Gross order value |
Gross value of the order. |
Outstanding |
Remaining amount that is due before the order is completely paid for. |
Payment status |
Shows the payment status of the order. |
Filtering data
You can use various filters to retrieve specific information about your contact’s payment overview. Set these filters (tune) in the payment overview of a contact and click on search. You can combine several filters. The filter settings are explained in the table below.
| Setting | Explanation |
|---|---|
Order ID |
Search for a specific order by entering an order ID. |
Order type |
Narrow down the orders by searching for a specific order type. |
Order date from and Order date to |
You can set a time range, for example to have only the data of the current month displayed. To do so, select the dates from the calendar (today) to narrow down the time range or enter the dates in the format |
Status from and Status to |
Use this filter to search for orders with a specific order status or in a status range. Set both filters to the same status to search for orders with this order status. Alternatively, you can enter different order statuses to search for orders in this selected status range. |
Document no. |
Search for a specific order by entering a document number. |
Payment status |
Search for all orders in a specific payment status. For example, you can search for all orders which are only partially paid. The payment statuses unpaid, prepaid, partly paid, paid and overpaid are available. |
RESET |
Resets the selected filter criteria. |
SEARCH |
Starts the search. The account data found is listed in the overview. |
4.14. Contact notes
The Contact notes area serves only for internal communication purposes. All notes that you create here are thus only internally visible and cannot be seen by your contacts.
In the messenger the group Contact notes is available to you that gives you access to all notes saved to the contact data records. For further information about the Messenger groups, refer to this user manual page.
4.15. Messenger
In the Messenger area, you can see all messages that belong to the contact. You can whisper messages so that they are only internally visible and not for your customers. You can send messages and you can capture minutes for the message and save these minutes as free minutes or paid minutes.
Click on the already created message to open the conversation in the messenger. You can carry out further settings there. For further information, refer to the Messenger page.
4.15.1. Whispering a message
Proceed as described below to whisper a message.
Whispering a message:
-
Go to CRM » Contacts.
-
Search for the contact that you want to edit by means of the filter settings. Note the explanations about the filters on the Searching for a contact page.
→ The contacts that correspond to the search criteria entered are displayed. -
Click in the line of the contact to open the data record.
-
On the left side, click on Messenger.
-
Click on New message (add).
→ The messenger opens. -
Select one ore multiple recipients.
Note: The ID of the contact is already prefilled as recipient. This way, the email will be sent to the email address that is saved in the invoice address. -
Enter more recipients, if needed.
-
Enter a subject.
-
Enter the text.
→ Double-click on the word to use formatting options for your message. -
Click on attach_file Add attachments to add a file, if needed.
-
Click on visibility_off WHISPER to whisper the message.
4.15.2. Sending a message
Proceed as described below to send a message.
Sending a message:
-
Go to CRM » Contacts.
-
Search for the contact that you want to edit by means of the filter settings. Note the explanations about the filters on the Searching for a contact page.
→ The contacts that correspond to the search criteria entered are displayed. -
Click in the line of the contact to open the data record.
-
On the left side, click on Messenger.
-
Click on New message (add).
→ The messenger opens. -
Select one ore multiple recipients.
Note: The ID of the contact is already prefilled as recipient. This way, the email will be sent to the email address that is saved in the invoice address. -
Enter more recipients, if needed.
-
Enter a subject.
-
Enter the text.
→ Double-click on the word to use formatting options for your message. -
Click on attach_file Add attachments to add a file, if needed.
-
Click on visibility_off Whisper mode to switch off the whisper mode.
Note: The button changes from visibility_off WHISPER to forward_to_inbox SEND. -
Click on forward_to_inbox SEND to send the message.
4.15.3. Capturing minutes for the message
Proceed as described below to capture minutes for the message. You can then decide whether the minutes are free minutes or paid minutes.
Capturing minutes is only possible for whispered messages.
Capturing minutes for the message:
-
Go to CRM » Contacts.
-
Search for the contact that you want to edit by means of the filter settings. Note the explanations about the filters on the Searching for a contact page.
→ The contacts that correspond to the search criteria entered are displayed. -
Click in the line of the contact to open the data record.
-
On the left side, click on Messenger.
-
Click on New message (add).
→ The messenger opens. -
Select one ore multiple recipients.
Note: The ID of the contact is already prefilled as recipient. This way, the email will be sent to the email address that is saved in the invoice address. -
Enter more recipients, if needed.
-
Enter a subject.
-
Enter the text.
→ Double-click on the word to use formatting options for your message. -
Click on attach_file Add attachments to add a file, if needed.
-
Click on more_vert and then activate (toggle_on) the option Capture minutes.
Note: The button changes to visibility_off CAPTURE MINUTES. -
Click on visibility_off CAPTURE MINUTES to capture the minutes for the message.
→ The Capture minutes window opens. -
Adjust the minutes, if necessary.
-
Select (radio_button_checked) whether the minutes are Free minutes or Paid minutes.
-
Assign tags to the message, if needed.
-
Click on CAPTURE AND SAVE.
4.16. Options
Here, you can see all options that are saved for the contact. When you open the contact data record, this area is opened by default and the available data is loaded.
Click on Add option (add) to add more options. To do so, select the appropriate option from the context menus and sub-menus. Options that are already in use are disabled and cannot be used a second time. Click on delete to directly delete the option.
Adding contact options:
-
Go to CRM » Contacts.
-
Search for the contact that you want to edit by means of the filter settings. Note the explanations about the filters on the Searching for a contact page.
→ The contacts that correspond to the search criteria entered are displayed. -
Click in the line of the contact to open the data record.
-
Click on Options on the left side.
→ If you have already entered the private email address and private telephone number of the contact when you created the contact data record, these values will be shown here. -
Click on Add option (add) to add a new contact option.
-
Select the option that you want to add from the context menus and sub-menus.
→ Options that are already in use are disabled and cannot be used a second time. -
Add more options following this procedure.
-
In the toolbar on the top, click on Save (save).
|
Direct link for default phone app and default email programme
Next to the phone number, click on Call number (phone) to open the default phone app on your computer and directly call the contact. Next to the email address, click on Send email (mail) to open the default email programme on your computer and directly write an email to the contact. |
Deleting an option
Simply delete those options that you do no longer need by clicking on delete.
Note: warning When clicking on delete, the option will be directly deleted without another security question.
Would you like to know which types and sub-types are available in the options? Simply expand the following area (expand_more).
| Type | Sub-type |
|---|---|
Phone |
Private |
Phone |
Work |
Phone |
Mobile private |
Phone |
Mobile work |
Private |
|
Work |
|
PayPal |
|
Fax |
Private |
Fax |
Work |
Web page |
Private |
Web page |
Work |
Marketplace |
eBay |
Marketplace |
Amazon |
Identification number |
Klarna |
Identification number |
DHL |
Payment |
PayPal |
Payment |
Klarna |
Payment |
Standard |
Payment |
Mollie |
User name |
Private |
User name |
Work |
User name |
Forum |
Group |
Forum |
Access |
Guest |
Access |
Marketplace partner |
Addition |
Contact person |
Addition |
Follow-up date |
Salutation |
Private |
Salutation |
Work |
4.17. Quick access: Addresses
In the place Addresses area, you can see all addresses that you opened in the Addresses area for this contact. Moreover, click on place New to easily and quickly create a new address for the contact.
| This area is only visible when you either added the area Addresses or Primary address to your view. |
4.18. Quick access: Bank details
In the Bank details area, you can see all bank data records that you opened in the Bank details area for this contact. Moreover, click on credit_card New to easily and quickly create a new bank data record for this contact.
| This area is only visible when added the area Bank details to your view. |
5. Saving changes in the contact data record
When you make changes to the contact data record, an asterisk appears in the left navigation bar next to the contact’s name and ID. The asterisk indicates unsaved changes.
If you try to close a contact data record with unsaved changes, a window will appear. It informs you of the unsaved changes. You decide how to proceed in this case.
The asterisk disappears when you save your changes or when you reset the settings to their original values.
| Option | Explanation |
|---|---|
Do not save |
The changes will be discarded and the contact data record will close. If you open the contact data record again, you will see that the settings were reset to their original state. |
Cancel |
Only the window will close. The contact data record remains open. Your changes are still pending, i.e. they have not been saved yet. You can continue editing the contact data record. |
Save |
The changes will be saved and the contact data record will close. If you open the contact data record again, you will see that the settings were changed. This action is the same as the save button further up in the toolbar. The save button is disabled as long as the changes are being saved. |
6. Deleting a contact
You can delete individual contact data records either from the overview or in the detail view of the contact data record. Also all addresses that are saved for the contact will be deleted when they are not linked to an order. A contact data record can only be deleted when it is not linked with an order or a ticket.
|
When linked to an order or ticket: anonymise data record
When the contact is linked with an order or a ticket or when the contact is a supplier who is linked with a reorder or redistribution, it is not possible to delete the data record. |
6.1. Deleting the contact in the overview
Proceed as follows to delete a contact in the overview.
Deleting the contact in the overview:
-
Go to CRM » Contacts.
-
Search for the contact that you want to edit by means of the filter settings. Note the explanations about the filters on the Searching for a contact page.
→ The contacts that correspond to the search criteria entered are displayed. -
In the line of the contact that you want to delete, click on more_vert.
→ A list with further options appears. -
Click on delete Delete contact.
→ A window appears and you need to confirm your decision. -
Click on Yes.
→ The contact is deleted and removed from the overview.
6.2. Deleting the contact in the detail view
Proceed as follows to delete a contact in the detail view.
Deleting the contact in the detail view:
-
Go to CRM » Contacts.
-
Search for the contact that you want to edit by means of the filter settings. Note the explanations about the filters on the Searching for a contact page.
→ The contacts that correspond to the search criteria entered are displayed. -
Click in the line of the contact to open the data record.
→ The detail view of the contact opens. -
In the toolbar on the top, click on more_vert.
-
Click on delete Delete.
→ A window appears and you need to confirm your decision. -
Click on Yes.
→ The contact is deleted and removed from the overview.
|
Delete addresses without orders, contacts, POS and warehouses (guest accounts)
Go to Setup » Settings » Hosting » Cleansing and determine the time period after which unused addresses are automatically deleted from your system. Unused addresses are those addresses that do not have any relation to a contact, an order, a POS and a warehouse. For further information about deleting unused data records, refer to the Data cleansing page of the manual. |
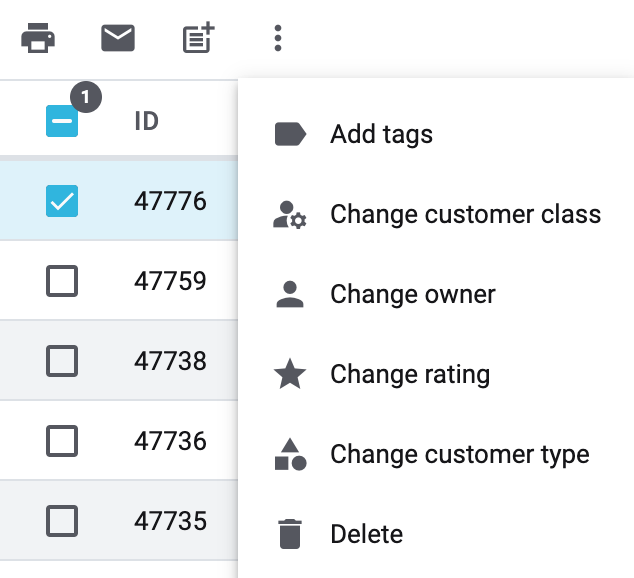
7. Carrying out the group function
Instead of editing every contact individually, you can save time and edit multiple contacts at the same time by using the group function. Once you selected (check_box) at least one contact in the overview, the different buttons become visible. [table-contact-group-functions] lists the elements from the group functions as well as their explanations.
Element |
Symbol |
Explanation |
Download address label |
Downloads the address label selected from the drop-down list for all activated (check_box) contacts in the overview. |
|
Send email template |
Sends the template selected from the drop-down list to all activated (check_box) contacts. Important: The email template that you send via the group function has no relation to an order. Therefore, make sure that the email template does not contain any order-related variables. Tip: You can find a detailed description on how to send email templates using the group function in this chapter. |
|
Add to newsletter folder |
post_add |
Copies the email addresses of the activated (check_box) contacts to the email folder selected from the drop-down list. The email addresses are listed in the Setup » CRM » Newsletter » PlentyONE » Email folder menu. |
Add tags |
label |
Adds the selected tags to all activated (check_box) contacts. The list shows all tags that you created in the Setup » Settings » Tags menu for the Contact area. |
Change class |
manage_accounts |
Changes the current class of all activated (check_box) contacts to the selected class. The lists shows all classes that you created. |
Change language |
translate |
Changes the current language of all activated (check_box) contacts to the selected language. |
Change owner |
person |
Changes the current owner of all activated (check_box) contacts to the selected owner. |
Change rating |
star |
Changes the current rating of all activated (check_box) contacts to the selected rating. |
Change customer type |
category |
Changes the current customer type of all activated (check_box) contacts to the selected customer type. |
Delete |
delete |
Deletes the activated (check_box) contact data records. |
7.1. Downloading address labels of multiple contacts
Proceed as described below to download the address label for multiple contacts using the group function.
Downloading address labels of multiple contacts:
-
Go to CRM » Contacts.
-
Search for the contacts by means of the filter settings. Note the explanations about the filters on the Searching for a contact page.
→ The contacts that correspond to the search criteria entered are displayed. -
Select (check_box) the contacts whose address labels you want to download.
-
In the toolbar on the top, click on Download address label (print).
→ The Download address label window opens. -
Select the address label from the drop-down list.
-
Click on print Download address label.
→ The address labels of the selected contacts will be downloaded.
→ Save the label on your computer and print it afterwards.
7.2. Sending an email template to multiple contacts
Proceed as follows to send an email template to several contacts via group function.
Sending an email template to multiple contacts:
-
Go to CRM » Contacts.
-
Search for the contacts by means of the filter settings. Note the explanations about the filters on the Searching for a contact page.
→ The contacts that correspond to the search criteria entered are displayed. -
Select (check_box) the contacts that you want to send an email template to.
-
Click in the toolbar on the top on Send email template (email).
→ The Email service window opens. -
In the Recipient field you see all chosen chosen (check_box) contacts that will receive the email templates in the overview.
-
Use filter if necessary. Note the explanations about the filters in the Filter options in the email service chapter.
-
Select the email template.
-
Click on send SEND.
→ The email template is sent to the selected contacts.
7.3. Adding multiple email addresses to a newsletter folder
Proceed as described below to add the email addresses of multiple contacts to a newsletter folder using the group function.
Adding multiple email addresses to a newsletter folder:
-
Go to CRM » Contacts.
-
Search for the contacts by means of the filter settings. Note the explanations about the filters on the Searching for a contact page.
→ The contacts that correspond to the search criteria entered are displayed. -
Select (check_box) the contacts whose email addresses you want to add to a certain newsletter folder.
-
In the toolbar, click on Add to newsletter folder (post_add).
→ The Add to newsletter folder window opens. -
Select the newsletter folder from the drop-down list.
-
Click on post_add Add to newsletter folder.
→ The email addresses of the selected contacts are added to the newsletter folder.
7.4. Adding tags to multiple contacts
Proceed as described below to assign tags to multiple contact data records.
Adding tags to multiple contacts:
-
Go to CRM » Contacts.
-
Search for the contacts by means of the filter settings. Note the explanations about the filters on the Searching for a contact page.
→ The contacts that correspond to the search criteria entered are displayed. -
Select (check_box) the contacts which you want to assign one or multiple tags to.
-
In the toolbar, click on more_vert.
-
Click on label Add tags.
→ The Add tags window opens. -
Select one or multiple tags from the list.
-
Click on label Add tags.
→ The tags are added to the selected contacts.
7.5. Changing the class for multiple contacts
Proceed as described below to change the class for multiple contact data records.
Changing the class for multiple contacts:
-
Go to CRM » Contacts.
-
Search for the contacts by means of the filter settings. Note the explanations about the filters on the Searching for a contact page.
→ The contacts that correspond to the search criteria entered are displayed. -
Select (check_box) the contacts that you want to change the class for.
-
In the toolbar, click on more_vert.
-
Click on manage_accounts Change class.
→ The Change class window opens. -
Select the class from the list.
-
Click on manage_accounts Change class.
→ The class is changed for the selected contacts.
7.6. Changing the language for multiple contacts
Proceed as described below to change the language for multiple contact data records.
Changing the language for multiple contacts:
-
Go to CRM » Contacts.
-
Search for the contacts by means of the filter settings. Note the explanations about the filters on the Searching for a contact page.
→ The contacts that correspond to the search criteria entered are displayed. -
Select (check_box) the contacts that you want to change the language for.
-
In the toolbar, click on more_vert.
-
Click on translate Change language.
→ The Change language window opens. -
Select a language from the list.
-
Click on translate Change language.
→ The language is changed for the selected contacts.
7.7. Changing the owner for multiple contacts
Proceed as described below to change the owner for multiple contact data records.
Changing the owner for multiple contacts:
-
Go to CRM » Contacts.
-
Search for the contacts by means of the filter settings. Note the explanations about the filters on the Searching for a contact page.
→ The contacts that correspond to the search criteria entered are displayed. -
Select (check_box) the contacts that you want to change the owner for.
-
In the toolbar, click on more_vert.
-
Click on person Change owner.
→ The Change owner window opens. -
Select the owner from the list.
-
Click on person Change owner.
→ The owner is changed for the selected contacts.
7.8. Changing the rating for multiple contacts
Proceed as described below to change the rating for multiple contact data records.
Changing the rating for multiple contacts:
-
Go to CRM » Contacts.
-
Search for the contacts by means of the filter settings. Note the explanations about the filters on the Searching for a contact page.
→ The contacts that correspond to the search criteria entered are displayed. -
Select (check_box) the contacts that you want to change the rating for.
-
In the toolbar, click on more_vert.
-
Click on star Change rating.
→ The Change rating window opens. -
Select the rating from the list.
-
Click on star Change rating.
→ The rating is changed for the selected contacts.
7.9. Changing the customer type for multiple contacts
Proceed as described below to change the customer type for multiple contact data records.
Changing the customer type for multiple contacts:
-
Go to CRM » Contacts.
-
Search for the contacts by means of the filter settings. Note the explanations about the filters on the Searching for a contact page.
→ The contacts that correspond to the search criteria entered are displayed. -
Select (check_box) the contacts that you want to change the customer type for.
-
In the toolbar, click on more_vert.
-
Click on category Change customer type.
→ The Change customer type window opens. -
Select the customer type from the list.
-
Click on category Change customer type.
→ The customer type is changed for the selected contacts.
7.10. Deleting multiple contact data records
Proceed as described below to delete multiple contact data records.
Deleting multiple contact data records:
-
Go to CRM » Contacts.
-
Search for the contacts by means of the filter settings. Note the explanations about the filters on the Searching for a contact page.
→ The contacts that correspond to the search criteria entered are displayed. -
Select (check_box) the contacts that you want to delete.
-
In the toolbar at the top, click on more_vert and then on Delete (delete).
→ A security question will follow. -
Confirm your decision by clicking on delete Delete.
8. Duplicate check for contact data records with identical email address
When creating new and updating existing contact data records, the email address is checked in order to avoid duplicate entries in the system.
The logic works in the following way:
-
When creating a new contact, the system searches for an existing regular contact with identical private email address. If a contact is found, this contact is updated with the new data. If no contact is found, a new regular contact is created.
-
When updating the private email address of an existing regular contact, the system searches if another regular contact with the same private email address exists. If this is the case, the private email address of the current contact is not updated. All other data, however, is updated.
9. Showing the change history for contact data
Via the change history you can track which user has changed data of a contact data record at which time in your system. Furthermore, it is displayed if the contact have made changes in the My account area of your online shop.
Showing the change history for contact data:
-
Go to Data » CRM Change History.
-
Click on tune.
-
Select an option from the drop-down list Reference type.
-
Enter the reference ID, e.g. the ID of the contact.
-
Click on search.
→ A list of changes with the old and new values, the change date as well as the name and ID of the user who did the changes appears.
For further information, refer to the CRM Change history chapter on the Tracking changes page.
10. Checking the VAT number
The value added tax identification number (VAT number) is an exclusive identification number and serves to designate VAT registered individuals. Within the EU, tax offices need this number for VAT accounting purposes. The VAT check via the European Commission allows you to verify German and international VAT numbers. These checks can be carried out daily from 5:00 a.m. to 11 p.m. CET.
Checking the VAT number in the PlentyONE back end is not possible. You can, however, download a plugin in the plentyMarketplace, e.g. the plugin VAT ID Check to carry out the VAT ID check.
10.1. Checking the VAT number in the plentyShop
The VAT number is automatically checked in the plentyShop during the order process. If an invalid VAT number was entered, the customer is only able to complete their order once a valid VAT number has been entered or once the entry has been deleted.
10.2. Exporting check data
You can export a list of all the check data or the data for the current month. For further information about exporting the VAT number check data, refer to the Exporting data page.
11. Exporting, importing and updating contact data
Go to Data » Elastic export to export the data of your contacts. To do so, it is required to install and deploy the plugins FormatDesigner and Elastic Export. Both plugins are available in the plentyMarketplace.
Create the format for the export in the Data » FormatDesigner menu. Create a new export in the Data » Elastic export menu. Select the format that you have just created via the FormatDesigner from the drop-down list. Afterwards, export the data to a CSV file.
Various filter options are available for the export. You can export, for example, only contacts that you have rated with 3 stars or only contacts that are assigned to a certain owner.
Import or update the data of your contacts including address options, contact options and account data via the import tool. To do so, use the import type Contacts, companies and addresses. For further information, refer to the Using the import tool page of the manual.