The Import tool
If you have data saved locally on your device or online that you would like to use in your PlentyONE system, then you can have the import tool take care of this for you. The import tool allows you import data into your system once as well as in regular intervals. You can access the import tool by navigating to Data » Import.
|
Old import UI
The user interface of the import tool has been completely overhauled in order to provide you with a more accessible user experience. All of your existing imports and all features of the old import UI are present in the new UI. The old import UI is accessible under Data » Import (Deprecated) until an End-of-Life date is announced for it. It is explained in detail here. |
1. First steps
The import tool is exceedingly feature-rich and complex. In order to enable you to import your data into your system as quickly as possible this first chapter will focus on explaining how to set up your first import. Chapter 2 will then delve into the particulars of the import tool’s user interface.
1.1. Creating an import
Here is how you create a new import:
Creating an import:
-
Go to Data » Import.
→ The import overview opens. -
Click on Create import(add).
→ The import creation assistant is opened. -
Carry out the settings. The creation of a new import is a 3-step-process. Each step is explained in detail in the following sub-chapters. You may use the stepper in the header section of the assistant to switch to previous steps in the process at any point.
-
Click CREATE IMPORT.
→ The import is created.
1.1.1. Step 1: Connect file
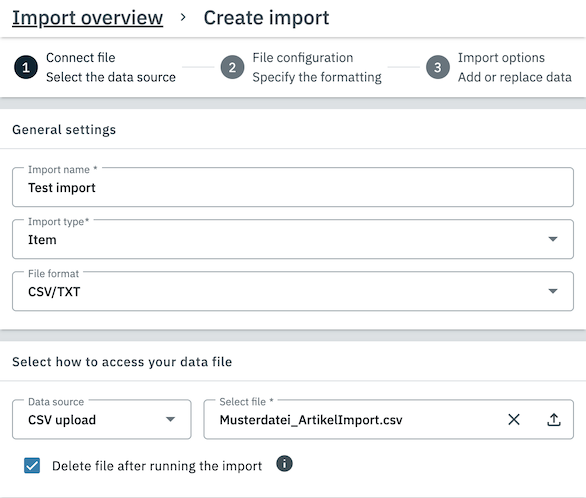
In Step 1 of the import creation process you need to provide some basic information about the import you want to create as well as a means by which your import file can be accessed. For further information on the different options, refer to the following table:
| Setting | Explanation | ||||||||
|---|---|---|---|---|---|---|---|---|---|
General settings |
|||||||||
Import name |
The name that will be displayed for the import in your system. It is recommended that you choose a name that clearly identifies the purpose of the import. |
||||||||
Import type |
Choose the import type that matches the type of data contained in your file. Here is a selection of the supported import types:
This list may not contain all available data categories. A more comprehensive list can be found here. |
||||||||
File format |
Select the file type of your file. |
||||||||
Select how to access your data file |
|||||||||
Data source |
Select the method by which your file can be accessed by the system. Depending on the selected option, different settings may be shown. The PlentyONE File Manager
Every PlentyONE system comes with a dedicated File Manager that allows you to store files online in your system. Additionally, all files stored in a File Manager receive a File URL which can be used to make each file available to other users and applications online. You can manage the File Manager of your system in the Shop » File Manager menu. WARNING: Usage of the File Manager may incur additional costs. The exact terms of use of the File Manager are outlined in your contract with PlentyONE.
|
||||||||
Click NEXT once you are satisfied with your settings in order to proceed to the next step.
1.1.2. Step 2: File configuration
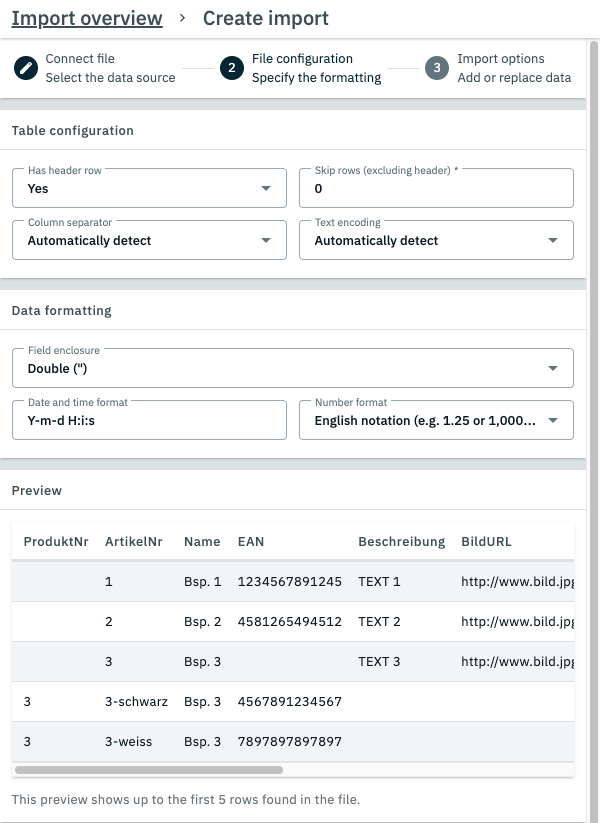
In this step you may specify the formatting of the data in your file in order to ensure that your data is imported correctly.
|
The table preview
The third section of this step contains a live preview that shows how the first 5 lines in your file are read by the import tool using the selected settings. You may use this preview to gauge if your data is being read as intended and adjust your settings accordingly. |
| Setting | Explanation | ||||||||||||||
|---|---|---|---|---|---|---|---|---|---|---|---|---|---|---|---|
File settings |
|||||||||||||||
Has header row |
If the first row in your file is used as a header row that assigns a name to each column in your file, then it is recommended that you pick Yes here. If Yes is picked, then the header row is not imported as a data set, and the column names in the header row are used for the columns in the import UI. |
||||||||||||||
Skip rows |
If you select a number above 0 here, then that number of rows at the start of the file (excluding the header row) are skipped during the import. Use this option if the first few rows of your file contain content that you do not want to import. |
||||||||||||||
Column separator |
Select the separator used to differentiate columns in your file. In most cases the column separator is detected automatically. However, if you notice that the auto-detection is not functioning correctly you may manually select the column separator here. |
||||||||||||||
Text encoding |
Select the text encoding method used in your file. In most cases the text encoding method is detected automatically. However, if you notice that the auto-detection is not functioning correctly you may manually select the text encoding method here. |
||||||||||||||
Data formatting |
|||||||||||||||
Field enclosure |
Select whether individual data fields are enclosed by single (‘) or double (‘’) apostrophes. |
||||||||||||||
Date and time format |
Select which data and time format is used in your file. The following formats can be selected here:
If your file uses an unusual date and time format that is not listed here, then you may enter it directly in the field. You can find an overview of the symbols conventionally used to denote date and time formats here. |
||||||||||||||
Number format |
Select whether your file uses the german or english writing style for numbers. This determines how commas and periods are interpreted in numbers. |
||||||||||||||
Table preview |
Use this preview to check your settings. |
||||||||||||||
Click NEXT once you are satisfied with your settings in order to proceed to the next step.
1.1.3. Step 3: Import options
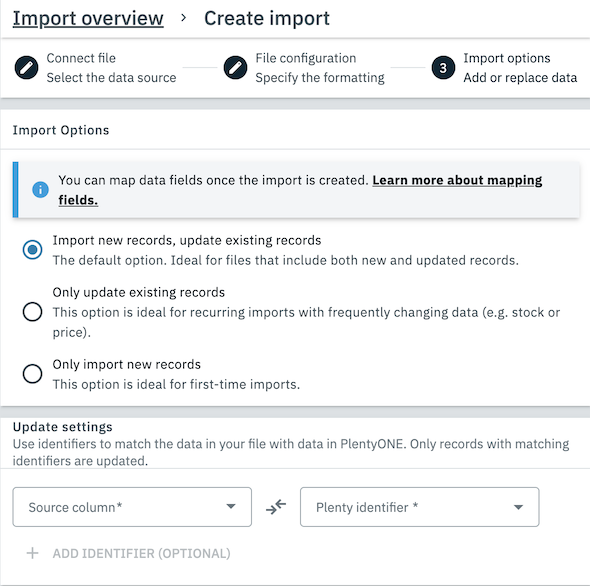
In this step you can select how the import handles conflicts between new and existing data sets.
| Setting | Explanation | ||||||
|---|---|---|---|---|---|---|---|
Import options |
Select how the records in your file are imported into existing records in your system. The following options are available:
|
||||||
Update settings |
In order to enable the import tool to associate data rows in your file with matching data sets in your system you must assign at least one column in your file to a data field in your system. These data entries are then used as identifiers.
For item data, the Variation ID usually serves as a good identifier. If there is no single value you can use to clearly assign each row in your file to a data set in your system, then you may use multiple identifiers as well. All identifiers are then used in combination with each other to clearly identify each matching data set. |
Click CREATE IMPORT once you are satisfied with your settings in order to create the import.
1.2. Creating a mapping set
In order for the import tool to be able to tell which column in your file belongs to which data field in your system, you must manually map each column to a data field first. In other words, you need to prepare a mapping set.
|
An import without mappings cannot be run!
If an import has no active mapping sets, then it does not know where your data belongs in your system and therefore cannot be used to import it. |
Here is how you create a new mapping set:
Creating mapping sets:
-
Go to Data » Import.
→ The import overview opens. -
Click on a created import and switch to the Mapping tab.
-
Click on Create mapping set(add).
-
Enter a name for the mapping set and click SAVE.
→ The mapping set is created. -
Click on the created mapping set.
→ The Map fields menu opens. -
Map your file data to fields in your system. You can find an in-depth explanation on how to do so in the following subchapter.
-
Click on Save (save).
→ The mapping set is now active and will be used in future runs of this import.
|
Default mapping sets
Every new import is outfitted with a standard mapping set that contains simple File column mappings for every column in your file. These mappings are sufficient for most use cases. However, the import tool also supports a number of more complex mapping types. |
1.2.1. Mapping data fields
When you open a mapping set, the Map fields menu is opened. In this menu you can map any number of columns in your file to data fields in your PlentyONE system.
| Some complex mapping types can adjust the data from your file during the import. However, the file itself will remain unchanged. |
Here is how you map your data:
Mapping data fields:
-
In the Map fields menu, click on Add mapping and select the mapping type you would like to use. You can find explanations of the different mapping types in Table 4.
→ A new mapping with the selected type is added.
OR: Select an existing mapping you would like to edit. -
If the mapping is inactive, activate it in order to start editing it.
-
Adjust the settings for the selected mapping type.
-
Repeat steps 1 to 3 until you have mapped the data in your file to your liking.
-
Deactivate or delete any mappings you do not want to use.
-
Save your changes.
| Type | Description | ||
|---|---|---|---|
File column |
Select a source column in your file and then a target field in your PlentyONE system. When the import is run, the data from the source column is imported into the target fields. |
||
Own value |
Enter a value and then a source column. When the import is run, the given value is imported into the target fields. |
||
Replacement |
You can use replacements to replace certain values in your file with certain other values during the import. To do so, proceed as follows: Importing data with replacements:
When the import is run, every instance of a specified old value in the source column is replaced by the corresponding new value during the import. If a fallback value was entered, then every instance of a value that doesn’t match any of the specified old values is replaced by the fallback value. The new set of values is then imported into the target fields. |
||
Function |
You can use functions saved in your system to generate new values from the values in your file and import those generated values into your system instead. To do so, proceed as follows: Importing data with functions:
When the import is run, the function uses the values in the specified source columns as parameters for the selected function, generates new values for each row and then imports these new values into the target fields. |
||
Regular expression |
Regular expressions (or simply RegEx) are a complex value type that is implemented in many programming languages and can be used to search, filter and manipulate strings. In the import tool, you can use regular expressions to replace values matching a certain pattern with different values.
Here is how you use regular expressions in a mapping: Importing data with regular expressions:
RegEx example 1: "TT.MM.YYYY" to "YYYY-MM-TT"
Value: "24.12.2017" Result: "2017-12-24" RegEx example 2: Change "[Surname], [First name]" to "[First name] [Surname]"
Value: “Musterberg, Maxi” Result: "Maxi Musterberg" When the import is run, each value in the source column that matches the Search pattern is replaced using the Replace pattern before the values are imported into the target fields. |
||
Mathematical operation |
You can use this mapping type to calculate a new value using the value from the source column and import this new value instead. The following calculation methods are available:
Importing values using mathematical operations:
When the import is run, the values from the source column are modified by the set mathematical operation before they are imported into the target fields. Example: Increase prices by 5%
Source column: [Select the column containing the price] Result: The prices in the specified column are increased by 5% during the import. This higher price is saved as the price in PlentyONE. |
| Most PlentyONE data fields only support specific types of values. For example, you can usually only enter a numerical value in the “sales price” field of a variation. The supported value type of a target field is displayed as an icon once it is selected. Take care to only map source columns to target fields that support the value types from those source columns. |
Running the import
If you followed every step in the import preparation process described so far, then your import should now be ready for use. You can run the import manually as follows:
Running the import:
-
Go to Data » Import.
→ The import overview opens. -
Click on the import that you have created.
→ The detail view of the import opens. -
Click START IMPORT in the upper right-hand corner of the header.
→ The import is run.
If the import run could be started successfully, then you should next check the run history to ensure that your data was imported correctly. To do so, proceed as follows:
Checking the run history:
-
Go to Data » Import.
→ The import overview opens. -
Click on the import that you have created.
→ The detail view of the import opens. -
Switch to the Status tab.
-
In the run history section, navigate to the import run you just started.
-
Click on the arrow (arrow_right) next to the import run to display the process notifications of the import run.
If an error occurred during the import run, then it will be displayed here. If the import run was finished without any errors, then you have set up the import correctly.
You may now run the import manually as needed or set up a schedule if it should run automatically at regular intervals.
2. The import user interface
Chapter 1 briefly touched on the basic functions of the import tool’s user interface in order to guide you through the import creation process. This chapter will elaborate on the different areas user interface in more detail.
2.1. The navigation bar
Similarly to other areas of your PlentyONE system, the import user interface includes a navigation bar. This navigation bar is visible at the left-hand border in all areas of the import user interface. You can use it to switch back to the import overview (manage_search) or create a new import (add) at any time.
Any imports whose detail view you opened during your current browser session will be listed here as well, allowing you to quickly access and switch between them.
2.2. The import overview
When you navigate to Data » Import you arrive in the Import overview. All imports created in your system are available in this overview. It is divided into different sections. The following chapters explain each of these sections in more detail.
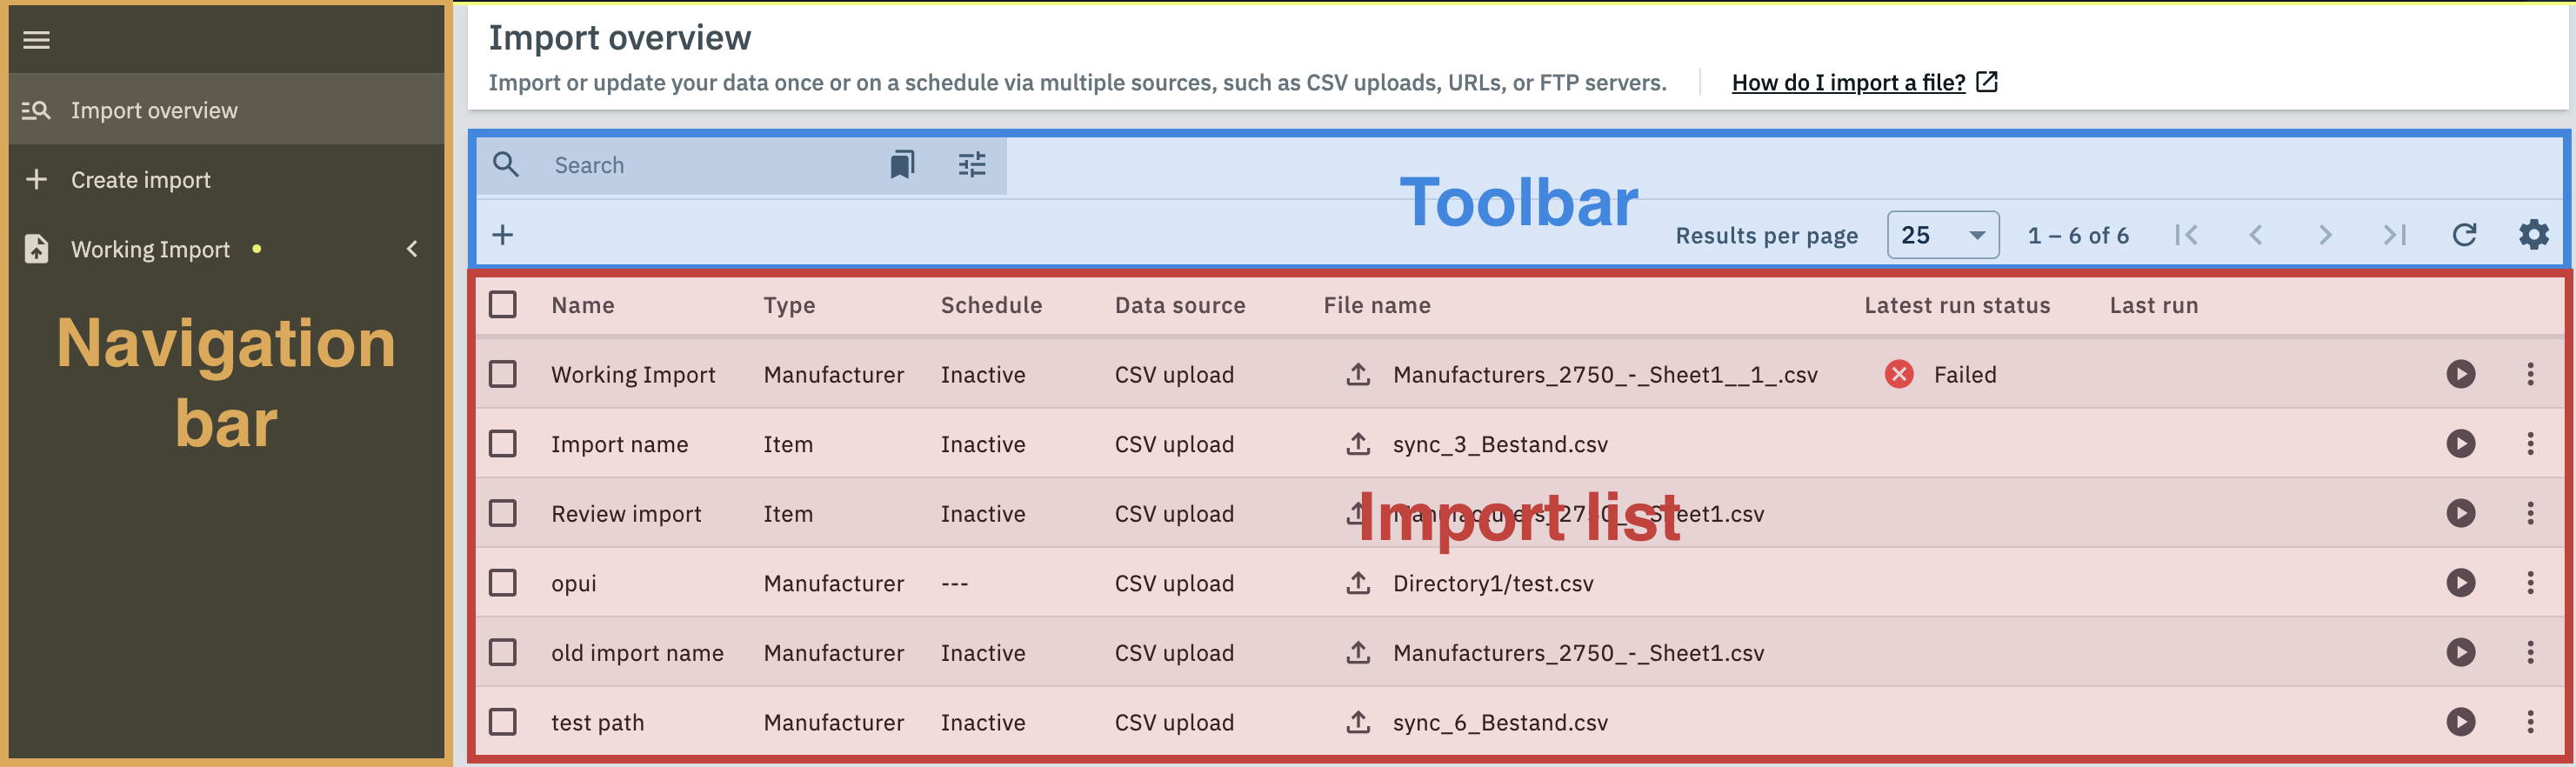
2.2.1. The overview toolbar
The overview toolbar offers a number of tools for managing your imports. You can search for specific imports (search), create new imports (add) and adjust the behaviour of the import list (settings).
2.2.2. The import list
The import list is the centerpiece of the import overview. Here you can view a variety of information regarding the imports that have been saved in your system. Table 5 contains a detailed explanation of each column in the import list.
| Column header | Content | ||||||
|---|---|---|---|---|---|---|---|
Name |
The name of the import. |
||||||
Type |
The type of the import. |
||||||
Schedule |
If a schedule has been set for the import, then that schedule is outlined in this column. |
||||||
Data source |
The type of the data source used for the import |
||||||
File name |
The name of the file that is imported when the import is run. |
||||||
Latest run status |
If the import was run at least once, then this column displays the status of the latest import run. |
||||||
Last run |
If the import was run at least once, then this column displays the time and date of the last import run. |
||||||
Start import |
Click on the Start import button (play_circle) in the row of an import in order to start a run of that import. |
||||||
More |
Clicking on More in the row of an import displays the following additional options for that import:
|
||||||
Import ID |
The internal ID of the import. |
2.3. The detail view
In the Detail view you can check a variety of information pertaining to your import as well as adjust its settings.
The left side of the header of the detail view displays the import name and import ID of the currently viewed import, as well as at what point in time it was created and last run.
The right side of the header contains the START IMPORT button (play_circle). You can use this button to manually start a run of the import. Clicking on More (more_vert) next to this button reveals options for starting special types of import runs:
-
A test run only imports the first 10 rows of your file. If you are not sure whether you chose the correct settings for the import, then you can use this option to import a smaller selection of data from your file and then check whether that data was imported as intended.
-
A live import is run immediately. Do not close the current browser session while a live import is running, otherwise the import will be interrupted.
The section underneath the header is divided into three tabs. The content of these tabs is explained further in the following chapters.
2.3.1. The Status tab
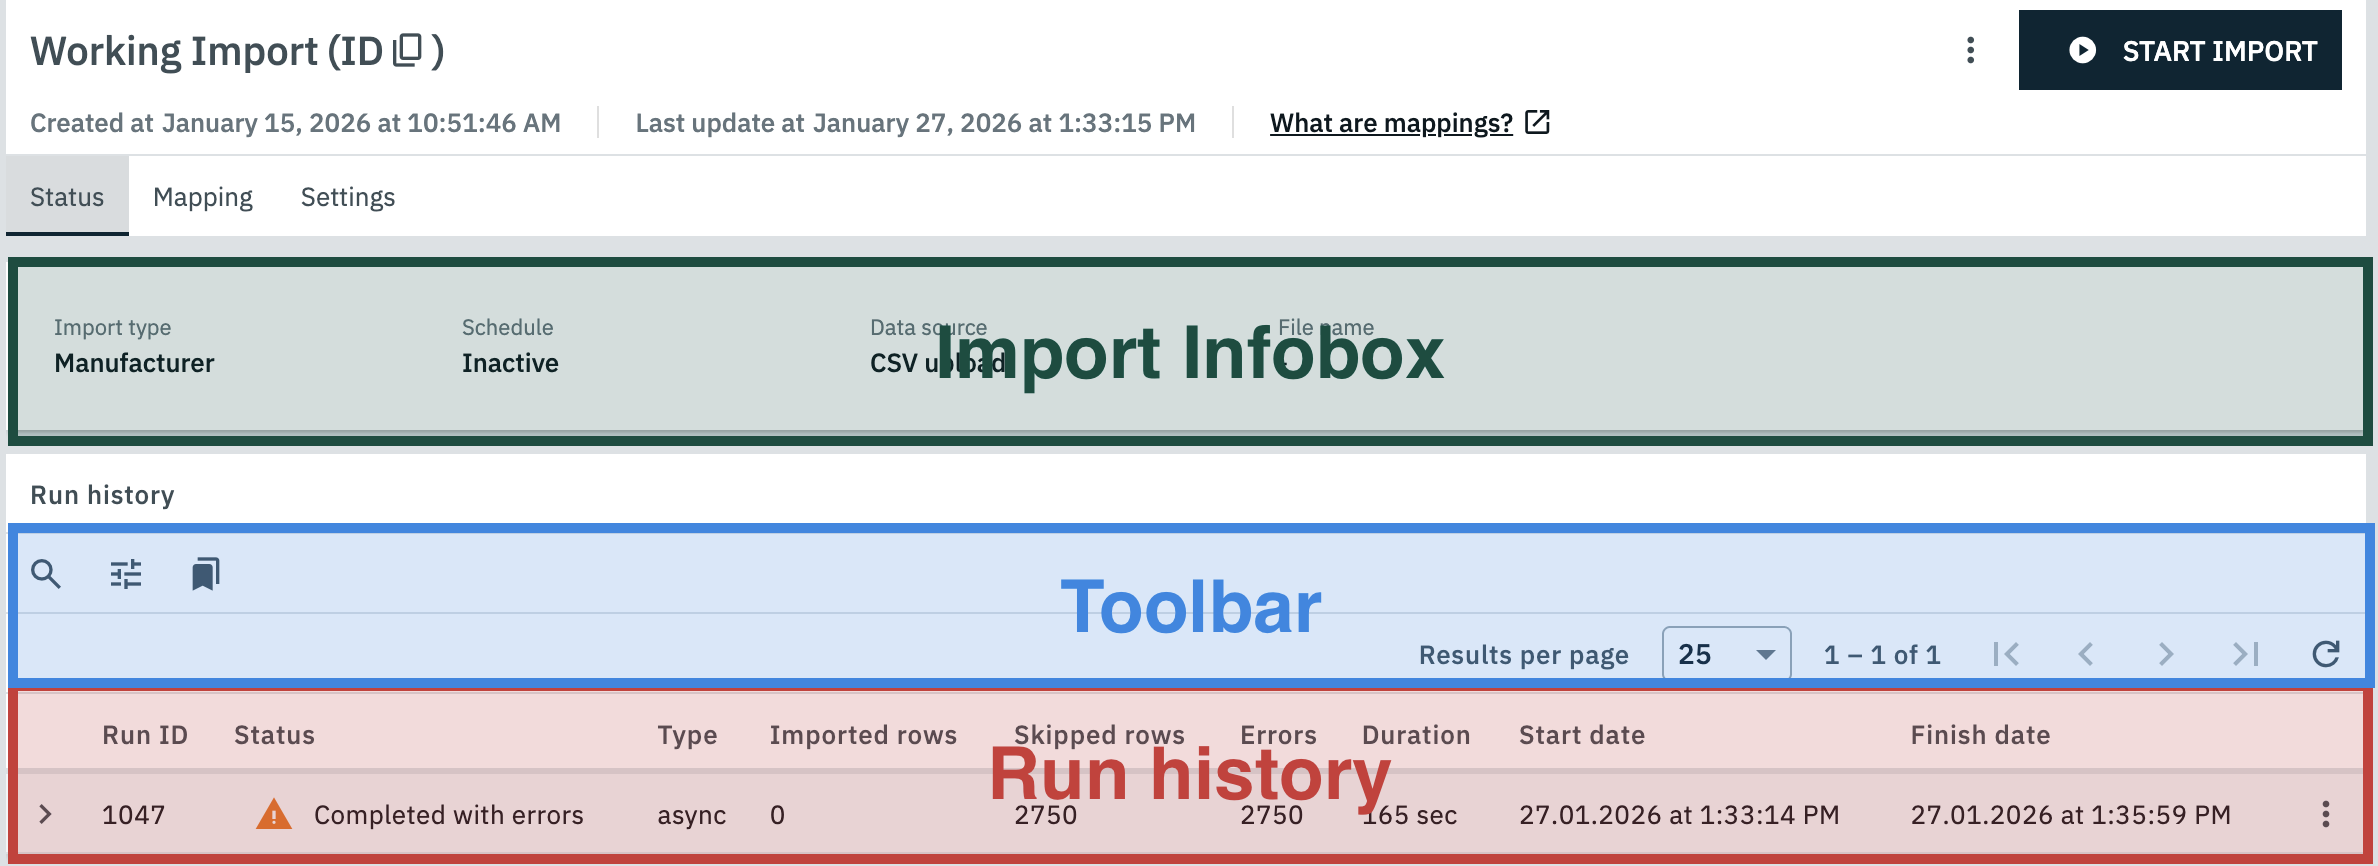
The status tab contains all relevant information regarding the currently viewed import.
The Import Infobox in the first section lists the basic properties of the import, i.e. its import type, whether a schedule has been set for it, the type of data source and the file name.
The next section contains the run history. Here you can check the following details for every past run of the import:
| Column header | Content |
|---|---|
chevron_right |
Click on the arrow symbol in the first column of an import in order to expand the process notifications for that import. If any errors occurred during the import run, then these errors will be listed here along with the data row that caused the error. You can also use the Raw data preview to show the content of the row that caused the error. |
Run ID |
Every run of an import is assigned a unique ID. This ID is displayed in this column. |
Status |
The status of the import run. Every import can have one of several statuses:
|
Type |
The type of the import run. Here is a selection of the supported import types:
|
Imported rows |
The amount of imported rows. |
Skipped rows |
The amount of skipped rows. Whether and which rows are skipped during an import run is determined by the settings of the import and can be checked in the process notifications. |
Errors |
The amount of errors that occurred during the import. You can find more information on these errors in the process notifications of the import run. |
Duration |
The duration of the import run. |
Start date |
The date and time at which the import run started. |
End time |
The date and time at which the import run finished. |
2.3.2. The Mapping tab
Mappings determine which columns in your file are imported into which PlentyONE data fields. They are saved in so-called mapping sets, which you can manage in this tab.
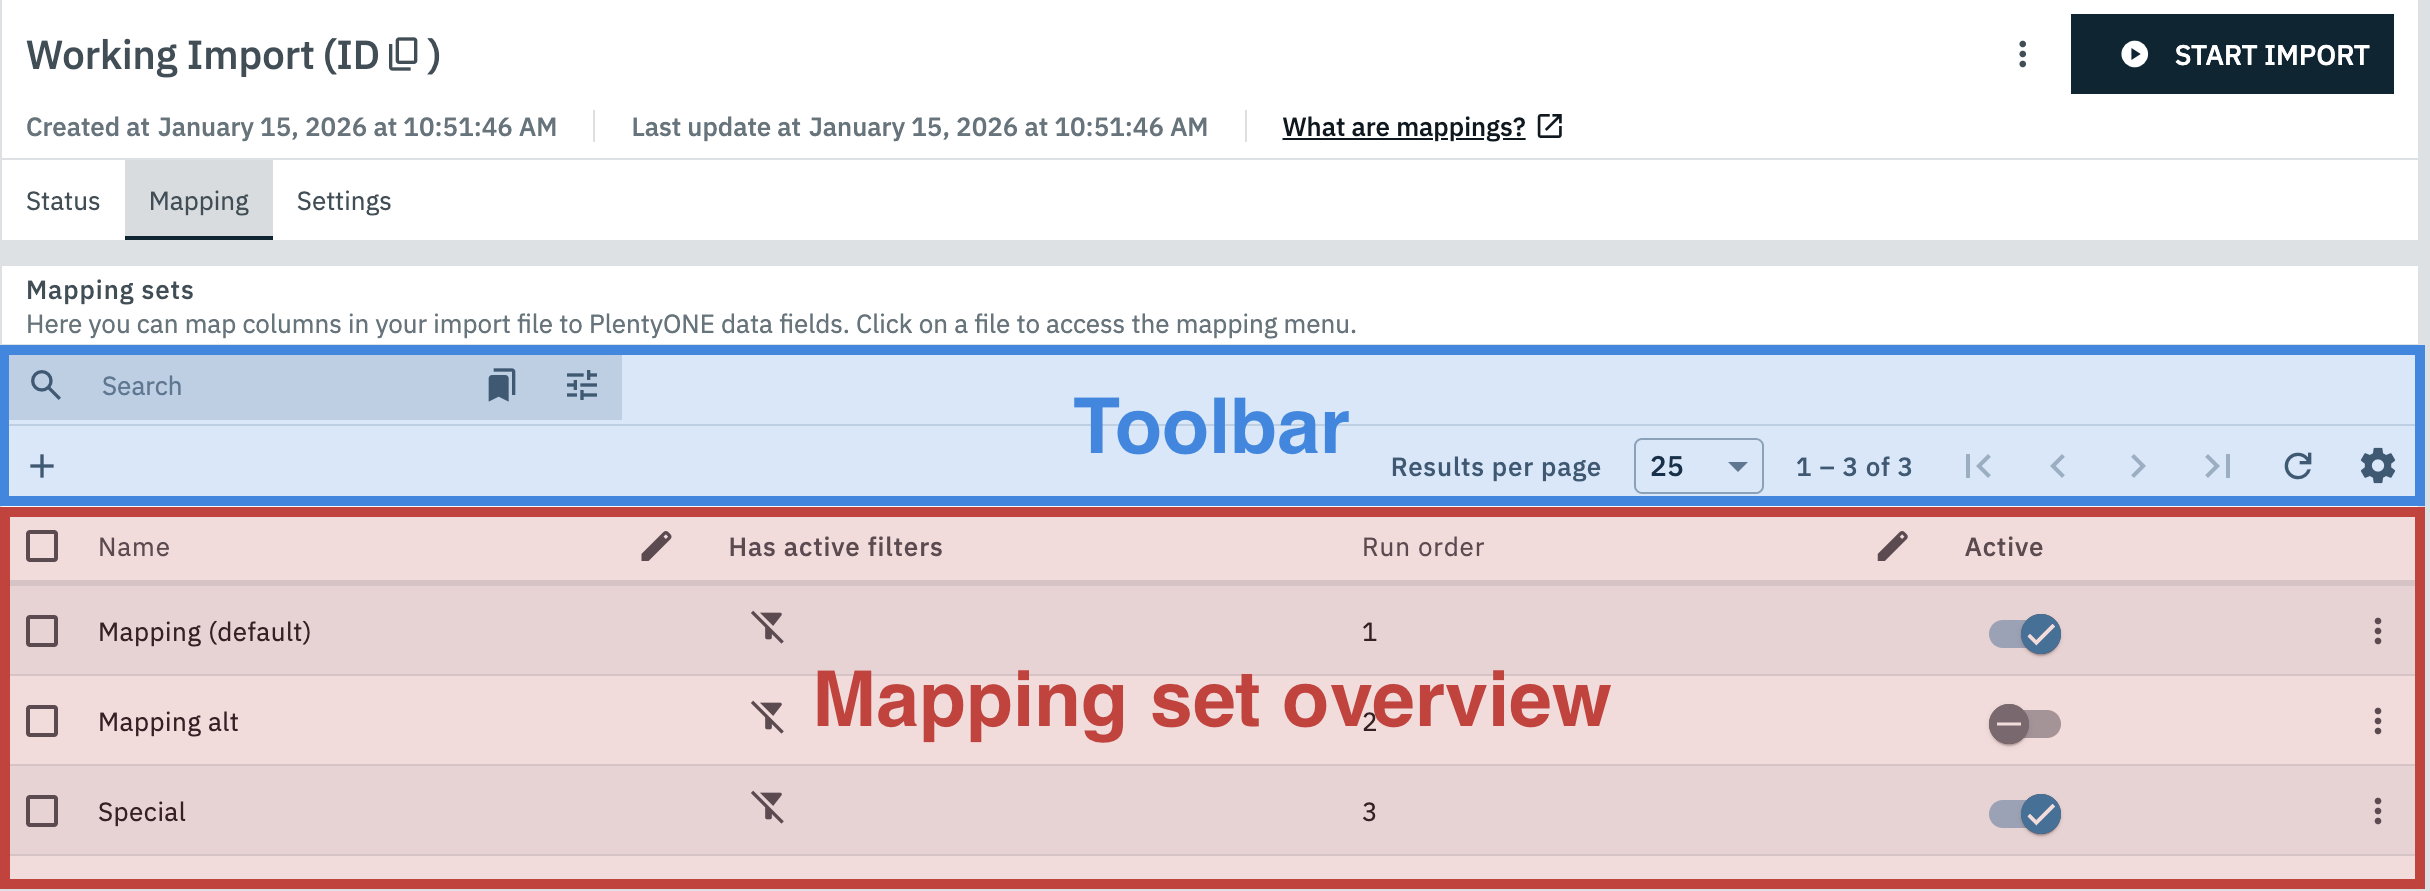
2.3.2.1. The toolbar for mapping sets
The mapping set features its own distinct toolbar. It contains a number of different tools for managing your mapping sets. The first line of the toolbar contains the Search bar. You can use the Search bar to find a specific mapping set or group of mapping sets in your system. To do so, proceed as follows:
Performing a search:
-
In the toolbar, click on the Search field.
-
Enter a search term.
-
Click Search (search).
→ The results for your search will be displayed.
*Tip:*You can also use filters (tune) in order to limit your search.
The contents of the second row of the toolbar are context-sensitive:
-
In its default state this row contains the Create mapping set button which allows you to create a new mapping set.
-
When a mapping set is selected in the overview, then the Copy and Delete options are displayed instead.
-
If the edit mode is active, then the edit mode options are displayed instead.
On the right-hand side of the toolbar you can adjust the display of the overview table. The following options are available:
-
You can adjust how many results per page are displayed.
-
You can navigate between the different pages of the overview by using the arrow buttons.
-
You can customize which columns are displayed in the overview by adjusting the Table settings (settings).
2.3.2.2. The mapping set overview
The overview is the centerpiece of the Mapping tab. In this overview you can view and manage the mapping sets saved for the currently viewed import.
The overview consists of the following columns:
| Column | Content |
|---|---|
check_box_outline_blank |
You can select multiple mapping sets here in order to duplicate or delete them at once. |
Name |
The name of the mapping set. |
Has active filters |
If a mapping set contains active filters that limit which rows in your file it applies to, then the filter_alt symbol is displayed here. |
Run order |
The position of the mapping set in the run order. |
Active |
You can activate or deactivate mapping set via the toggles in this column. Only active mapping sets are applied in import runs. At least one mapping set must be active in order to start an import run. |
more |
Clicking on More(more_vert) in the row of a mapping set displays the options for duplicating (content_copy) and deleting (delete) that mapping set. |
2.3.2.3. The edit mode
The mapping set overview features an edit mode that allows you edit the names and run order of your mapping set directly in the overview.
You can enable the edit mode by clicking on Enable edit mode (edit) in the header of the columns you want to edit. While the edit mode is enabled the available actions in the toolbar are replaced by actions specific to the edit mode:
| Option | Explanation |
|---|---|
Save (save) |
Saves the current configuration. |
Undo (undo) |
Reverts the last change made in the edit mode. |
Redo (redo) |
Restores the last change that was reverted by using the Undo button. |
Switch on edit mode for all columns (app_registration) |
Enables the edit mode for all columns that support it. The edit mode can also be enabled for individual columns by clicking on Enable edit mode (edit) in their header. |
Switch off edit mode for all columns (playlist_remove) |
Disables the edit mode for all columns. The edit mode can also be disabled for individual columns by clicking on Disable edit mode (edit_off) in their header. |
keyboard |
Hovering over this icon displays the keyboard controls for the edit mode. |
2.3.2.4. (De)activating mapping sets
Only active mapping sets are applied in import runs. Before you start a run of an import or set a schedule for it you should activate all mapping sets you want to use in runs of that import, as well as deactivate any mapping sets you do not want to use. To do so, proceed as follows:
(De)activating mapping sets:
-
Go to Data » Import.
→ The import overview opens. -
Click on a created import and switch to the Mapping tab.
-
Activate the mapping sets you want to use by activating the toggle in the Active column, and deactivate said toggle for any mapping sets you don’t want to use.
2.3.2.5. The run order of mapping sets
When multiple active mapping sets for an import contain conflicting mappings for the same column in your file, then only the mapping in the set with the lowest number in the run order is applied. You can change the run order as follows:
Changing the run order of mapping sets:
-
Go to Data » Import.
→ The import overview opens. -
Click on the import whose mapping sets you want to adjust.
-
Switch to the Mapping tab.
-
In the Run order column, click Enable edit mode (edit) in the header row.
→ The edit mode is activated. -
Enter the desired number in the run order for each mapping set.
-
Save (save) your settings.
→ The new run order is saved. -
Click Disable edit mode (*).
|
Choose a distinct run order!
Take care not to assign the same number in the run order to multiple mapping sets! Doing so may lead to mapping conflicts being resolved in unpredictable and undesirable ways. |
2.3.2.6. Duplicating mapping sets
The Duplicate option in the Mapping tab allows you to create duplicates of existing mapping sets. This can save time in cases where you may want to create mapping sets that are similar to existing ones. To duplicate mapping sets, proceed as follows:
Duplicating mapping sets:
-
Go to Data » Import.
→ The import overview opens. -
Click on a created import and switch to the Mapping tab.
-
Select (check_box_outline_blank) all mapping sets you want to duplicate.
-
Click on the Duplicate button (content_copy) in the toolbar.
→ Duplicates of the selected mapping sets are created.
2.3.2.7. Deleting mapping sets
If you no longer require certain mapping sets you have the option to delete them.
| This action cannot be undone. |
To delete mapping sets, proceed as follows:
Deleting mapping sets:
-
Go to Data » Import.
→ The import overview opens. -
Click on a created import and switch to the Mapping tab.
-
Select (check_box_outline_blank) all mapping sets you want to delete.
-
Click on the Delete button (delete) in the toolbar.
-
Confirm your decision by clicking DELETE.
→ The selected mapping sets are deleted.
2.3.2.8. The mapping menu
When you open a mapping set in the Mapping tab the mapping menu of that mapping set opens. Here you can manage and edit the mappings that are saved in the mapping set.
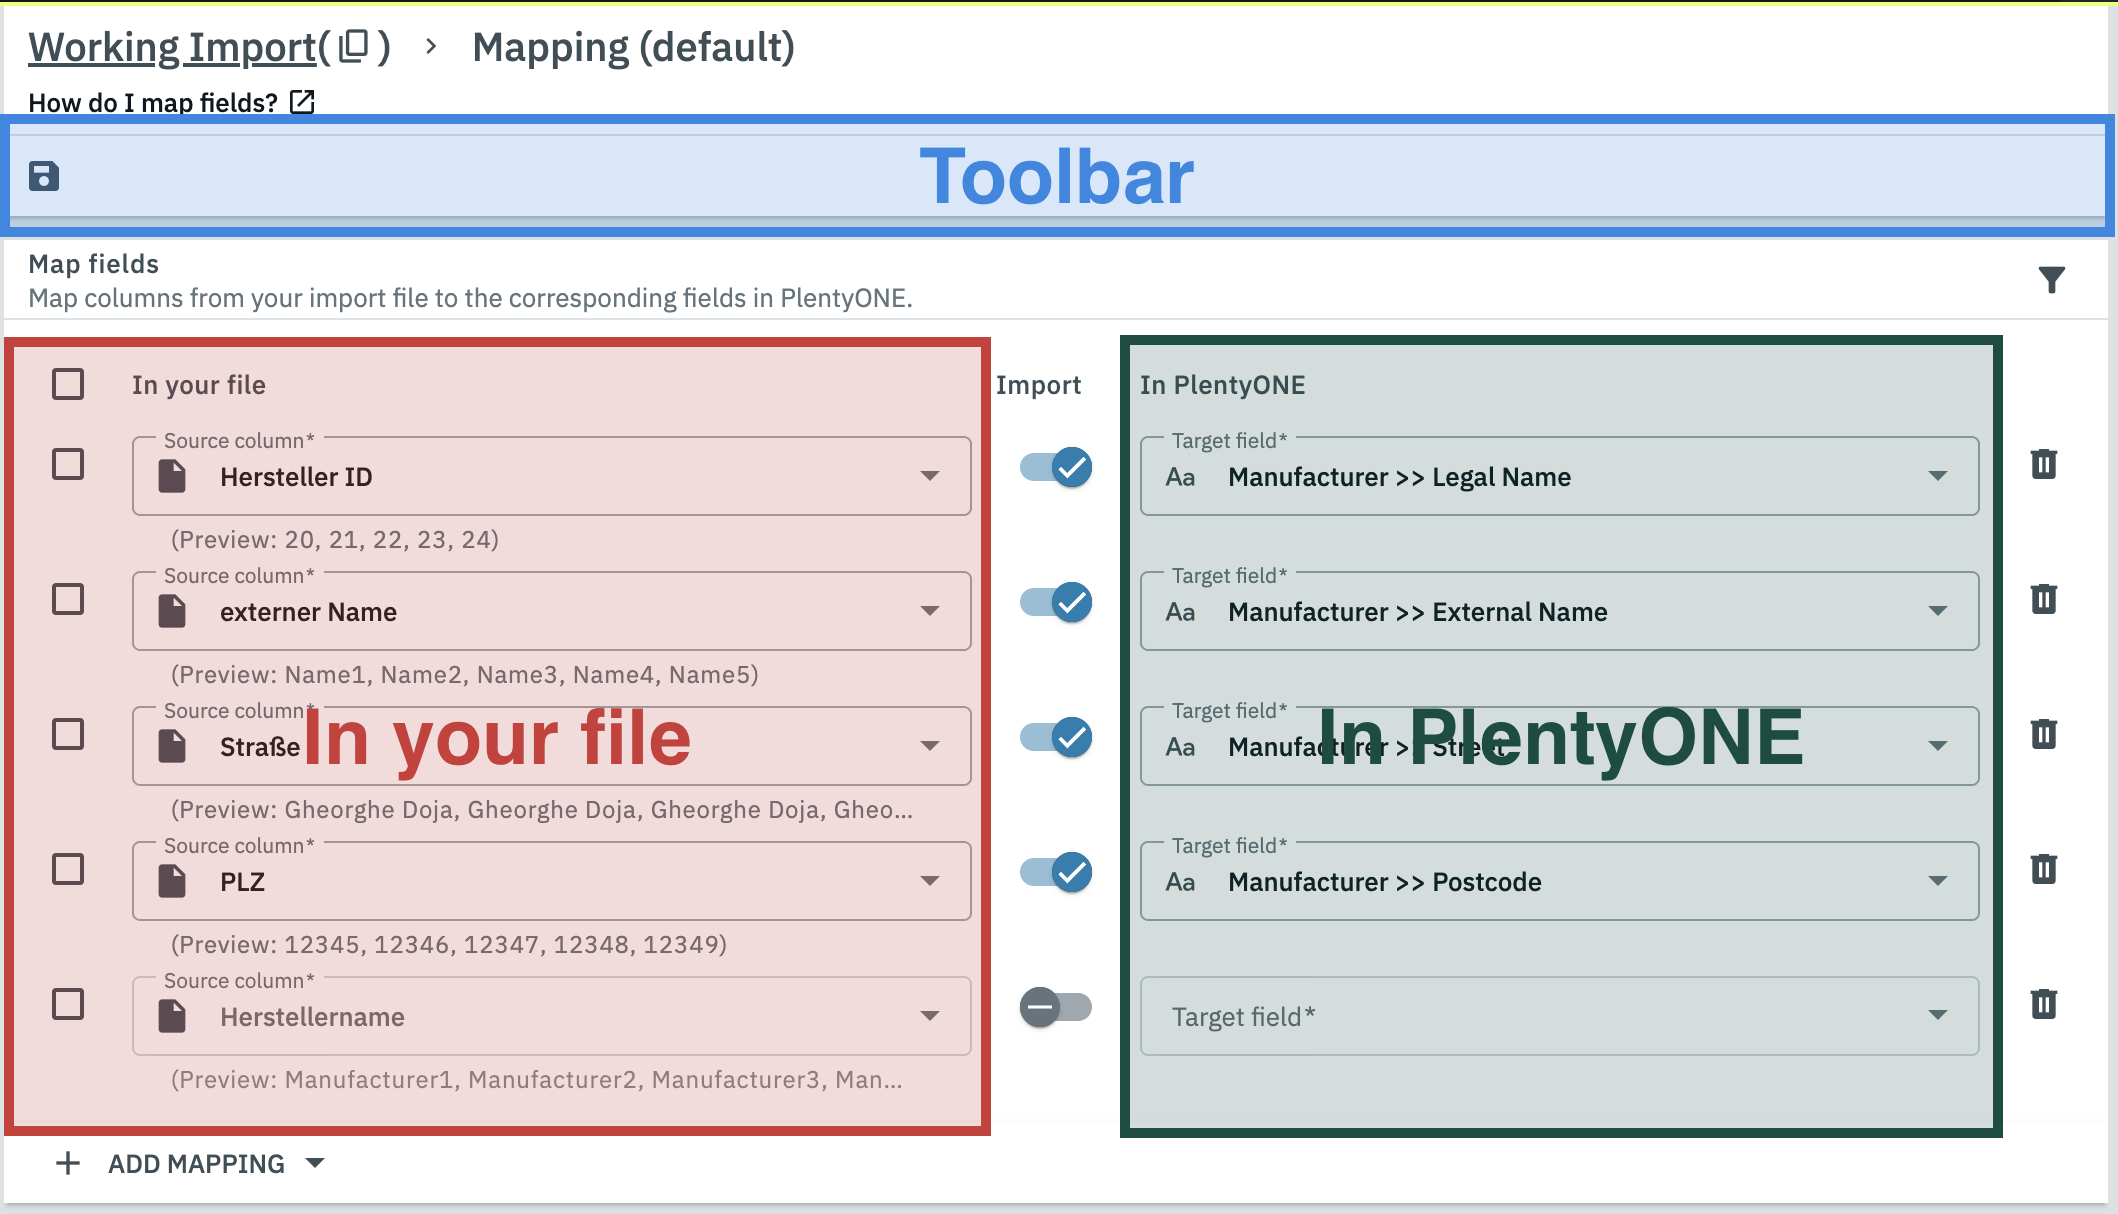
|
Active mappings
In order to edit a mapping you need to activate it first. Additionally, only active mappings in active mapping sets are applied during import runs. |
The mapping menu consists of the following elements:
| Element | Function |
|---|---|
check_box_outline_blank |
You can select multiple mappings here in order to duplicate or delete them at once. |
In your file |
Here you can select which data is imported from your file. The options displayed here depend on the mapping type. You can find an overview of the different mapping types in Table 4. |
Import |
Mappings can be activated or deactivated individually here. |
In PlentyONE |
Select the target field in PlentyONE for the data selected in In your file. |
delete |
You can delete individual mappings by clicking on Delete (delete). Keep in mind that this action cannot be undone. |
Save (save) your changes once you are satisfied with your mappings.
2.3.2.8.1. (De)activating multiple mapping sets at once.
Only active mappings are applied in import runs. Before you start a run of an import or set a schedule for it you should activate all mappings you want to use in runs of that import, as well as deactivate any mappings you do not want to use. You can do so for multiple mappings at once by proceeding as follows:
(De)activating multiple mapping sets at once:
-
Go to Data » Import.
→ The import overview opens. -
Click on the import you want to edit and switch to the Mapping tab.
-
Click on the mapping set whose mappings you want to edit.
→ The Map fields menu opens. -
Select (check_box_outline_blank) all mappings you want to activate or deactivate.
-
Click on Activate or deactivate mappings in the toolbar.
-
Select Activate mappings.
→ All selected mappings are activated.
OR: Select Deactivate mappings.
→ All selected mappings are deactivated.
2.3.2.8.2. Deleting multiple mappings at once
If you no longer need multiple mappings in a set you can delete them at once.
| This action cannot be undone. |
To delete multiple mappings, proceed as follows:
Deleting multiple mappings at once:
-
Go to Data » Import.
→ The import overview opens. -
Click on the import you want to edit and switch to the Mapping tab.
-
Click on the mapping set in which you want to delete mappings.
→ The Map fields menu opens. -
Select all mappings you want to delete.
-
Click on Delete selected mappings in the toolbar.
-
Confirm your decision by clicking DELETE.
→ The selected mappings are deleted.
2.3.2.8.3. Using filters in mapping sets
You can apply a filter to a mapping set in order to limit which rows in your file are imported using the mappings in the set. To do so, proceed as follows:
Applying filters to a mapping set:
-
Go to Data » Import.
→ The import overview opens. -
Click on the import you want to edit and switch to the Mapping tab.
-
Click on the mapping set to which you want to apply a filter.
→ The Map fields menu opens. -
Click on the filter icon (filter_alt).
-
Click ADD CONDITION.
-
Select a source column, a condition and a value. The available conditions are explained in Table 10.
-
Optional: Add further conditions with ADD CONDITION. Select a Logic operator in the first column for every condition after the first one.
-
Click SAVE.
→ The filters are applied.
|
Logic operators for filters
If you added multiple filter conditions you need to specify the connection between them by using the logic operators AND or OR.
If multiple conditions are connected using different operators, then the operators are applied in order from top to bottom. |
| Condition | Explanation |
|---|---|
Contains |
Filters all rows where the specified source column does not contain the specified value. |
Equal |
Filters all rows where the specified source column contains a value that is not equal to the specified value. |
Greater than |
Filters all rows where the specified source column contains a numerical value that is smaller than or equal to the specified value. |
Is empty |
Filters all rows where the specified column is not empty. |
Not empty |
Filters all rows where the specified column is empty. |
Less than |
Filters all rows where the specified source column contains a numerical value that is greater than or equal to the specified value. |
Not equal |
Filters all rows where the specified column contains a value that is equal to the specified value. |
2.3.3. The Settings tab
In the Settings tab you can adjust the basic settings of the import, most of which you set during the creation process. This tab also contains a number of settings that were not part of the creation process.
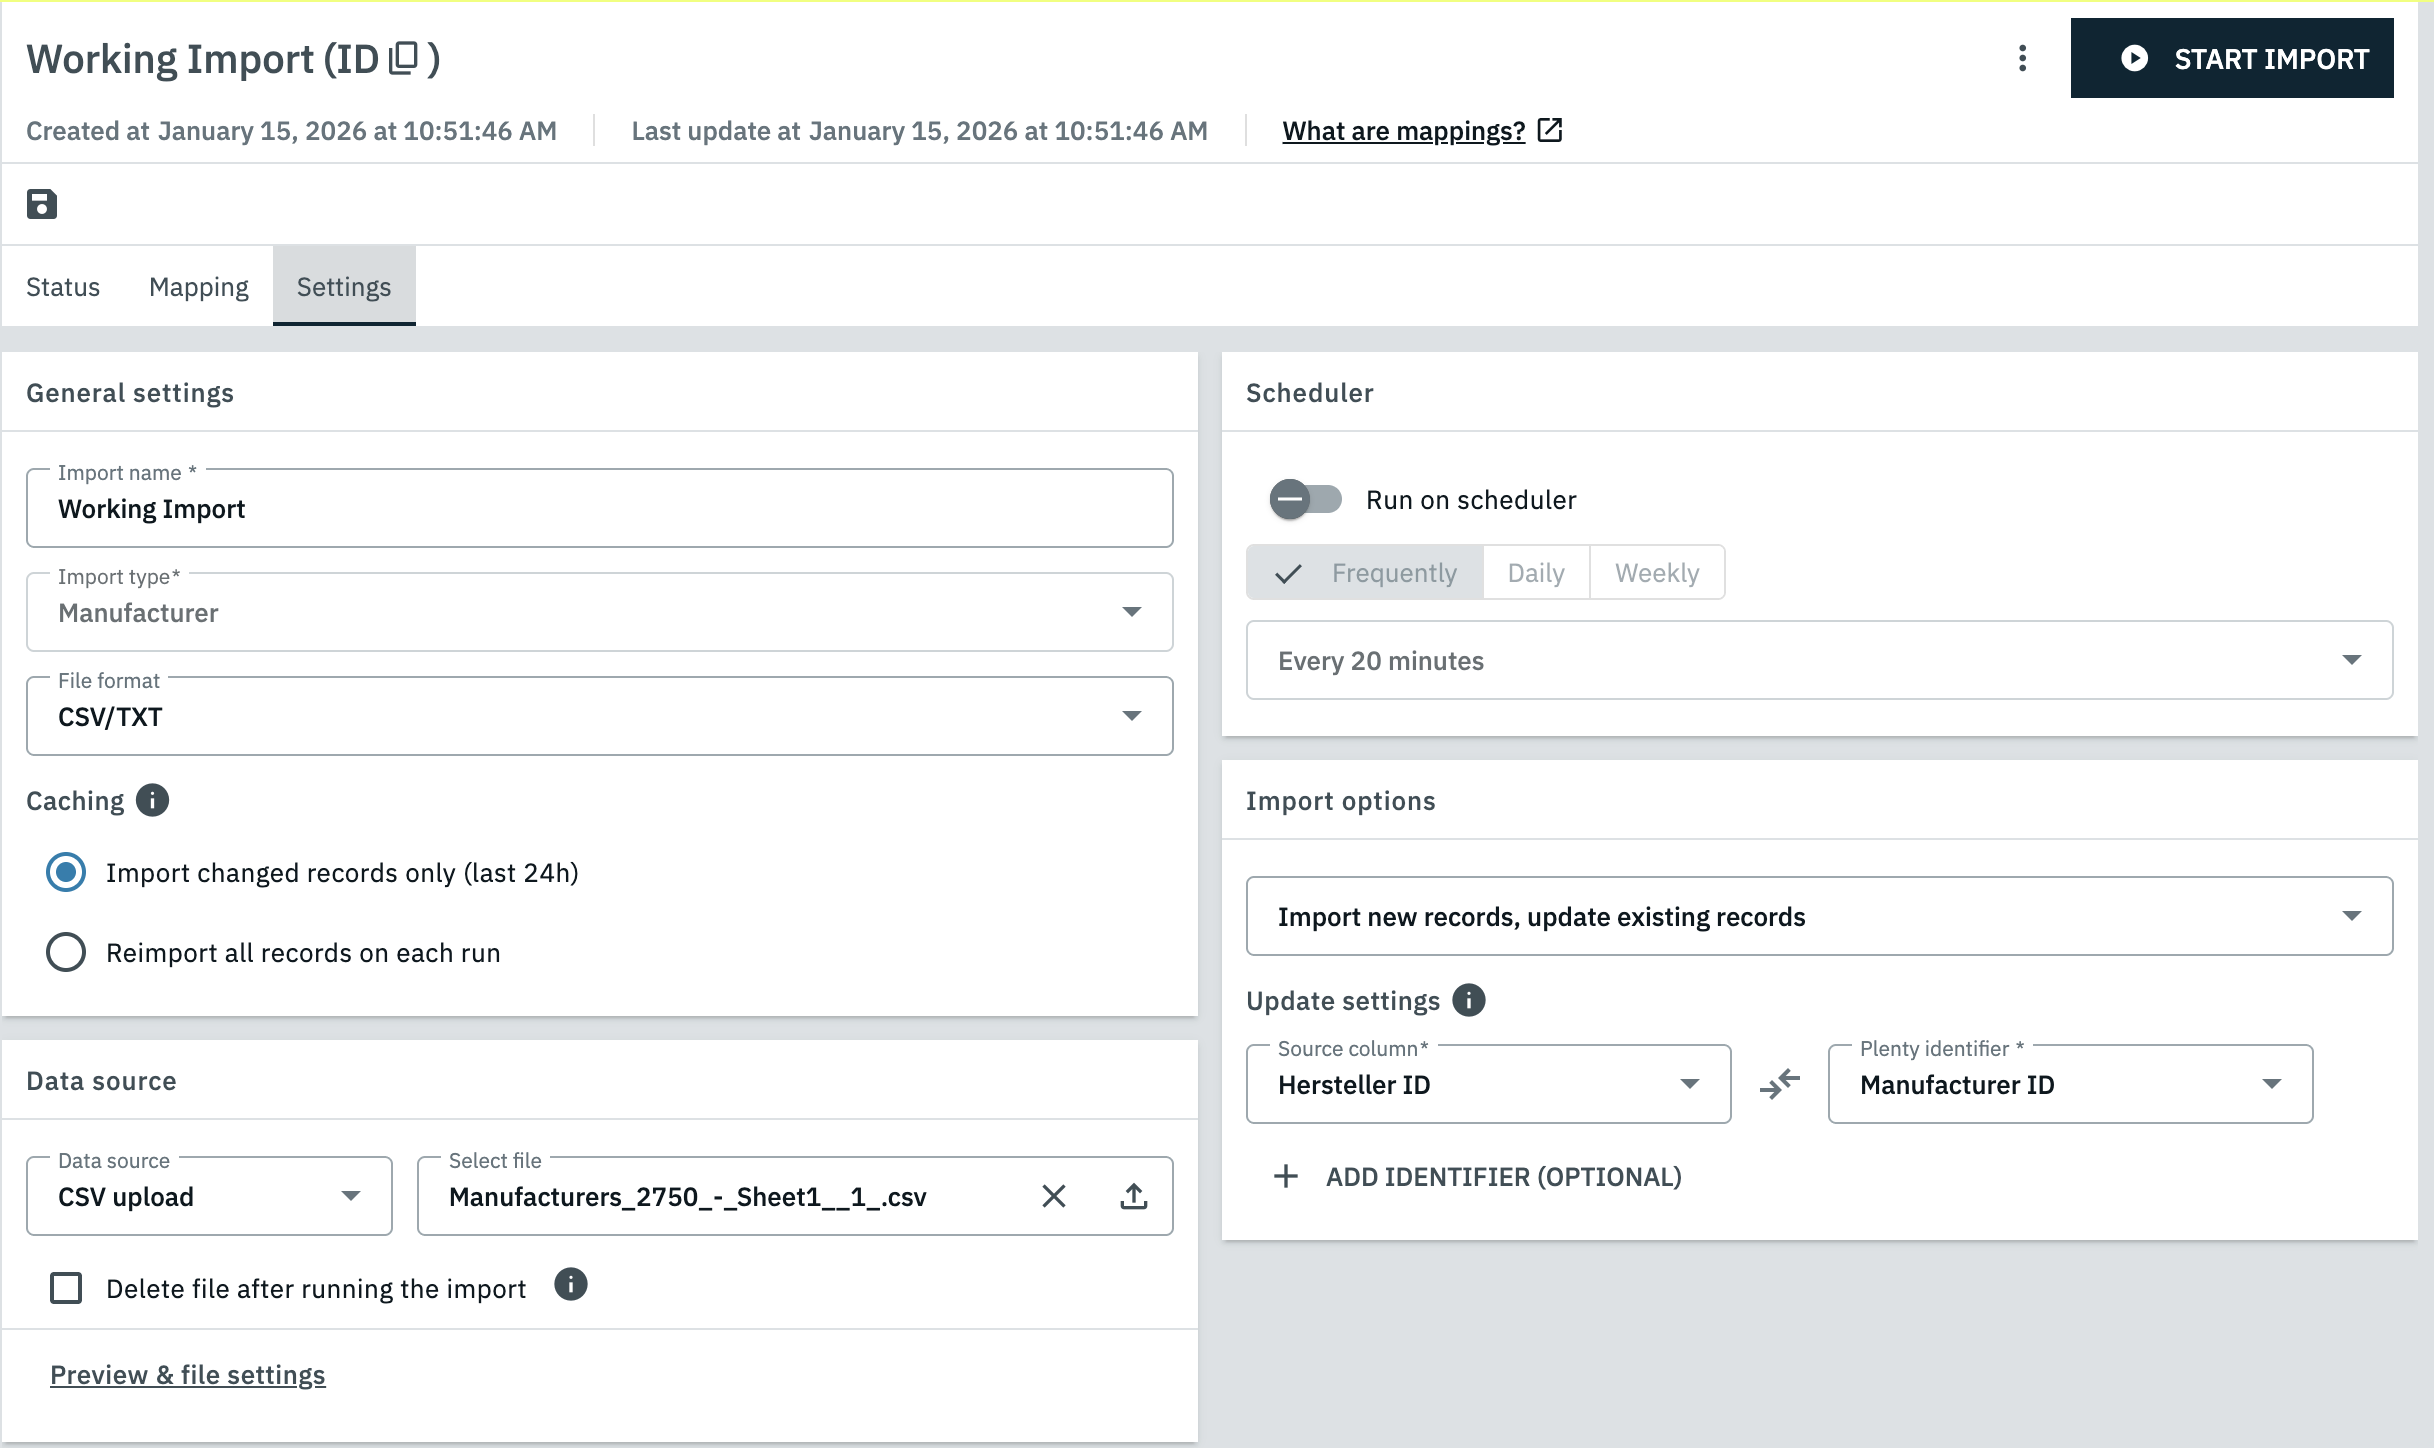
This tab is divided into multiple sections that are explained in Table 11.
| Section | Content |
|---|---|
General settings |
In this section you can change the import name and file format you entered during Step 1 of the creation process. What is caching?
PlentyONE can optionally save a cache of the latest run of an import for up to 24 hours after it was completed. If the import is run again within these 24 hours, then the import tool uses the cache as a reference to quickly determine which rows in the file have been changed and only import those rows. This can noticeably speed up runs of imports with especially large data sources. |
Data source |
In this section you can select a different data source for the import, as well as adjust the settings from step 2 of the import creation process by clicking on Preview and file settings. |
Schedule |
If you want the import to automatically run in regular intervals, then you can set up a Schedule for it here. |
Import options |
In this section you can adjust the settings from step 3 of the import creation process. |
2.3.3.1. Setting a schedule for an import
In addition to running an import manually you can also have it run automatically at set intervals by setting a schedule for it. To do so, proceed as follows:
Setting a schedule for an import:
-
Go to Data » Import.
→ The import overview opens. -
Click on the import that you have created.
→ The detail view of the import opens. -
Switch to the Settings tab.
-
Navigate to the Scheduler section.
-
Activate the Run on scheduler option.
-
Select an interval for carrying out imports. There are a number of different intervals to choose from, all of which are explained in Table 12.
-
Click on Save (save).
→ The import is automatically run at the set intervals.
| Interval | Options |
|---|---|
Regularly |
This tab contains the shortest intervals supported in PlentyONE. Select one of the options in this tab if the data in your system should be kept as up-to-date as possible using the data from the import file.
|
Daily |
Select any number of times of day in the Pick a time drop-down menu. The import will then be run daily at the selected times. |
Weekly |
Select all days in a week on which the import should be run. You can also select the times of day during which the import should be run, similarly to the Daily option. |