Best Practices: plentyShop LTS (Legacy)
|
Successor to plentyShop LTS
The content on this manual page pertains to the old plentyShop LTS. |
Here, you find best practices on subjects such as plentyShop LTS and the online store.
1. Testing plentyShop LTS updates for theme compatibility
In this best practice you will learn which steps are necessary in order to test newly published version upgrades of the plentyShop LTS template plugin without impacting the productive live operation of your plentyShop. Due to implementations of new features, bugfixes and changes to the user interface, dependencies between external plugins (for instance layout themes) and plentyShop LTS may lead to issues when updating to a new plentyShop LTS version. Therefore it is advisable to create a copy of your current plugin set configuration, with which you can test the compatibility of the newly released plentyShop LTS version and external plugins.
1.1. Copying a plugin set
First, you should create a new Plugin set, onto which you can transfer the current settings of your plentyShop LTS shop. To do so, proceed as follows:
Copying a plugin set:
-
Go to Plugins » Plugin overview.
-
Click on Create new set.
→ The New plugin set window opens. -
Enter a name for the plugin set, which should ideally communicate that this is a copy of your plentyShop LTS shop.
-
Select the plugin set for which you want to copy the current configuration from the Copy plugin set drop-down list.
-
Save the settings.
→ The new plugin set will be created.
The plugin set copy now contains the exact same settings as the one used as your plentyShop LTS shop. At this point, both the original set and its copy are identical. It is advisable to repeat this process before any major update, so that the plugin set is up to date.
1.2. Updating plentyShop LTS for the copied plugin set
In the next step, you need to update the copied plugin set to the current plentyShop LTS version.
Updating the plugin set:
-
Go to Plugins » Plugin overview.
-
Select the newly created copy of the plugin set.
→ The Plugin set details window opens. -
In the line of the plentyShop LTS plugin, click on Update in the Action column.
→ The Install plugin window opens. → The most current version of the plugin is preselected. -
Click on Install.
→ The plugin will open. -
Repeat steps 3 and 4 for the plugin IO.
-
Click on Save & publish plugins.
The copy of the plugin set is now at a more current stage than the plugin set of your plentyShop LTS shop. Click on the plugin set copy in the list of plugin sets on the left side of the interface. You can access your plentyShop LTS plentyShop in combination with the plugin set copy in preview mode via the button Plugin set preview. That way, you can assess whether the current changes to the plentyShop LTS plugin result in incompatibilities with external plugins, like a theme, that your are using. If the external plugins are functioning correctly under the new plentyShop LTS version, you can either activate the plugin set copy for the relevant client or Update the original plugin set, as detailed above.
|
Some dependencies betwen external plugins and plentyShop LTS/IO may not be immediately apparent. For this reason it is advisable to not dismiss the original plugin set prematurely, so that the switch to the previous version is still possible after a number of days without adjusting the plentyShop LTS settings again. |
2. Adjustments regarding the German Accessibility Improvement Act (BFSG)
Since 25 June 2025, the German Accessibility Improvement Act (BFSG) has come into effect. This serves to realise the European Accessibility Act in Germany.
This act brings with it a number of requirements for online sellers with regard to the design of their shops.
Online shops must be designed in such a way that they can also be used by people with visual, motor, or auditory impairments.
The following chapters provide an overview of the measures you need to implement for your shop so that it meets the upcoming requirements.
2.1. Conditions
Who is affected by this law?
The BFSG currently only applies to the B2C sector. The requirements of the BFSG do not apply to B2B shops. It should be noted that the B2B shop must be clearly designed and designated as such. However, if consumers have the option of using the service, it is an e-commerce service to consumers and the BFSG applies.
Who is not affected by this law?
Micro-enterprises (i.e. companies with fewer than ten employees and an annual turnover or annual balance sheet total of no more than EUR 2 million that offer or provide services) are not covered by the BFSG in accordance with Section 3 (3) BFSG.
Disclaimer:
The information provided does not constitute legal advice and is no substitute for individual legal advice from a suitably qualified professional. All content is for general information purposes only. No liability is assumed for the accuracy, completeness and topicality of the content. If you have specific legal questions or concerns, contact a licensed lawyer.
2.2. WAVE Accessibility Plugin
To check whether your shop has potential for improving accessibility, we recommend using the WAVE Web Accessibility Evaluation Tool. You can install WAVE as a browser extension and use it to check whether alternative texts are missing from images or whether text is difficult to read due to a lack of contrast with the background.
2.3. High contrast colours
In order to provide users who are visually impaired with a fully functional shopping experience in you shop, it is necessary for text and background colours to have a high contrast ratio.
The EU Accessibility Act is based on the recommendations of the Web Content Accessibility Guidelines.
To meet the requirements of the German Accessibility Improvement Act, texts and background colours should have a contrast ratio of at least 4.5:1. For larger text and embedded graphics, a contrast ratio of 3:1 is sufficient.
To check the contrast ratios of the colours you use in your shop, you can use external tools such as WebAim. Enter a hexadecimal code for your text colour in the left Foreground field and a hexadecimal code for your background colour in the Background field to the right. The contrast ratio (Contrast Ratio) is then displayed below.
In the area below, you can see analyses of the WCAG (Web Content Accessibility Guidelines) grade your contrast ratio would receive: AA is sufficient to meet the requirements of the BFSG; AAA exceeds these requirements.
2.4. Alternative texts
In order to make the visual content of your shop usable for people with visual impairments via tools such as screen readers, the German Accessibility Improvement Act requires that you provide images in your shop with alternative texts. These texts should be short and concise and not be longer than 80 to 100 characters.
You have to maintain alternative texts in two different places for your shop: For item images in the new Item UI and for static content, such as banners or logos, in the File Manager. There are 3 different methods available for adding alternative texts for item images: manually, item import or via API.
Adding alternative texts to item images:
-
Go to Item » Items.
-
Open the item for which you want to create alternative text.
-
Click Images in the side navigation to expand the image settings.
-
Click Translations.
-
Select a Language from the drop-down list.
-
Enter the text you want to use as alternative text in the Alternative text input field.
-
Repeat this process for other images of this item or for other languages.
-
Click Save (save).
You can also use the item import to avoid manually adding an alternative text to each image.
Proceed as follows to add alternative texts to images that are not item images:
Adding alternative texts for images in the file manager:
-
Go to Shop » File manager.
-
In the list of files, click on the image file for which you want to store an alternative text.
→ A preview image opens on the right-hand side. -
Enter the text you want to use as alternative text for this image in the Alternative text input field below the preview image.
-
Click Save (save).
Every PlentyONE system comes with a dedicated File Manager that allows you to store files online in your system. Additionally, all files stored in a File Manager receive a File URL which can be used to make each file available to other users and applications online. You can manage the File Manager of your system in the Shop » File Manager menu.
WARNING: Usage of the File Manager may incur additional costs. The exact terms of use of the File Manager are outlined in your contract with PlentyONE.
2.4.1. Adding alternative texts for item images via API
To handle a large amount of alternative texts, you can use the API to set the image names and alternative texts.
The route for this is:
/rest/items/XJY0P6P/images/{imageId}/names
{
    "imageId": 1000,
    "lang": "en",
    "name": "Image name",
    "alternate": "Alternative text"
  }
2.5. Accessibility statement
As part of the new BFSG requirements, a static page will be added to the shop to display the Accessibility Statement.
The accessibility statement contains comprehensive and accessible information about which content on the website is accessible and which is not yet accessible.
It also contains contact details so that users know who to contact if they encounter barriers that have not been idetnified and labelled.
A new entry will be created for the shop in the Setup » Shop » [Select client] » Legal menu.
Adding the accessibility statement:
-
Go to Setup » Shop » [Select client] » Legal.
-
Expand the Accessibility statement section.
-
Enter the text of your accessibility statement.
-
If you want to enter your accessibility statement as HTML instead, make sure that HTML is selected as Output type above and that the code (code view) is activated in the editor.
-
Click Save (save).
2.5.1. Creating a page for plentyShop LTS
If you use a plentyShop LTS, you will need to create a separate ShopBuilder page to display the accessibility statement. Proceed as follows:
Creating a ShopBuilder page for the accessibility statement:
-
Go to Shop » ShopBuilder.
-
Click New main category.
-
In the general settings, select the type Content.
-
Enter a name for the category.
-
Click Save (save).
-
In the navigation on the left-hand side, click Global settings.
-
Click in the input field Category for /declaration-of-accessibility.
-
Select the newly created category and click Select.
-
Click Save (save).
-
In the navigation on the left-hand side, click Categories.
-
Open the newly created category.
-
Click Add content.
-
Select the type Content.
-
Enter a name for the content.
-
Select the template Accessibility statement (plentyShop LTS).
-
Activate the content by activating the toggle in the Active column.
The template Accessibility statement contains a widget which shows the text that you saved in the Setup » Shop » [Select client] » Legal menu. You can customise the content in ShopBuilder to suit your needs.
2.6. Third party themes
If you are using a third-party theme, the adherence to the German Accessibility Improvement Act is the responsibility of the respective provider.
Contact your theme provider if you have any questions about the accessibility of your theme.
2.7. Implemented accessibility improvements
In addition to the aspects detailed above, further accessibility improvements have already been implemented for the shop:
-
The shop can be fully operated via keyboard inputs.
-
Input fields for users are labelled so that screen readers can recognise them.
-
Shop uses ARIA-Labels to improve accessibility.
3. Adjustments for the General Product Safety Regulations (GPSR)
The Product Safety Regulation (GPSR) comes into effect on 13 December 2024. Through it, a number of requirements regarding the display of manufacturer data will have to be met. This best practice describes which adjustments are necessary in plentyShop LTS and PlentyONE Shop in order to respond to the requirements of the GPSR.
3.1. Preparations
In order to display the necessary manufacturer data in the front end, this data first has to be maintained in the back end.
The following input fields for information on the EU Responsible Person are available in the Setup » Items » Manufacturer » [Select manufacturer] » Settings menu.
-
EU Responsible Name
-
EU Responsible Street
-
EU Responsible House No
-
EU Responsible Postcode
-
EU Responsible Town
-
EU Responsible Country
-
EU Responsible Email
-
EU Responsible Contact form
-
EU Responsible Phone number
Store this data for your manufacturers. Make sure that your manufacturers are correctly linked to your items, so that the corresponding manufacturer data can be displayed on the relevant item pages.
3.2. Display data in plentyShop LTS
In order to display the information on the EU Responsible Person in the shop, you need plentyShop LTS version 5.0.69 or higher.
However, we recommend using LTS version 5.0.70 or higher, because this version contains additional adjustments for displaying manufacturer information.
There are two ways to display manufacturer data in your shop:
3.2.1. Use the ShopBuilder default preset for item pages
Beginning with LTS version 5.0.69, the ShopBuilder preset for item pages contains all necessary changes for displaying relevant manufacturer data. The tab widget on the item page, which for instance also displays technical data, contains an additional tab in which information regarding the EU Responsible Person is displayed. You do not need to make any further adjustments.
3.2.2. Adjust existing ShopBuilder content
If you created custom contents for item pages in ShopBuilder, you will have to adjust these contents manually. For this, place a text widget anywhere on the item page and add the corresponding data fields. Please note that the data fields for EU Responsible Person are only available in LTS versions 5.0.60 and higher.
Adding manufacturer information:
-
Place a text widget on the item page.
-
In the text widget, click the pencil icon() to open the selection of data fields.
-
Expand the Manufacturer section.
-
Click on the data field you want to add. It is placed at the position of the cursor.
-
Save(save) the changes.
Take a look at what this solution looks like in our demo shop.
3.2.3. Alternatively: Use Properties
If you cannot update to the latest plentyShop LTS version in time, you can also use properties to display manufacturer information in the shop.
Proceed as follows:
Use properties to display manufacturer information:
-
Go to Setup » Settings » Properties » Configuration.
-
Click on Create property.
-
Select Item as the Section.
-
Select Text or HTML as Type.
-
Enter a Name and a Description.
-
In the Visibility section, activate the Referrer and the Clients for which you want to activate the property.
-
In the drop-down list Display activate the option Make available for ShopBuilder item page
-
Save(save) the changes.
In the next step, link the property with the corresponding items and store the necessary manufacturer data.
Then, place the property on your content for item pages via ShopBuilder, as described in the chapter Adjusting existing item contents in ShopBuilder.
3.3. Display the data in PlentyONE Shop
To display information on the EU Responsible Person in PlentyONE Shop, you require PlentyONE Shop version 1.6 or higher.
Beginning with this version, item pages include a clickable link below the item data, which opens a portlet on the right side of the screen. This portlet displays the corresponding information on the EU Responsible Person of the manufacturer.
You can take a look at how this might look in our demo shop.
3.4. Changed handling of manufacturer data as of plentyShop LTS 5.0.70 and PlentyONE Shop
The legal requirements brought about by the GPSR on 13 December 2024 are manifold. In some cases, it can be necessary to display additional manufacturer data in addition to the information about the EU Responsible Person.
You need to verify yourself whether this applies to your shop.
|
Current state up to version 5.0.69
The data on the EU Responsible Person can be maintained in the data record of the manufacturer.
However, up to plentyShop LTS version 5.0.70, it has not been possible to make this data available to the shop without manually adjusting the code.
In versions below 5.0.70, the following manufacturer data is available in the shop: |
3.4.1. Next steps / The next plentyShop version
Beginning with plentyShop version 5.0.70 the LTS assistant includes a new setting.
In the step Displayed Information, you can activate the checkboxes of the following manufacturer data to make them available in the shop:
-
Name
-
Logo URL
-
Homepage
-
Street
-
House number
-
Postcode
-
City
-
Country
-
Phone number
-
Fax number
-
Email
-
External name
|
Note
These checkboxes for manufacturer data are activated by default. |
Via the checkboxes, you can control which manufacturer data is made available in the shop. However, to display them in the shop, you need to place them as data fields in a text widget in ShopBuilder. To do so, proceed as follows.
Adding manufacturer information:
-
Place a text widget on the item page.
-
In the text widget, click the pencil icon() to open the selection of data fields.
-
Expand the Manufacturer section.
-
Click on the data field you want to add. It is placed at the position of the cursor.
-
Save(save) the changes.
|
Important information regarding the update to version 5.0.70
After updating to plentyShop version 5.0.70 (or higher), all manufacturer data specified above will be readable in the frontend if the manufacturer is linked to the accessed item and you have activated the corresponding checkboxes in the assistant, regardless of whether this manufacturer data is displayed via a text widget on the item page. This means that you may disclose manufacturer data that is only intended for your internal use and is not legally relevant. To avoid this, we advise you to either remove manufacturer data that is not absolutely necessary for the legally compliant offer of your items or to transfer it to a copy of the manufacturer that you do not use for the link to the article. You should carry out these adjustments before updating to 5.0.70. We will indicate this as a TODO in the changelog of the next version. |
4. Setting up filters
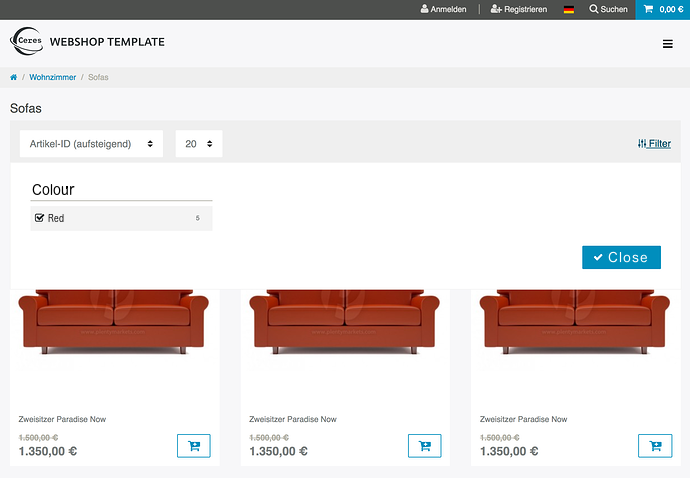
In plentyShop LTS, filters are realized by means of attributes and properties. This Best Practice describes how the filter Colour with the two values Red and Black is displayed in the category view of plentyShop. The corresponding filters are only available in the category view if there are items that are linked to the filter values.
|
First things first:
|
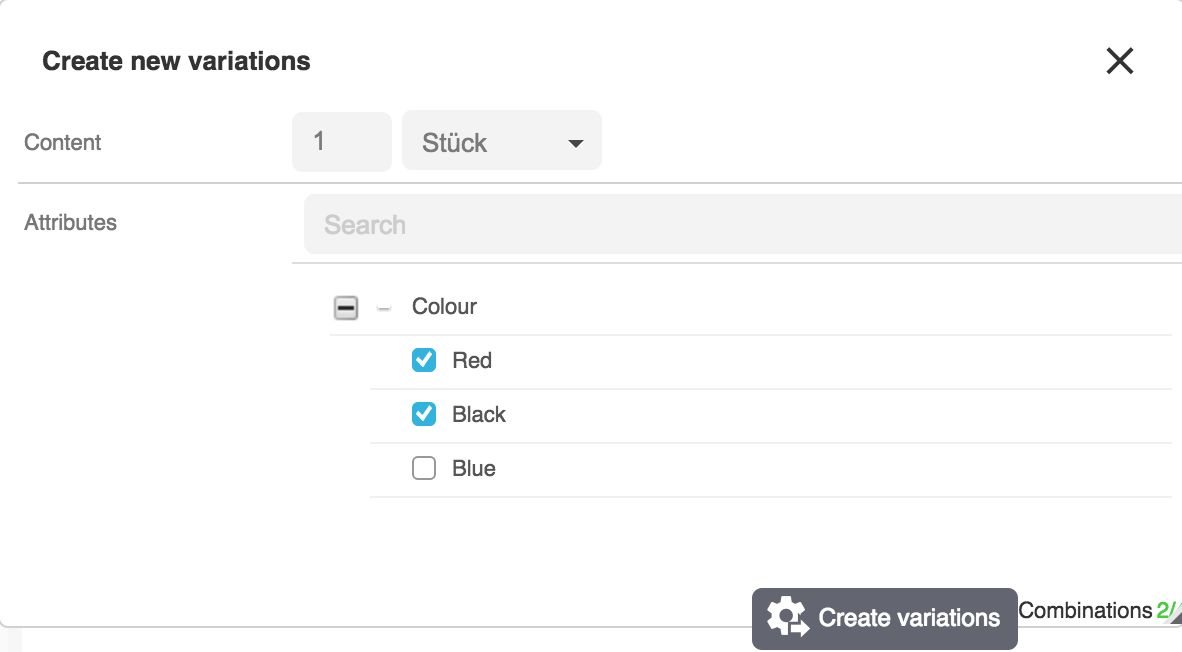
4.1. Creating an attribute
We begin with an attribute.
-
Go to Setup » Item » Attributes.
-
Click on New attribute.
-
Enter the internal name, e.g. Colour.
-
Save the settings.
→ The attribute is created and the tab Basic settings is displayed. -
Click on the Name tab.
-
Enter the translations for your attribute.
-
Click on the Values tab.
-
Click on New value.
-
Enter the internal name, e.g. Red.
-
Repeat steps 8 and 9 for the value Black.
-
Save the settings.
The attribute with the two values Red and Black is created. You can also create additional values, such as Vermilion or Burgundy, and link them to the same Red facet.
4.2. Linking an attribute with an item
You can link attributes with the main variation of an item when creating the item. When creating additional variations, you can link these variations with attribute values, too. You will now create variations in the Variations tab of the item. These variations have to be active in plentyShop, so that the filter will be available later on.
4.3. Setting up facets
In plentyShop, our filters are realized by means of facets. Therefore we have to create a new facet and link the attribute values and the desired client to it.
-
Go to Systems » Client » Settings » Online store » Faceted search.
-
Click on New to create a new facet.
-
Enter a Name for the facet in the default language of your system, e.g. Colour.
-
Select the type Attribute/Property.
-
Enter the facet’s position in plentyShop.
-
Save the settings.
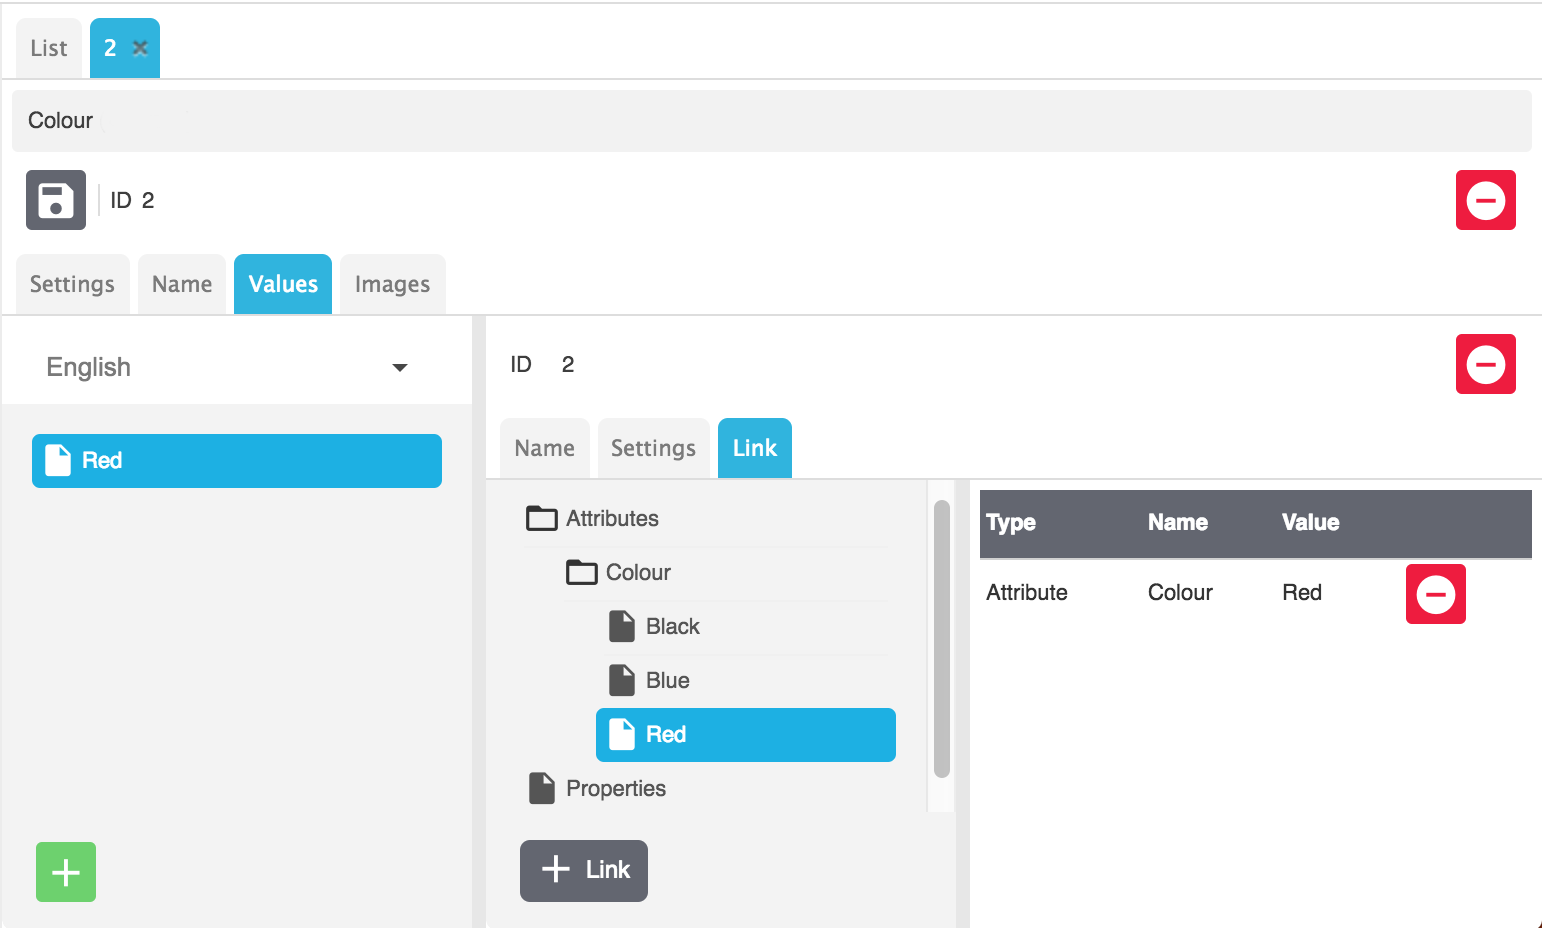
4.4. Linking attribute values to facets
-
Go to Systems » Client » Settings » Online store » Faceted search.
-
Open the facet.
-
Click on the Name tab.
-
Enter the translation for your facet.
-
Click on the Values tab.
-
Click on Add new value.
-
Enter the name, e.g. Red.
-
Enter the position.
-
Save the settings.
→ The facet value is added. -
Enter the translations for the facet value in th Name tab.
-
Click on the Link tab.
-
Open the attribute Attribute » Colour » Red.
-
Click on Link.
-
Repeat steps 6 to 13 for the value Black.
-
Save the settings.
5. Setting up order characteristics
In this Best Practice we will create a property through which you can enter a text that can be printed onto a T-shirt. The input will automatically calculate a surcharge for the product.
|
The most important things first:
|
|
Order properties
This Best Practice is about order characteristics. Order characteristics are an obsolete functionality in PlentyONE and should no longer be used for plentyShop. Instead, you can implement the same functionality on the level of the variation with the help of order properties. You can learn how to create and manage order properties on the order properties manual page. |
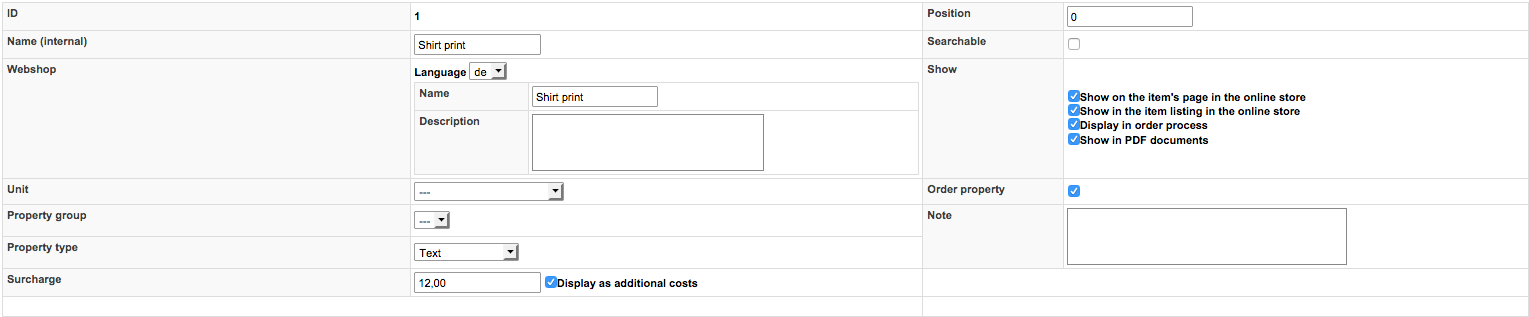
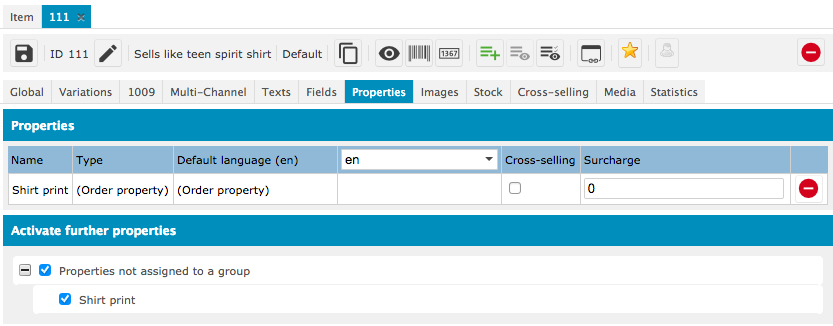
5.1. Creating order characteristics
We begin with an property.
-
Go to Setup » Item » characteristics.
-
Click on the New property tab.
-
Enter the Name (internal). This is the name of the property that is displayed in the back end.
-
Enter the Name in the Online store area. This is the name that your customers see in the item view. In this example we choose “T-shirt print”.
-
Choose Text from the Property type list.
-
Enter the Surcharge that should be added if the property is used. In this example we choose 12,00 euros for a T-shirt print.
→ Check the box Display as surcharge so that the customer sees the surcharge for the property in the item view. -
Check all the boxes in the Display area in order to keep the additional charges transparent throughout the entire order process.
-
Check the box Order property to define the property as such.
-
Save the settings.
→ The property will be created.
Your property interface should now look like this:
5.2. Linking an order property to an item
Characteristics are directly linked to the item. Proceed as follows:
-
Go to Item » Edit item.
-
Select an item with which the property should be linked.
-
Click on the Characteristics tab.
-
Go to Activate further characteristics » Characteristics not assigned to a group and check the box of the created property.
-
Save the settings.
→ The property is linked to the item and is shown under Characteristics.
|
Surcharges
You can also enter a surcharge in the Characteristics options. If you enter a value here, it overwrites the value of the surcharge that was saved for the property. |
5.3. Deploying plugins
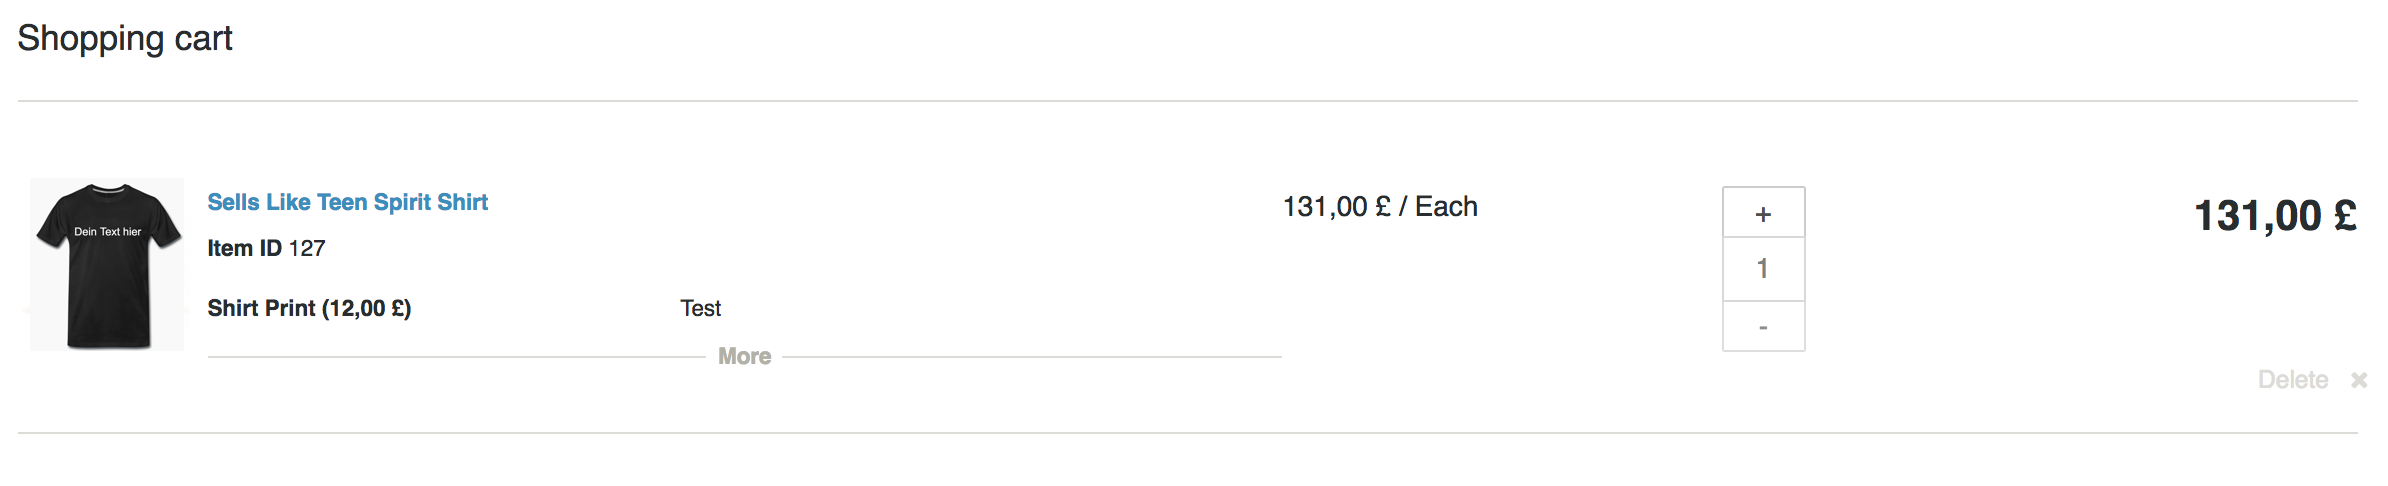
Now you will deploy the plugins in a plugin set in order to apply the changes. The order property will be available in the Item view and the Shopping cart.
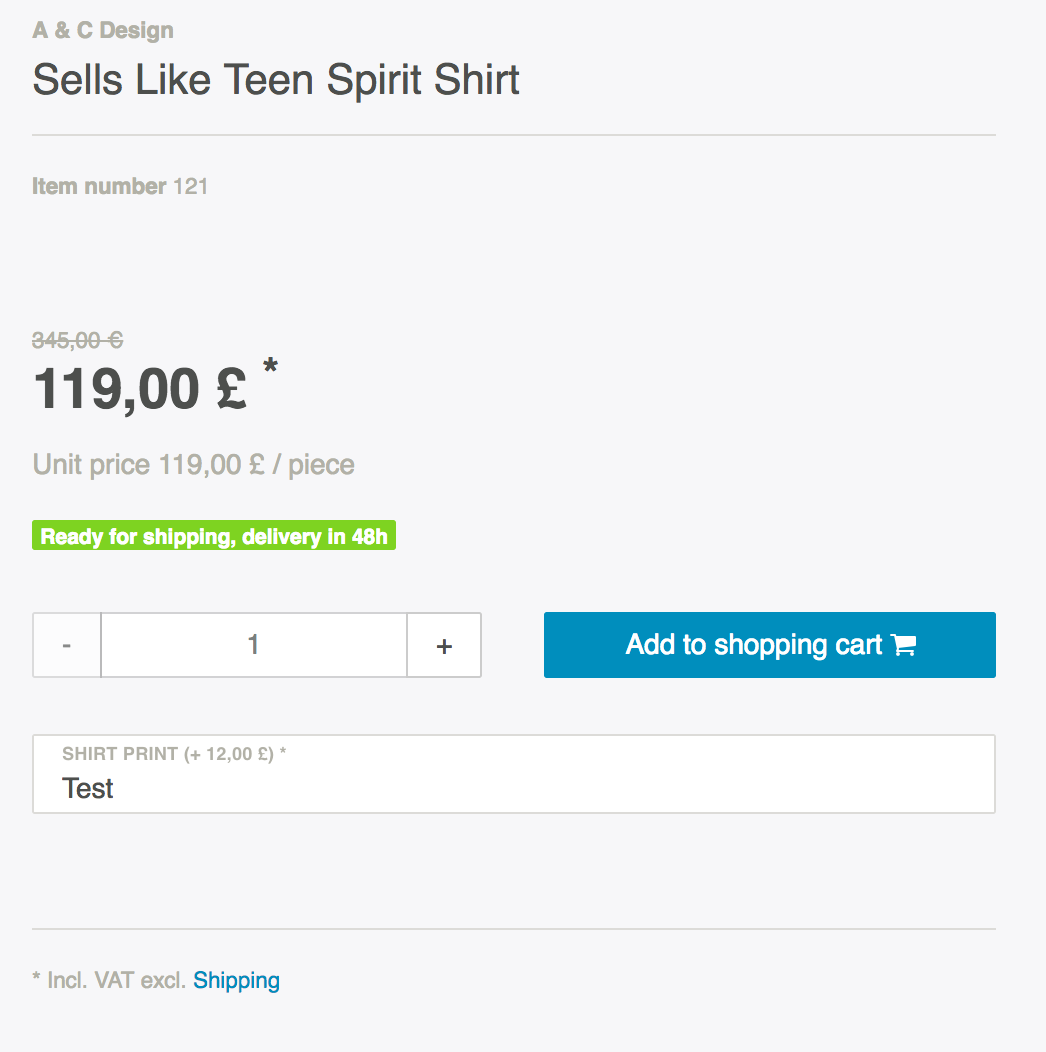
If the customer inputs something into the text field, the text is saved and the surcharge is added to the item price.
5.4. Setting up order characteristics with checkboxes
In this Best Practice we will create an order property that is displayed with a checkbox in the single item view. If the checkbox is checked, the surcharge for the product will automatically be calculated.
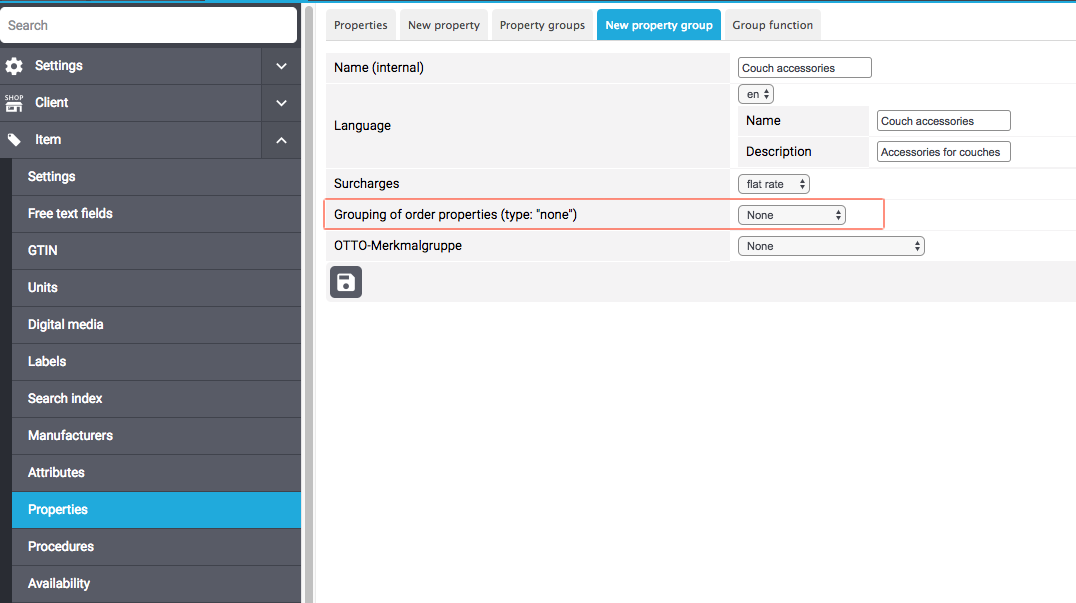
5.4.1. Creating a property group
In the first step we will create a new property group. In our example we want customers to be able to purchase complementary couch accessories through checking the checkbox.
-
Go to Setup » Item » Characteristics.
-
Click on the New property group tab.
-
Enter a Name (internal) for the property group to be displayed in the back end.
-
In the Language area you can enter a name and a description for the property group in various languages to be displayed in plentyShop.
-
Select None from the drop-down list Grouping of order characteristics (type: "none")
-
Save the settings.
5.4.2. Creating order characteristics
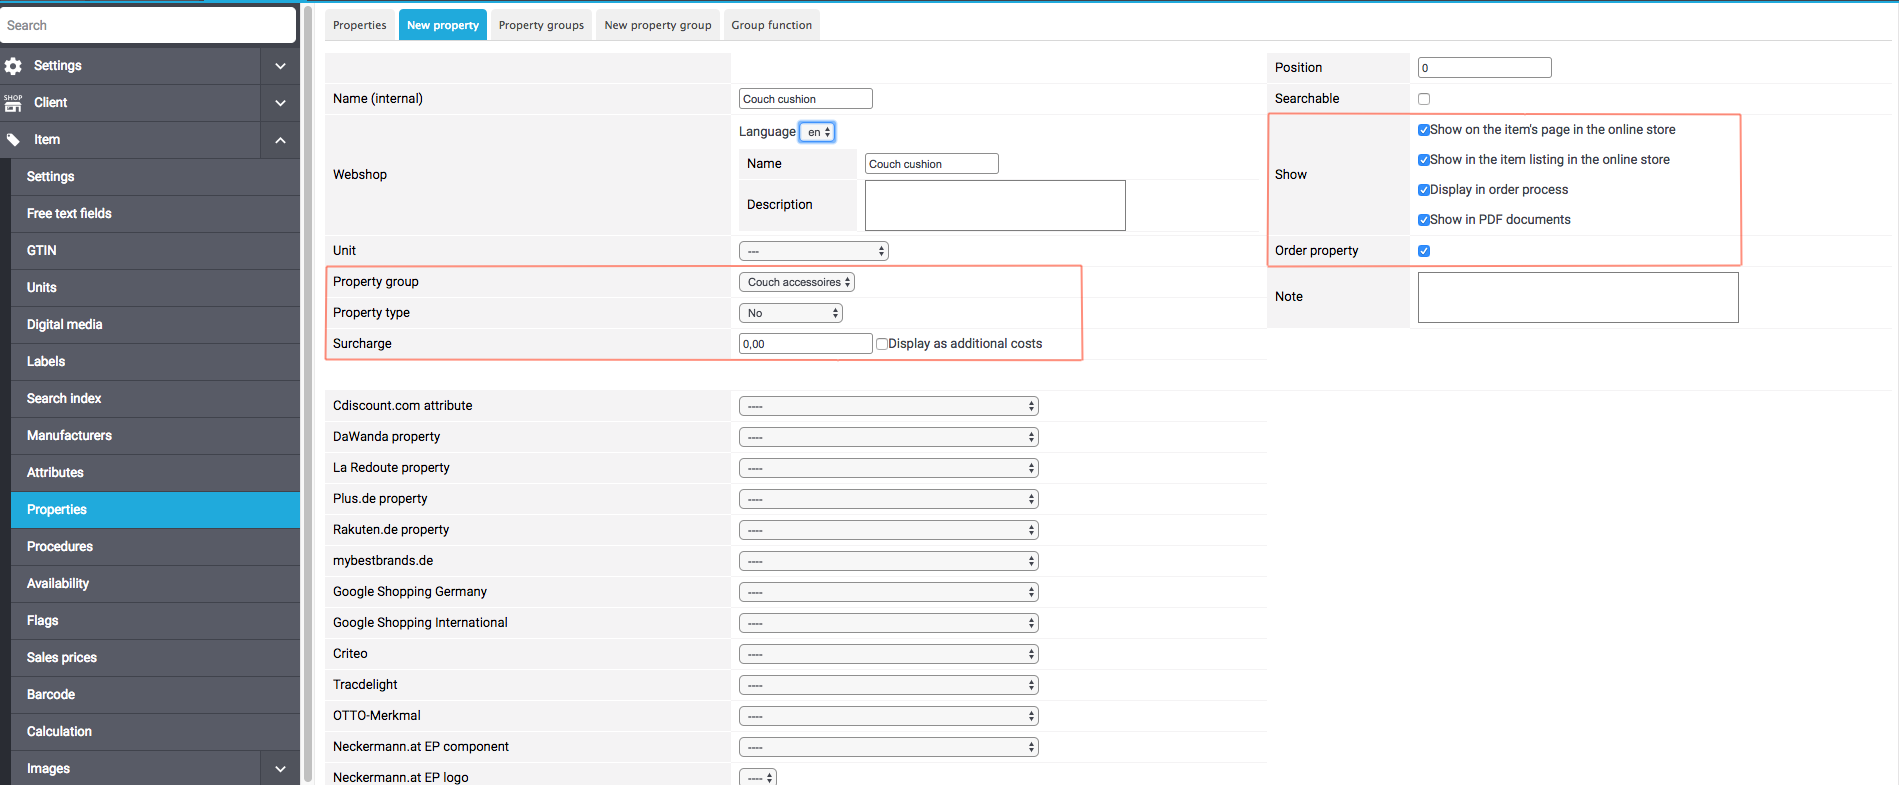
After we have created a property group for couch accessories, we now want to set up a new property, e.g. a couch cushion, and link it to the property group.
-
Go to Setup » Item » Characteristics.
-
Click on the New property tab.
-
Enter a Name (internal) for the property to be displayed in the back end.
-
In the Webshop area you can enter a name and a description for the property in various languages to be displayed in plentyShop.
-
Select the newly created property group from the Property group drop-down list.
-
Select None from the Property type drop-down list.
-
Enter the Surcharge that should be added if the property is used. In this example we choose 15.00 euros for a couch cushion.
→ Check the box Display as surcharge so that the customer sees the surcharge for the property in the item view. -
Check the boxes in the Show area for the areas in which you want to display the property.
-
Check the Order property box.
-
Save the settings.
The order property couch cushion has been successfully created.
5.4.3. Linking an order property to an item
Last but not least, we ned to link the desired item with the newly created order property.
-
Go to Item » Edit item.
-
Select an item with which the property should be linked.
-
Click on the Characteristics tab.
-
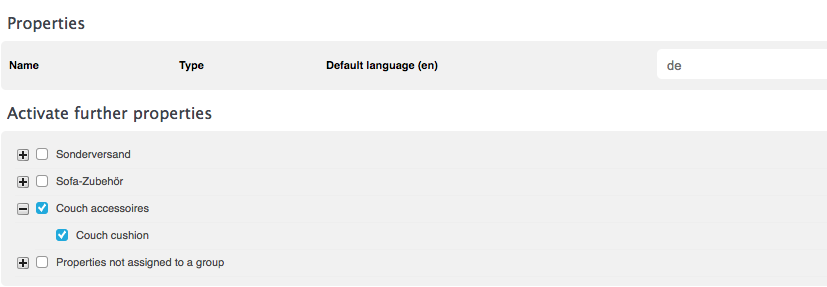
Go to Activate further characteristics and check the box of the newly created property group.
-
Save the settings.
→ The property will be linked with the item.
|
Displaying changes
Please note that it may take about 15 minutes until the changes are displayed in plentyShop. This is the interval in which the ElasticSearch index is refreshed. |
6. Setting up cross-selling item lists
This Best Practice guide helps you set up item lists of the type cross-selling in plentyShop LTS. If you’re using ShopBuilder, you can use the item list widget and don’t need this Best Practice.
|
First things first…
|
6.1. Setting up cross-selling item lists
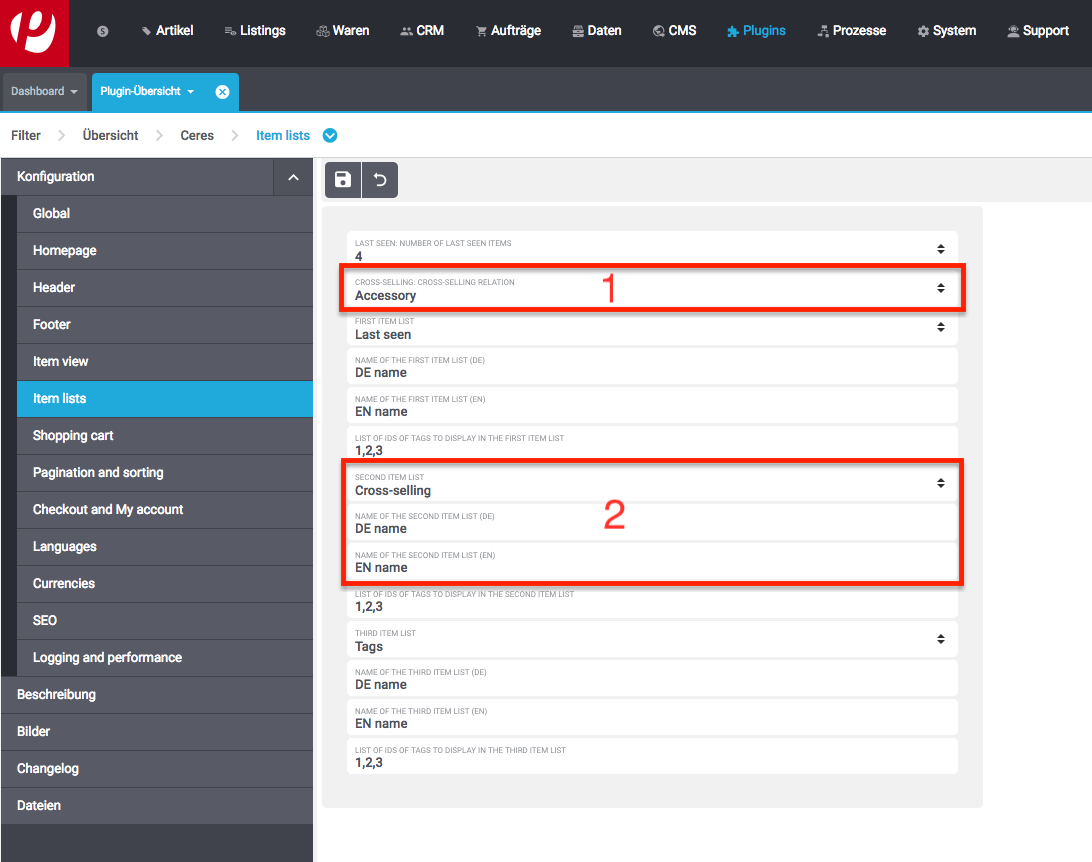
Go to Plugins » Plugin overview » plentyShop LTS » Configuration » Item lists. In this menu you can determine which type of item list you want to use in your plentyShop. Select the type of cross-selling relation that your item list should display from the Cross-selling: Cross-selling relation drop-down list (see box 1 in the image). You can choose from the options Similar, Accessory, Replacement parts and Collection. This cross-selling relation will apply to all cross-selling item lists in your plentyShop.
In the next step you determine which item list you want to use. Edit the First item list, Second item list or Third item list and select Cross-selling from the drop-down list. In the example below, the Second item list is configured as a cross-selling list (Box 2 in the image). Enter a German and an English name for your item list in the input fields Name of the second item list (DE) and Name of the second item list (EN), respectively.
Save the settings you have carried out.
6.2. Displaying cross-selling item lists in the plentyShop
After you have determined which item list you want to use for your cross-selling items, you now choose where the item list is to be displayed in your plentyShop.
Open the Shop » Container links menu.
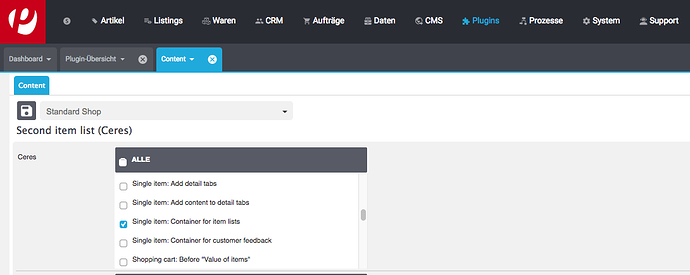
Go to the item list that you have configured as your cross-selling item list, i.e. First item list, Second item list or Third item list. Choose the layout container in which you want to display your cross-selling item list. In the example below, the second item list is displayed in the container of the single item view.
|
Displaying changes
Please note that it may take about 15 minutes until the changes are displayed in plentyShop. This is the interval in which the ElasticSearch index is refreshed. |
7. Improving your Google Page Speed Insights rating
In this Best Practice you will learn which measures you can take to improve the Google Page Speed Insights performance rating of your plentyShop. In a first step, you will learn which of the standard plentyShop LTS functionality you can use in order to achieve higher PSI values. At a later point, this guide will also include modifications you can implement via a theme in order to attain a higher performance rating. The measures explicated below require no background in programming whatsoever.
The following chapters detail a number of adjustments you can make to your plentyShop that you can implement without the need to code:
7.1. Activating the Live Mode in the plentyShop LTS plugin
The plentyShop LTS plugin offers you the possibility to choose between the Development mode and the Live mode. In the development mode, you can use debbuging options and the plugin files are neither minimised nor bundled, which can negatively impact the performance of your plentyShop. We advise you to operate your oplentyShop in live mode, in order to increase the performance. Take the following steps to activate live mode:
Activate live mode:
-
Open the menu Plugins » Plugin set overview.
-
Select your plugin set.
-
Click Edit plugin set.
-
In the row of the plentyShop LTS plugin, click Settings.
→ The plentyShop LTS settings are opened. -
Click on the tab Logging and performance.
-
Select the option Live mode for the setting Performance level.
-
Save () the settings.
If you activate the live mode, the plentyShop LTS files are bundled and minimised, resulting in a quicker loading of the pages of your plentyShop.
7.2. Activating Vue Server-Side Rendering
With the release of plentyShop LTS v5.0.29, we’re introducing Vue Server-Side Rendering (SSR). SSR makes it possible that many components of the online shop are already processed on the server. Therefore, the browser receives pages that have already been rendered. The browser does not need to execute the received code again. This improves the rating of mobile pages in particular.
We added the setting Activate Vue Server-Sider Rendering to the plentyShop assistant and the plentyShop LTS settings in the Performance settings. You should initially activate this setting in a separate plugin set and test your shop thoroughly before you activate SSR for your productive system.
If you want to use SSR, you should also adjust the image widgets that you use on your pages. You have two important settings for image widgets at your disposal: Peloading and lazy loading. The following chapters explain how to optimise your image widgets.
7.3. Optimising image widgets
Image files are one of the major culprits for low shop performance. You should, if possible, only include as many image widgets on your plentyShop pages as you need for your purposes. A lower number of image widgets per page will positively impact the performance of your plentyShop.
7.3.1. Preloading images in the visible area
With the release of plentyShop LTS v5.0.29 we added the setting Preload image to the widgets image box, image carousel, background widget, and item image. This setting can only be used in combination with Server-Side Rendering (see above). By peloading images that are located in the initially visible viewport of your pages, you can significantly decrease the Largest Contentful Paint (LCP). The LCP is the largest rendered content element in the visible area. Usually, this is a large image.
You should activate the setting Preload image for all images that are visible on the page before the user scrolls further down the page. You can learn how to identify the Largest Contentful Paint on your pages below.
7.3.2. Activating lazy loading for images that are not initially visible
Additionally, we recommend that you activate the option Only load visible content in the widget settings of every widget that includes images. This option, the so-called "Lazy loading", makes sure that image files which are not visible upon the initial access of the relevant page are loaded at a later time. The initial loading time of your plentyShop pages is positively impacted by activating this option.
This setting is deactivated by default in the ShopBuilder presets.
|
If you use Server-Side Rendering (SSR), it is important that you only activate lazy loading for image widgets that are not located in the initially visible viewport. |
7.3.3. Using modern image formats
Furthermore, we advise you to use modern image formats for the images you include in your plentyShop. For the widgets Background image, Image box, and Image carousel, we recommend that you use the input field Image selection to store images in the format WebP or AVIF. If you store a WebP or AVIF image, the additional input field Image selection for older browsers will be displayed, which serves to display fallback images in browsers, that are not yet compatible with modern image formats. If possible, we advise you to store images in JPEG format for these browsers.
7.3.3.1. Automatic conversion into modern image formats
To automatically convert item images in plentyShop into the WebP and AVIF formats, you can use the setting Automatic conversion to modern image formats. You can find the setting in the Performance step of the plentyShop LTS assistant.
This setting ensures that item images that are not yet available in a modern format are automatically generated in this format as soon as they are requested by the browser.
To use this function, you only need to activate the setting and publish the plugin set. The conversion is triggered automatically as soon as an item image is accessed.
Please note that because the images have to be converted once initially, the initial loading time will be increased.
Using modern image formats reduces the image size and can therefore lead to faster loading times.
Please note that activating this setting can lead to additional cloud storage costs for content and item images.
However, due to the smaller image size, lower traffic costs can also be expected.
The format in which the images are published depends on the browser compatibility with the formats.
If the browser used supports the AVIF format, this image format is used.
This is the case with most browsers.
If the browser does not yet support AVIF, the WebP format is used instead.
If the browser does not support either format, the format of the originally uploaded image is used, which is usually PNG or JPG.
To reduce the size of the converted images, you should deactivate the Lossless compression option in the Setup » Item » Images » Sizes menu for the AVIF and WebP formats.
|
Conversion time
The time it takes for item images to appear upom the first access is highly dependent on the size in which the item image was uploaded. For example, if the size of the originally uploaded image is 3000x3000px and the image size full is limited to 1500x1500px, the automatic conversion can take significantly longer than if the original image had the same size as the number of pixels specified under full. You set the size adjustments for the item images in the menu Setup » Articles » Images » Sizes. |
|
Zoomed image on single item view
Even if the setting Automatic conversion to modern image formats is active, the zoom image on the item page is not converted. The zoom image is the image that opens in an overlay when you click on the large item image. |
7.3.4. Identifying the Largest Contenful Paint (LCP)
You can use PageSpeed Insights to identify the Largest Contentful Paint of your pages.
Identifying the LCP:
-
Open PageSpeed Insights.
-
Enter the URL of the page for which you want to identify the LCP.
-
Click on Analyze. → The page analysis is started.
-
After the analysis has been concluded, scroll down to the Diagnostics area.
-
Click on Largest Contentful Paint element, to expand the section.
-
The content element displayed there is the LCP of this page.
After you have identified the page’s LCP, you can now check if you:
-
activated the setting Preloaded image in combination with SSR
-
stored the image in WebP image format
-
can decrease the image’s file size
These three measures can help you significantly in reducing the page’s Largest Contentful Paint.
7.4. Reducting the number of widgets
The number of widgets you include on each page is prone to negatively affecting the performance of your plentyShop. The larger the number of widgets per page, the slower the loading times. This is particularly applicable to image widgets and to widgets that necessitate a large quantity of item data. Each additional widget impacts the time to first full interactivity of the page.
We therefore recommend you use only as many widgets per page as is necessary for your purposes. On category pages, in particular, it is advisable to reduce the numver of displayed items, since category pages need to load large quantities of data and complex Javascript.
7.5. Activating the ShopBooster
The Time to first Byte (TTFB) is also part of the parameters evaluated by PSI, albeit to a small degree. In order to improve your TTFB values, you can activate the additional ShopBooster module for a fee. By activating the ShopBooster, page contents of your plentyShop are written into the cache, so that a second access to the page will benefit from greatly improved TTFB times.
The use of ShopBooster is particularly fruitful in combination with Server-Side Rendering (SSR), since using SSR can slightly increase the TTFB of your shop.
|
No additional costs
The ShopBooster and all its functions can be used at no additional cost. |
You can find additional information about ShopBooster on the plentyShop manual page.
7.6. Avoid invisible text caused by custom fonts
If you include custom fonts for your plentyShop and do not use the drsign settings of the ShopBuilder, it is possible that browsers try to display certain sections of text before the custom font is loaded. As a result, your plentyShop may be prone to a so-called Flash of invisible text (FOIT), meaning a short time during which the text you want to display cannot be displayed by the browser.
In order to avoit FOITS, you can use a CSS command to intermittenly display a system font instead of your custom font. to do so, you add the directive font-display: swap in your @font-face styles, for instance by using the Custom CSS/JS in the front end) plugin. You can thereby prevent annyoing FOITS to happen, which can have a positive impact on the PSI rating of your plentyShop.
7.7. Avoiding Javascript in code widgets
The ShopBuilder provides a code widget via which you can integrate additional adjustments that are not covered by ShopBuilder itself. If you want to inplement a piece of code, we advise you to avoid using Javascript in the code widget of the ShopBuilder. Instead, you can, for instance, use the Custom CSS/JS in the front end plugin or include the Javascript in a theme. Including additional Javascript in code widgets negatively impacts the loading times of your plentyShop.
If you integrate additional Javascript via an external plugin or a theme, we recommend that you place the Javascript at the lower end of the HTML body.
7.8. Linking payment plugins to the right containers
If you use payment plugins for your plentyShop that involve larger quantities of data (such as AmazonPay or PayPal), it is imperative for the performance of your plentyShop to link these plugins to the correct corresponding template containers. We added new template containers with the release of plentyShop LTS 5.0 in order to load Javascript and CSS of payment plugins only in the places that they are needed for the successful order process.
The plugin guides of the respective payment plugins, such as PayPal, already include detailed descriptions on how to link the contents of the plugins to the corresponding template containers. In general, you should link the Javascript of the payment method to the container Checkout.AfterScriptsLoaded and no longer to ScriptLoader.AfterScriptsLoaded. This can positively impact the performance of your plentyShop.
8. Adjusting the online shop search
This Best Practice supports you in familiarising yourself with the various search options available in plentyShop, so that you can customise the online shop search for the purposes of your store.
The search settings are mainly carried out in the Search step of the plentyShop LTS assistant, which you can find at Setup » Assistents » Plugins » Select plugin set » plentyShop LTS.
8.1. Sorting search results by relevance
The sorting value Relevance sorts search results in accordance with a numeric score that the PlentyONE system determines. The higher this numeric score, the higher the corresponding item’s position in the list of the search results. You can determine the calculation of the relevance score in 2 different places in the backend: The plentyShop LTS assistant hosts a slimmed version of this setting in the Search step under Priorisation of search values for the "Relevance" option. You can find the complete priorisation settings in the Setup » plentyShop » Global settings » Search settings » Settings menu.
Here, you can activate item data fields that you want to be considered in the calculation of the Relevance score. If you activate the fields Name 1, Description, and Keywords, for instance, an item that includes the entered search term in all three item fields will be considered to be more relevant than an item that only contains the search term in its name. The first item will thus be displayed higher in the list of search results than the latter item.
|
You should deactivate the field Name (deprecated) This fields subsumes the three data fields Name 1, Name 2, and Name 3. You can exert more precise influence over the relevant sorting if you deactivate this field. |
The boost of the individual data fields serves to determine the priorisation. The precise value of the individual boost fields is less important than the order of the boost values. If the boost value for the field Name 1 is higher than the value for Name 2, an item that includes the entered search term in the field Name 1 will receive a higher numeric relevance score than an item that includes the search term in the field Name 2.
The sorting by Relevance will usually list those search results first, that correspond to all of the entered search terms, followed by those results that only contain a part of the entered searchs terms.
|
Note that the item data fields you activate in the Consider in search suggestions area are automatically activated in the Consider in search results area, as well. If necessary, you can set the boost value of certain fields to 0 if you don’t want them to affect the Relevance sorting value. |
8.2. Sorting search results by recommended
The sorting value Recommended serves to sort search results in accordance to 3 values that you select and prioritise. You carry out these settings in the field Recommended sorting of search results in the Search step of the plentyShop LTS assistant.
The 3 sorting values interact with each other in the following way: Your items are first checked for the first sorting value; if 2 or more items would be sorted into the same position of the search results, the second value affects the sorting of the search results. If, as a result of the second sorting process, 2 or more items would be sorted into the same position, the third value becomes effective.
Example:
You’ve configured the recommended sorting of search results in your online shop in such a way that the first sorting value is Relevance, followed by Variation position as the second and Price (increasing) as the third value. A customer of your shop enters "Blue pants" as a search term. The search now goes over your entire item catalogue and assesses it according to the relevance sorting. The item data fields of your items are checked for both search terms ("blue" and "pants"). Depending on the item data fields you’ve activated for the Relevance sorting (name, description, etc.), multiple results may be returned that have the same (invisible) numeric relevance score. In the next step, the results are checked for their Variation position, which you either entered yourself or which is determined by the monthly sales. Finally, those results that have both the same relevance score and the same variation position are sorted by their price.
8.3. AND search
Currently, it is not possible to set up plentyShops in such a way that the search only functions as an "AND" search, i.e. that the search exclusively returns results that correspond to all search terms. However, the plentyShop search can simulate an "AND" search. For this, you need to select the sorting value Relevance for the setting Default sorting of search results in the Search step of the plentyShop LTS assistant. Alternatively, you can also select the sorting value Recommended, as long as Relevance is selected as the first value of the recommended sorting option.
That way, search results that contain all of the entered search terms are displayed first, followed by those that only correspond to parts of the search query. It is not possible to exclude the latter from the search.