PayPal
With the PayPal plugin, you integrate the PayPal payment methods in your online shop and make them available to your customers. To do so, download the PayPal plugin from the plentyMarketplace. The setup of the payment methods is done via an assistant. You also have to carry out a few basic settings in your PlentyONE system so that the payment methods are activated in your system.
The explanations in this section apply after adding the plugin. You can find more information on adding and installing plugins in the Plugins section of the manual.
Once the PayPal plugin is installed, payments are automatically imported into the PlentyONE system via the linked PayPal account. In the assistant, you can set how often you want the import to take place. If the import is done and all assignment criteria are met, PayPal payments are automatically assigned to the respective orders. Due to technical restrictions of PayPal, in exceptional cases the import may take up to 3 hours.
|
Differences between plugin versions
As there are a few differences between the plugin’s version 5 and 6, some chapters of this page contain tabs. Select the respective tab in order to get the information that are relevant for you. |
1. Update to plugin version 6.0
|
Update to version 6
Version 6.0 of the PayPal plugin provides some new features. When doing the update, pay attention to the following points:
|
Updating to version 6.0:
-
Go to Plugins » Plugin set overview.
-
Open the plugin set you want to update.
-
In the line of the plugin under Actions, click on Update.
→ The tooltip Update available shows that a new version is available.
→ You are forwarded to the overview for the update. -
Select the version of the plugin that you want to update to.
→ For the PayPal plugin version 6.0.0, the plugins IO and plentyShop LTS are required at least in version 5.034. -
Click on Update.
→ The update may take some time. -
Once the update is done, deploy the plugin set.
→ In the plugin set, the versions of the plugin should be the same in the columns Installed and Deployed. -
Complete the assistant. Pay attention to the points mentioned above.
→ It is possible that PayPal is not available as payment method for a short period of time until everything has been completed. Thus, consider this when planning the update.
If you are on version 5.X of the PayPal plugin, no further steps are required here. In case you want to update to version 6, switch to the tab of version 6.X.
2. Requirement: Opening a PayPal business account
To work with PayPal, you first need a PayPal business account. You get information as well as login details when you open the account. Without these, the plugin cannot be set up and is not usable. If you don’t have one yet, open a PayPal business account first.
3. Completing the assistant
|
Settings from version 6.3.0
From version 6.3.0 you will no longer find the settings in the assistant, but under Setup » Orders » Payment » PayPal. A guided tour is available for this menu. You can find the tour under Setup » Guided setup » Setting up plentyShop » Setting up PayPal. |
|
Activating the plugin set in the main client
For account linking and the functionality of event procedures, the PayPal plugin has to be activated in the plugin set used for the main client. Since there is a dependency on the IO plugin, IO must be active for the deployment process (saving the plugin set). |
After you have installed the plugin the corresponding assistant is available. Proceed as follows to complete the assistant and thus set up the payment method.
Setting up a payment method:
-
Go to Setup » Assistants » Plugins » [select Plugin set].
-
Select the assistant PayPal.
-
Complete the assistant.
The payment method PayPal is available in your online shop.
The PayPal assistant contains the option Address validation in the section Order processing. This validation is automatically activated. You have to select to deactivate the validation. You can either deactivate the validation for selected or for all countries. To do so, check () the countries for which addresses are not to be validated.
If the payment should also be executed with an incomplete address you should deactivate the address validation.
The default validation is a PayPal requirement. The validation checks if there is a complete address. It is not validated whether this is an actually existing address. The payment is only executed successfully if there is a complete address.
The PayPal address validation is important for the coverage when shipping goods. Moreover, PayPal offers buyer and customer protection, which is especially important when orders are processed with PayPal Express. In this case, the address is transmitted by PayPal itself.
Depending on the configuration of your plugin sets and clients, the PayPal assistant has to be completed more than once. Only this ensures that the PayPal payment methods are configured correctly and all functions such as event procedures and crons run smoothly in the background.
The following tables show you which assistants you have to complete in which plugin set. The upper row displays the configuration of the plugin sets and clients. The second row lists correspondingly, in which set the PayPal assistant has to be completed for which client.
Important: The examples are not about either or. The assistant has to be completed several times for multi-clients because it always also has to be completed in the plugin set which is linked with the main client.
Example 1:
Your plugin sets and clients: |
Plugin set 1 is linked with the main client |
Plugin set 2 is linked with multi-client 1 |
Plugin set 3 is linked with multi-client 2 |
Complete the assistant: |
Complete the PayPal assistant in this plugin set for all the clients. This means for the main client, for multi-client 1 and for multi-client 2. |
Complete the PayPal assistant in this plugin set for multi-client 1. |
Complete the PayPal assistant in this plugin set for multi-client 2. |
Example 2:
Your plugin sets and clients: |
Plugin set 1 is linked with the main client |
Plugin set 2 is linked with multi-client 1 and multi-client 2 |
Complete the assistant: |
Complete the PayPal assistant in this plugin set for all the clients. This means for the main client, for multi-client 1 and for multi-client 2. |
Complete the PayPal assistant in this plugin set for multi-client 1 and for multi-client 2. |
Example 3:
Your plugin sets and clients: |
Plugin set 1 is linked with the main client and to multi-client 1 |
Plugin set 2 is linked with multi-client 2 |
Complete the assistant: |
Complete the PayPal assistant in this plugin set for all the clients. This means for the main client, for multi-client 1 and for multi-client 2. |
Complete the PayPal assistant in this plugin set for multi-client 2. |
Example 4:
Your plugin sets and clients: |
Plugin set 1 is linked with the main client, with multi-client 1 and with multi-client 2 |
Complete the assistant: |
Complete the PayPal assistant in this plugin set for all the clients. This means for the main client, for multi-client 1 and for multi-client 2. |
4. ShopBuilder widgets
The PayPal Banners for PayPal Installment are available as widgets in the ShopBuilder. Moreover, you can use a ShopBuilder widget to configure the PayPal buttons for the different payment methods. The form, the label and the background colour of the Payment method buttons can be adjusted.
The PayPal Express Checkout Button and the Banners for PayPal Installment are available as widgets in the ShopBuilder.
5. Linking template containers
|
Information about linking containers
The containers needed by default are automatically linked during setup with the PayPal assistant. From version 5.4.0 on, required as well as optional containers are linked in the same plugin set in which the assistant is completed. |
You have multiple options to integrate the PayPal Installment Banners into your online shop. To do this, the PlentyONE system offers containers at relevant places which can be filled with content to meet your needs.
Linking template containers:
-
Go to Plugins » Plugin set overview.
-
Open the plugin set you want to edit.
-
Open the plugin PayPal.
-
Click on Container links.
-
From the drop-down list, select the data provider you want to link.
-
Select the container you want to link to the data provider. Pay attention to the explanations given in Table 1.
-
Repeat steps 5 and 6 for all data providers you want to link to containers.
-
Save (save) the settings.
| Content | Explanation |
|---|---|
Banners for PayPal Installments |
Optional: The Banners for PayPal Installments can be placed in many different ways to promote this payment method. You can choose between a graphic banner (PayPal Installment Graphical Promotion Banner) and a text banner (PayPal Installment Text Promotion Banner). A separate integration is not necessary. In the assistant, the banners can automatically be linked to an item page, the cart or the checkout. Additionally, the banners are also available to you as widgets in the ShopBuilder. Thus, they can be placed where they are needed, e.g. on landing pages, item pages, the shopping cart or the checkout. |
You have different options how to integrate PayPal PLUS, the PayPal Express Checkout button and the Banners for PayPal Installments in your online store. To do this, the PlentyONE system offers containers at relevant places which can be filled with content to meet your needs.
Linking template containers:
-
Go to Plugins » Plugin set overview.
-
Open the plugin set you want to edit.
-
Open the plugin PayPal.
-
Click on Container links.
-
From the drop-down list, select the data provider you want to link.
-
Select the container you want to link to the data provider. Pay attention to the explanations given in Table 2.
-
Repeat steps 5 and 6 for all data providers you want to link to containers.
-
Save (save) the settings.
| Content | Explanation |
|---|---|
General |
|
PayPal Checkout Scripts |
The container Checkout: After scripts loaded has to be linked. |
PayPal Confirmation Scripts |
The container Script loader: After scripts loaded has to be linked. |
PayPal Express Button Scripts |
The container Script loader: After scripts loaded has to be linked. |
PayPal Styles |
The container Template: style has to be linked to activate the styles required by PayPal and to offer optimal functionality. |
PayPal Express Checkout button |
Optional: The PayPal Express Checkout button can be individually placed, e.g. next to the shopping cart. By clicking on this button, customers can purchase the content of the shopping cart immediately without going through the regular checkout. Instead, the customer is immediately forwarded to the PayPal payment process. The shipping address is provided by PayPal. |
Banners for PayPal Installments |
Optional: The Banners for PayPal Installments can be placed in many different ways to promote this payment method. You can choose between a graphic banner (PayPal Installment Graphical Promotion Banner) and a text banner (PayPal Installment Text Promotion Banner). A separate integration is not necessary. In the assistant, the banners can automatically be linked to an item page, the cart or the checkout. Additionally, the banners are also available to you as widgets in the ShopBuilder. Thus, they can be placed where they are needed, e.g. on landing pages, item pages, the shopping cart or the checkout. |
PayPal Reinitialize Payment / PayPal PLUS Reinitialize Payment |
A link with the container My account: Additional payment information allows the customer to reinitialise the payment in the My account area after an unsuccessful transaction. For PayPal, the Order now button is displayed, for PayPal PLUS, the Wall is displayed. |
PayPal PLUS |
|
PayPal PLUS Wall |
A link with the container Checkout: Override payment method replaces all previous payment methods with the PayPal PLUS Wall. Any payment methods offered in addition to those included in the Wall – PayPal, Debit and Credit card – are displayed below these four inside the wall in the order of their priority. |
Additional information about the PayPal PLUS Wall
Apart from the PayPal PLUS payment methods, 10 further payment methods can be shown in the checkout within the PayPal PLUS Wall.
For Germany, for example, the payment methods Debit and Credit card are possible. With this, a maximum of 14 payment methods can be shown in the checkout.
But if, for example, only PayPal and Credit card are allowed for a certain delivery country, the maximum number is restricted to 12.
Moreover, PayPal PLUS limits the number of characters for the names of the other payment methods. The maximum number of characters is limited to 25. If a name has more than 25 characters, it is truncated.
Note that special characters, e.g. an umlaut, reduces the number of characters, because they are read out in HTML-style.
PayPal states the following:
-
max. image size of 100 x 25 px
-
max. 25 characters for methodName
-
max. 120 characters for description
6. Activating webhook notifications
|
Information about webhooks
The webhooks needed by default are automatically activated during setup with the PayPal assistant. You can carry out individual settings for webhooks in the Additional settings step of the assistant. You will receive the information that you can enter manually for PayPal webhooks from PayPal when you create a developer account there as a merchant. |
Your PlentyONE system and the PayPal interface communicate with the help of webhooks. For certain events, such as an incoming payment, PayPal sends a webhook notification to PlentyONE. PlentyONE automatically responds to these notifications.
| Webhook | Explanation |
|---|---|
PAYMENT.SALE.COMPLETED |
A payment has been completed. When PayPal sends this notification, a pending payment is marked as paid in PlentyONE. |
PAYMENT.SALE.DENIED |
A payment has been denied. When PayPal sends this notification, a pending payment is marked as unpaid in PlentyONE. |
PAYMENT.SALE.PENDING |
There is a pending payment. When PayPal sends this notification, a pending payment is created in PlentyONE. |
PAYMENT.SALE.REFUNDED |
A payment has been partially or completely refunded by the seller. When PayPal sends this notification, a credit note for the payment is created in PlentyONE. |
PAYMENT.SALE.REVERSED |
A payment has been reversed by PayPal. |
7. Customer classes and shipping profiles
Make sure the payment method is allowed in the customer classes and is not deactivated in the shipping profiles. For this, you should consider first for which customer classes and shipping profiles the payment method should be allowed. This can be set individually.
Permitting the payment method in a customer class:
-
Go to Setup » CRM » Customer classes.
-
Open the customer class for which you want to permit the payment method.
-
Select the payment method from the list Permitted payment methods.
-
Save (save) the settings.
-
If needed, repeat these steps for other customer classes as well.
Checking payment method in existing shipping profiles:
-
Go to Setup » Orders » Shipping » Settings.
-
Click on the Shipping profiles tab.
-
Open the shipping profile in which the payment method should be allowed.
-
Check whether the payment method is selected in the Blocked payment methods area.
-
Deselect the payment method if you want to allow it for this shipping profile.
-
Save (save) the settings.
-
If needed, repeat these steps for shipping profiles as well.
8. Setting up event procedures
The event procedures contain several actions for PayPal. Set them up so they match your workflow.
Automatically refunding PayPal payments
Set up an event procedure to automatically refund a PayPal payment.
-
Go to Setup » Orders » Events.
-
Click on Add event procedure ().
→ The Create new event procedure window opens. -
Enter a distinct name for the event procedure.
-
Select the event according to Table 4.
-
Save () the settings.
-
Carry out the additional settings according to Table 4.
-
Select the setting Active ().
-
Save () the settings.
| Setting | Option | Selection |
|---|---|---|
Event |
Select the event that will trigger a refund. |
|
Filter 1 |
Order > Payment method |
Select a payment method from the drop-down list. |
Procedure |
Plugins > Refunding a PayPal payment |
Select a payment method from the drop-down list. |
Following the procedure Refunding a PayPal payment, two additional event procedures are available to follow the further process of the order: PayPal refund successful and PayPal refund failed. You can optionally set up event procedures with these events in the same way as described above.
Transferring a tracking number
Set up an event procedure in order to transfer a tracking number to PayPal.
-
Go to Setup » Orders » Events.
-
Click on Add event procedure ().
→ The Create new event procedure window opens. -
Enter a distinct name for the event procedure.
-
Select the event according to Table 5.
-
Save () the settings.
-
Carry out the additional settings according to Table 5.
-
Select the setting Active ().
-
Save () the settings.
| Setting | Option | Selection |
|---|---|---|
Event |
Select the event that will trigger the transfer of a tracking number. |
|
Filter 1 |
Order > Payment method |
Select a payment method from the drop-down list. |
Procedure |
Plugin > PayPal - Transfer tracking number |
Automatically refunding PayPal payments
Set up an event procedure to automatically refund a PayPal payment.
-
Go to Setup » Orders » Events.
-
Click on Add event procedure ().
→ The Create new event procedure window opens. -
Enter a distinct name for the event procedure.
-
Select the event according to Table 6.
-
Save () the settings.
-
Carry out the additional settings according to Table 6.
-
Select the setting Active ().
-
Save () the settings.
| Setting | Option | Selection |
|---|---|---|
Event |
Select the event that will trigger a refund. |
|
Filter 1 |
Order > Payment method |
Plugin: PayPal |
Procedure |
Plugins > Refunding a PayPal payment |
Following the procedure Refunding a PayPal payment, two additional event procedures are available to follow the further process of the order: PayPal refund successful and PayPal refund failed. You can optionally set up event procedures with these events in the same way as described above.
|
Use event "Status change"
If you use the Package number event as a trigger, not all the information required to successfully execute the event action may be available. Use the event Status change instead. |
9. PayPal Import - only from version 6.0 onwards
The entry PayPal import with the PayPal icon in the navigation on the left is only displayed when the PayPal plugin is installed. To use this function, you need at least version 6.0.0 of the PayPal plugin.
With the function PayPal import, you import PayPal payments from your PayPal account directly into your PlentyONE system by using the transaction numbers. In this import, only new payments are imported. Already existing payments are not updated. To import the PayPal payments, proceed as follows:
Importing PayPal payments:
-
Select PayPal import in the navigation on the left.
-
Select the correct PayPal account.
-
In the Transaction number(s) field, enter the transaction numbers of the payments you want to import.
→ You can enter several transaction numbers, separated by comma. -
Click on Execute (import_export).
→ The payments with the entered transaction numbers are imported and added to the payments overview table.
After importing the PayPal payments, they are automatically assigned to orders, just like other payments as well. Note that the auto-assignment depends on the setting Match for automatic assignment (0.7 - 1.0) in the Setup » Orders » Payment » Incoming menu. The value 0.7 stands for a 70% match and the value 1.0 stands for a 100% match. In case a payment cannot be assigned automatically, you can still assign them manually.
Note: After the import, it can take up to 15 minutes until the automatic assignment is done.
10. PayPal settings from plugin version 6.3.0
If the plugin is available in version 6.3.0 or higher, you will find the settings in your system. From this version onwards, the Apple Pay and Google Pay payment methods are also available here.
You also have the option of activating PayPal Vaulting. This is a function that securely stores customers' payment information for future transactions, making checkout convenient and fast while ensuring a high level of security.
Setting up PayPal from version 6.3.0:
-
Go to Setup » Orders » Payment » PayPal.
-
Click on Add PayPal e-mail address to add a PayPal account.
-
Enter the PayPal e-mail address of your account.
-
Choose whether your account should be a sandbox account or a live account.
→ In a sandbox account, transactions can be simulated and tested. This does not work with live data. If you want to use your company’s PayPal email address for the normal setup, ‘Yes’ must be selected under Live environment. -
Save (save) the settings.
-
Click on the line with the newly created account to make further settings.
-
Click on Connect account to link your account with PayPal.
→ When you click on the Connect button, a window will appear. Here you have the option to allow your customers to save their payment methods for later use (PayPal Vaulting). -
After your selection, you will be redirected to PayPal to confirm the link.
You will then be automatically redirected back to continue with the setup. -
Click on Add configuration to add a configuration.
You will need this after the successful linking to activate your account for your webshop. -
Select a combination from your clients (shops) and plugin sets, for which you can then make further settings for the payment methods.
→ Each combination of plugin set and client can only occur once. -
Save (save) your settings.
→ Your account is now activated and available for the webshop.
By default, PayPal and other payment methods, such as credit card and SOFORT, are already activated. PayPal Checkout can now be used.
If you want to activate additional payment methods, change button configurations or only allow certain payment methods for certain countries, click on a configuration. Payment methods such as PayPal Checkout, Pay later, credit card, Apple Pay, Google Pay and others are available to you.
If you only want to allow certain payment methods for certain countries or change button configurations, you can also make these settings here.
Settings for configurations:
-
Click on the configuration for which you want to make settings.
-
Activate or deactivate the payment methods as required.
-
Select the desired delivery countries for each payment method from the respective drop-down list.
-
Select when and where the payment method buttons should appear.
-
Save (save) the settings.
-
Go to Setup » CRM.
Check in the classes whether the desired payment methods are activated.
→ The PayPal plugin is now set up and can be used.
11. Editing text elements
You can edit texts of the plugin in the Shop » Multilingualism menu. The texts can be adapted into all available system languages. To do so, proceed as described below.
Adapting language files:
-
Go to Shop » Multilingualism.
-
On the left side, select the Source language from the drop-down list.
-
On the right side, select the Target language from the drop-down list.
-
Expand the various sections in the PayPal area.
-
Enter the text for the individual text elements in the area of the target language.
-
Save (save) the settings.
-
Deploy the plugin set again to apply these changes.
By selecting German as the Target language, you can adapt the German labels for your online shop. The selected labels are then also applied in the back end, only the addition Plugin: PayPal remains. This way, it remains traceable where a payment method comes from. Reload the back end to see the changes.
Find more information on how to edit online shop texts on the manual page Editing plentyShop texts.
12. FAQ about the PayPal plugin
In this section, FAQ about linking the PayPal with PlentyONE are compiled. Additionally, you can also make use of our Forum. You can either look for information in already existing threads or open a new thread and ask our supporters.
Configuring PayPal using the assistant
When configuring PayPal with the assistant, problems in the online shop may occur under certain circumstances. Updating the PayPal plugin often helps with this:
I want to update PayPal. How should I proceed? If you want to update the PayPal plugin in a copy of your plugin set, you have to change the back end plugin set that is linked to your user account. For further information on how to change your back end plugin set, refer to the page Installing added plugins. After reloading your back end, you can complete the assistant.
First aid: Problems with linking your PayPal account
If you have problems with linking your PayPal account with PlentyONE. it is advisable to use a different browser to eliminate this as a source of errors. Moreover, you should make sure that there are no basic problems with your PayPal account itself. Possibly, the email address was not confirmed yet. More possible sources of error and their solutions are described below.
What am I to do if I am not redirected to PlentyONE after I activated my PayPal account?
First check whether the latest PayPal plugin version is installed and deployed in your PlentyONE system. How to update plugins is explained in the manual chapter Updating installed plugins.
|
Activation and preview of the plugin
Make sure that the PayPal plugin is already activated and deployed in the plugin set of the main client when you are linking your account with PlentyONE. If this is not the case, malfunctions can occur. |
-
Solution 1: Change the browser and try again. PlentyONE supports the browsers Google Chrome and Mozilla Firefox.
-
Solution 2: There is still an active API right in the PayPal account. Remove the rights for PlentyONE. The API authorisation can be found on this website.
|
NOTE
With removing the API rights, all linked PayPal accounts are disconnected from your PlentyONE system. In case a PayPal account is linked with the market eBay, this account has to be linked with the PayPal interface again. |
What am I to do if I am asked to sign up for a business account again?
If this window opens, check whether the data in the Account step were inserted correctly.
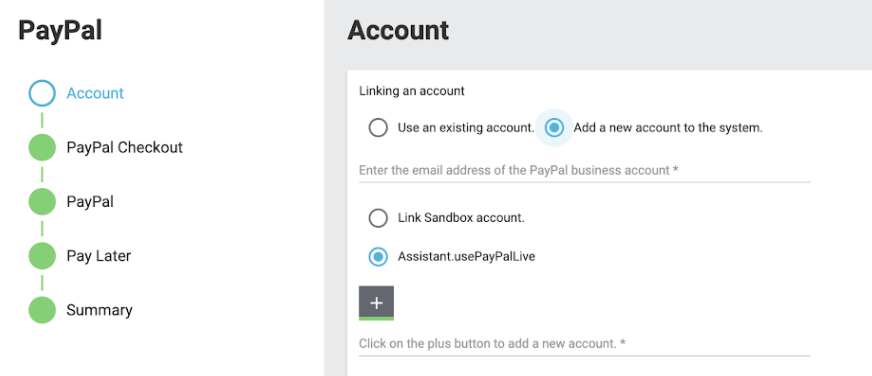
-
Adding an account: Was the right option selected? Add new account or use existing one.
-
New account: Check whether the email address of the PayPal business account has been entered correctly.
-
Use PayPal test environment: If this option is activated, you don’t use PayPal live but only in a test mode. To actually use PayPal, do not activate this option.
Event procedures and the old PayPal integration
Since the old payment integrations are no longer supported, procedures and filters for event procedures have to be selected from the respective plugin groups. However, from version 5.3.1 on of the PayPal plugin, the procedure Refund PayPal payment also works for the old PayPal integration.
In order to see all changes to the PayPal plugin and to not miss any updates, use the changelog of the PayPal plugins. In general we recommend to use the plugin payment methods available on the plentyMarketplace.
Configuring PayPal using the assistant
When configuring PayPal with the assistant, problems in the online shop may occur under certain circumstances. Updating the PayPal plugin often helps with this:
I want to update PayPal. How should I proceed? If you want to update the PayPal plugin in a copy of your plugin set, you have to change the back end plugin set that is linked to your user account. For further information on how to change your back end plugin set, refer to the page Installing added plugins. After reloading your back end, you can complete the assistant.
First aid: Problems with linking your PayPal account
If you have problems with linking your PayPal account with PlentyONE. it is advisable to use a different browser to eliminate this as a source of errors. Moreover, you should make sure that there are no basic problems with your PayPal account itself. Possibly, the email address was not confirmed yet, PayPal PLUS was not activated yet or you did not set a password yet. More possible sources of error and their solutions are described below.
What am I to do if I am not redirected to PlentyONE after I activated my PayPal account?
First check whether the latest PayPal plugin version is installed and deployed in your PlentyONE system. How to update plugins is explained in the manual chapter Updating installed plugins.
|
Activation and preview of the plugin
Make sure that the PayPal plugin is already activated and deployed in the plugin set of the main client when you are linking your account with PlentyONE. If this is not the case, malfunctions can occur. |
-
Solution 1: Change the browser and try again. PlentyONE supports the browsers Google Chrome and Mozilla Firefox.
-
Solution 2: There is still an active API right in the PayPal account. Remove the rights for PlentyONE. The API authorisation can be found on this website.
|
NOTE
With removing the API rights, all linked PayPal accounts are disconnected from your PlentyONE system. In case a PayPal account is linked with the market eBay, this account has to be linked with the PayPal interface again. |
What am I to do if I am asked to sign up for a business account again?
If this window opens, check whether the data in the Account step were inserted correctly.
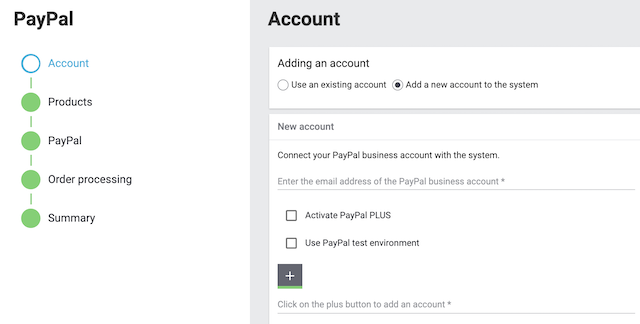
-
Adding an account: Was the right option selected? Add new account or use existing one.
-
New account: Check whether the email address of the PayPal business account has been entered correctly.
-
Activate PayPal PLUS: Only activate this option, if you also signed up for PayPal PLUS with this account.
-
Use PayPal test environment: If this option is activated, you don’t use PayPal live but only in a test mode. To actually use PayPal, do not activate this option.
Problems with the PayPal PLUS Wall
If the PayPal PLUS Wall is not or only incorrectly displayed, the reason often has to do with missing access or restrictions of the Wall itself. Also pay attention to Additional information about the PayPal PLUS Wall.
What do I do if the PayPal PLUS Wall is not displayed?
If the PayPal PLUS Wall is not displayed, check the following:
-
Make sure that you are allowed by PayPal to use PayPal PLUS.
-
Check the settings in the PayPal assistant.
→ PayPal PLUS has to be activated in Account step of the assistant. -
Check the container links. They should be created automatically by completing the assistant but can also be set manually.
-
In order to use PayPal PLUS, the payment method has to be allowed in customer classes and unblocked in shipping profiles.
Why are not all payment methods displayed in the PayPal PLUS Wall?
Not the following if a payment methods is not shown in the PayPal PLUS Wall:
-
Payment methods depend on the delivery country. For example, debit is only cleared for Germany. Also pay attention to Additional information about the PayPal PLUS Wall.
-
If a payment method is not cleared, contact PayPal directly about this. They can activate payment methods for your PayPal business account.
Event procedures and the old PayPal integration
Since the old payment integrations are no longer supported, procedures and filters for event procedures have to be selected from the respective plugin groups. However, from version 5.3.1 on of the PayPal plugin, the procedure Refund PayPal payment also works for the old PayPal integration.
In order to see all changes to the PayPal plugin and to not miss any updates, use the changelog of the PayPal plugins. In general we recommend to use the plugin payment methods available on the plentyMarketplace.
13. PayPal Dispute
The PayPal Dispute plugin allows you to work on problems and solve conflicts with your customers directly in your PlentyONE system. In PlentyONE. the notifications and the messenger are used for this.
13.1. Requirements and installation
Using PayPal Dispute requires setting up the PayPal plugin first. You need version 5.0.0 or higher of the PayPal plugin. Moreover, plentyShop LTS and IO are required from version 5.0.0 and higher.
Download and install the PayPal Dispute plugin to integrate PayPal Dispute into your PlentyONE system. After the installation of the plugin, the corresponding assistant is available. With the help of this assistant you can add the PayPal accounts for which you want to use PayPal Dispute. Proceed as follows, to complete the assistant and set up PayPal Dispute.
Setting up PayPal Dispute with the assistant:
-
Go to Setup » Assistants » Plugins » [select Plugin set].
-
Select the assistant PayPal Dispute.
-
Complete the assistant.
PayPal Dispute is now set up in your PlentyONE system.
13.2. Using PayPal dispute in PlentyONE
The advantage of using the PayPal Dispute plugin is that you will be informed about all cases of customers that reported a problem with a merchandise or service to PayPal directly in your PlentyONE back end. Go to CRM » Messenger to see all dispute messages. The buyer has 4 options to report a problem. The reactions available to you depend on the problem reported by the customer and on the level of escalation the problem has reached. The first level is called dispute and the second level is called claim. The 4 options available to the buyer are the following:
-
Item not received
-
Item not as described
-
Unauthorised activity
-
Billing issue
As long as a problem is still on the first level of escalation, the dispute level, you can still exchange messages with the customer to solve the problem. Once a problem is escalated to PayPal, the level of escalation will be set to claim and simple messages will no longer be send to PayPal.
|
Loading new cases
Once you have opened a case in the Dispute plugin, no other case will be loaded. This means that you need to close the Dispute plugin tab every time you want to open a different case. |
The following table explains the options you have to react to new dispute cases.
| Dispute case | Explanation | Response options |
|---|---|---|
Customer did not receive the item |
Your customer says that he did not receive the item. The case is on the dispute level and you have 3 options to respond to it. Depending on your response, there are different options available. |
You have the following 3 basic response options:
|
Customer says that the item is not as described |
Your customer says that the received item is not as described. The case is on the dispute level and you have 6 options to respond to it. Depending on your response, there are different options available. |
You have the following 6 basic response options:
|
Customer reported an unauthorised transaction |
The customer says that he did not buy the item and the access to the account was not authorised. The case is on the claim level and this means that the customer requested buyer protection. You have 2 options to respond to it. Depending on your response, there are different options available. |
Your 2 basic response options are:
|
Customer reported a billing issue |
Your customer reported that the invoice is not correct. This might be the case if the invoiced amount is not correct or the invoice applies to a recurring billing agreement that was cancelled. In these cases you will be informed about the issue, but cannot edit it in PlentyONE. You need to log into your PayPal account to edit the case. |
NONE - You need to log into your PayPal account to edit the case. |
13.2.1. Inspecting PayPal dispute messages
To get an overview of all issues, navigate to CRM » Messenger. Once you have opened an issue message, you can either answer the buyer or use one of the PayPal response options. If you activated the Notifications in the assistant, you are directly informed about new cases, updates to cases and when cases are closed.
Looking at messages:
-
Go to CRM » Messenger.
-
Click on Search ().
→ All messages are listed. -
Click on the message you want to respond to.
→ The message history for this issue opens. -
Write a message to the buyer or use one of the PayPal response options.
|
Change visibility
You can use the visibility to restrict who can read the messages of an issue. At first, all issues are visible to every user. The visibility can only be restricted after the first message has been received. The setting applies to all messages of an issue. |
| Icon | Explanation |
|---|---|
Blue circle |
The message is unread. |
Green check mark |
The issue was solved or needs to be edited in your PayPal account. |
13.2.2. Writing a message to a customer
If you want to send a simple message to the customer to solve the issue, you can only do so as long as the issue is on the dispute level. The message history is only visible to you and your customer. PayPal does not take a closer look at issues on dispute level. Proceed as described below to send a message to the customer.
Writing a message to a customer:
-
Go to CRM » Messenger.
-
Click on Search ().
→ All messages are listed. -
Click on the message you want to respond to.
→ The message history for this issue opens. -
Click on Reply.
→ An input field opens. -
Enter your text.
-
Click on Send.
→ The message is send to PayPal and will be displayed in the customer’s PayPal account.
|
Whisper
The message is not transmitted to PayPal if you whisper the message. Whispering is for internal conversations. Whispering has to be individually set for every message. |
13.2.3. Using dispute resolution options
The PayPal Dispute plugin opens if you treat an issue as conflict. The resolution options available to you depend on the issue that was reported by the customer. The options are exactly the same as in your PayPal account.
Using dispute resolution options:
-
Go to CRM » Messenger.
-
Click on Search ().
→ All messages are listed. -
Click on the message you want to respond to.
→ The message history for this issue opens. -
Below the customer’s message, click on Conflict: React to this case.
→ The PayPal Dispute plugin opens. -
Choose a response option and take the explanations in Table 9 into consideration.
-
Enter further information.
-
Click on Send to PayPal.
→ The message is transmitted to PayPal.
| Option | Explanation | Level of escalation |
|---|---|---|
Accept claim |
Choosing this option means that you refund the total amount to the customer or a partial amount if the customer requested a partial refund. This resolves and closes the case. |
The case is on the dispute level and will be closed as soon as you accept the claim. |
Offer a full refund while requesting the return of the item |
You are asking the customer to return the item while sending a full refund. The case will be closed as soon as the buyer accepts your offer and once you confirm the return. |
The issue is on the dispute level which means that you can write messages to the customer. |
Offer a partial refund |
You are offering a partial refund and you may want the item to be returned or you are offering an additional replacement. The case will be closed as soon as the buyer accepts your offer and once the buyer confirms the receipt of the replacement or once you confirm the return. |
The issue is on the dispute level which means that you can write messages to the customer. |
Offer replacement |
You are offering a replacement. The case will be closed as soon as the buyer accepts your offer and confirms the receipt of the replacement. |
The issue is on the dispute level which means that you can write messages to the customer. |
Escalate to PayPal |
Once you have escalated the issue to PayPal, the options Accept claim or Provide evidence will be available. |
The issue will be elevated to the claim level. On the claim level, you can no longer write messages to the customer and therefore you need to wait for PayPal to decide the case. |
Provide evidence |
This option is available if your customer says that the payment was unauthorised or an issue was escalated to PayPal. |
The issue is only available on the claim level. On the claim level, you can no longer write messages to the customer and therefore you need to wait for PayPal to decide the case. |