Galaxus.ch
Swiss online market leader Galaxus specializes in IT, consumer electronics and telecommunications. As the largest online department store in Switzerland, Galaxus has a steadily growing product range.
1. Registering with Galaxus
Register online for the Digitec Galaxus Merchant Program or contact Galaxus using the email address anmelden@digitecgalaxus.ch.
2. Orders if you are based in Germany
Your company is based in Germany and you deliver to Galaxus end customers in Switzerland. Here, two scenarios are possible:
-
You send the order directly to the address of the end customer in Switzerland.
-
You use the Galaxus EU Hub.
The EU Hub is a cross border customs clearance solution offered by Galaxus. It provides easy access to the Swiss market. The Digitec Galaxus AG acts as a service provider to handle logistics to Switzerland including declaration, customs clearance and VAT payment.
When you use the EU hub, orders work like so:
-
A customer in Switzerland orders and pays for a product on Galaxus.
-
You confirm receipt of the order to Galaxus.
-
You ship the package to the EU Hub.
-
You inform Galaxus that the package is on its way.
-
In the EU hub, the package is processed according to Swiss customs laws:
-
Package is labelled with shipping labels for Swiss Post.
-
The export steps that are legally required are carried out.
-
-
The package is transported to the Swiss central warehouse.
-
The central warehouse handles the steps necessary for import.
-
The package is handed over to Swiss Post.
-
Customer receives the package.
When you use the EU hub, returns work like so:
-
Customer announces that they want a return in the Galaxus shop.
-
Galaxus informs you about the return.
-
Customer sends the return to Digitec Galaxus AG in Switzerland.
-
In the Swiss central warehouse, the package is processed according to Swiss customs laws:
-
Package is labelled with shipping labels for DHL.
-
The export steps that are legally required are carried out.
-
-
The package is transported to the EU hub.
-
The EU hub handles the steps necessary for import.
-
The package is handed over to DHL.
-
You receive the return.
-
You inform Galaxus that you accepted the return.
2.1. Automatically creating delivery orders for EU Hub orders
For correct billing, Galaxus orders that are shipped to the EU Hub and from there onward to Switzerland must have a delivery address outside the EU. To ensure correct shipping, orders that are processed via the EU Hub still need a German delivery address — the address of the EU Hub. In PlentyONE, you therefore have the option of automatically creating delivery orders with the address of the EU Hub for Galaxus orders that are shipped via the EU Hub, in addition to the main order.
Automatically creating delivery orders with the address of the EU Hub:
-
Go to Setup » Markets » Galaxus » Order import.
-
Activate the option EU-Hub order handling.
→ To ensure correct shipping, a delivery order with the delivery address of the EU Hub is automatically created for the main order to be delivered to Switzerland via the EU Hub. -
Save (save) the settings.
An order generated on Galaxus.ch and to be shipped to Switzerland via the EU Hub will then proceed as follows:
-
Customers from Switzerland place an order via Galaxus.ch.
-
The order is imported into PlentyONE with the Swiss address, i.e., an address outside the EU.
-
In PlentyONE, a delivery order is created for the main order with the delivery address of the EU Hub, i.e., an address within the EU.
-
You send the order to the EU Hub, and from there the order is delivered to Switzerland.
-
This means that if you ship your Galaxus.ch orders to Switzerland via the EU Hub, you must activate the option EU-Hub order handling so that delivery orders with an address within the EU (EU Hub warehouse) are created automatically.
|
Orders with multiple deliveries
If an order requires multiple delivery orders (e.g. because the order fulfilment is done in multiple shipments), then only the first automatically generated order will use the specified delivery address. Any subsequently generated delivery orders will use the billing address as the delivery address. Therefore, if the delivery address specified in an order differs from the billing address, then you need to manually enter the correct delivery address for any delivery orders after the first. |
3. Installing the plugins
To export item data to Galaxus using the Elastic Export, you need the following plugins:
You can download the plugins in the plentyMarketplace.
Important: Install the plugin in the plugin set of the main client.
Adding plugin to the system:
-
Go to Plugins » plentyMarketplace.
→ The marketplace opens in a new tab. -
Navigate to the plugin Elastic Export.
Tip: Either use the search function or open the category Plugins » Sales » Marketplaces. -
Open the detail view of the plugin.
-
In the column to the right, click Go to checkout.
→ The Checkout window opens. -
Read and accept the General Terms and Conditions.
-
Click Order now.
→ Wait a few minutes before installing the plugin.
Installing plugins:
-
Go to Plugins » Plugin set overview.
-
Click on the plugin set of your main client.
Important: In other words: The plugin set must be linked to the main client.
→ The plugin set opens. -
Click add Add plugin.
-
Select Elastic Export from the plugin list.
-
Click Install.
→ The plugin is installed.
→ The plugin set is shown. -
Switch the plugin to active (toggle_on).
-
Save (save) the plugin set.
Tip: Problems saving the plugin set? Click Open details to show additional information.
Important: Install the plugin in the plugin set of the main client.
Adding plugin to the system:
-
Go to Plugins » plentyMarketplace.
→ The marketplace opens in a new tab. -
Navigate to the plugin Galaxus.
Tip: Either use the search function or open the category Plugins » Sales » Marketplaces. -
Open the detail view of the plugin.
-
In the column to the right, click Go to checkout.
→ The Checkout window opens. -
Read and accept the General Terms and Conditions.
-
Click Order now.
→ Wait a few minutes before installing the plugin.
Installing plugins:
-
Go to Plugins » Plugin set overview.
-
Click on the plugin set of your main client.
Important: In other words: The plugin set must be linked to the main client.
→ The plugin set opens. -
Click add Add plugin.
-
Select Galaxus from the plugin list.
-
Click Install.
→ The plugin is installed.
→ The plugin set is shown. -
Switch the plugin to active (toggle_on).
-
Save (save) the plugin set.
Tip: Problems saving the plugin set? Click Open details to show additional information.
4. Activating the order referrer
Go to Setup » Orders » Order referrer to activate the order referrer. This ensures that orders are assigned to the correct sales channel.
An order referrer tags an order with the sales channel on which the order was generated. Sales channels can be e.g. your online shop or markets on which you sell your items. Each sales channel has an individual order referrer. Some order referrers are available by default in your PlentyONE system. Further order referrers are added e.g. if you install a new plugin. For further information about the order referrer, see the page Order referrer of the PlentyONE manual.
Activating the order referrer for Galaxus:
-
Go to Setup » Orders » Order referrer.
-
Click Search (search).
-
In the list, navigate to the option Galaxus (not to be confused with GalaxusDE).
Tip: The order referrer is not in the list? Then you probably have not installed the plugin yet. -
On the right of the referrer’s line, click Edit (edit).
→ The window Edit referrer opens. -
Activate the option Visible in selection (toggle_on).
-
Click SAVE (save).
→ The referrer is active.
5. Setting up the order interface in PlentyONE
Carry out the following settings in PlentyONE in order to set up the order interface to Galaxus. Keep the FTP connection details ready that Galaxus emails you after your registration.
The menu Setup » Markets » Galaxus is only shown after you carry out the following steps:
-
The plugin is installed in the plugin set in which the default client is linked.
-
The plugin set was successfully deployed to your system.
-
The order referrer Galaxus is active in the menu Setup » Orders » Order referrer.
Setting up the order interface to Galaxus:
-
Go to Setup » Markets » Galaxus » Order import.
-
Carry out the settings. Note the explanations in Table 1.
-
Save (save) the settings.
| Setting | Explanation |
|---|---|
Activate Order Interface |
Activate to enable data exchange with Galaxus for orders. |
Add 'customer reference number' after externalorder number |
Activate if you need the customer reference number for customs documents (EU-HUB USER). Note: When this option is active, you can only search order numbers by entering the complete string GalaxusOrderNumber|GalaxusCustomerReferenceNumber. |
Do not send delivery date |
Activate if no estimated delivery date should be sent to customers. The estimated delivery date is automatically sent to customers with the order confirmation when the Flow or the event procedure Send an order confirmation notification to Galaxus is triggered. |
EU-Hub order handling |
If this option is activated, a delivery order with the delivery address of the EU Hub is automatically created for a main order that should be delivered to Switzerland via the EU Hub. Background: For correct billing, Galaxus orders that are shipped to the EU Hub and from there onward to Switzerland must have a delivery address outside the EU. To ensure correct shipping, orders that are processed via the EU Hub still need a German delivery address — the address of the EU Hub. This means that if you ship your Galaxus.ch orders to Switzerland via the EU Hub, you must activate the option EU-Hub order handling so that delivery orders with an address within the EU (EU Hub warehouse) are created automatically. |
FTP configuration |
|
Host |
Enter the host name based on the pattern ftp.dg.ch. |
User |
Enter the user name that you received from Galaxus. |
Password |
Enter the password that you received from Galaxus. |
Port |
Enter the port number. |
partner2dg |
Select the partner2dg folder for the selected host. |
dg2partner |
Select the dg2partner folder for the selected host. → From this FTP path, the plugin will read new orders and requests from Galaxus. |
Order status configuration |
|
Order status for cancellation requests |
Which order status do you want to assign to new cancellation requests during import? |
Order status for return requests |
Which order status do you want to assign to new return requests during import? |
Automatically reject cancellation requests for orders from this status |
From which order status do you want to reject cancellation requests automatically? Important: If you do not select a status, the status [5] Cleared for shipping is used. |
6. Setting up the item export
Items are exported to Galaxus using three Elastic export formats. These formats are automatically installed when the plugin is deployed.
-
GalaxusProductDataExport (product data)
-
GalaxusProductPropertiesExport (properties)
-
GalaxusProductStockPricingExport (stock & prices)
The settings for these formats are carried out in the Setup » Markets » Galaxus » Item Export menu in the submenus Product Data, Product Properties, and Product Stock Pricing.
| Setting | Explanation |
|---|---|
Menu Product Data (format GalaxusProductDataExport) |
|
Description |
Select which text should be shown as product description on Galaxus.
|
Export Customs tariff number as |
Select how the customs tariff number should be transferred to Galaxus.
|
Composition |
Select a description of a product’s composition or ingredients. This compliance-relevant description is required by law for specific product groups. Examples: Note: We recommend to create a property for the composition. To create a property, go to Setup » Settings » Properties » Configuration. |
Application |
Select a description for the application of the product. This compliance-relevant description is required by law for specific product groups. Note: We recommend to create a property for the application. To create a property, go to Setup » Settings » Properties » Configuration. |
WEEE number |
Select a WEEE number. This manufacturer number is assigned to the first distributors of electrical and electronic equipment following successful registration with EAR foundation. It consists of a country code and an eight-characters-long sequence of digits. Example: Note: We recommend to create a property for the WEEE number. To create a property, go to Setup » Settings » Properties » Configuration. |
Menu Product Properties » Item Characteristics (Format GalaxusProductPropertiesExport) |
|
Properties to export |
Select which characteristics should be exported to Galaxus. Possible options:
Note: Characteristics are no longer officially supported in PlentyONE. As such, do not select any characteristics if you did not use them previously. |
Product Properties » Variation Properties (Format GalaxusProductPropertiesExport) |
|
Variation properties to export |
Select which properties should be exported to Galaxus. Possible options:
|
Menu Product Stock Pricing (Format GalaxusStockPricingExport) |
|
Item export currency |
|
Currency |
Select which currency should be exported to Galaxus. Possible options:
|
Calculate "Sales price excl. VAT" based on Elastic Export format setting "Target country" |
Activate this option to consider the Elastic Export setting for Target country. |
Positive stock quantities are always exported, independent of the average delivery period |
Activate if positive stock is always to be exported. Note: For further information, check the default export matrix for active variations in Table 3. |
Sales price that is exported as purchase price excl. VAT |
Select a sales price. |
Sales price that is exported as purchase price excl. fees and VAT |
Select a sales price. |
Export stock from: |
Select the warehouses from which stock should be transferred to Galaxus. Possible options:
|
List of mapped warehouses |
|
Map warehouses |
Here you can assign your PlentyONE warehouses to the respective Galaxus GLN. Tip: A GLN (Global Location Number) is a unique number for physical locations that serves as identification. Mapping a PlentyONE warehouse to a Galaxus GLN:
|
6.1. Default export matrix for active variations
The basic logic of Galaxus is like this:
If positive stock is transmitted, Galaxus uses the default delivery time that is saved for the account in the Galaxus back end. If an item does not have positive stock, the reorder time is used instead.
Notes:
-
Galaxus assumes an average delivery time of 2 days for items that are in stock. If an item has stock and an availability that results in a delivery time of 2 or more days, the item is exported with a stock of 0. The delivery time is exported as the reorder time. For items with 0 or negative stock and an average delivery time of two days or less, the system assumes a configuration error and the item is not exported.
-
Item data is processed irrespective of the stock export conditions for export.
-
Item bundles are not exported if one of the items in it is not in stock. Also, the exported stock amount is based on the bundle component with the highest stock.
The following table shows a default export matrix for active variations.
| Net stock | Average delivery period | Result |
|---|---|---|
Positive stock |
Delivery time {le} 2 |
Stock is exported. |
Positive stock |
Delivery time > 2 |
Only delivery time is exported. |
Positive stock |
No Delivery time |
Stock is exported. |
Stock 0/negative |
Delivery time {le} 2 |
No export. |
Stock 0/negative |
Delivery time > 2 |
Only delivery time is exported. |
Stock 0/negative |
No delivery time |
No export. |
|
Log entries for the export matrix
You filter for notifications regarding the export matrix in the data log. Use the following filter settings for this:
|
7. Mapping shipping profiles
In the Setup » Markets » Galaxus » Shipping profile mapping menu, you can map shipping profiles saved in PlentyONE to Galaxus carriers.
Tip: If the shipping profiles are mapped, the carrier (and no longer the tracking URL) will be sent to Galaxus whenever a shipping confirmation is sent.
Mapping shipping profiles:
-
Go to Setup » Markets » Galaxus » Shipping profile mapping.
-
Click add Create mapping.
→ The Map shipping profiles window opens. -
Select a PlentyONE shipping profile.
-
Select a Galaxus carrier.
-
Save the settings.
8. Setting up a sales price
To sell variations on Galaxus, you need a sales price in which the order referrer Galaxus is activated. The price that you save for this sales price is the price that will be shown on Galaxus.
Sales prices define the conditions under which a variation is sold at a specific price and on a specific sales channel. For example, you can sell your items at a lower price in your webshop than on Amazon. Or you can sell products cheaper to B2B customers than to B2C customers.
Two default sales prices are already configured in your PlentyONE system. However, you can also create new sales prices and edit them individually. In addition to default sales prices, you can also create RRPs, special offers, and set prices.
Defining a sales price for Galaxus:
-
Go to Setup » Item » Sales prices » [Open sales price].
Tip: No sales prices? Then create a sales price first. -
Activate the referrer Galaxus.
-
Select the currency CHF or EUR.
-
Save () the settings.
Note: You can also activate the referrer Galaxus in an existing sales price if you do not want to create a new sales price for Galaxus.
9. Preparing categories for the export
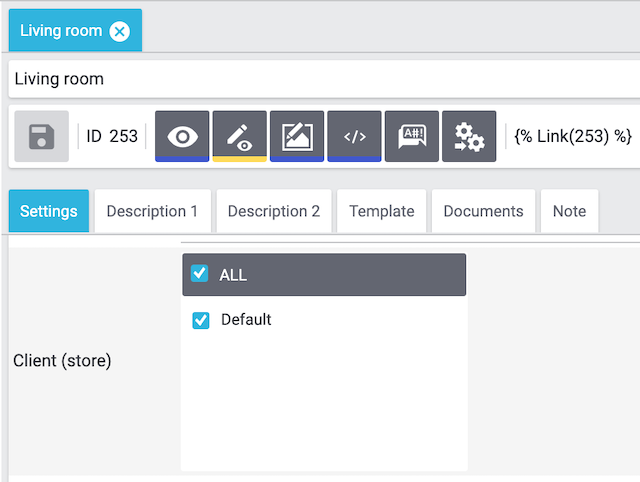
On Galaxus, your variations are offered using your default client (store). As such, the category of the variation must be linked to the default client (store).
Linking the default client to the category:
-
Go to Item » Category.
-
Click on the category in the directory tree on the left.
→ The category opens and the tab Settings is shown. -
Navigate to the setting Client (store).
-
Activate the option Standard (check_box).
-
Save (save) the settings.
10. Preparing variations for the export
| Setting | Explanation |
|---|---|
Select the default category |
The default category of the variation is exported to Galaxus in all cases. As such, define a default variation for the variation. This default category must be linked to the default client (store). Selecting the default category:
|
Activate the variation |
The variation must be active. Activating a variation:
|
Add SKU |
An SKU for the referrer Galaxus must be assigned to the variation. Adding an SKU:
|
Add sales channel |
The sales channel Galaxus must be added to the variation:
|
Link sales price |
The sales price must be linked to the variation. Linking the sales price:
|
Link properties |
Permitted properties must be linked to the variations. Linking properties:
|
Save availability |
The Availabilities 1-10 must be saved for the variation. Saving availabilities:
|
Set image availability |
To transfer images to Galaxus, you need to enable them for the referrer Galaxus. Set image availability:
|
11. Exporting items to Galaxus
The Galaxus plugin exports the item data using the Elastic Export plugin. For more information on the Elastic Export Plugin, visit the Elastic Export page.
11.1. Setting up Elastic Export formats
The following Elastic Export formats are used for the item export. When you deploy the plugin, these formats are installed automatically.
-
GalaxusProductDataExport
-
GalaxusProductPropertiesExport
-
GalaxusProductStockPricingExport
Setting up Elastic Export formats:
-
Go to Data » Elastic Export » New export [+].
→ Each format works for a specific part of the item export. -
Select a Galaxus format:
-
GalaxusProductDataExport
-
GalaxusProductPropertiesExport
-
GalaxusProductStockPricingExport
-
-
Set up the export formats.
-
Save the settings.
| Galaxus output | PlentyONE input field |
|---|---|
ProductKey, Mandatory, string(100) |
Item » Items » [Open variation] » Section: Settings » Variation number |
GTIN, mandatory, integer (8-14) |
Item » Items » [Open variation] » Section: Barcodes Corresponds to barcode type Selection in the elastic export filter of this format |
ManufacturerKey, string(200) |
Item » Items » [Open variation] » Section: Settings » Model |
BrandName, mandatory, string(100) |
Item » Items » [Open item] » Section: Settings » Manufacturer |
ProductTypeIdDigitecGalaxus, Integer(200) |
- |
Category, mandatory, string(200) |
Item » Items » [Open variation] » Section: Categories » Default category |
CategoryGroup_1, string(200) |
- |
CategoryGroup_2, string(200) |
- |
CategoryGroup_3, string(200) |
- |
CategoryGroup_4, string(200) |
- |
TARESCode, string(20) |
Item » Items » [Open variation] » Section: Costs » Input field: Customs tariff number |
TARICCode, string(20) |
Item » Items » [Open variation] » Section: Costs » Input field: Customs tariff number This information is recommended when using the EU Hub. |
CountryOfOrigin, string(20) |
Item » Items » [Open item] » Section: Settings » Manufacturing country This information is recommended when using the EU Hub. |
SuggestedRetailPriceIncludingVat, Mandatory, float(14,4) |
Item » Items » [Open variation] » Section: Sales prices PPP Galaxus Salesprice Note: For the SuggestedRetailPriceIncludingVat the same currency is used as for the GalaxusProductStockPricingExport format. You can specify the currency (EUR / CHF) in the menu Setup » Item » Sales Price » [Open Galaxus sales price] » Section: Currency. |
VatRatePercentage, mandatory, float(2.4) |
Item » Items » [Open variation] » Section: Costs » VAT |
ImageURL (1 to 10), mandatory, text(300) |
Item » Items » [Open item] » Tab: Images |
VideoURL (1 to 3), string(300) |
- |
ProductLink (1 to 3), string(300) |
- |
WeightG, EU-Hub mandatory, integer(10) |
Item » Items » [Open variation] » Section: Content / Dimensions » Input field: Gross weight in grams |
WidthM, float(14,4) |
Item » Items » [Open variation] » Area: Content / Dimensions » Width in mm. |
HeightM, float(14,4) |
Item » Items » [Open variation] » Area: Content / Dimensions » Height in mm. |
LengthM, float(14,4) |
Item » Items » [Open variation] » Area: Content / Dimensions » Length in mm. |
ReleaseDate, Format (YYYY-MM-DD) |
- |
GlobalSalesRank_integer(10)_ |
- |
MinimumAge, integer(10) |
Item » Items » [Open item] » Section: Settings » Age restriction |
ProductTitle_DE, Mandatory (at least one of four languages), (Text100) |
Item » Items » [Open item] » Tab: Texts » Name 1, 2 or 3 DE |
ProductTitle_EN, (Text100) |
Item » Items » [Open item] » Tab: Texts » Name 1, 2 or 3 EN |
ProductTitle_FR, (Text100) |
Item » Items » [Open item] » Tab: Texts » Name 1, 2 or 3 FR |
ProductTitle_IT, (Text100) |
Item » Items » [Open item] » Tab: Texts » Name 1, 2 or 3 IT |
ProductTitleTagLine_DE, Text |
- |
ProductTitleTagLine_EN, Text |
- |
ProductTitleTagLine_FR, Text |
- |
ProductTitleTagLine_IT, Text |
- |
ProductDescription_DE, mandatory (at least one of four languages), Text |
Standard: Item » Items » [Open item] » Tab: Texts » Item text DE |
ProductDescription_EN, Text |
Standard: Item » Items » [Open item] » Tab: Texts » Item text EN |
ProductDescription_FR, Text |
Standard: Item » Items » [Open item] » Tab: Texts » Item text FR |
ProductDescription_IT, Text |
Standard: Item » Items » [Open item] » Tab: Texts » Item text IT |
MinimumOrderQuantity, mandatory, integer(10) |
Item » Items » [Open variation] » Section: Availability and visibility » Input field: Minimum order quantity |
RetailUnitQuantityInPackingUnit, integer(10) |
- |
RetailUnitQuantityOnPallet, integer(10) |
- |
RetailUnitQuantity, mandatory, integer(10) |
Item » Items » [Open variation] » Section: Shipping » Input field: Packing quantity |
ProductSuperType |
Item » Item ID |
WEEE number |
This manufacturer number is assigned to the first distributors of electrical and electronic equipment following successful registration with EAR foundation. It consists of a country code and an eight-characters-long sequence of digits. |
Composition |
Describes a product’s composition or ingredients. This compliance-relevant description is required by law for specific product groups. |
Application |
Describes a product’s application. These are compliance-relevant descriptions that are by law required for specific product groups. |
| Galaxus output | PlentyONE input field |
|---|---|
ProductKey, Mandatory, string(100) |
Item » Items » [Open variation] » Variation number |
QuantityOnStock, mandatory, integer(10) |
Item » Items » [Open item] » Tab: Stock » Column: Net stock |
IsOnStock, mandatory, boolean(0/1) |
Item » Items » [Open item] » Tab: Stock » Column: Net stock |
DeliveryDate, integer(10) |
Item » Items » [Open variation] » Section: Availability and visibility » Drop-down list: Displayed delivery time This selection is equivalent to the settings in the menu Setup » Item » Availability » Average delivery time. |
PurchasePriceExcludingVat, mandatory, fload(14,4) |
Settings » Markets » Galaxus » Item Export » Product Stock Pricing » Choose Sales Price to export as Purchase Price Excluding Vat |
SalesPriceExcludingVat, mandatory, fload(14,4) |
Item » Items » [Open variation] » Section: Sales prices Note: The exported sales price uses the VAT.rate of the selected export currency only if the Target country is specified in the Elastic Export format. |
Currency, mandatory, string(3) |
Setup » Item » Sales prices » [Open Galaxus sales price] » Currency EUR / CHF |
PurchasePriceExcludingFee, decimal number(14,4) |
Settings » Markets » Galaxus » Item Export » Product Stock Pricing » Choose Sales Price to export as Purchase Price Excluding Vat |
WarehouseCountry, string(2) |
Setup » Stock » Warehouse » [Open warehouse] » Settings » Location |
WarehouseId, mandatory, integer(1) |
The identification number of the warehouse at Galaxus. Galaxus uses a GLN (Global Location Number) or the postcode of the warehouse. |
ExpectedRestockQuantity, mandatory, integer(10) |
Stock » Reorder management » Reorder » [Open reorder] » Ordered items Note: If you don’t use reorders, the value 0 is transferred. |
| Galaxus output | PlentyONE input field |
|---|---|
ProductKey, Mandatory, string(100) |
Item » Items » [Open variation] » Variation number |
SpecificationKey, mandatory, string(80) |
- |
SpecificationGroup_DE, string(80) |
Characteristic group name / Attribute (DE) Note: The plugin selects the first group from the list of property groups in the order in which they were added to the property. The following workaround should set GroupWeWantExported as the first in the list for the export: For example, the property Property1 is to exist in the 3 groups GroupA, GroupWeWantExported and GroupB
|
SpecificationGroup_EN, string(80) |
Characteristic group name / Attribute (EN) |
SpecificationGroup_FR, string(80) |
Characteristic group name / Attribute (FR) |
SpecificationGroup_IT, string(80) |
Characteristic group name / Attribute (IT) |
SpecificationKey_DE, mandatory, string(80) |
Characteristic designation / Attribute (DE) |
SpecificationKey_EN, mandatory, string(80) |
Characteristic designation / Attribute (EN) |
SpecificationKey_FR, mandatory, string(80) |
Characteristic designation / Attribute (FR) |
SpecificationKey_IT, mandatory, string(80) |
Characteristic designation / Attribute (IT) |
SpecificationValue_DE, mandatory, string(80) |
Characteristic value / Attribute (DE) |
SpecificationValue_EN, mandatory, string(80) |
Characteristic value / Attribute (EN) |
SpecificationValue_FR, mandatory, string(80) |
Characteristic value / Attribute (FR) |
SpecificationValue_IT, mandatory, string(80) |
Characteristic value / Attribute (IT) |
|
Fields for item data export
For the correct export of item data in the Data » Elastic export menu, the following two fields must be included in the CSV file:
|
11.2. Configuring formats in the elastic export
Configuring the Elastic Export:
-
Go to Data » Elastic Export.
-
Click New export.
-
Configure the export as described in Table 8.
-
Save the settings.
| Setting | Explanation |
|---|---|
Name |
Enter a name
|
Type |
Select the type item from the drop-down list. |
Format |
Select one of the three relevant data export formats.
|
Limit |
Enter a whole number. This number determines how many items are exported at maximum. Enter an integer between 0 and 9999. |
Generate cache file |
Place a check mark if you want to export more than 9999 data records to the interface. We recommend that you do not activate this setting for more than 20 export formats. This is to ensure a high performance of the Elastic Export. Depending on the user configuration and amount of data, it can take more than 24 hours to update the cache file. |
Provisioning |
You need to provide the data via SFTP. Using this option, you must also enter the SFTP credentials and the path to the SFTP folder where the data should be exported. |
File name |
Name your export files as follows:
|
Item filter |
Allow you to set up the export more granularly and thus ensure that only a specific subset of items is exported to Galaxus. Note that the plugin cannot use the following Elastic Export filters:
|
Add item filters |
Plugin relevant item filters are Active and Markets » Galaxus Select an item filter from the drop-down list and click Add. There are no filters selected by default. |
Client |
Default client |
Order referrer |
Select the order referrer that should be assigned during the order import from the drop-down list. In this case, this is: Galaxus |
Barcode |
Select the ASIN, ISBN or an EAN from the drop-down list. Selection must be linked to the referrer Galaxus. Otherwise, the barcode selection is not exported |
Sales price |
The exported sales price is always the Sales price net. The select Sales price gross is ignored during export. |
12. Preparing order documents
You need the following order documents for Galaxus:
-
Invoice
-
Delivery note
Adjust these order documents to the requirements of Galaxus. Check the following chapters to find out how. This information is structured like this:
Are you new to order documents? Then refer to the Order documents page of the manual before continuing.
12.1. Preparing invoices
In this chapter you will learn which information is required for your invoices.
Important: This information is accurate as of 1st January 2025. Check if these requirements are still up to date in the Galaxus documentation.
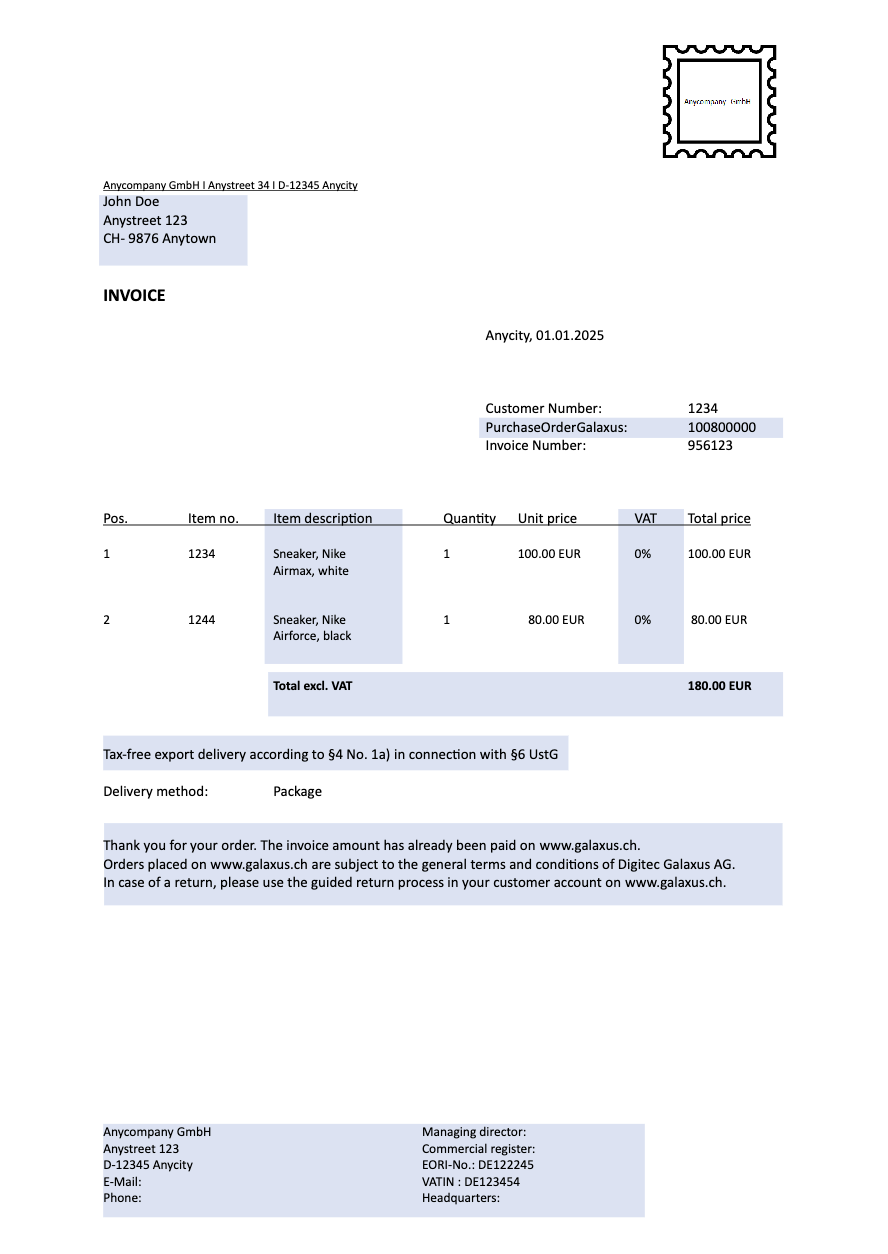
Export invoices must contain the following information:
-
Name and address of the invoice issuer in the EU
-
Invoice address of customer in Switzerland
-
Galaxus order number, in other words the purchase order number of Digitec Galaxus AG
-
Net invoice amount, thus without VAT (in EUR or CHF)
-
Legal note that invoice belongs to a tax-free delivery:
Tax-free export delivery in accordance with § 4 No. 1a) in conjunction with§ 6 UstG -
Note regarding payment digitec.ch/galaxus.ch:
Thank you for your order. The invoice amount has already been paid on www.galaxus.ch.
Orders placed on www.galaxus.ch are subject to the general terms and conditions of Digitec Galaxus AG. In case of a return, please use the guided return process in your customer account on www.galaxus.ch.
The following information is not allowed on invoices:
-
A return address in the EU
-
The delivery address of the EU Hub in Efringen-Kirchen
Below is a sample export invoice:
To show this information on the invoices, proceed as described below.
Saving VAT rates for Switzerland:
-
Go to Setup » Client » [Select client] » Locations » Location: Germany » Accounting » Tab: VAT.
-
Click New configuration.
-
Select the country Switzerland.
-
Enter the VAT rates for Switzerland.
Important: The VAT configuration cannot be changed in retrospect.
Additional information -
Save the settings.
Uploading PDF template for invoices:
-
Create a PDF template for invoices based on the requirements of Galaxus.
Tip: Check the additional settings in Table 9. Can you place any of the notes directly on your PDF template for Galaxus invoices? -
Go to Setup » Client » Select client » Locations » Location: Germany » Documents » Invoice.
-
Click on the tab PDF template.
-
Click Add template.
→ The editing window Upload new PDF template opens. -
From the drop-down list Payment method, select the option Galaxus Direct Checkout.
-
Tip: Can’t find the payment method in the drop-down list?
-
Go to Setup » Orders » Settings.
-
For the setting Show inactive plugin payment methods, select the option Yes.
-
Save (save) the setting.
-
-
In the drop-down list Language, select the option de.
-
In the line Template, click Choose template file.
-
Select the PDF template for Galaxus invoices.
-
Click Upload template (save).
→ The template is uploaded.
Tip: In the same menu, also carry out the settings for the PlentyONE template for invoices. The next chapter shows you how.
Adjusting invoice template:
-
Go to Setup » Client » [Open standard client] » Locations » Location: Germany » Documents » Invoice » Tab: Template.
-
For the setting Currency of the document, select the option Order currency. Important: This setting is applied to all invoices of the location, not just to Galaxus.
-
Scroll down to the section Optional elements below stock unit table.
-
Carry out the settings described in <table-delivery-notes>.
Tip: Depending on your layout, you might be able to place all notes in just one input field Payment instruction. -
Check the Galaxus documentation to see if any other adjustments to your template are required.
Important: The template is used for all invoices for this country, not just for Galaxus. -
Save (save) the settings.
→ The necessary information is shown on invoices.
| Requirement | Settings in the template |
|---|---|
Purchase order number of Digitec Galaxus AG |

|
Legal note regarding tax-free delivery |
Use the input field Payment instruction.
Tip: Alternatively, you can place this note directly on your PDF template for Galaxus invoices. |
Payment note |
Use the input field Payment instruction.
Tip: Alternatively, you can place this note directly on your PDF template for Galaxus invoices. |
12.2. Preparing delivery notes
Delivery notes for Galaxus orders must contain specific information. These requirements are listed on Galaxus.
Below, we describe how you show the following information on delivery notes for Galaxus:
-
Galaxus order reference
-
Legal information
To make sure that this information is shown on delivery notes, adjust the template for delivery note as described below.
Adjusting template for delivery notes:
-
Go to Setup » Client » Standard » Locations » Location: Germany » Documents » Delivery note » Tab: Template.
-
Scroll down to the section Optional elements below stock unit table.
-
Carry out the settings described in <table-delivery-notes>.
-
Check the Galaxus documentation to see if any other adjustments to your template are required.
Important: The template is used for all delivery notes for this country, not just for Galaxus. -
Save (save) the settings.
→ The necessary information is shown on delivery notes.
| Setting | Option |
|---|---|
Purchase order number of Digitec Galaxus AG |
|
Payment instruction |
|
13. Automating order processing
You can automatically inform Galaxus about changes to the order status. Two options are available for this purpose:
-
Option 1: PlentyONE Flow (recommended)
-
Option 2: Event procedures (old method)
13.1. Option 1: PlentyONE Flow (recommended)
Create event-based flows to automatically inform Galaxus about changes to the order status. The following actions are available for Galaxus in the PlentyONE Flow Studio:
-
Automatically inform Galaxus that the order was confirmed. (How?)
-
Automatically inform Galaxus that the items have been shipped. (How?)
-
Automatically inform Galaxus that a cancellation request has been accepted. (How?)
-
Automatically inform Galaxus that a cancellation request has been rejected. (How?)
-
Automatically inform Galaxus that an order has been cancelled by the seller. (How?)
-
Automatically inform Galaxus that a return request has been accepted. (How?)
-
Automatically inform Galaxus that a return request has been rejected. (How?)
-
Automatically inform Galaxus that a return to the seller has been accepted. (How?)
-
Automatically inform Galaxus that a return has been rejected by the seller. (How?)
-
Automatically send invoices to Galaxus. (How?)
With PlentyONE Flow (short: "Flow"), you can automate workflows for your business processes. Flow provides you with two functions in the Automation menu:
-
In Flow Studio, you create and configure automated workflows. Depending on the trigger type, there are three types of flows: event-based, time-based or manual.
-
In the Flow Tracker, you can monitor running or completed workflows.
The central element in both functions is the Canvas – a graphical interface on which the workflows are visualised with Actions and Controls. In Flow Studio the canvas can be edited, in Flow Tracker it is only used for visualisation and is therefore read-only.
-
Is this your first time working with PlentyONE Flow? Then read up on the basic concept of Flow first.
13.1.1. Sending order confirmation to Galaxus
Create an event-based flow to automatically inform Galaxus about the order confirmation.
-
Go to Automation » Flow Studio.
-
Click Create flow (add).
→ A stepper opens and guides you through the following three steps.-
General
-
Enter a unique name and, if necessary, a description for the new flow.
-
Click Next.
-
-
Trigger
-
Select Event-based as the trigger.
-
Click Next.
-
-
Settings
-
If desired, select a UI from the optional drop-down list Flow available in.
→ The option to manually trigger the flow directly from the selected UI is added to the group functions in that UI.
Note: UIs currently selectable: Order UI. -
From the drop-down list Trigger selection, select the event according to Table 11.
Note: If the trigger event has additional settings, then these are invariably mandatory. Without performing these settings, you will not be able to save the flow. -
Save () the settings.
→ The flow is created.
→ The Flow Studio Canvas appears, on which two elements are already displayed: The trigger type and the placeholder for the next step.
Note: With some event-based flows you cannot save the flow if it consists of only a trigger. In such cases, you need to add at least one further step.
-
-
-
Configure the new flow according to Table 11.
-
Save () the settings.
Note: The selected statuses, controls and filters in Table 11 only serve as an example. Select the statuses, controls and filters for the flow which best suit your workflow.
| Setting | Option | Selection | ||||||
|---|---|---|---|---|---|---|---|---|
Trigger selection |
Select a trigger, for example:
|
For Order types, select the type Sales order. |
||||||
Control element |
Branch |
Note: If there is more than one filter, add the others as conditions (playlist_add). Select AND as the relationship between the conditions.
|
||||||
Actions |
Plugin (Legacy) > Galaxus |
Send an order confirmation notification to Galaxus Important: The delivery date is either based on availability of the item or it is not sent if the UI option "Do not send delivery date" is active. |
13.1.2. Sending shipping confirmation to Galaxus
Create an event-based flow to automatically inform Galaxus when you have shipped the items of an order.
-
Go to Automation » Flow Studio.
-
Click Create flow (add).
→ A stepper opens and guides you through the following three steps.-
General
-
Enter a unique name and, if necessary, a description for the new flow.
-
Click Next.
-
-
Trigger
-
Select Event-based as the trigger.
-
Click Next.
-
-
Settings
-
If desired, select a UI from the optional drop-down list Flow available in.
→ The option to manually trigger the flow directly from the selected UI is added to the group functions in that UI.
Note: UIs currently selectable: Order UI. -
From the drop-down list Trigger selection, select the event according to Table 12.
Note: If the trigger event has additional settings, then these are invariably mandatory. Without performing these settings, you will not be able to save the flow. -
Save () the settings.
→ The flow is created.
→ The Flow Studio Canvas appears, on which two elements are already displayed: The trigger type and the placeholder for the next step.
Note: With some event-based flows you cannot save the flow if it consists of only a trigger. In such cases, you need to add at least one further step.
-
-
-
Configure the new flow according to Table 12.
-
Save () the settings.
Note: The selected statuses, controls and filters in Table 12 only serve as an example. Select the statuses, controls and filters for the flow which best suit your workflow.
| Setting | Option | Selection | |||||||||
|---|---|---|---|---|---|---|---|---|---|---|---|
Trigger selection |
Select a trigger, for example:
|
Select an order status, for example:
|
|||||||||
Control element |
Branch |
Note: If there is more than one filter, add the others as conditions (playlist_add). Select AND as the relationship between the conditions.
|
|||||||||
Actions |
Plugin (Legacy) > Galaxus |
Send a shipping confirmation notification to Galaxus |
13.1.3. Reporting acceptance of a cancellation request to Galaxus
Create an event-based flow to automatically inform Galaxus when you have accepted a cancellation request.
-
Go to Automation » Flow Studio.
-
Click Create flow (add).
→ A stepper opens and guides you through the following three steps.-
General
-
Enter a unique name and, if necessary, a description for the new flow.
-
Click Next.
-
-
Trigger
-
Select Event-based as the trigger.
-
Click Next.
-
-
Settings
-
If desired, select a UI from the optional drop-down list Flow available in.
→ The option to manually trigger the flow directly from the selected UI is added to the group functions in that UI.
Note: UIs currently selectable: Order UI. -
From the drop-down list Trigger selection, select the event according to Table 13.
Note: If the trigger event has additional settings, then these are invariably mandatory. Without performing these settings, you will not be able to save the flow. -
Save () the settings.
→ The flow is created.
→ The Flow Studio Canvas appears, on which two elements are already displayed: The trigger type and the placeholder for the next step.
Note: With some event-based flows you cannot save the flow if it consists of only a trigger. In such cases, you need to add at least one further step.
-
-
-
Configure the new flow according to Table 13.
-
Save () the settings.
Note: The selected statuses, controls and filters in Table 13 only serve as an example. Select the statuses, controls and filters for the flow which best suit your workflow.
| Setting | Option | Selection | |||||||||
|---|---|---|---|---|---|---|---|---|---|---|---|
Trigger selection |
Select a trigger, for example:
|
Select an order status, for example:
|
|||||||||
Control element |
Branch |
Note: If there is more than one filter, add the others as conditions (playlist_add). Select AND as the relationship between the conditions.
|
|||||||||
Actions |
Plugin (Legacy) > Galaxus |
Send a cancel request accepted notification to Galaxus Important: Cancellations for individual order items are rejected automatically (reason given for auto rejection: Non-refundable). Cancellations of complete orders are accepted automatically if the initial order does not yet have the status Shipped. |
13.1.4. Reporting rejection of a cancellation request to Galaxus
Create an event-based flow to automatically inform Galaxus when you have rejected a cancellation request.
-
Go to Automation » Flow Studio.
-
Click Create flow (add).
→ A stepper opens and guides you through the following three steps.-
General
-
Enter a unique name and, if necessary, a description for the new flow.
-
Click Next.
-
-
Trigger
-
Select Event-based as the trigger.
-
Click Next.
-
-
Settings
-
If desired, select a UI from the optional drop-down list Flow available in.
→ The option to manually trigger the flow directly from the selected UI is added to the group functions in that UI.
Note: UIs currently selectable: Order UI. -
From the drop-down list Trigger selection, select the event according to Table 14.
Note: If the trigger event has additional settings, then these are invariably mandatory. Without performing these settings, you will not be able to save the flow. -
Save () the settings.
→ The flow is created.
→ The Flow Studio Canvas appears, on which two elements are already displayed: The trigger type and the placeholder for the next step.
Note: With some event-based flows you cannot save the flow if it consists of only a trigger. In such cases, you need to add at least one further step.
-
-
-
Configure the new flow according to Table 14.
-
Save () the settings.
Note: The selected statuses, controls and filters in Table 14 only serve as an example. Select the statuses, controls and filters for the flow which best suit your workflow.
| Setting | Option | Selection | |||||||||
|---|---|---|---|---|---|---|---|---|---|---|---|
Trigger selection |
Select a trigger, for example:
|
Select the status that best suits your workflow. For example, you can create a new status for this:
|
|||||||||
Control element |
Branch |
Note: If there is more than one filter, add the others as conditions (playlist_add). Select AND as the relationship between the conditions.
|
|||||||||
Actions |
Plugin (Legacy) > Galaxus |
Send a cancel request not accepted notification to Galaxus Note: A reason for the rejection can be entered in the order note before executing this flow. |
13.1.5. Reporting cancellation by the seller to Galaxus
Create an event-based flow to automatically inform Galaxus that the order has been cancelled by the seller.
-
Go to Automation » Flow Studio.
-
Click Create flow (add).
→ A stepper opens and guides you through the following three steps.-
General
-
Enter a unique name and, if necessary, a description for the new flow.
-
Click Next.
-
-
Trigger
-
Select Event-based as the trigger.
-
Click Next.
-
-
Settings
-
If desired, select a UI from the optional drop-down list Flow available in.
→ The option to manually trigger the flow directly from the selected UI is added to the group functions in that UI.
Note: UIs currently selectable: Order UI. -
From the drop-down list Trigger selection, select the event according to Table 15.
Note: If the trigger event has additional settings, then these are invariably mandatory. Without performing these settings, you will not be able to save the flow. -
Save () the settings.
→ The flow is created.
→ The Flow Studio Canvas appears, on which two elements are already displayed: The trigger type and the placeholder for the next step.
Note: With some event-based flows you cannot save the flow if it consists of only a trigger. In such cases, you need to add at least one further step.
-
-
-
Configure the new flow according to Table 15.
-
Save () the settings.
Note: The selected statuses, controls and filters in Table 15 only serve as an example. Select the statuses, controls and filters for the flow which best suit your workflow.
| Setting | Option | Selection | |||||||||
|---|---|---|---|---|---|---|---|---|---|---|---|
Trigger selection |
Select a trigger, for example:
|
Select an order status, for example:
|
|||||||||
Control element |
Branch |
Note: If there is more than one filter, add the others as conditions (playlist_add). Select AND as the relationship between the conditions.
|
|||||||||
Actions |
Plugin (Legacy) > Galaxus |
Send a ‘merchant cancels' notification to Galaxus |
13.1.6. Reporting acceptance of a return request to Galaxus
Create an event-based flow to automatically inform Galaxus when you have accepted a return request.
-
Go to Automation » Flow Studio.
-
Click Create flow (add).
→ A stepper opens and guides you through the following three steps.-
General
-
Enter a unique name and, if necessary, a description for the new flow.
-
Click Next.
-
-
Trigger
-
Select Event-based as the trigger.
-
Click Next.
-
-
Settings
-
If desired, select a UI from the optional drop-down list Flow available in.
→ The option to manually trigger the flow directly from the selected UI is added to the group functions in that UI.
Note: UIs currently selectable: Order UI. -
From the drop-down list Trigger selection, select the event according to Table 16.
Note: If the trigger event has additional settings, then these are invariably mandatory. Without performing these settings, you will not be able to save the flow. -
Save () the settings.
→ The flow is created.
→ The Flow Studio Canvas appears, on which two elements are already displayed: The trigger type and the placeholder for the next step.
Note: With some event-based flows you cannot save the flow if it consists of only a trigger. In such cases, you need to add at least one further step.
-
-
-
Configure the new flow according to Table 16.
-
Save () the settings.
Note: The selected statuses, controls and filters in Table 16 only serve as an example. Select the statuses, controls and filters for the flow which best suit your workflow.
| Setting | Option | Selection | ||||||
|---|---|---|---|---|---|---|---|---|
Trigger selection |
Select a trigger, for example:
|
Select the status that you specified in the Galaxus settings as Order Status For Return Requests. |
||||||
Control element |
Branch |
Note: If there is more than one filter, add the others as conditions (playlist_add). Select AND as the relationship between the conditions.
|
||||||
Actions |
Plugin (Legacy) > Galaxus |
Send a 'return registration accepted' response to Galaxus |
13.1.7. Reporting rejection of a return request to Galaxus
Create an event-based flow to automatically inform Galaxus when you have rejected a return request.
-
Go to Automation » Flow Studio.
-
Click Create flow (add).
→ A stepper opens and guides you through the following three steps.-
General
-
Enter a unique name and, if necessary, a description for the new flow.
-
Click Next.
-
-
Trigger
-
Select Event-based as the trigger.
-
Click Next.
-
-
Settings
-
If desired, select a UI from the optional drop-down list Flow available in.
→ The option to manually trigger the flow directly from the selected UI is added to the group functions in that UI.
Note: UIs currently selectable: Order UI. -
From the drop-down list Trigger selection, select the event according to Table 17.
Note: If the trigger event has additional settings, then these are invariably mandatory. Without performing these settings, you will not be able to save the flow. -
Save () the settings.
→ The flow is created.
→ The Flow Studio Canvas appears, on which two elements are already displayed: The trigger type and the placeholder for the next step.
Note: With some event-based flows you cannot save the flow if it consists of only a trigger. In such cases, you need to add at least one further step.
-
-
-
Configure the new flow according to Table 17.
-
Save () the settings.
Note: The selected statuses, controls and filters in Table 17 only serve as an example. Select the statuses, controls and filters for the flow which best suit your workflow.
| Setting | Option | Selection | ||||||
|---|---|---|---|---|---|---|---|---|
Trigger selection |
Select a trigger, for example:
|
Select the status that you specified in the Galaxus settings as Order Status For Return Requests. |
||||||
Control element |
Branch |
Note: If there is more than one filter, add the others as conditions (playlist_add). Select AND as the relationship between the conditions.
|
||||||
Actions |
Plugin (Legacy) > Galaxus |
Send a 'return registration not accepted' response to Galaxus Note: A reason for the rejection can be entered in the order note before executing this flow. |
13.1.8. Reporting acceptance of a return to Galaxus
Create an event-based flow to automatically inform Galaxus when you have accepted a return to the seller.
-
Go to Automation » Flow Studio.
-
Click Create flow (add).
→ A stepper opens and guides you through the following three steps.-
General
-
Enter a unique name and, if necessary, a description for the new flow.
-
Click Next.
-
-
Trigger
-
Select Event-based as the trigger.
-
Click Next.
-
-
Settings
-
If desired, select a UI from the optional drop-down list Flow available in.
→ The option to manually trigger the flow directly from the selected UI is added to the group functions in that UI.
Note: UIs currently selectable: Order UI. -
From the drop-down list Trigger selection, select the event according to Table 18.
Note: If the trigger event has additional settings, then these are invariably mandatory. Without performing these settings, you will not be able to save the flow. -
Save () the settings.
→ The flow is created.
→ The Flow Studio Canvas appears, on which two elements are already displayed: The trigger type and the placeholder for the next step.
Note: With some event-based flows you cannot save the flow if it consists of only a trigger. In such cases, you need to add at least one further step.
-
-
-
Configure the new flow according to Table 18.
-
Save () the settings.
Note: The selected statuses, controls and filters in Table 18 only serve as an example. Select the statuses, controls and filters for the flow which best suit your workflow.
| Setting | Option | Selection | ||||||
|---|---|---|---|---|---|---|---|---|
Trigger selection |
Select a trigger, for example:
|
Select the status that best suits your workflow. For example, you can create a new status for this:
|
||||||
Control element |
Branch |
Note: If there is more than one filter, add the others as conditions (playlist_add). Select AND as the relationship between the conditions.
|
||||||
Actions |
Plugin (Legacy) > Galaxus |
Send a 'Return to merchant accepted' notification to Galaxus |
13.1.9. Reporting rejection of a return to Galaxus
Create an event-based flow to automatically inform Galaxus when you have rejected a return to the seller.
-
Go to Automation » Flow Studio.
-
Click Create flow (add).
→ A stepper opens and guides you through the following three steps.-
General
-
Enter a unique name and, if necessary, a description for the new flow.
-
Click Next.
-
-
Trigger
-
Select Event-based as the trigger.
-
Click Next.
-
-
Settings
-
If desired, select a UI from the optional drop-down list Flow available in.
→ The option to manually trigger the flow directly from the selected UI is added to the group functions in that UI.
Note: UIs currently selectable: Order UI. -
From the drop-down list Trigger selection, select the event according to Table 19.
Note: If the trigger event has additional settings, then these are invariably mandatory. Without performing these settings, you will not be able to save the flow. -
Save () the settings.
→ The flow is created.
→ The Flow Studio Canvas appears, on which two elements are already displayed: The trigger type and the placeholder for the next step.
Note: With some event-based flows you cannot save the flow if it consists of only a trigger. In such cases, you need to add at least one further step.
-
-
-
Configure the new flow according to Table 19.
-
Save () the settings.
Note: The selected statuses, controls and filters in Table 19 only serve as an example. Select the statuses, controls and filters for the flow which best suit your workflow.
| Setting | Option | Selection | ||||||
|---|---|---|---|---|---|---|---|---|
Trigger selection |
Select a trigger, for example:
|
Select the status that best suits your workflow. For example, you can create a new status for this:
|
||||||
Control element |
Branch |
Note: If there is more than one filter, add the others as conditions (playlist_add). Select AND as the relationship between the conditions.
|
||||||
Actions |
Plugin (Legacy) > Galaxus |
Send a 'Return to merchant denied' notification to Galaxus Note: A reason for the rejection can be entered in the order note before executing this flow. |
13.1.10. Sending invoices to Galaxus
Create an event-based flow to automatically send the invoice contained in the order to Galaxus.
-
Go to Automation » Flow Studio.
-
Click Create flow (add).
→ A stepper opens and guides you through the following three steps.-
General
-
Enter a unique name and, if necessary, a description for the new flow.
-
Click Next.
-
-
Trigger
-
Select Event-based as the trigger.
-
Click Next.
-
-
Settings
-
If desired, select a UI from the optional drop-down list Flow available in.
→ The option to manually trigger the flow directly from the selected UI is added to the group functions in that UI.
Note: UIs currently selectable: Order UI. -
From the drop-down list Trigger selection, select the event according to Table 20.
Note: If the trigger event has additional settings, then these are invariably mandatory. Without performing these settings, you will not be able to save the flow. -
Save () the settings.
→ The flow is created.
→ The Flow Studio Canvas appears, on which two elements are already displayed: The trigger type and the placeholder for the next step.
Note: With some event-based flows you cannot save the flow if it consists of only a trigger. In such cases, you need to add at least one further step.
-
-
-
Configure the new flow according to Table 20.
-
Save () the settings.
Note: The selected statuses, controls and filters in Table 20 only serve as an example. Select the statuses, controls and filters for the flow which best suit your workflow.
| Setting | Option | Selection | ||||||
|---|---|---|---|---|---|---|---|---|
Trigger selection |
Select a trigger, for example:
|
Select a document type, for example:
|
||||||
Control element |
Branch |
Note: If there is more than one filter, add the others as conditions (playlist_add). Select AND as the relationship between the conditions.
|
||||||
Actions |
Plugin (Legacy) > Galaxus |
Send invoice to Galaxus |
13.2. Option 2: Event procedures (old method)
For Galaxus, the event procedures listed in Table 21 are available.
| Name | Recommended event | Explanation |
|---|---|---|
Send an order confirmation notification to Galaxus |
Any |
Informs Galaxus about changes made to the PlentyONE order. |
Send a shipping confirmation notification to Galaxus |
Status change |
Informs Galaxus that the order is ready for shipping. |
Send a cancel request accepted notification to Galaxus |
Status change |
Informs Galaxus that the cancellation request was accepted. |
Send a cancel request not accepted notification to Galaxus |
Status change |
Informs Galaxus that the cancellation request was rejected. |
Send a 'merchant cancels' notification to Galaxus |
Status change |
Informs Galaxus that the order was cancelled by the seller. |
Send a 'return registration accepted' response to Galaxus |
Status change |
Informs Galaxus that the return request was accepted. |
Send a 'return registration not accepted' response to Galaxus |
Status change |
Informs Galaxus that the return request was rejected. |
'Send a 'Return to merchant accepted' notification to Galaxus |
Status change |
Informs Galaxus that a return was accepted by the seller. |
'Send a 'Return to merchant denied' notification to Galaxus |
Status change |
Informs Galaxus that the return request was rejected by the merchant. |
Send invoice to Galaxus |
Status change |
Sends the invoice as PDF file to Galaxus. |
13.2.1. Sending order confirmation to Galaxus
Set up an event procedure to automatically inform Galaxus that the order was confirmed.
-
Go to Setup » Orders » Events.
-
Click on Add event procedure ().
→ The Create new event procedure window opens. -
Enter a distinct name for the event procedure.
-
Select the event according to Table 22.
-
Save () the settings.
-
Carry out the additional settings according to Table 22.
-
Select the setting Active ().
-
Save () the settings.
Note: The selected statuses and filters in Table 22 only serve as an example. Select filters and statuses for the event procedure which best suit your workflow.
| Setting | Option | Selection |
|---|---|---|
Event |
Order generation: New order |
|
Filter |
Order > Referrer |
Galaxus |
Procedure |
Plugins |
Send an order confirmation notification to Galaxus Important: The delivery date is either based on availability of the item or it is not sent if the option Do not send delivery date is active. |
13.2.2. Sending shipping confirmation to Galaxus
Set up an event procedure to automatically inform Galaxus when you have shipped the items of an order.
-
Go to Setup » Orders » Events.
-
Click on Add event procedure ().
→ The Create new event procedure window opens. -
Enter a distinct name for the event procedure.
-
Select the event according to Table 23.
-
Save () the settings.
-
Carry out the additional settings according to Table 23.
-
Select the setting Active ().
-
Save () the settings.
Note: The selected statuses and filters in Table 23 only serve as an example. Select filters and statuses for the event procedure which best suit your workflow.
| Setting | Option | Selection |
|---|---|---|
Event |
Select a trigger, for example:
|
Select a status, for example:
|
Filter 1 |
Order > Order type |
Order |
Filter 2 |
Order > Referrer |
Galaxus |
Procedure |
Plugins |
Send a shipping confirmation notification to Galaxus |
13.2.3. Reporting acceptance of a cancellation request to Galaxus
Set up an event procedure to automatically inform Galaxus when you have accepted a cancellation request.
-
Go to Setup » Orders » Events.
-
Click on Add event procedure ().
→ The Create new event procedure window opens. -
Enter a distinct name for the event procedure.
-
Select the event according to Table 24.
-
Save () the settings.
-
Carry out the additional settings according to Table 24.
-
Select the setting Active ().
-
Save () the settings.
Note: The selected statuses and filters in Table 24 only serve as an example. Select filters and statuses for the event procedure which best suit your workflow.
| Setting | Option | Selection |
|---|---|---|
Event |
Select a trigger, for example:
|
Select a status, for example:
|
Filter 1 |
Order > Order type |
Order |
Filter 2 |
Order > Referrer |
Galaxus |
Procedure |
Plugins |
Send a cancel request accepted notification to Galaxus Important: Cancellations for individual order items are rejected automatically (reason given for auto rejection: Non-refundable). Cancellations of complete orders are accepted automatically if the initial order does not yet have the status Shipped. |
13.2.4. Reporting rejection of a cancellation request to Galaxus
Set up an event procedure to automatically inform Galaxus when you have rejected a cancellation request.
-
Go to Setup » Orders » Events.
-
Click on Add event procedure ().
→ The Create new event procedure window opens. -
Enter a distinct name for the event procedure.
-
Select the event according to Table 25.
-
Save () the settings.
-
Carry out the additional settings according to Table 25.
-
Select the setting Active ().
-
Save () the settings.
Note: The selected statuses and filters in Table 25 only serve as an example. Select filters and statuses for the event procedure which best suit your workflow.
| Setting | Option | Selection |
|---|---|---|
Event |
Select a trigger, for example:
|
Select the status that best suits your workflow. For example, you can create a new status for this:
|
Filter 1 |
Order > Order type |
Order |
Filter 2 |
Order > Referrer |
Galaxus |
Procedure |
Plugins |
Send a cancel request not accepted notification to Galaxus Note: A reason for the rejection can be entered in the order note before executing this procedure. |
13.2.5. Reporting cancellation by the seller to Galaxus
Set up an event procedure to automatically inform Galaxus that the order has been cancelled by the seller.
-
Go to Setup » Orders » Events.
-
Click on Add event procedure ().
→ The Create new event procedure window opens. -
Enter a distinct name for the event procedure.
-
Select the event according to Table 26.
-
Save () the settings.
-
Carry out the additional settings according to Table 26.
-
Select the setting Active ().
-
Save () the settings.
Note: The selected statuses and filters in Table 26 only serve as an example. Select filters and statuses for the event procedure which best suit your workflow.
| Setting | Option | Selection |
|---|---|---|
Event |
Select a trigger, for example:
|
Select a status, for example:
|
Filter 1 |
Order > Order type |
Order |
Filter 2 |
Order > Referrer |
Galaxus |
Procedure |
Plugins |
Send a ‘merchant cancels' notification to Galaxus |
13.2.6. Reporting acceptance of a return request to Galaxus
Set up an event procedure to automatically inform Galaxus when you have accepted a return request.
-
Go to Setup » Orders » Events.
-
Click on Add event procedure ().
→ The Create new event procedure window opens. -
Enter a distinct name for the event procedure.
-
Select the event according to Table 27.
-
Save () the settings.
-
Carry out the additional settings according to Table 27.
-
Select the setting Active ().
-
Save () the settings.
Note: The selected statuses and filters in Table 27 only serve as an example. Select filters and statuses for the event procedure which best suit your workflow.
| Setting | Option | Selection |
|---|---|---|
Event |
Select a trigger, for example:
|
Select the status that you specified in the Galaxus settings as Order Status For Return Requests. |
Filter |
Order > Referrer |
Galaxus |
Procedure |
Plugins |
Send a 'return registration accepted' response to Galaxus |
13.2.7. Reporting rejection of a return request to Galaxus
Set up an event procedure to automatically inform Galaxus when you have rejected a return request.
-
Go to Setup » Orders » Events.
-
Click on Add event procedure ().
→ The Create new event procedure window opens. -
Enter a distinct name for the event procedure.
-
Select the event according to Table 28.
-
Save () the settings.
-
Carry out the additional settings according to Table 28.
-
Select the setting Active ().
-
Save () the settings.
Note: The selected statuses and filters in Table 28 only serve as an example. Select filters and statuses for the event procedure which best suit your workflow.
| Setting | Option | Selection |
|---|---|---|
Event |
Select a trigger, for example:
|
Select the status that you specified in the Galaxus settings as Order Status For Return Requests. |
Filter |
Order > Referrer |
Galaxus |
Procedure |
Plugins |
Send a 'return registration not accepted' response to Galaxus Note: A reason for the rejection can be entered in the order note before executing this procedure. |
13.2.8. Reporting acceptance of a return to Galaxus
Set up an event procedure to automatically inform Galaxus when you have accepted a return to the seller.
-
Go to Setup » Orders » Events.
-
Click on Add event procedure ().
→ The Create new event procedure window opens. -
Enter a distinct name for the event procedure.
-
Select the event according to Table 29.
-
Save () the settings.
-
Carry out the additional settings according to Table 29.
-
Select the setting Active ().
-
Save () the settings.
Note: The selected statuses and filters in Table 29 only serve as an example. Select filters and statuses for the event procedure which best suit your workflow.
| Setting | Option | Selection |
|---|---|---|
Event |
Select a trigger, for example:
|
Select the status that best suits your workflow. For example, you can create a new status for this:
|
Filter |
Order > Referrer |
Galaxus |
Procedure |
Plugins |
Send a 'Return to merchant accepted' notification to Galaxus |
13.2.9. Reporting rejection of a return to Galaxus
Set up an event procedure to automatically inform Galaxus when you have rejected a return to the seller.
-
Go to Setup » Orders » Events.
-
Click on Add event procedure ().
→ The Create new event procedure window opens. -
Enter a distinct name for the event procedure.
-
Select the event according to Table 30.
-
Save () the settings.
-
Carry out the additional settings according to Table 30.
-
Select the setting Active ().
-
Save () the settings.
Note: The selected statuses and filters in Table 30 only serve as an example. Select filters and statuses for the event procedure which best suit your workflow.
| Setting | Option | Selection |
|---|---|---|
Event |
Select a trigger, for example:
|
Select the status that best suits your workflow. For example, you can create a new status for this:
|
Filter |
Order > Referrer |
Galaxus |
Procedure |
Plugins |
Send a 'Return to merchant denied' notification to Galaxus Note: A reason for the rejection can be entered in the order note before executing this procedure. |
13.2.10. Sending invoices to Galaxus
Set up an event procedure to automatically send the invoice contained in the order to Galaxus.
-
Go to Setup » Orders » Events.
-
Click on Add event procedure ().
→ The Create new event procedure window opens. -
Enter a distinct name for the event procedure.
-
Select the event according to Table 31.
-
Save () the settings.
-
Carry out the additional settings according to Table 31.
-
Select the setting Active ().
-
Save () the settings.
Note: The selected statuses and filters in Table 31 only serve as an example. Select filters and statuses for the event procedure which best suit your workflow.
| Setting | Option | Selection |
|---|---|---|
Event |
Select a trigger, for example:
|
|
Filter |
Order > Referrer |
Galaxus |
Procedure |
Plugins |
Send invoice to Galaxus |
14. Particularities of the Galaxus order processing
-
During order import, variations are assigned to the order based on their partner product key at Galaxus (supplier_pid). PlentyONE first checks whether a variation with a matching variation ID exists for this supplier_pid.
-
If a matching variation ID is found, this variation is assigned to the order.
-
If no matching variation ID is found, PlentyONE instead checks whether a variation with a corresponding SKU for the referrer Galaxus exists for this supplier_pid. If a variation with a matching SKU is found, this variation is assigned to the order based on its variation ID.
-
-
Galaxus return requests generate new PlentyONE orders of the type Return. These orders are linked to the initial order. The resulting orders must be processed separately.
-
Go to Order » Overview » Item » Edit » Delivery date to enter the delivery date. If no delivery date is saved, a delivery date is calculated based on the following formula:
[Day the flow or the event procedure GalaxusDE: Send an order confirmation notification to Galaxus was triggered] + 2 working days -
A shipping date is also not set if the item quantity needed to fulfil the order is not available as net stock. The planned delivery date can change based on the plugin option Positive stock quantities are always exported, independent of the average delivery period in the menu Setup » Markets » Galaxus » Tab: Product Stock Price.
-
In all scenarios where only a part of the order is to be processed (return/shipping), the imported order must be split. The resulting orders must be processed separately.
How to split an order:-
Open the order in the Orders » Orders menu.
-
In the toolbar, click more_vert and then call_split Split order.
-
Select the item quantities for the new order.
Important: The shipping costs of the original order will not be changed.
→ After splitting an order, the plugin can inform Galaxus without any additional user input.
-
-
Orders with an invoice address in Liechtenstein and a delivery address in the EU are imported as net orders.
15. Order data exchange: scenarios
The Galaxus plugin supports the following scenarios.
Important: All scenarios except cancellation requests can be applied to both entire orders and partial orders. As such and to avoid duplicate content, scenarios for entire orders are not described separately.
15.1. The imported order is ready for shipping
The imported order contains all required information and is ready to be shipped:
-
The order import was automatically reported back either by the flow Send an order confirmation notification to Galaxus or the event procedure Send an order confirmation notification to Galaxus.
-
When the order is ready for shipping, trigger either:
15.2. Only part of the imported order can be fulfilled
Only part of the imported order can be fulfilled at this time. The customer agrees to receive half of the oder now. The other half will be sent at a later date:
-
Open the order in the Orders » Orders menu.
-
In the toolbar, click more_vert and then call_split Split order.
-
If desired, enter a shipping date in the new order.
-
Save the settings.
-
Inform Galaxus of the new delivery date by either triggering:
-
When the items are ready for shipping, either trigger:
15.3. Parts of an order cannot be fulfilled
You realised that part of the order cannot be fulfilled, for example because the item is out of stock.
-
Open the order in the Orders » Orders menu.
-
In the toolbar, click more_vert and then call_split Split order.
-
Either trigger:
-
Afterwards, either trigger:
-
the event procedure 'Merchant Cancels' notification to Galaxus.
→ Galaxus responds with a cancellation request.
-
You can either:
-
accept the cancellation request:
or
-
reject the cancellation request:
-
15.4. The customer has requested a partial return
The customer wants to return parts of the order.
-
Galaxus receives the return request.
-
PlentyONE creates a new order of the type Return that is linked to the initial order.
-
You can either:
-
accept the return request:
or
-
reject the return request:
-
15.5. The customer has rejected the package
The customer did not accept your delivery for an unjustified reason. The package has now been returned to you.
-
Open the order in the Orders » Orders menu.
-
Create a new order of the type Return.
-
To do so, click Create orders (shopping_cart arrow_drop_down) and select Return » For all order items.
-
-
You can either:
-
accept the return request:
or
-
reject the return request:
-
Note:
-
Partial cancellation requests and cancellation requests for orders with a status higher than [5] In preparation for shipping are automatically rejected with the reason Non-refundable.
-
Go to Setup » Markets » Galaxus » Order status configuration to select a different status for rejecting such requests automatically.
16. FAQ and troubleshooting
The menu Setup » Markets » Galaxus is only shown after you carry out the following steps:
-
The plugin is installed in the plugin set in which the default client is linked.
-
The plugin set was successfully deployed to your system.
-
The order referrer Galaxus is active in the menu Setup » Orders » Order referrer.
-
On Galaxus, your variations are offered using your default client (store). As such, check that the category is linked to the default client (store).
-
The default category of the variation is exported in all cases. As such, check that the variation has a default category that is linked to the default client (store).
Linking the default client to the category:
-
Go to Item » Category.
-
Click on the category in the directory tree on the left.
→ The category opens and the tab Settings is shown. -
Navigate to the setting Client (store).
-
Activate the option Standard (check_box).
-
Save (save) the settings.
Selecting the default category:
-
Go to Item » Items » [Open variation] » Section: Categories.
-
Click more_vert and then link Link default category.
→ The Link default category window opens. -
Use the drop-down list to select a default category for each client.
Important: This category must be linked to the default client (store). -
Save the settings.
→ The data will be displayed as a table. -
Save (save) the settings.