Booking incoming items
|
Pay attention to the requirements
This page requires that you have installed the PlentyONE Warehouse app on an appropriate device. Note the hardware requirements described on the System requirements page of the manual. In addition, make sure that you are logged into the PlentyONE Warehouse app and that you have carried out all necessary steps for initial setup. |
Incoming items can not only be registered in the PlentyONE back end, but also conveniently by using the PlentyONE Warehouse app.
This way, your warehouse staff can book incoming items on the desired storage locations with the help of mobile devices. The corresponding stock changes are synchronised with your system automatically. Thus, you can maintain an overview of your stock at any time.
1. Assigning rights for incoming items
Before your warehouse staff can register incoming items in PlentyONE Warehouse, make sure that all users without roles of the type Administrator have been assigned the appropriate rights. Otherwise, items cannot be booked in correctly and the stock changes cannot be saved in the PlentyONE back end. The rights for the purchase price and procurement costs are optional.
Users with roles that are not of the type Administrator can only see certain areas and menus in PlentyONE. This means they only have limited access to the system. Should coworker register incoming items in PlentyONE Warehouse they need at least one of the following rights:
-
PlentyONE Warehouse > Incoming items > Incoming items > Edit
-
PlentyONE Warehouse > Order information > See
-
PlentyONE Warehouse > Incoming items > Purchase price > See
-
PlentyONE Warehouse > Incoming items > Purchase price > Edit
-
PlentyONE Warehouse > Incoming items > Procurement costs > See
-
PlentyONE Warehouse > Incoming items > Procurement costs > Edit
Note that only users with roles of the type Administrator can grant rights.
Assigning rights:
-
Open the menu Setup » Account management » Roles.
→ The roles overview opens. -
Click on New (add).
→ The role creation menu opens. -
Enter a name for the role.
-
Make sure that you are using the simple mode. This means that the option Advanced (toggle_off) is not activated.
-
Assign the rights for the respective area by ticking the check boxes indicated above.
Note: You can either grant rights for complete areas or limit the rights you grant the user. To only grant limited rights in a certain area, expand the area. -
Save (save) the settings.
2. Assigning rights for order statuses
Typically, reorders whose items should be booked in are in specific order statuses. Which statuses are used for this depends on the individual workflow of your company.
To register incoming items without any errors and access all reorders, you have to assign rights for displaying and editing those exact order statuses in the PlentyONE back end.
Assigning rights for order statuses:
-
Go to Setup » Account management » Roles » [Select role].
-
Scroll down to the Access rights area.
-
Expand the menu entry Changeable order status ().
-
Activate (check_box) the order statuses that reorders usually have.
-
Expand the menu entry Visible order status ().
-
Activate (check_box) the order statuses that reorders usually have.
-
Click Save (save).
3. Carrying out settings for incoming items
Different settings allow you to customise the function for booking incoming items in PlentyONE Warehouse so that it fits your needs and workflows.
|
Pay attention to required rights
By default, the settings described below can only be carried out by users with roles of the type Administrator. If other app users are supposed to see and edit the settings, administrators have to assign the respective rights in the PlentyONE back end. To do so, open the respective role in the Setup » Account management » Roles menu and activate the desired rights for the Settings option in the PlentyONE Warehouse area. |
For example, you can define what exactly happens if you wish to book in items that are part of a reorder that has been delivered to you. In addition, you can determine if items should always be booked on the same storage location, or if you wish to display and edit purchase prices while registering incoming items.
Carrying out settings for incoming items:
-
Tap on the menu icon in the top left corner.
-
Tap on Settings settings.
The settings menu opens. -
Tap on Incoming items
 .
. -
Carry out the settings for incoming items. Pay attention to the explanations given in Table 1.
| Setting | Explanation |
|---|---|
General settings area |
|
Warehouse |
Select a warehouse into which items should be booked. |
Error status |
Select a status to which reorders should be moved in case errors occur while incoming items are booked. This way, you can deal with such reorders separately later. In case you have not yet created error statuses for this use case, refer to the Using order statuses page of the manual. |
Assignment of item suppliers |
Should the supplier saved for the variation in the PlentyONE back end be selected automatically when booking incoming items? You can select one of three options: |
Reason for incoming items |
Select a reason for incoming items that is then preselected by default every time you book incoming items in the app. |
Automatically Print Item Labels |
After the goods receipt is completed, all item labels are printed automatically. If the option is activated, two new settings fields will appear, where you must select the default printer and the default label. The number of printed item labels corresponds to the quantity of items. Requirement:Can only be activated if PlentyBase is connected to PlentyONE Warehouse. |
Target storage location area |
|
Storage location search fields |
Use the toggle buttons to determine which criteria can be used for the storage location search while booking in items. |
Purpose |
Use this option to exclude storage locations with specific purposes from the list of suggested target storage locations. |
Suggested storage location list |
Select the storage locations that are suggested as target storage locations for incoming items. |
Show net stock |
Activate this option to display the respective net stock of each item when booking incoming items. |
Storage location selection |
How do you want to select storage locations when incoming items are booked? Select one of the three available options. |
Storage location |
This setting is only active if you have selected the option Select storage location for the setting Storage location selection. In this case, enter the storage location by scanning the barcode on the storage location label or by searching for the storage location name. |
Item search area |
|
Item search fields |
Use the toggle buttons to determine which criteria can be used for the item search while using the incoming items function. |
Focus on item search field |
Tap on the search field to which the cursor jumps automatically when the menu is opened. If no search field is selected, you have to tap on a search field every time before you can enter a search value. |
Prioritisation of item names |
Tap on this option to determine the order in which the components of item names are displayed while you are using the function. Tap and hold (drag_handle) for each component to adjust the order of the displayed elements. |
Purchase price area |
|
Show purchase price |
Activate this option if you want to display the purchase price saved for an item while booking incoming items. |
Edit purchase price |
Activate this option if you want to edit the purchase price saved for an item while booking incoming items. |
Ask for purchase price |
Activate this option if you wish to edit the purchase price for each item that is booked in. This way, a separate menu will be opened for each item that you add to the list of incoming items. In this menu, you can enter the Single price, Total price or the Discount (in percent). |
Item registration area |
|
Mandatory item scan |
Use this option to determine which rules should apply when registering items during incoming items. |
Number of items to scan individually |
If you are registering items via scanning them, you can use this setting to determine how many variations you have to scan individually until the available total quantity is inserted automatically in the field for entering the quantity. |
Reorder area |
|
Search fields |
Use the toggle buttons to determine which criteria can be used for the reorder search while booking in items. |
Focus on search field |
Tap on the search field to which the cursor jumps automatically when the menu is opened. If no search field is selected, you have to tap on a search field every time before you can enter a search value. |
Status |
Activate the order statuses that you normally assign to reorders in your system. This is necessary to make sure that orders in this status are loaded into the PlentyONE Warehouse app properly when searching for reorders. Also, keep in mind to assign rights for those order statuses. In case you have not yet created error statuses for reorders, refer to the Using order statuses page of the manual. |
Sorting |
In which order should the reorder search results be displayed? Select one of the following two options. |
Standard behaviour when loading reorders area |
Decide how the PlentyONE Warehouse app proceeds if you assign a reorder to an incoming items process after you have already added items to the list of incoming items. Also note the additional information provided in the Booking incoming items for a reorder chapter. |
Finish incoming items area |
|
Create incoming items receipt |
Select if an incoming items receipt should be created automatically and saved in the PlentyONE back end as soon as incoming items have been booked. |
Display dialogue for completing incoming items |
Select if the PlentyONE Warehouse app should display a confirmation dialogue as soon as you finish booking in items. |
Show summary |
Activate this option to display an overview of all important data after you have finished booking incoming items. If you tap on this option, you are forwarded to an additional settings menu. There, you select if the overview should include Target storage locations, Incoming items receipts or both information types. For further information, refer to the chapter Displaying an incoming items summary below. |
4. Overview: Carrying out actions
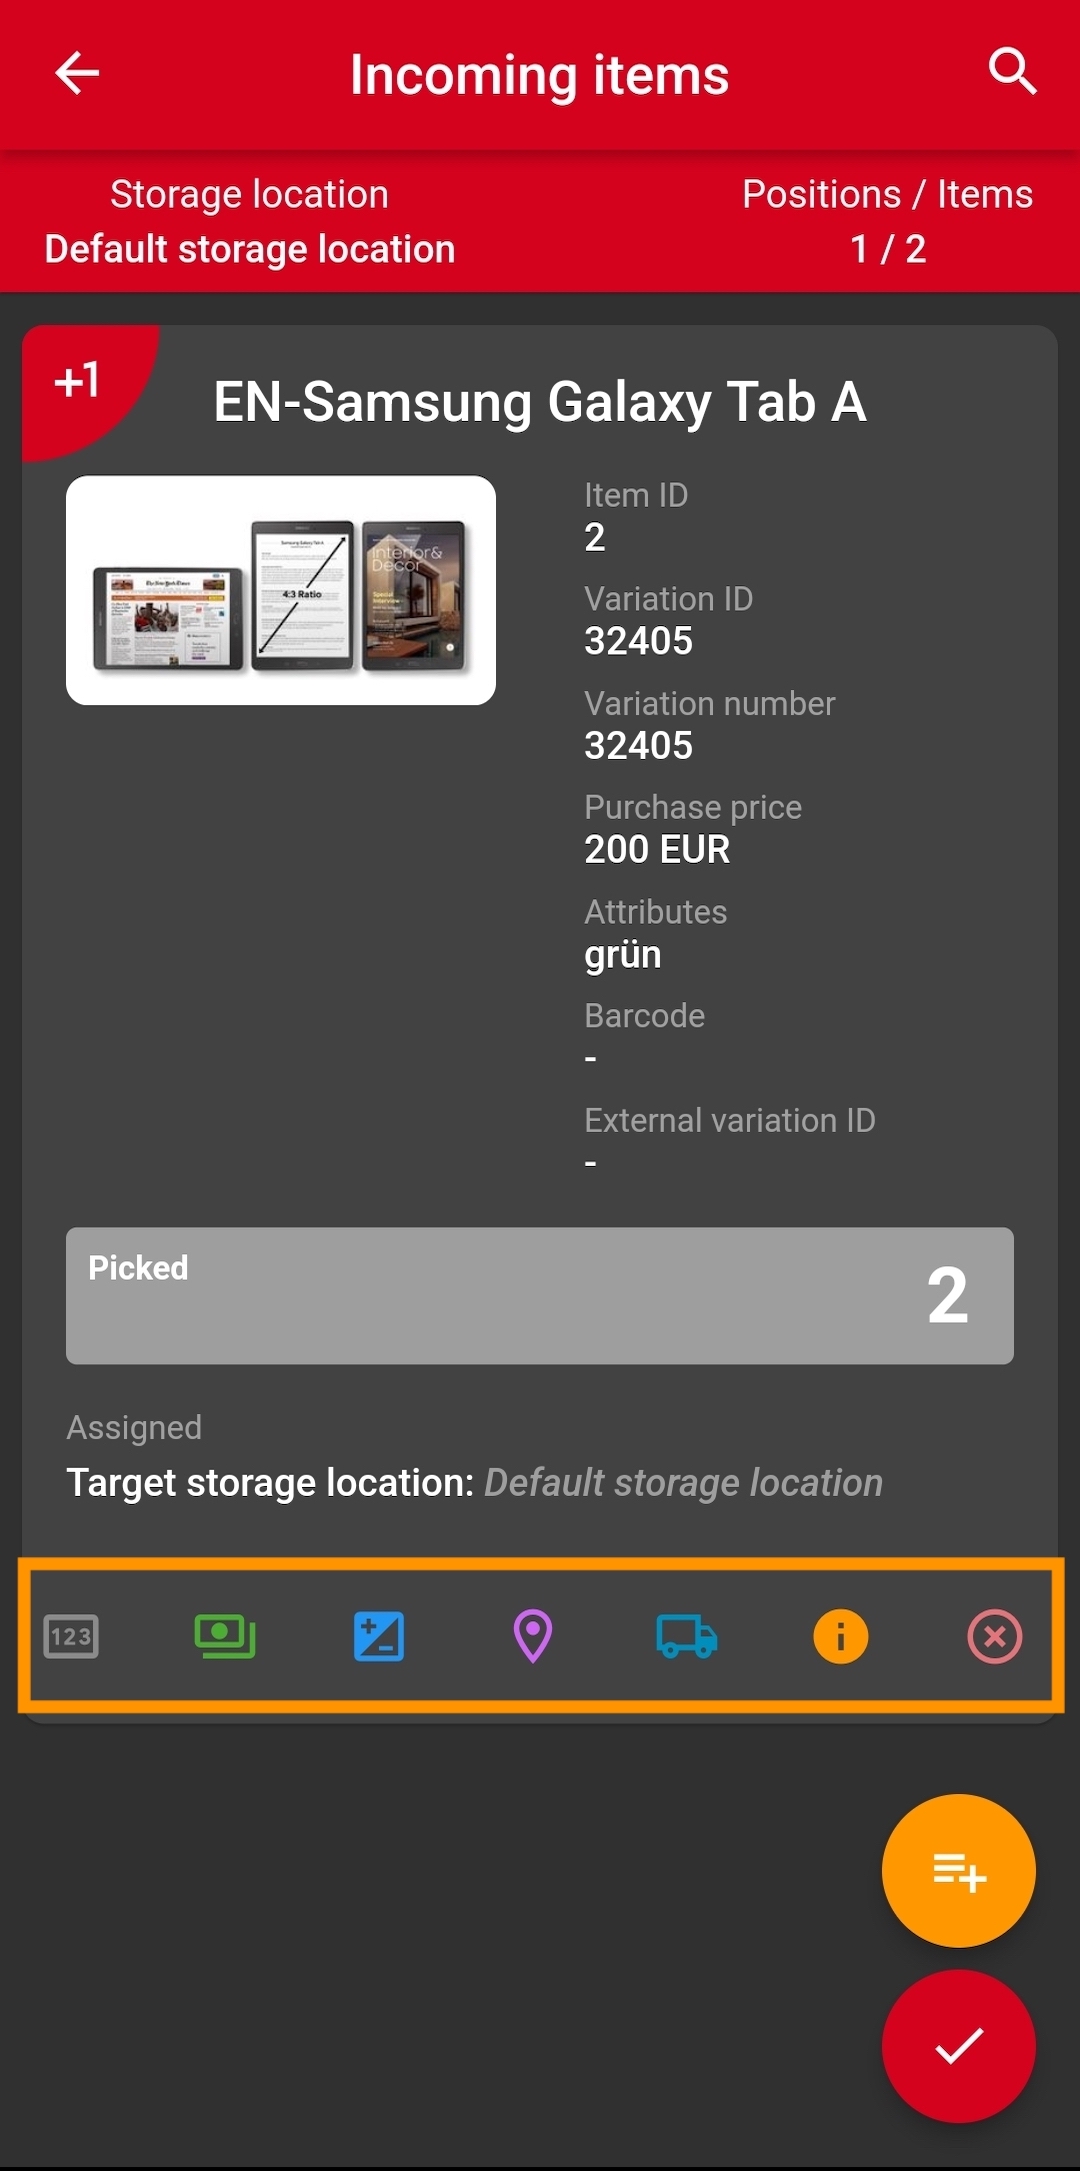
Before showing you how to book incoming items using the PlentyONE Warehouse app, we’re taking a look at the available actions. This way, you can get to know the basic functionality and the meaning of the individual symbols.
The function for incoming items is organised in a way that allows you to carry out actions either for individual items or for a list of items that has already been registered for incoming items. These two different approaches will become important as soon as you start booking items in. Table 2 shows both methods. Table 3 lists all actions that you can carry out by tapping on the individual symbols.
|
Display of action symbols for items may vary
Depending on the display size of the device that you are using for mobile stock management, the action symbols for individual items may not all be displayed simultaneously. Thus, the toolbar might seem incomplete at first glance. Simply scroll to the left and right at the bottom of the item to access more symbols. If you have connected plentyBase to PlentyONE Warehouse, the symbol for Printing item labels is displayed here as well. |
| Actions for individual items | Actions for whole item list |
|---|---|
|
|
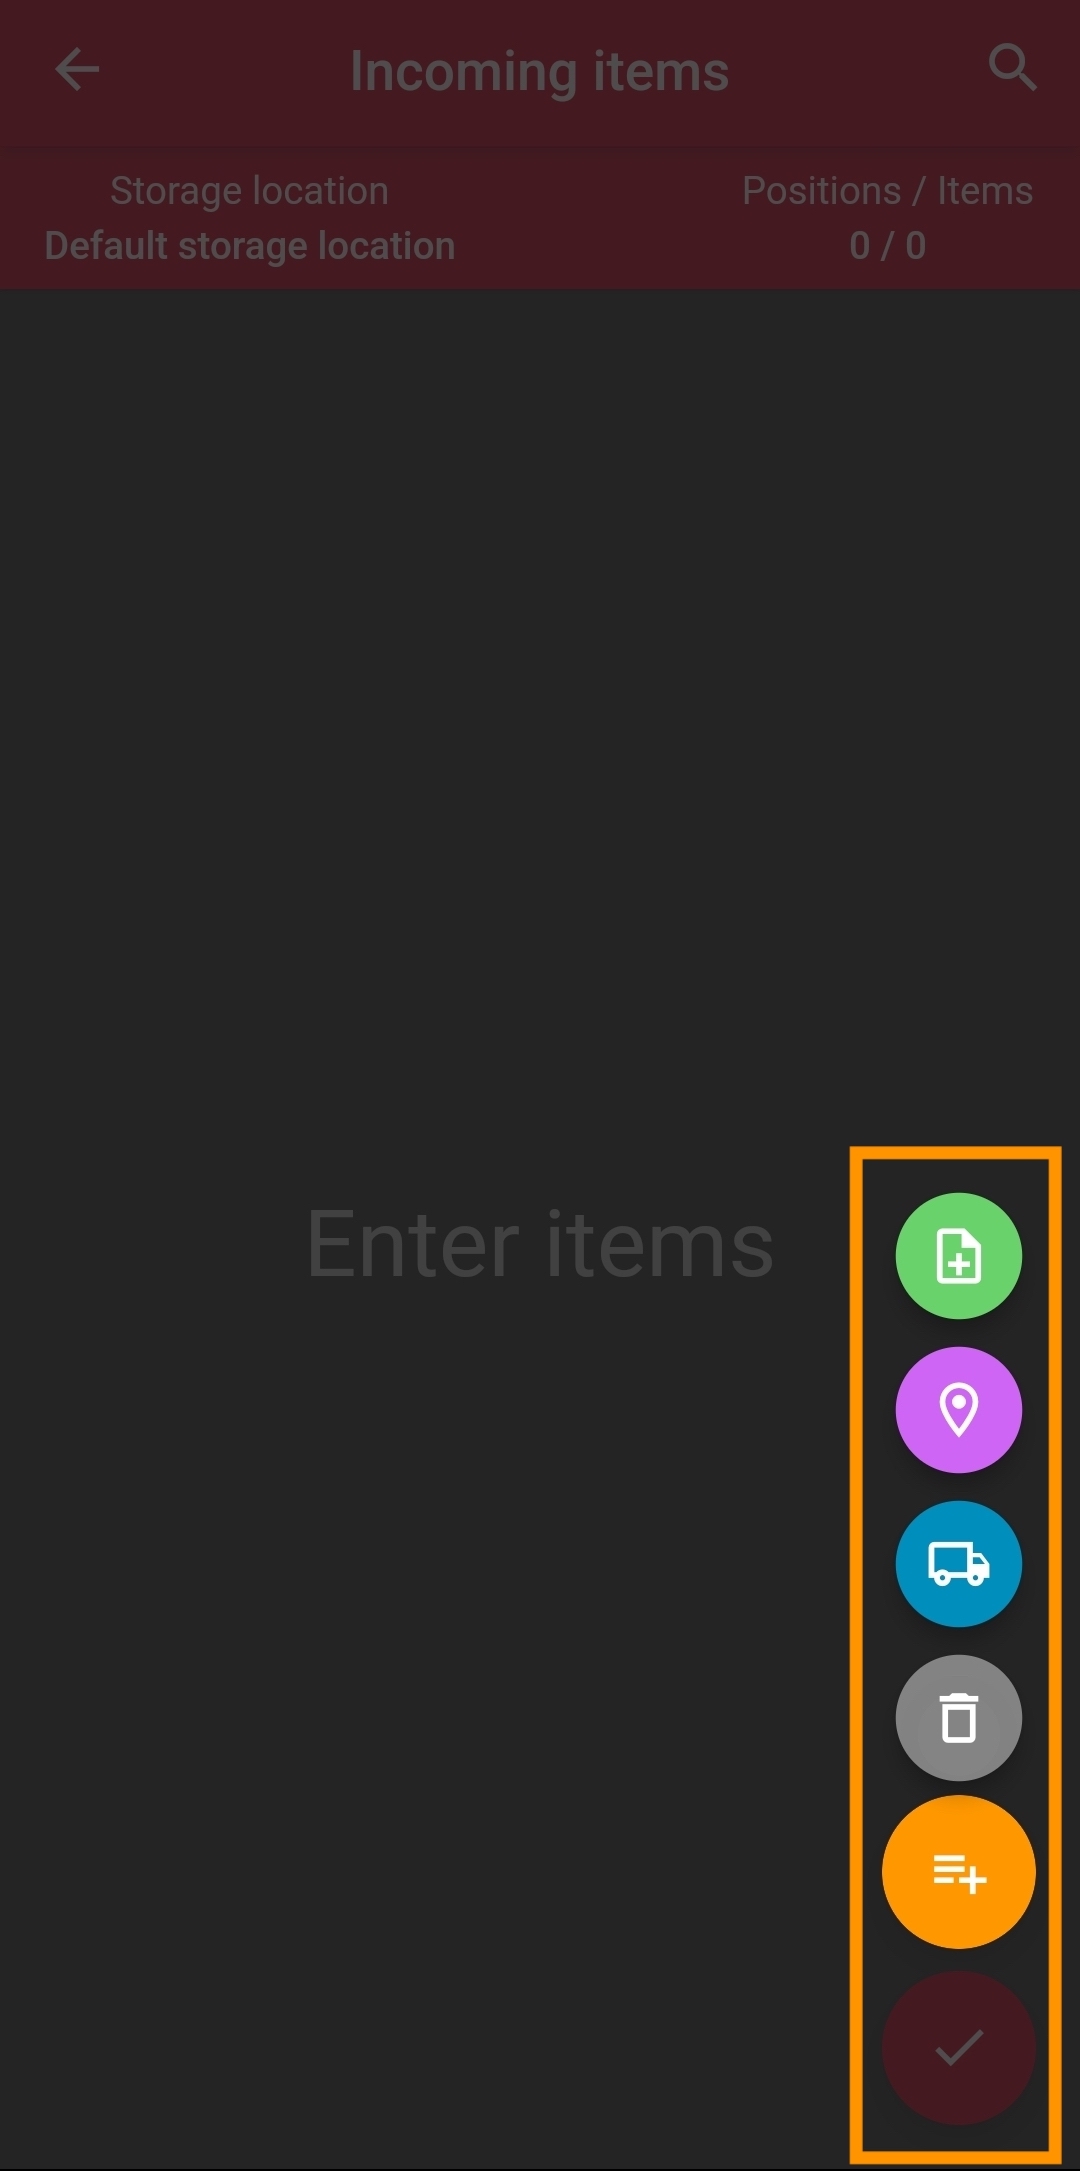
playlist_add |
Open action menu |
Displays the symbols for all available actions for the whole list of incoming items. |
note_alt |
Select reason for incoming items |
Opens a list of possible reasons for incoming items so that the preselected default reason can be changed. |
pin |
Register serial number |
Opens the view for registering a serial number for an individual item. |
payments |
Edit purchase price |
Opens the view for entering the purchase price for an individual item. |
iso |
Edit quantity |
Opens the view for entering the quantity for an individual item. |
room |
Select storage location |
Opens the view for selecting a storage location for an individual item or the whole list of incoming items. |
local_shipping |
Select reorder |
Opens the view for assigning a reorder to an individual item or to the whole list of incoming items. |
info |
Item information |
Opens the Item information tab for an individual item. |
highlight_off |
Remove item |
Removes the selected item from the list of incoming items. |
delete |
Delete item list |
Removes all items the list of incoming items. |
note_add |
Add delivery note number |
Opens the view for assigning a delivery note number for the whole list of incoming items. |
done |
Finish booking incoming items |
Finishes the current process of booking incoming items. |
5. Booking incoming items
In general, the process of booking incoming items always follows the same basic pattern. First, you select the items that have to be booked in. Then, you determine the storage location on which those items should be booked. The present chapter will first explain how to book incoming items in a simple way. Follow the links in the instruction to carry out additional steps as needed, such as assigning barcodes or entering purchase prices.
Proceed as described below to book incoming items via the PlentyONE Warehouse app.
|
Use labels for storage locations
To use the Incoming function most conveniently, create a label for each storage location and place it at the storage location. This way, you can scan the barcode on the label with your device and access the appropriate storage locations for booking incoming items easily in PlentyONE Warehouse. Have you not created labels for storage locations yet? You can find the appropriate instruction on the Setting up a warehouse page of the manual. |
Booking incoming items:
-
Tap on the menu icon in the top left corner.
Or: Find the Incoming items tile in the Functions area on the dashboard. -
Tap on Incoming items
. -
Register the items that should be booked in. Depending on the previously selected option for the setting Mandatory item scan, you either scan the barcode on the item label or click on Search to manually add items with the help of an appropriate search criterion.
-
Enter the item quantity that should be booked in. The quantity is always increased by 1 each time you scan the item, tap on the list entry for the item or enter a quantity using the quantity field iso. The possibilities depend on the option you have previously selected for the setting Mandatory item scan.
-
Optional: Edit the purchase price, or, if required, the discount of the items. To do so, tap on payments on the item itself. This option is only visible if you have activated the setting Edit purchase price beforehand.
-
Optional: Register a serial number for the items. To do so, tap on pin on the item itself. This option is only visible if you have previously saved serial numbers for the item and if you have additionally allowed for serial numbers to be scanned. The registered serial number is then applied to the item data record and displayed with the other item data in the PlentyONE back end.
-
Optional: Assign a barcode to the item.
-
Optional: Print a label for the item.
-
-
Tap on room to select a storage location on which the incoming items should be booked. You can either search for and select storage locations manually or by scanning the storage location label. You can also determine that all items should always be booked in on the same storage location. The possibilities depend on the option you have previously selected for the setting Storage location selection.
-
Check the item list. Do you notice an item that was registered by mistake and should be removed from the list of incoming items? Simply tap on highlight_off to remove the item.
-
Tap on done to finish booking incoming items.
→ The items are booked in. If required, you can view and adjust the corresponding stock changes and stock movements in the Stock » Incoming items menu of your PlentyONE back end.
|
Exporting data on incoming items
You can export a data record of incoming items as a CSV or PDF file in the Stock » Incoming items menu. For more detailed information on these settings, refer to the Managing incoming items page of the manual. |
5.1. Splitting item positions
Do you wish to book in several identical items that have to be booked in at different target storage locations or that have different best before dates or batch information? PlentyONE Warehouse lets you take care of this use case in one single step, so you don’t have to create multiple incoming item processes for this item.
Splitting item positions:
-
Register the items that should be booked in.
-
On the item whose positions should be split, click on splitscreen.
-
Enter the quantity of copies that should be split from the total quantity.
-
Tap on OK.
→ A new, separate entry for the item is displayed in the list of incoming items. This entry contains the quantity that you have entered before. -
Tap on the new list entry to edit the desired data.
Example 1: Tap on room to change the storage location for the item positions.
Example 2: In case BBD or batch information are saved for the item, you can change those as well by tapping on the list entry. Then enter the new data in the respective fields.
5.2. Printing item labels
If required, you can print item labels while booking incoming items using the PlentyONE Warehouse app. This way, you can label your items directly as soon as you place them on the corresponding storage location.
|
Pay attention to required settings
If you want to print item labels using the PlentyONE Warehouse app, the tool plentyBase needs to be installed on your computer. Also, make sure that you have already set up the connection between plentyBase and the PlentyONE Warehouse app. Take a look at the Printing labels page of the manual to carry out the required settings. |
Proceed as described below to print item labels with PlentyONE Warehouse.
Printing item labels:
-
In the list of incoming items, search for an item for which a label should be printed.
-
Tap on info on the item.
→ The Item information tab opens. -
Tap on print.
→ The Print view opens. -
How many copies of the item require a label? Enter the number of labels that should be printed for the item in the Quantity field.
-
Use the drop-down lists to select the desired template for the label and the printer.
-
Tap on Print.
→ The labels are printed.
*Note:After completing a goods receipt, you can also print multiple labels for different items or all labels for existing variants of an item in one print job in the summary.
5.3. Assigning barcodes
Barcodes are used to uniquely identify items. Usually, items that are delivered to you already have barcodes assigned to them by the manufacturer. However, barcodes are also displayed on the labels that you use for your own items in your warehouse.
PlentyONE Warehouse allows you to assign barcodes to items conveniently while booking incoming items. Make sure that you know how barcodes work and how they are used in your company’s workflows beforehand. For more information on barcodes, take a look at the Barcodes and labels page of the manual.
Assigning barcodes:
-
In the list of incoming items, search for an item to which a barcode should be assigned.
-
Tap on info on the item.
→ The Item information tab opens. -
Tap on
 .
.
→ The Barcodes view opens. -
Select the appropriate barcode type from the drop-down list.
-
Register the barcode in the Barcode field.
Tip: Are you working with a smartphone? Make sure to activate the option Use device camera for scanning in the general app settings to register the barcode quickly and without errors. This setting is not necessary for MDE devices. -
Tap on Add.
→ The barcode is added.
6. Booking incoming items for a reorder
Do you manage your reorders in your PlentyONE back end? In that case, it’s easy to book incoming items for exactly those reorders as soon as the delivery reaches your warehouse.
To book in items from reorders, you follow the basic steps described in the Booking incoming items chapter. However, a few additional options are available if incoming items are booked for reorders. These options will be described in more detail in the following sections.
6.1. Notes on assigning reorders
Before you search for and select reorders, you should be aware of the points in the workflow at which you can link a reorder to a list of incoming items.
Within the PlentyONE Warehouse app, you can freely decide when you assign a reorder to a list of incoming items. You can either select a reorder before starting the item registration for incoming items or after you have already registered items for the incoming items process. Click on the appropriate tab to learn more on both methods.
|
Note on registering item quantities
Have you assigned a reorder to the incoming items before registering items? In that case, it’s not possible to add more items than are included in the reorder by tapping on the item’s entry on the item list. Use the field for entering quantities or the item scan to increase the quantity in case more items have been delivered. A separate entry will be added to the item list for those additional items. |
Proceed as described below to assign a reorder before registering items.
Assigning a reorder before registering items:
-
Tap on the menu icon in the top left corner.
Or: Find the Incoming items tile in the Functions area on the dashboard. -
Tap on Incoming items
. -
Tap on playlist_add in the lower right corner of the screen.
→ The action menu for the whole list of incoming items opens. -
Tap on local_shipping.
→ The Reorder / Supplier view opens. A list of reorders that have already been created in your system is automatically displayed.
Tip: The chapter on searching for reorders explains how you can influence the display and the order of the search results. -
Tap on a search result to assign the desired reorder to the incoming items process.
→ The items included in the reorder are added to the list of incoming items. -
Now, register the quantities of the individual items and continue with the remaining steps as described above.
Proceed as described below to assign a reorder after you have already registered items.
Assigning a reorder during item registration:
-
Tap on the menu icon in the top left corner.
Or: Find the Incoming items tile in the Functions area on the dashboard. -
Tap on Incoming items
. -
Now, register the incoming items as described above.
-
Tap on playlist_add in the lower right corner of the screen.
→ The action menu for the whole list of incoming items opens. -
Tap on local_shipping.
→ The Reorder / Supplier view opens. A list of reorders that have already been created in your system is automatically displayed. -
Tap on a search result to assign the desired reorder to the incoming items process.
→ Depending on which option you have selected for the Standard behaviour when loading reorders, already registered items are either added to the reorder or removed or a dialogue is displayed. -
Now, register the quantities of the individual items and continue with the remaining steps as described above.
|
Booking in partial deliveries
In some cases, reorders are not fully delivered to your warehouse. Thus, it can happen that one reorder is delivered in several parts. In this case, simply finish the current incoming items process by tapping on done after you have registered the items that have been delivered. As soon as the remaining items from the reorder are delivered, you can open the reorder using the search. PlentyONE Warehouse will display the items and quantitites that have already been booked in for this specific reorder in the item list. Then, continue with booking in the remaining items and finish booking incoming items by tapping on done. If required, you can repeat this process every time a partial delivery arrives at your warehouse. |
6.2. Searching for a reorder
In the Notes on assigning reorders chapter, you have already learned when and how you assign a reorder for incoming items.
Below, you will find more detailed explanations on how to search for reorders in the PlentyONE Warehouse app and which filters are available.
|
Pay attention to settings
The search criteria available for reorders and the order in which search results are displayed are determined by the settings you have carried out in the Settings » Incoming items menu. Pay attention to the information provided on the available search settings for reorders. |
Searching for reorders:
-
Tap on the menu icon in the top left corner.
Or: Find the Incoming items tile in the Functions area on the dashboard. -
Tap on Incoming items
. -
Tap on playlist_add in the lower right corner of the screen.
→ The action menu for the whole list of incoming items opens. -
Tap on local_shipping.
Or: Search for items first, then tap on local_shipping on the desired item.
→ The Reorder / Supplier view opens. -
Tap on filter_list.
-
Enter the desired search criterion. Pay attention to the information provided in Table 4.
-
Tap on Search ().
→ The search results are displayed. Tap on an entry in the list to select the desired reorder.
| Search criterion | Explanation |
|---|---|
Reorder ID |
Search for reorders by their ID. |
Dealer sign |
Search for reorders by the dealer sign of the supplier that is assigned to the reorder. |
Including order item(s) |
This criterion filters for reorders that include items that you have already registered for incoming items. |
All reorders |
All reorders available in your system are searched. |
Status |
Search for reorders by the status that reorders are typically in. Note the Working with reorders page of the manual. |
Supplier ID |
Search for reorders by the ID of the supplier that is assigned to the reorder. |
Order date between |
The search results are filtered according to the period of time in which the reorder was created. Limit the period of time by entering the start and end date of the desired period for the Order date between option. |
6.3. Adding a delivery note
You can add delivery notes by entering the delivery note number in the PlentyONE Warehouse app. A delivery note number is always saved for the whole list of incoming items.
Adding a delivery note:
-
Open a reorder. Pay attention to the information on searching for reorders.
→ The action menu for the whole list of incoming items opens. -
Tap on note_add.
→ The Add delivery note number view opens. -
Tap on the input field Delivery note number.
-
Enter the delivery note number.
-
Tap on OK.
→ The delivery note number is saved.
6.4. Adding procurement costs
Most of the time, additional costs arise when items are reordered. Usually, you add those costs after creating a reorder so that the costs are saved for each reorder in the PlentyONE back end. As soon as the items of the reorder are delivered and you book in items with PlentyONE Warehouse, you can edit the procurement costs if required. This may be necessary if you need to register different procurement costs after items from reorders have been delivered, or if no procurement costs were saved when the reorder was created in the first place.
Pay attention to the Working with reorders page of the manual to learn more about procurement costs.
You can add the following procurement costs for reorders using the PlentyONE Warehouse app:
-
Freight charge
-
Packaging charge
-
Transport insurance
-
Drayage
-
Postage
-
Customs duties
-
Brokerage fee
-
Small quantity surcharges
-
Other charges
Adding procurement costs:
-
Open a reorder. Pay attention to the information on searching for reorders.
→ The action menu for the whole list of incoming items opens. -
Tap on local_shipping.
→ The Reorder / Supplier view opens. -
Tap on price_change.
→ The Procurement costs view opens. -
Enter the procurement costs in the respective field.
-
Tap on done.
→ The procurement costs are saved.
7. Creating an incoming items receipt
To create receipts for incoming items, three conditions have to be met:
-
The incoming items process in question has to be booked using the PlentyONE Warehouse app. It is not possible to create incoming item receipts for items that are booked in via the PlentyONE back end or using PlentyONE POS.
-
Incoming items receipts are generated based on the DocumentBuilder. Thus, you need to create a template for the document type Incoming items receipt beforehand. This step is carried out in the Setup » Documents » DocumentBuilder menu in the PlentyONE back end. For instructions on how to create DocumentBuilder templates, please refer to this manual page.
-
In the menu Settings » Goods Receipt » Complete Goods Receipt of the PlentyONE Warehouse app, the option Create Goods Receipt Document must be activated.
And that’s it! If all three conditions are met, an incoming items receipt is created automatically every time incoming items are booked. It does not matter if you are booking incoming items with or without an assignment to a reorder.
As soon as document generation is finished, you can find the document in the Data » Documents » Document archive menu and download it, if needed.
8. Displaying an incoming items summary
Do you want to display a summary of all important data regarding the incoming items process after you have finished booking incoming items? In that case, you only need to carry out a few settings to make sure that information on the affected storage locations, reorders and much more are provided as part of a central view directly in the PlentyONE Warehouse app. To do so, proceed as described below.
Displaying the summary:
-
Tap on the menu icon in the top left corner.
-
Tap on Settings settings.
The settings menu opens. -
Tap on Incoming items
. -
Scroll down until you see the Finish incoming items area.
-
Tap on Show summary.
→ Another settings menu opens. -
Determine if information regarding storage locations and incoming items receipts should be displayed by activating the respective options.
Note:*In the settings, you can activate or deactivate the option to display the summary.* If no panel is displayed but the summary is active, the summary will only be shown with a meta panel.
After you have carried out the settings described above, the following information is displayed in a separate view as soon as you have tapped on Finish incoming items for an incoming items process:
-
Number of reorders affected (if applicable)
-
Number of storage locations
-
Number of items booked in, including a shortcut for printing barcode labels for those items (print)
-
Names of the storage locations (if activated in the settings), including shortcuts to the functions Inspect storage location and Reshelving items for the respective storage location.
-
Number of generated incoming items receipts (if activated in the settings), including a shortcut for printing the receipts (print)