PlentyONE Flow Studio
|
Disclaimer
The full name of the tool is PlentyONE Flow Studio. For simplicity’s sake, the tool is also referred to as Flow Studio throughout this manual. |
In Flow Studio, you automate your daily business processes by creating and configuring flows.
A flow is the sequence of steps that you map out on a visual interface called the canvas.
You monitor and manage the runs of existing flows using the tool Flow Tracker.
1. The Flow Studio overview
To access plentyONE Flow Studio, open the menu Automation » Flow Studio. The following overview appears:
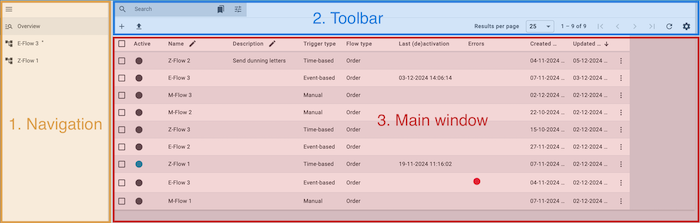
Here, you navigate between the Flow overview (manage_search) and any flows you have opened for editing (description). The currently selected area (highlighted in grey) is displayed in the main window on the right. Click on menu to expand or collapse the navigation bar.
The following functions are available in the toolbar:
-
Create a flow (add)
-
Configuring the columns in the main window (settings)
-
Searching for a flow * and displaying it in the overview (search)
-
Setting filters for the search (bookmarks)
-
Saving and applying filters (bookmarks)
When the overview (manage_search) is selected in the navigation and you perform a search (search), you will see the list of found flows in the main window.
-
Use the context menu (more_vert on the right of a flow row) to activate/deactivate, copy, export, delete or manually run a flow. You can also use the context menu to switch directly to Flow Tracker.
-
Use Select all (check_box_outline_blank in the top row of the overview) to select all found flows, and Select flow (check_box_outline_blank in the respective flow row) to select individual flows to open or delete.
-
Use Enable edit mode (edit in the top row of the overview) to edit the content of the fields in the respective columns directly in Flow Studio.
2. The Canvas view in Flow Studio
The Canvas view appears after you select the trigger type and configure the necessary settings when creating a new flow, or when you open an existing flow. It is structured as follows:
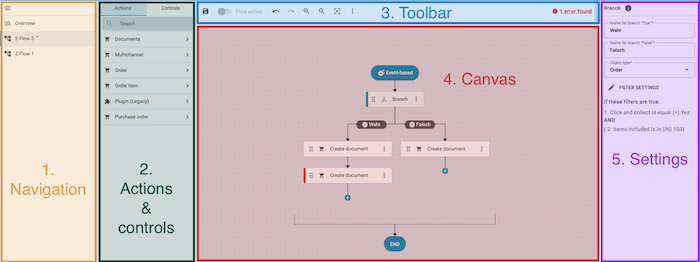
Here, you navigate between the Flow overview (manage_search) and the Canvas view (description). The currently selected area (highlighted in grey) is displayed in the main window on the right. Click on menu to expand or collapse the navigation bar.
The following functions are available in the toolbar:
-
Save flow (save)
-
Enable/disable a flow (toggle_on and toggle_off)
-
Undo/redo configuration steps (undo and redo)
Note: This function applies only to steps that take place on the canvas, not to any settings made within an action or control. -
Zoom in/out on the Canvas (zoom_in and zoom_out)
-
Centre Canvas (filter_center_focus)
-
Functions behind the context menu: (more_vert)
-
Run flow (play_circle)
-
Go to Flow Tracker (open_in_new)
-
-
Number of flow steps / Maximum number of flow steps
-
Error messages regarding the flow *(possible error messages: *No errors found, [Number] errors/warnings found)
-
Click on the error message, and information about the found errors/warnings will appear in the column on the right. On the Canvas, faulty flow steps are marked with a red bar.
-
Note: Error messages refer to missing or incorrect mandatory fields. It is the responsibility of the users to ensure that the flow itself is fit for purpose.
When a flow is selected in the navigation, you will see the corresponding flow steps displayed on the canvas.
The following elements can appear on the Canvas:
-
Trigger type (always the first rounded element). Possible trigger types: Event-based, Time-based, and Manual
-
Controls of the type Search
-
Controls of the type Branch
-
Controls of the type Start
-
Controls of the type Adapter
-
Plus signs (add_circle), which indicate possible locations for additional flow steps.
-
Lines and arrows, which show the connections between the elements as well as the flow direction.
-
Collectors (arrow_and_edge), which represent the end of a flow branch .
Click on a specific flow step, and the input fields and configuration details for the step will appear in this column.
Here, you can also directly edit the flow name, description as well as the trigger.
The following fields and information can appear in the column:
-
Input fields for configuring the flow step.
-
The Filter Settings button, to open the filter settings for the step.
-
Explanations of the filter settings that have already been configured for the step.
-
For interactive flow steps, a message indicating that the flow step requires manual input.
-
Information about trigger selection, object type and order type
3. Instructions for the functions in the Flow Studio overview
In this section, you will find instructions for the functions outlined in Section 1 of the Flow Studio overview.
3.1. Configuring columns in the Flow Studio overview
In the Flow Studio overview, you can determine which columns are displayed and in what order.
Configuring columns in the overview:
-
Go to Automation » Flow Studio.
-
At the top right, click on Configure columns (settings).
→ The Column Configuration window will open. -
Select (check_box) the columns to be displayed. Refer to the explanations of the columns in the Flow Studio overview for more details.
-
Move (drag_indicator) the columns via drag-and-drop to the desired position until they are displayed in the desired order.
-
Add (check_box) or remove (check_box_outline_blank) columns as needed.
-
Click on Confirm.
→ The settings are saved.
| Column | Explanation |
|---|---|
Selection |
Enables the selection of individual or multiple flows. |
Active |
Shows whether the flow is active or inactive. |
Name |
Displays the name of the flow. |
Description |
Displays the description of the flow. |
Object type |
Displays the object type (e.g. Order, if the flow is used for processing order datasets). |
Flow available in |
Displays the UIs from which the flow can be directly started. |
Trigger type |
Displays the trigger type of the flow. |
Error |
Indicates whether the flow contains errors.
|
Last (de)activation |
Displays the date of the last activation or deactivation. |
Created on |
Displays the date when the flow was created. |
Updated on |
Displays the date when the flow was last updated. |
Actions |
Displays the context menu, behind which a selection of actions for the flow can be found. |
4. Editing fields directly in the Flow Studio overview
You can edit some fields in the Flow Studio overview directly inside the respective column. This is called inline editing.
At the moment this feature is available for the following fields:
-
Name
-
Description
Proceed as follows to edit fields in the Flow Studio overview.
-
Open the Automation » Flow Studio menu. → The Flow Studio overview opens.
-
Carry out the search (search) to display Flows.
-
Click on edit in the overview header beside the field you want to edit.
→ Above the header several icons are shown in the editing mode. Refer to the explanations in the drop-down field Explanations of the edit mode icons.

| Symbol | Element | Explanation |
|---|---|---|
save |
Save |
Saves the changes. |
undo |
Undo |
Undoes the last change, unless this change has already been saved. |
redo |
Redo |
Restores the previously undone change. |
app_registration |
Activate the editing mode for all columns |
If you click on edit at a field that has editing mode available, you can click on app_registration to activate the editing mode for all columns. |
playlist_remove |
playlist_removeDeactivate the editing mode for all columnsplaylist_remove |
Click on playlist_remove to deactivate the editing mode for all columns and return to the overview. |
4.1. Creating a flow
To learn how to create a flow in Flow Studio, first navigate to one of the following manual pages:
4.2. Searching for flows
Use the search in Flow Studio to list all existing flows or search for specific flows using keywords or filter settings.
Searching for flows:
-
Go to Automation » Flow Studio.
-
Option 1: Click on search for a list of all flows.
-
_Option 2: _ Enter a search term into the search field and click on search to list all flows containing the search term in their name.
-
Option 3: Click on tune to narrow down the search results with filters. Refer to the explanations of the filters in the Flow Studio overview for more details.
-
| Filter | Explanation |
|---|---|
Name |
Enter a name to filter flows by that name. |
Active |
Select Yes or No from the dropdown list to filter by active or inactive flows. |
Trigger type |
Select the trigger type to filter flows by that trigger type. |
Object type |
Select an object type (e.g., Order, if the flow is for processing order datasets) to filter flows by that type. |
Flow available in |
Select a UI to filter for flows that can be started directly from that UI. |
Created on |
Select a date to filter flows by their creation date. |
Updated on |
Select a date to filter flows by their update date. |
4.3. Saving the current filter
If you have narrowed down a search in the flow overview using filter settings or a search term, you can save the used search settings as your own filter. This way, you can perform the same search quickly and easily in future.
Saving the current filter:
-
Adjust the settings accordingly and click on Search (search).
-
Click on Saved filters (bookmarks).
-
Click on bookmark_border Save current filter.
-
Enter a name and toggle the optional settings as needed (toggle_on).
-
Click on Save.
→ The new custom filter now appears under Saved filters. (bookmarks).
4.4. Applying saved filters
-
Click on Saved filters (bookmarks).
-
Click one of the custom filters saved.
→ The search results appear and the filter settings are displayed in the top section of the overview as chips.
4.5. Activating/deactivating a flow
Activate a flow to use it for the automated run of business processes.
*Note:*Once a Flow is active, it cannot be edited.
Deactivate a Flow to temporarily disable it, for example, if you want to edit it.
Note: If you make changes in a deactivated Flow, the changes will only apply to flow runs that occur after the Flow is activated.
Activating/deactivating a Flow:
-
Go to Automation » Flow Studio.
→ The Flow Studio overview opens. -
Carry out the search (search) to display Flows.
-
Open the Flow that you want to activate/deactivate.
-
Use the toggle button in the toolbar activate (toggle_on) or deactivate (toggle_off) the flow.
-
Click on Activate flow or Deactivate flow.
-
Confirm your decision.
→ The flow is activated or deactivated and the date in column Last (de)activation is updated.
4.6. Copying a flow
Copying a flow:
-
Go to Automation » Flow Studio.
→ The Flow Studio overview opens. -
Carry out the search (search) to display flows.
-
Click on the context menu (more_vert) in the row of the flow you want to copy.
-
Click on file_copyCopy flow.
→ The flow is copied and directly opened.
Note: The new flow will have the same name, with "Copy" added at the end. Copied flows are disabled by default.
4.7. Exporting a flow
Flows created in Flow Studio can be exported with just a few clicks.
Exporting a flow:
-
Go to Automation » Flow Studio.
→ The Flow Studio overview opens. -
Carry out the search (search) to display flows.
-
Click on the context menu (more_vert) in the row of the flow you want to export.
-
Click on Export flow (file_download).
→ The flow is exported.
Note: In new systems, the function for exporting flows is only available for the contract types Scale and Ultimate. The function is not available for the Lite, Lite + and Expand contract types. Please contact our sales team to upgrade your contract if necessary.
4.8. Importing a flow
You can import flows that you have exported from other systems into Flow Studio to use them further.
Importing a flow:
-
Go to Automation » Flow Studio.
→ The Flow Studio overview opens. -
In the top left corner, click on file_upload (Import flow).
-
From the files on your computer, select the flow you want to import.
-
Click on Open.
→ The flow is imported.
Note: In current systems, the function for importing flows is only available for the contract types Scale and Ultimate. The function is not available for the Lite, Lite + and Expand contract types. Please contact our sales team to upgrade your contract if necessary.
4.9. Deleting a flow
|
The option to delete a flow is not available for active flows
Active flows are available for the automated run of business processes and cannot be edited or deleted. You must first deactivate active flows before you can delete them. |
Deleting a flow:
-
Go to Automation » Flow Studio.
→ The Flow Studio overview opens. -
Carry out the search (search) to display flows.
-
Click on the context menu (more_vert) on the right side of a flow’s row.
-
Click on deleteDelete flow.
-
Confirm your decision.
→ The flow is deleted.
4.10. Manually starting a flow run
In Flow Studio, you can manually start all existing active flows.
Manually starting a flow run:
-
Go to Automation » Flow Studio.
→ The Flow Studio overview opens. -
Carry out the search (search) to display flows.
-
Click on the context menu (more_vert) in the row of the flow for which you want to start a flow run.
-
Click on file_copy Start flow run.
→ The Start flow run window opens. -
Select the flow type (currently, only the Order option is available) and enter the relevant (order) IDs.
-
Click on Start flow run to initiate a flow run for the entered orders.
4.11. Switching to Flow Tracker
You can switch to Flow Tracker from within Flow Studio.
Switching to Flow Tracker:
-
Go to Automation » Flow Studio.
→ The Flow Studio overview opens. -
Carry out the search (search) to display flows.
-
Click on the context menu (more_vert) on the right side of a flow’s row.
-
Click on launch Go to Flow Tracker.
→ Flow Tracker opens.
Note: When you use the Go to Flow Tracker function, you will switch to the Flow runs in progress overview in the Flow Tracker.
4.12. Correct an error in a flow element
Errors in a flow are initially indicated by an error message, which appears on the right side of the toolbar after you save the flow.
Note: Error messages in a flow relate exclusively to missing or incorrect mandatory fields and not to the logical structure of the flow. Ensuring a logical flow structure is the responsibility of the user.
If an error message appears in a flow, proceed as follows:
-
Click on the error message.
→ A red bar appears in the faulty element.
→ A notification with information about the error appears in the right-hand column -
Click on the faulty element or the notification.
→ In the right-hand column, the settings required to fix the error in the element are displayed (input field(s) appear for actions; the Filter Settings button appears for controls). -
Adjust the settings. Refer to the manual pages Use actions and Use controls for relevant information.
-
Save (save) the flow.
→ Provided all settings have been configured correctly, the error message will disappear.
Note: You can save a flow that has an error message, but you cannot activate it. This ensures that you can first create the flow structure and complete the setup later.