Configuring Messenger
On this page of the manual you learn how you can customize Messenger to your individual requirements in the best way and how to connect marketplaces to Messenger.
1. Overview
-
Global settings
Below you see global settings for configuring the Messenger: -
Messenger display
Below you see settings to customise the display of Messenger for your requirements: -
Connection of marketplaces
Below you see instructions on how to connect Messenger to various marketplaces.
2. Automatically emptying trash
Set after how many days deleted messages and deleted conversations should be automatically removed from trash. To do so, proceed as described below. Note that only a person with Admin rights is able to carry out this setting.
Automatically emptying trash:
-
Go to Setup » CRM » Messenger » General.
Or: If you are already in the Messenger menu, click on the left side below the settings Settings area on folder_open General. -
In the Automatically empty trash area, activate (toggle_on) the option Activate “Automatically empty trash” function.
-
In the Number of days (max. 5 years) area, enter a number.
-
Save (save) the settings.
→ All deleted messages and conversations that are contained in the trash will be automatically removed from trash after the number of days you entered here.
|
Manually removing deleted messages and conversations from trash
You also have the possibility to manually remove all deleted messages and conversations from trash. To do so, click on the left side in the navigation in the line of the trash on More options (more_vert) and then on delete Empty. After you have confirmed your decision that you really want to permanently delete all conversations and corresponding messages, the trash will be emptied. |
3. Automatically archiving conversations
Set the number of days after which conversations should be automatically moved to the archive. To do so, proceed as described below. Note that only a person with Admin rights is able to carry out this setting.
Automatically archiving conversations:
-
Go to Setup » CRM » Messenger » General.
Or: If you are already in the Messenger menu, click on the left side below the settings Settings area on folder_open General. -
In the Automatically archive conversations area, activate (toggle_on) the option Activate “Automatically archive conversations” function.
-
In the Number of days (max. 5 years) area, enter a number.
-
Save (save) the settings.
→ All conversations will be automatically moved to the archived after the number of days entered here.
4. Activate SPAM filter
Set incoming messages to be filtered for SPAM and moved to a separate folder. To do so, proceed as described below. Note that only a person with Admin rights is able to carry out this setting.
Activate SPAM filter:
-
Go to Setup » CRM » Messenger » General.
Or: If you are already in the Messenger menu, click on the left side below the settings Settings area on folder_open General. -
In the Automatically filter SPAM messages area, activate (toggle_on) the option Activate SPAM filter.
-
Save (save) the settings.
→ All messages recognized as SPAM are now moved to the newly created Spam folder.
5. Mark conversations as read for all users
Set incoming conversations to be marked as read for all users (globally) as soon as they are opened by any user. To do so, proceed as described below. Note that only a person with Admin rights is able to carry out this setting.
Mark conversations as read for all users:
-
Go to Setup » CRM » Messenger » General.
Or: If you are already in the Messenger menu, click on the left side below the settings Settings area on folder_open General. -
In the Mark converations as read for all users area, activate (toggle_on) the option Activate global read status.
-
Save (save) the settings.
→ Conversations are marked as read as soon as they are opened by any user.
6. Activating the whisper mode for all users
You can activate the whisper mode globally for all users. This means that the whisper mode is automatically activated for all new conversations and when replying to existing messages. Of course, you can switch anytime back to “normal” messages.
Proceed as follows to automatically activate the whisper for all users.
Activating the whisper mode for all users:
-
Go to Setup » CRM » Messenger » General.
Or: If you are already in the Messenger menu, click on the left side below the settings Settings area on folder_open General. -
In the Activate whisper mode automatically for all users area, activate (toggle_on) the option Activate whisper mode.
-
Save (save) the settings.
→ The whisper mode is now automatically activated for all users when creating a new conversation and when replying to an existing message.
7. Creating a folder
You can create as many folders as you like to better organise your conversations. For example, you can create a Payments folder in which you save all conversations that are related to invoices. How you create folders is described in the Adding new folders chapter.
8. Configuring columns
In every view of the Messenger, you can click in the top right on Configure columns (settings) and activate (check_box) the columns that you want to see in the overview. You can also deactivate (check_box_outline_blank) activated columns again. Click on drag_indicator and hold down the symbol to change the order of the columns with drag-and-drop.
|
Individually adjusting the width of the table columns
You can adjust the columns’ width in every Messenger view according to your needs. When hovering over the respective table columns, blue lines appear which allow you to adjust the size as desired. |
For further information about the available columns in the individual folders, refer to the corresponding chapters:
Save time and use the group function to carry out certain functions for the conversations in each folder at once.
9. Creating and editing views via MyView
You can use MyView to create your own views and customise them to suit your needs. In Messenger, you can edit both the Overview of conversations and the New conversation section using MyView.

You can find more information on using MyView on the manual page What is MyView?.
10. Notifications about new messages
In the Setup » CRM » Messenger » Channels menu, in the General section, activate the option Activate notifications for incoming messages (check_box) so that you can see the number of new messages next to the notifications icon in your PlentyONE backend when you receive new messages. Click on notifications to open the notification window.
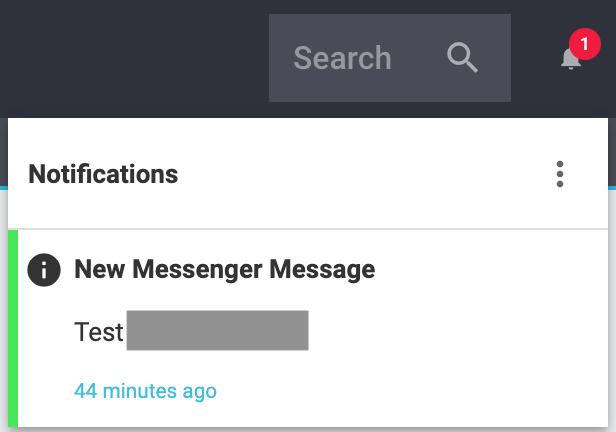
In the info New Messenger message, you can see the message’s subject and when the message was sent. Click on link Open message to open the message in the Messenger.
If you want to remove the notifications for this message, click on more_vert and then on delete Close. The number next to the notifications symbol will be reduced by 1.
11. Configure the Messenger for Amazon marketplace
You can directly retrieve Amazon messages in the Messenger.
Of course, you can also use the Messenger to type your replies. Your customer receives the message via the Amazon messaging system.
Configure the Messenger for Amazon marketplace
-
Make sure you have set the preset group Amazon to visible.
-
Make sure that you have added a type called Customer inquiry Amazon and a status called New to the Amazon group.
-
Go to Setup » CRM » Messenger » Channels.
-
Click on add to create a new channel.
-
Select the Amazon channel.
→ A new window with the channel settings opens. -
Click on toggle_on Activate channel to activate the channel.
-
Enter the Login details of your email client.
-
optional Click on Test email dispatch to send a test email.
-
Enter the name of the channel under General.
-
optional Click on check_box_outline_blankSet as default channel for outgoing messages to set this channel as the default channel for outgoing messages.
-
optional Click on check_box_outline_blankActivate notifications for incoming messages to activate notifications for ingoing messages to this channel.
-
Select Order and Contact under Skip sending in the Email dispatch section.
-
Enter the email addresses in the section Receiving emails that are allowed to send messages to the forwarding email address.
-
optional Select the template Messenger: Amazon example under Selection of email template. This template is already available by default in new systems.
-
optional Select the Tags, Subscribers and addOwners and rolesadd for this channel.
-
Select the type Customer inquiry Amazon and the status New under Group, type and status in the Receiving emails section.
-
Make sure all the information you entered is correct.
-
Click on save Save.
12. Managing eBay messages in the Messenger
You can directly retrieve the eBay messages from your eBay account in the Messenger.
Of course, you can also use the Messenger to type your replies. Your customer receives the message via the eBay messaging system.
12.1. Linking an eBay account to PlentyONE
Proceed as described below to link your eBay account to PlentyONE.
Linking an eBay account to PlentyONE:
-
Go to Setup » Markets » eBay » Accounts » OAuth2.
-
Click on public in the page header.
→ A new browser window opens. -
Enter your eBay email address or your eBay user name and click on Continue.
-
Enter your eBay password.
-
Click on Sign in.
→ Your eBay account is now linked to PlentyONE.
For further information on eBay accounts you can refer to our eBay manual page in the chapter Activating and changing accounts.
|
The first time that eBay messages are imported, only the ones from the last 7 days are retrieved. If an import has been carried out before, messages are imported until the date of the last import. However, this last import may not date back more than 7 days. Otherwise, only messages from the last 7 days are imported again. |
12.2. Setting the eBay group to visible
Proceed as described below to set the eBay group for the Messenger to visible.
Setting the eBay group to visible:
-
Go to Setup » CRM » Messenger » Groups, types and statuses.
Or: If you are already in the Messenger menu, click on the left side below the settings Settings area onchecklist_rtl Groups, types and statuses. -
In the eBay line, click on toggle_on Visible.
-
Expand the group and carry out further settings for the types and statuses, if desired.
-
Save (save) the settings.
12.3. Configure the Messenger for eBay marketplace
Proceed as described below to configure the Messenger for eBay marketplace.
Configure the Messenger for eBay marketplace:
-
Make sure you have set the preset group eBay to visible.
-
Make sure you have linked your eBay account to PlentyONE.
-
Go to Setup » CRM » Messenger » Channels.
Or: If you are already in the Messenger menu, click on the left side below the Settings area on _ Channels. -
Click on add and then on eBay channel.
→ A new window opens. -
Under Account details select the corresponding eBay account from the list. If your eBay account is not selectable here, click on open_in_new to open a window for linking your eBay account.
-
(optional) Under Mark as read in eBay message center, select whether messages are marked as read in the eBay message centre.
-
Enter a name for the channel under General in the Channel name section.
-
(optional) Select a message template for replies under Sending emails.
-
(optional) Select a type, status, tags and subscribers under Receiving emails.
-
(optional) Click on addOwner and roles under Receiving emails to add owners and roles to the eBay channel.
12.4. Replying to an eBay message
When you reply to an eBay message, you will see the following information above the incoming eBay message:

In the top line:
-
Short ID
-
Subject: Sender and subject (in brackets behind the number of messages)
-
Tag for the eBay inbox
-
Priority
-
Type and status
In the bottom line:
-
eBay logo
-
Account ID
-
External message ID
-
Name of the seller
-
Article ID
-
End of the eBay listing
The recipient field is deactivated for eBay messages. This means that you cannot add further recipients here.
Sending attachments is possible. The following formats are supported: JPEG, JPG, GIF, PNG, TIFF, BMP.
|
Maximum of 2000 characters
Note that you can only use up to 2000 characters in eBay messages. If you enter more than 2000 characters in an eBay message, the message can’t be send via eBay. |
12.5. Deleting the eBay account settings
Proceed as described below to delete your eBay account from PlentyONE. The eBay account itself remains active, only the connection to PlentyONE is deleted.
Deleting an eBay account:
-
Go to Setup » Markets » eBay » Accounts » OAuth2.
-
Click on remove_circle_outline.
→ A confirmation window opens. -
Click on Delete.
→ The eBay account has been removed.
13. Configure the Messenger for Kaufland and OTTO marketplace
You can directly retrieve Kaufland or OTTO messages in the Messenger. Of course, you can also use the Messenger to type your replies. Your customer receives the message via the corresponding messaging system.
|
Note regarding the Kaufland and OTTO Messenger configuration
The procedure for configuring the Messenger for the Kaufland and OTTO marketplaces is generally the same - it only differs in the selection of groups, types and statuses. If you want to configure both marketplaces for Messenger, you have to go through the Messenger configuration once for OTTO and once for Kaufland. |
Configure the Messenger for Kaufland and OTTO marketplace
-
Make sure you have set the preset groups Kaufland and OTTO to visible.
-
Make sure that you have added a type called Customer inquiry Kaufland and a status called New to the Kaufland group.
-
Make sure that you have added a type called Customer inquiry OTTO and a status called New to the OTTO group.
-
Go to Setup » CRM » Messenger » Channels.
-
Click on add to create a new channel.
-
Select the channel Kaufland or OTTO.
→ A new window with the channel settings opens. -
Click on toggle_on Activate channel to activate the channel.
-
Enter the Login details of your email client.
-
optional Click on Test email dispatch to send a test email.
-
Enter the name of the channel under General.
-
optional Click on check_box_outline_blankSet as default channel for outgoing messages to set this channel as the default channel for outgoing messages.
-
optional Click on check_box_outline_blankActivate notifications for incoming messages to activate notifications for ingoing messages to this channel.
-
Select Order and Contact under Skip sending in the Email dispatch section.
-
Enter the email addresses in the section Receiving emails that are allowed to send messages to the forwarding email address.
-
optional Select an email template under Selection of email template in the Email dispatch section.
-
optional Select the Tags, Subscribers and addOwners and rolesadd for this channel.
-
Select the type Customer inquiry Kaufland and the status New under Group, type and status in the Receiving emails section. The groups OTTO and Kaufland are already preconfigured.
-
Or: Select the type Customer inquiry OTTO under *Group, type and status *and the status New.
-
Make sure all the information you entered is correct.
-
Click on save Save.
14. Link to PayPal Dispute plugin
The PayPal Dispute plugin allows you to work on problems and solve conflicts with your customers directly in your system.
| Note that at least version 1.1.2 of the PayPal Dispute plugin is required to be able to use PayPal Dispute with the Messenger. |
The advantage of using the PayPal Dispute plugin is that you will be informed about all cases of customers that reported a problem with a merchandise or service to PayPal directly in your PlentyONE backend. Go to CRM » Messenger to see all dispute messages. The buyer has 4 options to report a problem. Depending on the problem and escalation level, you can take different steps in PlentyONE. There are 2 escalation levels in case of problems. The first level is called dispute and the second level is called claim. The 4 options available to the buyer are the following:
-
Item not received
-
Item not as described
-
Unauthorised activity
-
Billing issue
As long as a problem is still on the first level of escalation, the dispute level, you can still exchange messages with the customer to solve the problem. Once a problem is escalated to PayPal, the level of escalation will be set to claim and simple messages will no longer be sent to PayPal.
To see which requirements need to be met, how to install the plugin and many more details about PayPal Dispute, refer to the PayPal page.
Within the conversation in the Messenger, you can see that it is a PayPal Dispute case by means of the PayPal symbol. Click on the case to open the PayPal plugin and to react to this case.