Managing catalogues
Learn how to manage existing catalogues. This information applies to both marketplace and default formats.
1. Assigning rights for back end users
Users with roles that are not of the type Administrator can only see certain sections and menus in PlentyONE. This means they only have limited access to the system. If employees see catalogues, they need at least the following rights:
-
Data > Data exchange > Export > Catalogue > Show
Note that only users with roles of the type Administrator can grant rights.
Assigning rights:
-
Open the menu Setup » Account management » Roles.
→ The roles overview opens. -
Click on New (add).
→ The role creation menu opens. -
Enter a name for the role.
-
Switch to the advanced mode by toggling Advanced (toggle_on) slider.
-
Assign the rights for the respective section by ticking the check boxes indicated above.
Note: You can either grant rights for complete sections or limit the rights you grant the user. To only grant limited rights in a certain section, expand the section. -
Save (save) the settings.
|
The simple mode and advanced mode are connected. If you check menu visibilities in the simple mode the corresponding permissions in the advanced mode will be checked automatically. The connection only exists in this direction. If you check permissions in the advanced mode no menu or plugin visibilities will be checked automatically. |
2. Customizing catalogue overview columns
You can customize the information that is displayed in the table columns. To do so, proceed as follows:
Customizing catalogue overview columns:
-
Go to Data » Catalogues.
→ The catalogue overview opens. -
At the top right, click on Configure columns (settings).
→ The window Configure columns opens. -
Select which columns you want to be displayed.
-
Move (sort) the columns so they are displayed in the desired order.
-
Click on Confirm to save your settings.
3. Copying catalogues
Do you want to quickly create new catalogues based on well configures ones that you already use? No problem! Any data fields that you have already mapped are copied, even if you select a different format. You can also select a different language for the copy.
Coping a catalogue:
-
Go to Data » Catalogues.
→ The catalogue overview opens. -
In the row of the catalogue, click on the further actions (more_vert).
-
Click on Copy (content_copy).
Or: Tick the box of the catalogue that you want to copy. -
At the top in the catalogue overview click on Copy catalogue (content_copy).
→ A window opens. -
If desired, adjust the automatically created name for the copy.
-
Optional: Select another format from the drop-down list. Data fields that have already been mapped will be transferred.
-
Optional: Select another language from the drop-down list.
-
Click on Copy.
→ The catalogue is copied and displayed in the catalogue overview.
You can also copy several catalogues at once. However, in this case you cannot change the format or language of the catalogues.
Copying several catalogues:
-
Go to Data » Catalogues.
→ The catalogue overview opens. -
Select the catalogues that you want to copy.
-
Click on Copy catalogue (content_copy).
→ All selected catalogues are copied and displayed in the catalogue overview. -
Optional: If you want to edit the automatically created names of the copied catalogues, open the catalogues individually and adjust the name in the basic settings.
4. Deleting catalogues
You can delete one catalogue or multiple catalogues at the same time.
Deleting one catalogue:
-
Go to Data » Catalogues.
→ The catalogue overview opens. -
In the row of the catalogue that you want to delete, click on the further actions (more_vert).
-
Click on Delete (delete).
→ You are asked to confirm your decision. -
Confirm the deletion.
→ The catalogue is deleted.
Or: Open a catalogue. -
Click on the further actions (more_vert) at the top.
-
Click on Delete catalogue (delete).
→ You are asked to confirm your decision. -
Confirm the deletion.
→ The catalogue is deleted.
Proceed as follows in order to delete several catalogues at once.
Deleting several catalogues:
-
Go to Data » Catalogues.
→ The catalogue overview opens. -
Select the catalogues that you want to delete.
-
At the top right, click on Delete selected catalogues (delete).
→ You are asked to confirm your decision. -
Confirm the deletion.
→ The catalogues are deleted.
5. Restoring another catalogue version
You can restore a previous catalogue version via the further actions or in the view of a catalogue. The last 100 versions of the catalogue are available.
Restoring a catalogue version:
-
Go to Data » Catalogues.
→ The catalogue overview opens. -
Alternative 1: In the catalogue overview
-
In the row of the catalogue, open the further actions (more_vert).
-
Click on Restore catalogue version (history).
-
-
Alternative 2: In the catalogue menu
-
Open the catalogue.
-
In the toolbar, click on the additional actions ().
-
Click on Restore catalogue version (history).
-
-
In the window shown, select the version that you want to restore.
Tip: The last 100 versions of the catalogue are available. -
Click on Restore.
→ The catalogue version is restored and displayed in the catalogue overview.
6. Restoring a deleted catalogue
In the catalogue overview, you can restore the last version of a deleted catalogue.
Restoring a deleted catalogue:
-
Go to Data » Catalogues.
→ The catalogue overview opens. -
Click on Restore deleted catalogue (undo).
→ A window opens. -
Select a catalogue from the drop-down list.
-
Click on Restore.
→ The catalogue is restored and displayed in the catalogue overview.
7. Exporting catalogues
Export catalogues to import them into other PlentyONE systems afterwards. At the same time, an export also serves as a backup.
| These settings export the catalogue itself. As such, the import contains information on the settings and data fields the catalogue contains. The import cannot be used to import data for PlentyONE data fields. |
Exporting catalogues:
-
Go to Data » Catalogues.
→ The catalogue overview opens. -
Place a check mark for the catalogue that you want to export. You can also select several catalogues at once.
-
At the top, click on Export catalogue (file_download).
→ A window opens. -
Select a storage location.
→ The selected catalogues are exported and saved at the desired location.
8. Importing catalogues
Use the import function to import catalogues from other PlentyONE systems or catalogues that have been saved as backup beforehand.
| These settings import the catalogue itself. As such, the import contains information on the settings and data fields the catalogue contains and not the data that is saved for these data fields in PlentyONE. |
Importing catalogues:
-
Go to Data » Catalogues.
→ The catalogue overview opens. -
At the top, click on Import catalogue (file_upload).
→ A window opens. -
Select the catalogue file that you want to import.
Important: You can only import one catalogue at a time.
→ The catalogue is imported and displayed in the overview.
→ The name of the imported catalogue contains the addition(1).
If the catalogue originates from another system, the name stays the same.
9. FAQ: Questions and answers
-
You want to export data from PlentyONE to a CSV, JSON, TXT or XML file?
-
You need a catalogue with standard format.
-
-
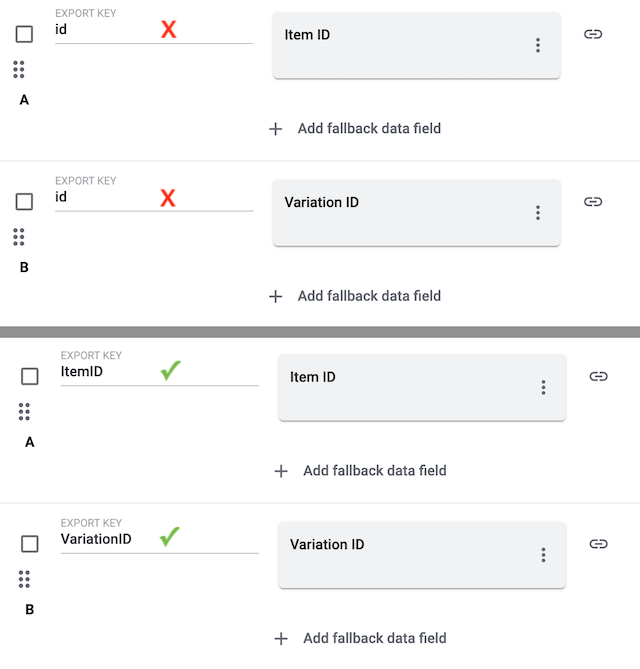
You want to export item data to markets?
The “Export Keys” are the names of the column headers, as they will appear in your export file. Every “Export Key” needs to be unique.
-
Negative example: You use the data sources Item ID and Variation ID. You give both “Export Keys” the name “id”. As a result, the export file only includes one of the two IDs. A column is missing in the export file.
-
Positive example: You use the data sources Item ID and Variation ID. You give one “Export Key” the name “VariationID” and the other “ItemID”.
The Export Key is the name of the column header that will be shown in your export file.
-
Each export key can only be used once in each catalogue.
Important: If several data fields have the same export key, only one data field is exported. -
Export keys cannot contain any spaces.
-
If the export key contains a dot, the data is exported in a tree structure. In most cases, this means that the data is not exported as expected. As such, we recommend that you do not use dots in export key names.
You might have data sources with the same “Export Key”. Every “Export Key” needs to be unique.
-
Negative example: You use the data sources Item ID and Variation ID. You give both “Export Keys” the name “id”. As a result, the export file only includes one of the two IDs. A column is missing in the export file.
-
Positive example: You use the data sources Item ID and Variation ID. You give one “Export Key” the name “VariationID” and the other “ItemID”.
If you export a file in CSV or TXT format, then you might only see the word "Array" instead of the actual export values. This happens e.g. when exporting multiple images or when exporting multi-selection properties. This is a known issue and it will be fixed in the future.
Possible workaround 1: Would it be an option for you to download a JSON or XML file instead? With these file types, you can see the actual export values.
-
Click on Settings.
-
Scroll down to the section Format settings.
-
Select CSV - Array to JSON, JSON or XML from the drop-down list Format.
-
Save () the settings and download the file (file_download).
-
Caution: If you want to revise the file and import it again. Note that the import tool only accepts the file types CSV and TXT.
-
Possible workaround 2: Export the data with the tools FormatDesigner and Elastic Export instead.
Yes. Export the file in CSV or TXT format. Then revise the file and import it again. Note that the import tool only accepts the file types CSV and TXT.
-
Is the catalogue active?
-
Has an export taken place? Check the export settings.
-
Did you use the right URL?
You used the admin URL. However, you are not logged into your PlentyONE system as an admin user.
-
Log in as an admin user.
-
Generate a public URL. The file can always be accessed with this URL.
Users with back end access rights can only see catalogues if an admin gave them access.
-
Find someone who has administrator rights for the PlentyONE system.
-
This person will open the menu Setup » Settings » User » Rights » User.
-
Then they will open your user account and activate the necessary rights:
-
Data > Data exchange > Export > Catalogue > Show
-
-
Save () the settings.
-
If the problem persists, ask our support team for help in the forum.