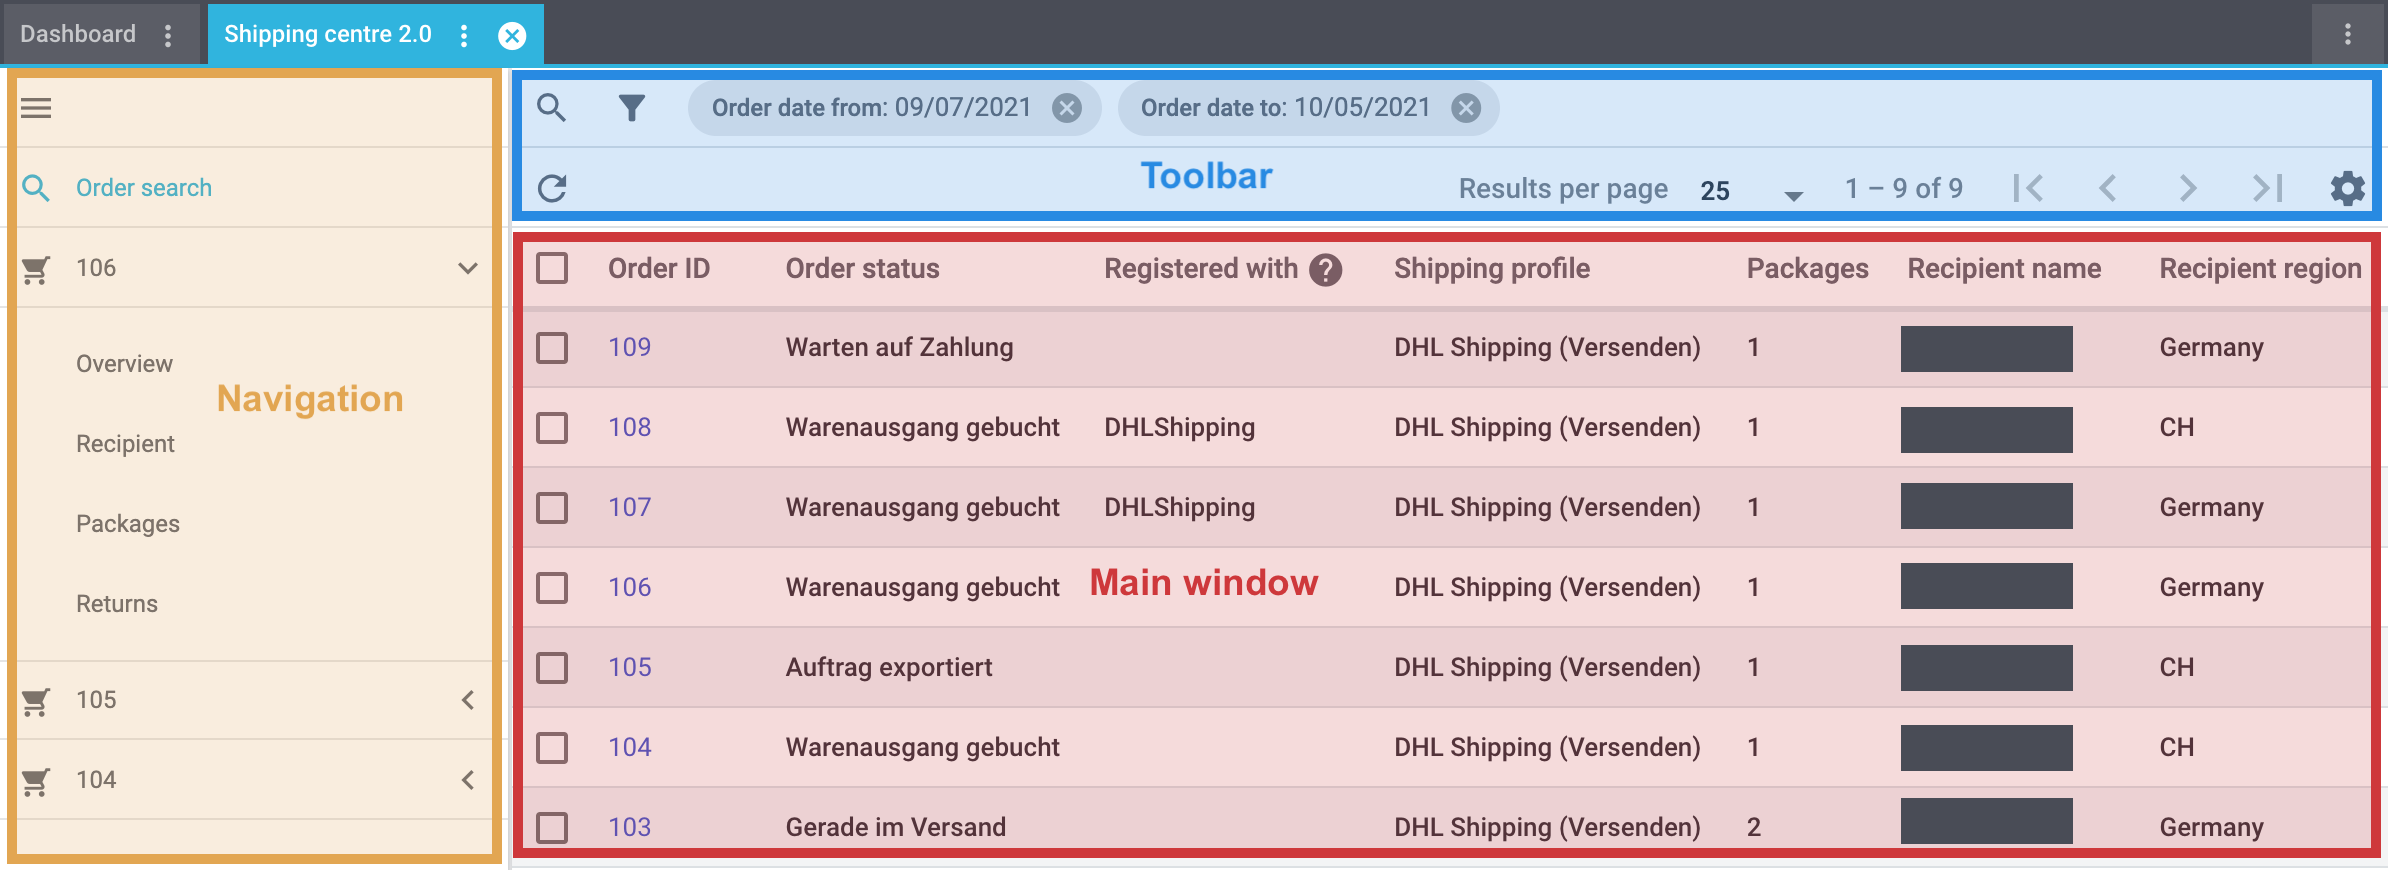
Shipping centre
In the Orders » Shipping centre menu, you can use the integrated interfaces to control all of the processes that are related to shipping your items. You cannot only search for and edit shipping orders but also register shipping orders directly with a shipping service provider or alternatively create a polling file or order summary to hand it over to a shipping service provider. By using the group function, you can, for example, register multiple orders or returns at the same time or reset multiple orders at the same time.
The Orders » Shipping centre menu is structured as follows:
-
Navigation: Here you can navigate through different parts of the menu. The currently selected area (blue font) is displayed in the main window on the right. If you open several shipping orders at once, they will be displayed underneath each other. Click on to expand or collapse the navigation bar.
-
Toolbar: Here you can search for shipping orders, configure columns, set the results to be shown per page and click through the pages with the shipping orders.
Note: By default, the filter is set to the date range of the last 4 weeks up to and including today’s date. -
Main window: Here you can see whichever area is currently open.
-
Overview: When you start a search, you’ll see the results in an overview. The overview provides information about the shipping orders found at a glance. For example, you can see the shipping service provider the order was registered with, the number of packages contained in the order and the recipient region.
-
Detail view: When you open a shipping order, its details are displayed in the main window on the right. The detail view of a shipping order is divided into the following areas: Overview, Recipient, Packages and Returns.
-
1. Searching for an order in the shipping centre
Open all orders in a list or select filters (tune) to narrow down the search results in the overview of the shipping centre 2.0. By default, the date range of the last 4 weeks is set.
Searching for an order in the shipping centre:
-
Go to Orders » Shipping centre.
Note: By default, the data range of the last 4 weeks is set. You can, of course, adjust the date range by using the filter.-
Option 1: Click on search to see a list of all orders.
-
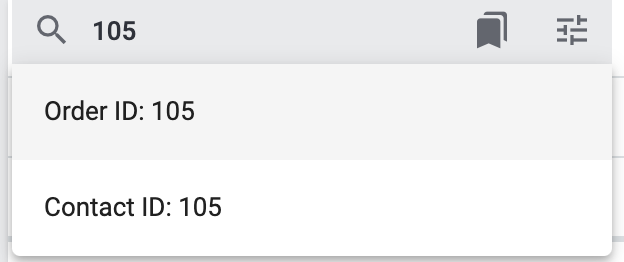
Option 2: Enter a value in the search field and select the appropriate filter from the suggestion list. Example: If you enter a number, the possible filters with this ID will be suggested to you such as for example the order ID or contact ID (see Figure 1).
-
Option 3: Click on tune to narrow down the search results with filters.
-
-
Note the explanations about the filters in Table 1.
| Setting | Explanation |
|---|---|
Order ID |
Enter an ID to search for the order with this exact ID. |
Order type |
Select one or more order types () to search for orders with this order type. |
Order status |
Select an order status to search for orders in this status. |
Registered with |
Select a shipping service provider to only search for orders that have been registered with this shipping service provider. |
Shipping service provider |
Select a shipping service provider to only search for orders that use this shipping service provider. |
Shipping profile |
Select a shipping profile to search for orders with this shipping profile. |
Country |
Select a country to search for orders to this country. |
Payment method |
Select a payment method or the option All to search for orders with this payment method. |
Owner |
Select an owner to search for orders with this owner. |
Contact ID |
Enter the ID of the contact to only search for orders from this contact. |
Client (store) |
Select a client to search for orders with this client. |
Warehouse |
Select a warehouse to search for orders with this warehouse. |
Order date from / to |
Select the dates from the calendars (today) to search for orders within a certain time period. |
Reset |
Resets the selected filter criteria. |
Search |
Starts the search. The orders found are listed in the overview. |
1.1. Saving the current filter
When you start a search, your selected filters are displayed up top as so-called “chips”. You can save these filters to apply them again more quickly and easily in the future.
Saving the current filter:
-
Start a search with one multiple filters that are listed in Table 1.
-
Click on Saved filters (bookmarks).
-
Click on bookmark_border Save current filter.
-
Enter a name for the filter.
-
Decide whether
-
this filter should be set as default filter ()
-
this filter should be created for all users ().
-
-
Click on SAVE.
→ The filter now appears under Saved filters (bookmarks).
| Use drag-and-drop to arrange the filters in a specific order by clicking on Move (drag_indicator). Click on delete to delete a filter. |
1.2. Applying saved filters
Applying saved filters:
-
Click on Saved filters (bookmarks).
-
Click on a filter that you have already created.
→ The search is started and the filter settings are displayed up top as so-called “chips”.
1.3. Setting a default filter
To make sure that you don’t have to select a filter that you use quite often from the list of your saved filters every time when opening the shipping centre 2.0, you can set a created filter as default filter. Every time when you open the shipping centre 2.0, this filter will be automatically applied.
You can set the filter as default filter directly when creating it as described in Saving the current filter or you can set the filter as default in the overview afterwards (see Figure 2).
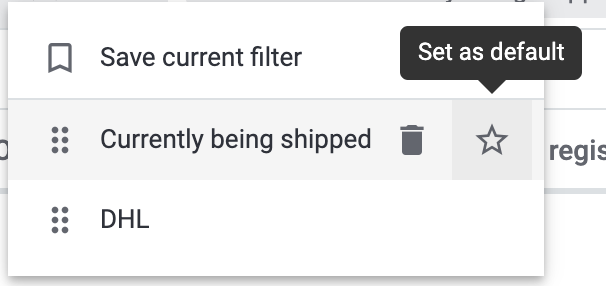
Click in the line of the saved filter on Set as default.
If you want to set another filter as default filter, deactivate the currently selected default filter by clicking on Do not use as default.
2. Configuring columns
You can have the following columns displayed in the overview of the shipping centre 2.0:
-
Order ID
-
Order type
-
Shows the order type, e.g. order, return or credit note.
-
-
Order status
-
The colour that you saved in the Setup » Orders » Order status menu is shown in front of the status.
-
-
Registered with
-
Shows the shipping service provider that you registered the order with.
-
-
Return registered with
-
Shows the return service provider that was used to create the return label for this order.
-
-
Shipping profile
-
Packages
-
Shows the number of packages contained in the order.
-
-
Recipient name
-
Recipient region
-
Order created at
-
Order registered at
Click on Configure columns (settings) on the top right to deactivate the columns that are already shown in the overview.
3. Carrying out the group function
Once you have selected an order (), the different buttons become visible (see Figure 3). Select at least 2 orders from the list to be able to use the group functions. Table 2 lists the elements from the group functions as well as their explanations.

| Element | Symbol | Explanation |
|---|---|---|
Editing orders |
edit |
Shows all selected orders in a list on the left side. |
Register orders |
Registers all selected orders. |
|
Polling |
Creates a polling file in CSV format for all selected orders. |
|
Register returns |
Registers a return for all selected orders. |
|
Summary |
Creates a summary in PDF format of all selected orders. |
|
Download shipping labels |
Downloads the shipping labels of orders that have already been registered in PDF format. |
|
Download return labels |
Downloads the return labels of orders that have already been registered as returns in PDF format. |
|
Reset orders |
Resets all selected orders. |
Step-by-step guide for the group functions
Click on one of the following tabs to see a step-by-step guide of the individual group functions.
Proceed as described below to edit multiple orders using the group function.
Editing multiple orders using the group function:
-
Go to Orders » Shipping centre.
-
Search for the orders by using the filter settings as described in the Searching for an order in the shipping centre chapter.
→ The orders that correspond to the search criteria entered are shown in the overview. -
Select () the orders that you want to edit.
-
In the toolbar on the top, click on Edit orders ().
→ The selected orders are shown on the left side. -
Click in the line of the order on shopping_cart Order ID to open the order in the detail view.
-
Carry out the desired changes.
-
Click on close in the line of an order to remove the order from the list.
-
Click on in the line of an order to open a list with the order areas.
→ Click on one of the areas to open the order in the detail view. -
Click on to close the order areas again.
→ The order remains in the list, however.
Proceed as described below to register multiple orders using the group function in the overview.
Registering multiple orders using the group function:
-
Go to Orders » Shipping centre.
-
Search for the orders by using the filter settings as described in the Searching for an order in the shipping centre chapter.
→ The orders that correspond to the search criteria entered are shown in the overview. -
Select () the orders that you want to register.
-
In the toolbar on the top, click on Register orders ().
→ The Register orders window opens. -
Select the shipping service provider from the drop-down list which you want to register the orders with.
Note: Depending on the selected shipping service provider, further drop-down lists with additional options are available. The additional options allow you to change the shipping profile for selected orders after they have been registered. They also allow you to change the shipping date so it is predated or postdated. -
Select the order status from the drop-down list which the order should switch to after having it successfully registered with the shipping service provider.
Note: You can link the switch to this order status with an event procedure which, for example, automatically books outgoing items. -
Select the order status from the drop-down list which the order should switch to when the registration with the shipping service provider failed.
Note: You can link the switch to this order status with an event procedure. -
If you do not want that the shipping labels are automatically downloaded after registration, deactivate () the option Automatically download shipping labels in PDF format after registration.
Note: This option is activated by default. -
Click on Register orders.
→ The orders are registered with the shipping service provider.
Proceed as described below to create a polling file for multiple orders using the group function.
Generating a polling file for multiple orders:
-
Go to Orders » Shipping centre.
-
Search for the orders by using the filter settings as described in the Searching for an order in the shipping centre chapter.
→ The orders that correspond to the search criteria entered are shown in the overview. -
Select () the orders that you want to create a polling file for.
-
In the toolbar on the top, click on Polling ().
-
Select the service provider from the drop-down list.
Note: Based on the selected service provider, further settings are possible. -
Select the order status that the orders should switch to after the polling file has been successfully generated.
-
Click on Create polling file.
→ The polling file is generated. -
Save the file to your computer and send it to the shipping service provider.
Proceed as described below to register returns for multiple orders using the group function.
Registering returns for multiple orders:
-
Go to Orders » Shipping centre.
-
Search for the orders by using the filter settings as described in the Searching for an order in the shipping centre chapter.
→ The orders that correspond to the search criteria entered are shown in the overview. -
Select () the orders that you want to register a return for.
-
In the toolbar on the top, click on Register returns ().
→ The Register returns window opens. -
Select the return service provider from the drop-down list which you want to register the orders with.
-
Click on Register returns.
→ The orders will be registered with the return service provider and the package numbers are saved at the order.
| After registering a return shipment an order note will be added by default, containing the shipping provider and the package number of the return. You can deactivate the order note generation here: Setup > Orders > Settings > Return Shipments. |
Generate an order summary or a manifest for the shipping service providers that are set up in your PlentyONE system.
Such a summary contains all orders that have been registered with the shipping service provider during one day and should be picked up by the shipping service provider. The person who picks up the parcels on behalf of the shipping service provider signs this list instead of each shipping label individually. Thus, the list serves as a pick-up receipt.
Proceed as described below to create a summary for multiple orders using the group function.
Creating an order summary for multiple orders:
-
Go to Orders » Shipping centre.
-
Search for the orders by using the filter settings as described in the Searching for an order in the shipping centre chapter.
→ The orders that correspond to the search criteria entered are shown in the overview. -
Select () the orders that you want to create an order summary for.
-
In the toolbar on the top, click on Summary ().
-
Select the service provider from the drop-down list.
Note: Additional options for the shipping service provider are displayed, if available. -
Carry out the setting for the options, if needed, such as selecting the shipping date.
-
Click on Create summary.
→ The PDF file is created.
|
Using the elastic export to export order summaries
As an alternative to the order summary of one day in the Orders » Shipping centre menu, you can also carry out an elastic export. To do so, create an export format of the type Orders using the FormatDesigner. |
Proceed as described below to download shipping labels for multiple orders using the group function.
Downloading shipping labels using the group function:
-
Go to Orders » Shipping centre.
-
Search for the orders by using the filter settings as described in the Searching for an order in the shipping centre chapter.
→ The orders that correspond to the search criteria entered are shown in the overview. -
Select () the orders whose shipping labels you want to download.
-
In the toolbar on the top, click on Download shipping labels ().
→ The PDF file is generated and you can save it to your computer.
Note: The number of PDF files corresponds to the number of shipping service providers. This means: One PDF file is generated for each shipping service provider.
Note: If an export document is available, these are also downloaded in a separate file.
Proceed as described below to download return labels for multiple orders using the group function.
Downloading return labels using the group function:
-
Go to Orders » Shipping centre.
-
Search for the orders by using the filter settings as described in the Searching for an order in the shipping centre chapter.
→ The orders that correspond to the search criteria entered are shown in the overview. -
Select () the orders whose return labels you want to download.
-
In the toolbar on the top, click on Download return labels ().
→ The PDF file is generated and you can save it to your computer.
Note: The number of PDF files corresponds to the number of return service providers. This means: One PDF file is generated for each return service provider.
Tip: Refer to the DHL Retoure Online page to learn more about how to generate return labels with the DHL Retoure Online.
Proceed as described below to reset multiple orders using the group function.
Resetting multiple orders using the group function:
-
Go to Orders » Shipping centre.
-
Search for the orders by using the filter settings as described in the Searching for an order in the shipping centre chapter.
→ The orders that correspond to the search criteria entered are shown in the overview. -
Select () the orders that you want to reset.
-
In the toolbar on the top, click on Reset orders ().
→ A window opens and you need to confirm your decision. -
Confirm your decision by clicking on Reset orders.
→ The orders are reset.
|
Difference between cancelling an order and resetting an order
If you cancel an order in the shipping centre, the registration is cancelled in PlentyONE and also with the shipping service provider. This means that the order will not be picked up. If you reset an order, it is available as a pending order in PlentyONE. However, it is still registered with the shipping service provider and you are billed for it. The Reset function simply resets the registrations. The order itself will not be cancelled with the service provider. Therefore, we recommend that you always cancel the order. Note: It is only possible to use the cancellation function within a single order, not via the group function. For further information, refer to the Cancelling a single order chapter. |
4. Editing a single order
The following sub-chapters describe which options you have to edit a single order. The following sub-chapters are available:
4.1. Displaying an order
When you open an order, you will see the following 4 areas in the detail view:
-
Overview
-
Recipient
-
Packages
-
Returns
These areas are described in the following sub-chapters.
Furthermore, the following functions in the order are available in the toolbar on the top:

Table 3 lists the elements from the single order as well as their explanations.
| Element | Symbol | Explanation |
|---|---|---|
Register order |
Registers the order. |
|
Polling |
Creates a polling file in CSV format. |
|
Register return |
Registers a return. |
|
Reset order |
Resets the order. |
|
Cancel order |
cancel |
Cancels the order. |
4.1.1. Overview
In the Overview area, you can see general information regarding the order’s registration status:
-
Order ID
-
By clicking on the ID, you will be redirected to the order in the Orders » Edit orders menu.
-
-
Registered with
-
In this column, you can see the name of the shipping service provider that you registered the order with.
Note: If the order has not been registered yet, the note Not registered is shown here.
-
-
Number of packages
-
Registration time of the shipping label
-
Date and time when the order was registered
-
4.1.2. Recipient
In the Recipient area, you can see some delivery details such as the shipping region and the recipient’s address. Click on the contact ID to open the contact data record in the CRM » Contacts menu.
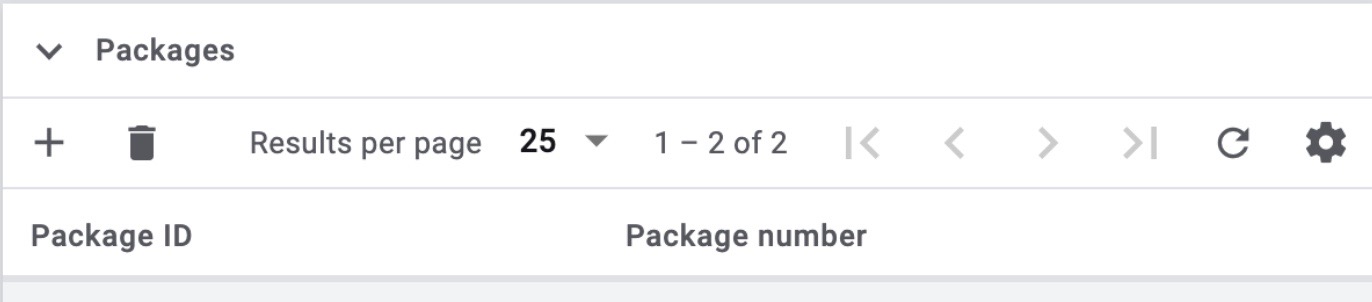
4.1.3. Packages
The Packages area shows the following columns by default:
-
ID
-
Name
-
Here, the Standard package or the name of the shipping package that you created in the Setup » Orders » Shipping » Shipping packages menu is shown.
-
-
Weight
-
Dimensions
-
Volume
-
Number of items
-
Type
-
Here, the packing unit type is shown.
-
-
Package number
-
Here, the package number is shown that is returned by the shipping service provider after having successfully registered the order.
-
Click on Add package (add) to directly add a package within this view. A window opens where you can select the package type, the packaging unit, the package weight and the package number.
Click on Delete all open packages (delete) to delete all open packages. A window opens and you need to confirm your decision.
Click on Update order packages (refresh) to update the data in the Packages area.
Click on Configure columns (settings) to deactivate the columns that are already shown in the overview.
You can configure individual packages by clicking on the line of the package. A window opens for you to configure the values for package type, packing unit type, package weight, package volume and package number. Your settings are saved and applied to the package when you click on the button Configure package (settings).
At the end of the line of the package, click on More (more_vert) and then on Delete package (delete) to delete individual packages. A window opens and you need to confirm your decision.
A detailed description about the shipping packages can be found further down on this page in the Editing a shipping package chapter.
You can also add additional weight to a package using the Configure package button. This is useful if, for example, the weight of the packaging material needs to be added.
You can edit the extra package weight in the shipping centre and in the package content list.
-
Click on the line of the package to which you want to add weight.
-
In the Configure package window, enter the additional weight in kilograms in the Extra package weight (kg) line.
-
Save your entry by clicking on Configure package (settings).
The total weight of the package is updated accordingly.
4.1.4. Returns
The Returns area shows the following columns by default:
-
ID
-
Return ID
-
If the return was registered via the main order, no ID is visible in this field. If the return is an order of the type Return, the ID is visible in this field.
-
-
Return service provider
-
Registered on
-
Date and time when the return was registered
-
-
Valid until
-
Validity how long the labels are available for download to your customers in your plentyShop.
-
-
Package number
-
Here, the package number is shown that is returned by the shipping service provider after having successfully registered the order.
-
Click on Update order returns (refresh) to update the data in the Returns area.
Click on Configure columns (settings) to deactivate the columns that are already shown in the overview.
4.2. Registering a single order
When you register your orders with a shipping service provider in the shipping centre, the orders are directly transmitted to the shipping service provider.
For example, use the filter settings in the search of the shipping centre to only show orders of a certain shipping service provider in a certain order status. During the registration process, you receive messages from the shipping service provider informing you of both success and errors.
Proceed as described below to register a single order.
Registering a single order:
-
Go to Orders » Shipping centre.
-
Search for the order that you want to register by using the filter settings as described in the Searching for an order in the shipping centre chapter.
→ The orders that correspond to the search criteria entered are shown in the overview. -
Search for the order that you would like to register.
-
In the toolbar on the top, click on Register order ().
→ The Register order window opens. -
Select the shipping service provider which you want to register the order with from the drop-down list.
Note: Depending on the selected shipping service provider, further drop-down lists with additional options are available. The additional options allow you to change the shipping profile for selected orders after they have been registered. They also allow you to change the shipping date so it is predated or postdated. -
Select the order status from the drop-down list which the order should switch to after having it successfully registered with the shipping service provider.
Note: You can link the switch to this order status with an event procedure which, for example, automatically books outgoing items. -
Select the order status from the drop-down list which the order should switch to when the registration with the shipping service provider failed.
Note: You can link the switch to this order status with an event procedure. -
If you do not want that the shipping label is automatically downloaded after registration, deactivate () the option Automatically download shipping label in PDF format after registration.
Note: This option is activated by default. -
Click on Register.
→ The order is registered with the shipping service provider.
→ The registered order receives a package number in the Packages area.
|
When multiple orders are to be registered the printing of the shipping labels will be performed in the order of selection. When all orders are selected by checking the box at the top left the printing order will be the same as the order in which the orders are listed. |
4.3. Downloading the shipping label
If the order has been successfully registered, the shipping label is visible in the Packages area. Click on Download shipping labels () in the Packages area of the order to save the label to your computer and print it afterwards.
| Another option to download the shipping label is the group function in the overview. For further information, refer to the chapter Step-by-step guide for the group functions in the tab Downloading shipping labels. |
Automatically sending shipping labels via email
You can automatically generate the shipping labels via an event procedure and send them via email. For this procedure, 2 event procedures are required. These are listed below:
Event procedure to register the order
First, set up an event procedure that registers the order and returns the package number.
| Setting | Option | Selection |
|---|---|---|
Event |
Status change: New order |
Cleared for shipping |
Procedure 1 |
Plugins > Register order with shipping service provider |
|
Procedure 2 |
Order > Change status (optional) |
Select a status. |
Event procedure for the email despatch
Now, set up another event procedure that reacts to the successfully registered order and send the email with the shipping label to your customers.
| Setting | Option | Selection |
|---|---|---|
Event |
Order change: Package number |
|
Procedure 1 |
Customer > Send email |
Select the email template that contains the attachment Shipping label from the first drop-down list. Select as recipient the option Customer from the second drop-down list. |
Procedure 2 |
Order > Change status (optional) |
Select a status. |
4.4. Resetting a single order
Note the end of the shipping day that you defined with your shipping service provider. When the end of the shipping day is reached (this is often a point in time between 4:00 and 6:00 pm), you can only reset the order, but it is not possible to cancel it any longer.
|
Difference between cancelling an order and resetting an order
If you cancel an order in the shipping centre, the registration is cancelled in PlentyONE and also with the shipping service provider. This means that the order will not be picked up. If you reset an order, it is available as a pending order in PlentyONE. However, it is still registered with the shipping service provider and you are billed for it. The Reset function simply resets the registrations. The order itself will not be cancelled with the service provider. Therefore, we recommend that you always cancel the order. |
Proceed as described below to reset a single order.
Resetting a single order:
-
Go to Orders » Shipping centre.
-
Search for the order that you want to reset by using the filter settings as described in the Searching for an order in the shipping centre chapter.
→ The orders that correspond to the search criteria entered are shown in the overview. -
Open the order.
-
In the toolbar on the top, click on Reset order ().
→ A window opens and you need to confirm your decision. Note the reference in the box Difference between cancelling an order and resetting an order at the beginning of this chapter. -
Confirm your decision by clicking on Reset order.
→ The order is reset.
4.5. Cancelling a single order
Note the end of the shipping day that you defined with your shipping service provider. When the end of the shipping day is reached (this is often a point in time between 4:00 and 6:00 pm), you can no longer cancel the order, but only reset it.
|
Difference between cancelling an order and resetting an order
If you cancel an order in the shipping centre, the registration is cancelled in PlentyONE and also with the shipping service provider. This means that the order will not be picked up. If you reset an order, it is available as a pending order in PlentyONE. However, it is still registered with the shipping service provider and you are billed for it. The Reset function simply resets the registrations. The order itself will not be cancelled with the service provider. Therefore, we recommend that you always cancel the order. |
Proceed as described below to cancel a single order.
| Note that you can only cancel an order in the detail view of a single order, but not in the group function. |
Cancelling a single order:
-
Go to Orders » Shipping centre.
-
Search for the order that you want to cancel by using the filter settings as described in the Searching for an order in the shipping centre chapter.
→ The orders that correspond to the search criteria entered are shown in the overview. -
Open the order.
-
In the toolbar on the top, click on Cancel order (cancel).
→ A window opens and you need to confirm your decision. Note the reference in the box Difference between cancelling an order and resetting an order at the beginning of this chapter. -
Confirm your decision by clicking on Reset order.
→ The order is reset.
4.6. Creating a polling file for a single order
Create a polling file for the shipping service provider’s software. A polling file is necessary if no direct interface to the shipping service provider’s software exists, i.e. if shipping orders cannot be registered in the shipping centre 2.0. The polling file generated in PlentyONE is usually a CSV file.
Creating a polling file for a single order:
-
Go to Orders » Shipping centre.
-
Search for the order by using the filter settings as described in the Searching for an order in the shipping centre chapter.
→ The orders that correspond to the search criteria entered are shown in the overview. -
Open the order.
-
In the toolbar on the top, click on Polling ().
-
Select the service provider from the drop-down list.
Note: Based on the selected service provider, further settings are possible. -
Select the order status that you want the order to switch to.
-
Click on Create polling file.
→ The polling file is generated. -
Save the file to your computer and send it to the shipping service provider.
4.7. Registering a return for a single order
After you have registered the return, the return label is available for download as a PDF file in the Returns are of the order. You can register a return via the main order or via the order type Return. For further information about the order type Return, refer to the Order type: Return page.
Registering a return for a single order:
-
Go to Orders » Shipping centre.
-
Search for the order that you want to register a return for by using the filter settings as described in the Searching for an order in the shipping centre chapter.
→ The orders that correspond to the search criteria entered are shown in the overview. -
Open the order.
-
In the toolbar on the top, click on Register return ().
→ The Register return window opens. -
Select the return service provider from the drop-down list.
-
Click on Register return.
→ The return for the order is registered and the package number is saved at the order.
| After registering a return shipment an order note will be added by default, containing the shipping provider and the package number of the return. You can deactivate the order note generation here: Setup > Orders > Settings > Return Shipments. |
4.8. Retrieving the return label
Once the return has been successfully registered, the return label is available in the Returns area of the order. Click on Return label () to save the label on your computer and print it afterwards.
Figure 5 shows as an example a return that was registered with DHL Retoure Online with the setting that one label is generated per package. If multiple packages are available, one PDF file per return label is generated.

Besides the manual option, you can, for example, use DHL Retoure Online to automatically generate the return labels via an event procedure or a process:
The following options are both available in the event procedures and in the processes:
-
Plugins > Generate DHL Retoure Online label
-
Registers the return with DHL Retoure Online. One label per order is generated, regardless of the number of packages.
-
-
Plugins > Generate DHL Retoure Online label (1 label per package / 1 file)
-
Registers the return with DHL Retoure Online. One label per package is generated. If multiple packages are available, one PDF file with all return labels is generated.
-
-
Plugins > Generate DHL Retoure Online label (1 label per package / multiple files)
-
Registers the return with DHL Retoure Online. One label per package is generated. If multiple packages are available, one PDF file per return label is generated.
-
You can select the options mentioned above in the following areas of the PlentyONE back end:
-
in the procedure group Plugins of the event procedures
-
as Return type in the procedure Return label in the processes
-
in the shipping centre when registering the return
For further information about DHL Retoure Online, refer to the DHL Retoure Online page.
Sending return labels of all available shipping service providers as email attachment via an event procedure
Go to CRM » EmailBuilder and select the setting Return label from the drop-down list of dynamic attachments in the email template. By doing so, the return labels of all shipping service providers available in PlentyONE - be it via a plugin or an integration in the back end- can be sent as email attachment. You only have to link the email template where you saved this setting with an event procedure to ensure that the email template will be sent automatically to your customers once the event occurs.
4.9. Downloading the export label
You need a customs declaration for shipments that you send to countries outside the European Union, the so-called CN23 form. Once you successfully registered an order where the country of delivery is outside of the European Union, the export label is automatically available in the Packages area of the order.
Downloading the export label:
-
Go to Orders » Shipping centre.
-
Search for the order by using the filter settings as described in the Searching for an order in the shipping centre chapter.
→ The orders that correspond to the search criteria entered are shown in the overview. -
Open the order.
-
In the Packages area, click on Download export labels ().
→ The PDF file is generated and you can save it to your computer.
| Another option to download the export label is the group function in the overview. For further information, refer to the chapter Step-by-step guide for the group functions in the tab Downloading shipping labels. |
5. Editing shipping packages in the packages area
The packages area is also available in the UI of an order. You can add it via myView and determine its position.
The packages area offers you the functionalities for shipping parcels from the shipping centre: One click opens an overlay in which the parcel data can be customised.
| Setting | Explanation |
|---|---|
Click on the plus to create additional packages. |
|
text_snippet |
Download your shipping labels. |
By clicking on the printer symbol you will receive a preview of the shipping label(s). |
|
delete |
Delete all open packages. |
update |
Update the data in this widget. |
settings |
Configure the columns of this widget. |
ID |
Click on the package ID to open the package content list. |
Package number |
Open the shipment tracking by clicking on the stored package number. |
more_vert |
Delete individual packages via the three-point menu. |
As in all newer UIs, the columns can be shown or hidden and their order can be changed.
6. Editing the shipping package in the package content list
If an order has not been registered yet, you can edit, add or delete the shipping packages at any time via the package content list. The parameters such as weight and volume are calculated based on the item data. Therefore, check the shipping package information and correct it if necessary.
If you want to edit shipping packages from the shipping centre 2.0, the package content list will open in a new tab.
Editing the shipping package in the package content list:
-
Go to Orders » Shipping centre.
-
Search for the order by using the filter settings as described in the Searching for an order in the shipping centre chapter.
→ The orders that correspond to the search criteria entered are shown in the overview. -
Open the order.
-
Click in the Packages area on the package ID.
→ The package content list opens in a new tab. -
In the Packages area, click on Edit package ().
→ The Edit package window opens. -
Carry out the desired changes. Note Table 7.
Note: Activate (check_box) the option Transfer all settings to all packages in the pallet if you want that the settings are transferred to all packages in the pallet. -
Save the settings.
| Setting | Explanation |
|---|---|
Shipping package |
Select the shipping package to assign a package size to the order. |
Weight (g) |
Enter the weight of the shipping package. |
Packaging unit |
Select a packaging unit. |
Volume |
Enter the volume. |
6.1. Adding a shipping package in the package content list
Proceed as described below to add a shipping package to the shipping order via the package content list.
Adding a shipping package in the package content list:
-
Go to Orders » Shipping centre.
-
Search for the order by using the filter settings as described in the Searching for an order in the shipping centre chapter.
→ The orders that correspond to the search criteria entered are shown in the overview. -
Open the order.
-
Click in the Packages area on Add package ().
→ The package content list opens in a new tab. -
Click on the button Add package.
→ The packages is added and you can edit it. -
In the Packages area, click on Edit package ().
→ The Edit package window opens. -
Carry out the desired changes. Note Table 7.
Note: Select the option at the bottom if you want that the settings are transferred to all packages in the pallet. -
Save the settings.
6.2. Deleting a shipping package in the package content list
Proceed as described below to delete a shipping package from the shipping order via the package content list.
Deleting a shipping package in the package content list:
-
Go to Orders » Shipping centre.
-
Search for the order by using the filter settings as described in the Searching for an order in the shipping centre chapter.
→ The orders that correspond to the search criteria entered are shown in the overview. -
Open the order.
-
Click in the Packages area on the package ID.
→ The package content list opens in a new tab. -
In the Packages area, click on Delete package () next to the package to be deleted.
→ A window opens and you need to confirm your decision. -
Confirm your decision by clicking on Yes.
→ The shipping package is deleted.
7. Splitting up orders into delivery orders
Define which criteria is used to split orders into delivery orders. The following options are available:
-
Warehouse
-
Shipping profile
-
Warehouse and shipping profile
-
Warehouse stock and net stock
Further information can be found in the Order type: Delivery order page of the Manual.