Using standard formats
Use catalogue standard formats to export data from your PlentyONE System to a file. You can create export files in the formats CSV, JSON, TXT or XML. There are different standard format for exporting data. Not all types of data can currently be exported using catalogues. Until standard formats are available for all types of data, you can continue using the Formatdesigner.
| This page is new and we always want to improve. Couldn’t find what you are looking for or do you think something could be explained better? Then let us know by using the feedback function at the bottom of this page. The more details you provide, the easier it is for us to improve this page. |
1. Understanding the catalogue menu for default formats
When you open the menu Data » Catalogues, the first thing you see is the catalogue overview. You can get to know this catalogue overview here.
The catalogue menu for standard formats is what you see when you open a catalogue with standard format.
The catalogue menu is the same for all default formats:
Tip: Your catalogue still looks different? Then you probably opened a marketplace format. It is used to export item data to markets and price portals. Also useful and interesting. However, working with marketplace formats is described elsewhere.
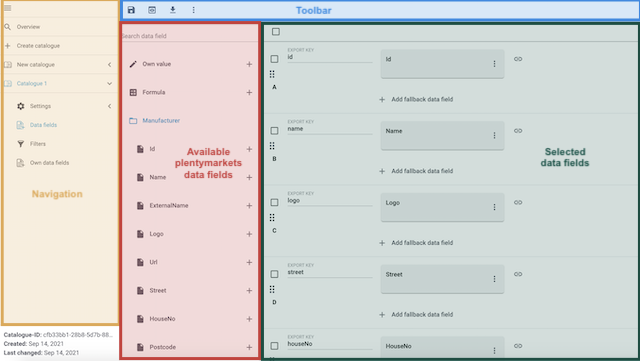
1.1. Navigation
When you open a catalogue, the view Data fields is shown by default. Use the navigation to switch to other views of the catalogue.
Catalogues |
Go back to the catalogue overview, that is to the list of catalogues. |
List of opened catalogues |
The navigation shows all catalogues that you accessed during your current session. This allows you to quickly switch between the catalogues you are currently working on. The catalogue that is currently on view is shown in blue. The names of the other catalogues are shown in grey. Tip: You can remove a catalogue or channel map from the navigation by hovering over it with your cursor and clicking on the X that appears. |
Settings |
This menu contains all settings for the catalogue. The settings consist of four sections:
These sections also appear in the navigation bar, but do not need to be accessed separately. |
Data fields |
This menu is shown when you open the catalogue. In this view, you select the data fields that you want to export. |
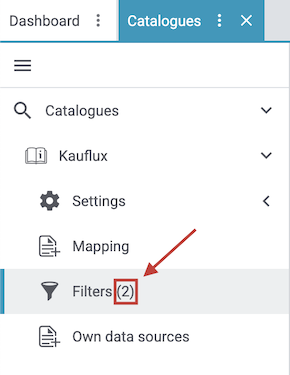
filter_alt Filter |
Add filters to only export specific records. Tip: The number of filters that you activated for a catalogue is always shown. Template filters, i.e. filters that are applied by default, are not included in the count.
|
Own data sources |
Own data sources are currently not available for most exports. |
1.2. Toolbar
The toolbar provides actions for the catalogue.
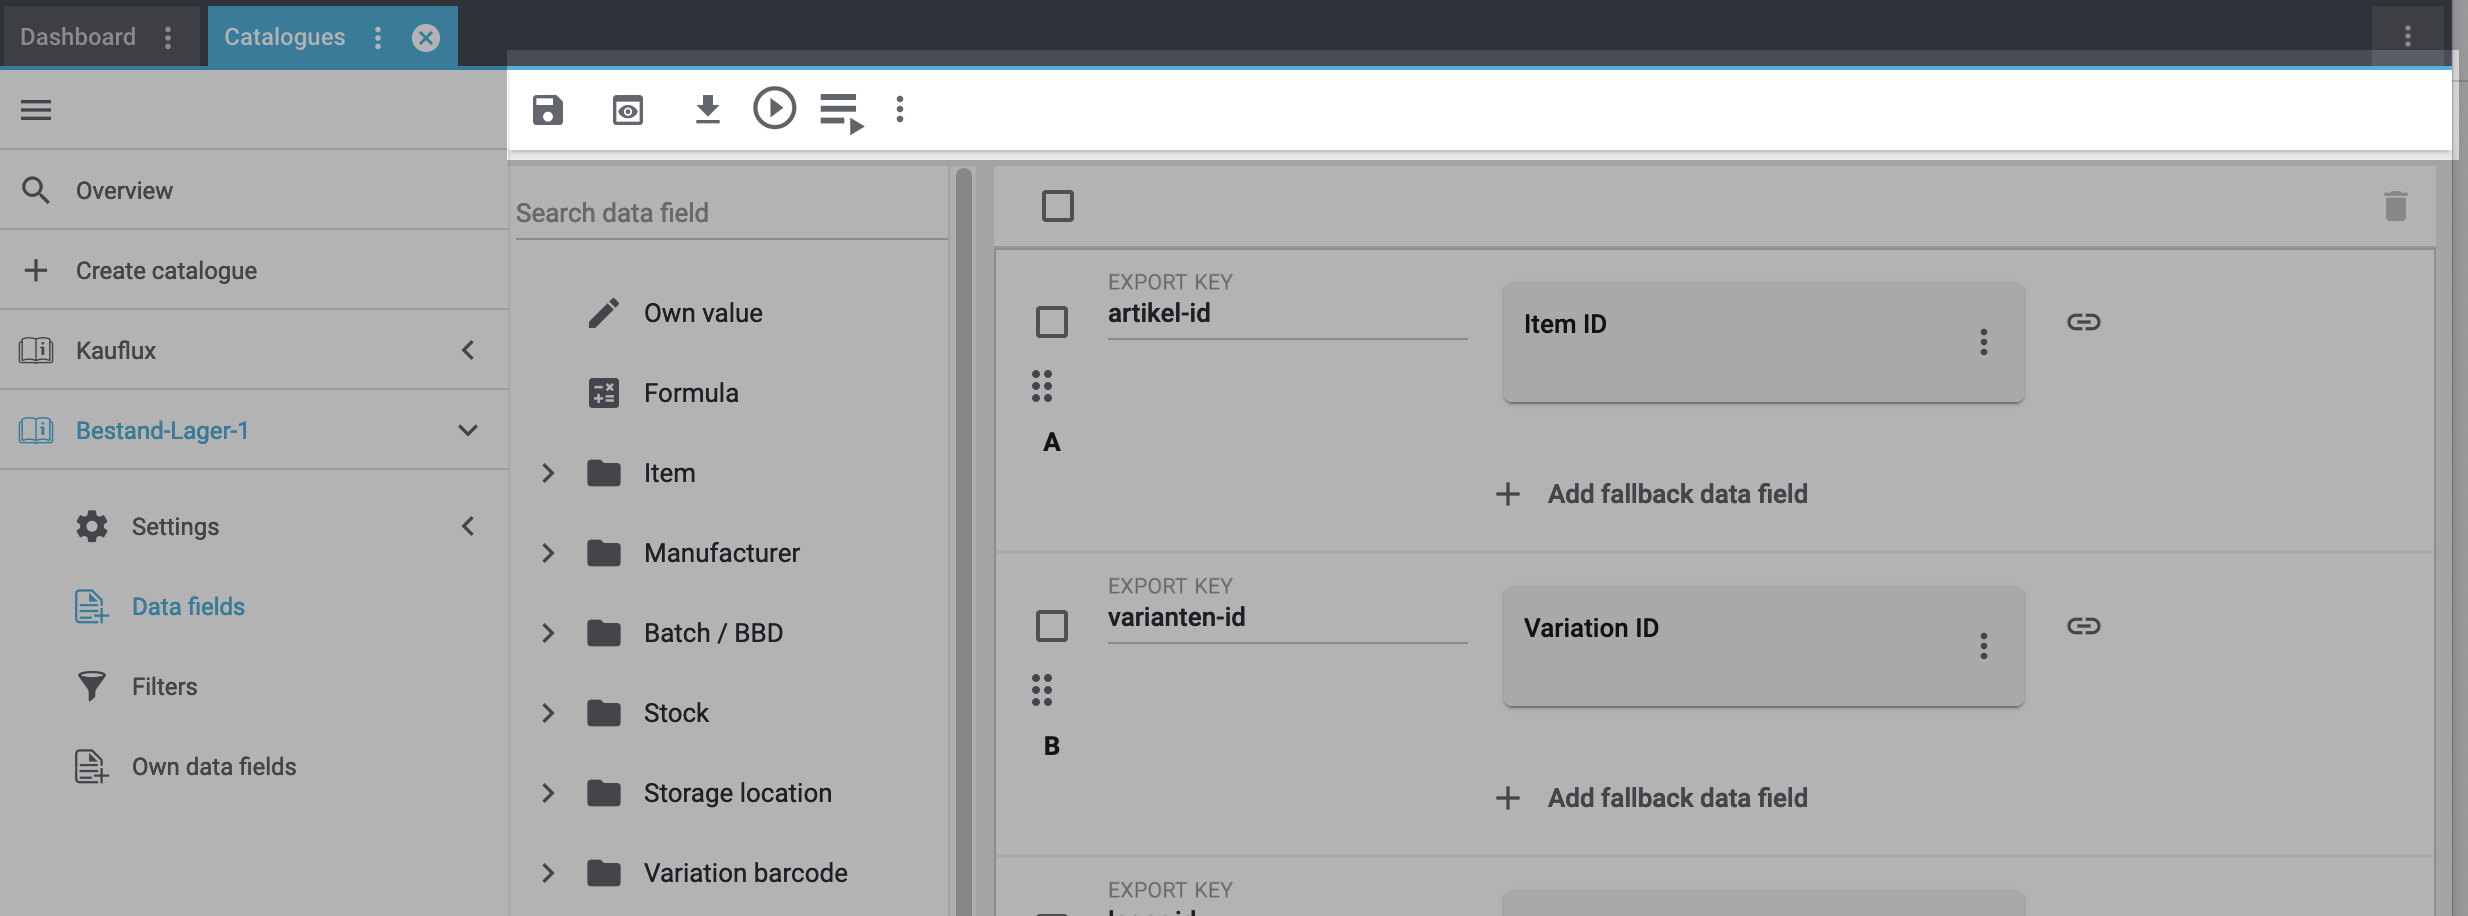
save Save |
Saves the catalogue settings. |
||||
preview Preview |
Creates a preview of the export data. The preview contains the first 5 data rows of the export file. Important: The preview function is not available for all catalogue formats. |
||||
Asynchronous download |
Starts a manual download of the catalogue data. |
||||
play_circle Live download |
Downloads the catalogue data as a file. The download starts immediately. The file is automatically saved on your computer when the export is done. |
||||
playlist_play Status |
Opens the menu Data » Catalogue export status and filters the list for this catalogue. Shows information about the status of the catalogue. |
||||
more_vert More |
Shows additional actions.
|
1.3. Data fields that are available for export
To the right of the navigation, all PlentyONE data fields that you can export are listed in groups. To add a data field to the export, click on the Plus icon to the light of the data field.
Tips:
-
Use the field Search data field to quickly find and add data fields.
-
In addition to the data fields listed, you can also add own values to the export. The same value is then exported for each record.
-
Add the option Formula to recalculate numerical values during the export. For example, you could update all exported variation prices during the export.
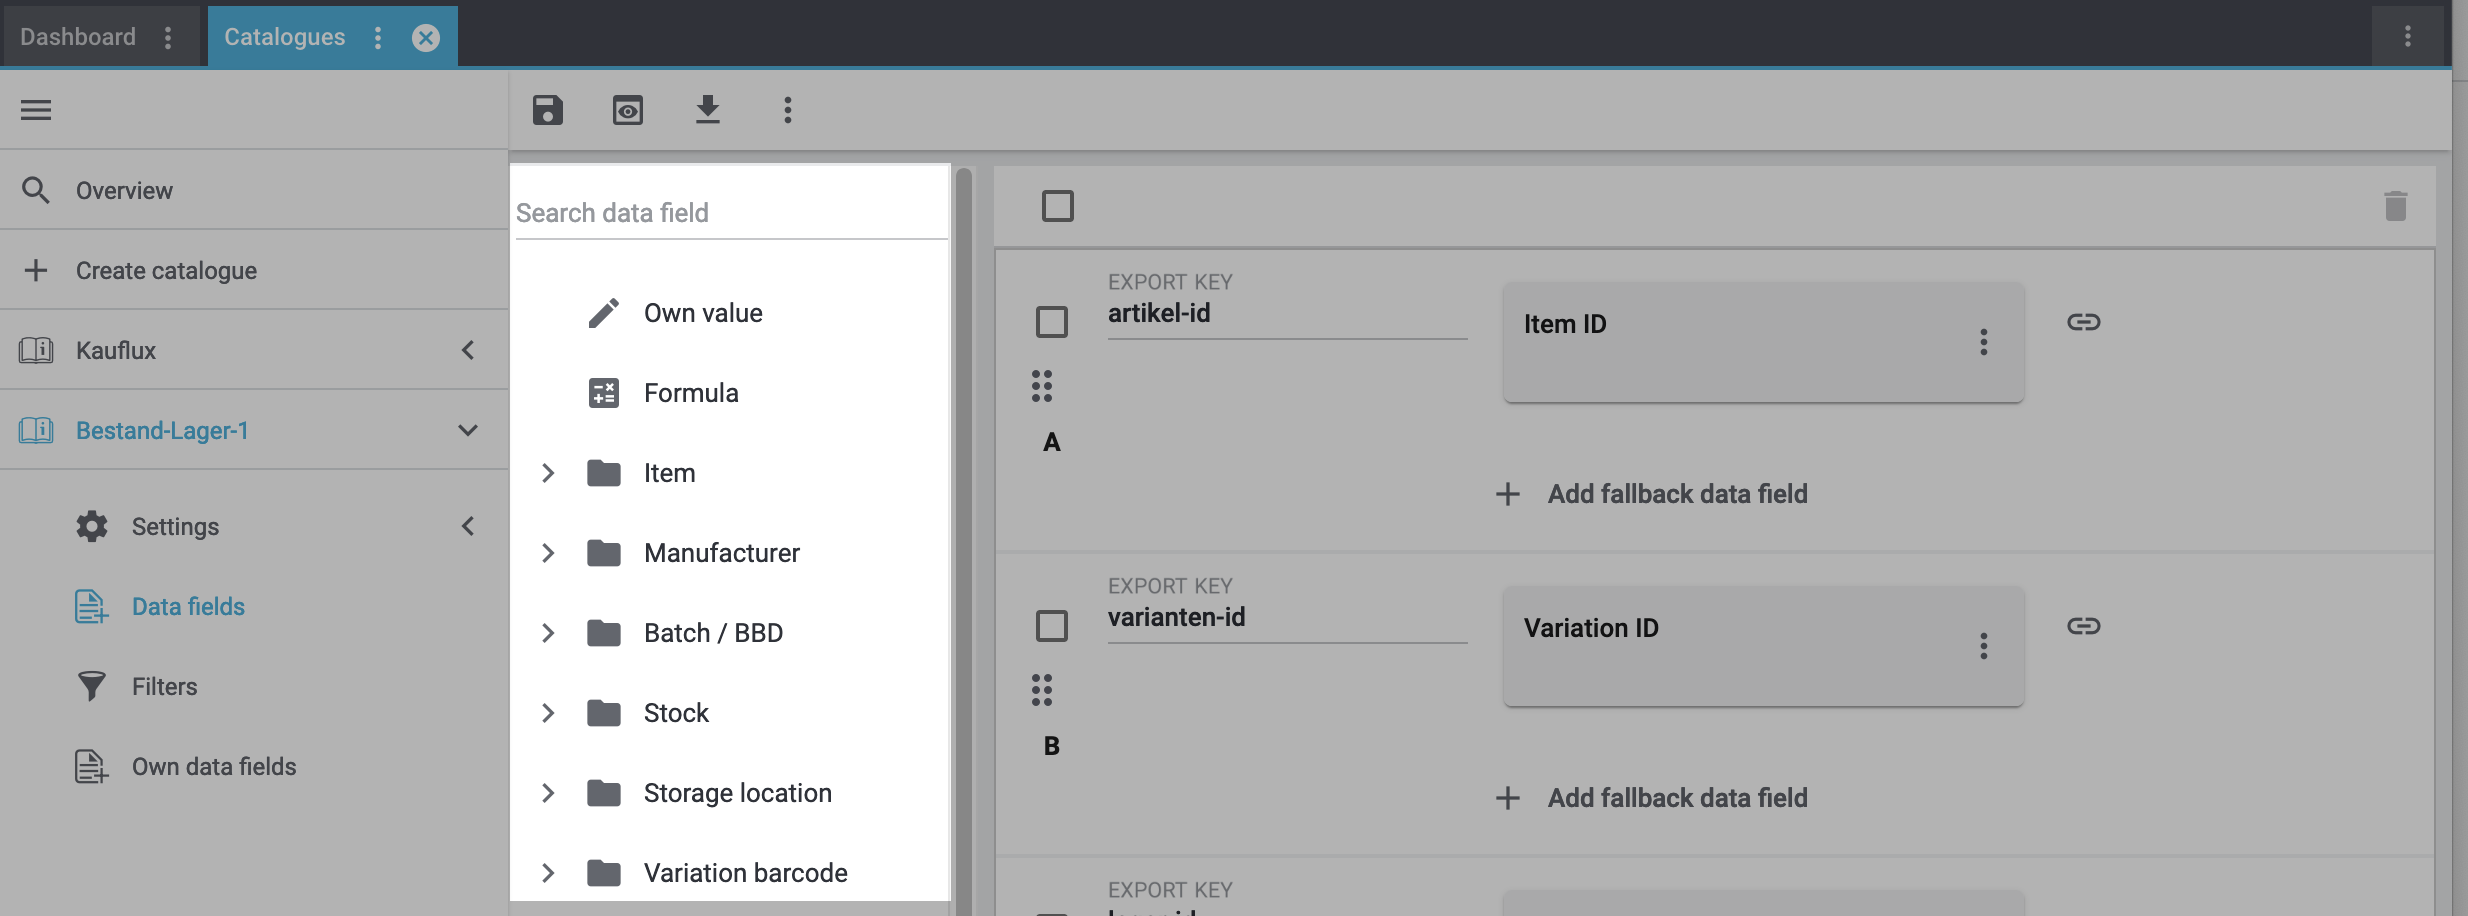
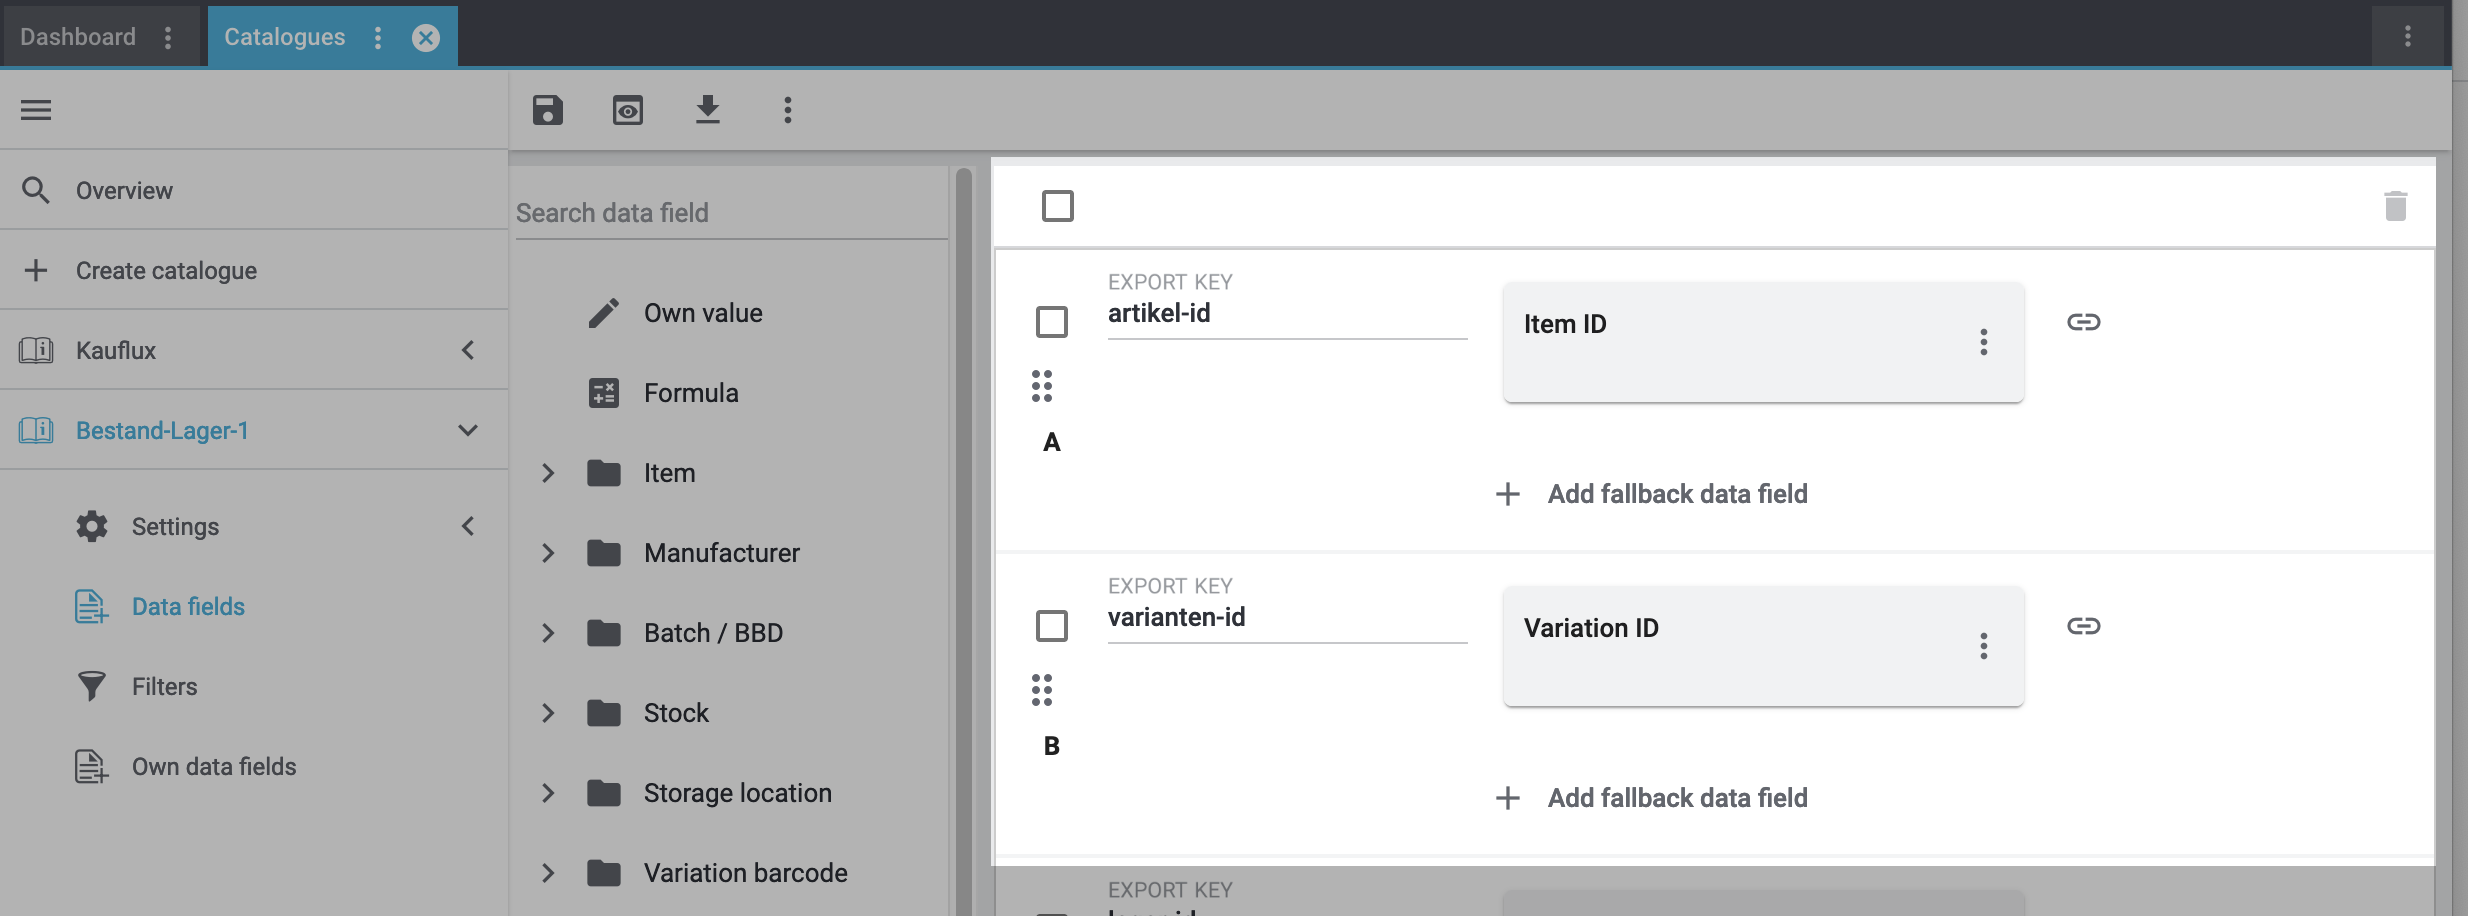
1.4. Data fields added to export
To the right, the data fields that you can add to the export are shown. So these data fields will be exported to your file. Before you select a data field, you can see the message “No data fields were selected”. In the screenshot, a few the fields are already selected.
Tips:
-
You can move the data fields using drag-and-drop. This will change the order in which the data fields are exported.
-
You can change the export key. The “Export Keys” are the names of the column headers, as they will appear in your export file. Every “Export Key” needs to be unique.
-
You can add fallback data fields. If the data field is empty or invalid, the first fallback data field is checked and the value of that fallback data field is exported instead.
2. Creating catalogues
You’ve gained a first understanding of the catalogues. Now let’s get started: It’s time to create your first catalogue!
Creating a catalogue:
-
Go to Data » Catalogues.
→ The catalogue overview opens. -
Click on Create catalogue (add).
→ A new view opens. -
Carry out the settings. Pay attention to the explanations given in Table 1.
-
Save (save) the settings.
→ The catalogue is created.
→ The tab Settings (settings) opens.
| Setting | Explanation |
|---|---|
Name |
Enter a name for the catalogue. |
Export type |
Select the option Standard format. |
Format type |
Select a format type from the drop-down list. Use the format type to specify which type of data is exported. |
Format |
Select a format from the drop-down list. |
3. Setting up catalogue export
Now, customise the catalogue to your individual needs. This is how the information in this chapter is structured:
3.1. Carrying out the format settings
The format settings are used to specify the file format in which the data is exported and how the export file is formatted.
Configuring the settings:
-
Go to Data » Catalogues.
→ The catalogue overview opens. -
Click on the catalogue.
→ The catalogue opens. -
In the navigation on the left, click on the tab Settings (settings).
→ The different settings options are shown. -
Navigate to the section Format settings.
-
Carry out the settings. Pay attention to the explanations given in Table 2.
-
Save (save) the settings.
| Setting | Explanation | ||||||||||||||||||||||||||||||||||||||||||||
|---|---|---|---|---|---|---|---|---|---|---|---|---|---|---|---|---|---|---|---|---|---|---|---|---|---|---|---|---|---|---|---|---|---|---|---|---|---|---|---|---|---|---|---|---|---|
File name |
Enter a file name. The exported file is saved with this name. Tip: Use placeholders: Placeholders automatically add additional information to the file name during export. List of available placeholders
The following placeholders are available:
Examples for using placeholders:
|
||||||||||||||||||||||||||||||||||||||||||||
Format |
Select the file format for the export. Possible values:
|
||||||||||||||||||||||||||||||||||||||||||||
Field separator |
Which field delimiter should separate the individual records from each other? Possible values:
|
||||||||||||||||||||||||||||||||||||||||||||
Text delimiter |
Which text delimiter should separate the individual records from each other? Possible values:
|
||||||||||||||||||||||||||||||||||||||||||||
Encode special characters () |
If you activate this option, unicode characters (e.g. umlauts: ä, ö, ü) will be exported in encrypted form. |
||||||||||||||||||||||||||||||||||||||||||||
Decimal separator |
Select the character that is used for decimal values. Possible values:
|
||||||||||||||||||||||||||||||||||||||||||||
Line break |
How do you want to handle line brakes in the export file? Possible values:
|
||||||||||||||||||||||||||||||||||||||||||||
Header is included |
Activate the option if you want the export file to contain a header line. The export keys are used as headings for the columns. |
3.2. Carrying out the export settings for order items
The export settings for order items are only available for catalogues of the export type Order. The export settings for order items determine whether order items should be skipped in the export file.
Carrying out the export settings for order items:
-
Go to Data » Catalogues.
→ The catalogue overview opens. -
Click on the catalogue for which you want to carry out the export settings.
→ The catalogue opens. -
In the navigation on the left, click on the tab Settings (settings).
→ The different settings options are shown. -
Navigate to the section Export settings for order items.
-
Carry out the settings. Pay attention to the explanations given in Table 3.
-
Save (save) the settings.
| Setting | Explanation | ||||||
|---|---|---|---|---|---|---|---|
Skip order items |
Do you want to skip order items during export?
|
3.3. Carrying out the export settings
The export settings determine where your export file is saved.
Carrying out the export settings:
-
Go to Data » Catalogues.
→ The catalogue overview opens. -
Click on the catalogue for which you want to carry out the export settings.
→ The catalogue opens. -
In the navigation on the left, click on the tab Settings (settings).
→ The different settings options are shown. -
Navigate to the section Export settings.
-
Carry out the settings. Pay attention to the explanations given in Table 4.
-
Save (save) the settings.
| Setting | Explanation | ||||||||
|---|---|---|---|---|---|---|---|---|---|
Limit |
Do you want to limit the number of records that is exported? |
||||||||
Provisioning |
Where do you want to save the export?
|
||||||||
Server |
Enter the server where you want to save the export. |
||||||||
Port |
Enter a port or use the default setting. Recommended port settings:
|
||||||||
User name |
Enter the user name for the server. |
||||||||
Password |
Enter the password for the server. |
||||||||
Path |
Where should the export be saved? Enter the path to a storage location. |
||||||||
Test connection |
Tests the server settings that you entered:
Tip: A test file is saved at the storage location. This test file is called |
||||||||
Transfer |
When do you want to start the export?
|
||||||||
Schedule: times |
Click into the field. In the drop-down list shown, select one or more points in time. The export starts at these times. |
||||||||
Weekdays |
By default, all weekdays are selected. To deactivate exports for specific days of the week:
Tip: The setting Weekdays is only shown if you select an interval or schedule for the setting Transfer. |
3.4. Setting up the download
In the Download settings of the catalogue you can generate a URL. This URL gives you direct access to the export file.
-
The admin link only allows you to access the exported file if you are currently logged into your PlentyONE System as an admin.
-
You can protect public links from inappropriate access by adding a version and/or token.
| The catalogue must be active to create an export file. The export file can only be accessed after the first export. |
Setting up the download:
-
Go to Data » Catalogues.
→ The catalogue overview opens. -
Select the catalogue.
→ The catalogue opens. -
In the navigation on the left, click on Settings (settings).
-
Navigate to the area Download settings.
-
Carry out the settings. Pay attention to the explanations given in Table 5.
-
Save the settings.
→ The URL for downloading the file is shown. The export can be accessed using this URL after the first export is completed.
→ The menu always shows the URL of the last exported file. -
Click on the URL or copy the URL (content_copy) to use it.
| Setting | Explanation | ||||
|---|---|---|---|---|---|
Shop URL |
Select a client. The domain name of this client is used for the URL. |
||||
Receive notifications |
Activate to get a notification at the top right of the system once the export is completed. 
|
||||
Options for admin link |
|||||
Use version |
Select whether a version should be used.
|
||||
Options for admin link |
|||||
Admin link |
An admin link is automatically created for each file. This admin link only allows you to access the exported file if you are currently logged into your PlentyONE System as an admin. Tip: Click on the icon to the right (content_copy) to copy the URL to your clipboard. |
||||
Options for public link |
|||||
Activate options |
Tip: In the row Public link, click on the icon to the very right (content_copy) to copy the URL to your clipboard. |
||||
Use version |
Select whether a version should be used.
|
||||
Use token |
|
||||
Security token |
Click on the symbol on the right () to generate a new token. Tip: The token is added to the URL of the public link. So when you copy the URL, you copy the token at the same time. When you generate a new token, the URL also changes. |
||||
Public link |
Shows the public link. After the first export, the file can be accessed by anyone who knows this link. Tip: In the row Public link, click on the icon to the very right (content_copy) to copy the URL to your clipboard. |
||||
4. Selecting data for export
Now decide what PlentyONE data you want to export with this catalogue.
This is how the information in this chapter is structured:
4.1. Adding data fields to export
Now it’s time to decide which PlentyONE data field data fields you want to export from PlentyONE with this catalogue. To do so, add the data fields to the export as described below.
You can also use more complex export features:
Adding data field to the export:
-
Go to Data » Catalogues.
→ The catalogue overview opens. -
Click on the catalogue.
→ The view Data fields () of the catalogue opens.
→ The available PlentyONE data fields are listed in groups. In addition, the options Own value and calculate Formula are shown. -
Expand a data field group to see the list of data fields in that group.
-
Click on the plus icon next to the data field that you want to export.
Tip: Alternatively, enter the name of the data field into the search field. Select the data field from the search results.
→ The data field is added to the export. -
Check if the export key suits your needs.
What is an export key and how should it be structured?
The Export Key is the name of the column header that will be shown in your export file.-
Each export key can only be used once in this catalogue.
Important: If several data fields have the same export key, only one data field is exported. -
Export keys cannot contain any spaces.
-
If the export key contains a dot, the data is exported in a tree structure. In most cases, this means that the data is not exported as expected. As such, we recommend that you do not use dots in export key names.
-
-
Add all data fields that you want to export.
-
Save (save) the settings.
→ The data fields are exported with this catalogue.
Tip: You can also use more complex export features. Curious? Then expand the info boxes underneath this description.
Fallback data fields are used like this:
-
I want the first PlentyONE data field to be exported.
-
If this data field is empty or invalid for a record, the first fallback data field is checked and the value of that fallback data field is exported instead.
-
If the first fallback data field is also empty or invalid, the second fallback data field is checked and the value of that fallback data field is exported instead and so on.
Adding fallback data fields:
-
Initial situation:
→ You added a data field to the export. For this data field, you want to specify an alternative in case the data field is empty or invalid for one or more records.-
Below the data fields, click on + Add fallback data field.
→ The editing mode opens. -
On the right, click on a group to expand the associated PlentyONE data fields.
→ The PlentyONE data fields are shown. -
Click on the plus to the right of the PlentyONE data field you want to select.
→ The PlentyONE data field is added as a fallback data field to the field on the right.
→ The fallback data field is exported when the first data field does not exist or is empty.
-
Note the following logic for fallback data fields:
-
Even if you assign one or more fallback data fields, the value of only one field is exported.
-
For each record, the PlentyONE data fields are checked in the order in which you mapped them. This means that if the first data field does not provide a value, the first fallback data field is exported etc.
-
Tip: You can also add Own value as a fallback data field.
The following GIF shows the standard format Manufacturer. The data field Manufacturer > External name is to be exported. However, if no external name is saved for one or more manufacturers, you want to export the Internal name instead.

The data field Own value is used like this:
-
For a column of your export file, the same value is exported for all records of the catalogue.
Exporting an own value:
-
In the list of the data fields, click on Own value.
→ The data field for an own value is added to the export. -
Check the export key. Own values are automatically assigned the export key own-value. As such, make sure that you adjust the export key, especially when you want to export more than one own value.
Important: If several data fields have the same export key, only one data field is exported. -
Enter a value into the input field Value.
→ This value is exported for all records.
The following GIF shows the standard format Stocks.
-
You want the export file to include a column with your company name.

Result in the export file:
-
Every exported record has a cell that contains your company name:

When you combine data fields, the following logic is applied:
-
The data fields are to be combined during the export.
-
The values of the data fields are added to the same column of the export file.
-
The character between the values is specified with the option Separator.
Combining data fields:
-
Initial situation:
You already added a data field to the export. You want to combine this data field with another data field.-
Next to the marketplace data field, click on + Add data field ().
→ The editing mode opens. -
Click on the plus to the right of the data field you want to select.
→ The data field is added to the right of the first data field. -
Click on Confirm.
-
To the right of the column, click on Settings ().
-
Select a separator from the drop-down list Separator or specify a custom separator.
-
Click on Save.
-
Save () the catalogue.
→ The settings are saved.
The content of these data fields is combined in the same column.
-
The following GIF shows the standard format Manufacturer.
-
Instead of exporting the data fields Street and House number in two separate columns, these data fields are combined into one column.
-
Select a space as the separator.

Result in the export file:

Mathematical calculations allow you to change numerical values automatically during the export.
-
The preview function is not available for all catalogue formats.
-
This function only works for data fields that contain numerical values.
Recalculating numerical values:
-
Go to Data » Catalogues.
→ The catalogue overview opens. -
Open the catalogue.
→ The tab Data fields opens. -
In the list of data fields, click on the plus next to Formula (calculate).
→ The field Formula is added to the view on the right. -
Click on the field Formula.
→ The Modify value window opens. -
Select a decimal separator from the drop-down list.
-
At the bottom right of the window, select a data field to add it to the calculation (add).
Tip: Use the search function. This helps you to find data fields quickly.
→ The data field is added to the calculation. -
Optional: If the symbol more_vert is shown in the data field, select the correct assignment for the data field.
Tip: A number tells you how many assignments are necessary for the data field.-
Click on the icon more_vert.
-
In the window shown, select the assignments from the drop-down list.
-
Save the settings.
-
-
Enter numbers and mathematical operators with the on-screen calculator or the keyboard.
-
Save the settings.
→ The entered formula is displayed in the overview.
Tip: If a preview is available for the format, check the result by using the preview function (preview).
→ The calculation will be carried out in the next export.
In the export file, the data fields are sorted in the same order as in the catalogue list. As such, the first column of a CSV file contains the data of the data field that is at the very top of the catalogue and so on.
To change the order of data in the export file, you can either move individual data fields or whole rows:
-
To move a single data field:
-
Point your mouse at the data field and drag and drop it to the new position.
-
-
To move a whole column:
-
Click on the symbol (drag_indicator) on the left side and drag and drop the row to the new position.
-
4.2. Removing data fields from export
In the Mapping tab of a catalogue with a standard format you can remove individual or several data fields at once.
Removing data fields from export:
-
Go to Data » Catalogues.
→ The catalogue overview opens. -
Open a catalogue with standard format.
→ The tab Data fields () with all available data fields opens. -
Click on the further actions (more_vert) on the right of the data field that you want to remove.
-
Click on Delete data field (delete).
→ The data field is removed.
Or: If you want to remove a complete row, click on Delete data row (delete) on the right.
→ The complete row is removed.
Or: Tick the box on the left for all rows containing data fields that you want to remove. Then, click on Delete selected data fields (delete) at the top right.
→ All selected data fields are removed.
4.3. Filtering export data
You can use filters to limit the data that should be exported.
Adding a filter:
-
Go to Data » Catalogues.
→ The catalogue overview opens. -
Open the catalogue.
-
In the navigation on the left, click on Filters (filter_alt).
→ The filter overview opens. -
Select a filter from the drop-down list.
Tip: Different filters are available for different standard formats. You can find descriptions of the individual filters here: -
On the right, click on Add filter (add).
→ The filter is added. -
If an operator is available for this filter:
-
Select an operator from the drop-down list.
-
Enter a value into field next to it.
-
-
Save (save) the settings.
→ The filter is saved. -
Add additional filters as necessary.
→ Only data that meets the filter criteria is exported.
5. Exporting catalogue data
There are several ways to export the catalogue data:
5.1. Creating an export preview
After you have selected data fields for export, you can test the catalogue export using the preview function. This preview function allows you to download the first 5 data rows of the export.
-
A preview function is not available for all catalogue formats.
Creating a preview in the catalogue:
-
Go to Data » Catalogues.
→ The catalogue overview opens. -
Open the catalogue.
-
In the toolbar at the top, click on Preview (preview).
→ A preview of the first 5 data rows of the export is shown in the Preview window. -
Check the data. Does the export work as expected?
-
Optional: Click on Download data (file_download).
→ You can save a file with the first 5 data rows on your computer.
You can also create a preview from the list of catalogues.
Creating a preview from the catalogue list:
-
Go to Data » Catalogues.
→ The catalogue overview opens. -
Navigate to the catalogue.
-
Open the further actions () of the catalogue.
-
Click on Preview (preview).
→ A preview of the first 5 data rows of the export is shown in the Preview window. -
Check the data. Does the export work as expected?
-
Optional: Click on Download data (file_download).
→ You can save a file with the first 5 data rows on your computer.
5.2. Activating automatic catalogue export
You have added all data fields that you want to export? Then activate the export now.
-
Make sure that you have carried out all necessary export settings. Otherwise, no data is exported.
Activating automatic catalogue export:
-
Go to Data » Catalogues.
→ The catalogues are listed. -
Scroll to the catalogue.
-
In the column Active, move the toggle button () to the right.
→ The catalogue is active.
→ The data is exported to the storage location and at the intervals you selected in the catalogue settings.
5.3. Starting a manual export
Have you added at least one data field to the export? Then start a manual export of the export. The format in which the data is exported depends on the format settings of the catalogue. You can export data in CSV, TXT, JSON and XML files.
Have you added at least one data field to the export? Then download the catalogue data manually. The format of the download file depends on the format settings of the catalogue. You can export data in CSV, TXT, JSON and XML files.
There are two ways to manually export the catalogue data:
Asynchronous download |
The export runs in the background. Once the download is completed, you download the export file from the Notifications (notifications). |
Live download |
The file is downloaded to your computer automatically. You can follow the export progress in real time.
|
For asynchronous downloads, the export runs in the background. So note that there will be no window for downloading the file straight away. Even exporting small amounts of data will take around 30 minutes. When the export is completed, you can download the export file from the Notifications (notifications).
Starting an asynchronous download:
-
Go to Data » Catalogues.
→ The catalogue overview opens. -
Open the catalogue.
-
In the toolbar at the top, click on Download data (file_download).
Or: Even quicker: Start the download from the Additional actions (more_vert) in the catalogue overview.
→ The export starts.
Important: The export runs in the background. Note that there will be no window for downloading the file straight away. Even exporting small amounts of data will take around 30 minutes.
Once the export is finished, you will be notified (notifications_none) that the export file can be downloaded. -
In the notification centre, click on link Download.
Tip: The notification is no longer shown? Use the URL shown in the Download settings to access the file at any time. -
Save the file on your computer.
The live download creates the file and automatically downloads it to your computer. In the tab Data export, you can follow the download progress in real time. However:
-
When you start the live download, a new browser tab opens. In this browser tab, the PlentyONE tab Data export is shown. Do not close or reload the browser tab and the PlentyONE tab Data export while the export is in progress. If you do, the export stops and is cancelled.
-
You can start live downloads for several catalogues at the same time. However, you can only start a new live download for the same catalogue once the current export is complete.
-
The import can run into a timeout if you try to import large amounts of data. If that happens, the download is cancelled. For lots of data or if a timeout occurs, use the asynchronous download instead.
Starting a live download:
-
Go to Data » Catalogues.
→ The catalogue overview opens. -
Open the catalogue.
-
In the toolbar at the top, click on Live download (play_circle_outline).
Or: Even quicker: Start the download from the Additional actions (more_vert) in the catalogue overview.
→ A new browser tab opens. PlentyONE and the tab Data export are shown.
No new tab? Then you are probably using a pop-up blocker. Allow pop-ups for your system to continue.
→ The export starts.
Important: Do not close or reload the browser tab or the PlentyONE tab Data export while the export is in progress. If you do, the export stops and is cancelled.
→ The progress is shown in real time.
→ The file is automatically saved on your computer when the export is done.
|
Stopping a live download
Do you want to stop a live download? No problem:
|
6. FAQ: Questions and answers
-
You want to export data from PlentyONE to a CSV, JSON, TXT or XML file?
-
You need a catalogue with standard format.
-
-
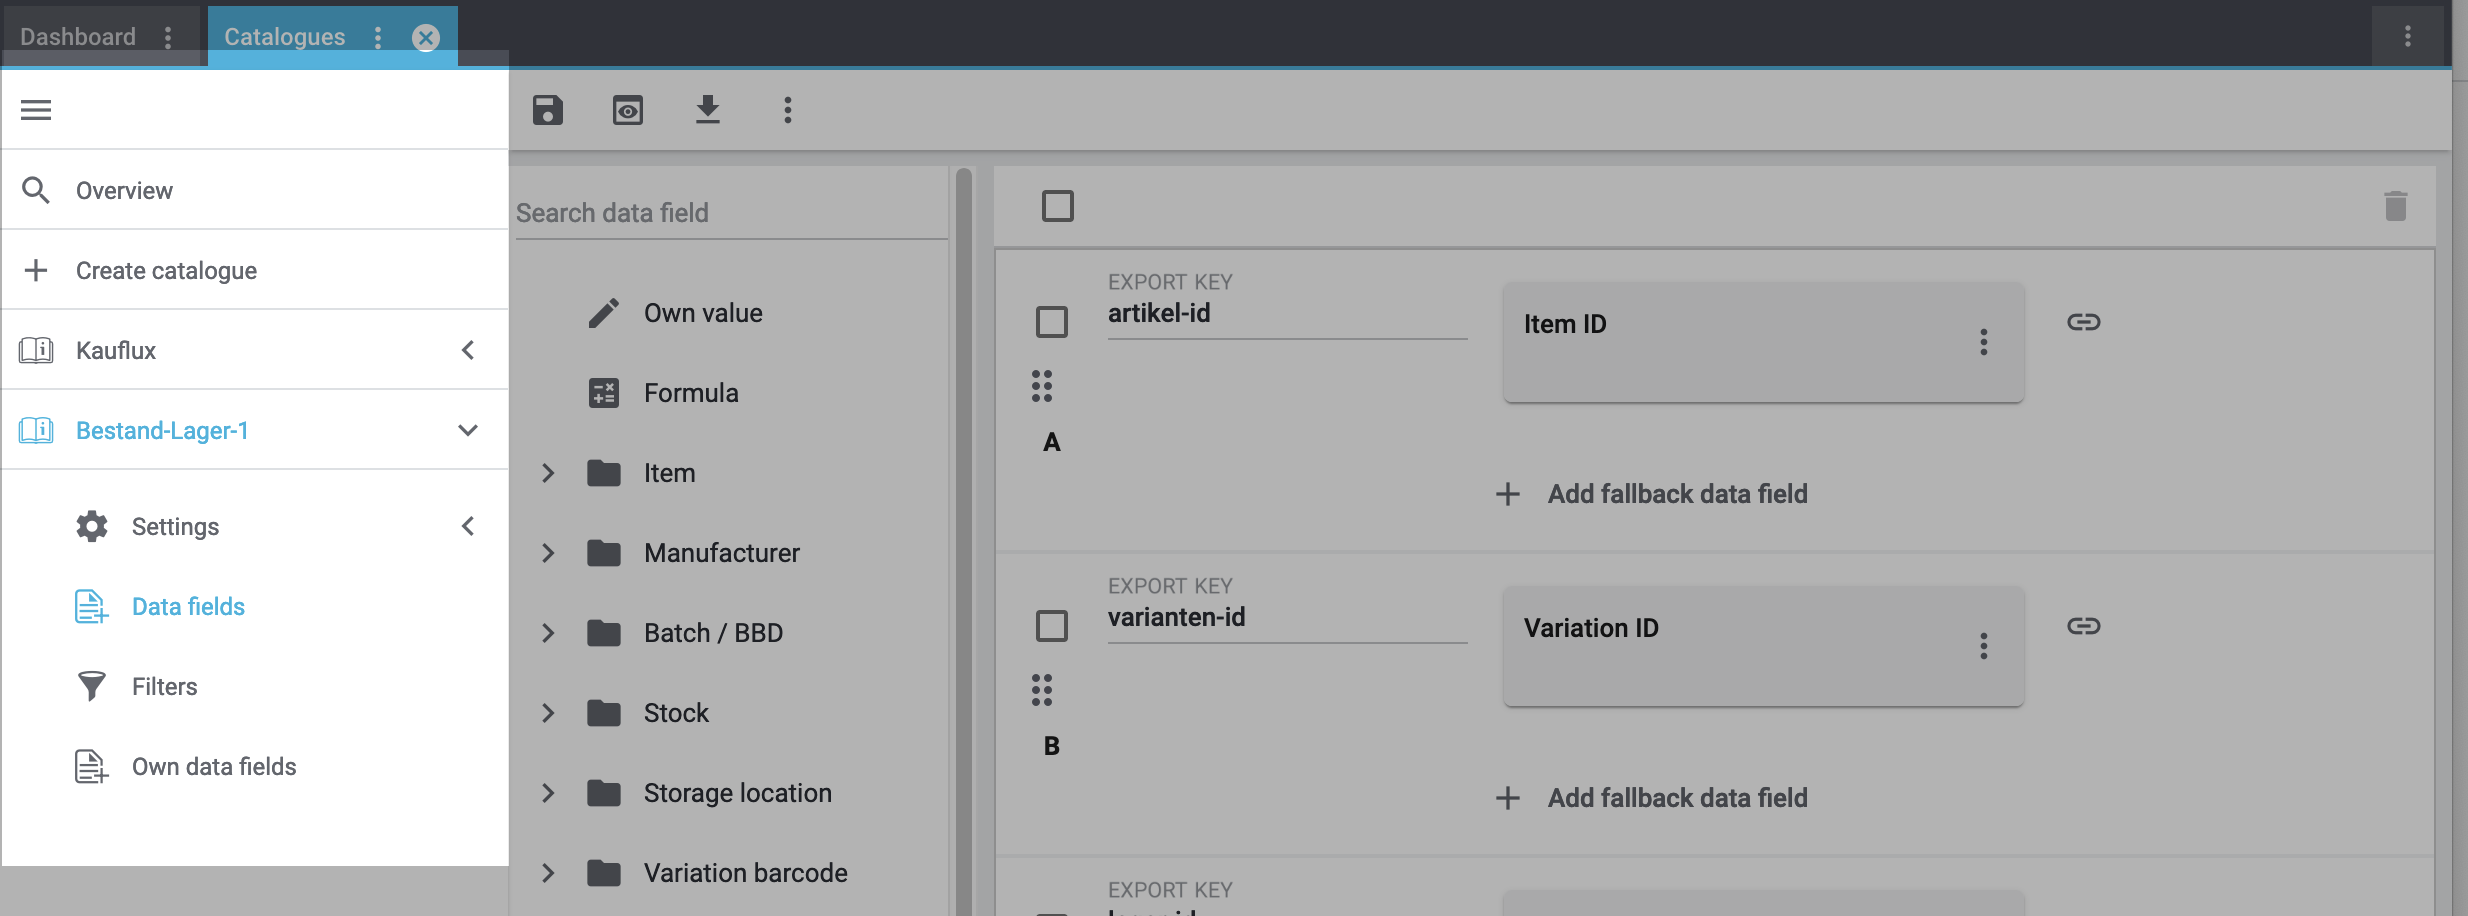
You want to export item data to markets?
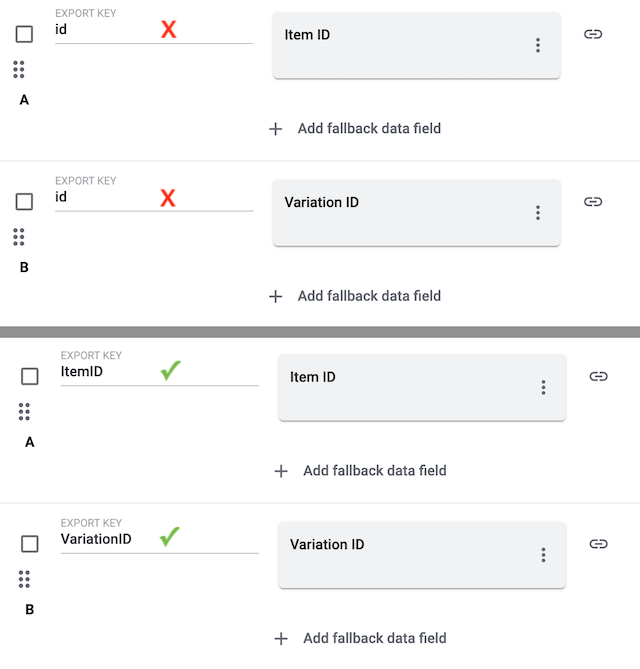
The “Export Keys” are the names of the column headers, as they will appear in your export file. Every “Export Key” needs to be unique.
-
Negative example: You use the data sources Item ID and Variation ID. You give both “Export Keys” the name “id”. As a result, the export file only includes one of the two IDs. A column is missing in the export file.
-
Positive example: You use the data sources Item ID and Variation ID. You give one “Export Key” the name “VariationID” and the other “ItemID”.
The Export Key is the name of the column header that will be shown in your export file.
-
Each export key can only be used once in each catalogue.
Important: If several data fields have the same export key, only one data field is exported. -
Export keys cannot contain any spaces.
-
If the export key contains a dot, the data is exported in a tree structure. In most cases, this means that the data is not exported as expected. As such, we recommend that you do not use dots in export key names.
You might have data sources with the same “Export Key”. Every “Export Key” needs to be unique.
-
Negative example: You use the data sources Item ID and Variation ID. You give both “Export Keys” the name “id”. As a result, the export file only includes one of the two IDs. A column is missing in the export file.
-
Positive example: You use the data sources Item ID and Variation ID. You give one “Export Key” the name “VariationID” and the other “ItemID”.
If you export a file in CSV or TXT format, then you might only see the word "Array" instead of the actual export values. This happens e.g. when exporting multiple images or when exporting multi-selection properties. This is a known issue and it will be fixed in the future.
Possible workaround 1: Would it be an option for you to download a JSON or XML file instead? With these file types, you can see the actual export values.
-
Click on Settings.
-
Scroll down to the section Format settings.
-
Select CSV - Array to JSON, JSON or XML from the drop-down list Format.
-
Save () the settings and download the file (file_download).
-
Caution: If you want to revise the file and import it again. Note that the import tool only accepts the file types CSV and TXT.
-
Possible workaround 2: Export the data with the tools FormatDesigner and Elastic Export instead.
Yes. Export the file in CSV or TXT format. Then revise the file and import it again. Note that the import tool only accepts the file types CSV and TXT.
-
Is the catalogue active?
-
Has an export taken place? Check the export settings.
-
Did you use the right URL?
You used the admin URL. However, you are not logged into your PlentyONE system as an admin user.
-
Log in as an admin user.
-
Generate a public URL. The file can always be accessed with this URL.
Users with back end access rights can only see catalogues if an admin gave them access.
-
Find someone who has administrator rights for the PlentyONE system.
-
This person will open the menu Setup » Settings » User » Rights » User.
-
Then they will open your user account and activate the necessary rights:
-
Data > Data exchange > Export > Catalogue > Show
-
-
Save () the settings.
-
If the problem persists, ask our support team for help in the forum.