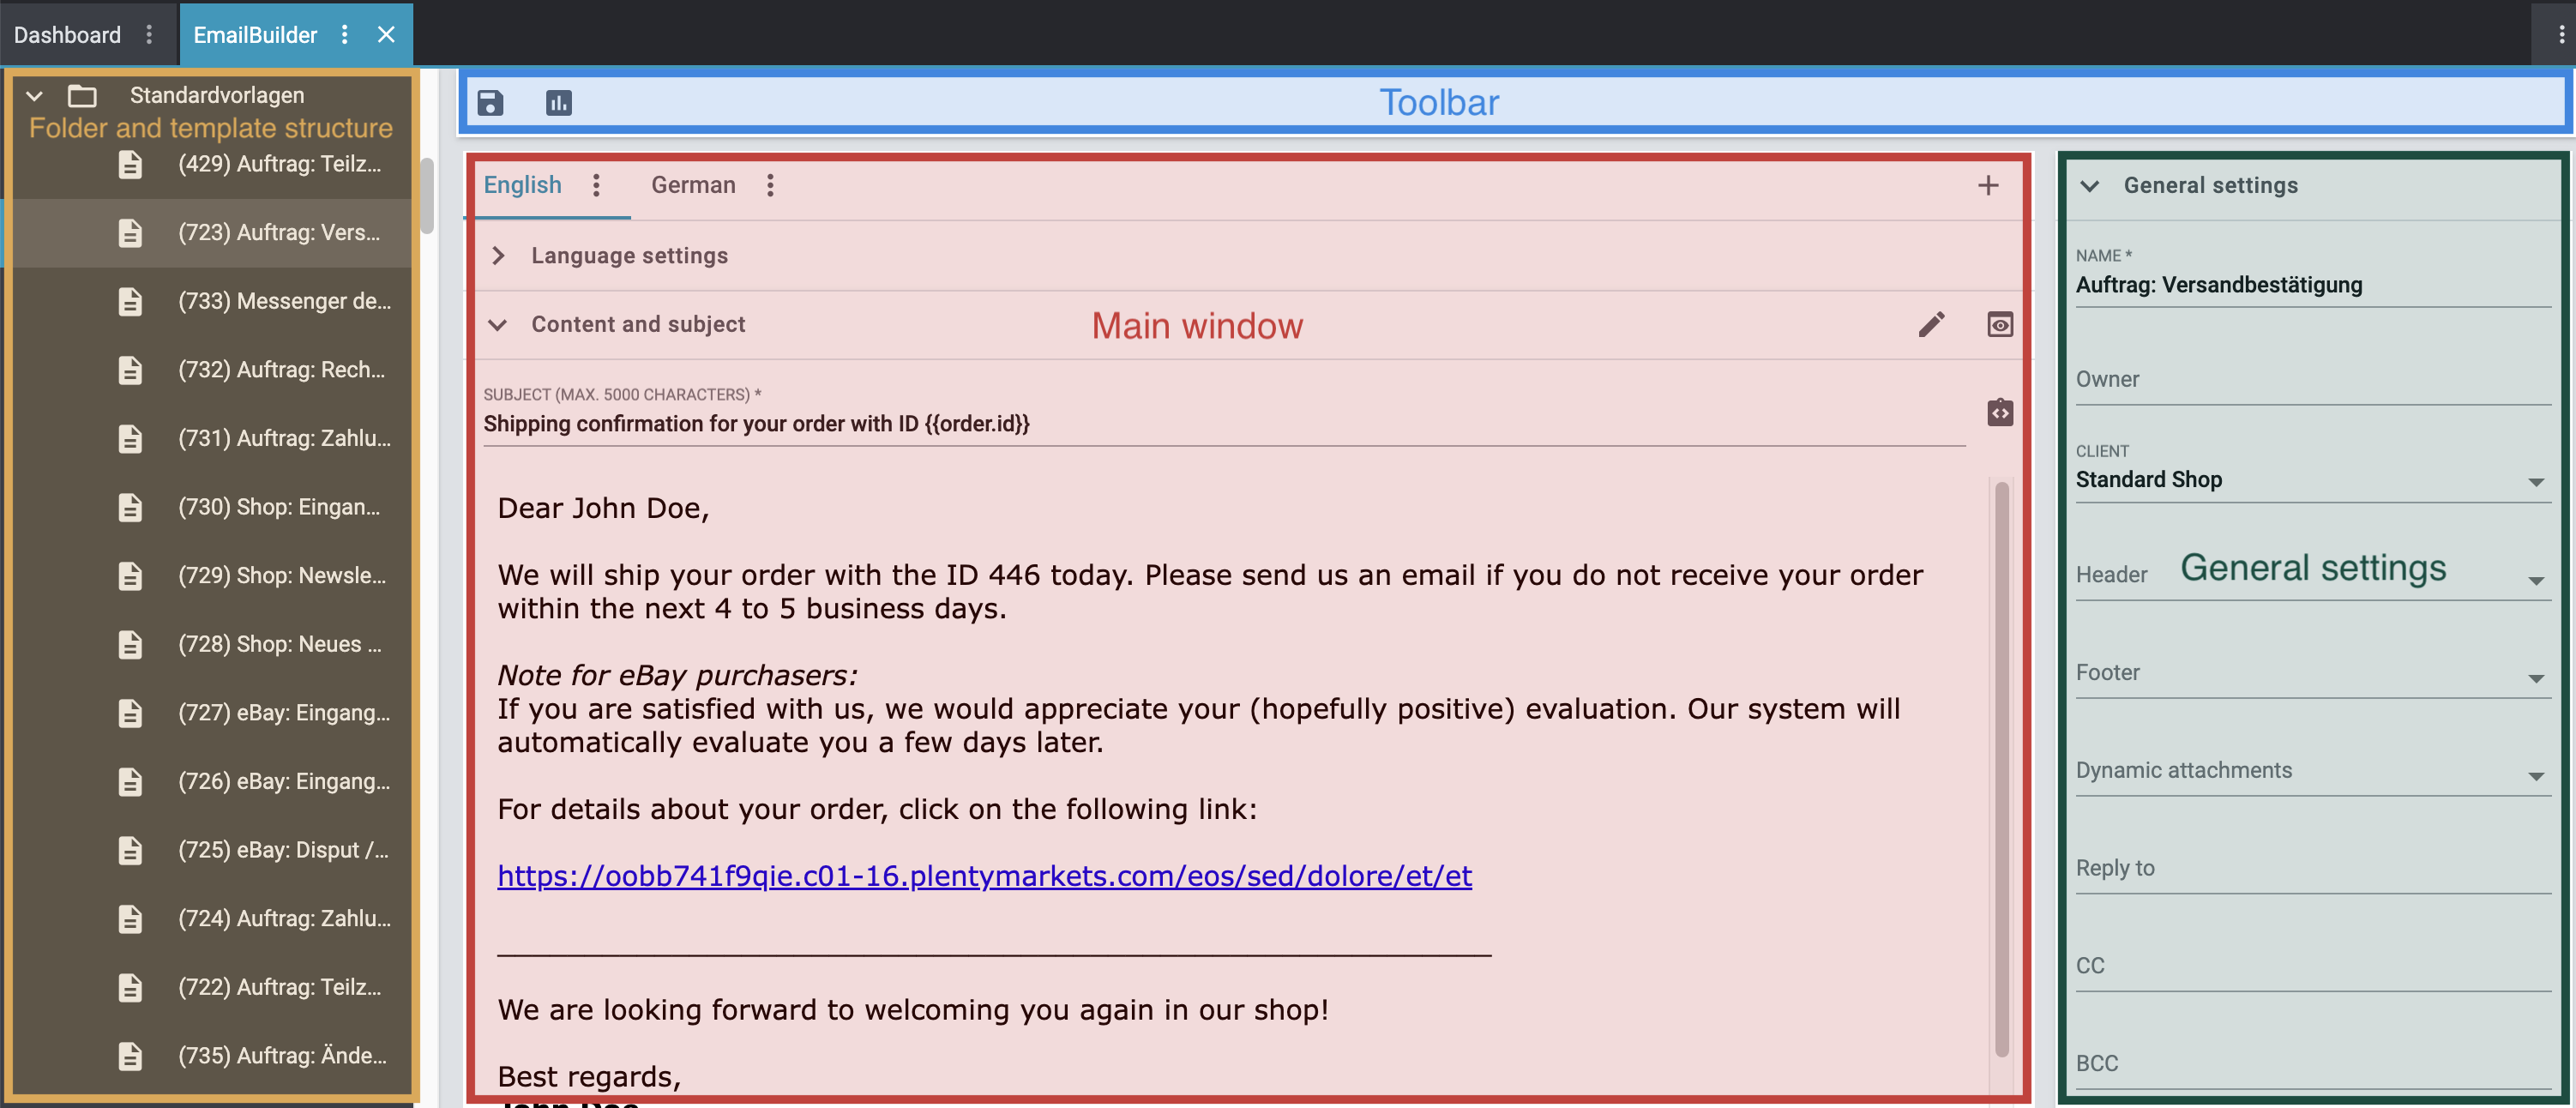
Working with the EmailBuilder
Learn on this user manual page how to work optimally with the EmailBuilder. For example, you will learn how to manage folders and templates, create text blocks and regular templates, insert widgets in your templates and use default templates. Also you can see in which areas of your systems the EmailBuilder template has been used.
The CRM » EmailBuilder menu is structured as follows:
-
Folder and template structure: Here you can navigate through the different folders and templates that you created in the EmailBuilder. The Default templates folder is available in your system by default. You can of course adjust the pre-filled template content. The currently selected template (blue background) is displayed in the main window on the right.
-
Search field: Enter the ID or the name of the template into the search field.
-
Filter area: In addition to the ID and the template name, you can also search by type, language, client and owner here. Enter a combination of all or multiple values and options to narrow down the search results even further.
-
Sort by: Under the search field, you can sort the folders and templates by ID, name or creation date in ascending or descending order.
-
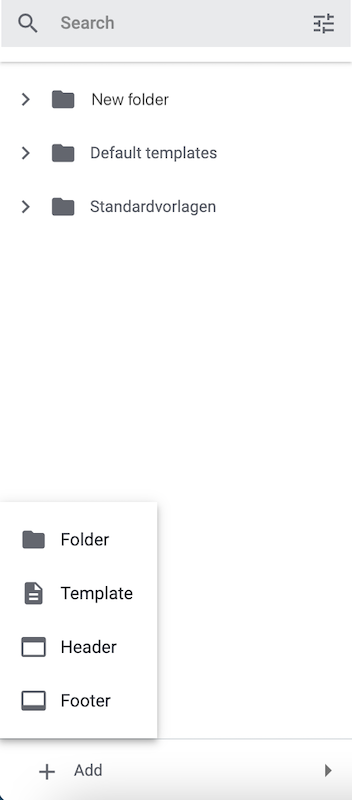
add Add: You can create a new folder, new template, new header, new footer or new text block here.
-
-
Main window: Here you can see whichever template is currently open. Directly in the first line, you can see the tabs in the template’s corresponding languages.
-
Language settings: In this area, you carry out the language-specific settings of the template. For example, you can link product data sheets or user manuals in the corresponding language with the template and determine the time, date and number formats and the number of decimal places for each language individually.
-
Content and subject: Here you can customise the template’s content and subject. Use variables that will be replaced with the correct content once the email is sent to your customers.
You cannot use variables in the subject, but the so-called twig expressions associated with the variable. Click on integration_instructions (Show variables) at the end of the subject line to open the variable list. When you click on the desired variable, the corresponding twig expression including the double curly brackets will be inserted in the subject line.
-
-
General settings: Here you can select the template name, owner, client as well as header and footer. In this area, you can also select up to 4 dynamic attachments and fill the fields Reply to, CC and BCC.
-
Toolbar: Here you can save the changes of the opened template and see in which areas of your system the template has been used.
1. Managing folders
In the EmailBuilder, you can create as many folders as you like and upt to 3 sub-folders. After you created the folder, click on more_vert to create new sub-folders, new templates in general and new header and footer templates and rename, move or delete the folders.
Your system contains a folder with pre-defined default templates. These are explained further down on this page in the Using default templates chapter.
1.1. Creating a folder
Create folders to get a better overview of your email templates at a later point in time. Proceed as described below to create a new folder.
Creating a folder:
-
Go to CRM » EmailBuilder.
-
In the bottom left, click on add Add.
-
Click on folder Folder.
→ The Add new folder window opens. -
Enter the name for the folder.
-
Click on Save.
→ The new folder is added to the folder list.
| Once you have carried out all settings as described in the following – so you have created sub-folders, templates, headers and footers –, you can open the main folder by clicking on chevron_right Name of the folder. You will see there at a glance all sub-folders, templates, headers and footers that you created directly in the main folder. |
1.2. Renaming the folder
You can update the folder name at any time. To do so, proceed as described below.
Renaming the folder:
-
Go to CRM » EmailBuilder.
-
In the line of the folder that you want to rename, click on more_vert and then on edit Rename.
→ The Rename folder window opens. -
Enter an other name for the folder.
-
Click on Save.
→ The new folder name is updated and shown in the list.
1.3. Moving a folder
You can move the folder to another position at any time. To do so, proceed as described below.
Moving a folder:
-
Go to CRM » EmailBuilder.
-
In the line of the folder that you want to move, click on more_vert and then on open_with Move.
→ The Move window opens. -
Select the target folder.
-
Click on open_with Move.
→ The folder is moved to the selected folder.
1.4. Creating a sub-folder
Create sub-folders in your folders to group your email templates in even more detailed topics. You can create up to 3 sub-folders within a folder.
|
Create a draft for your folder structure in advance
We recommend creating a draft in advance to avoid confusing and unclear nesting levels in your folder structure. Because: The more levels you create, the more complex the structure will be. |
Creating a sub-folder:
-
Go to CRM » EmailBuilder.
-
In the line of the folder that you want to create a sub-folder for, click on more_vert and then on add Add.
-
Click on folder Folder.
→ The Create new folder window opens. -
Enter the name for the sub-folder.
-
Click on Save.
→ The sub-folder is created within the main folder.
Open the sub-folder by opening the main folder with a click on chevron_right. You can see all sub-folders that you created at a glance.
1.5. Deleting a folder
You can delete folders and sub-folders at any time. Note that the entire content in the folder will also be deleted.
Deleting a folder:
-
Go to CRM » EmailBuilder.
-
In the line of the folder or sub-folder that you want to delete, click on more_vert and then on delete Delete.
→ A window opens and you need to confirm your decision. -
Click on delete Delete.
→ The folder with all corresponding sub-folders and templates contained in there will be deleted.
2. Managing templates
Learn in the following sub-chapters how to create templates for headers and footers and general templates. Moreover, it is described how you search for, move, copy, edit and delete templates.
You can also use pre-defined default templates. You will also learn everything about the available widgets and how you can use these widgets in your templates.
| Once you created a template, the template ID is shown in brackets in front of the template name. The systems assigns the IDs consecutively and automatically. This ID cannot be changed. |
The widgets and variables that are contained in the template form the actual content of your email. Via the widgets, you can insert as many variables as you like into a template by using drag-and-drop. These variables will then be replaced with the correct content when the email is sent to your customers.
You can find a detailed list of which variables are available for your email templates in the tables on manual page Using variables and twig expressions.
2.1. Creating templates for header and footer
Create templates for the header and the footer that you can later use in all of your email templates. Header and footer are globally active. This means: Changes you make to the header and footer affect the rest of all existing templates and all other templates that you will create in the future.
You can insert, for example, your company logo into the header and insert into the footer your signature and the general company details such as the address, links to social media, the legal structure of your company, details about your company’s executive board, and much more.
2.1.1. Creating a header template
Proceed as described below to create a template for the header of your email template.
Creating a header template:
-
Go to CRM » EmailBuilder.
-
In the line of the folder or sub-folder that you want to create a header for, click on more_vert and then on add Add play_arrow.
-
Click on web_asset Header.
→ The Add new header window opens. -
Enter a name for the header.
-
Click on Save.
→ The header template is created. -
Click on Add (add) to add a language.
→ A new window opens. -
Select a language from the list.
→ The window New name opens. -
Enter the header template’s subject.
-
Click on Save.
-
In the General settings area, select (check_box) the owner and the client.
-
Click on Edit (edit).
-
Edit the header according to your wishes and insert widgets and variables.
-
Save (save) the settings.
2.1.2. Showing the preview of the header
You can view a preview of your header template at any time. This is possible either in HTML format or as plain text. Enter an order ID to fill the preview with real order data. Proceed as follows to open the preview of the template.
-
Go to CRM » EmailBuilder.
-
Expand the folder (chevron_right) that contains the header for which you want to show the preview.
-
Click on the header.
-
Click on Preview (preview).
→ The Preview window opens. -
Select from the drop-down list Preview format the option HTML or Plain text.
-
In the Order ID field, enter the ID of the order that you want to see a preview of.
-
Click on preview PREVIEW.
→ The preview opens in a separate window.
Note: Your system remembers the value of the order ID you entered until the next login or until the browser cache is cleared. -
Check the header template.
-
Close the window.
If you are not satisfied with the result, edit the content of your header again.
2.1.3. Creating a footer template
Proceed as described below to create a template for the footer of your email template.
Creating a footer template:
-
Go to CRM » EmailBuilder. In the line of the folder or sub-folder that you want to create a footer for, click on more_vert and then on add Add play_arrow.
-
Click on video_label Filter.
→ The Add new footer window opens. -
Enter a name for the footer.
-
Click on Save.
→ The footer template is created. -
Click on Add (add) to add a language.
→ A new window opens. -
Select a language from the list.
→ The window New name opens. -
Enter the footer template’s subject.
-
Click on Save.
-
In the General settings area, select (check_box) the owner and the client.
-
Click on Edit (edit).
-
Edit the footer according to your wishes and insert widgets and variables.
-
Save (save) the settings.
2.1.4. Showing the preview of the footer
You can view a preview of your footer template at any time. This is possible either in HTML format or as plain text. Enter an order ID to fill the preview with real order data. Proceed as follows to open the preview of the template.
-
Go to CRM » EmailBuilder.
-
Expand the folder (chevron_right) that contains the footer for which you want to show the preview.
-
Click on the footer.
-
Click on Preview (preview).
→ The Preview window opens. -
Select from the drop-down list Preview format the option HTML or Plain text.
-
In the Order ID field, enter the ID of the order that you want to see a preview of.
-
Click on preview PREVIEW.
→ The preview opens in a separate window.
Note: Your system remembers the value of the order ID you entered until the next login or until the browser cache is cleared. -
Check the footer template.
-
Close the window.
If you are not satisfied with the result, edit the content of your footer again.
3. Creating a text block
Create a text block that you can later insert into the Messenger message. Text blocks are ready-made text modules that save you a lot of time and effort, particularly if you often answer the same questions or deal with the same problems. You can also enter long texts here and save a lot of time when working with your messages.
Think about a useful structure of folders, sub-folders and questions in advance.
Creating a text block:
-
Go to CRM » EmailBuilder.
-
Search for the folder that you have just created and click on more_vert.
-
Click on add Add and then on text_fields Text block.
→ The Add new text block window opens. -
Enter the name.
-
Click on Save.
→ The text block is created and opened. -
Click on add (Add).
-
Select a language from the list.
-
At the end of the Content line, click on edit.
-
Enter the text block’s content in the editor.
Tip: Use the usual formatting options of the editor, if desired, or click on Source code at the top left to enter HTML code for the text block. -
Click Save (save).
| If you have been using PlentyONE for a long time and have already created text blocks or FAQs in the old menu CRM » Text blocks / FAQ, you will see the folder Text blocks (migrated) in the CRM » EmailBuilder menu. This folder contains all folders, sub-folders and FAQs that you created in the old menu. |
4. Creating a template
Now create the template and save basic settings such as the name, the subject, CC and BCC and select the appropriate header and footer for the template. Proceed as described below to create a new template.
|
Important: Add header and footer in the corresponding language
If you created a template in multiple languages, remember to create also the header and footer in these languages and to link them with the template. Otherwise, the template cannot be sent. |
|
Switching between multiple templates
If you later edit multiple templates in the editor at the same time, you can use the navigation on the left to switch between the individual templates. The template you have just opened is highlighted in blue at the beginning of the line. |
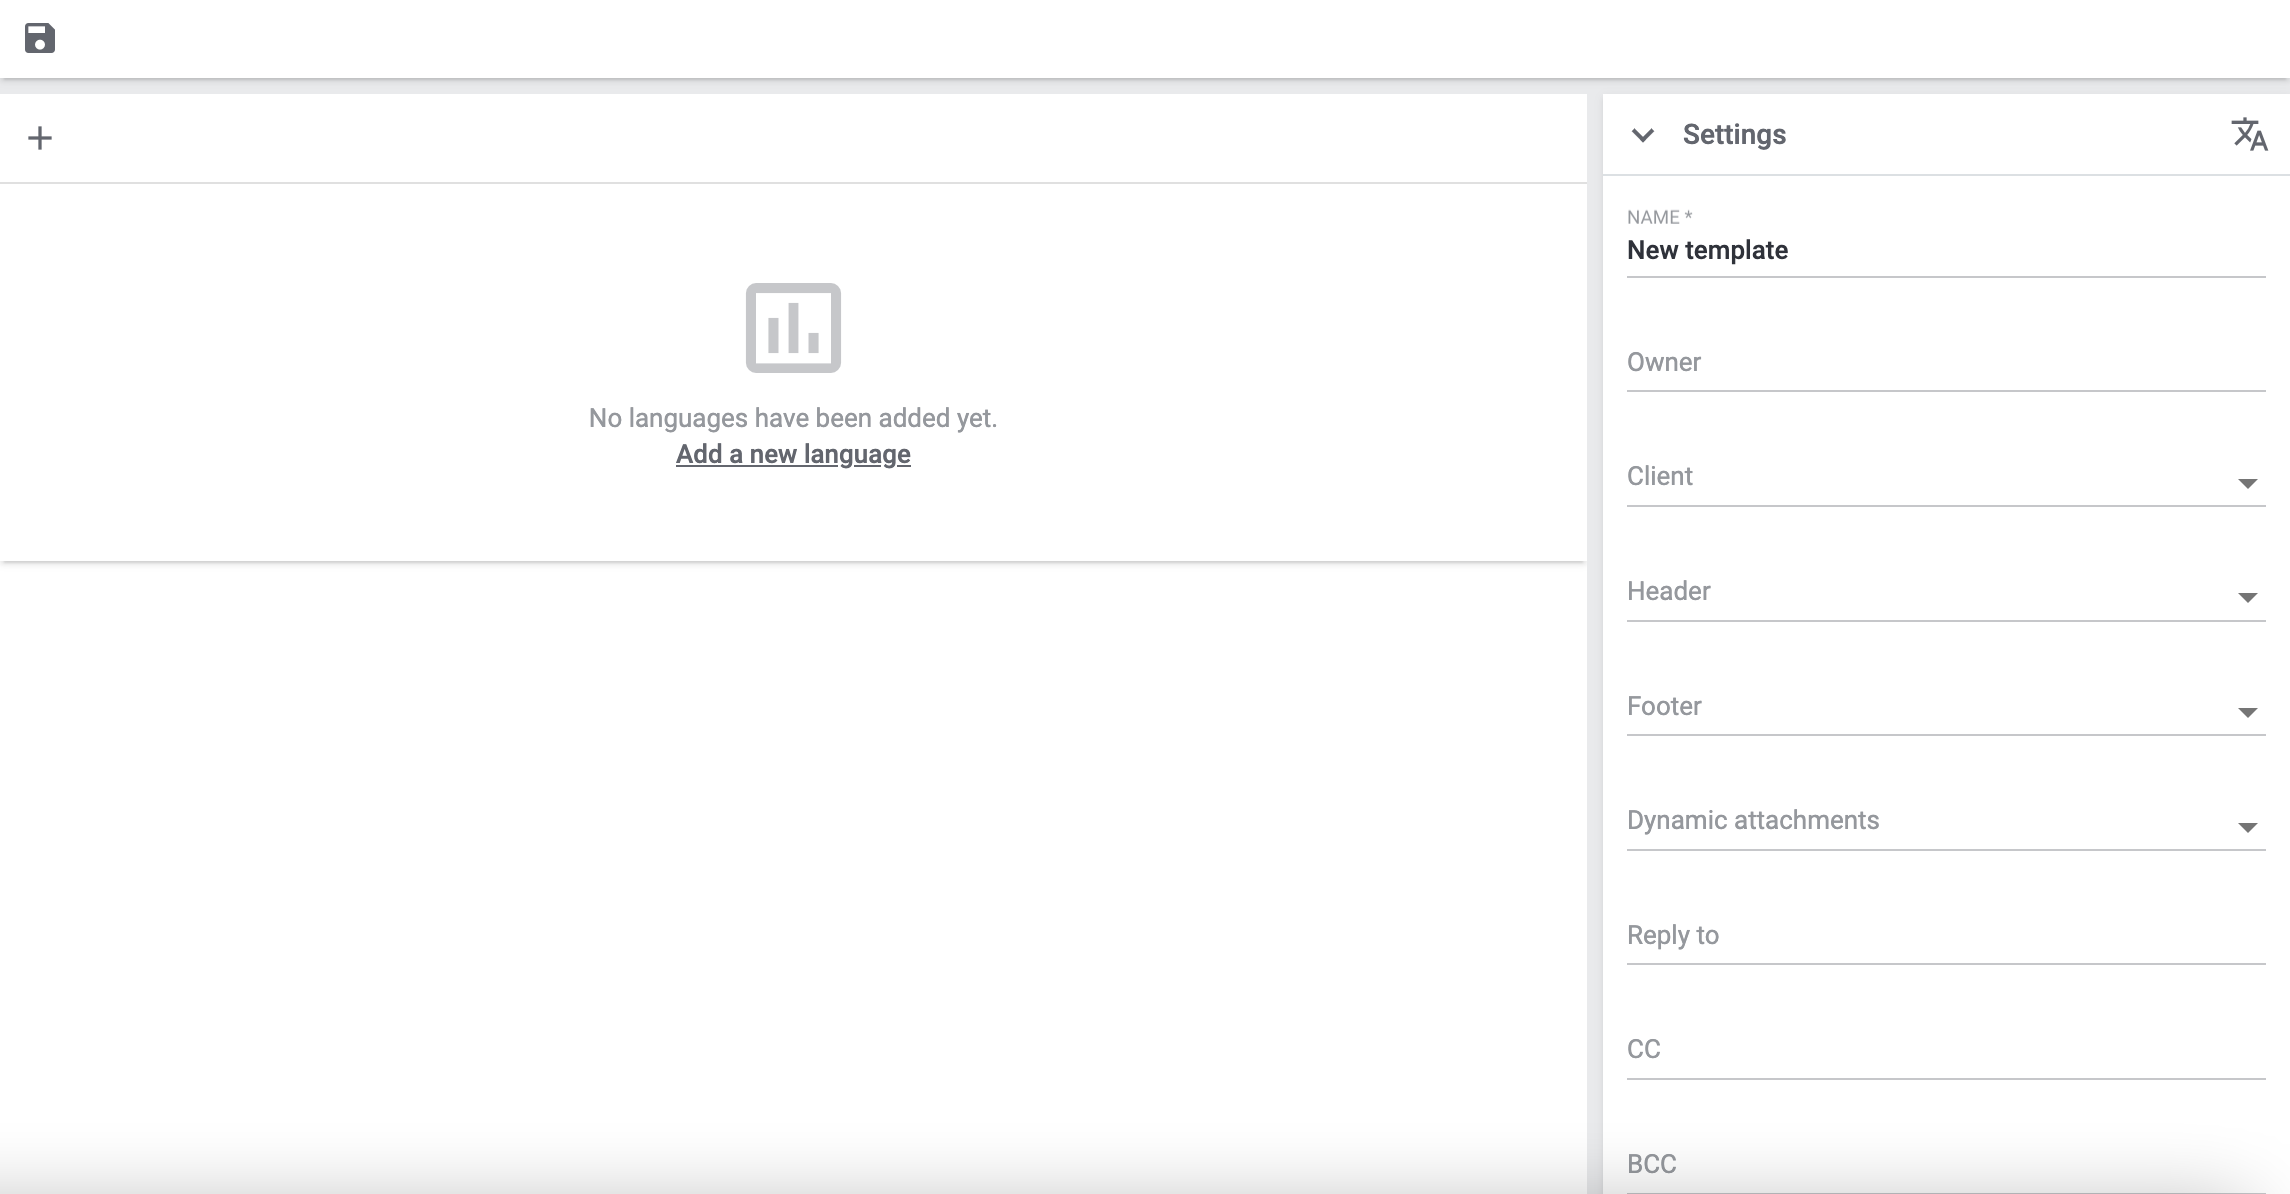
Creating a template:
-
Go to CRM » EmailBuilder.
-
In the bottom left, click on add Add.
Or: In the line of the folder in which you want to create a template, click on more_vert and then on add Add play_arrow. -
Click on description Template.
→ The Add new template window opens. -
Save (save) the settings.
Note: If you do not want to create the template within a folder, click on the start page of the CRM » EmailBuilder menu in the bottom left on add Add and select description Template afterwards. The template will then be created on the first level and does not belong to a folder.
|
Email templates are sent in multipart format
The email templates in the EmailBuilder use the multipart format. This means that the emails are sent in an HTML and in a text version at the same time. |
| Setting | Explanation |
|---|---|
Add new template window |
|
Name |
What’s the name of the template? Enter a descriptive name so you can easily find the template at a later point in time. |
Expert mode |
Activate (toggle_on) the option if you want to create the template in expert mode. |
Header |
Which header do you want to show in this template? Select a header from the drop-down list (arrow_drop_down). |
Footer |
Which footer do you want to show in this template? Select a footer from the drop-down list (arrow_drop_down). |
Build from default template |
Expand the area (arrow_drop_down) to select one of the default templates and link it with the new template. |
Save |
Saves the settings. |
Area for the template’s content |
|
Add |
Click on add (Add) to select the language of the template. |
Enter subject |
What’s the subject of your email? Enter the subject in the corresponding language. Note: By default, the language abbreviation is saved as subject. You can adjust the subject at any time. |
Save |
Saves the settings. |
Content and subject |
|
Subject |
You can see the template’s subject here. You can adjust the subject, if needed. |
Edit |
At the end of the Content and subject line, click on edit to edit the content of the template and to insert widgets and variables. |
Preview |
Click on preview Preview at the end of the line Content and subject and select from the Preview format list the option HTML or Plain text. Enter the ID of the order into the Order ID field to fill the preview with real order data. The preview opens in a separate window. |
Language settings |
|
Copy |
In the tab of the corresponding language, click on more_vert and then on content_copy Copy to copy the content and the language settings of the template for another language. |
Delete |
In the tab of the corresponding language, click on more_vert and then on delete Delete. After you have confirmed your decision, the template will be deleted. |
Language ID |
The ID is shown here. This ID cannot be changed. |
Static attachments |
This drop-down list provides all attachments that you uploaded before in the Shop » Documents menu. These are, for example, installation guides or product data sheets in the corresponding language. Select (check_box) up to 3 static attachments from the drop-down list. |
UPLOAD file_upload |
Here, you can upload the attachments directly from your computer without the need to upload them in the Shop » Documents menu in advance. |
Custom language specific styles |
You can adjust the CSS styling of your template, header and footer here. This CSS styling applies specifically to a particular language variant of the template. The Custom styles: Common CSS examples chapter below this table contains some common examples for adjusting the styling of your template. |
Email meta data |
Here you can save meta tags in the |
Number format |
Select the German or English notation for the number format from the list. Example: The German notation shows the number formats as follows: 1,25 or 1.000,25. The English notation shows the number formats as follows: 1.25 or 1,000.25. |
Number of decimals |
Enter a number that defines the number of decimals. |
Date format |
Select the date format from the drop-down list.
Also note the code examples regarding the date format for the code widget on this page. |
Time format |
Select the time format from the drop-down list.
|
General settings |
|
Name |
You can see the name here that you have just entered. If needed, you can adjust the name. |
Owner |
Select the owner from the drop-down list. |
Client |
Select (check_box) one or multiple clients from the list. |
Header |
You can see the header here that you have just selected for the template. If needed, you can select another header. |
Footer |
You can see the footer here that you have just selected for the template. If needed, you can select another footer. |
Dynamic attachments |
In this drop-down list all documents are available that you have set up in the Setup » Documents » DocumentBuilder menu. |
Reply to |
Who should receive replies to this email? Enter the email address(es). |
CC |
To whom do you want to send a copy of this email? Enter the email address(es). |
BCC |
To whom do you want to send a blind copy of this email? Enter the email address(es). |
Hide template in email selection |
Select Yes if you want that this template is hidden in the selection for the email service. This means that this template will not be available in any drop-down list in which you can select EmailBuilder templates. |
Custom template styles |
You can adjust the CSS styling of your template, header and footer here. This CSS styling applies globally to all language variants of the template. The Custom styles: Common CSS examples chapter below this table contains some common examples for adjusting the styling of your template. |
Toolbar |
|
Save |
Saves the changes that you have made to the template. |
Template usage |
Click on assessment to open the Template usage window. Here, you can see in which areas of your system the EmailBuilder template has been used. For further information, refer to this chapter. |
5. Custom styles: Common CSS examples
Table 2 lists some common examples to adjust the CSS styling of your template. You can adjust the CSS styling using the following options:
-
in the Language settings section of the template in the Custom language specific styling field
-
in the General settings section in the Custom template styling field
-
in the Setup » CRM » EmailBuilder » Global CSS styles menu.
Unlike the language-specific styling, the CSS styling contained here is applied to all EmailBuilder templates. -
by clicking on edit within in the template and then on css
-
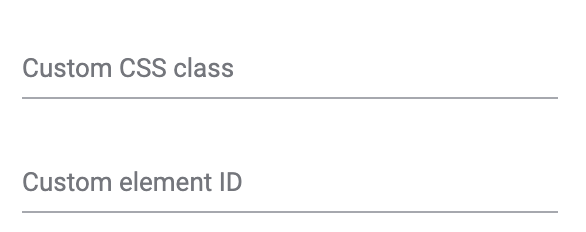
in the widget settings in the fields Custom CSS and Custom element ID
|
warning In order for the CSS styling to be displayed correctly, it has to be surrounded by a class or an element ID. If you want to save multiple CSS stylings for the template, enter all values one after the other, separated by a semicolon. Tip: Take a look at the CSS tutorial on this page that comes with illustrative examples. |
Expand the following box to see some examples.
The following code example shows a positive example for the CSS styling. Here, the class has no name, but only consists of *.
Note: You can see an example of a class with name in code example further down below in this box.
*{
  background-color: #9ebdf0;
  color: #272d38;
  text-align: center;
}
In contrast to the first code example, the following one shows a negative example. Here, the class is missing. This is why CSS styling would not work for the template.
background-color: #9ebdf0;
color: #272d38;
text-align: center;
If you have created multiple classes or element IDs and want to use them differently in your templates, we recommend that you always give the class or element ID a name. This makes it easier for you to recognise the correct class later if you want to select it in the widget settings in the Custom CSS class or Custom element ID fields:
The following two code examples show the CSS once with a named class and once with a named ID.
Note: If you enter a name for the class, it always has to start with .. If you enter a name for the ID, it always has to start with #.
.custom-class{
  background-color: #9ebdf0;
  color: #272d38;
  text-align: center;
}
#custom-ID{
  background-color: #9ebdf0;
  color: #272d38;
  text-align: center;
}
| CSS-Styling | Explanation |
|---|---|
Template width |
Enter |
Background colour |
Enter |
Font colour |
Enter |
Font size |
Enter |
Font weight |
Enter |
Text alignment |
Enter |
Background image |
Enter |
Text frame |
Enter e.g. |
Inner margin |
Enter |
6. Inserting a widget into a template
In the editor, you can find a selection of widgets whose contents are already pre-configured for you. It is possible for some widgets to later insert variables.
The following widgets are available:
-
Two-column layout
-
Three-column layout
-
Text
-
Code
-
Contact address
-
Order address
-
Order items
-
Item list
-
Image
-
If-else widget
For example, you will find in the Order items widget a pre-defined list with the most important variables around the ordered item such as item name, the number of ordered items, the prices, the shipping costs and the total invoice amount. However, you can adjust the content at any time according to your needs and add further column names and individual items.
Additionally, some widgets offer restrictions. These allow you to define conditions under which the content of a widget will appear in the email template. For more information, refer to Widget restrictions.
Proceed as described below to insert one or multiple widgets into your template.
Inserting a widget into a template:
-
Go to CRM » EmailBuilder.
-
Expand the folder (chevron_right) that contains the template you want to edit.
-
Click on the template.
-
Click on Edit (edit).
→ The editor opens and the widgets are loaded. -
Click on the widget on the left side and drag-and-drop it to the shaded area.
-
Depending on the widget you are using, click on edit or settings and carry out the settings. Note the explanations about the individual widgets and their editing options in Table 3.
-
Save (save) the settings.
| Widget | Explanation |
|---|---|
Two-column layout |
Allows to display text in a two-column layout. |
Three-column layout |
Allows to display text in a three-column layout. |
Text |
In this widget, you can enter text and use variables. You can also format the text you entered. |
Code |
In this widget, you can insert text in HTML format and use twig expressions. To do so, some basic HTML skills are needed. |
Contact address |
This widget contains data of the contact address. The layout of the address depends on the settings that you saved in the Setup » CRM » Address layout menu. |
Order address |
This widget contains data of the order address. The layout of the address depends on the settings that you saved in the Setup » CRM » Address layout menu. |
Order items |
This widget contains a pre-defined layout for the order items that you can adjust, of course. You can add columns, adjust the column’s width and carry out more settings. |
Item list |
In this widget, you can enter text and use variables. Note that you can only use variables from the sub-category Order / Order items (only for item list widget) in this widget. |
Image |
Use this widget to upload images such as your company logo to show it in your email templates. |
If-else widget |
Use this widget to implement if-else conditions. |
6.1. Widget: Two-column layout
This is widget is a structural widget. It allows to display text in a two-column layout.
Click on settings to open the settings. You can also determine the relation how the fields are displayed. The following values are available:
-
50% / 50% (standard)
-
30% / 70%
-
70% / 30%
You can insert further widgets in this widget by dragging them to one of the two columns. Insert, for example, an image widget.
Note: In the widget settings, you can use the Custom CSS and Custom element ID fields to adjust your template’s CSS styling yourself. You can find further information and examples in this chapter.
Click on Close settings (close) to close the settings. Click on Delete widget (delete) to remove the widget.
6.2. Widget: Three-column layout
This is widget is a structural widget. It allows to display text in a three-column layout.
You can insert further widgets in this widget by dragging them to one of the three columns. Insert, for example, an image widget.
Click on settings to open the settings. Here, you can remove the widget by clicking on Delete widget (delete). Further settings cannot be carried out in this area. Click on Close settings (close) to close the settings.
Note: In the widget settings, you can use the Custom CSS and Custom element ID fields to adjust your template’s CSS styling yourself. You can find further information and examples in this chapter.
6.3. Widget: Text
You can enter text in this widget and use variables. You can also format the text you entered. To do so, double-click on the word that you want to format to open the editor. For example, you can centre the text or pin it flush left or right and change the font and background colour.
Click on edit to open the list with the variables on the left side of the screen. Use the search function to find the variables or find the appropriate variables by expanding the individual areas (chevron_right). Click on the variable you want to insert. Enter additional text in the widget, if needed.
Click on settings to open the settings. Use the Custom CSS and Custom element ID fields to adjust your template’s CSS styling yourself. You can find further information and examples in this chapter.
Here, you can remove the widget by clicking on Delete widget (delete). Click on Close settings (close) to close the settings.
6.4. Widget: Code
In this widget, you can insert text in HTML format and use twig expressions. To do so, some basic HTML skills are needed.
Click on to open the view.
On the left side of the code editor, you can see the list with the available variables. The difference to the variable list that opens in the text widget, for example, is that the twig expression is automatically inserted into the code editor when you click on the variable.
Click on settings to open the settings. Here, you can remove the widget by clicking on Delete widget (delete). Further settings cannot be carried out in this area. Click on Close settings (close) to close the settings.
Also note the code examples for the code widget on this user manual page.
6.5. Widget: Address
This widget contains data of the address. The layout of the address depends on the settings that you saved in the Setup » CRM » Address layout menu. This means: The layout in the EmailBuilder is displayed in the same way as the address layout that you defined as the standard address layout in the Setup » CRM » Address layout menu.
Click on settings to open the settings. Select order address or contact address as address source. Order address is preselected. Select the address type *Invoice address or Delivery address from the drop-down list.
Click on Close settings (close) to close the settings. Click on Delete widget (delete) to remove the widget.
Note: In the widget settings, you can use the Custom CSS and Custom element ID fields to adjust your template’s CSS styling yourself. You can find further information and examples in this chapter.
Note: You can find all addresses that are saved for the contact in the contact data record in the Addresses area. The contact’s primary delivery and invoice address are saved in the contact data record in the Primary address area.
Restriction:
With a widget restriction you determine specific circumstances in which the content of the given widget is displayed in a document. Here you find more information on widget restriction.
6.6. Widget: Order items
This widget contains a pre-defined layout for the order items that you can adjust, of course.
Click on settings to open the settings. Select from the Currency settings list whether you want to show the currency symbol (e.g. €) or the ISO symbol (e.g. EUR) in the widget. Select the order item types under Order item types that you want to display in the table.
Use the drop-down list Column value to decide which content is to be shown in the columns and as individual positions.
Enter in the fields Set column width below a value in percent to adjust the table’s column widths.
If you want to change the column name: Enter in the fields Define name each the new name for the column shown.
Click on unfold_more to change the order of the columns shown.
You can immediately see in the preview how the changes affect the table.
Click on add (Add new entry) in the settings to add further columns. Click on Remove entry (delete) to delete the columns from the overview.
Note: In the widget settings, you can use the Custom CSS and Custom element ID fields to adjust your template’s CSS styling yourself. You can find further information and examples in this chapter.
Available columns and individual positions in the table of the “Order items” widget
Available columns:
-
Quantity
-
Article ID
-
Item name
-
Item image
-
Attribute values
-
Barcode
-
Barcode image
-
Unit price (gross)
-
Unit price (net)
-
External variation ID
-
VAT value
-
VAT rate
-
Price (gross)
-
Price (net)
-
Discount (%)
-
Discount (gross)
-
Discount (net)
-
Variation ID
-
Variation name
-
Variation number
-
Availability
-
Order property value
Tip: You can enter a number in percent in the Column width field to determine the column width yourself.
Available individual positions:
-
VAT rates and values
-
Discount (gross)
-
Discount (net)
-
Shipping costs (gross)
-
Shipping costs (net)
-
Value of items (gross)
-
Value of items (net)
-
Open amount
-
Amount paid
-
Invoice amount (gross)
-
Invoice amount (net)
6.7. Widget: Item list
In this widget, you can enter text and use variables. Note that you can only use variables from the sub-category Order / Order items (only for item list widget) in this widget.
Click on edit to open the list with the variables on the left side of the screen. Use the search function to find the variables or find the appropriate variables by expanding the individual areas (chevron_right). Click on the variable you want to insert. Enter additional text in the widget, if needed.
Click on settings to open the settings. Use the Custom CSS and Custom element ID fields to adjust your template’s CSS styling yourself. You can find further information and examples in this chapter.
Here, you can remove the widget by clicking on Delete widget (delete). Click on Close settings (close) to close the settings.
6.8. Widget: Image
Use this widget to upload images such as your company logo to show it in your email templates.
Click on settings to open the settings. You can upload the image, enter the width and height of the image in px or %, enter an alternative text, adjust the styling in CSS format and save the image link.
Important: Always use https for the image link.
Tip: If you want to place the image to a certain position, you can adjust the CSS styling in the field Custom styling, e.g. margin-left: auto; margin-right: 0; display: block; or float:right;display:block;. Further information can be found here and here.
Click on Close settings (close) to close the settings. Click on Delete widget (delete) to remove the widget.
Note: In the widget settings, you can use the Custom CSS and Custom element ID fields to adjust your template’s CSS styling yourself. You can find further information and examples in this chapter.
6.9. Widget: If-else
Use this widget to implement if-else conditions.
Click on settings to open the settings. You can select the following variables here:
-
Client ID
-
Payment method
-
Shipping profile
-
Class
-
Availability
-
Flag
-
Warehouse
-
Order referrer
-
Language
-
Is guest
-
Variation ID
-
Contact ID
-
Order tags
-
Package number list
Depending on which variable you selected in the upper drop-down list, the following operators are available:
-
Is equal to
-
Is not equal
-
Greater than
-
Less than
-
Greater than or equal to
-
Less than or equal to
-
Exists
-
Does not exist
Once you have selected a relational operator, the values available in your system for the variable selected above are available. Select an option from the list.
Note: For the variable Variation ID and the Contact ID, an input field is available, for all other variables a drop-down list.
Note:*Neither an input field nor a drop-down list is available for the *Package number list variable. For this variable, you can only select the operators Exists and Does not exist to check whether a package number exists.
Click on Close settings (close) to close the settings. Click on Delete widget (delete) to remove the widget.
Note: In the widget settings, you can use the Custom CSS and Custom element ID fields to adjust your template’s CSS styling yourself. You can find further information and examples in this chapter.
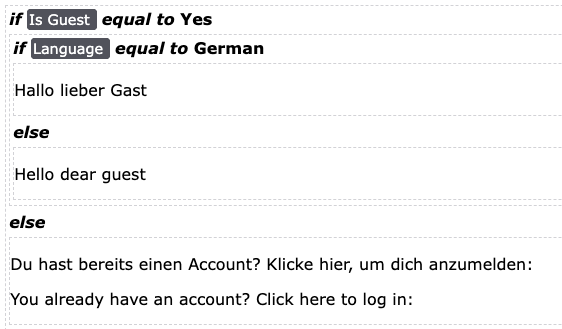
6.9.1. AND condition in the if-else widget
To display an AND logic using if-else widgets, you can nest any number of if-else widgets inside each other.
In the following example, the first if-else widget checks whether the value is equal to Guest. In the nested if-else widget, the condition Language equal to German is checked.
In this example, the widget displays a specific text (text widget) if the user is a guest and their language is German.
6.10. Showing the preview of the widget
Check the widget by opening the preview.
-
Go to CRM » EmailBuilder.
-
Expand the folder (chevron_right) that contains the template for which you want to show the preview.
-
Click on the template.
-
Click on Preview (preview).
-
Select Preview HTML or Preview plain text.
→ The preview opens in a separate window. -
Check the widget.
-
Close the window.
If you are not satisfied with the result, edit the widget.
7. Editing the widget
You can edit the content of the widgets at any time. To do so, proceed as described below.
| Note the information about line spacing in our FAQ area. |
Editing a widget:
-
Go to CRM » EmailBuilder.
-
Expand the folder (chevron_right) that contains the template you want to edit.
-
Click on the template.
-
Click on Edit (edit).
→ The editor opens and the widgets are loaded. -
Click on settings.
→ The widget settings open – if they are available. -
Click on edit - if available.
→ The variables open on the left side. -
Use the search function to find the variables or find the appropriate variables by expanding the individual areas (chevron_right).
-
Click on the variable that you want to show in the widget.
→ The variable is taken to the widget. -
Save the settings.
8. Using default templates
Before you created a new folder, you might have recognised the folders Standardvorlagen and Default templates? These folders contain pre-defined templates in German and English language. You can either use the default templates as they are available in your system or you can adjust their content according to your needs.
Besides the content of the email template, the subject is already filled in in a default template. This means that you only have to select the owner, the client and header and footer and fill the fields Reply to and, if needed, also CC and BCC. Also it is possible to adjust the pre-filled subject and attach dynamic and static attachments as well as define the number format, date format and date format and the number of decimals. Also you can hide the template in the selection for the email service.
|
Switching between multiple templates
If you later edit multiple templates in the editor at the same time, you can use the navigation on the left to switch between the individual templates. The template you have just opened is highlighted in blue at the beginning of the line. |
8.1. Creating a default template
12 default templates in total are available in German and English each in your system. When creating a new template, you can select one of these default templates and adjust it, if needed. Refer to the Available default templates chapter to see which default templates are available and what their subject is.
Creating a default template:
-
Go to CRM » EmailBuilder.
-
In the line of the folder in which you want to create a default template, click on more_vert and then on add Add play_arrow.
-
Click on description Template.
→ The Create new template window opens. -
Enter a name for the template.
-
Select header and footer for the default template from the drop-down list.
-
Select a default template from the drop-down list Build from default template.
-
Save (save) the settings.
→ The template is created and opened.
| If you do not want to create the default template within a folder, click on the start page of the CRM » EmailBuilder menu in the bottom left on add Add and select description Template afterwards. The template will then be created on the first level and does not belong to a folder. |
8.2. Adjusting the default template’s subject
As soon as the default template is created, you can see the prefilled content in the toolbar. Simply click in the line of the subject to adjust it. Click on integration_instructions (Show variables) at the end of the subject line to open the variable list. You can either search for the desired variable using the categories and sub-categories or you enter the variable’s name into the search field. When you click on the desired variable, the corresponding twig expression including the double curly brackets will be inserted in the subject line.
9. Selecting static attachments and adjusting the default template’s styling
In the Language settings area, you can select up to 3 static attachments that you can attach to your email template. Also in this area, you can adjust the custom styles of the template such as the template width and font size and define the number format, date format and time format for your templates.
10. Editing the default template
Besides the language settings where you can select static attachments for your template, for example, you can also adjust the template’s content or the subject by clicking on edit in the Content and subject line.
In the General settings area of the template, select an owner, the client and the header and footer, if not done already. In this area, you can also select up to 4 dynamic attachments and fill the fields Reply to, CC and BCC. Also you can hide the template in the selection for the email service.
11. Available default templates
Would you like to know which default templates are already available in the EmailBuilder and how their subjects are? Simply expand the following area by clicking on expand_more.
Default templates in the EmailBuilder and their subjects
| Name of the template german/english | Subject german/english |
|---|---|
Auftrag: Status geändert |
Der Status Ihrer Bestellung mit der Auftrags-ID |
Auftrag: Versandbestätigung |
Versandbestätigung für Ihre Bestellung mit der Auftrags-ID |
Auftrag: Zahlungseingang vollständig |
Zahlung für Auftrag |
Auftrag: Zahlungseingang vollständig |
Zahlungseingang - offener Betrag für Auftrags-ID |
Auftrag: Rechnung PDF-Anhang |
Rechnung zu Order-ID |
Auftrag: Bestellbestätigung |
Ihre Bestellung mit der Auftrags-ID |
Auftrag: Retoure - Empfangsbestätigung |
Wir haben Ihre Retoursendung erhalten |
Shop: Neues Passwort erstellen |
Ihre angeforderten Zugangsdaten zu unserem Webshop |
Anmeldung zum Newsletter |
Melden Sie sich für unseren Newsletter an |
Anmeldung zum Newsletter - Bestätigung |
Bestätigung: Anmeldung für unseren Newsletter |
Amazon-Beispiel |
|
Here, you can find more useful default templates that you can customise to suit your needs:
More default templates in EmailBuilder with explanation
| Name of the template german/english | Explanation |
|---|---|
Standard-Header |
Example header with an image placeholder and the shop name. |
Standard-Footer |
Example footer with links to the legal notice, the shop page and the terms and conditions. |
Amazon-Beispiel |
Example template for Amazon communication. The twig expression in the subject verifies that the word ‘Important’ is included, as required by the Amazon marketplace. Otherwise, messages cannot be transmitted. |
12. Showing the preview of the template
You can view a preview of your template at any time. This is possible either in HTML format or as plain text. Enter an order ID to fill the preview with real order data. Proceed as follows to open the preview of the template.
|
Email templates are sent in multipart format
The email templates in the EmailBuilder use the multipart format. This means that the emails are sent in an HTML and in a text version at the same time. |
Showing the preview:
-
Go to CRM » EmailBuilder.
-
Expand the folder (chevron_right) that contains the template for which you want to show the preview.
-
Click on the template.
-
Click on Preview (preview).
→ The Preview window opens. -
Select from the drop-down list Preview format the option HTML or Plain text.
-
In the Order ID field, enter the ID of the order that you want to see a preview of.
-
Click on preview PREVIEW.
→ The preview opens in a separate window.
Note: Your system remembers the value of the order ID you entered until the next login or until the browser cache is cleared. -
Check the template.
-
Close the window.
If you are not satisfied with the result, edit the content of your template.
13. Searching for a template
In order to search for specific templates, enter a search term in the search fields. You can enter multiple search terms into the search fields at once. This makes your search run quicker and more accurate.
Searching for a template:
-
Go to CRM » EmailBuilder.
-
Alternative 1: Enter a value in the search field and select the appropriate filter from the suggestion list. Example: If you enter a number, the possible filters with this ID will be suggested such as for example the template ID.
-
Alternative 2: Click on tune to narrow down the search results with filters.
-
-
Note the explanations about the filters in Table 6.
Tip: You can enter multiple search terms into the search fields at one time. This makes your search run quicker and be more accurate. -
Click on search Search.
→ The templates that correspond to the search criteria entered are shown in the overview.
| Filter | Explanation |
|---|---|
ID |
Enter an ID to search for the template with this exact ID. |
Language |
Select (check_box) a language from the drop-down list to only search for templates that were created in this language. You can select one or multiple languages. |
Name |
Enter a name to search for templates with this name. |
Client |
Select (check_box) a client from the drop-down list to only search for templates that were created for this client. |
Type |
Select (check_box) a type from the drop-down list to only search for templates with this template type. You can select one or multiple types. |
Expert mode |
Select Yes to only search for templates that have been created in expert mode. Select No to only search for templates that have not been created in expert mode. |
Owner |
Select (check_box) an owner from the drop-down list to only search for templates that were created for this owner. |
replay |
Resets the selected filter criteria. |
search SEARCH |
Starts the search. → The templates that correspond to the search criteria are displayed. |
14. Moving a template
You can move your templates to another folder at any time. To do so, proceed as described below.
Moving a template:
-
Go to CRM » EmailBuilder.
-
Expand the folder (chevron_right) that contains the template you want to move.
-
In the line of the template, click on more_vert and then on open_with Move.
→ The Move window opens. -
Select the target folder.
-
Click on open_with Move.
→ The template is moved to the selected folder.
15. Editing a template
The following instruction describes how to edit templates in general. The procedure is thus identical for editing all templates, i.e. also editing the templates that you created for the header and the footer.
|
Switching between multiple templates
If you later edit multiple templates in the editor at the same time, you can use the navigation on the left to switch between the individual templates. The template you have just opened is highlighted in blue at the beginning of the line. |
Editing a template:
-
Go to CRM » EmailBuilder.
-
Expand the folder (chevron_right) that contains the template you want to edit.
-
Click on the template.
-
Carry out the changes. Note Table 1.
-
Save (save) the settings.
Besides the language settings where you can select static attachments for your template, for example, you can also adjust the template’s content or the subject by clicking on edit in the Content and subject line.
In the General settings area of the template, select an owner, the client and the header and footer, if not done already. In this area, you can also select up to 4 dynamic attachments and fill the fields Reply to, CC and BCC. Also you can hide the template in the selection for the email service.
16. Adjusting the template’s subject
As soon as the template is created, you can see the template’s language in the toolbar. Simply click in the line of the subject to adjust it. Click on integration_instructions (Show variables) at the end of the subject line to open the variable list. You can either search for the desired variable using the categories and sub-categories or you enter the variable’s name into the search field. When you click on the desired variable, the corresponding twig expression including the double curly brackets will be inserted in the subject line.
17. Selecting static attachments and adjusting the template’s styling
In the Language settings area, you can select up to 3 static attachments that you can attach to your email template. Also in this area, you can adjust the custom styles of the template such as the template width and font size and define the number format, date format and time format for your templates.
18. Adding a language to the template
You can add the following languages to your template, your header and your footer:
-
Fallback
-
Select Fallback if you use your company logo in the header only and therefore don’t need to take into account any content-related adjustments or a translation to another language.
-
-
Bulgarian
-
Chinese
-
Danish
-
German
-
English
-
Estonian
-
Finnish
-
French
-
Irish
-
Italian
-
Croatian
-
Latvian
-
Lithuanian
-
Dutch
-
Norwegian
-
Polish
-
Portuguese
-
Romanian
-
Russian
-
Swedish
-
Slovakian
-
Spanish
-
Czech
-
Turkish
-
Hungarian
-
Vietnamese
Let’s assume, you have created a shipping confirmation in English and added widgets and variables. Now, you want to create this shipping confirmation also in French for your French-speaking customers. The quickest way is to copy the template and adjust the translation afterwards. How to proceed in this case is described in the Copying a template chapter.
|
Important: Add header and footer in the corresponding language
If you created a template in multiple languages, remember to create also the header and footer in these languages and to link them with the template. Otherwise, the template cannot be sent. |
19. Copying a template
You want to copy an existing template to save time when creating a new template with similar content? To do so, proceed as follows.
| Before copying the template, carry out the settings in the General settings area. The advantage of this sequence is that you also copy the settings themselves and not only the template content. Thus, you don’t need to carry out the settings for the other templates again. |
Copying a template:
-
Go to CRM » EmailBuilder.
-
Expand the folder (chevron_right) that contains the template you want to copy.
-
In the line of the template that you want to copy, click on more_vert and then on content_copy Copy.
→ A new window opens. -
Enter the subject of the copied template in the selected language.
-
Select in the folder structure under Target the target folder that you want to use to save the template in.
-
Click on content_copy Copy.
→ The template is copied and opened. -
Ajdust the subject.
-
Now edit the copied template according to your needs and adjust the translation.
20. Deleting a template
Proceed as described below to delete templates. Only the assembled template will be deleted but not the components contained in it such as the header and footer.
Deleting a template:
-
Go to CRM » EmailBuilder.
-
Expand the folder (chevron_right) that contains the template you want to delete.
-
In the line of the template that you want to delete, click on more_vert and then on delete Delete.
→ A window opens and you need to confirm your decision. -
Click on delete Delete.
→ The template is deleted.
21. Removing a language from the template
Proceed as described below to remove a certain language from the template.
Removing a language from the template:
-
Go to CRM » EmailBuilder.
-
Expand the folder (chevron_right) that contains the template from which you want to remove a language.
-
Click on the template.
-
Click on more_vert and then on delete Delete at the top of the template’s tab whose language you want to remove.
→ A window opens and you need to confirm your decision. -
Click on delete Delete.
→ The language is removed from the template.
22. Viewing the template usage
Here, you can see with one click in which areas of your system the EmailBuilder template has been used.
The following filters are available:
-
Email accounts assistant - Automatic despatch
-
Messenger inbox
-
Messenger automation
-
Order event
-
Order procedure
-
Process
Viewing the template usage:
-
Go to CRM » EmailBuilder.
-
Expand the folder (chevron_right) that contains the template from which you want to remove a language.
-
Click on the template.
-
Click at the top on assessment (Template usage).
→ The Template usage window opens. The overview lists the location in the system in which the template has been used as well as the template’s name and whether the template is active or not. -
Use the filters (tune) Location/Type and Is active to narrow down the search results.
Tip: Click on the respective line in the search results to be forwarded directly to the corresponding menu. -
Click on Close to close the window again.
23. Using the email service
Use the email service to manually send email templates. You can use the email service in the following user interfaces:
-
in the Orders » Orders menu
-
in the order itself
-
via the group function in the order overview
-
-
via the group function in the contact overview in the CRM » Contacts menu
-
in the CRM » Messenger menu
-
in a new conversation
-
in the reply message
-
23.1. Filter options in the email service
Table 7 lists the available filter options in the email service.
| Filter | Explanation |
|---|---|
Owner |
Select an owner from the list to only show templates that are assigned to this owner. |
Client |
Select a client from the list to only show templates that are assigned to this client. |
ID |
Enter the ID of the template to only show the template with exactly this ID. |
Name |
Enter the name of the template to only show the template with exactly this name. |
Sort by |
Select an option from the list to specify the criteria according to which the templates found should be sorted. |
Sorting order |
Select whether the templates found should be shown in ascending or descending order based on the creation date, ID or name. |
23.1.1. Saving the current filter
When you start a search in the email service, your selected filters are displayed up top as so-called “chips”. You can save these filters to apply them again more quickly and easily in the future.
Saving the current filter:
-
Start a search.
-
Click on Saved filters (bookmarks).
-
Click on bookmark_border Save current filter.
-
Enter a name for the filter.
-
Decide whether
-
this filter should be set as default filter (toggle_on)
-
this filter should be created for all users (toggle_on).
-
-
Click on SAVE.
→ The filter now appears under Saved filters (bookmarks).
| Use drag-and-drop to arrange the filters in a specific order by clicking on Move (drag_indicator). Click on delete to delete a filter. |
23.1.2. Applying saved filters
Proceed as follows to apply an already saved filter for the search.
Applying saved filters:
-
Click on Saved filters (bookmarks).
-
Click on a filter that you have already created.
→ The search is started and the filter settings are displayed up top as so-called “chips”.
23.1.3. Setting a default filter
To make sure that you don’t have to select a filter that you use quite often from the list of your saved filters every time when opening the email service, you can set a created filter as default filter. Every time when you open the email service, this filter will be automatically applied.
You can set the filter as default filter directly when creating it as described in Saving the current filter or you can set the filter as default in the overview afterwards.
Click in the line of the saved filter on star_border Set as default. If you want to set another filter as default filter, deactivate the currently selected default filter by clicking on star Do not use as default.
23.2. Adding a template to favourites
If you have found the correct template by means of the filters, you can add them to the favourites. To do so, click on star Add to favourites. The template then appears also in the favourite’s folder (folder_special) at the top.
To remove a template again from the favourites, click again on star Remove from favourites.
23.3. Using the email service in the order
You can use the email service both in the order itself and via the group function in the order overview. Also you can see the email templates already sent in the history.
23.3.1. Sending an email template using the email service in the order
In the order in the Orders » Orders menu, use the button email (Email service) to send specific email templates and also view the email templates that have already been sent in the history.
Proceed as described below to send an email template in the order using the email service.
Sending an email template using the email service in the order:
-
Go to Orders » Orders.
-
Search for the order by means of the filter settings. Note the explanations about the filters on the Searching for orders page.
→ The orders that correspond to the entered search criteria are shown. -
Click on the order ID to open the data record.
-
In the toolbar at the top, click on email (Email service).
→ The Email service window opens. -
In the Template area, select an option from the drop-down list Recipient type.
-
Select a language from the drop-down list Template language.
Note: The language from the order is automatically preselected. -
Use the filters to search for the appropriate EmailBuilder template. Note the explanations about the filters in the Filter options in the email service sub-chapter.
→ The templates that correspond to the search criteria entered are shown. Or: The folders that contain the templates that correspond to the search criteria entered are shown. -
Click on the template.
-
Click on the right-hand side in the Preview area on preview LOAD TEMPLATE to show the template’s preview.
Note: Also the email account, recipient, subject and, if available, attachments, are shown.
Tip: Next to the recipient, click on more_vert to add the CC and BCC fields. -
If desired, add further attachments by clicking on attach_file.
-
Use the editor’s formatting options, if desired. Click on code (Code view) to edit the template’s content in HTML source code.
-
Click on send SEND to send the template to the recipients entered.
23.3.2. Viewing sent email templates in the order
Use the history in the email service to view all email templates that have been sent for an order.
Viewing sent email templates in the order:
-
Go to Orders » Orders.
-
Search for the order by means of the filter settings. Note the explanations about the filters on the Searching for orders page.
→ The orders that correspond to the entered search criteria are shown. -
Click on the order ID to open the data record.
-
In the toolbar at the top, click on email (Email service).
→ The Email service window opens. -
Click on the History tab.
→ In the sending history, you can see the type, order ID, date and time when the template was sent, recipient, template name and template ID.
23.4. Using the email service via the group function in the order overview
Proceed as described below to send an email template using the group function in the order overview.
Using the email service via the group function in the order overview:
-
Go to Orders » Orders.
-
Search for the orders by means of the filter settings. Note the explanations about the filters on the Searching for orders page.
→ The orders that correspond to the entered search criteria are shown. -
Select (check_box) the orders that you want to send an email template to.
-
In the toolbar at the top, click on email (Send email).
→ The*Email service* window opens.
→ In the Templates area, you can see the order IDs that you have just selected. -
Select an option from the drop-down list Recipient type.
-
Select a language from the drop-down list Template language.
-
Use the filters to search for the appropriate EmailBuilder template. Note the explanations about the filters in the Filter options in the email service sub-chapter.
→ The templates that correspond to the search criteria entered are shown. Or: The folders that contain the templates that correspond to the search criteria entered are shown. -
Click on the template.
-
Click on send SEND.
23.5. Using the email service via the group function in the contact overview
Proceed as described below to send an email template using the group function in the contact overview.
Using the email service via the group function in the contact overview:
-
Go to CRM » Contacts.
-
Search for the orders by means of the filter settings. Note the explanations about the filters on the Searching for a contact page.
→ The contacts that correspond to the search criteria entered are displayed. -
Select (check_box) the contacts that you want to send an email template to.
-
Click in the toolbar at the top on email (Send email template).
→ The*Email service* window opens.
→ In the Recipient field, you can see the names of the contacts that you have just selected. -
Select a language from the drop-down list Template language.
-
Use the filters to search for the appropriate EmailBuilder template. Note the explanations about the filters in the Filter options in the email service sub-chapter.
→ The templates that correspond to the search criteria entered are shown. Or: The folders that contain the templates that correspond to the search criteria entered are shown. -
Click on the template.
-
Click on send SEND.
23.6. Using the email service in the Messenger
You can use the email service both in a new conversation and in a reply message.
23.6.1. Using the email service in a new Messenger conversation
Use the email service to send an email template in a new Messenger conversation. To do so, proceed as follows.
Using the email service in a new Messenger conversation:
-
Go to CRM » Messenger.
-
In the top left corner, click on addNew conversation.
-
Enter a value in the Recipient field and select the appropriate value from the suggestion list.
Example: If you enter a number, possible receivers with this order ID or contact ID will be suggested. Also the external order ID and the external number that is saved in the contact details will be taken into account here. -
Select a group from the drop-down list.
-
Enter the subject of the message in the Subject field.
-
Select the inbox from the drop-down list.
-
Click on preview (Template overview) at the bottom of the toolbar.
→ The Email service window opens. -
Select a language from the drop-down list Template language.
-
Use the filters to search for the appropriate EmailBuilder template. Note the explanations about the filters in the Filter options in the email service sub-chapter.
→ The templates that correspond to the search criteria entered are shown. Or: The folders that contain the templates that correspond to the search criteria entered are shown. -
Click on the template.
-
Click on preview LOAD TEMPLATE.
→ The template is loaded in the text field. -
Use the editor’s formatting options, if desired. Click on code (Code view) to edit the template’s content in HTML source code.
-
Click on forward_to_inbox SEND at the bottom right.
23.6.2. Using the email service in the Messenger reply message
Use the email service to send an email template in an existing Messenger conversation. To do so, proceed as follows.
-
Go to CRM » Messenger.
-
Search for the conversation that contains the message you want to reply to by means of the filter settings. Note the explanations about the filters on the Messenger page in the Searching for a conversation in the Messenger chapter.
-
Open the conversation.
-
Click on the message you want to respond to.
-
Click on preview (Template overview) at the bottom of the toolbar.
→ The Email service window opens. -
The Recipient field shows the recipient that should receive the message.
-
Select a language from the drop-down list Template language.
-
Use the filters to search for the appropriate EmailBuilder template. Note the explanations about the filters in the Filter options in the email service sub-chapter.
→ The templates that correspond to the search criteria entered are shown. Or: The folders that contain the templates that correspond to the search criteria entered are shown. -
Click on the template.
-
Click on preview LOAD TEMPLATE.
→ The template is loaded in the text field. -
Use the editor’s formatting options, if desired. Click on code (Code view) to edit the template’s content in HTML source code.
-
Click on forward_to_inbox SEND at the bottom right.