Generating documents
This page of the manual describes how you export the list of delivery addresses to your shipping service provider and then import the package numbers, which you receive from your shipping service provider, into your PlentyONE system. You can print shipping labels after you have registered your orders online with your shipping service provider. Furthermore, you learn how to set up address label templates and generate delivery lists.
How you set up all other documents that are available in PlentyONE, such as invoice, order confirmation or delivery note, can be found in the Orders area.
1. Exporting a list of delivery addresses
If you ship packages with a shipping service provider, you need a list of delivery addresses. This list is an export of shipping information that you have to hand over to your shipping service providers. The shipping service provider - in return - can then provide you with valid shipping labels. This export allows to get larger quantities of packages ready for shipment quickly and easily. In the following, you learn how to export your orders' delivery addresses into a file, which you need for your shipping service provider’s software.
If you have questions about importing the file into the shipping service provider’s software or about using the software itself, contact the provider.
Exporting a list of delivery addresses:
-
Go to Orders » Fulfilment.
-
Expand the List of delivery addresses section ().
-
Carry out the desired settings. Note Table 1.
-
Click on the gear-wheel icon (settings).
→ You receive a file that you save on your computer. -
Afterwards, import the file with your shipping service provider’s software.
| Setting | Explanation |
|---|---|
Search filters |
|
Order status |
Select the order status. |
Owner |
Select the owner. |
Payment method |
Select the payment method. |
Shipping method |
Select the shipping method. |
Incoming payment |
Select the incoming payment. |
Data format |
Select the data format used in your shipping service provider’s software. |
Separator |
Select the separator. |
Procedure |
|
Change order status |
Select the order status that should be assigned to the orders during export process. |
|
Data format UPS WorldShip 11
If you generate a list of delivery addresses with the data format UPS Worldship 11, the information contained in the Additional address information field is displayed in the columns Str2 and Str3. The columns can each contain 35 characters. Once the first column has been filled, the information continues in the second column. The additional address information is only displayed in the columns if they are empty. If the columns are not empty, the additional address information is not displayed. |
2. Importing package numbers
Besides the convenient option to import package numbers into your system via the import tool, you can also import the package numbers manually or with the help of a barcode scanner.
2.1. Importing package numbers via the import tool
Using the import tool is the easiest way to import package numbers in your PlentyONE system. To do so, create an import of the type Orders. Note our Best Practice: Importing package numbers from shipping service providers.
2.2. Manually importing package numbers
In the Orders » Fulfilment menu in the Import of package numbers tab in the List import section, you can manually enter the package numbers with the corresponding order ID. Alternatively, you can use a barcode scanner to scan these from the packing list. You find a description of how to proceed in the next chapter.
2.3. Importing package numbers with the help of a barcode scanner
The outgoing items should be booked in PlentyONE once an order is finished being packed. Status [7] Outgoing items booked is saved for the order and the current date is saved as the date for the outgoing items. For example, this operation can be carried out by scanning the barcode on the invoice, delivery note, packing list or the address label. Make sure that your barcode scanner is correctly set up.
The following example describes the scanning process of the packing list.
Importing package numbers with the help of a barcode scanner:
-
Go to Orders » Fulfilment.
-
Expand the Generating invoices section ().
-
Generate one or multiple invoices. For further information, refer to the explanations on the Invoices page of the manual.
-
Create a packing list from these invoices for all orders that need to be packed this time. For further information, refer to the explanations on the Packing list page of the manual.
-
As soon as a package has been packed, mark this order on the packing list.
-
Additionally, place another small sticker with the package number (light label) underneath the order ID’s barcode.
-
Go to Orders » Fulfilment.
-
Click on the Import of package numbers tab.
-
Place the cursor in the first field in the List import section.
-
First scan the order ID and afterwards the package number.
→ By clicking on Save (save), the package numbers is saved for all orders in the Settings tab.
Set up an event procedure in the Setup » Orders » Event procedures menu. Select the procedure Order > Book outgoing items for the event Order change > Package number. Furthermore, you can send your customers an email template including the package number and the link for tracking the package. For further information, refer to the Event procedures page of the manual.
3. Setting up the address label
In contrast to shipping labels, you can precisely define which information should be displayed for address labels in PlentyONE and where it should be positioned on the label. These address labels do not yet include the shipping charges or the shipment numbers, as they were not generated by the shipping provider. Using address labels is especially recommended in certain situations. For example, when shipping books, it is sometimes possible to write book mail on the package and ship it for a cheaper price than the weight of the package. In PlentyONE. you can configure the address label templates, generate a PDF file and use it to print labels.
|
When does it make sense to use the software of a parcel service?
Generate address labels in PlentyONE to send your items. If you would like to ship packages with a parcel service, we recommend that you use the software of the parcel service in order to print shipping labels. PlentyONE supports the data exchange with different parcel services. |
If you have already created an address label template and saved a PDF template, continue with chapter Generating the address label.
4. Activating address labels for the DocumentBuilder
To create address labels via the DocumentBuilder you have to activate them first in the settings.
|
Activating document templates in DocumentBuilder
If you activate address labels for the DocumentBuilder, you can’t create them in the Orders » Fulfillment menu anymore. |
-
Open the Setup » Documents » Settings menu.
-
Activate (toggle_on) Address labels in the Document types switch area.
5. Setting up a document template for address labels
You can create address labels using the PlentyONE standard templates. If necessary, you can copy the standard template and adjust it for your needs.
5.1. Setting up document templates in DocumentBuilder
We recommend that you set up document templates in DocumentBuilder (menu: Setup » Documents » DocumentBuilder).
For more information on how to use DocumentBuilder, refer to the manual page DocumentBuilder.
Do you have questions about the variables? All variables are described on the page Using variables.
5.2. Upload PDF background
In the address label settings you have the possibility to upload a PDF background.
Uploading the PDF template:
-
Go to Setup » Documents » DocumentBuilder.
-
Open the template.
→ The detail view of template opens. -
Click Output settings (settings).
→ The output settings menu opens. -
Click Upload PDF background (upload_2) in the Display settings section.
-
Select the PDF file from your computer.
-
Save (save) the settings.
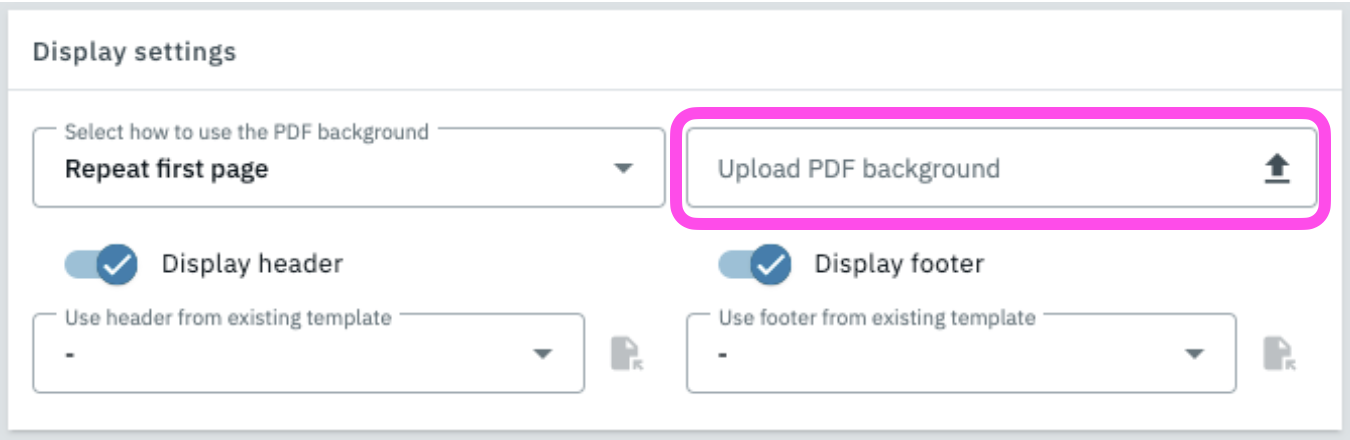
Click Show preview (visibility) in the detail view to check on the PDF background.
5.3. Generating the address label
After you have created and saved a template for a label, you can print the label in the Orders » Fulfilment » Address labels menu.
Generating the address label:
-
Go to Orders » Fulfilment.
-
Expand the section Address labels ().
-
Carry out the desired settings. Note Table 2.
-
Click on the gear-wheel icon (settings).
→ The shipping label opens in a separate window and can be printed.
| Setting | Explanation |
|---|---|
Search filters |
|
Label template |
Select the template from the drop-down list. |
Order status |
Select the current status of the orders that you would like to generate address labels for. |
Order ID |
Enter one (or more) order IDs. Address labels are only generated for the specified orders. Separate multiple IDs with commas. |
Contact ID |
Enter one (or more) customer IDs. Address labels are only generated for the specified customers. Separate multiple IDs with commas. |
Item |
Enter one or more item IDs. Address labels are only generated for the specified items. Separate multiple IDs with commas. |
Type |
Select the type from the drop-down list. Select the option Order to generate address labels for orders only. Select the option ALL to generate address labels for all types of orders, e.g. also for credit notes and returns. |
Shipping service provider |
Select the shipping service provider from the drop-down list to generate address labels for one shipping service provider only. Select the option ALL to generate address labels for all shipping service providers. |
Client (store) |
Select the client (store) from the drop-down list to generate address labels for one client only. Select the option ALL to generate address labels for all clients. |
Warehouse |
Select the warehouse from the drop-down list to generate address labels for one warehouse only. Select the option ALL to generate address labels for all warehouses. |
Start from line |
Enter the number to determine which line the print should begin from. |
Sorting |
Determine the identifying feature that you would like to use for sorting the address labels that are generated. Alternatively, select the option NONE if you do not want to have the labels be sorted in any particular way. |
Grouping |
Determine which criterion you would like to use for generating and grouping the address labels. Select one of the following options: |
Limit |
Select how many orders should be edited at one time. |
Procedure |
|
Change order status |
Select a new status that you would like to have assigned to the selected orders after the invoices were successfully retrieved. |
|
Using the label printer
It is possible to use label printers. Label rolls are used most of the time. You can generate the necessary labels in the Setup » Orders » Documents » Address label menu. Enter 1 for the options Lines per page and Columns per page. This way, you end up with one label per PDF page. In this case, the label measurements would correspond to the page measurements. |
6. Generating the delivery list
In the Orders » Fulfilment menu in the section Delivery list, you carry out settings with which you define which packages should be on the delivery list that will be generated next. For example, you can generate a delivery list for all orders that are in Status [6] Currently being shipped by selecting the correct search filter settings.
Generating the delivery list:
-
Go to Orders » Fulfilment.
-
Expand the Delivery list section ().
-
Carry out the settings for the search filters. Note Table 3.
-
Click on the gear-wheel icon (material:settings) to generate the delivery list.
→ A file containing the data that corresponds to the search criteria entered is listed.
| Setting | Explanation |
|---|---|
Order status |
Select the status of the orders that you are searching for. Only the orders with this status are included in the delivery list. |
Owner |
Select an owner for the orders that you are searching for. Alternatively, select the option ALL. |
Outgoing items |
Click in the field to open the calendar. Select a date from the calendar or manually enter the date to narrow down the orders that are on the delivery list. The delivery list only includes orders which had their outgoing items booked that day. If no date was selected or entered, you search for orders where the outgoing items were not booked yet. |
Shipping method |
Select a shipping service provider for the orders that you are searching for. Alternatively, select the option ALL. |
List number |
Enter the number of the delivery list. This number is displayed on the generated delivery list. If you are generating a delivery list for the first time, number 1 is set in this field by default. Every time that you generate a delivery list, this number automatically increases by 1. |
Customer number |
Enter the customer number. This number is displayed on the generated delivery list. |
Title |
Enter a title for the delivery list. The title is displayed on the generated delivery list. |
Name |
Enter the name. The name as well as the contact data (address, postcode and town) are displayed on the generated delivery list. |
Address |
Enter own address. |
Postcode / town |
Enter the postcode and town. |
Display format |
Select the format for the delivery list. The following options can be selected: PDF and CSV. |