PlentyONE Flow Hub
You can find Flow Hub in the Automation » Flow Hub menu. There, you can organise, review and interact with your flows all in one place.
The aim is to automate as much as possible, whilst retaining control at critical points. This is achieved through interactive actions. You add these to your flows in Flow Studio, and they are then executed in Flow Hub: The flow is paused precisely at the point where a decision is required, and resumes once the relevant input has been provided.
You can customise the Flow Hub user interface to suit your employees’ needs using MyView. For example, warehouse staff only see what they need to work efficiently.
1. Flow Hub Overview
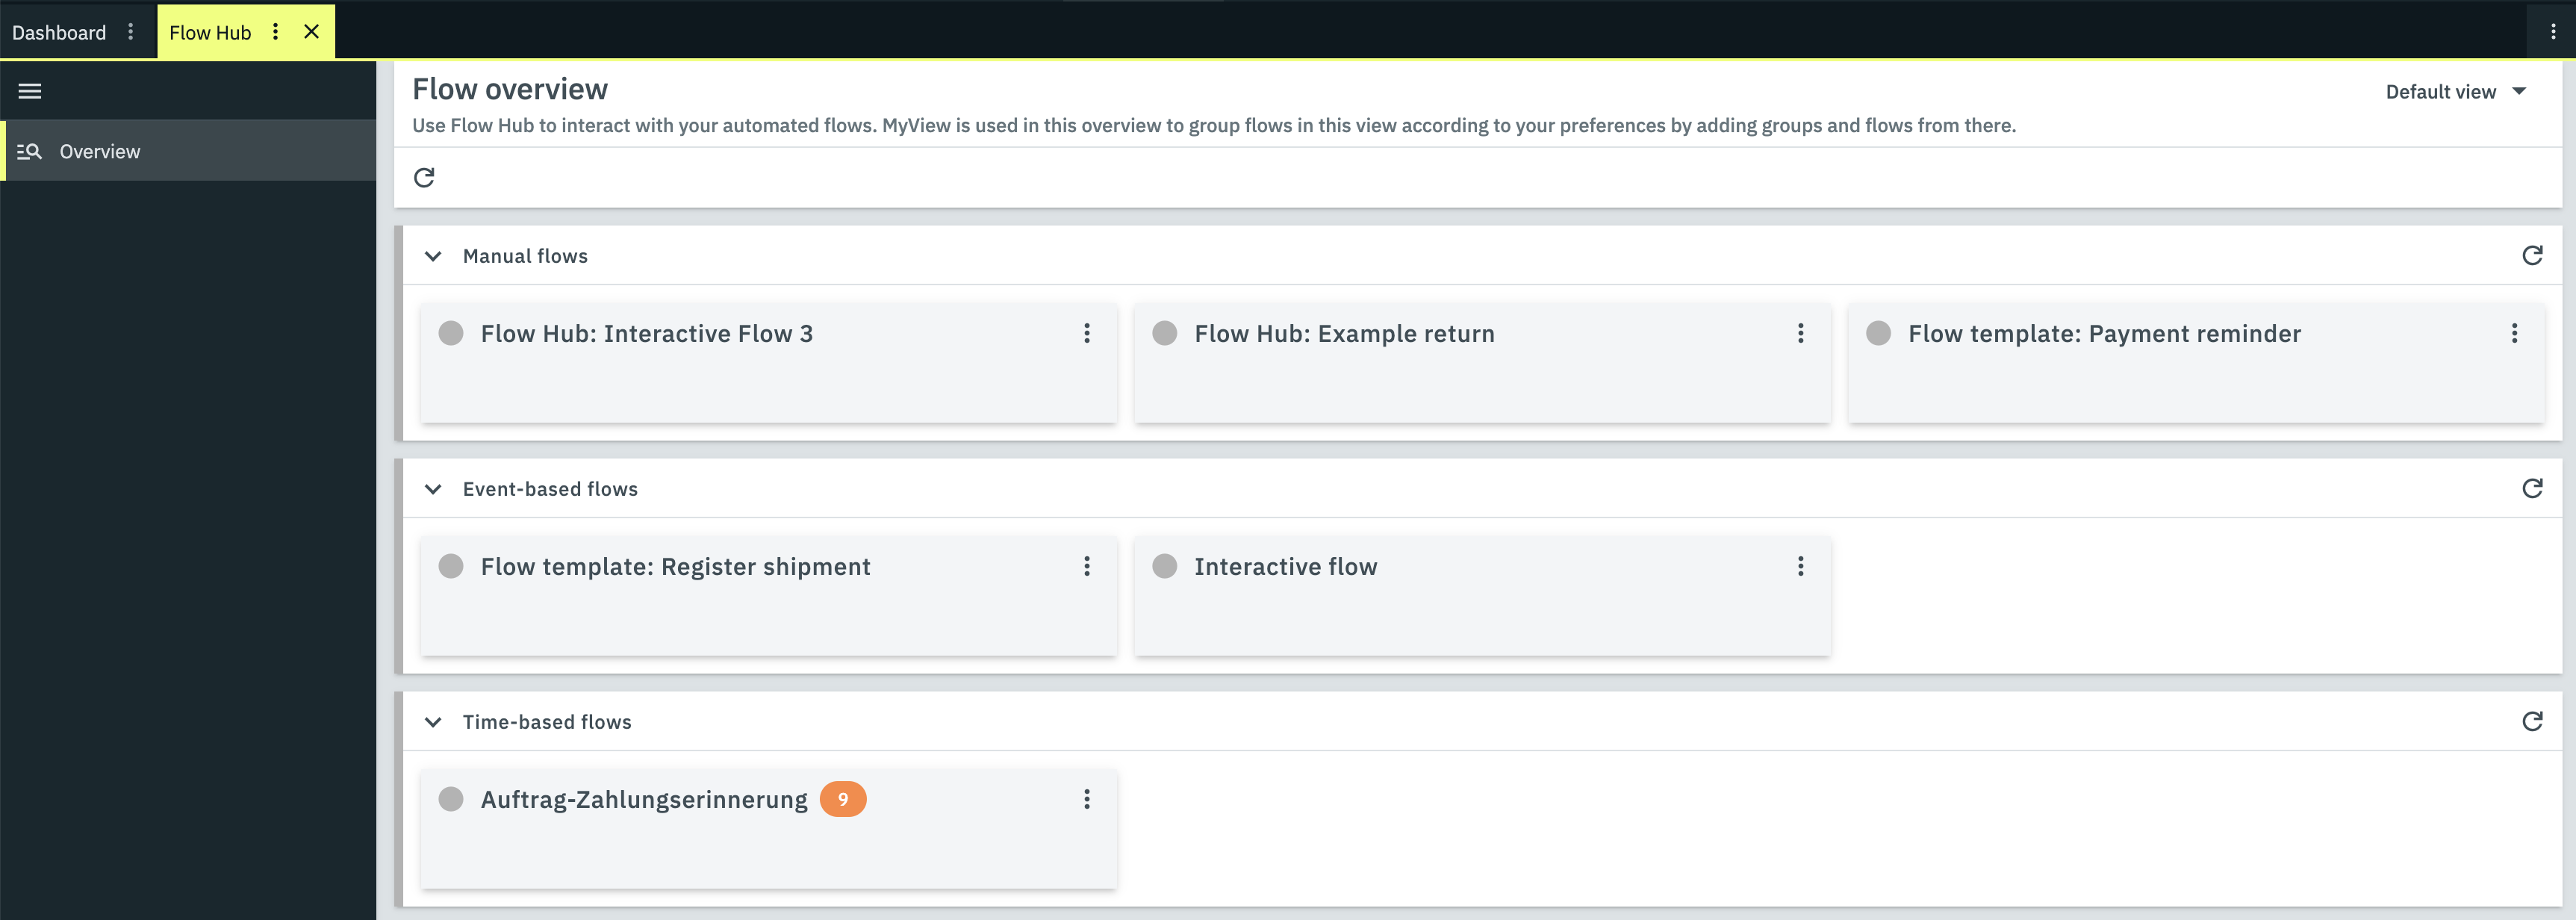
The Flow Hub overview is the home page where all active flows are grouped into cards. What you see first is the default view, in which your flows are divided into Manual flows, Event-based flows and Time-based flows.
You can customise the view by clicking on Default view in the top right-hand corner and selecting your preferred option from the drop-down menu.
You can:
-
Add a new view
-
Edit the current view
-
Upload a view that has already been created using MyView
When creating and editing a view, you can use the Spacer and Flow group elements, which you can further customise in their respective settings. To add an item, simply drag it into the overview.
|
How do flows get into the Hub?
All flows that have the status Active in Flow Studio are displayed in Flow Hub. |
1.1. Adding a new view
-
Click on Default view in the upper right corner.
-
Select the option add Add new view from the drop-down list.
→ A new window opens. -
Enter a name for your new view.
-
Tick the box if you want to create a blank view: In this case, all elements present in the default view will be removed. If you do not tick the box, these will remain.
-
Click CREATE if you don’t want to make any further changes for now, or click CREATE AND EDIT if you want to edit the elements straight away. The settings will then appear on the right-hand side. You can also open them at any time via the menu item edit Edit current view in the drop-down list.
→ The new view will be created, depending on your choice, with or without the settings open In the top right-hand corner, you can now see the name you gave your view. You can use this button to switch between views.
1.2. Editing the current view
-
Click on the name of the current view in the top right-hand corner.
-
Select the option edit Edit current view from the drop-down list.
→ The settings panel opens on the right-hand side: You can change the view name and access a link to rights management. At the bottom, you can see the elements that you can add to your view. Spacers and Flow groups are available to you. -
Drag the desired items into the overview.
-
Move your cursor over the element. You will then see the options available for that particular element.
-
Carry out the desired settings there.
-
Click on save Save view.
| Element | Settings |
|---|---|
Spacer |
delete Delete Delete element |
Flow group |
delete Delete Delete element
Drag the flow tiles from the lower Elements section into the Flow group. You edit the tiles in the same way as spacers and flow groups. |
Flow tile |
delete Delete Delete element
Tick the box if you want the chip to be displayed even for 0 instances. |
|
Settings marked with * are mandatory. All the others are optional. |
1.3. Uploading a view
-
Click on the name of the current view in the top right-hand corner.
-
Select the option upload Upload view from the drop-down list to upload a view that you have previously created using MyView.
→ A new window opens. -
There, click on attach_file Select file and select the view you have created from your files.
-
Click on UPLOAD.
2. Organising flows in Flow Hub
2.1. The Flow Hub detail view
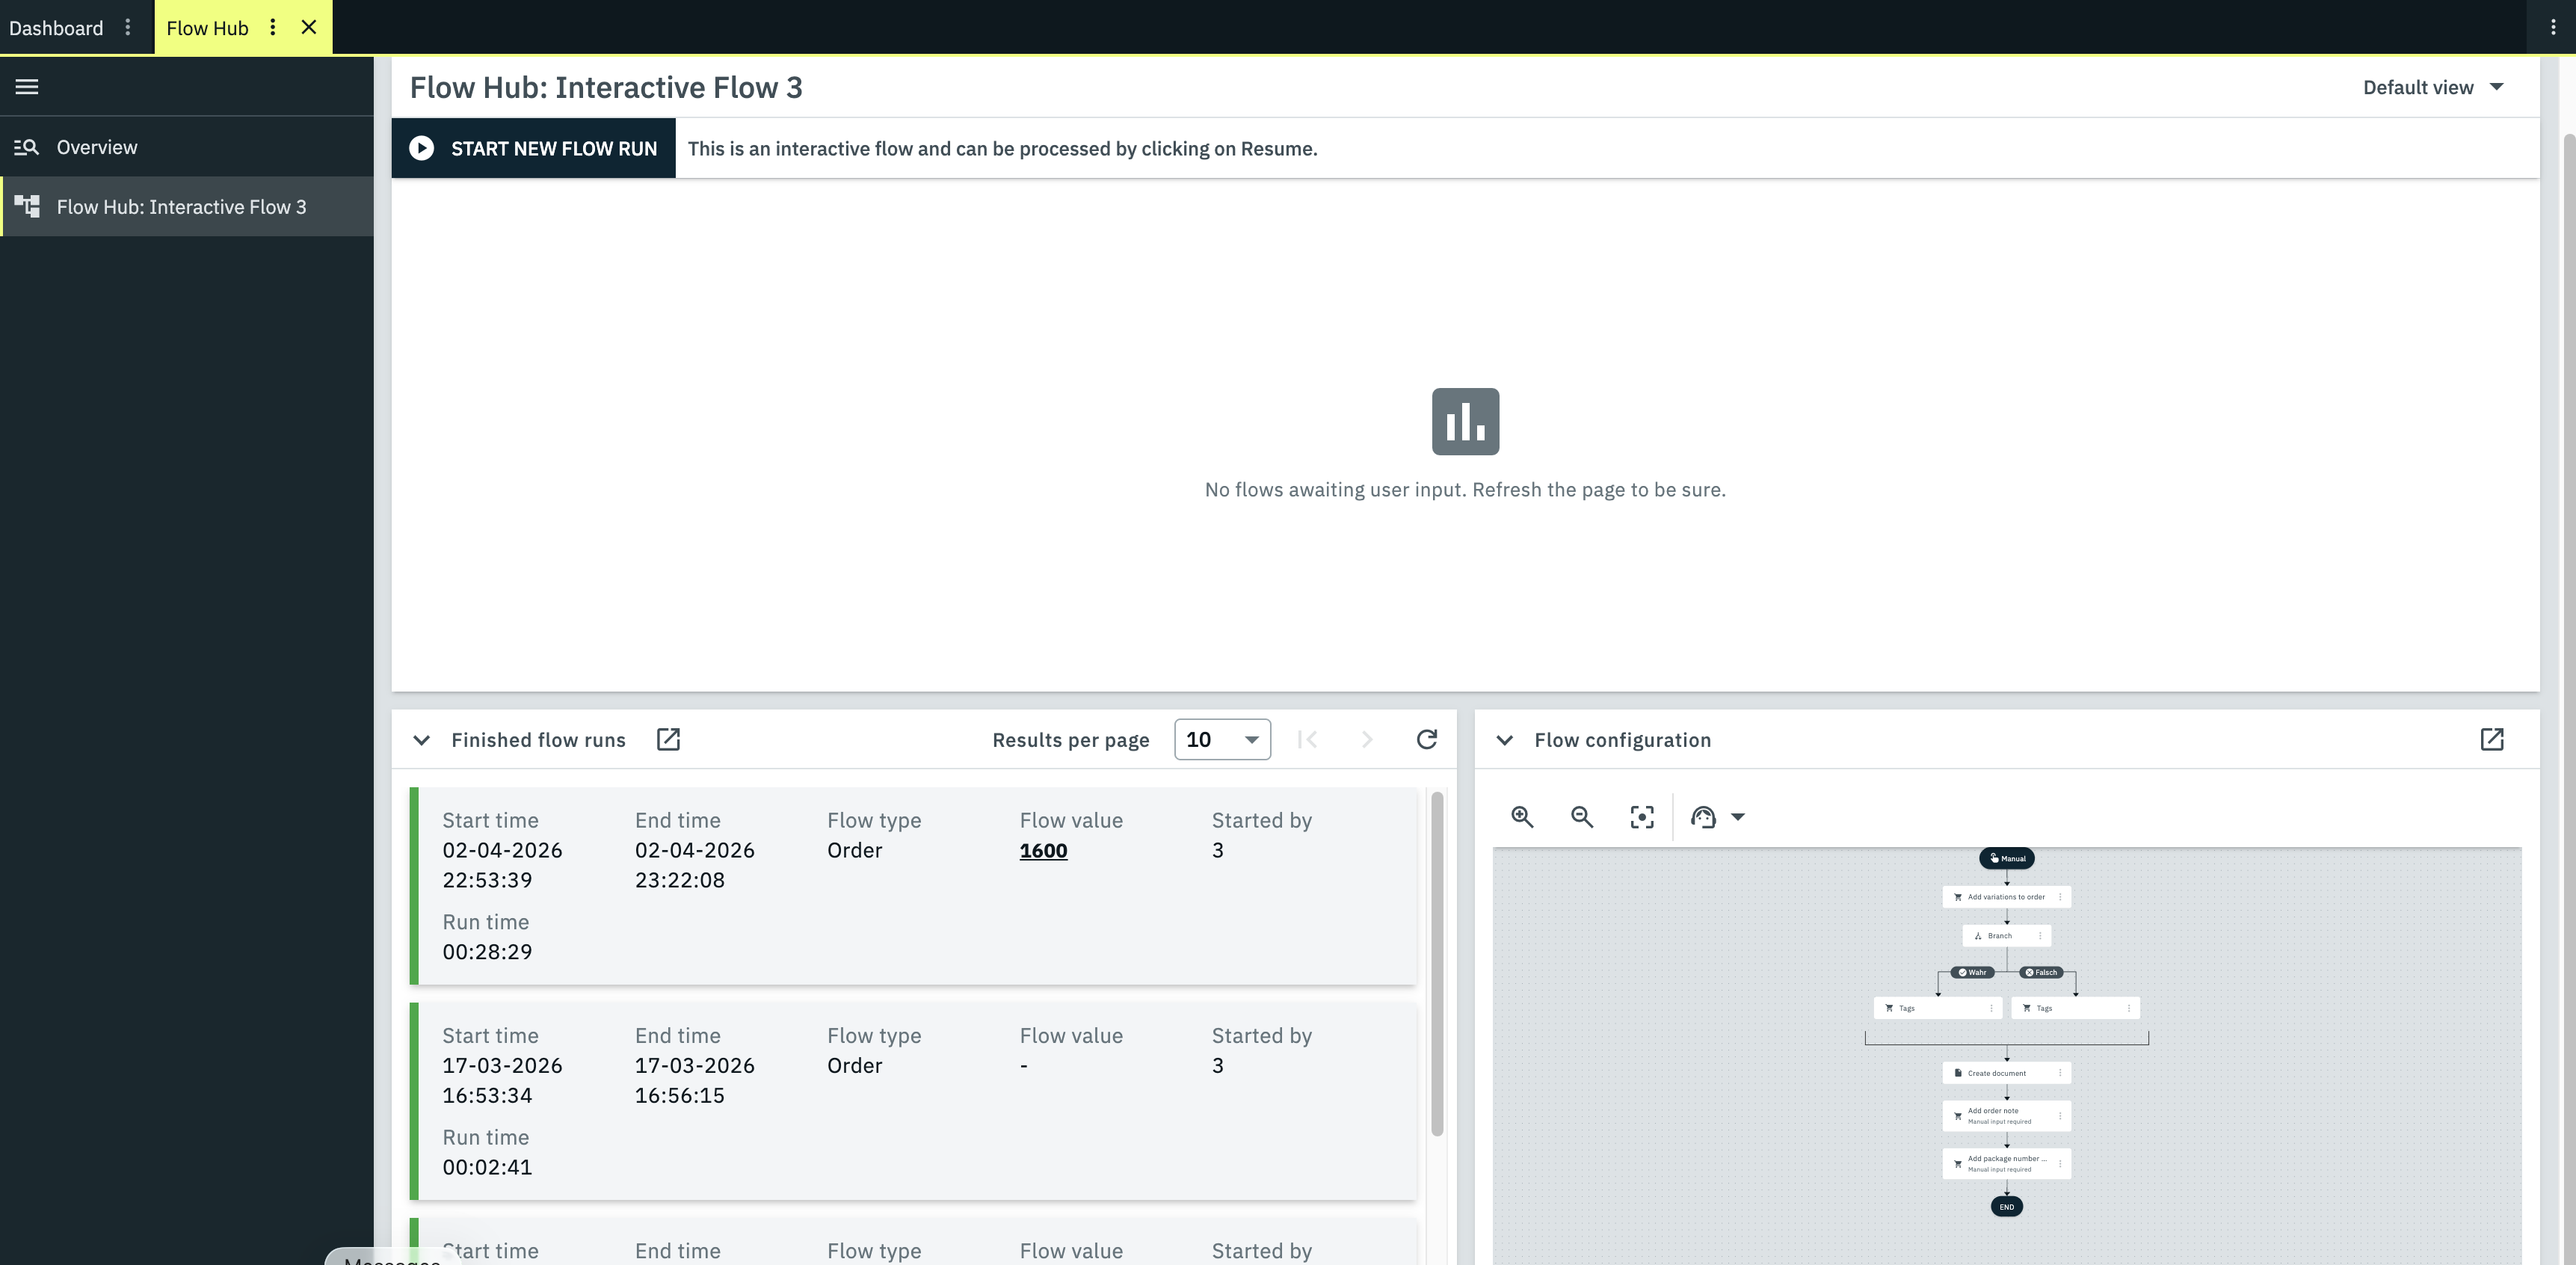
Once you’ve clicked on a flow in the overview, you’ll be taken to its details page.
In the standard view of the detail view for a flow, you will see the following elements:
2.1.1. “Start new flow run” button
As the name suggests, you can use this button to manually start a new flow execution. If you click on it, a window will open. Here, select an object type (order, flow or contact), enter the relevant IDs, and then click START RUN.
2.1.2. Awaiting user input
If there are any instances of the flow that require user input, they will appear here, along with the start time, the flow type, the flow value and the duration. You have the option to resume the flow run.
If an order ID is entered under Flow value, you can click on it to go to the order for which the flow is being executed.
2.1.3. Finished flow runs
This window lists the completed runs of the flow, showing the start and end times, flow type, flow value and runtime. Runs marked in green have completed successfully. Errors occurred in the runs marked in red, and they were aborted.
Click on a flow to go to the Flow Tracker. You can view the history here.
If an order ID is entered under Flow value, you can click on it to go to the order for which the flow is being executed.
2.1.4. Canvas
On the canvas, you can see the sequence of steps in the flow, as created in Flow Studio. Use the magnifying glass with the + symbol to zoom in, the one with the - symbol to zoom out, and the third icon to centre the view.
Would you like to change the sequence of steps? Then go back to Flow Studio by clicking on open_in_new in the top right-hand corner.
3. Running flows in Flow Hub
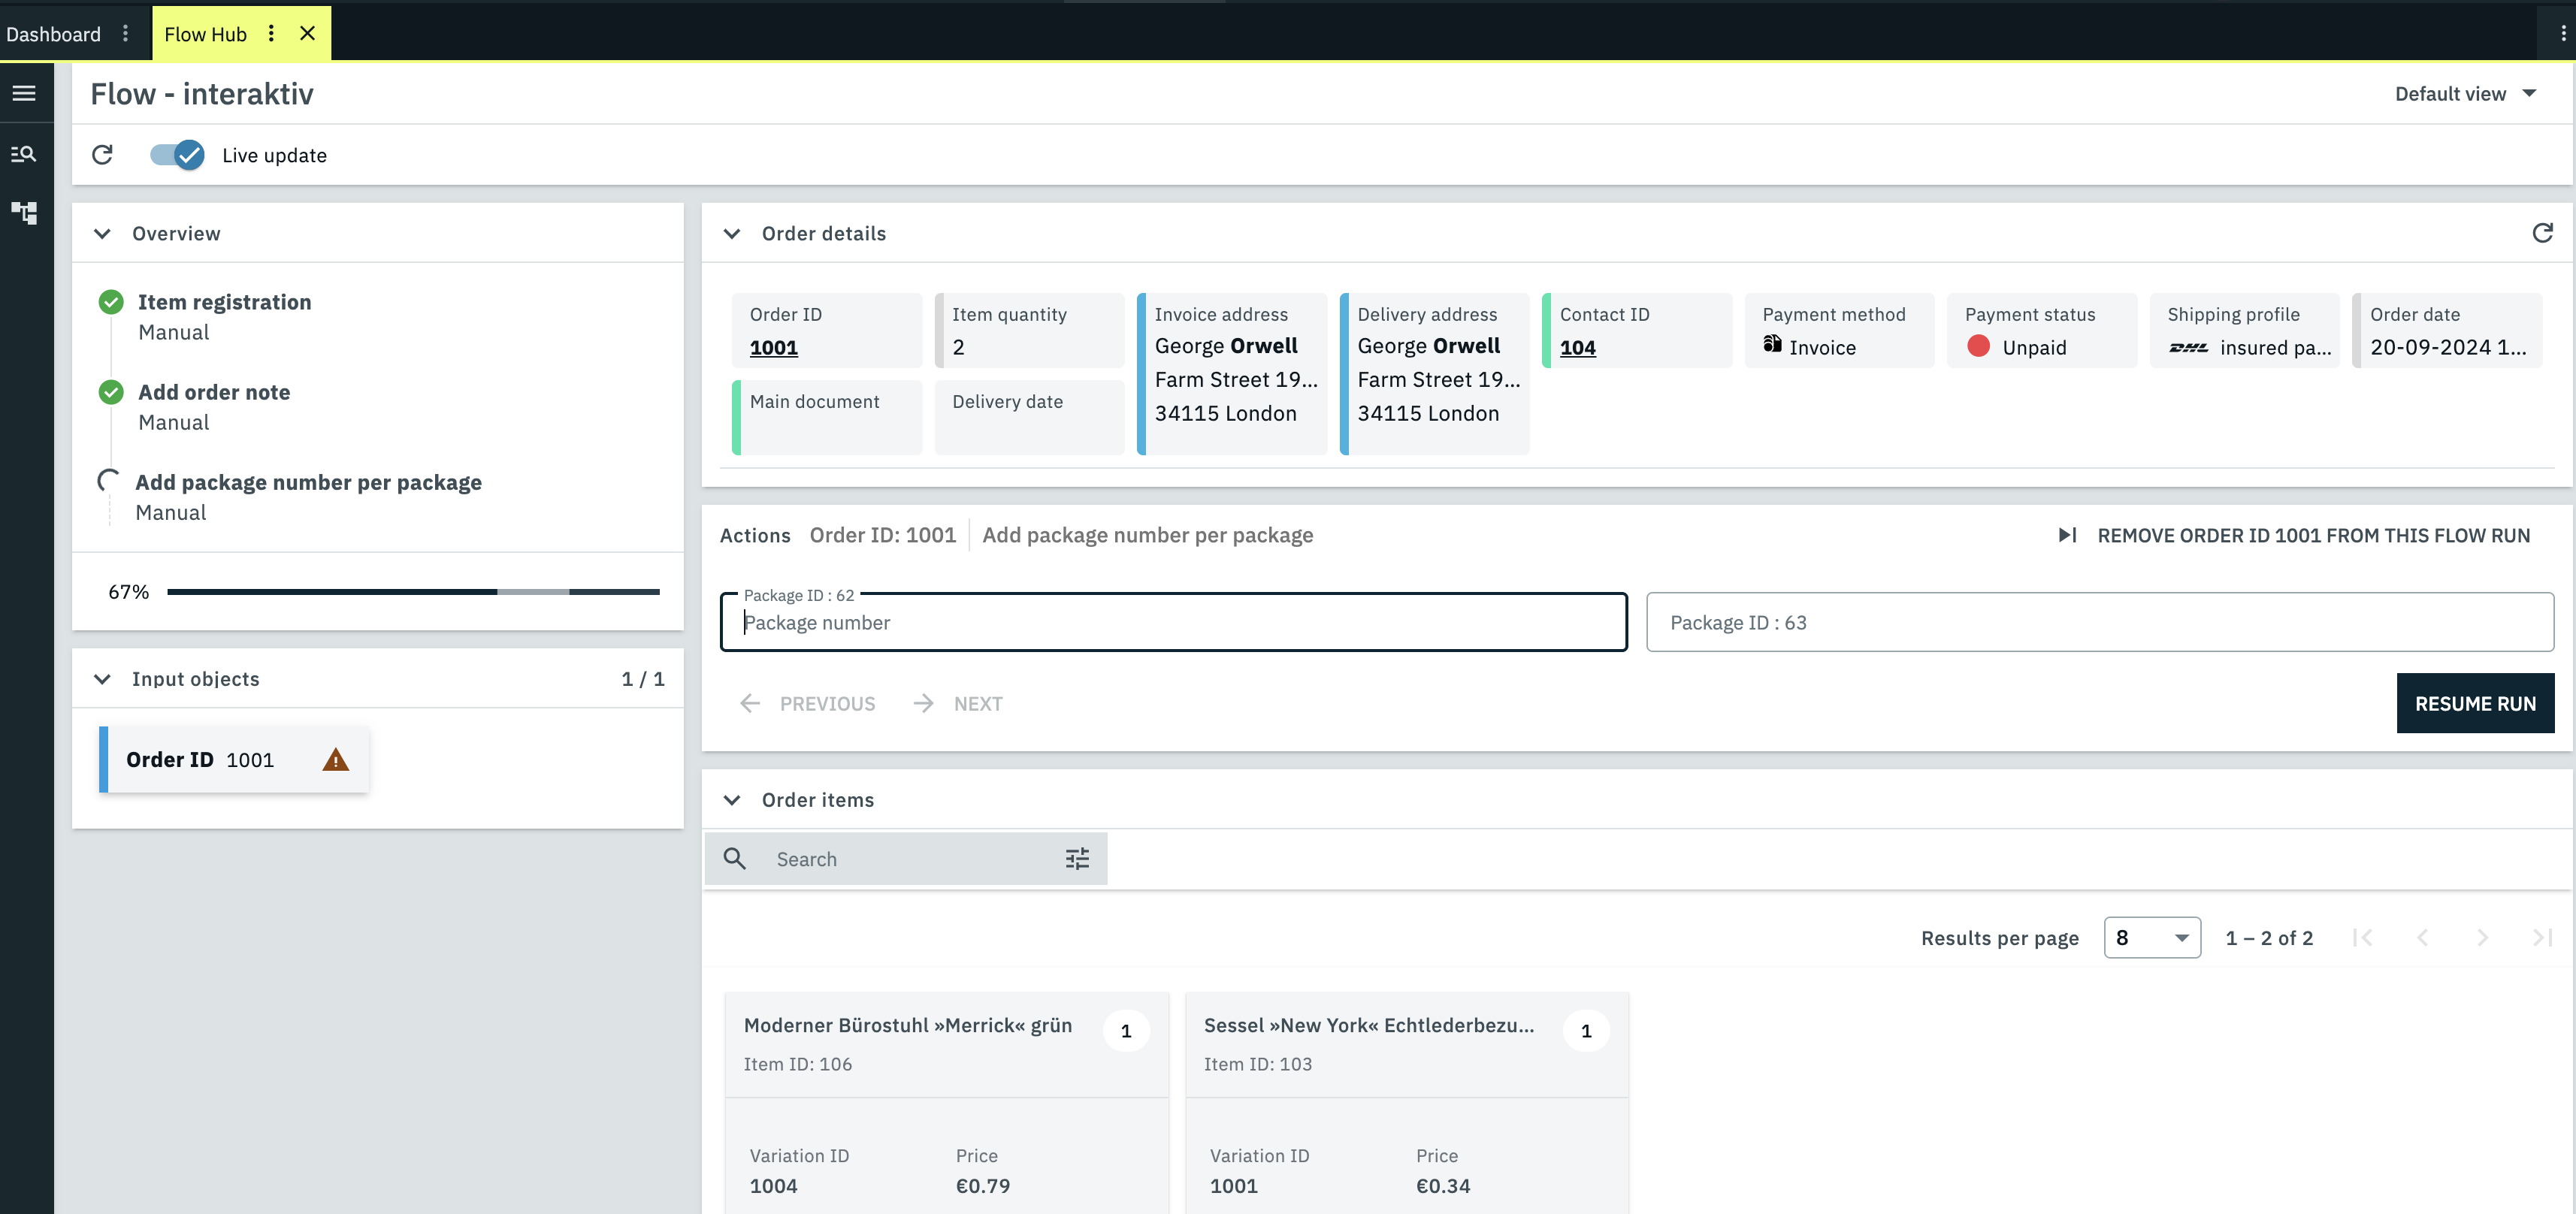
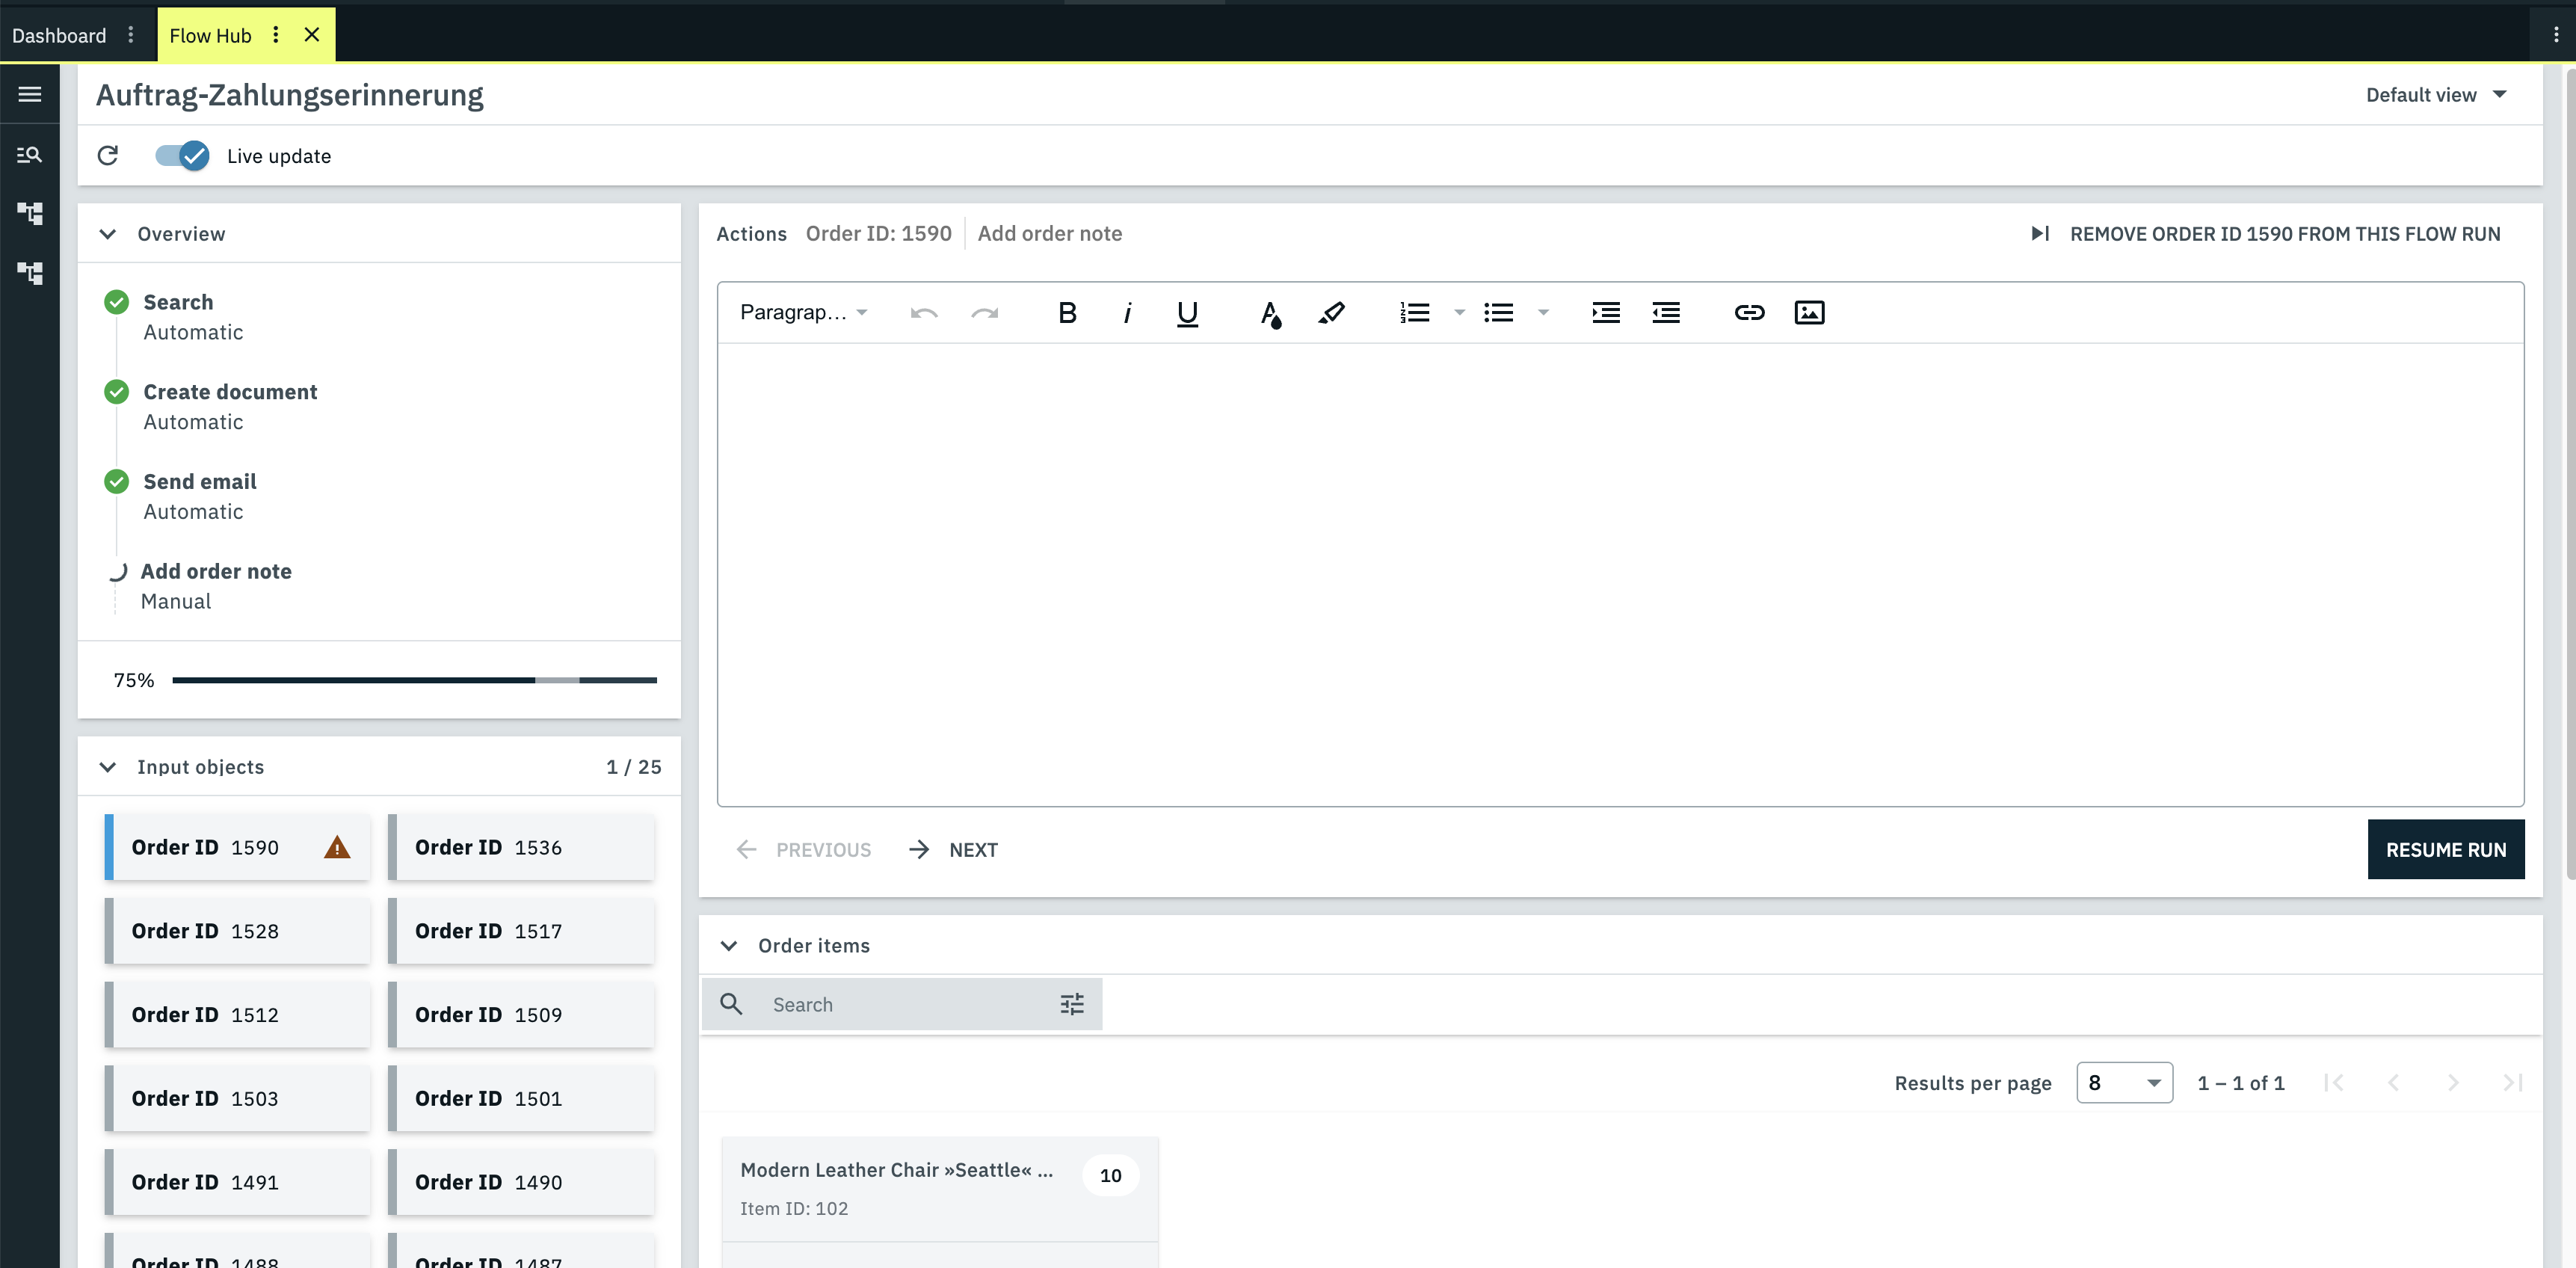
If there is a flow in the detail view under Awaiting user input, you can continue executing it by clicking RESUME. You will then be taken to the execution view of this flow.
|
Customising view via MyView
Would you like to customise the detail view to suit your needs? This UI is a MyView user interface. You can adjust the settings via Default view at the top right of the screen. |
3.1. The Flow Hub execution view
In the execution view, you can monitor your flow whilst it is running, make manual inputs directly if required by the flow (see interactive actions), and then continue the flow.
You will also see important information here, such as the input objects, order details and order items for the relevant flow. You can customise the view to suit your preferences using MyView.
|
The execution view is only available for flows that require manual input. |
3.1.1. Overview
The overview shows you a section of the flow. You can also see which action is currently being processed in the flow run. Completed actions are indicated by a check_circle. The current action to be processed is represented by radio_button_unchecked.
3.1.2. Order details
The order details display information such as the order date, contact ID, and billing and delivery addresses for the order selected in the input objects. Click on refresh to refresh the order details.
3.1.3. Input objects
In the Input objects section, you can see all the objects (for example, order IDs) associated with the flow run that require manual input. When you click on an object, you can enter details for it in the Actions tile, remove the object from the flow run, and then resume the execution.