Attributes
Some items like shoes and t-shirts are sold in various sizes and colours. In PlentyONE, such characteristics are called attributes. Attributes help you simultaneously characterise your products and create saleable variations, e.g. the t-shirt in the colour red and the size S.
1. Creating attributes manually
First, create attributes like colour or size.
-
Go to Setup » Item » Attributes.
-
Click on New attribute.
-
Enter an internal name.
-
Click on save Save.
→ The attribute is created and the tab Basic settings opens. -
Carry out the settings in all of the tabs.
-
Save () the settings.
1.1. Tab: Basic settings
| Setting | Explanation |
|---|---|
Name (internal) |
Unique name for the attribute. The internal name is used in the PlentyONE back end only and is not visible for the customers. The internal name can only be assigned once per system. The internal name must not contain the following characters, otherwise errors may occur while exchanging data:
|
Position |
Which attribute should be displayed in the plentyShop first, second, third, etc? Enter a position number into this field. If an item has multiple attributes, then the attributes will be displayed in ascending order according to their position number. |
Image link possible |
Select this option (), for example, if you want the item image to change on eBay, depending on which colour a customer chooses. In other words, select this option if the appropriate images should automatically be displayed. Note: Although multiple attributes can be linked with one variation, the image link is only possible for one attribute per variation. Additional settings: These steps are described in further detail in another chapter. |
Attribute selection in store |
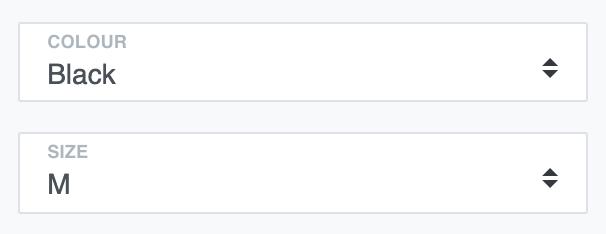
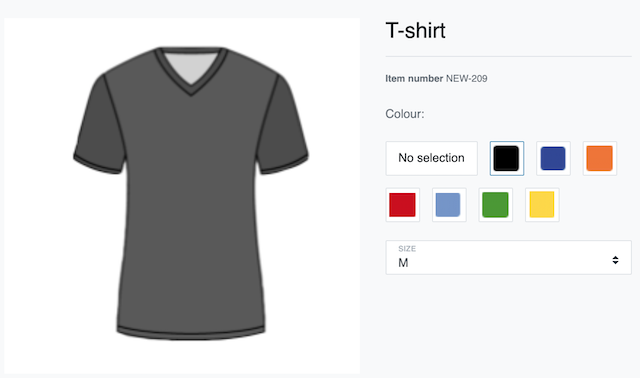
How should customers choose sizes or colours in your plentyShop? Should they choose the name from a drop-down list or click on an image?
|
Display variations in item lists as one entry |
Should variations that have this attribute be displayed individually or cumulatively in the plentyShop?
Example: you sell a shoe with 2 attributes: colour and size. You want each shoe colour to look like an individual product in the plentyShop, but not each size. In this case, you’ll check this option for the attribute “colour” and you you won’t check this option for the attribute “size”. Relationship to other settings: Check your settings for the item view and category view in the plentyShop LTS plugin. The option Show variations by type can affect the option Display variations in item lists as one entry and vice versa. |
1.2. Tab: Name
Enter a name for the attribute (e.g. “Colour” or “Size”). This name will be visible in your plentyShop. If your shop is available in multiple languages, then you can enter translations of the name here.
| The attribute name can be displayed in the plentyShop e.g. in a drop-down list. Make the name as short as possible since the space is limited. |
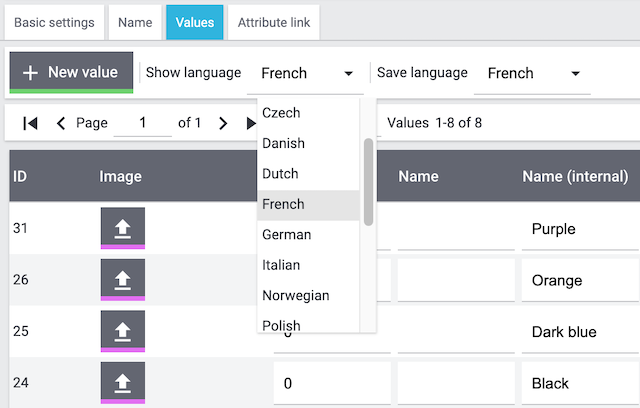
1.3. Tab: Values
Create attribute values like red, blue, green or S, M, L, XL.
-
Go to Setup » Item » Attributes » [Open attribute] » Tab: Values.
-
Click on New value.
-
Enter an internal name. Pay attention to upper and lower-case letters, since PlentyONE understands e.g. "Yellow" and "yellow" as two different attribute values.
-
Click on save Save.
→ The attribute value is assigned an ID and displayed in the Values tab. -
Carry out additional settings in this tab.
-
Save () the settings.
| Setting | Explanation |
|---|---|
ID |
A consecutive ID is automatically assigned by the system and cannot be changed. |
Image |
How should customers choose sizes or colours in your plentyShop? Should they choose the name from a drop-down list or click on an image? Upload an image here () if you want to visually display the attribute value. Additional settings:
These steps are described in further detail in another chapter. |
Position |
Which attribute value should be displayed in the plentyShop first, second, third, etc? Enter a position number into this field. The attribute values will be displayed in ascending order according to their position number. |
Name |
Enter a name for the attribute value (e.g. “Red”, “Blue” or “Green”). This name will be visible in your plentyShop. Multilingualism: If your shop is available in multiple languages, then you can enter translations of the name here.
|
Name (internal) |
Unique name of the attribute value. The internal name is only used in the PlentyONE back end and is not visible in the plentyShop. Note: The internal name can only be assigned once per attribute.
The internal name is case-sensitive, i.e. "Yellow" and "yellow" are understood as two different attribute values.
The internal name must not contain the following characters, otherwise errors may occur while exchanging data:
|
Note |
Enter an optional note about the attribute value. Tip: The note is for internal use only. The text does not appear in the plentyShop. |
Percentage |
Enter the percentages for the automatic distribution of attribute values. When reordering an item, the quantities of attribute values will automatically be distributed among the total quantity. Note: Automatic distribution only takes effect for items with exactly two attribute values. |
1.4. Tab: Attribute link
Some markets, such as Amazon and eBay, require you to link your own attribute values with their attribute values. For example, imagine you sell a turquoise t-shirt. But the market you want to sell it on only accepts the colours green and blue. Link your own attribute values with the ones on the other market. This ensures that your items are displayed correctly.
|
Additional settings
Should the item image change, e.g. on eBay, depending on which size or colour a customer chooses? Some markets, such as eBay, require you to also link your variation images with the appropriate attribute values. |
2. Creating attributes via import
PlentyONE has an import tool, which you can use to import attributes. The idea is simple. Rather than manually saving attribute data in PlentyONE, you’ll enter the same information into a CSV file and then import this file into your system.
-
Create attributes (like colour and size) and attribute values (like blue, red, green and S, M, L). You can do this with the import type Attribute.
-
Use the attributes to generate variations. You can do this with the import type Item. See a practical example to learn how variations are generated.
|
Attributes can also be exported
|
3. Generating variations
An item’s first variation is called its main variation. If an item has multiple variations, then the main variation can either be a saleable product or it can be a virtual data record. A virtual main variation is used to manage the other variations of the item with inheritance.
Imagine you sell a t-shirt in the sizes S, M, L and XL:
-
Main variation is not saleable: The main variation is not for sale and it doesn’t correspond to any of these sizes. The main variation is simply a data container used to manage prices, categories and other product settings.
-
Main variation is saleable: The main variation is for sale and corresponds to one of these sizes, e.g. S.
How exactly you’ll proceed depends on whether the main variation should be for sale or not.
-
First create the item without selecting any attributes. This will create the main variation without any attributes.
-
Then choose the attributes while you create the necessary variations.
-
First create the item and choose the appropriate attribute value, e.g. the size S. The main variation will be created with this attribute value.
-
Then choose the remaining attributes while you create more variations.
4. Deleting attributes
Before you can delete an attribute, you have to delete all of the variations that are linked with this attribute.
Deleting variations linked to an attribute:
-
Go to Item » Items.
-
Click on tune.
-
Click besides the Attribute filter.
→ A pop-up window will open. -
Select the attribute from the tree structure () and click Apply.
-
Click on () Search.
→ All variations linked with this attribute are displayed. -
Select all of the variations ().
-
Click delete Delete variations.
-
Confirm your decision to delete the selected variation from the system.
Deleting an attribute:
-
Go to Setup » Item » Attributes.
-
Click on Delete () in the line of an attribute.
→ A new window opens. -
Click on Delete () again to confirm your decision.
→ The attribute is deleted.
5. Use cases
5.1. Images
Imagine you sell a t-shirt in the colours red, green and blue. You want customers e.g. to automatically see an image of the green t-shirt when they select the colour black in your plentyShop. Simply:
-
Upload all of the product images (i.e. images of the red, black and blue t-shirt variations).
-
Assign the images to the appropriate variations. For example, assign the black t-shirt image to the black t-shirt variation.

Upload images:
-
Go to Item » Items » [Open item] » Tab: Images » Section: Details.
-
Drag and drop the images into the appropriate area or select the images from where they are located on your computer.
Linking images with variations:
-
Go to Item » Items » [Open variation] » Tab: Images.
-
Select the images () that you want to link.
-
Save () the settings.
How should customers choose sizes or colours in your plentyShop? Should they choose the name from a drop-down list or click on an image? Follow these three steps if you want your attribute values to be displayed as images.
Step 1: Upload images for attribute values
-
Go to Setup » Item » Attributes » [Open attribute] » Tab: Values.
-
Click on Upload image () in the Image column.
-
Select the image from where it is saved on your computer.
→ The image is uploaded and a preview is shown. -
Repeat the steps to upload images for other attribute values.
-
Save () the settings.
Step 2: Change the appearance in the plentyShop from text to image
-
Go to Setup » Item » Attributes » [Open attribute] » Tab: Basic settings.
-
Select With image from the Attribute selection in store drop-down list.
-
Save () the settings.
Step 3: Change the size of attribute images
-
Go to Setup » Item » Images » Settings.
-
Enter the maximum height and width in the Attribute images area.
-
Save () the settings.
5.2. Markets
Some markets, such as Amazon and eBay, require you to link your own attribute values with their attribute values. For example, imagine you sell a turquoise t-shirt. But the market you want to sell it on only accepts the colours green and blue. Link your own attribute values with the ones on the other market. This ensures that your items are displayed correctly.
Should the item image change, e.g. on eBay, depending on which size or colour a customer chooses? Some markets like eBay not only require you to link your attributes with the market, but also to link your variation images with the appropriate attribute values.
Prerequisites
-
Have you already linked your variations to the corresponding images?
Instructions
-
Go to Item » Items » [Open item] » Tab: Images » Section: Details.
-
Select the appropriate attribute value for the item image from the Market attribute link drop-down list.
-
Save () the settings.
→ If a customer chooses the variation e.g. on eBay, he will see the appropriate item image.
| The option Market attribute link is only visible if you have met all of the requirements listed above. |
5.3. Multilingualism
Translate the names of your attributes and attribute values into all of the languages that you need.
Step 1: Translate the attributes
-
Go to Setup » Item » Attributes » [Open attribute] » Tab: Name.
-
Enter the name in as many different languages as needed.
-
Save () the settings.
| The attribute name can be displayed in the plentyShop e.g. in a drop-down list. Make the name as short as possible since the space is limited. |
Step 2: Translate the attribute values
-
Go to Setup » Item » Attributes » [Open attribute] » Tab: Values.
-
Select a language from the Show language drop-down list in the header.
→ Only the text in the Name column will change. -
In the Name column, enter the attribute values in the selected language.
-
Save () the settings.
6. FAQ
-
Attributes, for example, are the various colours and sizes that your products are available in. Attributes help you simultaneously characterise your products and create saleable variations, e.g. a t-shirt in the colour red and the size S.
-
Characteristics and properties define products without simultaneously creating saleable variations: Characteristics describe entire items. For example, if an item is available in red, blue or green, then the characteristic will apply to all three variations. Characteristics aren’t very flexible, they’re outdated and they’re gradually being replaced by properties. Properties describe specific variations. For example, if an item is available in red, blue or green, then the property can apply to one, two or all three of the variations. Therefore, properties are much more flexible.
Before you can delete an attribute, you have to delete all of the variations that are linked with this attribute. You can easily filter for all of the variations that are linked to an attribute and delete them. Further information and step-by-step instructions.
Prerequisites
-
Have you already linked your variations to the corresponding images?
Instructions
-
Go to Item » Items » [Open item] » Tab: Images » Section: Details.
-
Select the appropriate attribute value for the item image from the Market attribute link drop-down list.
-
Save () the settings.
→ If a customer chooses the variation e.g. on eBay, he will see the appropriate item image.
| The option Market attribute link is only visible if you have met all of the requirements listed above. |
Yes. You can reset your system to the status of any backup.
-
Open the database backup settings and select the area ItemAttribute. This restores the attributes and attribute values in the menu Setup » Item » Attributes. The attributes are not linked to the individual variations in the process.
-
Open the database backup settings and select the area ItemVariation. This restores the links, along with other variation data.
Once you have added attributes to an item, you can no longer add even more attributes to it. You can only add new values to the existing attributes.
Example: Imagine you sell a t-shirt with the attributes size and colour. Specifically, the t-shirt is available in the variations “Red/S”, “Red/L”, “Blue/S” and “Blue/L”.
-
What’s possible: You could add new colour and size variations. For example, you could add the variations “Green/S” and “Green/L”.
-
What’s not possible: You can not bring new attributes into play. For example, you can not add the attribute “Material” retroactively. In this case, we recommend creating a new item so that you don’t run into any problems with pending orders and existing stock levels.