MyView UI
1. What does MyView mean?
MyView user interfaces are based on a special technology that is developed by PlentyONE. While you can’t configure some UIs in PlentyONE, MyView interfaces offer you the possibility to create personal view sets, thus enabling you to adjust the layout in your own way This manual page offers you insights on what MyView has to offer you.
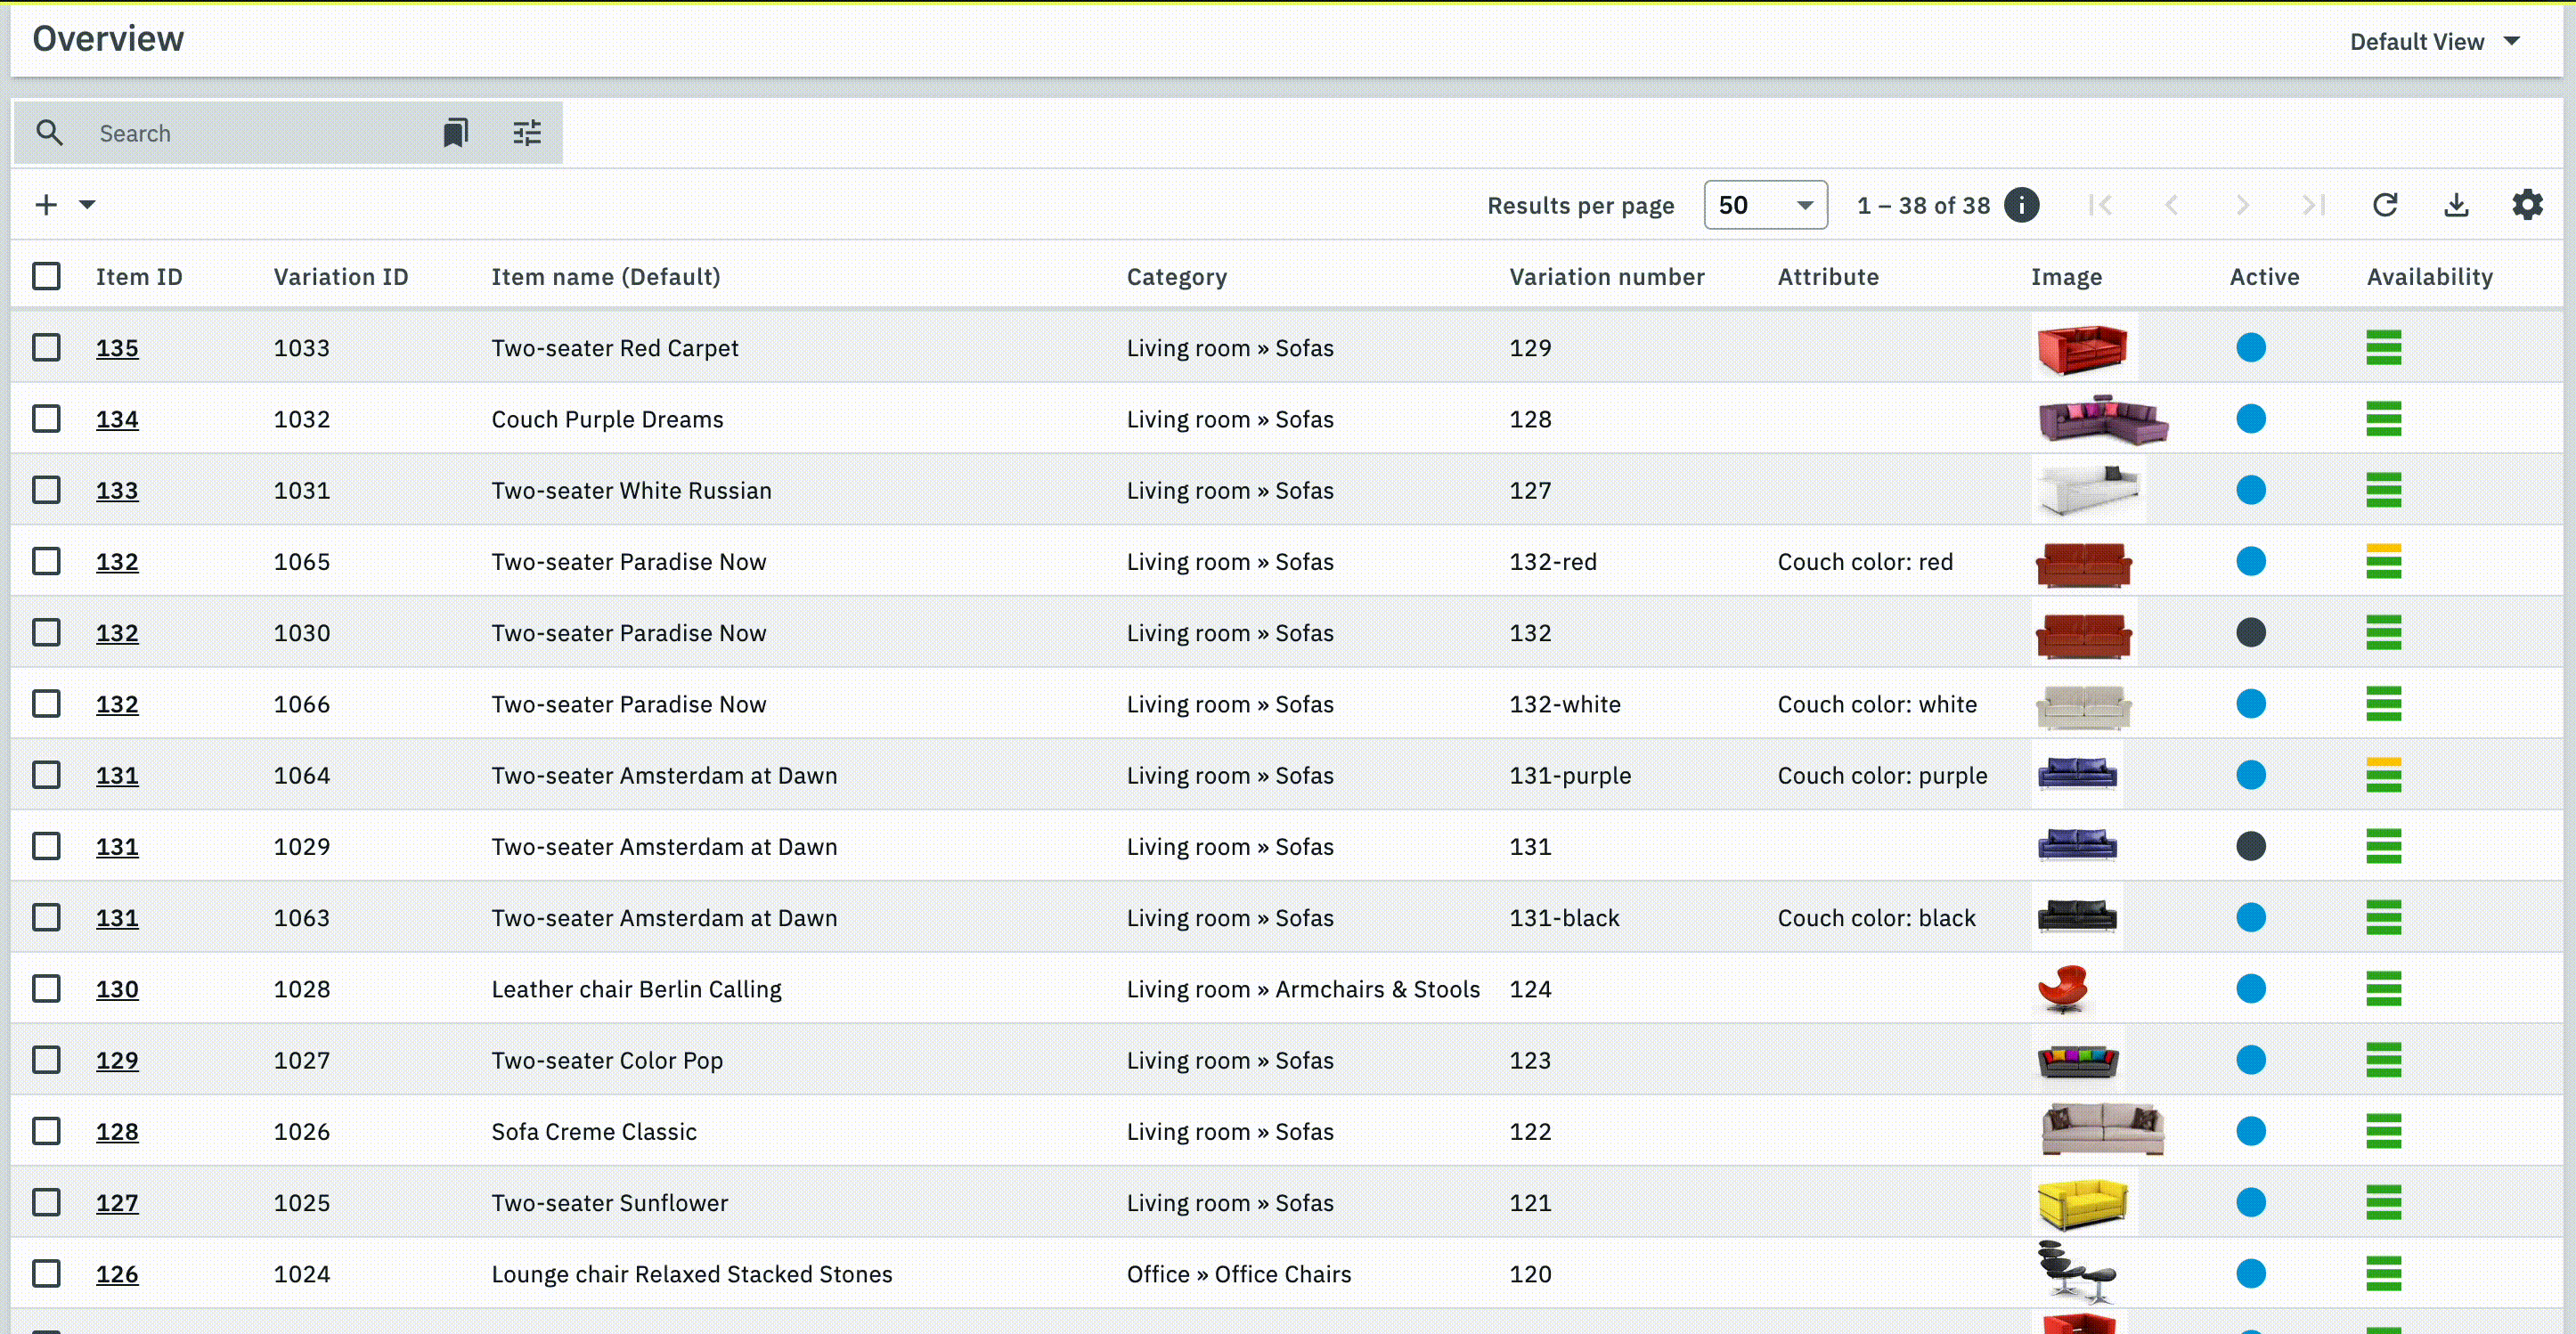
Many parts of PlentyONE are available as MyView. All these menus offer you a default view that you can instantly use. Additionally, you can create indefinite individual view sets. Table 1 shows a list of all menus where that is possible. Click on the links in the table to get more information.
| Menu path | Further information |
|---|---|
Orders » Orders |
|
Items » Items |
|
CRM » Contacts |
|
CRM » Messenger |
|
PlentyONE logo (Start) » Dashboard. |
In these menus you will find MyView at the top right of your screen:
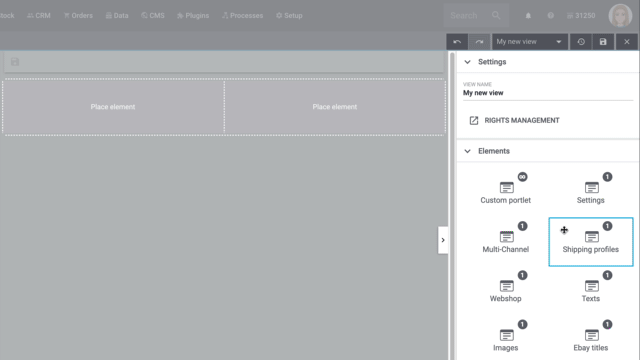
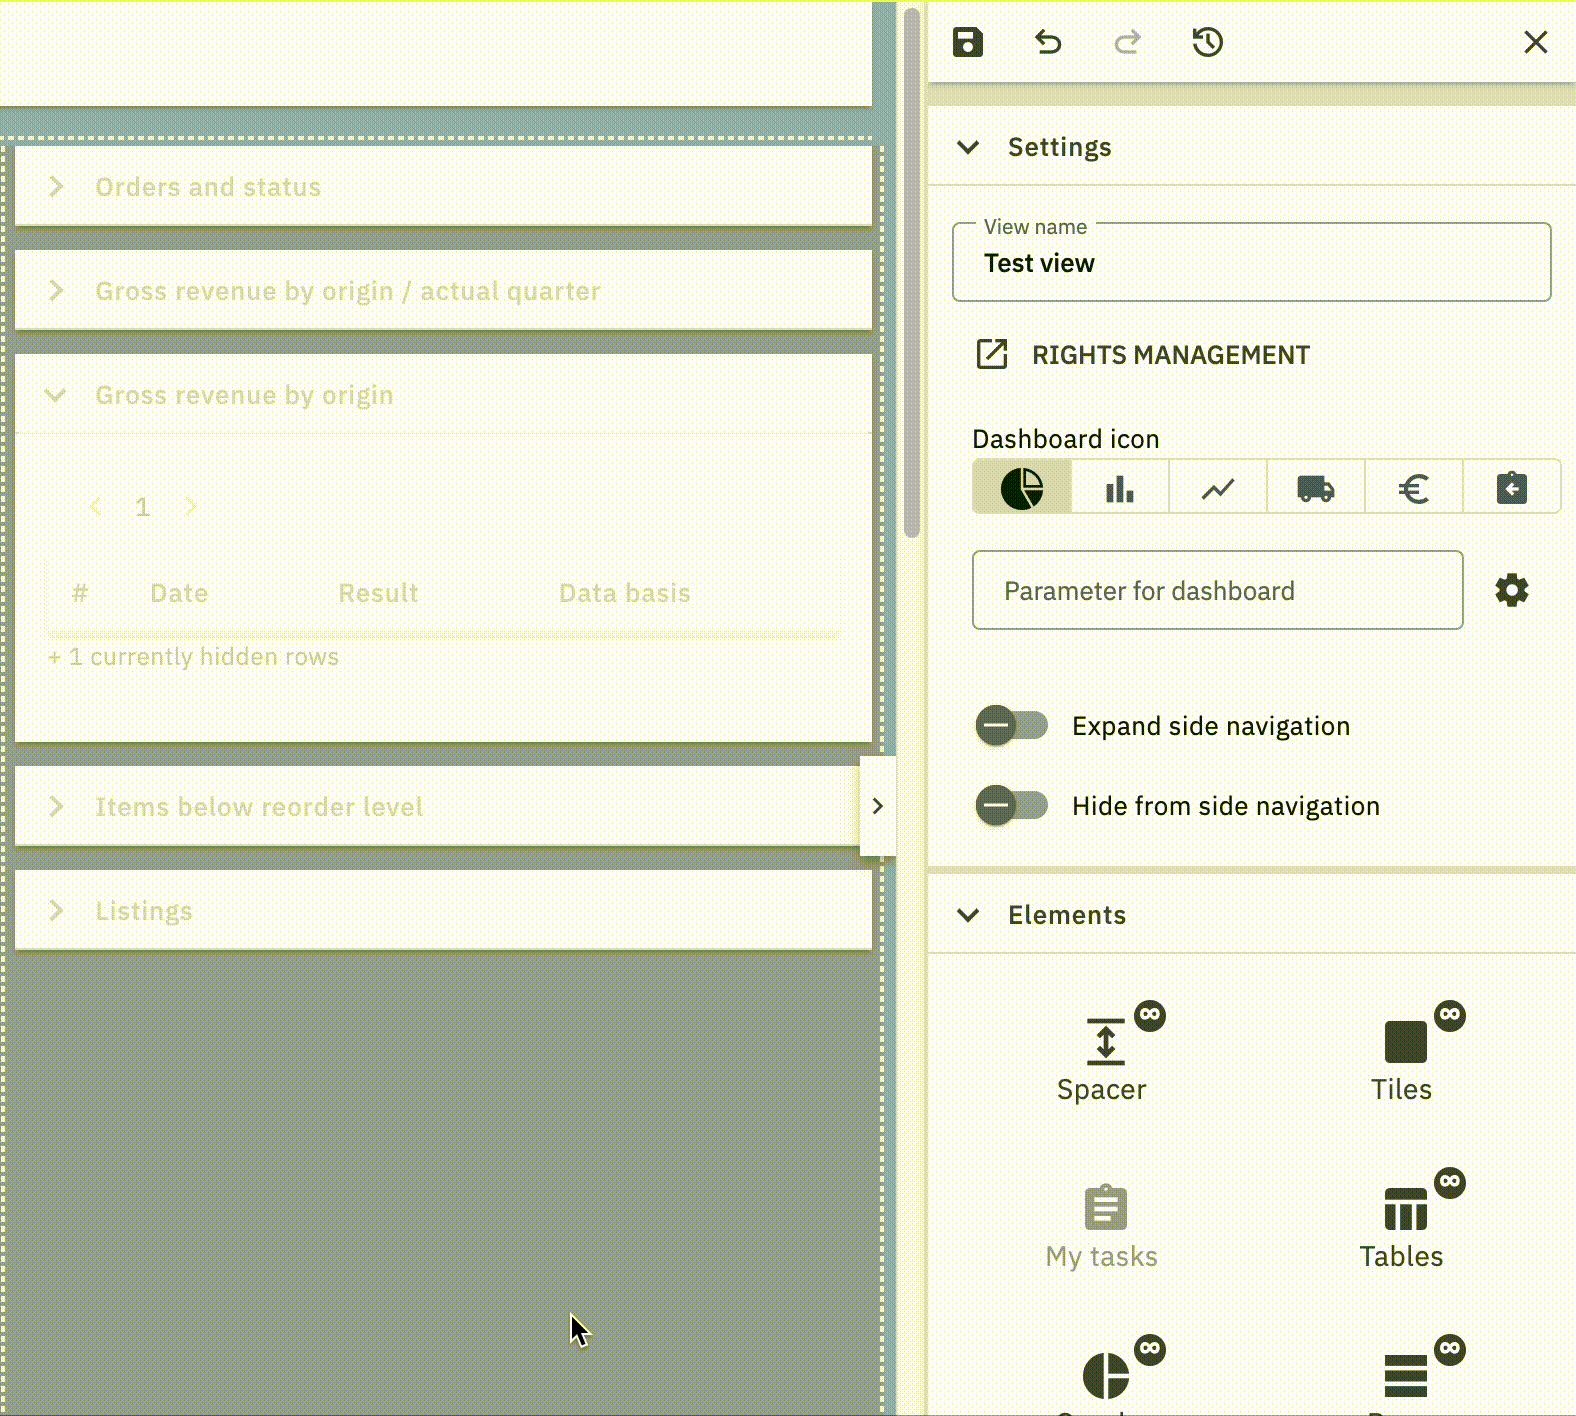
2. Editing mode
The editing mode allows a high degree of flexibility for positioning content and data in the menu. This works by intuitively positioning elements via drag-and-drop. You can individually adjust and edit each element. Table 2 contains an overview of the functions available in the editing mode.
|
Do you have admin rights?
Only admin users can create and edit views. If you are not an admin:
|
Element |
Symbol |
Explanation |
Edit view |
Opens the view for editing. |
|
Undo |
undo |
Undoes the last change, unless this change has already been saved. |
Redo |
redo |
Restores the previously undone change. |
Default view |
This area displays the view that is currently opened. Click on to switch to another view or to create a new view. |
|
Restoring the previously saved state |
restore |
Resets the view to the state that was last saved. |
Save |
save |
Saves the changes. By doing so, you can save as many different views as you like. |
Edit |
edit |
When you edit the element, you can see in the Elements area on the right side which elements have not been added yet and are therefore still available. Elements that have already been added are disabled and cannot be used another time. |
Delete |
delete |
Deletes the element. |
Close |
close |
Closes the editing mode. If you have not saved the changes yet, a security inquiry appears. |
3. Creating a new view set
To create a new view, proceed as described below.
Creating a new view:
-
Click on the list of views ().
-
Click on add Add new view.
-
Enter a name.
Optional: Tick Create empty view if the view should contain no elements. If you dont select it, the new view contains all elements of the currently selected view. -
Click on Create view.
Optional: Click on Create and Edit to open the new view in the editing mode.
→ The new view is created and opens automatically, i.e. it is applied. It’s now possible to switch between different views.
4. Placing elements
Drag-and-drop the elements to intuitively place them exactly where you want them. In addition, adjust the size of the elements according to your needs.
Proceed as described below to add elements.
Placing elements:
-
Go to .
-
Open the view in which you want to place an element.
-
Click on Edit view
-
On the right side, select an element and put it into the right position via drag-and-drop.
Optional: Move your cursor over the border of an element and drag the element to its desired size while holding on to your cursor.
Tip: Do you want to move your elements to another position at a later point in time? You can do so by using drag-and-drop until all elements are placed correctly.
5. Saving and applying filters
When you start a search, your selected filters are displayed at the top as chips. You can save these chips to apply them again more quickly and easily in the future.
Saving the current filters:
-
Go to .
-
Start a search.
-
Click on Saved filters (bookmarks).
-
Click on bookmark_border Save current filter.
-
Enter a name for the filter.
-
Decide whether
-
this filter should be set as default filter (toggle_on)
-
this filter should be created for all users (toggle_on).
-
-
Click on SAVE.
→ The filter now appears under Saved filters (bookmarks).
| Use drag-and-drop to arrange the filters in a specific order by clicking on Move (drag_indicator). Click on delete to delete a filter. |
Proceed as follows to apply an existing filter for the search.
Applying a saved filter:
-
Go to .
-
Click on Saved filters (bookmarks).
-
Click on an existing filter setting.
→ The search is started and the filters used are shown as chips at the top.
6. Determining default filters
To make sure that you don’t have to select a filter that you use quite often from the list of your saved filters every time when opening , you can set a created filter as default filter. Every time when you open the , this filter will be automatically applied.
You can set the filter as default filter directly when creating it as described in Saving the current filter or you can set the filter as default in the overview afterwards.
Setting a default filter:
-
Go to .
-
In the line of the saved filter, click on star_border Set as default.
-
If you want to set another filter as default filter, deactivate the currently selected default filter by clicking on star Do not use as default.
→ The next time you open the menu, the default filter will be applied automatically.
| Use drag-and-drop to arrange the filters in a specific order by clicking on Move (drag_indicator). Click on delete to delete a filter. |
7. Inserting placer elements
You can use the spacer element to separate elements in your view set more visibly. You are able to manually set and change the height of the spacer element. The width of the spacer element automatically adjusts to the column width.
Proceed as follows to add a spacer element to your view set:
-
Open the view set, where you want to add the spacer element.
-
Click on Edit view ().
→ The editing mode opens. -
Click on the element Spacer in the Element tab and drag it to the desired position.
-
Save (save) your settings.
Proceed as follows to editthe height of the spacer element:
-
Open the view set, where you want to edit the spacer element.
-
Click on Edit view ().
→ The editing mode opens. -
Hover with your cursor on the spacer element that you want edit and click on Edit ().
-
Enter the preferred height of the spacer element.
-
Save (save) your settings.
8. Creating sticky rows
Sticking rows in view sets make it possible for you to make rows stick at the top of your view set. That way, you can make important rows stick at the top in larger view sets and don’t lose track of figures that are important to you. You can make any amount of rows stick. Only when you scroll past a row it will stick on top. Every sticky row can be unsticked at any time.
To make a row stick, proceed as follows:
-
Open the view set in which you want to make the row stick.
-
Click on Edit view ().
→ The editing mode opens. -
Hover with the cursor over the dotted line above or below the row and click on more_vert.
-
Either choose push_pin stick row above or push_pin stick row below
-
Save (save) your settings.
To make a row unstick, proceed as follows:
-
Open the view set in which you want to make the row unstick.
-
Click on Edit view ().
→ The editing mode opens. -
Hover with the cursor over the dotted line above or below the row and click on more_vert.
-
Either select push_pin unstick row or push_pin unstick row.
-
Save (save) your settings.
9. Importing and exporting view sets
If you want to create a new view set, you can use an existing view set as template.
By downloading you can export every view and save it as a file. You can then upload these files in other view sets to use them template.
You can also upload view sets from different menus. Meaning that you can upload a dashboard view set into an item view set.
Incompatible elements are not transferred during the upload to guarantee that the menu still works with the uploaded view set.
To upload and download view sets you will need the following right: View sets » Create
9.1. Downloading a view:
Proceed as follows to download a view:
-
Open the menu where you want to download a view.
-
Click on the view name in the top right.
→ A dropdown menu with all views in the menu opens. -
Click on more_vert besides the view name you want to download.
→ A drop-down list opens. -
Click on Download view (material:download).
→ The selected view set is downloaded as a json file.
9.2. Upload view
Proceed as follows to upload a view:
-
Open the menu in which you want to upload the view.
-
Click on the view name in the top right.
→ A dropdown menu with all views in the menu opens. -
Click on Upload view (upload).
→ The Upload view window opens. -
Click on Select file attach_file.
-
Select the .json file you want to upload.
Optional: The name of the selected view is automatically displayed in the Name field. You can change the name. -
Click Import.
→ The view is created under the given name.
10. FAQ: MyView Interface
Administrators and every user that has the option Create activated under View sets in their role can create view sets.
In the simple mode of the role Create, Edit and/or Delete must be activated under View sets.
Additionally, the role needs the visibilities of the respective user interface. For more information about user rights, refer to the User accounts and access page.