Items (new PIM UI)
|
Acronyms
The acronym PIM stands for Product Information Management. |
This chapter describes the new PIM UI. The PlentyONE PIM allows you to manage all item data centrally. By introducing the new article user interface, PlentyONE provides a new menu for managing your article data. You can then sell your goods on various marketplaces, as well as in your own Shop and in stationary trade.
Whenever you need to change item data, such as the product description or the sales price, you can change the data centrally in PlentyONE. Your updates will show in all your sales channels.
1. The new item UI
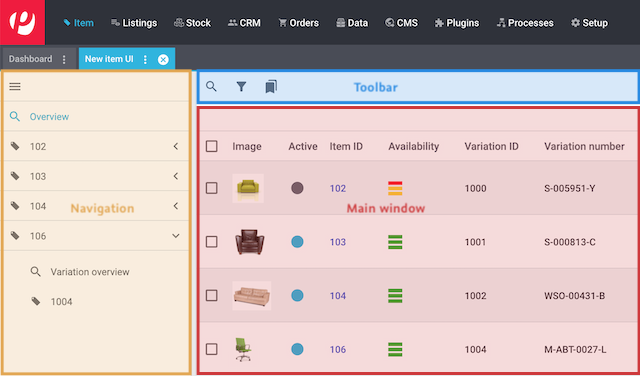
The menu Item » Items is structured as follows:
-
Navigation: Here you can navigate through different parts of the menu. The currently selected section is displayed in the main window on the right. If you open several items or variations at once, then they will be displayed underneath each other. Click on to expand or collapse the navigation bar.
-
Toolbar: Here you can perform relevant actions. For example:
-
Main window: Here you can see whichever area is currently open.
-
Overview: When you start a search, you’ll see the results in an overview. The overview provides information about the items at a glance. For example, you can see an image of the item, whether the item is active or inactive, its IDs, prices, tags and timestamps.
-
Detail view: When you open an item, its details are displayed in the main window on the right. But what if the main window is empty? Or what if you’re not happy with how the item details are arranged? You can create a new detail view and customise it to meet your needs.
-
2. The item structure
Are you new to PlentyONE? Before you start entering data, learn how items are structured! The introduction teaches you about the topic and answers your basic questions:
-
What’s the difference between items and variations?
-
How does inheritance work?
-
Where do I find my items in the back end?
-
Can I also see a few example items?
3. Preparatory settings
Items are made up of lots of information, e.g. categories, prices and manufacturers. But before you can sort an item into a specific category, the category first needs to exist in PlentyONE. Before you can select an item’s manufacturer, the manufacturer data needs to exist in PlentyONE.
Once you’ve saved such preparatory settings in PlentyONE, you’ll be able to apply them to all of the relevant items and variations.
Some of the most important system settings are:
-
Categories, which group your products.
-
Attributes, which simultaneously characterise your products and build variations.
-
Properties, which characterise your products without building variations.
-
Sales prices, which define the conditions under which a variation is sold at a specific price.
-
Shipping profiles, which define your shipping services and shipping costs.
-
Manufacturers, which list the names, contact information, IDs and commissions saved for your manufacturers.
-
Units, which define the content of your variations.
5. Import, export and manual processing
Ready to start entering item data into PlentyONE? Or do you want to send product information back and forth between your own system and other external systems? There are many options for importing, exporting and manually editing item data records.
FormatDesigner + Elastic Export: |
6. Use cases
Do you have a particular scenario in mind? In this chapter, you’ll learn how to:
-
Combine products and sell them as a unit
-
Sell personalised items in your plentyShop
-
Add give-aways or promotional gifts to an order
-
Work with items that have serial numbers or license keys
-
Track changes to items, i.e. track the entire life cycle of an item
-
Modify the default item search behaviour in the PlentyONE backend
7. Appearance in the plentyShop
Once you’ve saved your items in PlentyONE, you’re ready to start selling them. PlentyONE comes with a free online store, which you can use to sell your products.
Turn to this chapter for help if your items or categories aren’t displayed in the plentyShop. This chapter also shows you how to set up additional functions for displaying your items exactly how you want: