Cross-selling
In cross-selling, you subtly encourage customers to spend more money. This is done by offering additional products that relate to the purchased product. For example:
-
The cashier at a fast food restaurant asks if you want fries with your cheeseburger.
-
The sales person in an electronics store suggests a memory card that would work with the digital camera.
In e-commerce, you can’t directly ask your customers if they want to buy additional products. However, you can display a list of related items on the product pages in your plentyShop.
Procedure
In just two steps, you can generate additional sales through cross-selling:
1. Creating cross-selling links
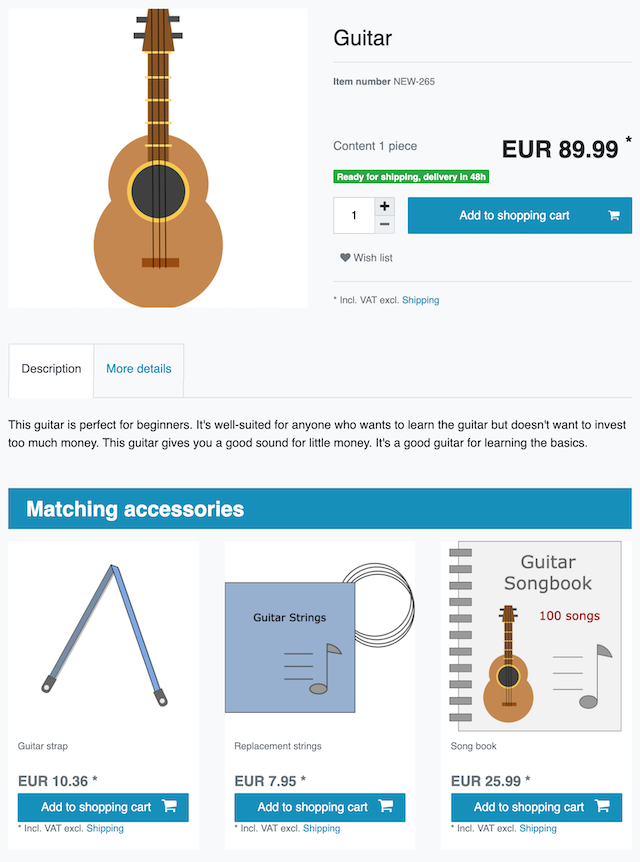
Which items should be linked together? You can link an item to any number of other products from your portfolio. For example, imagine you want to link a guitar to a pack of replacement strings, a song book and a guitar strap.
-
Go to Item » Items.
-
Search for and open the main item, e.g. the guitar.
-
Switch to the tab Cross-Selling » Section: Item selection
-
Search for items again in this section.
-
Select all the accessories that should be linked to the main item (e.g. select the replacement strings, the song book and the guitar strap).
-
Click add Add for every accessory that should be linked to the main item. → The links will be created and they can be changed any time.
Would you prefer to import cross-selling links, rather than create them manually?
PlentyONE offers a import tool. The idea is simple. Rather than manually saving cross-selling links in PlentyONE, you’ll enter the same information into a CSV file and then import this file into your system.
| Setting | Explanation |
|---|---|
Similar () |
The selected items are similar to the opened item. |
Accessory () |
The selected items are accessories of the opened item. |
Replacement part () |
The selected items are replacement parts for the opened item. |
Item bundle () |
The selected items are suitable to be sold as a bundle together with the opened item. |
Copy () |
Copies the cross-selling links and applies them to other main items. Example: Imagine you don’t just want to link one guitar to a pack of replacement strings, a song book and a guitar strap. Rather, you have 50 additional guitars that should also have these cross-selling links. It would take forever to manually link every single item. Instead, copy the existing cross-selling links from the first main item and apply them to all 50 other main items simultaneously.
|
Add to selection () |
Select this option if you want to link the other way around. So for example, if you want to link a replacement part or accessory to a main item. Example: Imagine you want to link a pack of replacement strings to several different guitars.
|
2. Modifying or deleting existing links
Once you’ve created a cross-selling link, you’ll see it in an overview within the item data record. In other words, you’ll see which accessories or replacement parts were linked to a particular main item. The links can be modified or deleted any time.
Modifying or deleting cross-selling links:
-
Go to Item » Items.
-
Search for and open the main item.
-
Open the tab Cross-selling » Selected cross-selling items.
-
Modify: Choose a different relationship from the drop-down list.
-
Delete: Select all of the items that should be deleted () and click on Delete link.
-
-
Save () the settings.
3. Publishing the cross-selling list in the plentyShop
Use ShopBuilder and so-called item lists to display cross-selling items in the plentyShop.
3.1. Creating content of the type “Item view”
-
Go to Shop » ShopBuilder.
-
Click on a grey item category on the left.
-
Click on Add content.
-
Select the type Item view.
-
Enter a name and choose a preset if desired.
-
Click Create.
→ The new content is displayed in the overview.
|
Preset: pro and con
We provide a template, which you can modify and adapt to your product portfolio as needed. Of course, you can also work without a template if you would prefer to design the view from scratch. |
3.2. Adding the widget
-
Add the widget Item » Item list.
-
Click on for the widget.
→ The widget settings are displayed on the right. -
Specify that the widget should be a cross-selling list.
-
Save () the settings.
| Setting | Explanation |
|---|---|
Item list type |
Select the option Cross-selling. |
Cross-selling relation |
What type of cross-selling relationship do you want to display with this widget? Select the appropriate relationship from the drop-down list. Note: Only one type of relationship can be displayed per item list. So if you want to display replacement parts and similar items, for example, then you will need to add two item list widgets to the layout. |
3.3. Customising the text and appearance
-
Click on for the widget.
→ The widget settings are displayed on the right. -
Modify the heading and appearance as needed.
-
Save () the settings.
| Setting | Explanation | ||||||
|---|---|---|---|---|---|---|---|
Appearance |
What colour and font should the widget have? Select the appropriate colour scheme from the drop-down list. Note: Click on Design () to configure the various colour schemes and fonts in advance. |
||||||
Caption type |
What text should be displayed in the heading?
|
3.4. Activating the content
In order for the content to be displayed in the plentyShop, it needs to be activated. Active contents are highlighted in blue.
Activating contents:
-
Go to Shop » ShopBuilder.
-
Click on the appropriate category.
-
Use the toggle button () to activate the content.
→ A pop-up window opens. -
Decide which items the content should apply to (). For example, you can design the layout differently for each category.
-
Click on Activate.
→ The content is activated and is now highlighted in blue.
|
Only activate one content of the same type
Within a grey item category, you can create many different contents of the type Item view. The contents can be activated or deactivated as needed. For example, this allows you to create different pages for each season of the year. However, only one content of the type “Item view” can be activated simultaneously. Activating one content automatically deactivates another content of the same type. |
4. FAQ
The following requirements have to be met in order for direct cross-selling items to be displayed in the plentyShop: