Amazon FBA Inbound
On this page, you find an overview of Amazon FBA Inbound as well as the most important links that you need to set up Amazon FBA Inbound.
1. What does inbound mean?
Inbound means that you supply Amazon with items that Amazon then delivers to your customers.
-
Inbound shipments are your shipments to an Amazon FBA Fulfillment Center.
-
Inbound orders are the orders that are created in PlentyONE for your inbound shipments.
2. What are my options?
Since 1 March 2023 the workflow of the Amazon FBA Inbound API has changed.
You can find further information in this forum article.
You have three options to create, edit and process your shipments.
|
Keep in mind that your shipments only remain available to PlentyONE when you use option 2. |
2.1. Option 1: Using only Amazon Seller Central
You create and edit your shipments in the Seller Central (Shipments » Send to Amazon). With this option PlentyONE is not able to receive any data about these shipments from Amazon and editing or processing using PlentyONE will not be possible. You have to use solely the Seller Central.
2.2. Option 2: Using PlentyONE / Data transmission via API
You create your shipments in PlentyONE and PlentyONE transmits the data to Amazon via the API. For this you first create a redistribution order using the information of the shipment, as described here.
|
As in this case the shipment is not created with Amazon first and then transmitted via the API but as a redistribution in PlentyONE. a valid ASIN should be entered in the item data. |
-
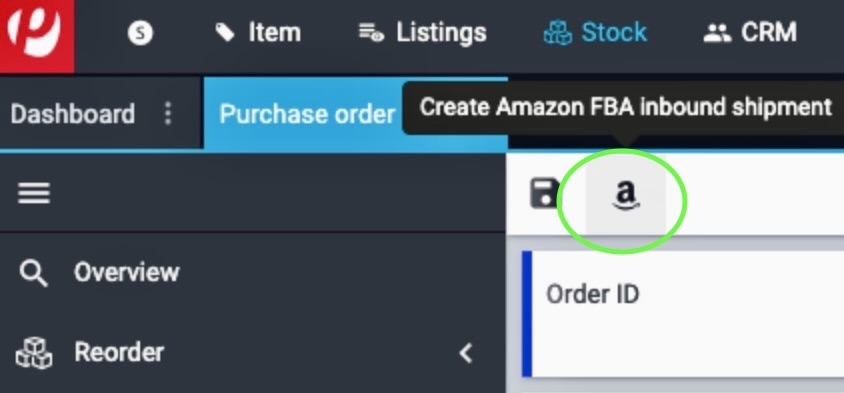
You open the order for which you created the redistribution here: Stock » Amazon FBA Inbound.
-
You create an Amazon FBA Inbound shipment via the Amazon button at the top.
-
All further steps are the same as before.
You edit your shipments exclusively in PlentyONE. To keep this option it is important that you do not perform any changes in Seller Central, otherwise option 3 will apply.
2.3. Option 3: Combination of PlentyONE and Amazon Seller Central
You create your shipments in PlentyONE as described in option 2 and you can edit them manually in the Seller Central. It is possible to switch to the Amazon backend at any step after creating a shipment in PlentyONE. But keep in mind: After you switch to the Seller Central, PlentyONE will not be able to receive updated data about the shipment from Amazon via the API.
3. What do I have to set up?
|
Which settings do I need to carry out in advance?
You must have already completed the following points in advance:
|
4. What is the workflow like?
|
There have been a few changes to the workflow since 20 December 2024. These are shown in the following tables. |
| Workflow | Change |
|---|---|
1. Go to Stock » Purchase Order to first create a redistribution. |
The workflow is initially as usual… |
2. Click on Redistribution. |
|
3. Select Amazon FBA Inbound as a recipient. |
|
4. Also select an owner. |
|
5. Save () the settings. |
|
6. Now add the order items. Use the search filters to search for the items and click on the shopping cart icon to add them to the item list. |
|
7. Once you have added all your order items, save () your settings. |
|
8. If required, enter further data for your redistribution. |
|
9. Then save () your redistribution. |
|
10. Click on the Amazon icon to create a shipment plan on Amazon with your redistribution. |
Enter a name for your plan here. The number of characters is limited. |
11. Click on Yes to save your information. |
After you have saved the plan, Amazon will suggest a selection from which you can choose a placement option. This allows you to decide how your items should be split up. |
| Workflow | Change |
|---|---|
1. Go to Stock » Amazon FBA Inbound. |
|
2. Use the filters to search for the redistribution you have just created. |
|
3. Click on the line of the order. You will now see further options. |
|
4. Click on FBA inbound package content list. |
|
5. Now add the appropriate number of items and parcels to the package content list. |
|
6. When your package content list is finished, close all packages. Only then will the Amazon icon appear to register the order with Amazon. |
|
7. Click on the Amazon icon. |
|
8. Select the desired options: Shipment type and shipping service provider. |
What’s new here is that you can also select a ‘start date’ and a time from which you want to release the consignment for transport. After you have confirmed the date and time, Amazon will show you the transport options available for your order, from which you can select one. You have the option of filtering by transport options and selecting a delivery time window. If you choose a service provider not supported by Amazon, you must enter the package number(s) as before. For freight carrier deliveries, you still need to enter the PRO number. |
9. Click on Yes to confirm your selected options. |
Finally, all that remains is to print the labels. The selection and confirmation of shipping fees is now integrated into the selection of applicable transport options from service providers supported by Amazon.
|
As processing at Amazon is asynchronous, it may take a moment for Plenty to receive a response that can be displayed in the UI. |
5. Where can I find further information?
How you now set up Amazon FBA Inbound and send your inbound shipments to an Amazon FBA Fulfillment Center is described on the Using the FBA service by Amazon page.
If you would like to access certain chapters quickly and directly, the following list may help you: