Multipacks, item bundles and sets
PlentyONE offers a variety of ways to combine products and sell them as a single unit. This page explains the basic concept and teaches you how to manually create multipacks, item bundles and sets.
|
Manual creation vs. Import
This page teaches you how to manually create the data records. But PlentyONE also includes an import tool, which you can use to import multipacks, item bundles and sets. Further information can be found in the FAQ area. |
1. Multipacks
Example: 1 bottle of water, a package containing 6 bottles and a package containing 12 bottles.
Technical specifications:
-
Multipacks are different quantities of the same variation.
-
The main variation is the smallest sales unit of the product, e.g. 1 bottle.
-
All of the other variations are combinations of this smallest sales unit, e.g. 6 or 12 bottles.
-
Stock is managed for the main variation only.
-
All variations of a multipack have the same attributes.
1.1. Creating a new multipack
Create the multipack data record by entering some basic information about the product. After creating the multipack, you will add further product information and then activate the multipack when it is ready to be sold.
Creating a new multipack:
-
Go to Item » Items.
-
Click on and select Multipack item.
-
A pop-up window opens. This window is divided into several steps. Carry out the settings in each step.
Item name |
Enter a name for the item. Note: Once you’ve created the item, you can translate the name into other languages or save additional names, e.g. if you want the item to have a different name on marketplaces. |
Choose categories |
Which category should the item be sorted into?
|
An item’s first variation is called its main variation.
-
For multipacks, the main variation is the smallest sales unit of the product, e.g. 1 bottle.
-
All of the other variations are combinations of this smallest sales unit, e.g. 6 or 12 bottles.
-
Stock is managed for the main variation only.
Variation number |
Enter a number for the main variation. |
Content |
Enter a numerical value for the main variation and choose a unit from the drop-down list, e.g. 500ml or 150g. |
Choose attributes |
The main variation can have attributes, but it is not required to.
Note: All variations of a multipack have the same attributes. So, for example, you cannot create a multipack where some water bottles are carbonated and others are non-carbonated. |
Summary |
Here you can see a summary of the settings that you selected. Click on Create item if you are satisfied with the settings. Afterwards, you will have the following options:
|
1.2. Creating the necessary quantities
Multipacks are different quantities of the same variation. For example, customers can buy 1 bottle of water, a package containing 6 bottles or a package containing 12 bottles.
Creating the necessary quantities:
-
Go to Item » Items » [Open multipack] » Variation overview.
-
Click on Create variations ().
-
A pop-up window opens. This window is divided into several steps. Carry out the settings in each step.
Pack size |
The main variation is the smallest sales unit of the product, e.g. 1 bottle. Here you create all of the other combinations of this smallest sales unit, e.g. 6 or 12 bottles. Instructions:
|
Summary |
Here you can see a summary of the settings that you selected. Click on Create multipack variation if you are satisfied with the settings. Afterwards, you will have the following options:
|
1.3. Adding further product data
While creating the data record, you entered some basic information. Now add further product data. For example, what should the multipack look like? Which images and texts should be displayed?
How much should the multipack cost when it is sold as a 1, 6 or 12-pack? Decide which price should apply for each quantity. You will have to deactivate the inheritance of sales prices and then save the price separately for each quantity.
Saving a price for the main variation:
-
Go to Item » Items » [Open multipack] » [Open main variation] » Tab: Prices » Section: Sales prices.
-
Click on .
→ A pop-up window will open. -
Select the sales prices () that should be linked to the variation.
-
Click Apply.
→ The data will be displayed as a table. -
Enter the monetary price.
-
Save () the settings.
Saving a price for a sub-variation:
-
Go to Item » Items » [Open multipack] » [Open sub-variation].
-
Click on Inheritance () in the upper toolbar.
-
Deactivate the inheritance of sales prices.
-
Click Execute.
-
Navigate to the element Sales prices.
-
Enter a different monetary price for the sub-variation.
-
Save () the settings.
-
Repeat the process for the other quantities.
Stock is managed for the main variation only. That means, the other variations’ stock is purely informative. When the stock level of the main variation changes, the stock for all other variations of the item is recalculated.
1.4. Viewing the multipack in the front end
Are you curious what the new product will look like in your plentyShop or on Amazon? See a preview of the item and find out where you need to add further product data or adjust the settings.
Viewing a preview of the item:
-
Click on Product link (open_in_new) in the toolbar.
→ A pop-up window opens. -
Carry out the settings.
-
Click on open_in_new Open.
→ A preview of the item is shown.
|
Product links for items or variations
You can access the product link for an item or for a variation. The product link button is found in both the item toolbar and the variation toolbar. |
| Setting | Explanation | ||||||
|---|---|---|---|---|---|---|---|
URL |
The product’s URL is displayed in an info-box up top. Click on the URL to open the page in a new tab. Click on to copy the URL to the clipboard. |
||||||
Sales channel |
Do you want to see what the product will look like in your plentyShop or on Amazon?
|
||||||
Client (store) |
In which client, i.e. in which online shop, do you want to see the preview? Select the client from the drop-down list. Background info: With PlentyONE, you can manage several online stores, i.e. several clients, with only one software. Consequently, it is possible to manage several different areas of business with one PlentyONE system. Note: This option is only displayed if you selected the sales channel plentyShop LTS Preview or plentyShop LTS live. |
||||||
Plugin set |
In which plugin set do you want to see the preview? Select the plugin set from the drop-down list. Background info: In PlentyONE, plugins don’t stand alone. Rather, they are grouped together into so-called plugin sets. This lets you, e.g. design seasonal layouts for your plentyShop or test new plugin versions before activating them. Note: This option is only displayed if you selected the sales channel plentyShop LTS Preview. |
||||||
Referrer |
Do you want to check which prices and information are displayed when an end customer accesses your plentyShop from a specific price search engine? Select the referrer from the drop-down list. Note: This option is only displayed if you selected the sales channel plentyShop LTS live. |
||||||
ASIN |
Which ASIN do you want to use for the preview? Select the ASIN from the drop-down list. Note: This drop-down list only includes the ASINs that were already saved for the variation. You haven’t saved an ASIN for the variation yet? Or you haven’t selected an ASIN from the drop-down list? Then you’ll see an error message in the info-box up top. Note: This option is only displayed if you selected the sales channel Amazon. |
1.5. Putting the multipack up for sale
Variations are not visible to customers in the plentyShop until they have been activated. In other words, you can work on inactive variations without your customers noticing. You activate the variation when you’re ready for it to be visible in your plentyShop.
Activating a variation:
-
Go to Item » Item UI » [Open variation] » Element: Availability and visibility.
-
Select the option Active ().
-
Save () the settings.
|
Complete checklist for item visibility
Not only do items need to be activated, but they also need to have a price, a category and positive net stock. Otherwise customers wouldn’t be able to buy the item. Work through this checklist and make sure your item meets all of the requirements for being visible in the plentyShop. This checklist helps you find any possible errors that are preventing your items from being displayed. |
2. Item bundles
Example: A beard care kit consisting of scissors, a brush, beard oil and beard wax.
Technical specifications:
-
The components (e.g. scissors, brush, oil, wax) can:
-
be sold separately as individual items.
-
be sold together as a bundle. End customers buy the entire bundle. They can not decide which components are included in the bundle. For example, they can not buy the beard care kit without the beard wax.
-
-
It’s possible to make the bundle price cheaper than the sum of all the individual prices.
-
It’s possible to combine variations with different tax rates together in one bundle.
-
All of the components must be stored in the same warehouse.
-
The bundle’s stock level is determined by the component with the lowest stock. You do not manage stock for the bundle itself.
2.1. Creating a new item bundle
Let’s stick with the example that you want to create a beard care kit consisting of scissors, a brush, beard oil and beard wax. This is done in three steps:
-
You create the individual components, e.g. the scissors, brush, beard oil and beard wax.
-
You create the bundle itself, e.g. the beard care kit.
-
You add the components to the bundle.
The components can be purchased as individual items and/or as a bundle. Example: the scissors can be purchased individually. They can also be part of a bundle.
Creating a component:
-
Go to Item » Items.
-
Click on and select Standard item.
-
A pop-up window opens. This window is divided into several steps. Carry out the settings in each step. Further information about the settings.
|
Add further product data to the components
What should the component look like when it is sold individually? Which image and text should be displayed? How much should the individual item cost? Add further information for when the component is sold as an individual item. For example, you can: |
Now create an item that represents the bundle itself. You do not manage stock for the bundle itself. The bundle’s stock level is determined by the component with the lowest stock.
Creating a new item:
-
Go to Item » Items.
-
Click on and select Standard item.
-
A pop-up window opens. This window is divided into several steps. Carry out the settings in each step. Further information about the settings.
-
Finally, you add the components to the bundle.
|
Using an existing item as a bundle
Instead of creating a new bundle item, you can also use an existing item and add components to this item. Note that the bundle item to which components are added must not have stock. |
Select all of the components that should be sold together as a bundle. It’s possible to combine variations with different tax rates together in one bundle. But all of the components must be stored in the same warehouse.
Adding components to the bundle:
-
Go to Item » Items » [Open bundle] » [Variation level] » Tab: Bundles.
-
Within the element, click on and then on Add bundle component.
→ A pop-up window will open. -
Choose which variations () should be added to the bundle.
-
Click Apply.
→ The data will be displayed as a table. -
Enter the quantity.
-
Save () the settings.
2.2. Adding product data for the bundle
What should the bundle look like when it is sold as a whole? Which image and text should be displayed? How much should the entire bundle cost? Now add further information for when the bundle is sold as a whole.
The bundle price is saved separately from the prices of the individual components. For example, you can make the bundle price cheaper than the sum of all the individual prices.
-
Go to Item » Item UI » [Open bundle] » [Variation level] » Tab: Prices » Section: Sales prices.
-
Click on .
→ A pop-up window will open. -
Select the sales prices () that should be linked to the variation.
-
Click Apply.
→ The data will be displayed as a table. -
Enter the monetary price.
-
Save () the settings.
While processing the order, only the bundle price will be displayed. The components will be displayed without their individual prices.
The bundle’s stock level is determined by the component with the lowest stock. You do not manage stock for the bundle itself.
An item bundle is made up of various components. Each component has its own key figures, such as a weight and a purchase price. But how do these key figures come together for the entire bundle? You could enter a weight and purchase price for the entire bundle as a whole. But there’s also a way to have plentymarkets automatically calculate these figures for you.
-
Go to Item » Item UI » [Open bundle] » [Variation level] » Tab: Bundles » Section: Selected bundle components.
-
Within the element, click on and then on Configure bundle automatics.
→ A pop-up window will open. -
Select the automatic functions as needed ().
-
Click Apply.
Bundle gross weight: Automatically calculate from bundle components |
The gross weight is automatically calculated based on the individual components. That means, the field Gross weight in grams will be greyed out within the Dimensions and Content section. |
Bundle net weight: Automatically calculate from bundle components |
The net weight is automatically calculated based on the individual components. That means, the field Net weight in grams will be greyed out within the Dimensions and Content section. |
Bundle net purchase price: Automatically calculate from bundle components |
The net purchase price is automatically calculated based on the individual components. That means, the field Net purchase price will be greyed out within the element Costs. |
Bundle moving average purchase price (net): Automatically calculate from bundle components |
The moving net purchase price is automatically calculated based on the individual components. That means, the field Net moving average purchase price will be greyed out within the element Costs. |
|
Using automatic calculation by default
Do you only have a few items that should be excluded from the automatic calculation? No problem! You can activate the automatic calculation by default.
|
2.3. Viewing the bundle in the front end
Are you curious what the new product will look like in your plentyShop or on Amazon? See a preview of the item and find out where you need to add further product data or adjust the settings.
Viewing a preview of the item:
-
Click on Product link (open_in_new) in the toolbar.
→ A pop-up window opens. -
Carry out the settings.
-
Click on open_in_new Open.
→ A preview of the item is shown.
|
Product links for items or variations
You can access the product link for an item or for a variation. The product link button is found in both the item toolbar and the variation toolbar. |
| Setting | Explanation | ||||||
|---|---|---|---|---|---|---|---|
URL |
The product’s URL is displayed in an info-box up top. Click on the URL to open the page in a new tab. Click on to copy the URL to the clipboard. |
||||||
Sales channel |
Do you want to see what the product will look like in your plentyShop or on Amazon?
|
||||||
Client (store) |
In which client, i.e. in which online shop, do you want to see the preview? Select the client from the drop-down list. Background info: With PlentyONE, you can manage several online stores, i.e. several clients, with only one software. Consequently, it is possible to manage several different areas of business with one PlentyONE system. Note: This option is only displayed if you selected the sales channel plentyShop LTS Preview or plentyShop LTS live. |
||||||
Plugin set |
In which plugin set do you want to see the preview? Select the plugin set from the drop-down list. Background info: In PlentyONE, plugins don’t stand alone. Rather, they are grouped together into so-called plugin sets. This lets you, e.g. design seasonal layouts for your plentyShop or test new plugin versions before activating them. Note: This option is only displayed if you selected the sales channel plentyShop LTS Preview. |
||||||
Referrer |
Do you want to check which prices and information are displayed when an end customer accesses your plentyShop from a specific price search engine? Select the referrer from the drop-down list. Note: This option is only displayed if you selected the sales channel plentyShop LTS live. |
||||||
ASIN |
Which ASIN do you want to use for the preview? Select the ASIN from the drop-down list. Note: This drop-down list only includes the ASINs that were already saved for the variation. You haven’t saved an ASIN for the variation yet? Or you haven’t selected an ASIN from the drop-down list? Then you’ll see an error message in the info-box up top. Note: This option is only displayed if you selected the sales channel Amazon. |
2.4. Putting the bundle up for sale
Variations are not visible to customers in the plentyShop until they have been activated. In other words, you can work on inactive variations without your customers noticing. You activate the variation when you’re ready for it to be visible in your plentyShop.
Activating a variation:
-
Go to Item » Item UI » [Open variation] » Element: Availability and visibility.
-
Select the option Active ().
-
Save () the settings.
|
Complete checklist for item visibility
Not only do items need to be activated, but they also need to have a price, a category and positive net stock. Otherwise customers wouldn’t be able to buy the item. Work through this checklist and make sure your item meets all of the requirements for being visible in the plentyShop. This checklist helps you find any possible errors that are preventing your items from being displayed. |
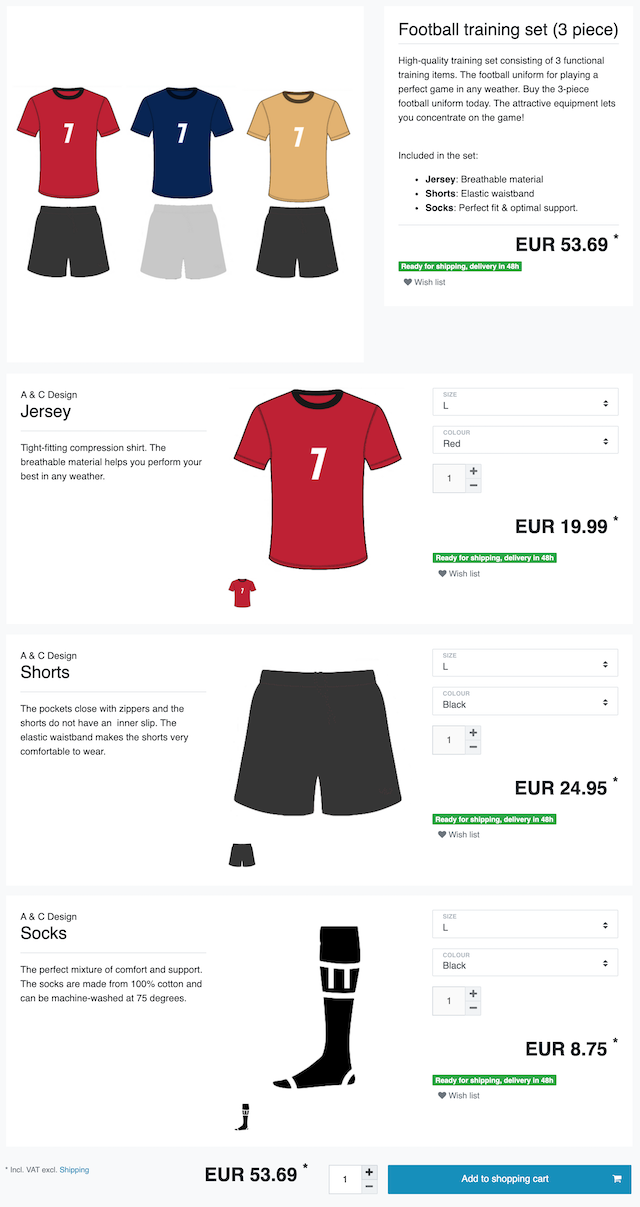
3. Sets
Example: A football uniform composed of a jersey, shorts and socks. End customers can put their own uniforms together by selecting the appropriate size and colour for each of the three components.
Technical specifications:
-
Sets consist of multiple items (jersey, shorts, socks).
-
While placing an order, the end customer chooses the appropriate variation (size, colour) for each item.
-
The main variation is virtual. This means that the main variation cannot be sold.
-
The set function is only intended for the plentyShop.
-
It’s not possible to sell item sets on marketplaces like Amazon and eBay.
-
It’s not possible to sell item sets with POS or pick them with the app.
-
3.1. Preparation: Components
Theory
A set consists of multiple items (jersey, shorts, socks). While placing an order, the end customer chooses the appropriate variation (colour, size) for each item. It can be helpful to sketch out the items and variations that will be included in the set.

Set |
Football uniform |
||
Items in the set |
Jersey |
Shorts |
Socks |
Variations per item |
|
|
|
Practice
If the necessary items and variations do not already exist in your PlentyONE system, then you will need to create them first.
-
Go to Item » Items.
-
Click on and select Standard item since the components are normal items and variations.
-
A pop-up window opens. This window is divided into several steps. Carry out the settings in each step.
3.2. Preparation: Prices
Theory
The unique thing about sets is that you don’t know in advance exactly how end customers will combine the variations. Therefore, it wouldn’t make sense to save fixed prices for sets. Instead, PlentyONE calculates the price of the cheapest possible combination and saves this information for the set. This minimum price can be displayed in the plentyShop and in the back end. For example: "Available from € 99.99".
PlentyONE regularly checks the prices of all the variations in the set and calculates the cheapest possible combination. PlentyONE checks the prices:
-
when you add a component to a set
-
when you remove a component from a set
-
when you manually update the "from-price"
-
every night
Practice
-
Create a sales price for sets. Choose the type Set price.
-
link this sales price to all of the set components and enter a monetary price for each component.
Note: Set components are normal variations.
|
Can items be cheaper if they’re purchased together as a set?
It’s possible to make a set cheaper than the sum of its components. There are two ways to do this:
|
3.3. Creating a new set
Have you already decided which items and variations should be included in the set? Have you created a sales price especially for sets? Then you’re ready to start creating sets.
Creating a new set:
-
Go to Item » Items.
-
Click on and select Item set.
-
A pop-up window opens. This window is divided into several steps. Carry out the settings in each step.
Item name |
Enter a name for the set. Note: Once you’ve created the set, you can translate the name into other languages or add further names. |
Choose categories |
Which category should the set be sorted into?
|
Which items should be included in the set?
-
Click on Add item set components.
→ A pop-up window opens. -
Search () for the items that you want to add to the set.
→ The items are listed. -
Select the items () you want to add to the set.
-
Click Apply.
→ The selected items will be displayed as a table. Click on delete to remove an item from this list again. -
If needed, enter the maximum and minimum order quantities for each component.
|
Minimum quantity / Maximum quantity
Imagine you sell football uniforms, consisting of a jersey, shorts and socks. You only want to sell the uniforms to teams that will buy at least 10 jerseys, shorts and socks at one time. In this case, you’ll enter 10 as the minimum order quantity for each component. |
|
Minimum quantity can not be 0
It’s not possible to sell sets with optional components. This means:
|
|
Items with / without variations
|
Summary |
Here you can see a summary of the settings that you selected. Click on Create item if you are satisfied with the settings. Afterwards, you will have the following options:
|
|
What’s the main variation for?
A main variation is automatically created when you create a new set. This main variation is linked to the set. It can only be created or deleted together with the set. The main variation:
|
3.4. Editing existing sets
3.4.1. Searching for and opening sets
-
Go to Item » Items.
-
Click on tune.
-
Set the filter Type to Set.
-
Click on () Search.
→ The sets that are found will be displayed in an overview on the right. -
Click on a set to open it.
3.4.2. Adding or removing components
-
Go to Item » Items » [Open bundle] » [Open item level] » Tab: Set » Section: Item selection.
-
Click Add (add) on every item you want to add.
→ The items are added to the Selected bundle components section. -
Save (save) the settings.
3.4.3. Removing bundle components
-
Go to Item » Items » [Open set] » [Open item level] » Tab: Set » Section: Selected set components.
-
Click delete Delete to remove a bundle component.
Tip: If you want to remove several items at once, select them check_box and click delete Delete in the tool bar above. -
Save (save) the settings.
|
Minimum quantity / Maximum quantity
Imagine you sell football uniforms, consisting of a jersey, shorts and socks. You only want to sell the uniforms to teams that will buy at least 10 jerseys, shorts and socks at one time. In this case, you’ll enter 10 as the minimum order quantity for each component. |
|
Minimum quantity can not be 0
It’s not possible to sell sets with optional components. This means:
|
|
Items with / without variations
|
3.4.4. Managing the stock
The stock of a set depends on the variation with the lowest stock. This means:
-
You do not manage stock for the set itself.
-
You manage stock for the set components.
3.4.5. Optional: Manually updating the “from-price”
PlentyONE regularly checks the prices of all the variations in the set and calculates the cheapest possible combination. PlentyONE checks the prices whenever a component is added to a set or removed from a set, as well as every night. But you can also manually update the “from-price” at any time.
-
Go to Item » Items » [Open set] » [Open variation level]»Tab: Prices » Section: Sales prices.
-
Click on the reload symbol ().
-
Go to Item » Items.
-
Select () the items to be edited.
-
In the toolbar, click on layers » layers Item group function.
→ The Item group function window opens. -
Select the action Item settings » Update set prices from the drop-down list ().
→ The action is added to the lower part of the window. -
Select the option Update price from in sets in the lower part of the window ().
-
Execute the group function.
3.4.6. Optional: Granting discounts
By default, the price of an item set is equivalent to the sum of the individual prices of all set components. However, you can offer a discount in % on the total price of the set.
Saving a discount for an item set:
-
Go to Item » Items » [Open set] » [Open item level] » Section: Set discounts.
-
Enter a percentage. The total price will be discounted by this percent.
-
Save () the settings.
→ The discount is applied.
3.4.7. Optional: Specifying the minimum or maximum order quantity
Imagine you sell football uniforms, consisting of a jersey, shorts and socks. You only want to sell the uniforms to teams that will buy at least 10 jerseys, shorts and socks at one time. In this case, you’ll enter 10 as the minimum order quantity for each component.
Specifying the minimum or maximum order quantity:
-
Go to Item » Items » [Open set] » [Open item level] » Tab: Set » Section: Selected set components.
-
Enter the maximum and minimum order quantities for each component. Enter these values into the columns Minimum quantity and Maximum quantity.
-
Save () the settings.
|
Minimum quantity can not be 0
It’s not possible to sell sets with optional components. This means:
|
3.4.8. Adding further product data
This page only describes the functions that apply specifically to sets. But there are lots of other settings and options that you can also configure in the data record. For example:
These settings correspond to the same ones available for regular items, e.g. items of the type Standard. You can find explanations of these settings in the directory of item data fields.
3.5. Displaying sets in the plentyShop
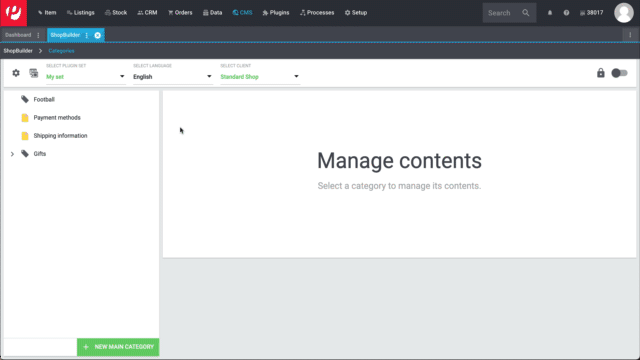
3.5.1. Creating content of the type “Item set”
-
Go to Shop » ShopBuilder.
-
Click on a grey item category on the left.
Note: Item sets are not compatible with the yellow content categories. -
Click on Add content.
-
Choose the type Item set.
-
Enter a name and choose a preset if desired.
-
Click Create.
→ The new content is displayed in the overview.
|
Preset: pro and con
We provide a template, which you can modify and adapt to your product portfolio as needed. Of course, you can also work without a template if you would prefer to design the view from scratch. |
3.5.2. Designing the content
Set components are displayed with the widget Item / Components for item sets. This widget is special because you can place other item widgets inside it, e.g. for descriptions and images.
Depending on the placement - inside or outside the widget - item information such as name, image and description relate to the entire set or to a set component. For example, you can display one image for the entire set and other images for each component.
How do you design the layout, add widgets and modify the widget settings? You can find this information on the ShopBuilder page of the manual.
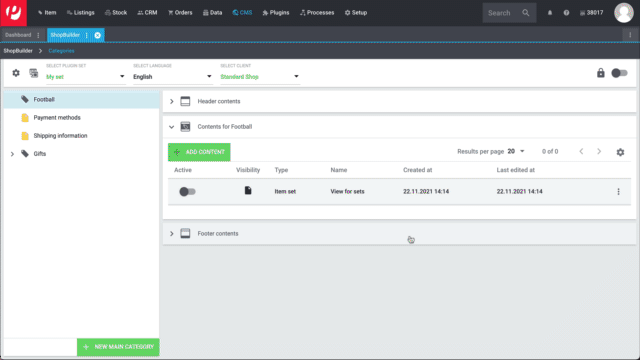
3.5.3. Activating the content
In order for the content to be displayed in the plentyShop, it needs to be activated. Active contents are highlighted in blue.
Activating contents:
-
Go to Shop » ShopBuilder.
-
Click on the appropriate category.
-
Use the toggle button () to activate the content.
→ A pop-up window opens. -
Decide which item sets the content should apply to (). For example, you can design the layout differently for each category.
-
Click on Activate.
→ The content is activated and is now highlighted in blue.
|
Only activate one content of the same type
Within a grey item category, you can create many different contents of the type Item set. The contents can be activated or deactivated as needed. For example, this allows you to create different pages for each season of the year. However, only one content of the type “Item set” can be activated simultaneously. Activating one content automatically deactivates another content of the same type. |
3.5.4. Viewing the set in the front end
Are you curious what the new set will look like in your plentyShop? See a preview of the set and find out where you need to add further product data or adjust the settings.
Viewing a preview of the set:
-
Click on Product link (open_in_new) in the toolbar.
→ A pop-up window opens. -
Carry out the settings.
-
Click on open_in_new Open.
→ A preview of the set is shown.
|
Product links for items or variations
You can access the product link for an item or for a variation. The product link button is found in both the item toolbar and the variation toolbar. |
| Setting | Explanation | ||||||
|---|---|---|---|---|---|---|---|
URL |
The product’s URL is displayed in an info-box up top. Click on the URL to open the page in a new tab. Click on to copy the URL to the clipboard. |
||||||
Sales channel |
|
||||||
Client (store) |
In which client, i.e. in which online shop, do you want to see the preview? Select the client from the drop-down list. Background info: With PlentyONE, you can manage several online stores, i.e. several clients, with only one software. Consequently, it is possible to manage several different areas of business with one PlentyONE system. Note: This option is only displayed if you selected the sales channel plentyShop LTS Preview or plentyShop LTS live. |
||||||
Plugin set |
In which plugin set do you want to see the preview? Select the plugin set from the drop-down list. Background info: In PlentyONE, plugins don’t stand alone. Rather, they are grouped together into so-called plugin sets. This lets you, e.g. design seasonal layouts for your plentyShop or test new plugin versions before activating them. Note: This option is only displayed if you selected the sales channel plentyShop LTS Preview. |
||||||
Referrer |
Do you want to check which prices and information are displayed when an end customer accesses your plentyShop from a specific price search engine? Select the referrer from the drop-down list. Note: This option is only displayed if you selected the sales channel plentyShop LTS live. |
||||||
ASIN |
Not available for sets. The set function is only intended for the plentyShop. It’s not possible to sell item sets on marketplaces like Amazon. |
Your customer selects all of the preferred variations in the plentyShop and then places the entire set in the shopping cart.
3.5.5. Putting the set up for sale
Variations are not visible to customers in the plentyShop until they have been activated. In other words, you can work on inactive variations without your customers noticing. You activate the variation when you’re ready for it to be visible in your plentyShop.
Activating a variation:
-
Go to Item » Items » [Open variation] » Element: Availability and visibility.
-
Select the option Active ().
-
Save () the settings.
|
Complete checklist for item visibility
Not only do items need to be activated, but they also need to have a price, a category and positive net stock. Otherwise customers wouldn’t be able to buy the item. Work through this checklist and make sure your item meets all of the requirements for being visible in the plentyShop. This checklist helps you find any possible errors that are preventing your items from being displayed. |
4. FAQ
-
Standard item: This type is suitable for:
-
Normal items and variations. Example: a t-shirt that’s available in the colours red, blue and green. Further information about creating this type of item.
-
Bundles. Example: a beard care kit consisting of scissors, a brush, beard oil and beard wax. Further information about creating this type of item.
-
-
Multipack item: This type is suitable for multipacks. Example: 1 bottle of water, a package containing 6 bottles and a package containing 12 bottles. Further information about creating this type of item.
-
Set item: This type is suitable for sets. Example: a football uniform composed of a jersey, shorts and socks. End customers can put their own uniforms together by selecting the appropriate size and colour for each of the three components. Further information about creating this type of item.
Note: This setting can not be changed once you’ve created the item.
This page teaches you how to manually create the data records. But PlentyONE also includes an import tool, which you can use to import multipacks, item bundles and sets. The idea is simple. Rather than manually saving item data in PlentyONE, you’ll enter the same information into a CSV file and then import this file into your system.
-
Use the import type Item.
-
Use the mapping field Item / Type to specify what type of item you want to import.
A set doesn’t have a fixed price that you define yourself. Rather, PlentyONE checks the price of each component and then calculates the cheapest possible price for the entire set. For example: "Available from € 99.99".
Configuring set prices:
-
Create a sales price for sets. Choose the type Set price.
-
link this sales price to all of the set components and enter a monetary price for each component.
Note: Set components are normal variations.
There is not currently a setting to control which component is displayed first, second, third, etc. However, we’re planning to implement a position field in the future.
Workaround: Add the components in whichever order they should be displayed in the plentyShop.
No. It’s not possible to sell sets with optional components. This means:
-
End customers always buy the entire set. They can not decide which components should be included in the set. For example, they can not buy the football uniform without the socks.
-
While it’s technically possible to enter 0 into the field Minimum quantity, this does not affect the minimum order quantity in the plentyShop. The minimum order quantity will still be displayed as 1 in the plentyShop.