Setting up processes
Processes allow you to automate many complex tasks in PlentyONE.
|
Install plentyBase
You need plentyBase to create and run processes in the PlentyONE back end. You can find the installation files for plentyBase in the plentyMarketplace. |
1. Parts of a process
The following process elements are available:
-
Work steps
-
Control elements
-
Procedures
-
Sub-procedures
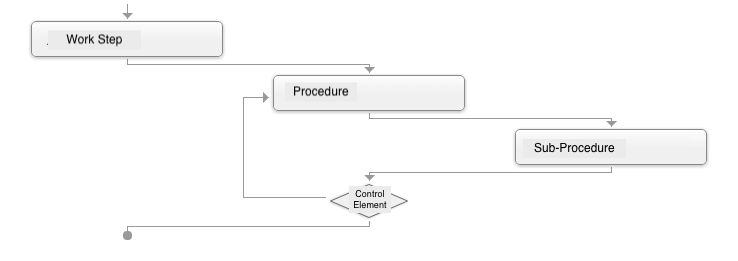
1.1. What are work steps?
Every process is composed of one or more work steps. Work steps are the core of your processes. You’ll use work steps to define the tasks and sequences that you’d like to automate. Depending on which type of work step you use, you’ll either focus on an individual order, multiple orders or incoming items. You can add an unlimited number of work steps to your process. The following work steps are available:
1.2. What are procedures?
Procedures are added to a work step. Use procedures to specify which actions should be performed when the process runs.
1.3. What are control elements?
Control elements are a special type of procedure. They control how work steps, procedures and sub-procedures behave within a process. By adding control elements to a work step, you can control how individual procedures interact with each other. For example, you can repeat procedures, jump to a specific point within a work step or even create conditions that have to be met before a procedure is carried out.
1.4. What are sub-procedures?
Sub-procedures are added to a procedure. Use sub-procedures to specify which actions should be performed within the scope of a procedure. For example, use the sub-procedure Print to print the documents that were created by the procedure.
2. Controlling the visibility of processes
The folders in the menu Setup » Processes are only visible to users who are allowed to edit the processes within those folders. Table 1 explains which orders are available to users.
Assigning rights
Users with roles that are not of the type Administrator can only see certain sections and menus in PlentyONE. This means they only have limited access to the system. If employees see and run processes, they need at least the following rights:
-
Processes > Read
-
Processes > Update
Note that only users with roles of the type Administrator can grant rights.
Assigning rights:
-
Open the menu Setup » Account management » Roles.
→ The roles overview opens. -
Click on New (add).
→ The role creation menu opens. -
Enter a name for the role.
-
Switch to the advanced mode by toggling Advanced (toggle_on) slider.
-
Assign the rights for the respective section by ticking the check boxes indicated above.
Note: You can either grant rights for complete sections or limit the rights you grant the user. To only grant limited rights in a certain section, expand the section. -
Save (save) the settings.
|
The simple mode and advanced mode are connected. If you check menu visibilities in the simple mode the corresponding permissions in the advanced mode will be checked automatically. The connection only exists in this direction. If you check permissions in the advanced mode no menu or plugin visibilities will be checked automatically. |
| Folder | Explanation |
|---|---|
Mine |
Processes that belong to whichever user is currently logged in. |
Others |
Other people’s processes. The folder is only visible to Admin users. |
Per role |
Processes that are visible to all users who belong to a specific role. If the user is not assigned to any roles, this folder is shown. Admin users can see the processes for all roles. |
Global |
Processes that are available for all user accounts. |
3. Creating a process
Go to Setup » Processes to create and manage processes. Proceed as described below to create a process.
Creating a process:
-
Go to Setup » Processes » New process.
Note: If the menu Setup » Processes is not visible, install plentyBase. -
Carry out the desired settings. Pay attention to the explanations given in Table 2.
-
Save the settings.
→ The process will appear in the menu tree.
| Setting | Explanation |
|---|---|
Name |
Enter a name for the process. |
Visibility |
Decide which group the process should be visible for. Visible means that the process will appear in the Processes menu and that it can be started from there. |
User |
This option is only visible if you selected User from the Visibility drop-down list. Decide which person the process should be visible for. |
Role |
This option is only visible if you selected Role from the Visibility drop-down list. Decide which role the process should be visible for. |
Can be changed |
Decide who should be allowed to change the process. |
Warehouse |
Select a warehouse. The warehouse with the ID 1 is selected by default. |
Colour |
Decide which colour the process should have in the Processes menu. |
3.1. Adding elements
Once you’ve created a process, you can start adding as many work steps, procedures, sub-procedures and control elements as you want.
|
Use the context menu
If your process already includes an element, then you can use the context menu to add further elements. Simply right-click on an element and then select the desired option. |
3.2. Dealing with errors
Sometimes processes contain faulty orders, which throw everything off track. If you don’t want such processes to be aborted completely, then you can add specific combinations of procedures and sub-procedures, which guide your process in a different direction. These procedures only run if an error occurs. For example, if you add the procedure Order with the two sub-procedures Change status and Add order notes, then faulty orders will be assigned a new status. In addition, a note will be added to the order.
3.2.1. Available procedures in case of error
Table 3 shows the procedures that can run if an error occurs.
| Procedure | Sub-procedure | Explanation |
|---|---|---|
Send |
Use the Email procedure together with the Send sub-procedure to send an email template if an error occurs. |
|
Order |
Change status |
Changes the status of the faulty order. The status changes to whichever status is selected from the drop-down list. |
Order |
Add order notes |
Adds a note to the faulty order. |
3.2.2. Adding a procedure to deal with errors
Proceed as described below to add a procedure that deals with errors.
Adding a procedure to deal with errors:
-
Go to Setup » Processes » [Select folder] » [Select process].
-
Right-click on the procedure.
Tip: A grey beetle icon identifies the procedures that can be used to deal with errors.
→ The context menu opens. -
Click on Add procedure for occurring errors in the context menu.
-
Select the procedure from the drop-down list.
-
Save the settings.
-
Carry out additional settings as desired.
→ The procedure is created. Procedures for dealing with errors are outlined in red. -
Save the settings.
→ The procedure is created. Procedures for dealing with errors are outlined in red.
|
Visualising errors
|
4. Reusing a process
Copy processes that you’d like to reuse in the same system. Or export processes and then import them into a different system.
4.1. Copying a process
Proceed as described below to copy a process.
Copying a process:
-
Go to Setup » Processes.
-
Open the process that you want to copy.
-
Click on Copy process.
→ The Copy process window opens. -
Enter a name for the process.
-
Click on Copy process.
→ The process will be created. It will open and you can continue editing it further.
4.2. Exporting a process
We recommend using the export and import functions to exchange processes between different PlentyONE systems. To do so, proceed as described below.
Exporting a process:
-
Go to Setup » Processes.
-
Open the process that you want to export.
-
Click on Export process.
→ The process will be exported as a ZIP file and saved in the Downloads (MAC) or Documents (Windows) folder on your computer.
4.3. Importing a process
You can download processes, e.g. from certain pages of the PlentyONE manual. Then you can import these processes into your own system.
But keep in mind that you’ll need to modify a few system-specific settings.
Importing a process:
-
Go to Setup » Processes.
-
Click on Import.
-
Enter a name for the process and click on Select file.
-
Select the ZIP file from your computer and click on Open.
→ The process will be imported. It will open and you can continue editing it further.
|
System-specific settings will not be imported
System-specific settings, e.g. printer settings for the Print sub-procedure, will not be exported. As such, they will not be imported either. |