Package content list
On this page of the manual, you find detailed information on how to use the package content list in PlentyONE. The package content list contains information about the content of pallets, packages and the respective items. Decide yourself how to pack your packages and easily manage them with only a few clicks. You want to send your package content list to your shipping service provider? No problem, just use the CSV export. Furthermore, the quick packing function is now available, which allows you to quickly pack a huge amount of items into packages.
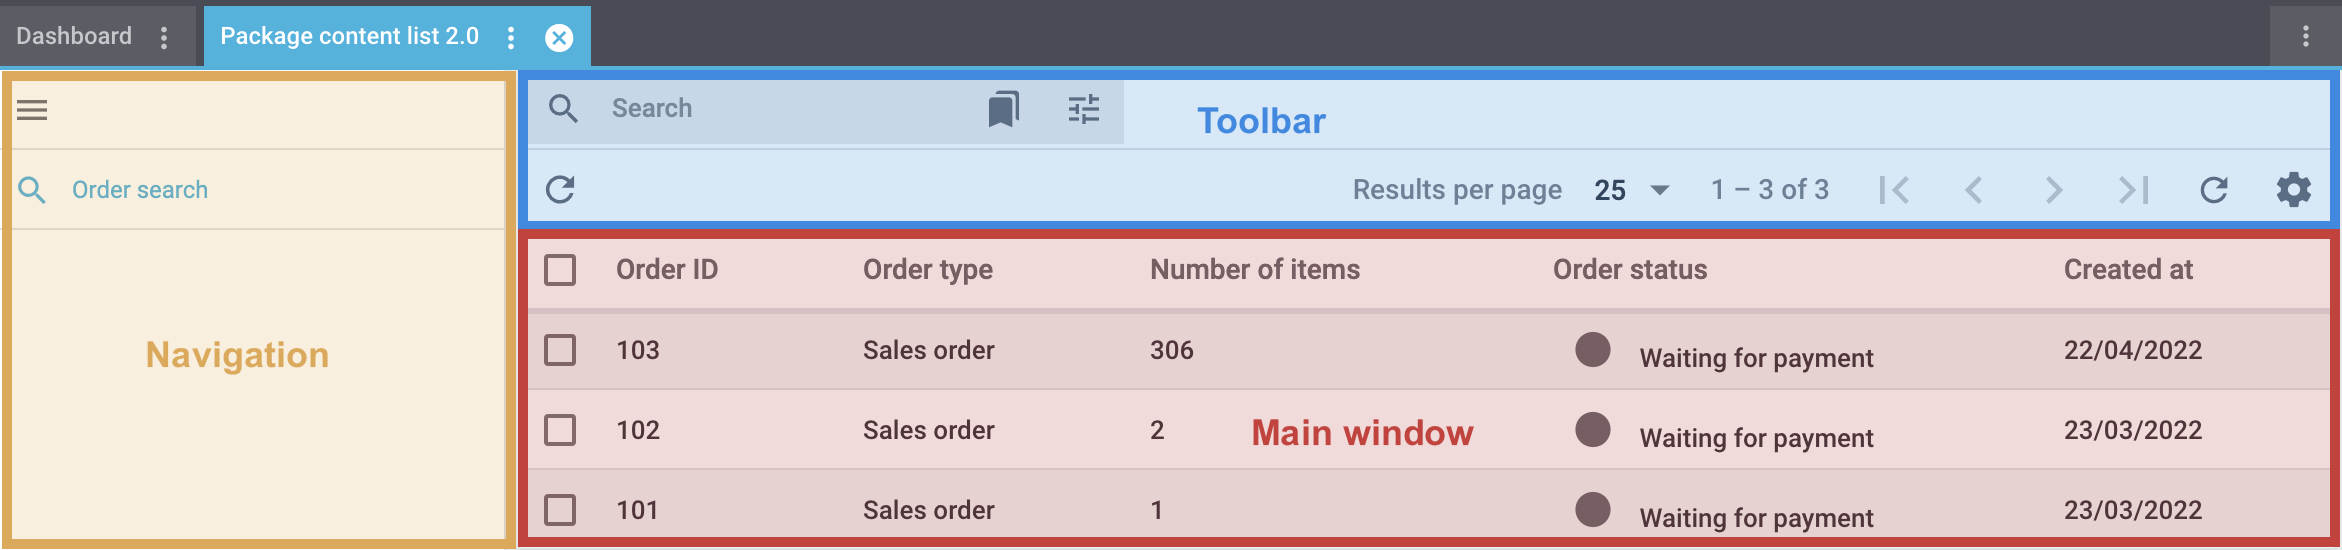
The Orders » Package content list menu is structured as follows:
-
Navigation: Here you can navigate through different parts of the menu. The currently selected area (blue font) is displayed in the main window on the right. Click on menu to expand or collapse the navigation bar.
-
Toolbar: Here you can search for orders, customise the overview, set the results to be shown per page and click through the pages with the orders.
-
Main window: Here you can see whichever area is currently open.
-
Overview: When you start a search, you’ll see the results in an overview. The overview provides information about the orders found at a glance. You can for example see the order type, the number of items in the order or the order status.
-
Detail view: When you open an order, the pallets and packages as well as details about the contents are displayed in the main window.
-
Special features
Among other thing, you can do the following in the package content list:
-
Packages can be added to an order even without a pallet.
-
With the group functions, you can carry out a variety of actions for several packages or pallets at once.
-
The quick packing function is especially helpful for big orders, as you can use it to pack many packages at once.
-
Thanks to the connection to Amazon FBA, you can choose the FBA service and let them ship your items.
-
You can export the content of your orders as a CSV file.
1. Assigning rights for back end users
Users with roles that are not of the type Administrator can only see certain sections and menus in PlentyONE. This means they only have limited access to the system. If employees work with the package content list, they need at least the following rights:
-
Orders > Package content list
Note that only users with roles of the type Administrator can grant rights.
Assigning rights:
-
Open the menu Setup » Account management » Roles.
→ The roles overview opens. -
Click on New (add).
→ The role creation menu opens. -
Enter a name for the role.
-
Switch to the advanced mode by toggling Advanced (toggle_on) slider.
-
Assign the rights for the respective section by ticking the check boxes indicated above.
Note: You can either grant rights for complete sections or limit the rights you grant the user. To only grant limited rights in a certain section, expand the section. -
Save (save) the settings.
|
The simple mode and advanced mode are connected. If you check menu visibilities in the simple mode the corresponding permissions in the advanced mode will be checked automatically. The connection only exists in this direction. If you check permissions in the advanced mode no menu or plugin visibilities will be checked automatically. |
2. Searching for orders
Open all orders in a list or select filters (tune) to narrow down the search results in the overview of the package content list.
Searching for orders in the package content list:
-
Open an order under Orders or in the Shipping Centre.
-
Click on a package ID in the Packages widget.
→ The details for this package will open. -
Click on Order search on the left-hand side.
→ The Package content list will open.-
Option 1: Click on search to see a list of all orders.
-
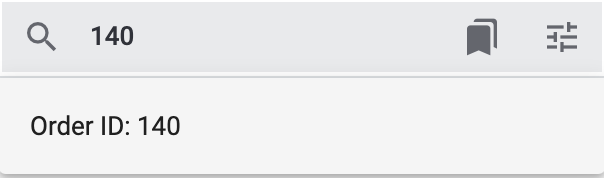
Option 2: Enter an order ID into the search field and click on one of the automatic suggestions (see Figure 1). Then click on search to start the search.
-
Option 3: Click on tune to narrow down the search results with filters. Note the explanations about the filters in Table 1.
-
-
When you start a search, you will see a list of all results.
| Filter | Explanation |
|---|---|
ID |
Enter the Order ID. |
Packing state |
Select the packing status from the drop-down list. |
Order date |
Select a date from the calendar (today) and an operator from the drop-down list. Is equal to (=): The search results display only orders with this exact date. |
2.1. Saving the current filter
When you start a search, your selected filters are displayed at the top as chips. You can save these filters to apply them again more quickly and easily in the future.
Saving the current filter:
-
Start a search with one or multiple filters that are listed in Table 1.
-
Click on Saved filters (bookmarks).
-
Click on bookmark_border Save current filter.
-
Enter a name for the filter.
-
Decide whether
-
this filter should be set as default filter (toggle_on)
-
this filter should be created for all users (toggle_on).
-
-
Click on SAVE.
→ The filter now appears under Saved filters (bookmarks).
| Use drag-and-drop to arrange the filters in a specific order by clicking on Move (drag_indicator). Click on delete to delete a filter. |
2.2. Applying saved filters
Applying saved filters:
-
Click on Saved filters (bookmarks).
-
Click on a filter that you have already created.
→ The search is started and the filter settings are displayed at the top as chips.
2.3. Setting a default filter
To make sure that you don’t have to select a filter that you use quite often from the list of your saved filters every time when opening the package content list, you can set a created filter as default filter. Every time when you open the package content list, this filter will be applied automatically.
You can set the filter as default filter directly when creating it as described in Saving the current filter or you can set the filter as default in the overview afterwards (see Figure 2).
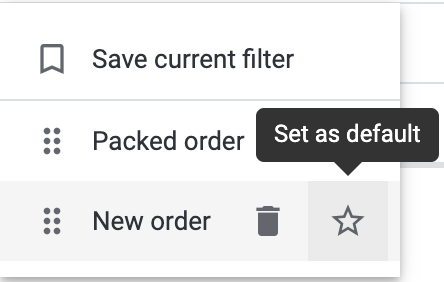
Click in the line of the saved filter on star_border Set as default.
If you want to set another filter as default filter, deactivate the currently selected default filter by clicking on star Do not use as default.
2.4. Customising the overview
You can customise the overview to meet your needs.
| Symbol | Explanation |
|---|---|
settings |
Which columns should be included in the overview?
Available columns
|
drag_indicator |
Which order should the columns be shown in?
|
arrow_downward / arrow_upward |
Should the results be displayed in ascending or descending order?
|
3. Using group functions
When you select an order (check_box) in the overview of the package content list, you can see the further options (more_vert) which contain several group functions. When you open an order and select several packages or pallets, more group functions become available in the detail view. Table 2 lists the elements from the group functions as well as their explanations.
| Element | Explanation |
|---|---|
Group functions in the order overview |
|
receipt_longExport CSV file |
Exports the contents of the selected orders as CSV file. |
lock Close all pallets |
Closes all pallets of the selected orders. |
lock Close all packages |
Closes all packages of the selected orders. |
delete Delete all pallets |
Deletes all pallets of the selected orders. |
delete Delete all packages |
Deletes all packages of the selected orders. |
Group functions in the detail view of an order |
|
dynamic_feed Quick packing |
Allows to pack several packages for an order at once. |
settings Configure package(s) |
Configures the selected packages of the order. |
settings Configure pallet(s) |
Configures the selected pallets of the order. |
table_rows Put package on pallet |
Puts the selected packages of the order on a pallet. |
lock Close package(s) |
Closes the selected packages of the order. |
lock Close pallet(s) |
Closes the selected pallets of the order. |
delete Delete package(s) |
Deletes the selected packages of the order. |
delete Delete pallet(s) |
Deletes the selected pallets of the order. |
4. Using the Amazon FBA service
You want to save time and rather let someone else take care of the shipping process? No problem - the Amazon FBA service allows you to do so. Thanks to the linkage between the package content list and Amazon FBA, you can easily set up which of your items you want to ship via this service. If you go for the shipment via Amazon FBA, Amazon also takes care of the customer service as well as potential returns.
In a shipment plan that you create on Amazon, you first tell them which items you want to send to the Amazon FBA warehouse. Let them know which items you want to send in which amount and in which packages. Once an order exists, Amazon can send the items on your behalf to the end customers.
For further information on the settings for using the Amazon FBA service in combination with the package content list, take a look at the manual page Amazon: Using the FBA service.
5. Exporting order contents as CSV file
In the package content list, you can export the contents of your orders as CSV file. You can also do this for several orders at once. In order to export the order contents in a CSV file, proceed as follows.
Exporting order contents as CSV file:
-
Open an order under Orders or in the Shipping Centre.
-
Click on a package ID in the Packages widget.
→ The details for this package will open. -
Click on Order search on the left-hand side.
→ The Package content list will open. -
Search for the order by means of the filter settings. Pay attention to the information given in Searching for orders.
→ The orders that correspond to the entered search criteria are shown. -
Click in the line of the order to open the order.
-
At the top, click on receipt_long Export order contents as CSV file.
→ The order contents are exported as CSV file.
|
Exporting the contents of several orders as CSV file
If you want to export the contents of several orders as CSV file, place a check mark (check_box) next to all desired orders in the overview. At the top, click on receipt_long Export order contents as CSV file. The contents of all selected orders are then exported all together in one CSV file. |
6. Working with pallets
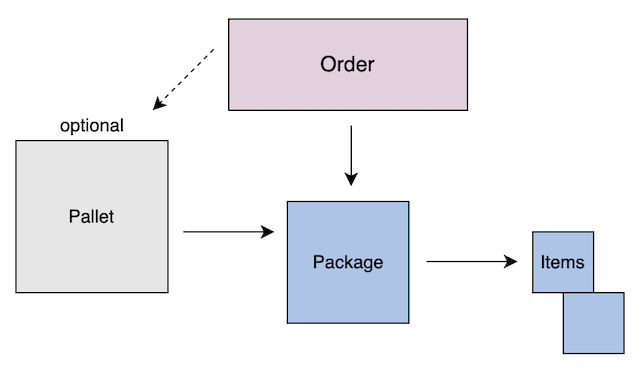
Pallets are the biggest packing unit in an order of the package content list and can contain packages and items. However, in the package content list, pallets are not required anymore in order to hand over a package to a fulfilment service provider. The image shows the different levels of an order. The following chapters describe how to work with pallets.
6.1. Creating a pallet
In order to create a new pallet for an order, proceed as follows.
Creating a pallet:
-
Open an order under Orders or in the Shipping Centre.
-
Click on a package ID in the Packages widget.
→ The details for this package will open. -
Click on Order search on the left-hand side.
→ The Package content list will open. -
Search for the order by means of the filter settings. Pay attention to the information given in Searching for orders.
→ The orders that correspond to the entered search criteria are shown. -
Click in the line of the order to open the order.
-
At the top, click on add Add content.
-
Select the option Create pallet.
Or: In the navigation on the left, click on the further options (more_vert) next to the order and select the option add Create transport unit > add Create pallet.
→ The window Create a new pallet opens. -
Carry out the settings. Pay attention to the information given in Table 3.
-
Click on add Create new pallet.
→ The pallet is created.
| Setting | Explanation |
|---|---|
Height (cm) |
Enter the height of the pallet. |
Width (cm) |
Enter the width of the pallet. |
Length (cm) |
Enter the length of the pallet. |
Individual pallet weight (kg) |
Enter the individual weight of the pallet. |
Pallet is stackable |
Activate this option, if the pallet is stackable. |
Additional information |
Optionally enter any additional information. |
Barcode |
Enter the barcode of the pallet. |
6.2. Configuring a pallet
In order to configure a pallet and to adjust existing settings, proceed as follows.
Configuring a pallet:
-
Open an order under Orders or in the Shipping Centre.
-
Click on a package ID in the Packages widget.
→ The details for this package will open. -
Click on Order search on the left-hand side.
→ The Package content list will open. -
Search for the order by means of the filter settings. Pay attention to the information given in Searching for orders.
→ The orders that correspond to the entered search criteria are shown. -
Click in the line of the order to open the order.
-
On the left of the pallet that you want to configure, place a check mark (check_box).
-
Click on the further options (more_vert) at the top.
-
Select the option settings Configure pallet.
Or: In the navigation on the left, click on the further options (more_vert) and select the option settings Configure pallet.
→ The window Configure pallet opens. -
Carry out the settings. Pay attention to the information given in Table 3.
-
Click on Configure pallet.
→ The pallet is configured according to your settings.
6.3. Closing a pallet
If all settings for a pallet have been carried out, you can close the pallet. Note however that all packages in this pallet will be closed, too and that it is not possible to carry out any changes afterwards. In order to close a pallet, proceed as follows.
Closing a pallet:
-
Open an order under Orders or in the Shipping Centre.
-
Click on a package ID in the Packages widget.
→ The details for this package will open. -
Click on Order search on the left-hand side.
→ The Package content list will open. -
Search for the order by means of the filter settings. Pay attention to the information given in Searching for orders.
→ The orders that correspond to the entered search criteria are shown. -
Click in the line of the order to open the order.
-
On the left of the pallet that you want to close, place a check mark (check_box).
-
Click on the further options (more_vert) at the top.
-
Select the option lock Close pallet.
Or: In the navigation on the left, click on the further options (more_vert) and select the option lock Close pallet.
→ The window Close pallet opens. -
If you are sure that you want to close the pallet, click on lock Close pallet.
→ The pallet is closed.
|
Registering pallets is possible without closing
Pallets do not have to be closed to be able to register them in the shipping centre. |
6.4. Deleting a pallet
If you delete a pallet, no changes can be carried out afterwards. In order to delete a pallet, proceed as follows.
Deleting a pallet:
-
Open an order under Orders or in the Shipping Centre.
-
Click on a package ID in the Packages widget.
→ The details for this package will open. -
Click on Order search on the left-hand side.
→ The Package content list will open. -
Search for the order by means of the filter settings. Pay attention to the information given in Searching for orders.
→ The orders that correspond to the entered search criteria are shown. -
Click in the line of the order to open the order.
-
On the left of the pallet that you want to delete, place a check mark (check_box).
-
Click on the further options (more_vert) at the top.
-
Select the option delete Delete pallet.
Or: In the navigation on the left, click on the further options (more_vert) and select the option delete Delete pallet.
→ The window Delete pallet opens. -
If you are sure that you want to delete the pallet, click on delete Delete pallet.
→ The pallet is deleted.
7. Working with packages
Packages are the second biggest packing unit in an order of the package content list and can contain items or variations. The following chapters describe how to work with packages. You can create new packages, add items to a package, edit items, put packages on a pallet, use the quick packing function, configure packages, change the scan type, close packages and delete packages.
7.1. Creating a package
In order to create a new package, proceed as follows.
Creating a package:
-
Open an order under Orders or in the Shipping Centre.
-
Click on a package ID in the Packages widget.
→ The details for this package will open. -
Click on Order search on the left-hand side.
→ The Package content list will open. -
Search for the order by means of the filter settings. Pay attention to the information given in Searching for orders.
→ The orders that correspond to the entered search criteria are shown. -
Click in the line of the order to open the order.
-
At the top, click on add Add content.
-
Select the option Create package.
→ The window Create a new package opens.
Or: In the navigation on the left, click on the further options (more_vert) next to the order and select the option add Create transport unit > add Create package. -
Carry out the settings. Pay attention to the information given in Table 4.
-
Click on add Create package.
→ The package is created.
| Setting | Explanation |
|---|---|
Package type |
Select a package type from the drop-down list. |
Packing unit type |
Select the packing unit type from the drop-down list. |
Package weight (kg) |
Enter the package weight. |
Package number |
Enter the package number. |
7.2. Packing items
You still have some unpacked items that you want to add to a package? To pack items into a package, proceed as follows.
|
Adding items via Variation ID
In the package content list, already existing items don’t need to be created manually anymore. In order to add an item to a package with only a few clicks, select the option Variation ID as scan type. When you now enter the Variation ID into the input field, the item is suggested and you can add it. |
Packing items:
-
Open an order under Orders or in the Shipping Centre.
-
Click on a package ID in the Packages widget.
→ The details for this package will open. -
Click on Order search on the left-hand side.
→ The Package content list will open. -
Search for the order by means of the filter settings. Pay attention to the information given in Searching for orders.
→ The orders that correspond to the entered search criteria are shown. -
Click in the line of the order to open the order.
-
Click on the package in order to show the items.
-
On the left in the Unpacked items section, place a check mark (check_box) next to the items that you want to add to the package.
-
Click on Add item to package (add).
→ The items are moved to the Packed items section and thus added to the package.
|
Add more items than specified in the variation
If you add items to a package that already contains the number of items specified in the variation settings, a pop-up window will open. Here you can confirm that you still want to add the item. |
|
Remove packed items from a package
If you want to remove an item from a package, place a check mark (check_box) next to the item in the Packed items section and click on Remove item from package * (delete). Then click on delete *Remove in order to remove the item from the package. |
7.3. Editing items
You can also access the variation settings from the package content list and edit them when needed.
Editing items:
-
Open an order under Orders or in the Shipping Centre.
-
Click on a package ID in the Packages widget.
→ The details for this package will open. -
Click on Order search on the left-hand side.
→ The Package content list will open. -
Search for the order by means of the filter settings. Pay attention to the information given in Searching for orders.
→ The orders that correspond to the entered search criteria are shown. -
Click in the line of the order to open the order.
-
Click on a package.
→ The items that exist in the package are shown. -
In the ID column, click on the Variation ID that you want to open.
→ The variation’s settings in the Item » Edit item menu open. -
Make any necessary corrections.
-
Save (save) the settings.
7.4. Putting a package on a pallet
If you have a package in an order that hasn’t been put on a pallet yet, you can do this with only a few clicks. You can either put the package on an existing pallet or create a new pallet. It is also possible to put several packages on a pallet at once.
Putting a package on a pallet:
-
Open an order under Orders or in the Shipping Centre.
-
Click on a package ID in the Packages widget.
→ The details for this package will open. -
Click on Order search on the left-hand side.
→ The Package content list will open. -
Search for the order by means of the filter settings. Pay attention to the information given in Searching for orders.
→ The orders that correspond to the entered search criteria are shown. -
Click in the line of the order to open the order.
-
On the left of the package that you want to put on a pallet, place a check mark (check_box).
Tip: You can also select several packages and collectively put them on a pallet. -
Click on the further options (more_vert) at the top.
-
Select the option table_rows Put package on pallet.
→ The window Put package on pallet opens. -
Select the ID of the pallet from the drop-down list or select the option Create a new pallet.
-
Click on table_rows Put package to pallet.
→ The package is put on the selected pallet.
7.5. Using quick packing
The quick packing function allows you to pack several packages at once and to equally distribute unpacked items among the packages. This is especially helpful if you have big orders and you want to pack many packages with the same content at once.
Using quick packing:
-
Open an order under Orders or in the Shipping Centre.
-
Click on a package ID in the Packages widget.
→ The details for this package will open. -
Click on Order search on the left-hand side.
→ The Package content list will open. -
Search for the order by means of the filter settings. Pay attention to the information given in Searching for orders.
→ The orders that correspond to the entered search criteria are shown. -
Click in the line of the order to open the order.
-
Place a check mark (check_box) next to the package or pallet that you want to use the quick packing for.
Tip: You can also select several packages, several pallets or a combination of packages and pallets for the quick packing. -
Click on the further options (more_vert).
-
Select the option dynamic_feed Quick packing.
→ The window Quick packing opens. -
Expand (chevron_right) the item settings on the left.
-
Carry out the settings. Pay attention to the information given in Table 5.
Note: In case there is a remaining quantity of items that cannot be packed, you can decide whether you want to pack the remaining items into another package or whether you want to leave the items unpacked. -
Afterwards, click on add Add.
→ The items are packed according to your settings.
| Setting | Explanation |
|---|---|
Package type |
Select the package type from the drop-down list. |
Packing unit type |
Select the packing unit type from the drop-down list. |
Package weight (kg) |
Enter the package weight. |
Items to pack |
Enter the number of items that should be packed. |
Items per package |
Enter the number of items that should be packed in each package. |
Number of packages |
Enter the number of packages that should be packed. |
Package total weight (kg) |
Enter the total weight of the packages. |
Package volume (cm³) |
Enter the package volume. |
7.6. Changing the scan type
There are several possibilities to scan items. Decide yourself how you want to scan your items and change the scan type if needed.
Changing the scan type:
-
Open an order under Orders or in the Shipping Centre.
-
Click on a package ID in the Packages widget.
→ The details for this package will open. -
Click on Order search on the left-hand side.
→ The Package content list will open. -
Search for the order by means of the filter settings. Pay attention to the information given in Searching for orders.
→ The orders that correspond to the entered search criteria are shown. -
Click in the line of the order to open the order.
-
Click on a package.
→ The items that exist in the package are shown. -
Click on Change scan type (settings) in the upper right corner.
-
Select one of the available options.
→ The scan type is updated according to your settings.
7.7. Configuring a package
In order to configure a package and to adjust existing settings, proceed as follows.
Configuring a package:
-
Open an order under Orders or in the Shipping Centre.
-
Click on a package ID in the Packages widget.
→ The details for this package will open. -
Click on Order search on the left-hand side.
→ The Package content list will open. -
Search for the order by means of the filter settings. Pay attention to the information given in Searching for orders.
→ The orders that correspond to the entered search criteria are shown. -
Click in the line of the order to open the order.
-
On the left of the package that you want to configure, place a check mark (check_box).
-
Click on the further options (more_vert) at the top.
-
Select the option settings Configure package.
Or: In the navigation on the left, click on the further options (more_vert) and select the option settings Configure package.
→ The window Configure package opens. -
Carry out the settings. Pay attention to the information given in Table 6.
-
Click on settings Configure package.
→ The package is configured according to your settings.
Package type |
Select a package type from the drop-down list. |
Packing unit type |
Select the packing unit type from the drop-down list. |
Package weight (kg) |
Enter the package weight. |
Package volume (cm³) |
Enter the package volume. |
7.8. Closing a package
If you have carried out all settings for a package and its items, you can close the package. The pallet in which the package is located can still stay open. Note however that it is not possible to carry out any changes for the package afterwards. In order to close a package, proceed as follows.
Closing a package:
-
Open an order under Orders or in the Shipping Centre.
-
Click on a package ID in the Packages widget.
→ The details for this package will open. -
Click on Order search on the left-hand side.
→ The Package content list will open. -
Search for the order by means of the filter settings. Pay attention to the information given in Searching for orders.
→ The orders that correspond to the entered search criteria are shown. -
Click in the line of the order to open the order.
-
On the left of the package that you want to close, place a check mark (check_box).
-
Click on the further options (more_vert) at the top.
-
Select the option lock Close package.
Or: In the navigation on the left, click on the further options (more_vert) and select the option lock Close package.
→ The window Close package opens. -
If you are sure that you want to close the package, click on lock Close package.
→ The package is closed.
|
Registering pallets is possible without closing
Pallets do not have to be closed to be able to register them in the shipping centre. |
7.9. Deleting a package
If you delete a package, no changes can be carried out afterwards. In order to delete a package, proceed as follows.
Deleting a package:
-
Open an order under Orders or in the Shipping Centre.
-
Click on a package ID in the Packages widget.
→ The details for this package will open. -
Click on Order search on the left-hand side.
→ The Package content list will open. -
Search for the order by means of the filter settings. Pay attention to the information given in Searching for orders.
→ The orders that correspond to the entered search criteria are shown. -
Click in the line of the order to open the order.
-
On the left of the package that you want to delete, place a check mark (check_box).
-
Click on the further options (more_vert) at the top.
-
Select the option delete Delete package.
Or: In the navigation on the left, click on the further options (more_vert) and select the option delete Delete package.
→ The window Delete package opens. -
If you are sure that you want to delete the package, click on delete Delete package.
→ The package is deleted.
8. Closing orders
If you are sure that the settings for an order are complete, you can close the order. Note that it is not possible to carry out any changes afterwards.
Closing orders:
-
Open an order under Orders or in the Shipping Centre.
-
Click on a package ID in the Packages widget.
→ The details for this package will open. -
Click on Order search on the left-hand side.
→ The Package content list will open. -
Search for the order by means of the filter settings. Pay attention to the information given in Searching for orders.
→ The orders that correspond to the entered search criteria are shown. -
Click in the line of the order to open the order.
→ The order is displayed in the navigation on the left. -
Click on the further options (more_vert).
-
Select the option lock Close order.
→ The window Close order opens. -
If you are sure that you want to close the order, click on lock Close order.
→ The order is closed.
|
Registering orders is possible without closing them
Orders do not have to be closed to be able to register them in the shipping centre. |