Functions
Functions in PlentyONE allow you to automatically modify data before it is used in import or export processes in your system. They can be used in mappings catalogues as well as the import tool.
Functions are a powerful tool for automating your data processing routines. It is recommended that you set some time aside to familiarize yourself with this feature. Prior experience with programming languages or spreadsheet programs is especially advantageous for this.
The following chapters explain how you can create functions and parameters in the editor in order to automatically adjust your data for individual sales channels.
|
Functions feature availability
Your access to the features in the Data » Functions menu is determined by your contract edition. By upgrading your contract edition you gain access to additional base functions in order of their release, as well as additional custom function slots. The following table provides an overview of the Functions features available in each edition:
You may view and adjust your contract to fit your needs via Account () » Current plan. |
1. Quick start guide
PlentyONE has prepared a short video tutorial for this topic. You can use this tutorial to get started with building your own functions more quickly.
This video includes separate audio tracks in german and english. To select your preferred audio track proceed as follows:
-
Click on the gear wheel (settings) in the video overlay.
→ The settings open. -
Open the Audio track menu.
-
Select the audio track you want to use with this video.
2. The Functions user interface
The following chapters explain the Functions user interface accessible under Data » Functions.
2.1. The overview
When you navigate to Data » Functions you will find the overview of the Functions section of your system. The overview is divided into several sections. The different sections are highlighted in the image below. The following chapters explain each section of the overview in more detail.
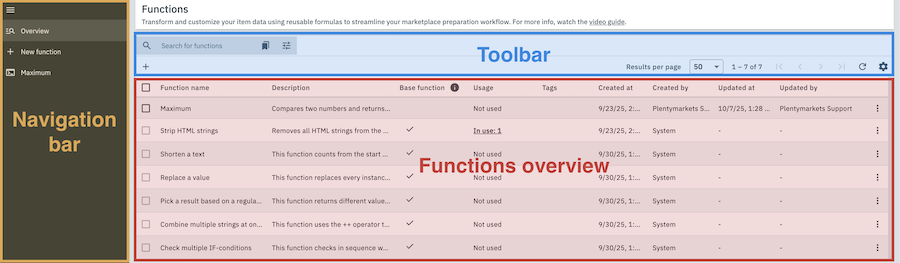
2.1.1. The navigation bar
The navigation bar allows you to navigate to the functions overview (manage_search) or create a new function (add) at any time. It is visible at the left-hand border in all areas of the Functions interface.
Any functions whose detail view you opened during your current browser session will be listed here as well, allowing you to quickly access and switch between them.
2.1.2. The functions overview
The functions overview is the centerpiece of the overview. It displays a variety of information regarding the functions that have been saved in your system at a glance.
A detailed explanation regarding the columns in the functions overview can be found in the following table.
| Column header | Content |
|---|---|
Function name |
The name of the function. Assigning a name to a function is a mandatory step in its creation. |
Description |
The description of the function. Descriptions can be entered in the detail view of a function when creating or editing it. |
Base function |
If a check mark is displayed in this column, then the corresponding function is a base function. An explanation of base functions can be found in the tooltip in the column header (info) or in the Base functions section. |
Usage |
This column displays whether a function is currently being used elsewhere in the system. If the function is in use you can also access its usage overview here. |
Tags |
The tags that have been applied to the function. Tags can be applied to a function when creating or editing it in the detail view. |
Created on |
The date and time when the function was created. |
Created by |
The name of the user account that created the function. |
Updated at |
The date and time when the function was last edited. |
Updated by |
The name of the user account that last edited the function. |
2.1.2.1. Base functions
When you open the functions overview for the first time you’ll notice that a few functions have been saved in your system already. These are base functions, basic functions that have been prepared by PlentyONE in advance. Base functions are marked by a check mark in the Base function column in the functions overview.
Base functions have many different uses:
-
They are ready to be used for automating some basic tasks out of the box.
-
They can be used as templates for more complex functions.
-
The comments left in their Editor area explain each part of their structure in detail, making them an excellent learning aid if you’re having trouble understanding how to build the functions you need.
|
Functions that are in use cannot be edited
All base functions are read-only and cannot be edited. If you want to modify a base function, you can create a copy of it instead. |
2.1.3. The overview toolbar
The overview toolbar allows you to customize the functions overview to your liking.
The first line of the toolbar contains the Search bar. You can use the Search bar to find a specific function or group of functions in your system. To do so, proceed as follows:
Searching for functions:
-
Click on the field labeled Search for functions.
-
Enter the name of a function or an ID.
-
Press the Enter key.
→ The results for your search will be displayed.
Tip: Alternatively, you can use the Filter (tune) to search for a function.
The first item in the second line of the toolbar is the New function button (add). You can click on this button to create a new function.
On the right-hand side of the toolbar you will find a few tools that allow you to customize how functions are displayed in the functions overview. The following editing options are available to you there:
-
You can use the drop-down-menu next to Results per page to select how many functions are displayed on each page of the functions overview.
-
You can navigate between the different pages of the functions overview by using the arrow buttons.
-
You can customize which columns are displayed in the functions overview by adjusting the Table settings (settings).
2.1.4. Usage overview
The usage overview displays which locations in the system a function is being used in and allows you to jump to those locations directly. It can be accessed via the function overview. To do so, proceed as follows:
Opening the usage overview:
-
Go to Data » Functions.
→ The functions overview opens. -
Carry out the Search (search) to display functions.
-
Find the function in the list whose usage you want to check.
-
Check the field in the Usage column.
→ If the function is being used somewhere in the system the field will display the message “In use” and the number of usages. Otherwise, it will display the message “Not used”. -
Click on “In use”.
→ The usage overview for the function opens.
Or: In the functions overview, click on the function whose usage overview you want to open.
→ The detail view of the function opens. -
Click on the usage overview icon (insert_chart) on the top left.
→ The usage overview for the function opens.
For each instance of a function being used in the system, the usage overview displays the name of the instance, its location in the system, a clickable link that leads to said location and the amount of times the function is being used in that location.
2.2. The detail view
When you select a function in the function overview or create a new function, the detail view of that function opens. The detail view is divided into several sections. The following chapters explain these sections further.
2.2.1. The navigation bar in the detail view
The navigation bar is accessible in the detail view as well and functions similarly to its appearance in the overview. However, it additionally displays when and by which user the currently viewed function was created and edited.
2.2.2. The functions toolbar
In the topmost section of the detail view you will find the functions toolbar. This toolbar contains a few important features:
-
Click on Save (save) in order to save all of your changes in the currently accessed detail view.
-
Click on Usage overview (insert_chart) in order to open the usage overview of the currently viewed function. If this button cannot be used then the function is not in use anywhere in the system.
-
Click on More (more_vert) in order to show more options.
-
Click on Delete to delete the currently viewed function.
-
|
Save your changes
The changes you make in the detail view are not saved automatically. Remember to manually save (save) any changes you want to make in the detail view. |
2.2.3. General settings
In the General settings section you can enter data that will make it easier to recognize your function elsewhere in the system. A detailed explanation of the different data fields in this section can be found in Table 2.
| Setting | Explanation |
|---|---|
Function name |
The name you enter here will be used to refer to your function everywhere in the system. |
Description |
The description of your function is visible in certain locations in your system. Use this field to describe what your function does. |
Tags |
Choose tags from the drop-down list or click on add Add tag in order to create a new tag. Further information on tags can be found in the next manual section. |
Strict Mode |
Strict Mode is a special mode that restricts the values a function is allowed to output. When Strict Mode is enabled for a function it can only output non-zero values. If it would output an unusable value such as 0, null or infinity, it will cause an error to occur instead. |
2.2.3.1. Adding tags to a function
You can use tags to make your functions more easily identifiable and distinguish them from other functions. To create a tag for a function, proceed as follows.
Creating tags for a function:
-
Go to Data » Functions.
→ The overview opens. -
Click on the function for which you want to create a tag.
→ The function is opened. -
Click on the Tags field in the General settings section.
-
Click on + Add tag.
→ The tag creation window is opened. -
In the field Tag name, enter a name for the tag.
-
In the field Tag colour, choose a colour for the tag.
*Tip:*You can either enter the hex code of a color or click on the colored square on the right and use the color picker. -
Click on NEXT.
-
Check the details in the summary.
-
Once you are satisfied with the settings, click on CREATE TAG.
→ The tag is created and automatically added to the Setup » Settings » Tags menu.
2.2.4. Editor
In the Editor section you can customize how your function works. It is divided into three subsections, as you can see in the diagram below. The following chapters explain each section in further detail.
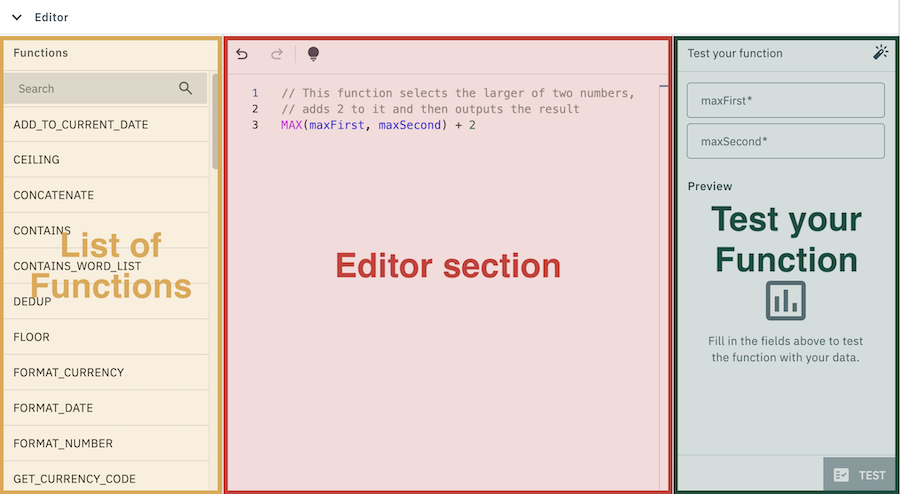
2.2.4.1. List of functions
The left-hand section of the Editor contains the list of functions. Here you can view a list of all available functions, search for a specific function or insert a function into the editor by clicking on it or dragging it into the editor section.
A list of all functions that are currently available in PlentyONE can also be found in the section Available functions.
2.2.4.2. Editor section
The central section of the Editor is the editor section. In this section you can edit your function by inserting functions from the functions list.
|
Manual entry:
You can also use manual entry to edit the contents of the editor section. However, you should only use this method once you already have some experience with functions. |
The top border of the editor section contains the editor toolbar. The editor toolbar contains some useful tools for building your functions:
-
The Undo button (undo) reverts the last change you made within the editor. You can also click it multiple times to undo several edits at once.
-
The Redo button (redo) reverts your last Undo press. Like the Undo button, it can be clicked multiple times to redo several edits.
-
The Editor Tips (tips_and_updates) button displays a brief overview of the basic math operations that can be performed within the functions editor. A detailed overview can be found in the manual section Operators.
| Functions cannot be modified in the editor while they are in use elsewhere in the system. |
2.2.4.3. Test your function
The right-hand section of the Editor is the Test your function section. Here, you can test your function in order to check whether it functions as intended. To test your function, proceed as follows.
Testing a function:
-
Go to Data » Functions.
→ The functions overview opens. -
Click on the function you want to test.
→ The function is opened. -
In the Test your function section on the right-hand side of the editor, fill out the fields for the respective parameters.
Note: The TEST (fact_check) button only becomes available once all mandatory fields have been filled out. -
Click on TEST (fact_check).
→ The output preview is displayed.
|
Example data
In the top right of the Test your function section you will find the Example data button (auto_fix_high). When you click on this button, all empty test data fields are filled with a random selection of data from PlentyONE’s pool of example data. This will not replace any of your own test data entries. |
3. Creating and editing a function
The following sections explain how to create and edit functions.
3.1. Creating a function
To create a new function, proceed as follows.
Creating a function:
-
Go to Data » Functions.
→ The functions overview opens. -
Click on New Function() in the navigation bar on the left-hand side.
Or: Click on New Function () at the top left of the overview.
→ The detail view of the function opens. -
Carry out the settings. Note the explanations in Table 2.
-
Customize the function in the Editor.
-
Save () the settings.
→ The function will be added to the overview.
3.2. Duplicating a function
If you want to create a function that is similar to another function in your system (or a base function) you can simply create a copy of that function instead. To do so, proceed as follows:
Duplicating a function:
-
Go to Data » Functions.
→ The functions overview opens. -
Carry out the Search (search) to display functions.
-
Click on the three-dot menu (more_vert) to the right of the function.
-
Click on Duplicate function (content_copy).
→ A copy of the function with the name “Copy of (Name of the original function)” will be created and added to the overview.
|
Duplicating base functions
When you duplicate a base function, the comments in its editor section are not carried over. |
3.3. Editing a function
In order to edit an existing function in your system, proceed as follows.
Editing a function:
-
Go to Data » Functions.
→ The overview opens. -
Click on the function you want to edit in the functions overview. → The detail view of the function opens.
-
Edit the settings. Note the explanations in Table 2.
-
Customize the function in the Editor.
-
Save () the settings.
→ The function will be added to the overview.
| All base functions are read-only and cannot be edited. If you want to modify a base function, you may create a copy of it instead. |
3.4. Deleting a function
To delete a function, proceed as follows.
| Functions cannot be deleted while they are in use. |
Deleting a function:
-
Go to Data » Functions.
→ The functions overview opens. -
Carry out the Search (search) to display functions.
-
Click on the three-dot menu (more_vert) to the right of the function.
-
Click on delete Delete.
-
Confirm the confirmation message by clicking on search DELETE.
→ The function is deleted and removed from the overview.
Or: In the overview, click on the function you want to delete.
→ The detail view of the function opens. -
Click on the three-dot menu (more_vert) at the top of the editor.
-
Click on delete Delete.
-
Confirm the confirmation message by clicking on search DELETE.
→ The function is deleted and removed from the overview.
4. Using functions in your system
Functions can currently be used in two places in your system: The import tool and the Catalogues menu. The following chapters explain these use cases in further detail.
4.1. Using functions in catalogues
Catalogues are used to export data from your PlentyONE System. They can be managed via the Data » Catalogues menu. You can find more information on how catalogues work here.
You can use functions as data sources when mapping data in a catalogue. To do so, proceed as follows:
Using functions in catalogues:
-
Go to Data » Catalogues.
→ The catalogue overview opens. -
Click on the catalogue you want to edit.
→ The catalogue’s Mapping menu opens. -
Navigate to the data field in which you want to use a function.
-
Click on Add data source.
-
In the Data source selection sidebar, hover over the Functions entry and click on the add symbol.
-
Select the function you want to use as a data source for the selected field.
→ The function is added as a data source. -
For each parameter displayed below the function, click on Add data source and select a data source that should be used for that parameter.
-
save Save your changes.
→ The function is used as a data source in the catalogue.
| Functions can only be used as primary data sources. They cannot be used as additional or fallback data sources. |
4.2. Using functions in the import tool
The import tool allows you to import data into your system once as well as in regular intervals. It is accessible via Data » Import. You can find more information on how the import tool works here.
In the import tool, you can use functions saved in your system to generate new values from the values in your data source and import those generated values into your system instead. To do so, proceed as follows:
Importing data with functions:
-
Go to Data » Import.
→ The import overview opens. -
Click on a created import you want to edit and switch to the Mapping tab.
-
Click on the mapping set in which you want to use a Function.
→ The Map fields menu of that mapping set opens. -
Click on Add mapping and select the mapping type Function
→ A new mapping of the selected type is added. -
Select a source column for each parameter of the function.
-
Select a target field for the function’s outputs.
-
save Save your settings.
When the import is run, the function uses the values in the specified source columns as parameters for the selected function, generates new values for each row and then imports these new values into the specified target fields in your system.
5. How to build a function
In this section you will find further explanations on how to build more complex functions. If you have not used the Functions feature before or do not fully understand it yet it is recommended that you read this section carefully.
5.1. Elements of a function
A function can be made of a variety of different elements. This chapter explains the different types of elements that can occur in a function.
| Element | Description |
|---|---|
Name of a function |
The name of a function determines how exactly that function modifies the data contained within the subsequent brackets. A list of all functions that are currently available in PlentyONE can also be found in the section Available functions. |
Parameter |
A function receives the data it should modify via its parameters. They can be renamed directly in the editor. |
Operator |
Operators are special characters that you can use to perform basic math or logic operations within a function. You can view a list of explanations for the operators that are currently supported in PlentyONE in the Operators chapter. |
Value |
Values have a similar function to parameters. However, unlike parameters they are static values and do not need to be specified for each use case. TIP: If you want to use a value instead of a parameter in a function, simply replace the parameter with the value in the editor. Example
CONCATENATE(concatenateParam1, "shirt") The CONCATENATE function combines two values exactly as entered. The two values to be combined are specified by the two parameters of the function. The default names of these parameters are concatenateParam1 and concatenateParam2 respectively. In the example above, the concatenateParam2 parameter has been replaced with the value “shirt". Therefore, this function will always combine the value specified by concatenateParam1 with the value “shirt". There are special formatting rules to keep in mind when inserting values into a function, depending on the type of value you want to enter. An explanation regarding the different value types can be found in the next chapter. |
Comment |
Comments are texts that can be inserted into the editor section without affecting the function itself. Insert // into a line in the editor section to label all subsequent characters in that line as a comment. |
5.2. Value types
There are different types of values that can be used for parameters, and most functions do not support every value type. You can find out which value types are supported by a function via two methods:
-
When you hover over the name of a function within the editor section, a tooltip will be displayed. This tooltip shows which value types are supported by each parameter used in this function, as well as the value type of the function’s output.
-
When you hover over the name of a parameter, a tooltip will be displayed. This tooltip displays which value types can be used for this parameter.
The following table contains an explanation of the different value types that are used in PlentyONE.
| Type | Explanation | Example | ||||
|---|---|---|---|---|---|---|
String |
Strings are values that consist of a sequence of characters, such as text.
|
"plenty" |
||||
Number |
Numbers are exclusively numerical values.
|
4 |
||||
Boolean |
Booleans are a special type of value used for logic operations. A boolean can only have one of two values: true or false. Unlike strings, booleans should not be put in quotation marks. |
true |
||||
Generic |
Generics are values whose type cannot be predetermined by the system. If the parameter of a function asks for a generic, then you can use any type of value for that parameter. |
true |
||||
Regular expression |
Regular expressions (also known as RegEx) are an especially complex value type that is implemented in a number of programming languages. They can be used to search, filter and manipulate strings.
|
(t?)shirt |
||||
List of strings |
Lists consisting of several strings. When inserting a list of strings into the editor, the following formatting rules apply:
|
["plenty", "one"] |
||||
List of numbers |
Lists consisting of several numbers. When inserting a list of numbers into the editor, the following formatting rules apply:
|
[2] |
||||
List of booleans |
Lists consisting of several booleans. When inserting a list of booleans into the editor, the following formatting rules apply:
|
[true, false, true, true] |
||||
List of generics |
Lists consisting of several generics. Do keep in mind that all elements of a list must be of the same type. When inserting a list of generics into the editor, the following formatting rules apply:
|
["blue", “red", “green"] |
5.3. Inserting a function into the editor section
In order to insert a function into the editor section you can use two different methods:
Method 1:
-
Select the function in the list of functions that you want to insert into the editor section. You can use the tooltips next to the function names (info) or the elaborations in the Available functions chapter to help you choose a function.
-
Click on the name of the function you want to use.
→ The function is inserted into the editor section.
Method 2:
-
Select the function in the list of functions that you want to insert into the editor section. You can use the tooltips next to the function names (info) or the elaborations in the Available functions chapter to help you choose a function.
-
Drag the name of the function you want to use into the editor section via Click-and-Drag.
→ The function is inserted into the editor section.
5.4. Combining functions
You can also combine functions with each other by replacing the parameter of a function with another function. To do so, proceed as follows:
-
Select the function in the list of functions that you want to insert into the editor section. You can use the tooltips next to the function names (info) or the elaborations in the Available functions chapter to help you choose a function.
-
Highlight the parameter you want to replace with a function.
-
Click on the name of the function you want to use, or drag it into the editor section via Click-and-Drag.
→ The highlighted parameter is replaced by the function.
By combining functions you can create more complex functions and therefore automate more complex tasks.
NOT(notValue)
The NOT function is very simple: It takes the boolean value of its only parameter notValue and returns the opposite boolean. For example, if the value of notValue is true, then NOT returns the value false.
You can use NOT to flip the outputs of a boolean function, for example IS_IN_LIST:
IS_IN_LIST(isInListValue, isInListList)
If the value of isInListValue occurs in the list provided by isInListList, then the function returns the boolean true, otherwise it returns the boolean false.
However, if you want this function to return the opposite value in each case, simply proceed as follows:
-
Click on the name of the NOT function or drag it into the editor section via Click-and-Drag.
→ The function is inserted into the editor section. -
Highlight the notValue parameter.
-
Click on the name of the IS_IN_LIST function or drag it into the editor section via Click-and-Drag.
→ The notValue parameter is replaced by the IS_IN_LIST function.
The function should now look like this:
NOT(IS_IN_LIST(isInListValue, isInListList))
THis function executes the following process:
-
If the value of isInListValue does occur in the list provided by isInListList, then the function returns the boolean true
→ The NOT function receives this value and returns the opposite boolean false. -
If the value of isInListValue does not occur in the list provided by isInListList, then the function returns the boolean false.
→ The NOT function receives this value and returns the opposite boolean true.
You can insert the function above into the editor section and use the Test your Function button in order to test how it handles different value combinations.
IF(ifCondition, ifOnTrue, ifOnFalse)
The IF function is an especially potent function that can be combined with other functions to great effect. Here is how it works:
-
If its first parameter (ifCondition) returns the boolean true, then IF returns the value of its second parameter (ifOnTrue).
-
If its first parameter (ifCondition) returns the boolean false, then IF returns the value of its third parameter (ifOnTrue).
The ifCondition parameter can be replaced by any function that returns a boolean. For example, it can be combined with the CONTAINS function in order to output different values depending on whether a given text contains a particular word or sentence:
IF(CONTAINS(containsSearchValue, containsSearchString), ifOnTrue, ifOnFalse)
This function executes the following process:
The IF function searches for the value of containsSearchValue in the value of containsSearchString.
→ If containsSearchValue does occur in containsSearchString, then the function returns the value of ifOnTrue.
→ If containsSearchValue does not occur in containsSearchString, then the function returns the value of ifOnFalse.
You can insert the function above into the editor section and use the Test your Function button in order to test how it handles different value combinations.
5.5. Using operators in functions
In addition to functions you can also use operators to manipulate your data. Operators are special characters or character combinations that you can insert inbetween two elements of a function in order to use those elements in a basic math or logic operation.
The most frequently used math and logic operations are implemented as operators instead of functions in order to simplify the function-building process. A complete list of all operators that are currently implemented in PlentyONE can be found in the Operators chapter.
MAX(maxFirst, maxSecond)
The MAX function compares two numbers and returns the larger of the two. For example, if the value of maxFirst is 1 and the value of maxSecond is 2, then the above function returns the value 2.
However, you can also have your function modify the two values as needed before MAX compares them. For example:
MAX(maxFirst + 2, maxSecond)
This function uses the + operator to add 2 to the value of maxFirst before MAX compares it with maxSecond. If the values of maxFirst und maxSecond are once again 1 and 2 respectively, then this function executes the following process:
-
The value of maxFirst (1) is added to 2.
→ THe first value to be compared is now 3. -
The two values are compared with each other.
→ 3 is greater than the value of maxSecond (2) -
The function returns the value 3.
You can use operators to implement complex logical connections in your functions. The IF function is especially suited for this:
IF(ifCondition, ifOnTrue, ifOnFalse)
The IF function returns one of two values (ifOnTrue oder ifOnFalse) depending on whether a certain condition (ifCondition) is met.
By using IF in combination with operators you can make the output of your function dependent on a certain value. For example, you can use the < operator for the ifCondition:
IF(stock > 0, "In stock", "Sold out")
This function returns In stock if the value of stock is greater than 0, and Sold out if it is not.
You can also use operators to make the output of your function dependent on multiple conditions at once:
IF(ifCondition1 && ifCondition2, ifOnTrue, ifOnFalse)
This IF function uses two conditions (ifCondition1 and ifCOndition2) that are joined by the AND operator (&&). In other words, the function will only return the value of ifOnTrue if the values of both ifCondition1 and ifCOndition2 are true.
Naturally you can combine different kinds of logic operators as well:
IF(Example > 1 && Example < 3, true, false)
This function only returns true if the value of Example is both greater than 1 and smaller than 3, otherwise it returns false.
|
Order of operations
Much like in mathematics, different kinds of operations within a function are always executed in a certain order. The order of operations goes as follows:
|
6. Available functions
The following table contains information regarding all available functions. You can also find short explanations and examples for each function in the respective tooltip (info) next to the name of the function in the list of functions.
| Function | Explanation | Example | Example output |
|---|---|---|---|
ADD_TO_CURRENT_DATE |
Adds a specified amount of time to today’s date. |
ADD_TO_CURRENT_DATE(10, "months") |
"2026.07.29" |
CEILING |
Returns the smallest whole number greater than or equal to the input number. |
CEILING(3.14) |
4 |
CONCATENATE |
Combines two strings into a single string. |
CONCATENATE("This is", "a tshirt") |
"This isa tshirt" |
CONTAINS |
Checks whether a string contains the specified value. |
CONTAINS("tshirt", "thisisatshirt") |
true |
CONTAINS_WORD_LIST |
Checks whether any of the specified strings are present in the given list. Returns true if at least one match is found, or false if no match is found. |
CONTAINS_WORD_LIST(["this", "is", "a", "tshirt"], "tshirt") |
true |
DEDUP |
Removes all duplicates from the given list. |
DEDUP(["this", "this", "is", "a", "tshirt"]) |
["this", "is", "a", "tshirt"] |
FLOOR |
Returns the largest whole number that is smaller than or equal to the input number. |
FLOOR(3.14) |
3 |
FORMAT_CURRENCY |
Formats a number as currency and rounds it to the specified number of decimal values. |
FORMAT_CURRENCY(12345.67, "de-DE", "EUR", 4) |
"12345,7€" |
FORMAT_DATE |
Converts a date into the specified format. |
FORMAT_DATE("2025.07.03", "yy-MM-dd") |
"2025-07-03" |
FORMAT_NUMBER |
Rounds the given number to the specified amount of decimal places. |
FORMAT_NUMBER(1234.56, "en-US", 1) |
"1,234.6" |
GET_CURRENCY_CODE |
Returns the three-character currency code for the specified country code. |
GET_CURRENCY_CODE("AD") |
"EUR" |
GET_CURRENCY_EXCHANGE |
Returns the exchange rate between the two specified currencies. |
GET_CURRENCY_EXCHANGE("eur", "ron") |
5.081 |
GET_CURRENT_DATE |
Returns the current date. |
GET_CURRENT_DATE() |
"2025-09-30" |
GET_DAYS_BETWEEN |
Returns the difference in days between the two given dates. |
GET_DAYS_BETWEEN(2024.10.21, 2023.10.14) |
373 |
GET_PART |
Separates the given string into parts based on the given delimiter and then returns the requested part. |
GET_PART("this, is, a, tshirt", ",", 2) |
"is" |
GET_UNIX_TIMESTAMP |
Returns the current unix timestamp. Unix time is a special time representation that counts the amount of non-leap seconds that have passed since 00:00:00 UTC on January 1st 1970. This method avoids the usual issues with time representations (e.g. timezones and daylight savings) and allows you to communicate specific dates and times without having to account for local time differences. |
GET_UNIX_TIMESTAMP |
1763546693085 |
IF |
Returns one of two specified values, depending on whether the given condition is true or not. |
IF(2>1, "visible when true", "visible when false") |
"visible when true" |
IF_BLANK |
Returns the first non-blank item in a comma-separated list. This function can evaluate up to 8 fields or functions. |
IF_BLANK(["", "tshirt", ""]) |
""tshirt" |
IS_IN_LIST |
Checks whether the given list contains the specified string. |
IS_IN_LIST("is", ["this", "is", "a", "tshirt"]) |
true |
IS_NUMERIC |
Checks whether the given string can be interpreted as a number. |
IS_NUMERIC("42") |
true |
IS_NULL |
Returns true if the given value is null (i.e. does not have an actual value), or false if it is not. |
IS_NULL() |
true |
JOIN |
Combines up to eight strings into a single string separated by a given value. Leaves out empty strings if instructed to do so. |
JOIN(",", ["this", "", "is", "a", "tshirt"]) |
"this,is,a,tshirt" |
LEFT |
Returns the specified amount of characters at the start of a text string. |
LEFT("this is a tshirt", 5) |
|
LEFT_WORD |
Returns all whole words within the specified character range at the start of the string. |
LEFT_WORD(10, "this, is, a, tshirt", /,/) |
"this" |
LIST_LENGTH |
Returns the number of items in the given list. |
LIST_LENGTH([1, 2, 3]) |
3 |
LOOKUP |
Searches for the specified value in the first list and then returns the value at the same spot in the second list. |
LOOKUP("kind", ["kind", "color", "material"], ["tshirt", "red", "cotton"]) |
tshirt |
LTRIM |
Removes all space characters at the start of a string. |
LTRIM(" stock") |
"stock" |
MAX |
Compares two numbers and returns the larger of the two. |
MAX(3, 4) |
4 |
MAX_LIST |
Compares all numbers in the provided list and returns the largest one. |
MAX_LIST([1, 4, 3, 2]) |
4 |
MIN |
Compares two numbers and returns the smaller of the two. |
MIN(3, 4) |
3 |
MIN_LIST |
Compares all numbers in a list of numbers and returns the smallest one. |
MIN_LIST([3, 4, 2, 1]) |
1 |
NOT |
Returns false if the input boolean is true. Returns true if the input boolean is false. |
NOT(true) |
false |
NUMBER_TO_STRING |
Returns the specified number as a value of the type string. This function allows for numbers to be used in functions that usually only support strings. |
NUMBER_TO_STRING(20) |
"20" |
NWORDS |
Returns all words at the start of a text string up to the specified maximum and/or the specified delimiter. |
NWORDS(3, ",", "This, is, a, tshirt") |
"This, is, a" |
PROPER |
Capitalizes the first letter of each word in a text string and converts all other letters to lowercase. |
PROPER("this is a tshirt") |
"This Is A Tshirt" |
REGEX_GET |
Returns the first match of a regular expression. |
REGEX_GET("this is a tshirt", "(^(shirt))|((shirt)$)") |
"shirt" |
REGEX_MATCH |
Returns true if the string contains a regular expression, or false if it does not. |
REGEX_MATCH("this is a tshirt", "(^(shirt))|((shirt)$)") |
true |
REGEX_REPLACE |
Replaces all matches of a regular expression in a string with the provided text. |
REGEX_REPLACE("this is a tshirt", "(t?)shirt", "shirt"); |
"this is a shirt" |
REPLACE |
Replaces all instances of the specified value in a string with a specified new value. |
REPLACE("This is a tshirt", "tshirt", "sweater") |
"This is a sweater" |
REPLACE_WORD_LIST |
Replaces all specified values in a text based on multiple values from a list. |
REPLACE_WORD_LIST("This is a red tshirt", ["red", "tshirt"], ["green", "sweater"]) |
"This is a green sweater" |
RIGHT |
Returns the specified amount of characters at the end of a text string. |
RIGHT("this is a tshirt", 5) |
"shirt" |
RIGHT_WORD |
Returns all complete words within the specified character range at the end of the string. |
RIGHT_WORD(6, "this, is, a, tshirt", /,/) |
tshirt |
RTRIM |
Removes all space characters at the end of a string. |
RTRIM(" this is a tshirt ") |
" this is a tshirt" |
SORT |
Sorts the elements in a given list according to the specified sorting order. All elements in the list must have the same type. The following sorting orders can be used: ascending, a, descending, d |
SORT([1, 4, 2, 3], "a") |
[1, 2, 3, 4] |
SPLIT |
Splits a given string into multiple strings by interpreting the specified regular expression as a delimiter. If no delimiter is given, then commas will be interpreted as delimiters instead. |
SPLIT(“this;is;a;tshirt”, /;/) |
["this", "is", "a", "tshirt"] |
STRING_LENGTH |
Returns the number of characters in the field. |
STRING_LENGTH("tshirt") |
6 |
STRING_TO_NUMBER |
Returns the specified string as a value of the type "number". Only strings that are formatted like a number (e.g. "3.14") can be used with this function. |
STRING_TO_NUMBER(131.59) |
131.59 |
STRIP_HTML |
Removes all HTML tags from a text string. |
STRIP_HTML("<p>This <strong>is</strong> a tshirt </p>") |
"This is a tshirt" |
TO_LOWER |
Converts all letters in a text to lower case letters. |
TO_LOWER("THIS SOFA IS RED") |
"this sofa is red" |
TO_UPPER |
Converts all letters in a text to upper case letters. |
TO_UPPER("this sofa is red") |
"THIS SOFA IS RED" |
TRIM |
Removes all leading and trailing white space characters from a text string. |
TRIM(" this is a tshirt ") |
"this is a tshirt" |
URL_ENCODE |
Encodes a string so that it can be used in a URL. |
URL_ENCODE("thisisagrüntshirt.com") |
www.thisisagr%C3%BCntshirt.com |
7. Operators
In addition to functions you can also use operators to modify your data. The following operators are supported in PlentyONE.
|
Editor Tips
An overview of the available operators can also be found in a tooltip in the editor section, accessible by clicking on the Editor Tips button. |
| Symbol | Function | Example | Result |
|---|---|---|---|
// |
Labels all subsequent symbols in the same line as a comment. Comments are not taken into account by the system when interpreting a function. They are colored light green in the editor section. |
// This is an example comment |
|
+ |
Adds two values together. |
10 + 2 |
12 |
- |
Subtracts the right value from the left value. |
17 - 5 |
12 |
* |
Multiplies two values with each other. |
5 * 7 |
35 |
/ |
Divides two values by each other. |
4 / 2 |
2 |
% |
Outputs the remainder of a division operation between two values. |
7 % 3 |
1 |
== |
Checks whether two values are equal and outputs true if they are, or false if they are not. |
"hey" == "hey" |
true |
!= |
Checks whether two values are equal. Outputs false if they are, or true if they are not. |
"hey" != "hey" |
false |
++ |
Combines multiple strings. Keep in mind that this will not insert any separators inbetween the strings. |
"this" ++ "is" ++ "a" ++ "tshirt" |
thisisatshirt |
|| |
Combines values as OR-Conditions in a boolean function. In other words, this operation will output the boolean true if one or both of the conditions is true. |
false || false |
false |
&& |
Combines values as AND-Conditions in a boolean function. In other words, this operation will output the boolean true if both of the conditions are true. |
true && false |
false |
< |
Checks whether the left value is smaller than the right value. Outputs true if it is, or false if it is not. |
5 < 3 |
false |
> |
Checks whether the left value is greater than the right value. Outputs true if it is, or false if it is not. |
4 > 1 |
true |
<= |
Checks whether the left value is smaller than or equal to the right value. Outputs true if it is, or false if it is not. |
5 >= 3 |
false |
>= |
Checks whether the left value is greater than or equal to the right value. Outputs true if it is, or false if it is not. |
5 >= 3 |
true |