DHL Shipping
1. Registering with DHL
In order to set up the interface for DHL Shipping in your PlentyONE system and use the function Shipping in the DHL business customer portal, you must be registered with DHL. You receive the data from DHL that you need for the settings in PlentyONE.
2. Carrying out the preparatory settings
To set up DHL Shipping in PlentyONE, you first need to carry out some preparatory settings:
-
Setting up countries of delivery
-
You can set up the countries of delivery in the back end.
-
-
-
You can create regions in the back end.
-
-
create the shipping service provider DHL Shipping
-
create shipping profiles and tables of shipping charges for DHL Shipping
-
You can set up some of the shipping settings in the Shipping settings. The remaining settings have to be carried out in the back end in the Setup » Orders » Shipping » Settings menu in the Shipping profiles tab.
-
3. Setting up DHL Shipping in PlentyONE
Under Setup » Orders » Shipping » Shipping service provider » DHL Shipping you will find the menus
-
Basic settings
Entering the login details for the business customer portal, billing numbers and sender data, and -
Shipping settings
Configuration of basic settings for shipping profile and shipping region, as well as specific services
|
Guided tour available
The guided tour DHL Shipping settings combination set-up is available for the shipping settings. The tour shows you the most important functions step by step. |
3.1. Carrying out the basic settings
Now carry out the basic settings. Here you enter your login details, billing numbers, and sender information, and select the details that should appear on the shipping label.
You can find the basic settings under Setup » Orders » Shipping » Shipping service provider » DHL Shipping » Basic settings.
3.1.1. Login details
Here you enter your login details for your DHL business account or details for use in a test environment. You can also decide whether label creation should be enforced even if there are minor address errors.
Entering login details:
-
Open the Basic settings menu.
-
Click on the plus (add) under Login details.
→ A pop-up window opens. -
Select whether you want to use your account in a live or test environment. If you choose the live environment, enter your login details for the DHL business customer portal. For the test environment, you need different data, which you can obtain from the DHL developer portal.
-
Activate the toggle if you want to force label generation.
-
Save (save) your settings.
3.1.2. Billing number
Enter your billing number(s).
DHL billing numbers are 14-digit character strings. They consist of your 10-digit customer number (EKP) and two characters each for the product and subscription.
You can find them in the DHL business customer portal in the Contract Data > Contract Items section of your personal DHL customer account area.
Enter the billing number:
-
Click on the plus (add) under Billing number.
→ A pop-up window opens. -
Decide whether you want to add the billing number manually or import it.
→ We recommend importing billing numbers instead of entering them manually. This prevents typing errors and ensures that the correct data is used. -
If you add it manually, enter your 10-digit DHL customer number under Customer Number / EKP. You can find this number in the contract details in your personal customer account area on the DHL business customer portal.
-
Select the required product from the drop-down list.
-
Enter the two-digit value for subscription.
-
Optionally, you can enter your own note for the billing number.
-
Save (save) your settings.
|
If you want to import a billing number from DHL, select this option, enter your username, and select the desired billing number from the drop-down list. |
3.1.3. Sender data
The sender data is shown as sender address on the shipping label.
If you want your company logo to appear on the shipping label, make sure you have uploaded it to the sender address in the DHL business customer portal. In Plenty, select the option Use sender reference from the DHL business customer portal.
Entering sender data:
-
Click on the plus (add) under Sender data.
→ A pop-up window opens. -
Choose whether you want to enter the sender data or use a sender reference that you have created in the DHL business customer portal.
-
If you chose the first option, enter the sender data.
-
Activate the first toggle if bank details are to be used.
→ This is necessary when using the cash on delivery service. -
Activate the second toggle if the polling data is to be used. Then enter the sender reference and bank account reference from the DHL business customer portal.
-
Save (save) your settings.
|
The reference used for sender and polling data, as well as the bank reference, is created in the DHL business customer portal, not in Plenty. Ensure that the data is correct before using a reference. |
3.1.4. Reference on label
-
Decide which details should appear on the label for each order and/or each item, and whether they should appear at all.
-
Activate the first toggle if the number of packages is to be indicated on the label when there are multiple packages.
-
Activate the second toggle if the number of items is to be indicated on the label.
-
You have now completed the basic settings. Save them by clicking on the disk icon (save) at the top left of the page.
3.2. Carrying out shipping settings
-
Open the Shipping settings menu item.
-
Click on the plus (add) to add a shipping combination.
-
Under Shipping settings, select a previously created shipping profile and a shipping region.
→ Only DHL shipping profiles are shown here. -
Under Login details, select your DHL login details or add new details using the plus (add).
-
Under Sender data, select the sender data or add new data using the plus (add).
-
Select a billing number or add a new one using the plus (add).
-
Under Shipping services, select the services you want to link to this shipping profile.
→ Only shipping services that are compatible with the selected DHL product will be displayed. -
If you want to use a different print format for the shipping label than the one provided by DHL, select it under Print format. This selection is optional: if you do not select anything here, the standard DHL format will be used.
→ The option to select the print format for the return label only appears if the DHL Retoure service has been selected. -
Under Advanced settings, you can choose whether you want to offer your customers the option of using a DHL Packstation or post office finder. The addresses will then be displayed on an interactive map.
Important: If you want to use the Finder, enter your Google Maps API key in the DHL Preferred Delivery settings. -
Furthermore, you can determine that the phone numbers of your customers are neither transmitted to DHL nor displayed on the shipping label.
-
If you want to set a minimum package weight for shipment registration with DHL, activate the third toggle and enter it in the line that appears. This weight is transferred to DHL if the total weight of the items falls below the weight entered here.
-
Save (save) your settings.
|
The services you see and for which you can configure settings depend on the selected DHL product. |
4. Information about data transfer
If you activated the option Agreement upon data transfer in the DHL Shipping shipping profile in the Setup » Orders » Shipping » Setting menu in the Shipping profiles tab, a checkbox is visible for your customers in the checkout of your plentyShop. Your customers decide whether they agree that their data is transferred to the shipping service provider or not.
-
If the customer agrees that their data is transferred, the email address of the customer is transferred to the shipping service provider.
-
If the customer does not agree that their data is transferred, the alternative email address that you entered in the shipping profile is transferred.
-
If the customer does not agree that their data is transferred and you did not enter an alternative email address in the shipping profile, an error message is displayed and the order cannot be registered with DHL.
Therefore, it is important that you enter alternative values for the email address and the telephone number in the shipping profile. Otherwise, it is not possible to successfully register the order with DHL when selecting certain services.
|
Upload polling file in case of DHL failure
If there is a failure of the interface on the part of DHL, it is possible to use the polling format DHL Shipping (Versenden) as an alternative. Generate the polling file containing the orders that should be registered either with a process and plentyBase or go to the Orders » Shipping centre menu. Afterwards, you can upload this file to the DHL business customer portal via the template DHL PlentyONE import format.
|
5. DHL Services
Expand () the following area to see a list of all available DHL products and the corresponding services. Note that the products and services available in your system are based on your DHL contract. Thus, you may need to contact DHL to obtain additional activation for certain products and services.
The following table lists all products and services that are currently available.
| Product | Service |
|---|---|
01 - DHL Paket |
|
53 - DHL Paket International |
|
54 - DHL Europaket |
|
62 - DHL Kleinpaket |
|
|
5.1. Using the Retail Outlet Routing service
Thanks to the Retail Outlet Routing service your undeliverable item (in case the recipient is unknown) gets a second chance to reach the recipient: Rather than being returned immediately to you, the undeliverable item will be held at the nearest outlet that has a parcel collection point for collection by the recipient. Your recipient will be informed of this by email. If the item is collected by the recipient, the time and costs involved in returning it can be avoided.
The Retail Outlet Routing service is only available for DHL products 01 - DHL Paket and 62 - DHL Kleinpaket.
In order that your customers can use it, the following settings have to be carried out:
-
Go to Setup » Orders » Shipping » Settings and click on the Shipping profiles tab. Then activate the option Agreement upon data transfer in the shipping profile and select an option how the data (email address and phone number) is to be transferred.
-
This setting is important for orders that come to your PlentyONE system via the online shop.
-
-
Under Setup » Orders » Shipping » Shipping service provider » DHL Shipping » Shipping settings, a DHL billing number must be selected for product 01 - DHL Paket or 62 - DHL Kleinpaket. Only then will the DHL Services drop-down list be available under Shipping Services.
-
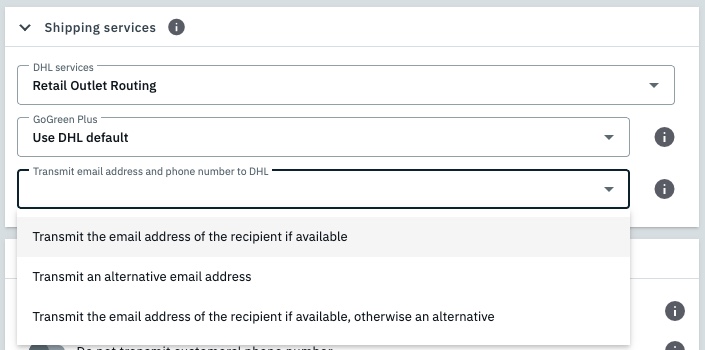
Check the box next to the Retail Outlet Routing service.
→ A new drop-down list appears. -
Choose whether the email address and phone number of the purchaser or an alternative should be sent to DHL.
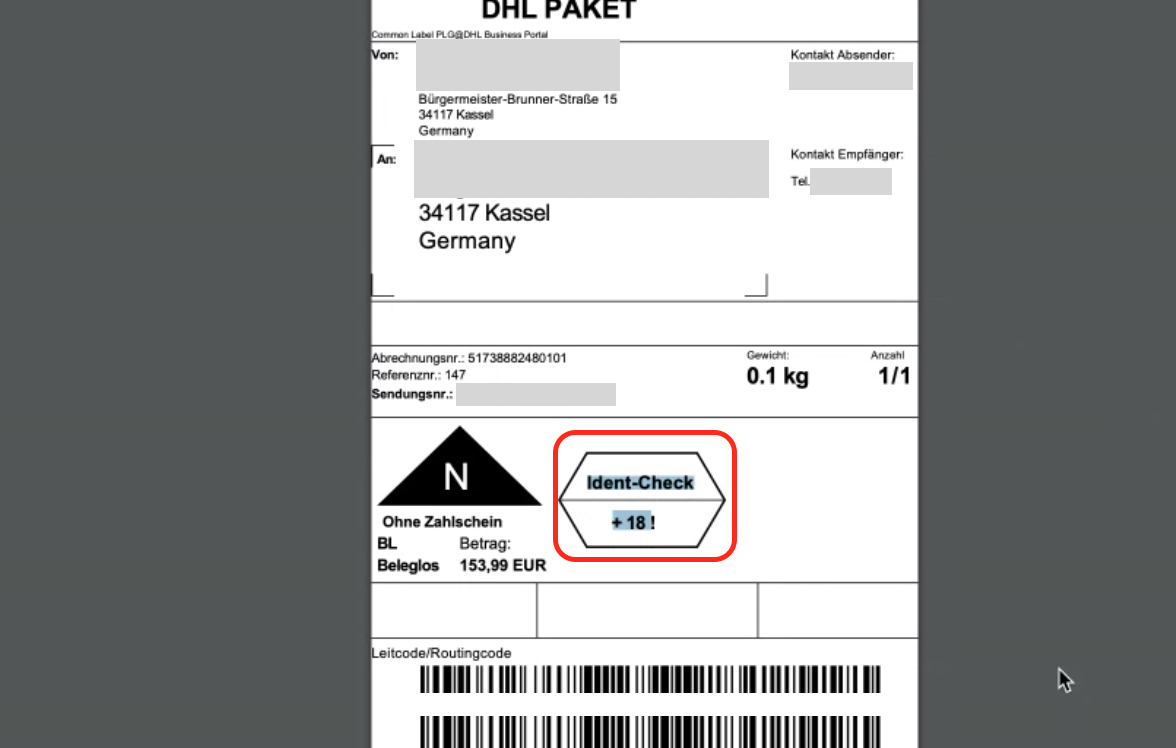
5.2. Using the Ident check service
Ensure that your packages are only handed over in person to the persons who are supposed to receive them, after the DHL delivery person has checked their identity and age using ID and documented this.
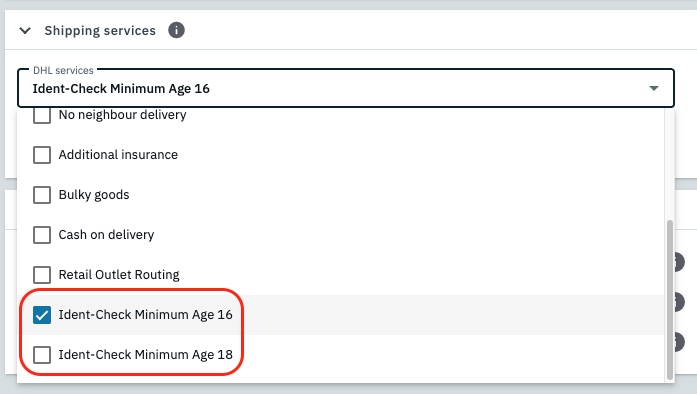
The Ident check service (minimum age 16 or 18) is only available for the 01 - DHL Paket product.
In order for your customers to use it, a DHL billing number for the product 01 - DHL Paket must be selected under Setup » Orders » Shipping » Shipping service Providers » DHL Shipping » Shipping Settings. Only then will the DHL Services drop-down list be available under Shipping Services.
Select the desired service here: Ident check minimum age 16 or Ident check minimum age 18.
5.3. Using the Preferred delivery service
The Preferred delivery service is only available for DHL products 01 - DHL Paket and 62 - DHL Kleinpaket. If you have selected a billing number for one of these products, the setting Preferred delivery services:
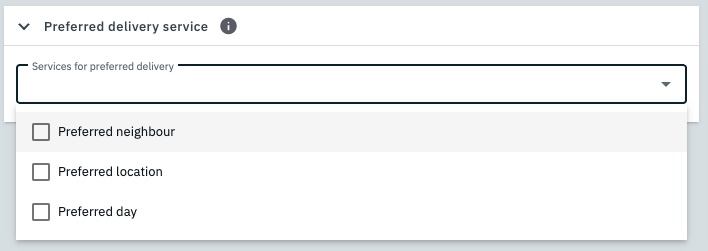
-
Select one or more services.
-
Save (save) your settings.
|
Carrying out the settings
If you want to offer your customers the preferred delivery service, configure the settings in the Setup » Orders » Shipping » Shipping service provider » DHL Shipping » Preferred delivery settings menu. |
Refer to the DHL Preferred Delivery page of the manual for further information.
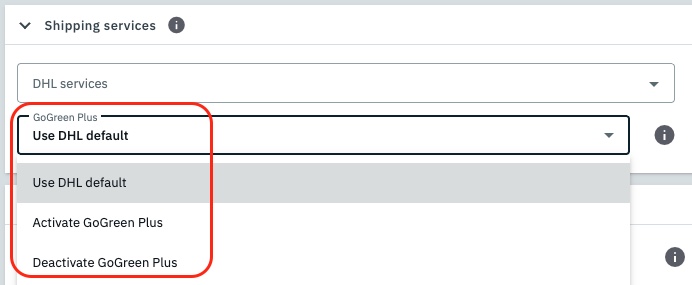
5.4. GoGreen Plus
With the GoGreen Plus service, you as a retailer can support DHL’s sustainability efforts.
Once you have registered on the DHL business customer portal and your account has been activated, you can select whether you want to use the default settings in DHL or a different setting for individual shipping combinations in the Setup » Orders » Shipping » Shipping service provider » DHL Shipping » Shipping settings menu under Shipping services.
GoGreen Plus is only available for domestic shipments, i.e., for products 01 - DHL Paket and 62 - DHL Kleinpaket.
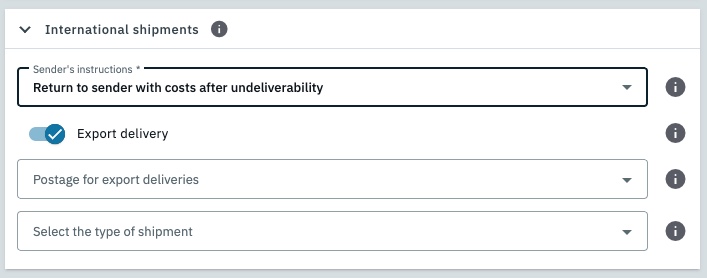
5.5. International shipping
If you have selected a billing number for international shipping in the Setup » Orders » Shipping » Shipping service providers » DHL Shipping » Shipping settings menu (DHL products 53 - Paket International, 54 - Europaket, 66 - Warenpost International), you will need to configure additional settings.
-
Select Sender’s instructions. This information is mandatory for international shipments and defines what happens to packages that cannot be delivered.
Note: The process for undeliverable mail varies from country to country and depends on the regulations of the postal service in the destination country. Recipients usually receive a notification card and can pick up their shipment at a local branch. After a storage period has expired, the shipment will be returned subject to a fee. Shipments that cannot be delivered due to address problems or active refusal will be returned immediately. -
Activate the Export delivery toggle if you want to ship to countries outside the EU. In this case, additional settings are necessary.
-
Select the postage for your export deliveries. This information is mandatory for shipments to non-EU countries. Only selections valid for the country of delivery will be accepted by DHL.
-
Select the type of shipment.
-
Save (save) your settings.
6. Using DHL Kleinpaket
Many items are too small to send them in parcels or packages. If you send many of those items, DHL Kleinpaket might be a convenient solution for you. DHL Kleinpaket can only be used for deliveries within Germany.
In order that you can offer your customers DHL Kleinpaket, the item and package data have to be correctly saved and transmitted to the shipping service provider. According to DHL, the following dimensions have to be maintained:
-
Minimum dimension: Length: 10.0 cm, width: 7.0 cm, height: 0.1 cm
-
Maximum dimension: Length: 35.3 cm, width: 25.0 cm, height: 8.0 cm
-
Maximum weight: 1000 g
When registering the order, DHL checks the maximum dimensions and the maximum weight. The minimum dimensions are not checked by DHL when the order is registered.
Carry out the settings in the PlentyONE back end and in the DHL business customer portal described in the following sub-chapters.
6.1. Settings in the back end
-
It is recommended to save the weight of the variations that you want to send with DHL Kleinpaket in the variation’s Dimensions area.
-
In order to ensure that the dimensions are not exceeded, you can use one of the two options that can be set up in the settings of the shipping package. You can find these options in the Setup » Orders » Shipping » Shipping packages menu in the drop-down list Volume.
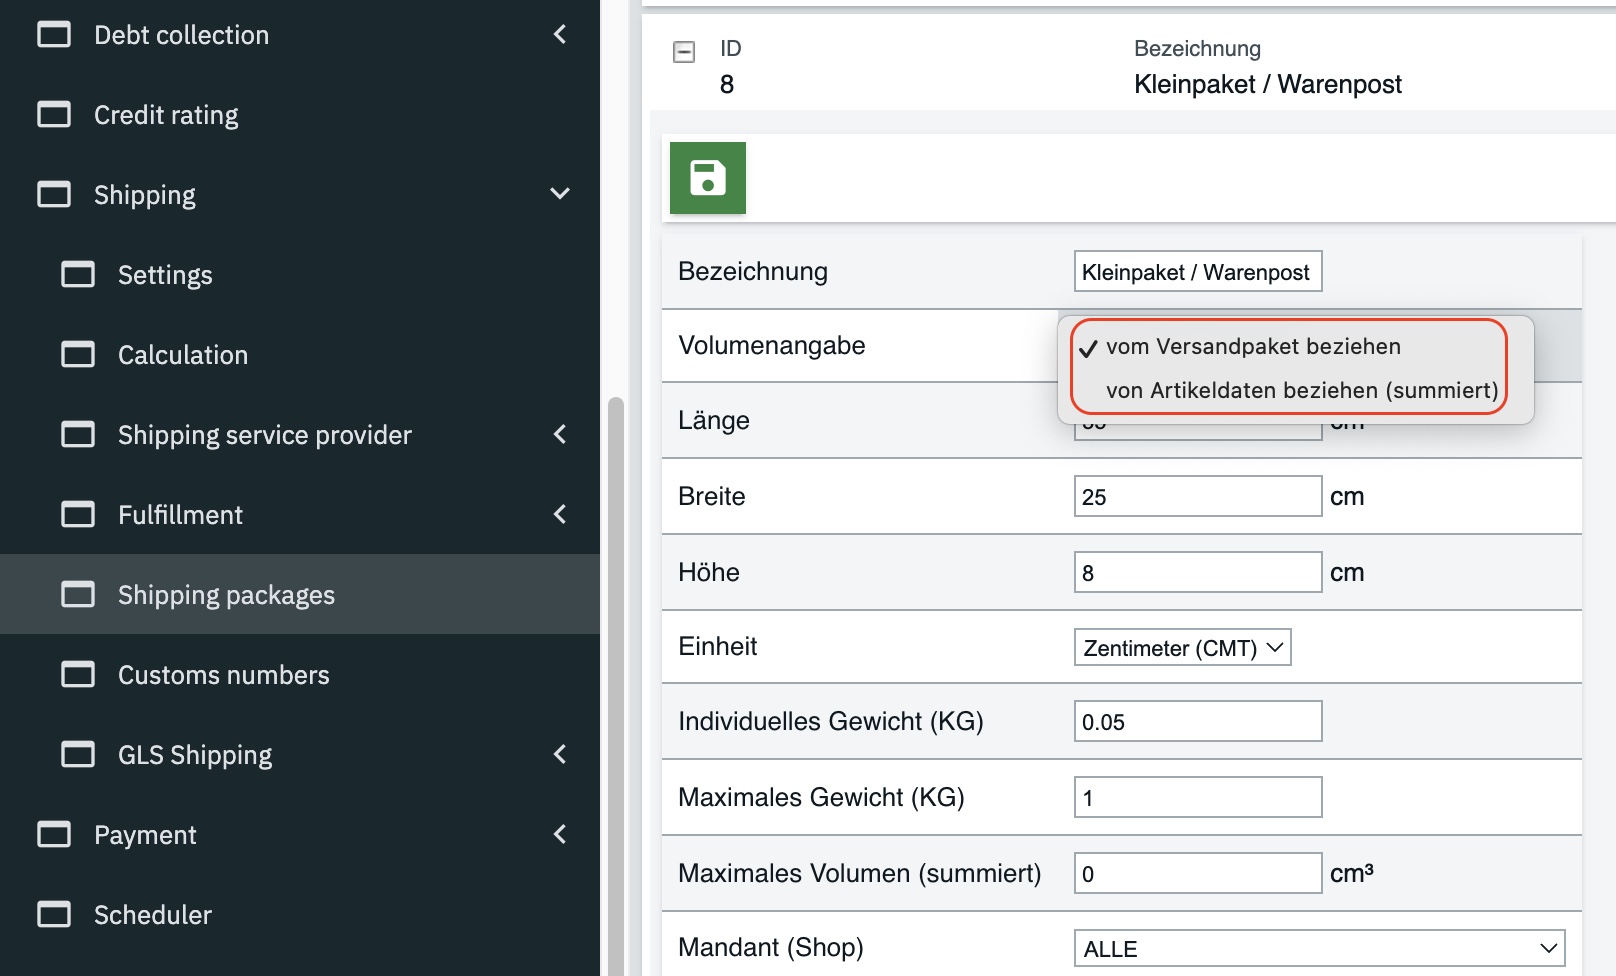
The two options regarding the volume that you can select in the shipping package are explained in detail in the following:
6.1.1. take from the shipping package
In order that the packages in the shipping centre are always generated with the correct dimensions and the order can be successfully registered with DHL Kleinpaket, you can use the option take from the shipping package and save the permissible maximum dimensions (length, width, height) in cm.
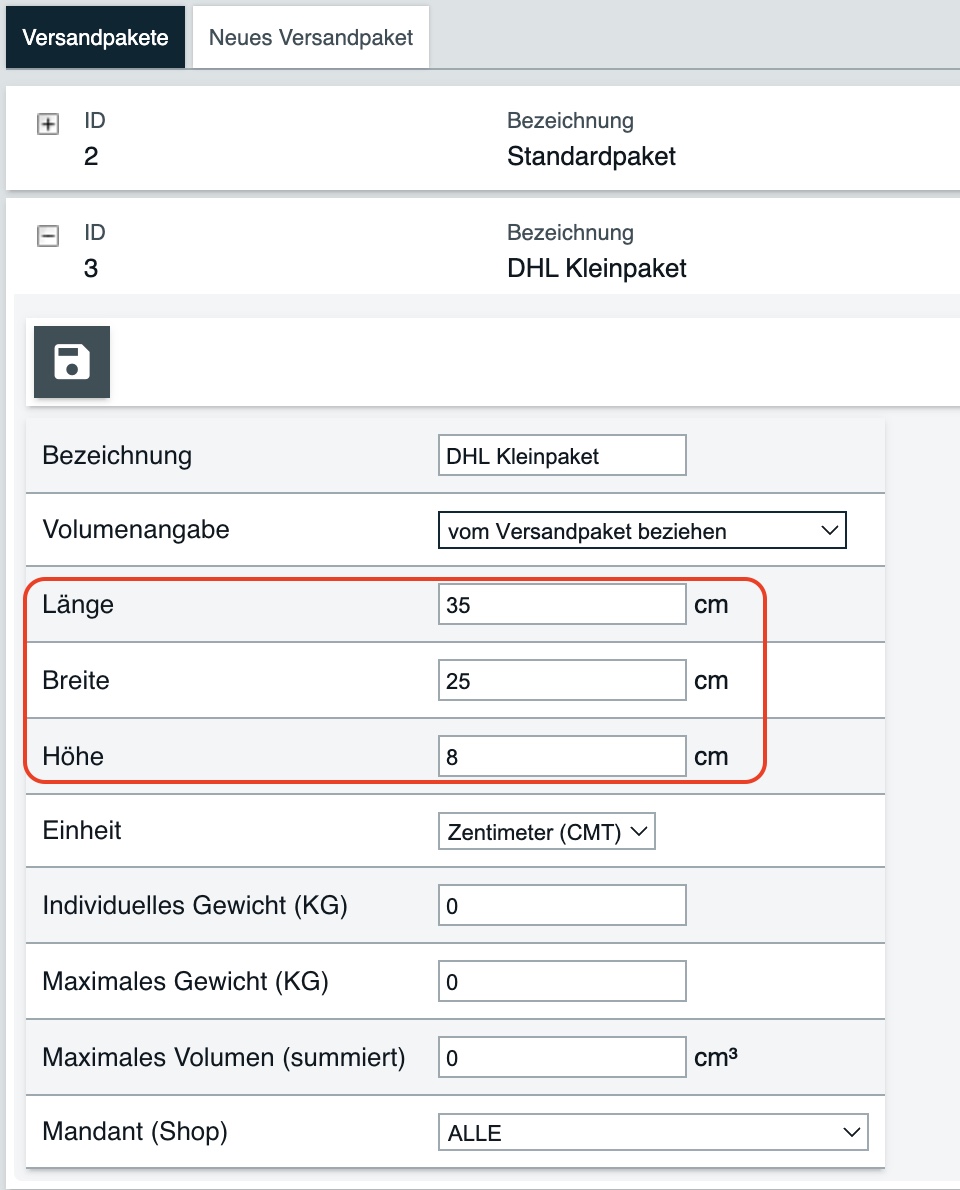
If you select the settings mentioned above, the dimensions of the shipping package and the gross weight of all variations in the order are transferred to the shipping service provider.
6.1.2. take from the item data (total)
Note: If you select the option take from item data (total), the weight only is transferred to the shipping service provider. The logic does not transfer the other dimensions (length, width, height).
You can, however, have the volume calculated based on a volume limitation in the shipping profile. To do so, select in the region of the corresponding shipping profile the limitation type Maximum (cubic metres) and save the calculated volume from the maximum dimensions in m³ that is prescribed for Kleinpaket by DHL: 353 mm x 250 mm x 80 mm = 0,0044 m³.
Another possibility is to select the limitation type Maximum (g) in the region of the shipping profile and to save the calculated maximum weight of 1000 g that is prescribed for Kleinpaket by DHL.
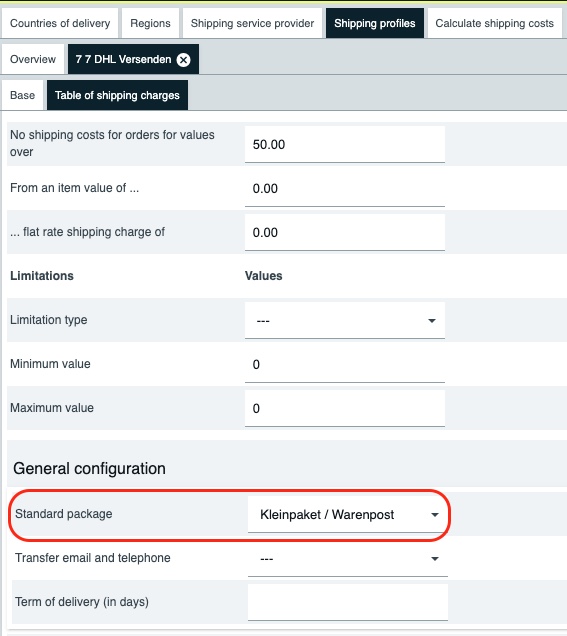
You can select the shipping package as standard package in the corresponding region of the current shipping profile in the Table of shipping charges tab:
6.2. Settings in the DHL business customer portal
Go to the DHL business customer portal and select the appropriate size for the shipping labels:
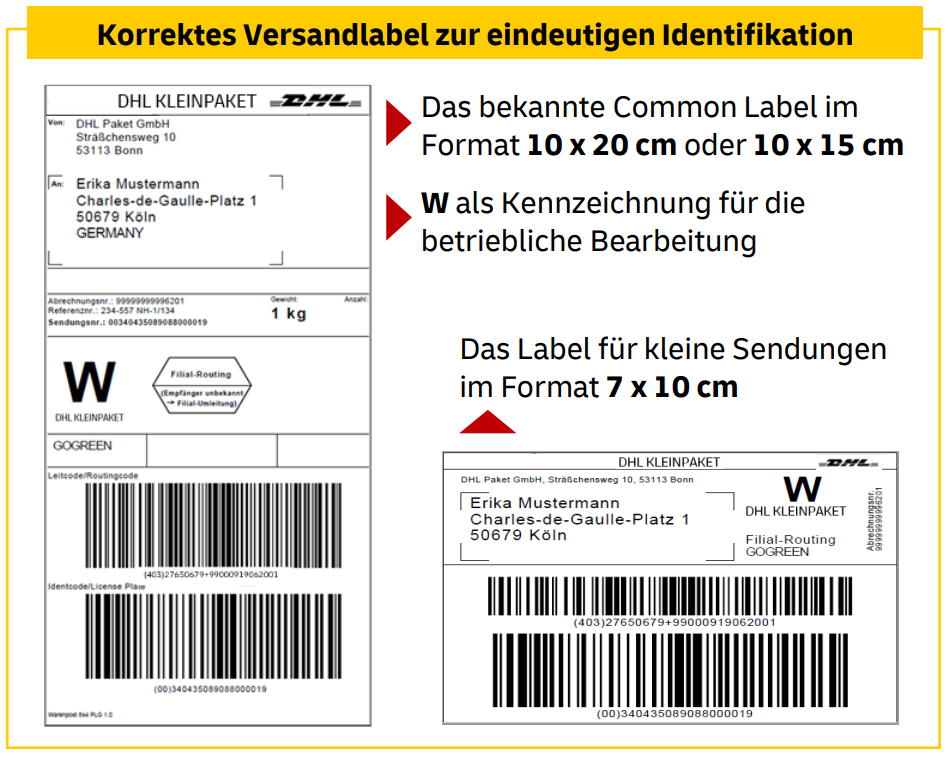
In the DHL business customer portal, go to the section Ship > Basic settings > General settings and set up the printer settings for your shipping labels. You can activate that the label size 100 x 70 mm is used for Kleinpaket. Note that it is not possible to print the additional name information for this label size: Sender name 2, sender name 3 and recipient name 3 cannot be printed on the label.
You can also use the common label in the format of 100 x 200 mm for Kleinpaket.
For further information on DHL Kleinpaket, refer to the DHL website.
7. DHL Warenpost International
DHL Warenpost International is the ideal solution for shipping small and lightweight shipments worldwide not just affordably, but also quickly and reliably to your customers. The Premium service offers additional transparency and reliability through tracking and liability.
When registering an international Warenpost shipment to an non-EU country, the CN22 form will automatically be generated on the label. The icon for printing export documents is therefore not available in your system.
In order that you can offer your customers DHL Warenpost International, the item and package data have to be correctly saved and transmitted to the shipping service provider. According to DHL, the following dimensions have to be maintained:
-
Minimum dimension: Length: 14.0 cm, width: 9.0 cm, height: 0.1 cm
-
Maximum dimension: Length: 35.3 cm, width: 25.0 cm, height: 10.0 cm
-
Maximum weight: 1000 g
|
You have to carry out the settings in the back end and in the DHL business customer portal for DHL Warenpost International in the same way as you did for DHL Kleinpaket. Please refer to the explanations on DHL Kleinpaket in the chapters Settings in the back end and Settings in the DHL Business customer portal. |
For further information on DHL Warenpost International, refer to the DHL website.
8. Assigning rights for back end users
Users with roles that are not of the type Administrator can only see certain sections and menus in PlentyONE. This means they only have limited access to the system. If employees work with DHL Shipping, they need at least the following rights:
-
Setup > Orders > Shipping > Shipping service provider > DHL Shipping > Read
Note that only Admin users can grant rights.
Assigning rights:
-
Open the menu Setup » Account management » Roles.
→ The roles overview opens. -
Click on New (add).
→ The role creation menu opens. -
Enter a name for the role.
-
Assign the rights for the respective area by ticking the check boxes indicated above.
Note: You can either grant rights for complete areas or limit the rights you grant the user. To only grant limited rights in a certain area, expand the area. -
Save (save) the settings.
|
The simple mode and advanced mode are connected. If you check menu visibilities in the simple mode the corresponding permissions in the advanced mode will be checked automatically. The connection only exists in this direction. If you check permissions in the advanced mode, no menu or plugin visibilities will be checked automatically. |
|
Shipping function in the DHL business customer portal
Note that the function Shipping has to be activated for the user in the DHL business customer portal. |
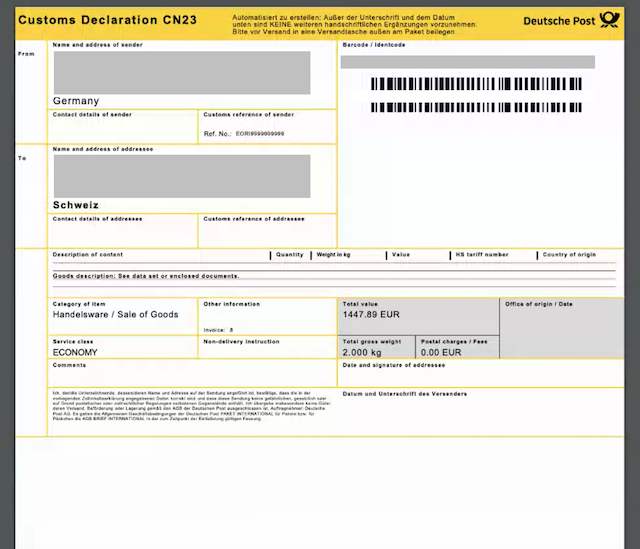
9. Customs declaration
You need a customs declaration for shipments that you send to countries outside the European Union, the so-called CN23 form. Customs declarations have to be attached to the outside of the package, preferably in a transparent, self-adhesive envelope. This way, the customs authority employees in the country of destination can see at a glance the value and the content of your package and can take out the form from the envelope for closer inspection, if needed.
The following data has to be entered on the CN23 form:
-
Sender data
-
Name and address of recipient
-
EORI number, i.e. the sender’s customs reference
-
Recipient’s reference (applies to B2B only)
-
Detailed description of contents
-
Note: If the order contains more than 5 items, another page is added to the CN23 form that lists all items.
-
-
Quantity, weight, value
-
Customs tariff number
-
Country of origin of the items
-
Total weight of the package
-
Total value of the package’s content
-
Type of shipment
-
Invoice number, if needed
-
Date and sender’s signature
For further information on the customs declaration, refer to the DHL website.
|
Basic settings for customs numbers for use with shipping service providers
Under Setup » Shipping » Customs numbers, you can easily store customs numbers according to specific criteria (including client, order referrer, and delivery country). The following options are available for assigning values:
In addition, you can define the type and usage of customs information - for example, if certain fields are required by shipping service providers in a different form. For further information, refer to the Customs numbers page. |
10. Tracking URL for DHL
The currently valid, known tracking URL for DHL is:
https://www.dhl.de/en/privatkunden/dhl-sendungsverfolgung.html?piececode=[].