Faceted search (filters)
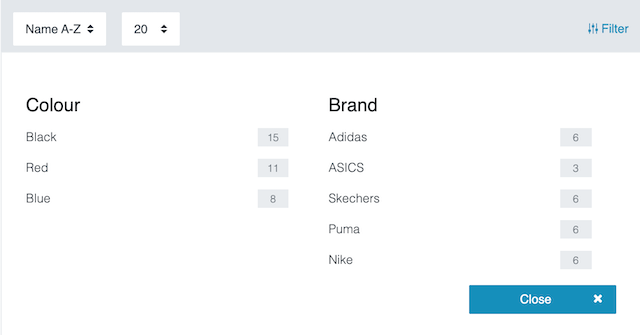
Some customers know exactly what they’re looking for. For example, imagine you sell shoes. A customer searches for black Nike shoes that cost less than €150. Online shop visitors can use search filters to limit which products they see. The more products a shop category includes, the more important search filters are.
|
Filters or facets?
In PlentyONE, search filters are also called facets. Don’t get confused if someone talks about the so-called faceted search. This refers to the search filters in the plentyShop. |
Procedure
This function is configured in several different steps:
1. Creating and editing filters
First, create all of the necessary filters. For example, if customers should be able to search for black Nike shoes that cost less than €150, then you’ll need to create the filters “Colour”, “Brand” and “Price range”.
1.1. Manual procedure
1.1.1. Creating new filters
-
Go to Setup » plentyShop » Global Settings » Search » Faceted Search.
-
Click on New.
-
Carry out the settings. Note Table 1.
-
Save () the settings.
→ The filter is created and opened for editing. Depending on which type of filter you chose, you’ll see some or all of the tabs explained further below.
| Setting | Explanation | ||||||||
|---|---|---|---|---|---|---|---|---|---|
Name (English) |
Enter a name for the filter. This name is displayed in the English language version of your plentyShop. In other words, the name is visible to customers. Other language versions: Is your plentyShop also available in other languages? Once you’ve created the filter, you’ll be able to save the name in other languages. |
||||||||
Type |
What sort of filter do you want to create? Allow your customers to filter products by the following criteria: attribute, characteristic, property, brand name, availability, price range. Note: This setting can not be changed once you’ve created the filter.
|
||||||||
Position |
Where should the filter appear in the plentyShop? In other words, which filter should be displayed first, second, third, etc? Enter the position number here. Note: Filters that have the same position will be sorted alphabetically. |
1.1.2. Tab: Settings
Here you can configure additional settings for the filter.
-
Go to Setup » plentyShop » Global Settings » Search » Faceted Search.
-
Open the facet and click on Tab: Settings.
-
Carry out the settings. Note Table 2.
-
Save () the settings.
| Setting | Explanation |
|---|---|
Type |
Here you’ll see whichever type you selected while creating the filter. The type cannot be changed. If you accidentally created the wrong type, then you’ll need to delete the filter and create a new one. |
Sorting |
How should the values be sorted within the filter? Example: If you’re creating the filter “Brand name”, then you could sort the individual brands alphabetically. |
Position |
Here you’ll see the position number that you entered while creating the filter. You can change the position number if needed. The position number specifies where the filter should appear in the plentyShop. In other words, which filter should be displayed first, second, third, etc. Note: Filters that have the same position will be sorted alphabetically. |
CSS class |
This option currently has no function. Enter a CSS name. In the future, it will be possible to design the filter with CSS. |
Selection type |
What should happen when customers select multiple filter criteria? Should they see products that fulfil all of these criteria or any one of the criteria?
|
Minimum number of hits |
Will customers be disappointed if they filter products (e.g. the brand “Nike”) and only get a few results? In this case, it makes sense to save a minimum number of hits. Enter a number into the field. This is the minimum number of results that a filter value must have, in order for it to be displayed in the plentyShop. Filter values will automatically be invisible in the plentyShop if they do not return the minimum number of results. Filter vs. filter value: In the example above, the filter would be “Brand”. The filter could have values like “Nike”, “Adidas” and “Puma”. |
Maximum number of facet values shown |
How many values should be displayed within a filter at maximum? Enter a number into the field. Example: Imagine you’ve created a filter “Brand” with 30 different values like “Nike”, “Adidas”, “Puma” etc. If you enter the number 10 here, then only 10 of the 30 brand names will be displayed in the filter. Note: A maximum of 250 values can be displayed per filter. |
1.1.3. Tab: Name
You already entered an English name while creating the filter. This name is displayed in the English language version of your plentyShop. In other words, the name is visible to customers. But what should you do if your plentyShop is also available in other languages? In this tab, you can save names in other languages.
-
Go to Setup » plentyShop » Global Settings » Search » Faceted Search.
-
Open the facet and click on Tab: Name.
-
Enter translations for every language version of your plentyShop.
-
Save () the settings.
1.1.4. Tab: Values
Here you’ll create the individual values within the filter. For example, if you’re creating the filter “Colour”, then you’ll need values like “Blue”, “Red” and “Black”. There are two steps to the process:
Creating values
-
Go to Setup » plentyShop » Global Settings » Search » Faceted Search.
-
Open the facet and click on Tab: Values.
-
Click on Add new value () in the lower left corner.
→ The Create new value window opens. -
Enter a name for the value in the system’s language.
-
Enter a position.
-
Save () the settings.
→ The value is created. -
Optional: In the Name tab, enter translations for the name of the value.
-
Optional: In the Settings tab, enter a CSS class.
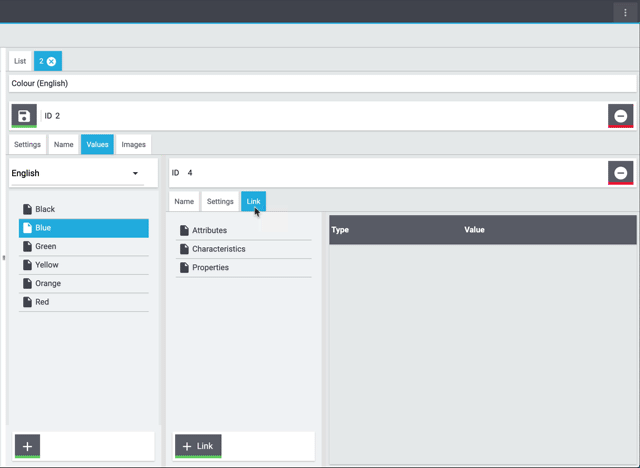
Linking values
-
Go to Setup » plentyShop » Global Settings » Search » Faceted Search.
-
Open the facet and click on Tab: Values.
-
Open the value and click on Tab: Link.
-
Click on the back end value.
-
Click on Link in the bottom left corner.
→ The back end value is linked to the facet’s value. -
Repeat the process to link as many other values as needed.
-
Save () the settings.
|
Should I link multiple values?
Imagine you sell t-shirts in all different colours such as “light blue”, “dark blue” and “turquoise”. You want all three colours to be found with the blue colour filter. In this case, you’ll need to link all three back end values to the facet value. |
|
Do I need to link items to the filter?
No. It’s not necessary to directly link items to the filter. Your items will automatically be assigned to the appropriate filters. How? When linking the filter to back end values, the filter is also automatically linked to all of the items that have this back end value. |
1.1.5. Tab: Images
This tab currently has no function.
Here you can save optional images for the individual filter values. For example, imagine you’ve created the filter “Colour” with the values “Blue”, “Red” and “Black”. You want customers to see colour tiles in the plentyShop, rather than colour names. There are two steps to the process:
Uploading images
-
Go to Setup » plentyShop » Global Settings » Search » Faceted Search.
-
Open the facet and click on Tab: Images.
-
Add images by clicking on the Upload files button or by dragging and dropping them into the tab.
-
Save () the settings.
Linking images
-
Go to Setup » plentyShop » Global Settings » Search » Faceted Search.
-
Open the facet and click on Tab: Images.
-
Move your mouse cursor over an image.
→ You’ll see a drop-down list with values at the bottom of the image. -
Choose the appropriate value from the drop-down list.
-
Save () the settings.
→ The image is linked with this value. It is displayed with a red frame.
|
Number of links
|
|
Additional setting: Make images available
In a later step, you’ll click on the option Make images available () to display the linked images in the plentyShop. |
1.2. Data import
PlentyONE has an import tool. The idea is simple. Rather than manually saving filter information in PlentyONE, you’ll enter the same information into a CSV file and then import this file into your system.
|
Requirements
These instructions assume that you already: |
1.2.1. Practical example: Importing new facets
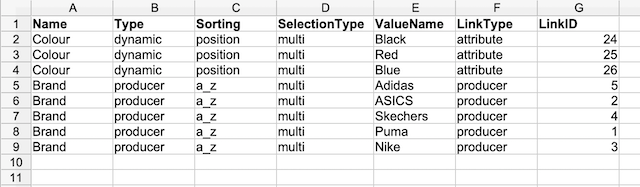
Imagine you sell shoes in your online shop. For example, if customers should be able to search for black Nike shoes, then you’ll need to create the filters “Colour” and “Brand”.
What about a price filter?
Very few settings need to be configured for the price filter. You’ll probably be quicker if you manually create the price filter. For this reason, the price filter is not discussed further on this page.
Filters
First, transfer the filters into a CSV file. This is the file that you’ll import into PlentyONE later. In our example, the filters would look like this in the CSV file:
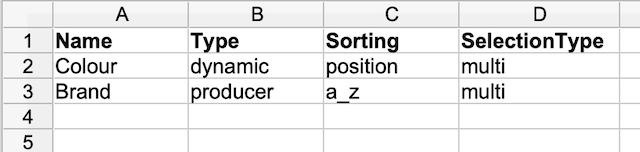
You are free to choose any names for the column headers. In this example, I’ve put the following filter information in the columns:
-
Name = The name of the filter, as it should be displayed in the online shop.
-
Type = What sort of facet do you want to create? Enter the type into the CSV file. This setting can not be changed once you’ve created the facet. Further information about the type.
-
Sorting = How should the values be sorted within the facet? For example, if you’re creating the facet “Brand name”, then you could sort the individual brands alphabetically. Enter your preferred sorting method into the CSV file. Further information about the sorting method.
-
SelectionType = What should happen when customers select multiple filter criteria? Should they see products that fulfil all of these criteria or any one of the criteria? Enter your preferred selection type into the CSV file. Further information about the selection type.
Filter values
Now add the individual values to the filter. For example, if you’re creating the filter “Colour”, then you’ll need values like “Blue”, “Red” and “Black”.
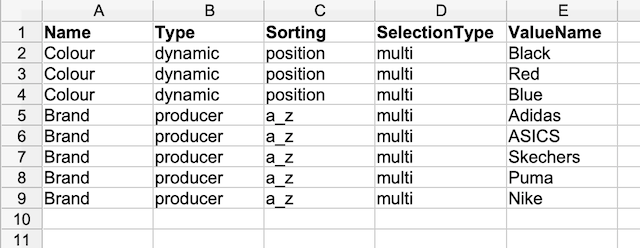
Linking filter values
Finally, link each filter value to existing data in your system, i.e. to existing attributes, characteristics, properties, manufacturers or availabilities.
The link consists of two pieces of information:
-
LinkType = What sort of back end information do you want to link the facet value to? Enter the appropriate type into the CSV file. Further information about the link type.
-
LinkID = What specific piece of back end information do you want to link the facet value to? Enter the ID of the back end information into the CSV file. Further information about the ID.
Create a new import. Most of the settings can be chosen freely. However, since you want to import facet data, make sure you’ve set the Type to Facet.
During the import, PlentyONE will check whether the facet already exists. This is done with the help of a so-called matching field.
Since we want to import new facets in this example, configure the settings as follows.
| Setting | Explanation |
|---|---|
Facet name |
Which column of your CSV file lists the facet name? Choose this column here. This option is useful if you want to create new facets. |
Import options |
Since you’ll be importing new facets, choose the option Only import new data or Import new, update existing data. |
Your CSV file is already filled with a bunch of facet information. Now you’ll decide where in PlentyONE each piece of information should appear when you import the file. Take a look at this page while you map the columns of your CSV file to the fields in PlentyONE. In this example, I’ve configured the settings as follows.
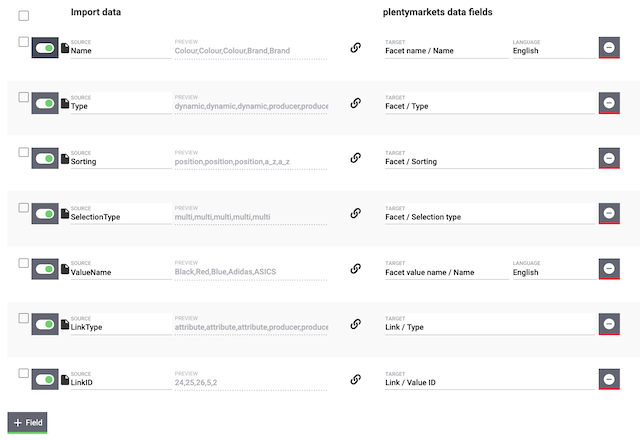
I created the filters by:
-
mapping the Name column of my CSV file with the Facet name / Name data field in PlentyONE.
-
mapping the Type column of my CSV file with the Facet / Type data field in PlentyONE.
-
mapping the Sorting column of my CSV file with the Facet / Sorting data field in PlentyONE.
-
mapping the SelectionType column of my CSV file with the Facet / Selection type data field in PlentyONE.
I created the filter values by:
-
mapping the *ValueName column of my CSV file with the Facet value name / Name data field in PlentyONE.
I created the links by:
-
mapping the LinkType column of my CSV file with the Link / Type data field in PlentyONE.
-
mapping the LinkID column of my CSV file with the Link / Value ID data field in PlentyONE.
Ready to import your filters? Start the import and check whether the data was correctly imported into PlentyONE.
Starting the import and checking the result:
-
Activate the lines that should be imported ().
-
Test the import () or start the import ().
Note: This can take a few minutes. -
Go to Setup » plentyShop » Global Settings » Search » Faceted Search.
-
Open a few filters to check their settings and values.
Do a trial run
We recommend testing the import () before you start it for the first time. This imports the first 10 rows of the file and bypasses the cache. It gives you time to check whether the import works correctly. If the import does not perform as expected, you can correct it before importing the entire file.
Resetting the cache
Directly within the import, you’ll find the button Reset cache (). This button allows you to reset the import cache in order to reimport a file that does not contain any changes.
1.2.2. Directory of matching and mapping fields
The table explains the fields that are available for matching facet data. During the import, PlentyONE checks if the imported data record already exists based on the matching field.
| Setting | Explanation |
|---|---|
Facet ID |
Which column of your CSV file lists the facet IDs? Choose this column here. This option is useful if you want to update existing facets. Background info: Every new facet automatically receives an ID, which can not be changed. The ID is used to uniquely identify the facet. Because the ID is unique, it’s a good way to check whether the imported data record already exists in PlentyONE. |
Facet value ID |
Which column of your CSV file lists the facet value IDs? Choose this column here. This option is useful if you want to update existing facet values. Background info: Every new facet value automatically receives an ID, which can not be changed. The ID is used to uniquely identify the facet value. Because the ID is unique, it’s a good way to check whether the imported data record already exists in PlentyONE. |
Facet name |
Which column of your CSV file lists the facet name? Choose this column here. This option is useful if you want to create new facets. |
Facet value name |
Which column of your CSV file lists the facet value name? Choose this column here. This option is useful if you want to create new facet values. |
Facet
CSS class
Enter a CSS name into the CSV file. This option currently has no function. In the future, it will be possible to design the facet with CSS.
Default value: No default value
Permitted import values: Alpha-numeric
You can find the result of the import in the back end menu: Setup » plentyShop » Global Settings » Search » Faceted Search » Tab: Settings » Entry field: CSS class
Position
Where should the facet appear in the webshop? In other words, which facet should be displayed first, second, third, etc? Enter the position number in the CSV file.
Default value: 1
Permitted import values: Numeric
You can find the result of the import in the back end menu: Setup » plentyShop » Global Settings » Search » Faceted Search » Tab: Settings » Entry field: Position
Sorting
Not relevant for the type "Price"
How should the values be sorted within the facet? For example, if you’re creating the facet “Brand name”, then you could sort the individual brands alphabetically.
Enter your preferred sorting method into the CSV file.
Default value: position
| Permitted import values in CSV file | Result in the back end |
|---|---|
|
Hit rate |
|
Position |
|
A-Z |
You can find the result of the import in the back end menu: Setup » plentyShop » Global Settings » Search » Faceted Search » Tab: Settings » Drop-down list: Sorting
Type
Required field for creating new facets.
What sort of facet do you want to create? Allow your customers to filter products by the following criteria: attribute, characteristic, property, brand name, availability, price range.
Enter the appropriate type into the CSV file. This setting can not be changed once you’ve created the facet.
Default value: No default value
| Permitted import values in CSV file | Result in the back end | Explanation |
|---|---|---|
|
Attribute/characteristic |
This type can be used for many different scenarios. The filter is linked to the attributes, characteristics or properties in your system. Example: Choose this type if you want to create the filter “Colour” or “Size”. |
|
Manufacturer |
This type of filter is linked to the manufacturers in your system. Example: Choose this type if you want to create the filter “Brand name”. |
|
Price |
You do not need to link this type of filter with values. Example: Choose this type if you want to create the filter “Price range”. Webshop visitors can individually limit the filter from the lowest to the highest price of a category. |
|
Availability |
This type of filter is linked to the availabilities in your system. Example: Choose this type if you want customers to filter for items that ship within 24 hours. |
You can find the result of the import in the back end menu: Setup » plentyShop » Global Settings » Search » Faceted Search » Tab: Settings » Field: Type
Minimum number of hits
Not relevant for the type "Price"
Enter a number into the CSV file. This is the minimum number of results that a facet value must have, in order for it to be displayed in the online shop. Facet values will automatically be invisible in the online shop if they do not return the minimum number of results.
Default value: 1
Permitted import values: Numeric
You can find the result of the import in the back end menu: Setup » plentyShop » Global Settings » Search » Faceted Search » Tab: Settings » Entry field: Minimum number of hits
Maximum number of facet values shown
Not relevant for the type "Price"
How many values should be displayed within a facet at maximum? Enter a number into the CSV file. A maximum of 250 values can be displayed per facet.
Default value: 50
Permitted import values: Numeric
You can find the result of the import in the back end menu: Setup » plentyShop » Global Settings » Search » Faceted Search » Tab: Settings » Entry field: Maximum number of facet values shown
Selection type
Not relevant for the type "Price"
What should happen when customers select multiple filter criteria? Should they see products that fulfil all of these criteria or any one of the criteria?
Enter your preferred selection type into the CSV file.
Default value: restrict
| Permitted import values in CSV file | Result in the back end | Explanation |
|---|---|---|
|
Restricting |
Products will only be displayed if they fulfil all of the selected criteria. For example, imagine you sell grills. Webshop visitors should be able to filter for grills that have a warming rack and a lid and a temperature gauge. The results only include products that have all three functions. |
|
Multiple |
Products will be displayed if they fulfil one of the selected criteria. For example, imagine you sell grills. Webshop visitors should be able to filter for grills that were manufactured by the company Weber or Tefal or Coleman. |
You can find the result of the import in the back end menu: Setup » plentyShop » Global Settings » Search » Faceted Search » Tab: Settings » Drop-down list: Selection type
Delete facet
Do you want to delete the facet?
Default value: 0
| Permitted import values in CSV file | Result in the back end |
|---|---|
|
Facet will not be deleted |
|
Facet will be deleted |
Facet name
Name
Required field for creating new facets
Enter a name for the facet in the CSV file. This name is displayed in the online shop.
Default value: No default value
Permitted import values: Alpha-numeric
| Also use the drop-down list to select the language. |
You can find the result of the import in the back end menu: Setup » plentyShop » Global Settings » Search » Faceted Search » Tab: Name
Facet value
Not relevant for the type "Price"
CSS class
Enter a CSS name into the CSV file. This option currently has no function. In the future, it will be possible to design the facet value with CSS.
Default value: No default value
Permitted import values: Alpha-numeric
You can find the result of the import in the back end menu: Setup » plentyShop » Global Settings » Search » Faceted Search » Tab: Values » Tab: Settings » Entry field: CSS class
Position
Where should the facet value appear in the webshop? In other words, which facet value should be displayed first, second, third, etc? Enter the position number in the CSV file.
Default value: 1
Permitted import values: Numeric
You can find the result of the import in the back end menu: Setup » plentyShop » Global Settings » Search » Faceted Search » Tab: Values » Tab: Settings » Entry field: Position
Delete facet value
Do you want to delete the facet value?
Default value: 0
| Permitted import values in CSV file | Result in the back end |
|---|---|
|
Facet value will not be deleted |
|
Facet value will be deleted |
Facet value name
Not relevant for the type "Price"
Name
Required field for creating new facet values
Enter a name for the facet value in the CSV file. This name is displayed in the online shop.
Default value: No default value
Permitted import values: Alpha-numeric
| Also use the drop-down list to select the language. |
You can find the result of the import in the back end menu: Setup » plentyShop » Global Settings » Search » Faceted Search » Tab: Values » Tab: Name
Link
Not relevant for the type "Price"
Type
What sort of back end information do you want to link the facet value to? Enter the appropriate type into the CSV file.
|
Selection properties
It is not currently possible to link the values of selection properties via import. This function has not yet been developed. Currently, the values of selection properties need to be linked manually. |
Default value: No default value
| Permitted import values in CSV file | Result in the back end |
|---|---|
|
Characteristic |
|
Property |
|
Attribute |
|
Availability |
|
Manufacturer |
You can find the result of the import in the back end menu: Setup » plentyShop » Global Settings » Search » Faceted Search » Tab: Values » Tab: Link
Value ID
What specific piece of back end information do you want to link the facet value to? Enter the ID of the back end information into the CSV file.
Default value: No default value
Permitted import values: Numeric
You can find the result of the import in the back end menu: Setup » plentyShop » Global Settings » Search » Faceted Search » Tab: Values » Tab: Link
|
Where can I look up the IDs?
|
|
How do I link multiple values?
Imagine you sell t-shirts in all different colours such as “light blue”, “dark blue” and “turquoise”. You want all three colours to be found with the blue colour filter. In this case, you’ll need to link all three attribute values to the facet value.
|
Delete link
Do you want to delete the link?
Default value: 0
| Permitted import values in CSV file | Result in the back end |
|---|---|
|
Link will not be deleted |
|
Link will be deleted |
2. plentyShop search settings
2.1. Which plentyShops should the filters appear in?
Once you’ve created the filters, you’ll need to specify which plentyShops they should be available in. This is done by linking the filters to a client. Decide which filters are relevant for each client and which ones are not. Changes that you make will go into effect in real time.
|
Price filter
Only one price filter can be linked per client. |
Linking the filters with a client:
-
Go to Setup » plentyShop » (Select client) » Facet links.
-
In the list on the left, click on whichever filter should appear in the plentyShop.
-
Click on Link facet in the bottom left corner.
→ The filter is added to the overview on the right. -
Optional: Did you upload images for the filter? Select the option Make images available () to display the images in the plentyShop.
-
Repeat this process for all of the other filters that should also be linked.
-
Save () the settings.
2.2. Optional: Which item data should be considered?
You decide which item data is relevant to the search function. During a search, only the item data that you selected will be queried. You also decide how heavily weighted each piece of item data should be. The higher the number entered, the higher the item data field will be prioritised in the search result.
Choosing and prioritising item data:
-
Go to Setup » Item » Search » Frontend » Search settings.
-
Activate the item data fields () that should be included in the search results and search suggestions.
-
If needed, enter a value into the Boost column.
-
Save () the settings.
|
Which boost value should I enter?
You can enter any number as a boost value. The default settings are appropriate in most cases. These default settings prioritise the variation ID and the item ID. So if someone searches for a number in your plentyShop, then the search results will give priority to these ID fields. |
|
What’s the difference between search results and search suggestions?
Note: If you activate an item data field for the search suggestions on the right, then the field will automatically be activated for the search results on the left too. Why? Otherwise you would be suggesting customers to use a search term that doesn’t deliver any results. |
2.3. Optional: Changing languages
The search function can be activated for up to three languages. The languages German, English and French are activated by default. If you run plentyShops in other languages, you can select different languages.
|
Search index is completely rebuilt after any changes
If you change the language settings, the search index is completely rebuilt. That means that all items are added to the index again from scratch. Depending on how many items you have, this process can take several days. |
Changing the languages:
-
Go to Setup » plentyShop » Global Settings » Search » Languages.
-
Activate or deactivate languages as needed ().
Note: Only three languages can be activated per system at the same time. -
Save () the settings.
→ The items are added to the search index for the activated languages.
3. Displaying filters in the plentyShop
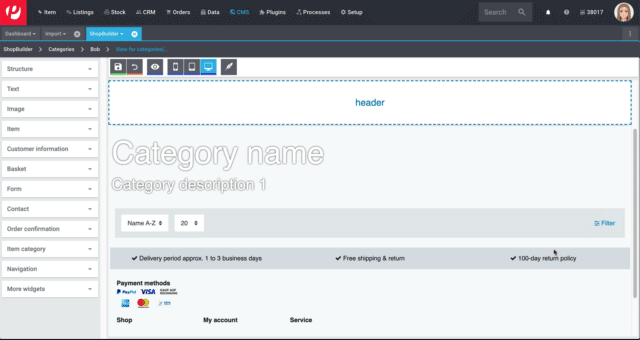
3.1. Creating content of the type "Category view"
-
Go to Shop » ShopBuilder.
-
Click on a grey item category on the left.
Note: Filters are not compatible with the yellow content categories. -
Click on Add content.
-
Select the type Category view.
-
Enter a name and choose a preset if desired.
-
Click on Create.
→ The new content will be displayed in the overview.

|
Preset: pro and con
We provide a template, which you can modify and adapt to your product portfolio as needed. Of course, you can also work without a template if you would prefer to design the view from scratch. |
3.2. Designing the content
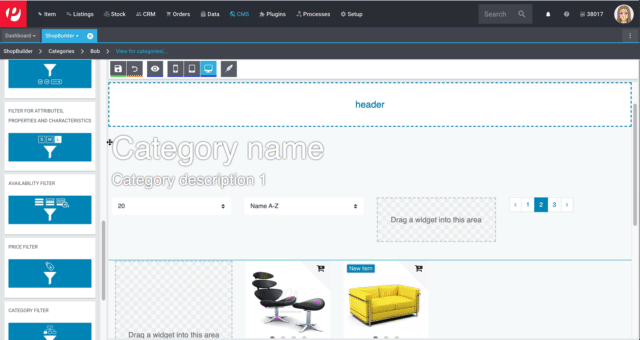
3.2.1. Adding filters to the toolbar
-
Go to Shop » ShopBuilder.
-
Open the "Category view" content.
-
Insert the widget Item category » Toolbar if it’s not already included in your category view.
-
Click on Filter to open the area for filter widgets (see GIF).
-
Optional: Insert a grid with multiple columns.
-
Insert some or all of the following widgets:
-
Item category » Filter for attributes, properties and characteristics
-
Item category » Availability filter
-
Item category » Price filter
-
Item category » Category filter
-
Item category » Manufacturer filter
-
-
Click on for each of the widgets and customise the settings.
-
Save () the settings.
3.2.2. Adding filters to the sidebar
-
Go to Shop » ShopBuilder.
-
Open the "Category view" content.
-
Use structure widgets to create a sidebar. For example:
-
Insert the widget Structure » Two column grid.
-
Click on and select the layout ratio 25% : 75%.
-
-
Insert some or all of the following widgets into the left column:
-
Item category » Filter for attributes, properties and characteristics
-
Item category » Availability filter
-
Item category » Price filter
-
Item category » Category filter
-
Item category » Manufacturer filter
-
-
Click on for each of the widgets and customise the settings.
-
Save () the settings.
3.2.3. Optional: Renaming texts
You can change the texts in the plentyShop to meet your needs. For example, you could change the text in the toolbar from "Filter" to "Refine search".
Renaming texts:
-
Go to Shop » Multilingualism.
-
Choose a source language and a target language from the drop-down lists.
Note: You can select the same language from both lists. -
Expand the area plentyShop LTS » Item ().
-
Rename the text on the right side.
Example: Find the field ITEMFILTER and change the text from "Filter" to "Refine search". -
Save () the settings.
-
Deploy the plentyShop LTS plugin to apply the changes.
3.3. Activating the content
In order for the content to be displayed in the plentyShop, it needs to be activated. Active contents are highlighted in blue.
Activating contents:
-
Go to Shop » ShopBuilder.
-
Click on the appropriate category.
-
Use the toggle button () to activate the content.
→ A pop-up window opens. -
Decide which categories the content should apply to (). For example, you can design the layout differently for each category.
-
Click on Activate.
→ The content is activated and is now highlighted in blue.
|
Only activate one content of the same type
Within a grey item category, you can create many different contents of the type Category view. The contents can be activated or deactivated as needed. For example, this allows you to create different pages for each season of the year. However, only one content of the type "Category view" can be activated simultaneously. Activating one content automatically deactivates another content of the same type. |
3.4. Checking the result in the plentyShop
Check what the search filters look like in your plentyShop. Change the appearance as needed. Are you happy with the result? Then deploy the plentyShop LTS plugin to apply the changes.
4. Frequently Asked Questions (FAQ)
Make sure you’ve saved an external name for the manufacturer. If you don’t save an external name, then the manufacturer will not appear in the brand name filter.
Note: It can take a little while for the index to be updated and everything to be displayed correctly. If the manufacturer still doesn’t appear in the brand name filter the next day, then create a ticket in our Service Desk.