Working with reorders (Test phase)
Reorders allow you to efficiently map out merchandise orders with your suppliers. In the reorder overview, you can see important information at a glance and perform some actions directly. This simplifies the entire reordering process and helps you manage your inventory optimally at all times.
1. Using group functions
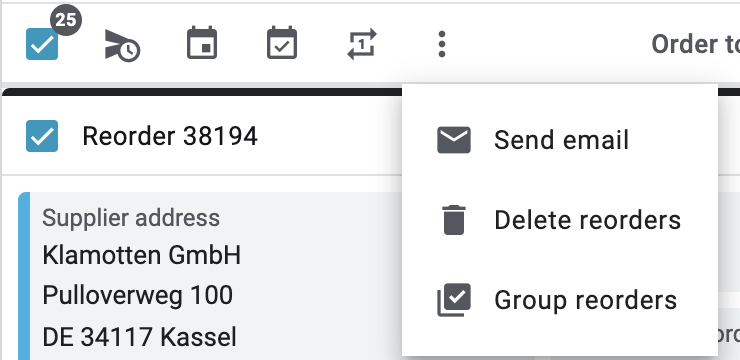
Use the group functions to perform actions simultaneously for multiple reorders. The group functions in the table below are available for reorders.
Note: You can click on Select all (check_box) at the top left to select all reorders on the current page and perform an action.
Using group functions:
-
Go to Stock » Reorder (Test phase).
-
Carry out the Search (search) to display reorders.
-
Select (check_box) all reorders for which you want to carry out a certain action at once.
-
Select one of the available group functions. Refer to the explanations given in Table 1.
|
Select default group functions
In the editing mode () of the reorder overview, you can determine default group functions that will be directly visible when selecting reorders. All remaining group functions will automatically be added to the context menu (more_vert).
|
| Setting | Symbol | Explanation |
|---|---|---|
Set delivery date |
schedule_send |
Sets a delivery date for all selected reorders. Enter a delivery date or select a date via the calendar (today). |
Group reorders |
library_add_check |
Groups the selected reorders. Note: Only reorders with the same supplier and warehouse and without transactions can be grouped. The original orders are deleted after grouping. |
Execute reorder |
calendar_month |
Sets an order date and executes all selected reorders. Enter a date or select a date via the calendar (today). You can also click Today to automatically set today’s date. |
Close reorder |
event_available |
Allows you to set a finish date for all selected reorders and cancel open quantities. |
Change status |
repeat_one |
Changes the status of the selected reorders. Select another status from the drop-down list. |
Delete reorders |
delete |
Deletes all selected reorders. |
Send email |
Sends an email for all selected reorders. First, select a Recipient and a Template for the email. As soon as the email is sent, a success message is displayed. Afterwards, you can see the sent emails in the detail view of the email service (mail) and in the Messenger section. Note: To see the email in the Messenger section, you have to complete the Messenger configuration assistant and activate the function first. |
2. Using additional functions in the reorder overview
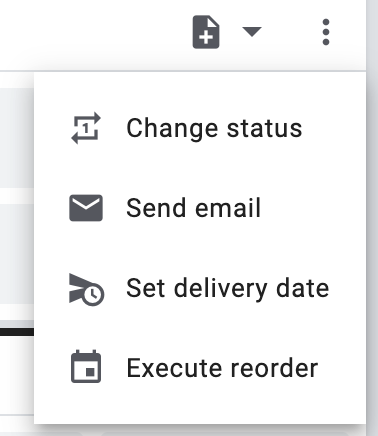
On the right side of the overview, additional functions are available for each individual reorder through the context menu (more_vert). Through it, you can, for example, change the status or create documents for an individual reorder. Refer to the explanations given in Table 2.
| Setting | Symbol | Explanation |
|---|---|---|
Change status |
repeat_one |
Changes the status of a reorder. The current status is preselected. Select another status from the drop-down list. |
Send email |
Sends an email for the selected reorder. First, select a Recipient and a Template for the email. As soon as the email is sent, a success message is displayed. Afterwards, you can see the sent emails in the detail view of the email service (mail) and in the Messenger section. Note: To see the email in the Messenger section, you have to complete the Messenger configuration assistant and activate the function first. |
|
Create document |
note_add |
Creates documents for the reorder. The available document types are PO delivery note and External document. Select a document type from the drop-down list. Then select a template for the selected document type. Also enter a creation date for the document or select a date from the calendar (today). |
Set delivery date |
schedule_send |
Sets a delivery date for the selected reorder. Enter a delivery date or select a date via the calendar (today). You can also click Today to automatically set today’s date. |
Execute reorder |
insert_invitation |
Sets an order date and executes the selected reorder. The reorder will be locked for editing after it is executed. |
Close reorder |
event_available |
Allows you to set a finish date for the selected reorder and cancel open quantities. |
3. Details about the individual sections
All reorder sections and their functions are described in the following sub-chapters. Use the editing mode and decide which fields should be displayed in which section. You can also define in which order the fields should be arranged. This way, you can individually design your reorder view and adapt it to suit your needs. Note that the available fields may vary depending on the reorder type. Once you have opened a reorder, all sections will be displayed on the left in the navigation panel.
By clicking on an entry in the following list, you will be directly forwarded to the corresponding sub-chapter where you can find further details.
|
How is data being loaded in the individual sections?
If you click on the section that you want to edit on the left side in the navigation panel, this section will shortly be highlighted in blue, the available data for this section will be loaded and you can directly start editing it. |
|
Missing rights for certain sections, buttons and functions in the reorder?
If a person without admin rights is not able to see certain actions and/or buttons and functions contained in the order, a person with Admin access rights needs to activate further rights in the Setup » Account management » Roles menu. |
3.1. Functions for single reorders
At the top of each reorder in the toolbar, additional functions are available in the context menu (more_vert). Refer to the explanations given in Table 3. Note: If you want to place certain functions for reorders directly in the toolbar, you can set this in the editing mode. Refer to Placing functions in the toolbar for more information.
| Setting | Symbol | Explanation |
|---|---|---|
Save |
save |
Saves the changes made. |
Duplicate reorder |
content_copy |
You can copy an existing reorder. The newly created reorder will receive its own unique ID, just like other reorders. The following data will be copied into the new reorder:
No dates will be copied. You can set these in the newly created reorder. The owner will not be copied either. The current user is set as the owner of the reorder. The status is set to the default status for reorders that you defined. |
Reload reorder |
replay |
Reloads the reorder. |
Execute reorder |
insert_invitation |
Sets an order date and executes the selected reorder. The reorder will be locked for editing after it is executed. |
Close reorder |
event_available |
Allows you to set a finish date for the selected reorder and cancel open quantities. |
New redistribution |
add |
Creates a redistribution from the reorder. The booked transactions from the reorder are directly transferred to the redistribution and can be used, for example, to move items to different storage locations or another warehouse. |
Calculate delivery date |
calculate |
Calculates the delivery date based on the delivery time value set in the variation. The calculation is applied to all reorder items. |
Set delivery date |
schedule_send |
Sets a delivery date for all reorder items. |
Delete |
delete |
Deletes the reorder. |
Send email |
Sends an email for the selected reorder. First, select a Recipient Type, a Template language and a Template for the email. As soon as the email is sent, a success message is displayed. Afterwards, you can see the sent emails in the detail view of the email service (mail) and in the Messenger section. Note: To see the email in the Messenger section, you have to complete the Messenger configuration assistant and activate the function first. |
|
Split reorder |
call_split |
Splits the reorder. Refer to the chapter Splitting reorders for more information. |
Transactions |
move_up |
Allows choosing between three options:
Refer to Additional functions in the reorder items section for more information. |
3.2. Section: Overview
The Overview section provides all basic information about a reorder. Table 4 lists all fields that are available in the Overview section of a reorder. Use the Editing mode to choose which settings should be displayed in this section.
| Setting | Explanation |
|---|---|
Ordered items |
Displays the number of ordered items. |
Open items |
Displays the number of open items. |
Delivered items |
Displays the number of delivered items. |
Net value of items |
Displays the net value of items. |
Cancelled items |
Displays the number of cancelled items. |
Procurement costs in total |
Displays the total amount of procurement costs for goods. |
3.3. Section: Status and tags
The Status and tags section provides information about the reorder status and the selected tags.
| Setting | Explanation |
|---|---|
Status |
Displays the status of the reorder. |
Tags |
Displays the selected tags. |
3.4. Section: General
The General section provides basic information about your reorder. Use the Editing mode to choose which settings should be displayed in this section.
| Setting | Explanation |
|---|---|
Warehouse |
Displays the target warehouse to which the reorder should be delivered. Note: As long as the reorder is unlocked (toggle_off) and does not contain any transactions, you can edit the warehouse. If the reorder is locked (toggle_on) or contains transactions, editing this field is not possible. |
Supplier |
Displays the supplier. If needed, select another supplier from the drop-down list. |
Client |
Displays the client. If needed, select another client from the drop-down list. |
Owner |
Displays the owner (the editing user). If needed, select another owner from the drop-down list. |
Order date |
Displays the date the order was placed. |
Payment due date |
Displays the selected payment due date. You can select a different date if needed or click Today to automatically set today’s date. |
Finish date |
Displays the finish date of the reorder. |
Delivery date |
Displays the delivery date of the reorder. You can select a different date if needed or click Today to automatically set today’s date. |
Currency |
Displays the currency of the reorder. |
Exchange rate |
Displays the applicable exchange rate for the selected currency. |
External reorder ID |
Displays the external ID of the order. The external ID can be filled in by the merchant. |
Main document |
Displays the main document of the order. |
Status |
Displays the current status. If needed, select another status from the drop-down list. |
External delivery note number |
Displays the external delivery number that can be filled in by the merchant. |
Reorder ID |
Displays the internal reorder ID from plenty. The internal ID cannot be changed. |
Language |
Displays the language of the reorder. The default setting is German. Reorder documents as well as emails are generated in the language of the reorder. You can adjust the language via the drop-down list. Note that to generate documents and emails in different languages, the respective templates must be created. |
Custom date |
Displays a custom date that was created, for example, by a script or a plugin. |
Custom property |
Select a custom property. Note: You can add a maximum of 5 properties. |
3.5. Section: Addresses
The Addresses section provides information about the warehouse and supplier address.
| Setting | Explanation |
|---|---|
Warehouse |
Displays the address of the warehouse.
|
Supplier |
Displays the address of the supplier.
The default setting contains this information: name, street, postcode and town, country, email address, and ID.
|
3.6. Section: Reorder items
In the Reorder items section, you can see all relevant information about the reorder items. Reorder items are used to restock goods that are low in inventory. Certain fields in the columns are editable, allowing you to make adjustments directly. Additionally, group functions can be applied to multiple items at once to simplify bulk updates. The following table lists the available fields in this section.
| Setting | Explanation |
|---|---|
Variation ID |
Displays the variation ID of the reorder item. You can open the variation by clicking on the ID. |
Supplier information |
Displays the information about suppliers that is stored in the variation. Contains the following information:
This is a default column. |
Supplier item name |
Displays the supplier’s item name. |
Supplier item number |
Displays the supplier’s item number. |
Price |
Displays the price. |
Discount [%] |
Displays the discount that was selected for this reorder item. |
Discounted price |
Displays the discounted price. |
Order ID |
Displays the ID of the order. |
Item name |
Displays the item name of the reorder item. |
Attributes |
Displays the attributes of the reorder item. |
Barcode |
Displays the variation’s barcode. |
Item ID |
Displays the item ID of the reorder item. You can open the item by clicking on the ID. |
Variation no. |
Displays the variation number of the reorder item. |
Variation name |
Displays the variation name of the reorder item. |
Model |
Displays the model of the variation. |
System purchase price |
Displays the system purchase price. |
Ordered quantity |
Displays the ordered quantity of the reorder item. |
Open quantity |
Displays the open quantity of the reorder item. |
Incoming quantity |
Displays the incoming quantity of the reorder item. |
Actions |
Displays the available actions for the transaction. |
Delivery date |
Displays the delivery date of the reorder item. |
Cancelled quantity |
Displays the cancelled quantity of the reorder item. |
Ordered total |
Displays the ordered value of the reorder item. |
Open total |
Displays the outstanding value of the reorder item. |
Cancelled total |
Displays the cancelled value of the reorder item. |
Incoming total |
Displays the received value of the reorder item. |
Editing fields directly in the reorder item table
You can edit some fields directly in the reorder item table. This is called inline editing.
At the moment this feature is available for the following fields:
-
Item name
-
Supplier item number
-
Ordered quantity
-
Delivery date
-
Price
-
Discount
-
Supplier item name
Proceed as follows to edit the fields in the table.
Edit fields directly in the reorder item table:
-
Click on edit in the table header next to the field you want to edit.
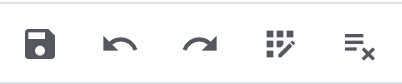
→ Several icons will be displayed above the header in the editing mode. Refer to Table 9.
| Symbol | Element | Explanation |
|---|---|---|
save |
Save |
Saves the changes. |
undo |
Undo |
Undoes the last change, unless this change has already been saved. |
redo |
Redo |
Restores the previously undone change. |
app_registration |
Activate the editing mode for all columns |
If you click on edit in a field that has editing mode available, you can click on app_registration to activate the editing mode for all columns. |
playlist_remove |
Deactivate the editing mode for all columns |
Click on playlist_remove to deactivate the editing mode for all columns and return to the overview. |
3.6.1. Editing reorder items
In the Reorder items section, you can edit the items in the reorders. To do so, click on Edit items (edit) on the right. A new window for editing reorder items will open. The editing items window consists of an item table (in red) and a shopping cart table (in green) as shown in the screenshot:
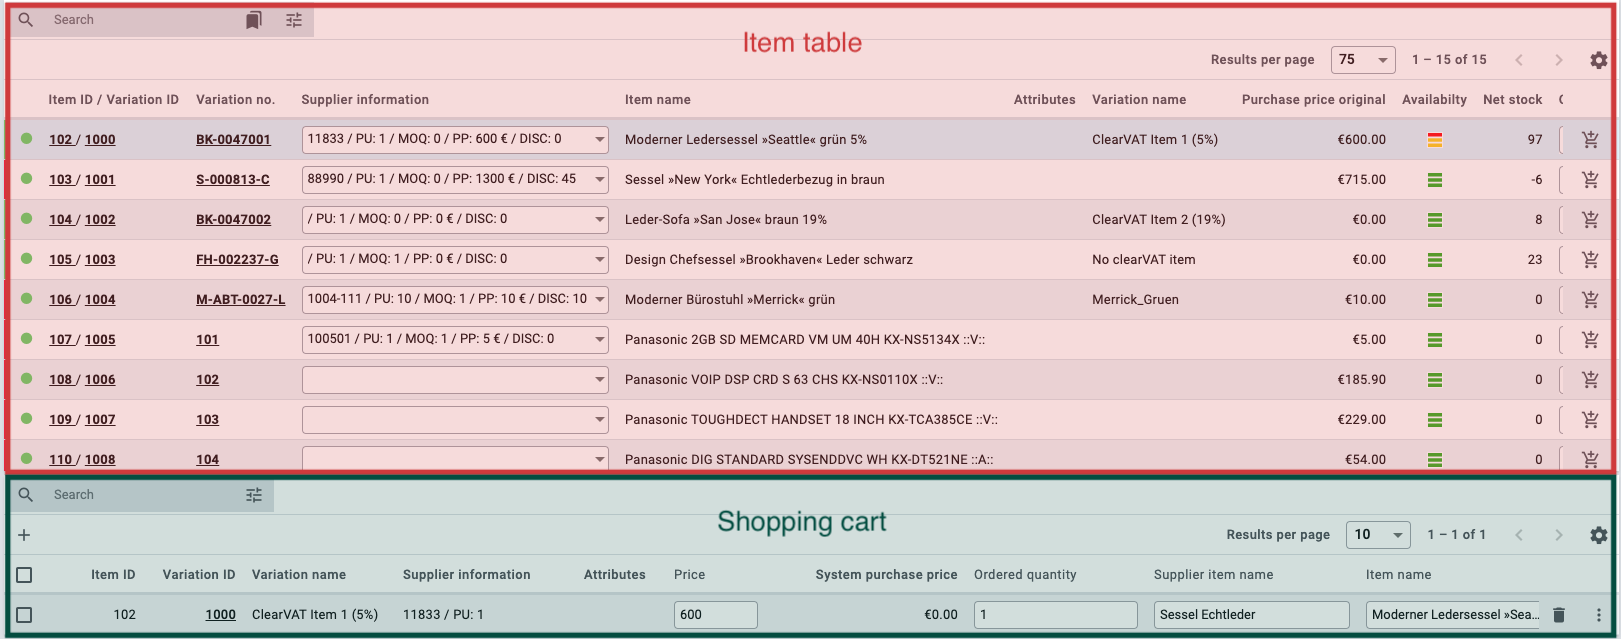
Item table
To add new items to the reorder, you need to first search for them. There are a few ways to start a search.
Searching for items:
-
Option 1: Click .
-
Option 2: Start typing in the search field, and select an option from the suggestions.
-
Option 3: Click tune to refine your search with filters.
After the search, the items will appear in the table. To add an item to the shopping cart, click the add_shopping_cart icon at the end of the respective row.
Shopping cart table
The shopping cart table lists all items in the currently open reorder that can still be adjusted. You can directly edit the following fields:
-
Item name
-
Supplier item number
-
Ordered quantity
-
Price
-
Discount
-
Supplier item name
If there are many items in the shopping cart, use the search bar to quickly find one. There are a few ways to start a search.
Searching for items in the shopping cart:
-
Option 1: Click .
-
Option 2: Start typing in the search field, and select an option from the suggestions.
-
Option 3: Click tune to refine your search with filters.
The following table lists all available fields in both the item and shopping cart tables.
| Setting | Explanation |
|---|---|
Item |
|
Item ID |
Displays the item ID. |
Variation ID |
Displays the variation ID. |
Item ID / Variation ID |
Displays both the item and the variation ID. |
Variation no. |
Displays the number of the variation. |
Supplier information |
Displays the information about suppliers that is stored in the variation. |
Item name |
Displays the name of the item. |
Attributes |
Displays the attributes. |
Variation name |
Displays the name of the variation. |
Purchase price original |
Displays the original purchase price. |
Availability |
Displays the availability of the items. |
Net stock |
Displays the net stock. |
Quantity |
Displays the quantity of the items. |
Stock status |
Displays the stock status. |
Status |
Displays the status. |
Actions |
Displays the available actions for the item.. |
Shopping cart |
|
Ordered quantity |
Displays the ordered quantity of the items. Adjust the quantity if necessary. |
Variation ID |
Displays the variation ID of the reorder item.
You can open the variation by clicking on the ID. |
Supplier information |
Displays the information about suppliers that is stored in the variation. |
Supplier item number |
Displays the supplier’s item number. |
Supplier item name |
Displays the supplier’s item name. |
Price |
Displays the price. |
Discount [%] |
Displays the discount in percent. |
Discounted price |
Displays the discounted price. |
Order ID |
Displays the ID of the order. |
Selection |
Allows multiple items to be selected. |
Item name |
Displays the name of the item. |
Attributes |
Displays the attributes. |
Barcode |
Displays the barcode. |
Item ID |
Displays the item ID. |
Variation no. |
Displays the number of the variation. |
Variation name |
Displays the name of the variation. |
Model |
Displays the model of the variation. |
System purchase price |
Displays the system purchase price. |
Actions |
Displays the available actions for the item. |
Delete reorder items |
|
Delete (delete) |
You can delete a reorder item by clicking on delete on the right. |
If you’ve made changes, click the Save button (save) in the top left corner. If you haven’t made any changes, click the X button next to Edit items in the side navigation.
3.6.2. Using group functions for reorder items
When editing reorder items, certain group functions are available that can be applied to all selected items. To use these group functions, proceed as follows.
Using group functions:
-
In the Edit reorder items section, select (check_box) all items for which you want to carry out a group action.
-
Select one of the available group functions. Refer to the information given in Table 11.
| Setting | Symbol | Explanation |
|---|---|---|
Apply discount |
percent |
Allows applying discount. Enter a percentage to be used as a discount for the selected reorder items. Note: Only values between 0.1 and 100 are valid. |
Change warehouse |
warehouse |
Changes the warehouse for all selected reorder items. |
Delete |
delete |
Deletes all selected reorder items. |
3.6.3. Additional functions in the reorder items section
In the top right of the reorder items section, additional functions are available. Refer to the information given in Table 12.
| Setting | Symbol | Explanation |
|---|---|---|
Create complete delivery |
move_up |
Adds all reorder items as type "Incoming" to the transactions. |
Cancel open quantities |
cancel |
Adds all reorder items as type "Cancelled" to the transactions. |
Search |
search |
Searches for reorder items. |
Filter |
tune |
Filters for reorder items. The following filters are available:
|
3.7. Section: Transactions
In the Transactions section, you can see the goods movements related to an order. This section is important for tracking partial deliveries, accurate inventory management, and order processing. The following table lists the available fields in this section.
| Setting | Explanation |
|---|---|
Variation ID |
Displays the variation ID of the transaction. |
Variation name |
Displays the name of the variation. |
Variation no. |
Displays the variation number. |
Supplier information |
Displays the information about suppliers that is stored in the variation. |
Supplier item number |
Displays the supplier’s item number. |
Storage location |
Displays the storage location. |
Created on |
Displays the creation date of the variations. |
Booking ID |
Displays the ID of the booking. |
Quantity |
Displays quantity of the items. |
Delivery note number |
Displays the delivery note number. |
User |
Displays the user. |
Incoming / Outgoing |
Displays an outgoing movement from the warehouse or an incoming booking into the warehouse. |
Batch |
Displays the batch of the product. |
BBD |
Displays the best before date of the item. |
Selection |
Allows multiple items to be selected. |
Actions |
Displays the available actions for the item. |
Editing fields directly in the transactions table
You can edit some fields directly in the transactions table. This is called inline editing.
At the moment this feature is available for the following fields:
-
Storage location
-
Delivery note number
-
Batch
-
BBD (Best before date)
Proceed as described here to edit the fields in the table.
3.7.1. Adding transactions
In the Transactions section, you have the option to record incoming items, for example, when you receive a partial delivery. You can record incoming items by selecting Add Transactions (add) at the top right. A new window for adding transactions will open. This window includes sections for entering the delivery note number and storage location (in yellow), along with an item table (in red) and a shopping cart table (in green), as shown in the screenshot.
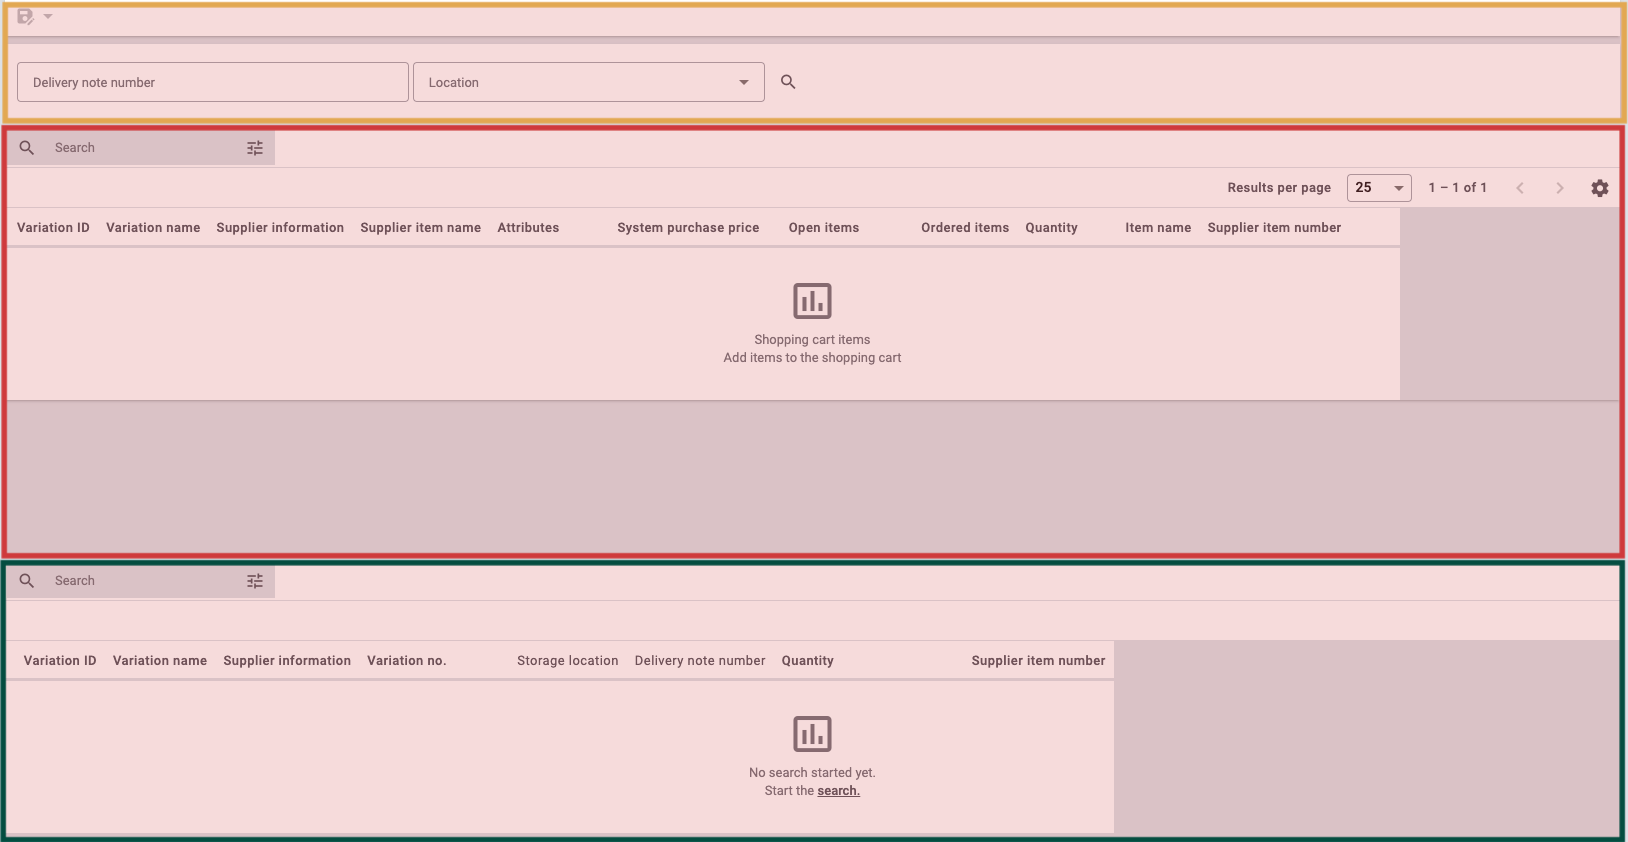
Adding transactions:
-
Enter the delivery note number and select the storage location to be applied to all items in the cart.
-
Search (search) for the desired item.
-
In the item table, enter the quantity of the items to be added to the cart.
-
At the end of the respective row, click on Add items to shopping cart (add_shopping_cart) to add the item to the shopping cart.
After selecting the storage location and adding the items to the cart, you can change the storage location if needed.
Changing the storage location:
-
Click on (search) next to Storage location.
-
Click on the search bar.
-
Select a storage location from the list.
-
Click on Select.
-
Select one of the options mentioned in Table 14.
| Setting | Explanation |
|---|---|
Apply to newly added entries only |
The newly selected storage location will only apply to the items added to the cart thereafter. |
Apply to all entries in cart |
The newly selected storage location will apply to all items in the cart. |
Shopping cart table
If there are many items in the shopping cart, use the search bar to quickly find one. There are a few ways to start a search.
Searching for items in the shopping cart:
-
Option 1: Click .
-
Option 2: Start typing in the search field, and select an option from the suggestions.
-
Option 3: Click tune to refine your search with filters.
The following table lists the available fields in the item and shopping cart tables.
| Setting | Explanation |
|---|---|
Item |
|
Transaction status |
Displays the status of the transaction. |
Item name |
Displays the name of the item. |
Supplier information |
Displays the information about suppliers that is stored in the variation. |
Supplier item number |
Displays the supplier’s item number. |
Attributes |
Displays the attributes. |
Barcode |
Displays the barcode. |
Price |
Displays the price. |
Discount [%] |
Displays the discount in percent. |
Item ID |
Displays the item ID. |
Variation ID |
Displays the variation ID. |
Variation no. |
Displays the number of the variation. |
Variation name |
Displays the name of the variation. |
Model |
Displays the model of the variation. |
Supplier item name |
Displays the supplier’s item name. |
System purchase price |
Displays the system purchase price. |
Open items |
Displays the number of items not yet delivered. |
Ordered items |
Displays the number of ordered items. |
Quantity |
Displays the quantity of the items. If needed, adjust the quantity. |
Actions |
Displays the available actions for the transaction. |
Shopping cart |
|
Quantity |
Displays the quantity of the items. If needed, adjust the quantity. This is a default column. |
Variation ID |
Shows the variation ID of this reorder item. |
Supplier information |
Displays the information about suppliers that is stored in the variation. |
Supplier item number |
Displays the supplier’s item number. |
Variation no. |
Displays the number of the variation. |
Variation name |
Displays the name of the variation. |
System purchase price |
Displays the system purchase price. |
Storage location |
Displays the storage location. |
Delivery note number |
Displays the delivery note number. |
Batch |
Displays the batch of the product. |
BBD |
Displays the best before date of the item. |
Actions |
Displays the available actions for the item. |
Delete reorder items |
|
Delete (delete) |
You can delete a reorder item by clicking on delete on the right. |
3.7.2. Booking items
After adding the transactions as described above, you can now book the items.
You can book items individually or in bulk.
Select (check_box) the items you want to book and click on Book selected items at the top left.
If any of the items does not have a delivery note number, a window will open where you need to enter the delivery note number.
Once you’re done, click on Book.
3.8. Section: Documents
The Documents section contains the following settings:
| Setting | Symbol | Explanation |
|---|---|---|
Create a document |
add |
Use this function to generate new documents for the order. The document types available for the order will depend on the order type. Select a document type from the drop-down list. Then select a template for the selected document type. Also enter a creation date for the document or select a date from the calendar (today). |
Upload a document |
file_upload |
Use this function (accessible via (add)) to upload external documents for the order. Note: You can upload multiple documents at once. Please keep the following in mind:
|
Matching templates and number ranges |
fact_check |
Use this function to verify which templates and number ranges match the order. |
Download a document |
download |
Use this function (accessible via the context menu (more_vert) in a document row) to download the respective document. |
Archive a document |
archive |
Use this function (accessible via the context menu (more_vert) in a document row) to archive the respective document within the order. Note: The Archive function (archive) is only available for non-tax-relevant documents. When used, the respective document is moved to the Archived documents folder (on the left side of the overview) and is removed from the main overview. This allows you to create a new document of the same type for the order. In this way, the function enables you to correct and reissue previously generated documents. |
Adding tags |
arrow_drop_down |
You can display an additional column for tags in the table settings. Here you can select tags from a drop-down list by clicking on the icon (arrow_drop_down) and assign them to the document or remove them from a document. Tags can be created under Setup » Settings » Tags. |
Table settings |
settings |
Use this function to configure the columns in the overview to suit your preferences. |
The overview in the Documents section allows you to track the documents generated for the order:
-
The files on the left categorise the generated documents by type.
-
The overview on the right lists the documents and provides additional information about them. The status-specific information is updated in real-time. So, if a document currently marked as Pending changes status, you will see the update instantly without needing to refresh the page.
| Folder/column | Explanation |
|---|---|
Folders on the left-hand side of the overview: |
|
All documents |
Contains all documents generated for the order. Click on the folder to display its documents in the overview on the right. |
Archived documents |
Contains all documents actively archived for the order using the Archive function (more_vert). Click on the folder to display its documents in the overview on the right. |
Information on the right-hand side of the overview: |
|
Name |
Shows the name of the document. |
Number |
Displays the number of the document. |
Type |
Shows the type of the document. |
Reference |
Displays the reference. |
Warehouse |
Shows the warehouse. |
Owner |
Displays the owner. |
Last change |
Displays the date of the last changes. |
Display date |
The date that is shown on the document. |
Actions |
Allows you to archive or download a document via the context menu (more_vert). |
Status |
Shows the document’s status. |
3.9. Section: History
In the History section you get an overview of all previous actions as well as the respective status and date. You can configure the columns (settings) as desired.
| Setting | Explanation |
|---|---|
Date |
Displays the date and time. |
User |
Displays the user. |
Action |
Displays the procedure that was carried out. |
Status |
Displays the current status. |
3.10. Section: Notes
In the Notes section, you can view internal order notes. The most recent note is always displayed at the top. Additionally, you can add more notes (add) and edit or delete internal notes by clicking Delete (delete ) next to the respective note.
3.11. Section: Messenger
In the Messenger section, you can see all messages that belong to the reorder. You can whisper messages so that they are only internally visible and not for your customers. You can send messages and you can capture minutes for the message and save these minutes as free or paid minutes.
Click on the already created message to open the conversation. In case you want to add a new message, click on Add message (add) at the top right. Click on open_in_new (Open messenger) to open the CRM » Messenger menu. For further information, refer to the Messenger page.
3.11.1. Searching for messages
Use the filters Linked to and Whisper mode to find messages quicker and easier. Select Order or Contact in the Linked to filter. Select all, whispered or normal conversations in the Whisper mode filter.
Searching for messages:
-
Click on Messenger in the detail view of the reorder.
-
Select one option each from the lists Linked to and Whisper mode.
→ The filters are applied automatically and the results found are shown in the list.
3.11.2. Whispering a message
Proceed as described below to whisper a message.
Whispering a message:
-
Click on Messenger in the detail view of the reorder.
-
Click on New message (add).
-
Select one ore multiple recipients.
Note: The ID of the order is already prefilled as recipient. This way, the email will be sent to the email address that is saved in the invoice address. -
Enter more recipients, if needed.
-
Enter a subject.
-
Enter the text.
→ Double-click on the word to use formatting options for your message. -
Click on attach_file Add attachments to add a file, if needed.
-
Click on visibility_off WHISPER to whisper the message.
3.11.3. Sending a message
Proceed as described below to send a message.
Sending a message:
-
Click on Messenger in the detail view of the reorder.
-
Click on New message (add).
-
Select one ore multiple recipients.
Note: The ID of the order is already prefilled as recipient. This way, the email will be sent to the email address that is saved in the invoice address. -
Enter more recipients, if needed.
-
Enter a subject.
-
Enter the text.
→ Double-click on the word to use formatting options for your message. -
Click on attach_file Add attachments to add a file, if needed.
-
Click on visibility_off Whisper mode to switch off the whisper mode.
Note: The button changes from visibility_off WHISPER to forward_to_inbox SEND. -
Click on forward_to_inbox SEND to send the message.
3.11.4. Capturing minutes for the message
Proceed as described below to capture minutes for the message. You can then decide whether the minutes are free minutes or paid minutes.
Capturing minutes is only possible for whispered messages.
Capturing minutes for the message:
-
Click on Messenger in the detail view of the reorder.
-
Click on New message (add).
-
Select one ore multiple recipients.
Note: The ID of the order is already prefilled as recipient. This way, the email will be sent to the email address that is saved in the invoice address. -
Enter more recipients, if needed.
-
Enter a subject.
-
Enter the text.
→ Double-click on the word to use formatting options for your message. -
Click on attach_file Add attachments to add a file, if needed.
-
Click on more_vert and then activate (toggle_on) the option Capture minutes.
Note: The button changes to visibility_off CAPTURE MINUTES. -
Click on visibility_off CAPTURE MINUTES to capture the minutes for the message.
→ The Capture minutes window opens. -
Adjust the minutes, if necessary.
-
Select (radio_button_checked) whether the minutes are Free minutes or Paid minutes.
-
Assign tags to the message, if needed.
-
Click on CAPTURE AND SAVE.
3.11.5. Carrying out the group functions
Instead of editing each conversation individually, you can save time and edit multiple conversations at once using the group functions.
For a complete list of group functions and their descriptions, see the Group functions section on the Messenger page.
Editing fields directly in the Messenger overview
You can edit some fields directly in the Messenger overview. This is called inline editing.
At the moment this feature is available for the following fields:
-
Type
-
Status
-
Done
-
Follow-up date
-
Tags
-
Priority
-
Deadline
Proceed as follows to edit the fields in the overview.
Edit fields directly in the Messenger overview:
-
Go to CRM » Messenger.
-
Search for the conversation by means of the filter settings. Note the explanations about the filters in the Searching for a conversation in the Messenger chapter.
-
Click on edit in the overview header beside the field you want to edit.
→ Above the header several icons are shown in the editing mode. Note Table 9.
| Symbol | Element | Explanation |
|---|---|---|
save |
Save |
Saves the changes. |
undo |
Undo |
Undoes the last change, unless this change has already been saved. |
redo |
Redo |
Restores the previously undone change. |
app_registration |
Activate the editing mode for all columns |
If you click on edit at a field that has editing mode available, you can click on app_registration to activate the editing mode for all columns. |
playlist_remove |
playlist_removeDeactivate the editing mode for all columnsplaylist_remove |
Click on playlist_remove to deactivate the editing mode for all columns and return to the overview. |
Information on the different table columns in the Messenger section can be found in this chapter.
3.12. Section: Procurement costs
Different costs arise when stock is reordered. These can be added to a reorder in the Procurement costs section. This way, all known additional costs are saved as properties in the reorder and are displayed so that you can see all relevant information. The additional procurement costs are displayed in the same currency as the one selected for the reorder.
Hinweis: The procurement costs section is not displayed in the standard view. If you would like to add this section to a reorder view, refer to the chapter Placing elements.
The following procurement costs can be added:
-
Brokerage fee
-
Customs duties
-
Drayage
-
Freight charge
-
Other charges
-
Packaging charge
-
Postage
-
Small quantity surcharges
-
Transport insurance
The procurement costs can only be entered once the reorder has been created and initiated. Before that, the fields for the various costs in the Procurement costs section of the reorder are locked.
Click directly in the field where you want to add a price, and manually enter the corresponding amount. Amounts with a maximum of 2 decimal places are allowed. The costs will automatically be added in the currency set for the reorder. After adding the costs, Save () the reorder. It will then be updated.
You can also adjust and delete costs by clicking on the corresponding field and making the desired changes. Then click on save () to update the costs.
4. Editing mode
The editing mode allows a high degree of flexibility for positioning content and data in the Stock » Reorder » Reorder (ID) menu.
The editing mode can be accessed by clicking on Edit view () in the upper right corner of a specific redistribution.
This works by intuitively positioning elements via drag-and-drop. You can individually adjust and edit each element. Table 20 contains an overview of the functions available in the editing mode.
| Element | Symbol | Explanation |
|---|---|---|
Edit view |
Opens the view for editing. |
|
Undo |
undo |
Undoes the last change, unless this change has already been saved. |
Default view |
Displays the view that is currently opened. Click on to switch to another view or to create a new view. |
|
Restoring the previously saved state |
restore |
Resets the view to the state that was last saved. |
Save |
save |
Saves the changes. By doing so, you can save as many different views as you like. |
Edit |
edit |
When you edit the element, you can see in the Elements section on the right side which elements have not been added yet and are therefore still available. Elements that have already been added are disabled and cannot be used again. |
Delete |
delete |
Deletes the element. |
Close |
close |
Closes the editing mode. If you haven’t saved the changes, a confirmation prompt will appear. |
4.1. Creating a new view
To create a new view, proceed as described below.
|
Do you have admin rights?
Only admin users can create and edit views. If you are not an admin:
|
Creating a new view:
-
In the editing mode, click on the list of views ().
-
Click on add Create new view.
-
Enter a name for the view.
-
Click on Create view.
→ The new view is created and opens automatically, i.e. it is applied. It’s now possible to switch between different views.
4.2. Placing elements
Drag-and-drop the elements to intuitively place them exactly where you want them. In addition, adjust the size of the elements according to your needs.
Proceed as described below to add elements.
Placing and editing elements:
-
Go to Stock » Reorder (Test phase).
-
Open the reorder view in which you want to place an element.
-
Click on Edit view () at the top right.
-
On the right side, select an element and put it into the right position via drag-and-drop.
Optional: Move your cursor over the border of an element and drag the element to its desired size while holding on to your cursor.
Tip: Do you want to move your elements to another position at a later point in time? You can do so by using drag-and-drop until all elements are placed correctly. -
Click on Edit at the top right corner of the placed section ().
→ The settings menu opens.
→ The available elements for the section are displayed. -
Depending on the type of element, you will also find additional fields that you can further edit within the element.
To do so, click on Edit at the top right corner of the placed section. -
Save the settings.
4.3. Placing functions in the toolbar
Every single reorder contains many different functions that are available in the context menu (more_vert). If you want to see specific functions for reorders directly in the toolbar, you can carry out the corresponding settings in the editing mode.
Placing functions in the toolbar:
-
Go to Stock » Reorder (Test phase).
-
Open the reorder that you want to edit.
-
Click on Edit view () at the top right.
→ The editing mode opens. -
Click on Edit (edit) in the toolbar.
→ The settings will be visible on the right. -
In the settings, select (check) all Default toolbar buttons from the drop-down list that should be visible by default in the reorder.
-
Save (save) the settings.
→ All selected functions are now directly available in the toolbar.
4.4. Detecting unsaved changes
If you have made changes to an reorder, a blue dot appears on the left side of the page navigation. This dot indicates sections where unsaved changes are present. As soon as you save (save) the changes or reset the changes to the previous state, the dot will disappear.
5. Splitting reorders
You can find the function for splitting reorders in the toolbar of an opened reorder in the Stock » Reorder (Test phase) menu.
When you split a reorder, a new reorder is created.
A reorder can be split if it contains items that haven’t been fully booked in, i.e. items that still have open quantities.
To split a reorder, follow the steps below.
Splitting a reorder:
-
Open the reorder that you wish to split.
-
In the toolbar at the top, click on Split reorder (call_split).
A menu for splitting reorders opens. -
In the item table select the quantity of items that you wish to split.
-
At the end of the respective row, click on Add items to shopping cart (add_shopping_cart) to add the item to the shopping cart.
-
Repeat the steps described above until all items that should be split are included in the cart in the desired quantities.
-
At the top left click on Save (save) and choose whether you want to Save and open new reorder or Save and open original reorder.
The new reorder will display the newly added items in the Reorder items section.
The original reorder will list these items as cancelled quantities in both the Reorder items and Transactions sections.
5.1. Assigning rights for splitting reorders
Users with roles that are not of the type Administrator can only see certain sections and menus in PlentyONE. This means they only have limited access to the system. If employees should be able to split reorders, they will need the following rights:
-
Orders > Update
Note that only users with roles of the type Administrator can grant rights.
Assigning rights
-
Open the menu Setup » Account management » Roles.
→ The roles overview opens. -
Click on New (add).
→ The role creation menu opens. -
Enter a name for the role.
-
Switch to the advanced mode by toggling Advanced (toggle_on) slider.
-
Assign the rights for the respective section by ticking the check boxes indicated above.
Note: You can either grant rights for complete sections or limit the rights you grant the user. To only grant limited rights in a certain section, expand the section. -
Save (save) the settings.
| The simple mode and advanced mode are connected. If you check menu visibilities in the simple mode, the corresponding permissions in the advanced mode will be checked automatically. The connection only exists in this direction. If you check permissions in the advanced mode, no menu or plugin visibilities will be checked automatically. |