Zalando
Thanks to the Zalando partner programme, online sellers and manufacturers can use Zalando as an additional distribution channel for selling their high-quality products and take advantage of the well-known brand name Zalando.
Zalando is a closed, invite only market. In other words: Zalando will approach you if your products are a good fit for the Zalando product range.
You can use the following fulfilment types with PlentyONE:
-
Own logistics; Zalando calls this Partner Fulfillment (own logistics)
-
Shipping by Zalando, i.e. Zalando Fulfillment Solutions (ZFS)
Which countries you can sell in with Zalando depends on your contract with Zalando. You can import orders from the following countries into PlentyONE:
-
Germany
-
Belgium
-
Estonia
-
Finland
-
France
-
Ireland
-
Latvia
-
Lithuania
-
Luxembourg
-
Netherlands
-
Austria
-
Portugal
-
Slovakia
-
Slovenia
1. Frequency of data exchange
Connecting to this market allows for the following automatic functions to take place:
| Data | Interval |
|---|---|
Item export |
Once a day |
Stock synchronisation |
Every 15 minutes, asynchronous |
Price synchronisation |
Every 15 minutes |
Order import |
Every 5 minutes |
2. Overview of the necessary steps
There are two ways to proceed. This depends on if you set up Zalando for the first time or already sell on Zalando and want to sell on another Zalando platform.
You have signed a contract with Zalando. Great. What happens now?
This is a list of the steps you are going to take.
Step 1 |
|
Step 2 |
|
Step 3 |
|
Step 4 |
Complete the assistant Account settings - Zalando for the first time. |
Step 5 |
Ask our supporters to link your account with your zDirect account. |
Step 6 |
|
Step 7 |
|
Step 8 |
|
Step 9 |
|
Step 10 |
|
Step 11 |
You already sell on Zalando and now want to offer your products on another country platform? No problem.
As soon as you signed a contract with Zalando for the additional sales channels, the process continues with the following steps:
Step 1 |
In the PlentyONE forum, request the API route for the new sales channel. |
Step 2 |
Send the new API route to your Zalando contact with the additional information that all other data is to be sourced from the first sales channel. |
Step 3 |
Go to Setup » Orders » Order referrer and activate the order referrer for the new country. |
Step 4 |
Create a new sales price. Remember to correctly save the currency and the country. |
Step 5 |
Prepare the order documents for the country. |
Step 6 |
Activate the sales price for the variations. |
Step 7 |
3. Account settings
As soon as Zalando has accepted you into their partner programme, you will receive a user guide from Zalando which helps you setting up the interface. In PlentyONE, carry out the basic settings described here.
3.1. Creating a user account
Create a user account.
Creating a user account:
-
Open the menu Setup » Account management » Accounts.
-
Click on New account (add).
-
Enter the Username.
-
Enter the real name under Name.
-
Enter a Password.
-
Repeat the password.
-
Save (save) the settings.
→ The account is created.
Note: he user name must not contain any spaces and must have at least 5 characters.
Tip: You do not need to grant any rights for this account. It is enough that the account exists in the system.
3.2. Carrying out the basic settings
Carrying out the basic settings:
-
Go to Setup » Markets » Zalando » Settings.
→ The Settings tab opens. -
Carry out the settings as described in Table 1.
-
Save () the settings.
| Setting | Explanation |
|---|---|
Basic configuration |
|
User |
Select the API account that you created for Zalando. |
Item name |
Select Name 1, Name 2, or Name 3. The name you select will be exported to Zalando. |
Advanced options |
|
Standard tax rate |
Select 19% or 7%. |
Reduced tax rate |
Select 19% or 7%. |
3.3. Request the CSV form for matching items/silhouettes
Now, request the FTP credentials and API data in the PlentyONE forum. Zalando needs this data to set up a sales channel for you.
-
Contact our support team in the forum thread Request CSV form for matching items and silhouettes.
→ Our support team will provide you with a CSV file that contains a form. This file contains the following information:-
Routes for items
-
Login details for the PlentyONE FTP server for silhouettes
Tip: Zalando sends your silhouettes to this FTP server for import into your system. PlentyONE imports these silhouettes every Wednesday.
-
-
In row 5 of the file, enter the user name that you selected in the menu Setup » Markets » Zalando » Settings.
-
In row 6 of the file, enter the password that you set in the menu Setup » Markets » Zalando » Settings.
-
Forward the completed form to your Zalando contact.
→ Zalando activates the sales channel for you.
3.4. Assistant part 1: account settings
Now, open the assistant Account settings - Zalando to continue setting up your account.
Important: You need to complete the assistant three times in total. This describes part 1.
Carrying out settings in the assistant:
-
Go to Setup » Assistants » Omni-Channel.
-
Click on the assistant Account settings - Zalando.
→ The step Account activation is shown.
Important: You will see This account cannot be activated. That’s normal and as it should be. -
Click on Next.
→ The step Summary is shown. -
Click on Complete.
→ The assistant is completed.
→ The account is added to the menu Setup » Assistants » Omni-Channel » Assistant: Account settings - Zalando. The accountID that you need in the next step is also shown in this menu.
Tip: You can run through the assistant again at any time to create additional accounts.
3.5. Linking account with zDirect account
You have completed the assistant for the first time. Now, request activation of your Zalando account:
In the forum post, provide the following information:
-
The company/brand name you used to register with Zalando
-
Your plenty ID
-
The ID of the Zalando account (accountId) in PlentyONE that you want to activate for the Zalando interface
Tip: Go to Setup » Assistants » Omni-Channel » Assistant: Account settings - Zalando to find the accountID.
3.6. Assistant part 2: Account and channel settings
The PlentyONE support linked your account to your zDirect account? Great. Then you are ready for the next step: You run through the assistant Account settings - Zalando for the second time.
Carrying out settings in the assistant:
-
Go to Setup » Assistants » Omni-Channel.
-
Click on the assistant Account settings - Zalando.
-
Follow the instructions on the screen. If you need additional information about one of the options, expand the info boxes below this description ().
-
In the Summary step, check your settings to make sure they are correct.
Tip: In the Summary step, click on the arrow () to show the settings.
Important: You have not completed the setup. Therefore, in the step Account activation, do not activate the Zalando account yet. -
If everything is as it should be, click on Finalise.
→ The settings are saved.
Tip: You can run through the assistant again at any time to update settings. Tip: You can run through the assistant again at any time to update settings.
| Setting | Explanation |
|---|---|
Client |
Select a client (store). Zalando orders will be assigned to this client. |
| Setting | Explanation |
|---|---|
Map PlentyONE reasons for return to |
From the drop-down list, select a Zalando return reason for each return reason saved in PlentyONE. The return reasons are only transmitted for the order type Return and if they are saved in the order items of the return. Tip: Name of the return reason as it is saved in the menu Setup » Orders » Order types » Return. Zalando currently has the following reasons for return:
Note: Sending reasons of return to Zalando is optional. However, Zalando recommends that you send a reason. |
| Setting | Explanation | ||
|---|---|---|---|
Do you want to use Zalando Fulfillment Solutions? |
Activate the toggle button to use Zalando Fulfillment Solutions. Background: Zalando Fulfillment Solutions is a service in which Zalando ships the orders to your customers. You send your items to Zalando and Zalando takes care of the storage and the shipment to your customers. |
||
Match warehouses |
Now assign PlentyONE warehouses to the different Zalando locations (countries). There is a Zalando Fulfillment warehouse your items can be stored in each country that you can select here. Assign PlentyONE warehouses to these Zalando warehouses. This provides an overview of the Zalando locations your items are stored in. The stock from the Zalando locations is transferred to your PlentyONE warehouses.
Recommendation: Create new warehouses for Zalando Fulfilment Solutions. You can either specify a default warehouse only or a default warehouse and additional warehouses for each Zalando channel. Possibility 1: Only specify a default warehouse
Possibility 2: Specify a default warehouse and additional warehouses for each Zalando channel
|
Each country has a separate Zalando sales channel. Zalando activates you for the channels that you agreed upon in your contract. In the assistant, a separate step Channel settings is added for each country. The settings are the same for all countries.
Don’t see any steps for the channel settings? Then your account has not been linked to the zDirect account yet. (What do I need to do?)
Is a country missing? The countries are updated once a day. So when Zalando activates a new country for you, it can take up to 24 hours before that country is available in PlentyONE.
| Setting | Explanation |
|---|---|
Activate self-fulfilled order import |
Activate to automatically import orders every five minutes. |
Start date of self-fulfilled order import |
Select a date (optional). Only orders updated on or after this date are imported. |
Import reservations |
If this option is activated, reservations will be imported into PlentyONE with the status [3] Waiting for payment. What are reservations? Items are considered reserved if a customer has placed an order which has either not been paid for or has not been released for shipping by Zalando. |
Status for cancelled reservations |
Decide which status cancelled reservations should be moved to. Select a status [8.X] or higher. If the customer or Zalando cancels, reservations are moved to this status. Any orders that customers cancel before the import of reservations is started are not imported. |
Reuse package numbers for returns |
Activate this option if you generate Hermes shipping labels that also serve as return labels. The package numbers stay the same. |
Activate ZFS order import |
Activate to automatically import ZFS orders. ZFS orders are then imported once per hour. |
Start date of ZFS order import |
Select a date (optional). Only orders updated on or after this date are imported. |
Initial status of ZFS orders |
What order status do you want to assign to ZFS orders on import? |
Imported ZFS returns |
Activate to automatically import ZFS returns. ZFS returns are then imported once per hour. |
Initial status of ZFS returns |
What order status do you want to assign to ZFS returns on import? |
Activate stock export |
Activate option to export your stock to Zalando every 15 minutes. |
Select sales warehouse |
Select one or more sales warehouses. The totalled net stock of these sales warehouses is exported. |
Maximum stock to export |
If a variation has a higher stock, the value you entered in the Maximum stock field will be exported instead. |
Stock buffer |
The quantity you enter in the * Stock buffer*field is deducted from the net stock of each variation before export. |
Stock for variations without positive net stock and without stock limitation |
Enter the stock to be exported for variations that have no positive net stock. Variations that have no positive net stock are variations with the setting Tab: Settings, Setting: Limitation, Option: None that have no positive net stock. |
Stock for variations without stock administration |
Enter the stock to be exported for variations without stock administration. Variations for which no stock is administered are variations with the setting Tab: Settings, Dropdown list: Limitation, Option: Do not administer stock for this variation. The entered value is exported for these variations. |
Activate price update |
Activate option to export your prices to Zalando every 15 minutes. |
Ignore warnings of Zalando on price updates |
During price updates, Zalando checks the plausibility of your prices based on specific criteria. For example, Zalando compares the prices of the same variations on different platforms and compares the regular price with the reduced price. If any significant differences are detected, Zalando triggers a warning. Select if such warnings should be ignored when prices are updated.
|
Regular price |
Select the sales price from the drop-down list that you want to export to Zalando as the regular price. You can select from sales prices of the types Default or RRP for which the referrer Zalando, the country and the currency of the country are activated. |
Reduced price |
Select the sales price from the drop-down list that you want to export to Zalando as the reduced price. You can select from sales prices of the types Offer price or Default for which the referrer Zalando, the country and the currency of the country are activated. |
Planned price 1 |
Use scheduled prices to announce any temporary or permanent price changes to Zalando ahead of time. Define up to three scheduled prices. Scheduled prices ensure that Zalando really changes your prices at the specified time. To export scheduled prices to Zalando, you need at least a sales price for the regular price and a property that contains the start date and time for the new price. The start date for scheduled prices must be in the future. You can also select a property for an end date for a scheduled price.
|
| Setting | Explanation |
|---|---|
In which interface environment do you want to exchange data with Zalando? |
Select if real or test data is to be exchanged with Zalando.
|
Would you like to activate your Zalando account now? |
You have not completed the setup. |
4. Continuing the setup
4.1. Linking categories
Link your PlentyONE categories to the Zalando categories in order to display your variations in these categories.
Linking categories:
-
Go to Setup » Markets » Zalando » Category link.
→ A list of your categories is shown in the column Category.
→ In the column Zalando category, you can link a Zalando category to each of your PlentyONE categories. -
In the column Zalando category, select a Zalando category from the drop-down list for all categories that you need.
-
Save () the settings.
→ The categories are linked to the selected Zalando categories.
→ New variations that you create for the PlentyONE category are also assigned to the linked Zalando category.
4.2. Activating an order referrer
Go to Setup » Orders » Order referrer to activate the order referrer. This ensures that orders are assigned to the correct sales channel.
An order referrer tags an order with the sales channel on which the order was generated. Sales channels can be e.g. your online shop or markets on which you sell your items. Each sales channel has an individual order referrer. Some order referrers are available by default in your PlentyONE system. Further order referrers are added e.g. if you install a new plugin. For further information about the order referrer, see the page Order referrer of the PlentyONE manual.
Activating the order referrer for Zalando:
-
Go to Setup » Orders » Order referrer.
-
Click Search (search).
-
In the list, navigate to the Zalando platforms, for example Zalando DE.
-
On the right of the referrer’s line, click Edit (edit).
→ The window Edit referrer opens. -
Activate the option Visible in selection (toggle_on).
-
Click SAVE (save).
→ The referrer is active.
118 = Zalando
118.01 = Zalando DE
118.02 = Zalando NL
118.03 = Zalando FR
118.04 = Zalando IT
118.05 = Zalando UK
118.06 = Zalando AT
118.07 = Zalando CH
118.08 = Zalando PL
118.09 = Zalando BE
118.1 = Zalando SE
118.11 = Zalando FI
118.12 = Zalando DK
118.13 = Zalando ES
118.14 = Zalando NO
118.15 = Zalando CZ
118.16 = Zalando IE
118.17 = Zalando PT
118.18 = Zalando SK
118.19 = Zalando SI
118.2 = Zalando LT
118.21 = Zalando LV
118.22 = Zalando EE
118.23 = Zalando HR
4.3. Defining a sales price
To sell variations on Zalando, you need a sales price in which the order referrer Zalando is activated. The price that you save for this sales price is the price that will be shown on Zalando.
Sales prices define the conditions under which a variation is sold at a specific price and on a specific sales channel. For example, you can sell your items at a lower price in your webshop than on Amazon. Or you can sell products cheaper to B2B customers than to B2C customers.
Two default sales prices are already configured in your PlentyONE system. However, you can also create new sales prices and edit them individually. In addition to default sales prices, you can also create RRPs, special offers, and set prices.
Defining a sales price for Zalando:
-
Go to Setup » Item » Sales prices » [Open sales price].
Tip: No sales prices? Then create a sales price first. -
Activate the referrer Zalando.
Important: Activate the referrer Zalando. The sub-referrers for each Zalando platform (Zalando DE, Zalando NL etc.) will be ignored. -
Save () the settings.
4.4. Linking attributes to Zalando
If you have created attributes in your PlentyONE system, you need to link these attributes with Zalando. The following example describes how you can link the attribute “colour” with Zalando. Link further attributes in the same way.
Link at least the following attributes to export your variations to Zalando:
-
Größe (size register)
and/or
-
A colour for the 1st Farbcode (colour code)/Herstellerfarbe (manufacturer colour)
and/or
-
Länge (length register) for length information (e.g. skirt length)
| You can only link one size register or one length register to each attribute. |
Linking attribute "Colour":
-
Go to Setup » Item » Attributes.
→ An overview of all existing attributes opens. -
Open the attribute Colour.
-
Click on the Attribute link tab.
-
From the list of markets, select the option Zalando.
→ The area for linking attributes is shown. -
From the drop-down list Categories, select the attribute Colour.
-
From the drop-down list Market attributes, select a market value for each attribute value.
Example: For the colour Purple, from the first drop-down list select the option dark purple and from the second drop-down list select the option Purple. -
Save () the settings.
-
Repeat this process for the remaining attributes.
4.5. Converting silhouettes to characteristics
Zalando groups products into "silhouettes". Zalando also calls these silhouettes "article types". For example, "skirts", "dresses", and "trousers" are all silhouettes. In the Setup » Markets » Zalando » Settings » Tab: Silhouettes menu, you convert Zalando silhouettes to item characteristics. Silhouettes are imported into PlentyONE when Zalando is first set up. When Zalando publishes new silhouettes, PlentyONE updates these silhouettes on the following Wednesday. After that, you can convert new silhouettes into characteristics if necessary.
Converting silhouettes to characteristics:
-
Go to Setup » Markets » Zalando » Settings.
-
Click on the Silhouettes tab.
-
Select the Groups for the characteristics that you want to convert.
Note: No groups? Either Zalando has not provided the silhouettes or you have not sent the FTP credentials to Zalando (see Requesting the CSV form for matching items/silhouettes). -
Save () the settings.
→ Characteristics are created in your PlentyONE system based on the silhouettes.
5. Preparing variations
Continue with preparing your variations.
5.1. Setting the variation availability
You need to activate the variations you want to sell on Zalando and enable them for the relevant sales channel. This is done in the Item » Items » [Open variation] menu.
Making a variation available for Zalando:
-
Go to Item » Items » [Open variation].
Tip: To sell all variations of an item on Zalando, carry out the settings for the item’s main variation. If the inheritance function is active for the variations, then this activates the availability of all variations of the item. -
In the Availability and visibility section, enable the option Active (toggle_on).
-
Click the Sales channels tab.
-
In the Sales channels section, activate the sales channel Zalando in the Status column (toggle_on).
Tip: You can activate multiple sales channels at once. To do so, activate the checkboxes to the left of the desired sales channels. Then activate the toggle above the checkbox column (toggle_on). Click ACTIVATE to confirm the activation.
Important: Activate the sales channel Zalando. The other sales channels (Zalando DE, Zalando NL etc.) will be ignored. -
Activate WEB-API.
-
Save (save) the settings.
→ The variation is available for Zalando.
Use the variation group function to edit multiple variations at once. You select the variations that you want to edit.
Making several variations available for Zalando using the variation group function:
-
Go to Item » Items.
-
Select () the variations to be edited.
-
In the toolbar, click on layers » layers Variation group function.
→ The Variation group function window opens. -
Select the action Sales channels from the drop-down list Actions.
→ The action is added to the lower part of the window. -
Select (check_box) the option Zalando from the drop-down list Sales channels.
→ The sales channel is added below the Sales channels drop-down list.
Important: Select the sales channel Zalando. The other sales channels (Zalando DE, Zalando NL etc.) will be ignored. -
Select (check_box) WEB-API.
-
Activate (toggle_on) the toggles to the left of the sales channels.
-
Click EXECUTE & CLOSE to apply the settings.
Batch processing allows you to edit several variations at once. You use filters to limit which variations are edited.
Making several variations available for Zalando using batch processing:
-
Navigate to the area Market availability.
-
Activate the checkbox to the left of the option Zalando.
-
Activate the checkbox to the right of the option Zalando.
Important: Activate the availability Zalando. The availabilities for each Zalando platform (Zalando DE, Zalando NL etc.) will be ignored. -
Activate the checkbox to the left of the option Web API.
-
Activate the checkbox to the right of the option Web API.
-
Navigate to the area Availability.
-
Activate the checkbox to the left of the option Active.
-
Activate the checkbox to the right of the option Active.
-
Click on Apply to apply the settings to the variations.
5.2. Optional: Saving SKU
SKU are generated automatically when your variations are exported. However, you can also save market specific SKU for variations that you want to sell on this market instead.
-
Go to Item » Items » [Open variation].
→ The General tab opens. -
Switch to the Sales channels tab.
-
Expand the section SKU (chevron_right).
-
Click Add SKU (add).
→ The Add SKU window opens. -
Select the referrer Zalando from the drop-down list.
-
Select the corresponding Account.
-
Click Apply.
-
Enter the SKU.
-
Enter the Parent SKU, if necessary.
-
Click Save (save).
| Only the most important settings for the import are described here. Is this your first time working with the import tool? Then get familiar with how data imports work in PlentyONE first. |
| Column in CSV file | Explanation | PlentyONE data field for mapping |
|---|---|---|
Variation ID |
Enter the variation ID in this column. |
Variation ID |
Marketplace ID |
Enter the referrer ID 118 in this column. |
SKU > Marketplace ID |
Account ID |
This market does not require a marketplace account. As such, enter the number 0 in this column. |
SKU > Account-ID |
SKU |
Enter the SKU that you want to save for the variation for this market in this column. |
SKU > SKU |
5.3. Linking characteristics to items
Link the Zalando characteristics with the items that you want to sell on Zalando.
Link at least the following mandatory characteristics to export your variations to Zalando:
-
1. Farbcode (colour code)
-
Altersgruppe(n) (age group(s))
-
Form of address (Geschlecht)
-
Größenregister (size list)
-
Hersteller-Code (manufacturer code)
-
Manufacturer colour
-
Jahreszeiten-Code (Seasonal code)
-
Silhouetten-Typ (silhouette type)
Several hundred characteristics are created in PlentyONE when you convert the Zalando silhouettes to characteristics. To make it easier to work with these characteristics, you can export the characteristics to a file. This gives you quick access to the IDs of your Zalando characteristics. This gives you easy access to the IDs of the Zalando characteristics. For example, this will help you to link the characteristics to your items using the import tool.
Exporting Zalando item characteristics:
-
Go to Setup » Markets » Zalando » Settings.
-
Click on the Silhouettes tab.
-
Click on Export Zalando item characteristics.
→ A file that contains the Zalando characteristics is exported. -
Save the file on your computer. Tip: Table 3 explains the file’s columns. For more information about characteristics, refer to the Characteristics and properties page of the manual.
| Column | Explanation |
|---|---|
Group name |
Names of the characteristic groups |
Silhouette |
Values of all silhouettes |
Characteristic ID |
IDs of the characteristics, see also Setup » Items » Characteristics |
Characteristics type |
Characteristic type
|
Mandatory entry |
0 = The characteristic is optional. |
Language |
The language of the characteristic. Currently, only German is available. |
Linking a characteristic to an item:
-
Go to Item » Edit item.
-
Open the item.
-
Click on the Characteristics tab.
-
Activate the characteristic in the Activate further characteristics area.
-
Save () the settings.
→ The characteristics are displayed in the Characteristics area. -
Optional: Carry out additional settings. Pay attention to the explanations regarding characteristics.
-
Save () the settings.
5.4. Check list for exporting variations
Zalando expects some mandatory product information. As a result, variations can only be exported to the market if this mandatory information is saved for the variation. The information listed in Table 4 must be saved for all variations that you want to export to Zalando.
| Mandatory data | Explanation | ||
|---|---|---|---|
EAN |
An EAN must be saved for the variation.
|
||
Technical data |
Technical data must be saved for the item.
|
||
Images |
An image must be saved for the variation.
|
||
Price |
A price must be saved for the variation.
|
||
Supplier SKU |
An supplier SKU must be saved for each variation. Save this supplier SKU in the Model field of your variations. |
||
Properties |
As a minimum, the following mandatory characteristics need to be linked to an item:
|
||
Attributes |
As a minimum, the following attributes must be linked to the variation:
and/or
and/or
|
6. Providing information on product safety, manufacturer and EU-responsible person (GPSR)
The General Product Safety Regulation of the EU (GPSR) requires manufacturers and sellers to ensure the product safety of certain goods and to provide certain information for this purpose. This includes details about the manufacturer and the responsible person in the EU, product warnings and hazardous materials information. The GPSR regulation ensures that products are safe and comply with consumer protection requirements before being placed on the market.
In this chapter, you will learn how to set product safety information, hazardous material details, and manufacturer data in PlentyONE to comply with GPSR regulations.
6.1. Providing information on manufacturer and EU-responsible person
On Zalando, you submit the information on manufacturer and EU-responsible person at partner/brand level.
To submit this information, add the required contact details for each brand directly in your Zalando zDirect account. Zalando provides a step-by-step guide on how to do this:
6.2. Providing information on product safety
On Zalando, you submit information and documents on product safety as attributes at article level.
You have two options to submit attributes at article level:
Information and documents on product safety vary depending on the product category and include the following at Zalando:
| Information | Required format |
|---|---|
Warnings and safety information |
Text |
Instructions for use |
PDF |
Energy efficiency label |
|
Energy efficiency class |
Selection |
Product/item information sheet |
|
UPF (Ultraviolet Protection Filter) rating |
Selection |
Filter type, lens type |
Text |
Filter/tint category |
Text |
Product description |
JPG, PNG or PDF |
Product and packaging artwork |
JPG, PNG or PDF |
Risk assessment |
|
Bill of material/parts list |
|
Test reports |
|
EU Declaration of Conformity |
Zalando provides a complete overview of the required information and documents, the allowed formats and a list of the relevant product categories in this spreadsheet.
6.2.1. Option 1: Direct upload via your Zalando zDirect account
If you create your items manually at Zalando, you can upload product safety information and documents directly via your Zalando zDirect account. Zalando provides a step-by-step guide on how to do this:
6.2.2. Option 2: Upload via characteristics in PlentyONE
In PlentyONE, you can upload product safety information and documents to Zalando via characteristics.
|
This option only works for new items
Only apply the following steps to items that have not yet been uploaded to Zalando. Updating characteristics on items that are already listed on Zalando will not affect them. For existing items, Zalando will disregard any updates to item data when it’s resubmitted. |
Uploading product safety information and documents to Zalando via characteristics:
-
Convert the silhouettes for which you want to upload product safety information and documents to characteristics.
-
Link the new characteristics to your items.
-
Enter the data for the new characteristics at item level.
→ Pay attention to the required formats for the characteristics.
7. No longer offering items on Zalando
Variations cannot be sold on Zalando if they do not have stock in PlentyONE. As stock data is transferred to Zalando every 15 minutes, variations without stock are deleted automatically. If a variation has stock again in PlentyONE, it is offered again on Zalando with the next stock export.
If you do not want to sell a variation which is in stock in PlentyONE on Zalando, then you have to delete the availability for the market and update the timestamp for market exports.
Note: Items cannot be deleted on Zalando. Thus, if you remove the availability and update the timestamp for market exports, your variation will not be deleted on Zalando. It will only be displayed as not in stock.
Deleting the availability:
-
Go to Item » Edit item » [Open item] » [Open variation] » Variation tab: Availability.
-
Delete () the availability Zalando.
-
Save () the settings.
After you removed the availability, you have to Update the timestamp for market exports using the Item group function. This ensures that a stock of 0 is transferred to Zalando.
Updating the timestamp for market exports:
-
Go to Item » Edit item » Tab: Item group function.
-
Place a check mark next to Update timestamp for market exports.
-
Click on Execute.
→ A stock of 0 is transferred to Zalando.
→ The variation is displayed as not in stock on Zalando and cannot be bought any longer.
8. Preparing order documents
For each country, you need the following order documents for Zalando orders:
-
Delivery notes
-
Invoices
-
Return slips
-
Return flyer
| If you did not create separate order documents for a country, then the order documents are created using the template for the payment method Zalando DE. |
The payment method you select in the template settings determines the country the template is used for. Here, we show you how to prepare documents for the sales channel Zalando DE. This information is structured like this:
This information is accurate as of 1st of March 2022. Consult the documentation for Zalando Partners to find out if the requirements have changed. Current templates for order documents for all Zalando platforms are available on Zalando’s Google Drive.
| You can use a separate PDF template for each payment method and order document. However, for each client and document type, the settings for the document templates need to be configured globally. As such, all delivery notes for one client have the same layout. If you sell on different markets with strict requirements, you might want to consider creating a separate client for Zalando. |
8.1. Preparing delivery notes for Zalando DE
Delivery notes for Zalando orders must contain the following information:
-
Zalando Partner logo
-
External order number
-
External customer number
-
Payment note required by Zalando
-
Footer with company details, payment information and external order number

Consult the documentation for Zalando Partners to find out more about the requirements for order documents.
Creating layout templates for order documents in PlentyONE is described in the Orders area of the manual. On this page, we only describe how to upload the PDF template and set up the delivery note document for the specific requirements of the market:
8.1.1. Personalising the PDF template for Zalando DE delivery notes
Zalando delivery notes need to show the Zalando Partner logo. Zalando provides a DOCX template for delivery notes. On this DOCX template, you need to add your company data to the footer before you upload it to PlentyONE as a PDF.
Personalising the DOCX template for delivery notes:
-
Save the DOCX template for delivery notes to your computer:
-
Open the template in an editor.
-
Insert your logo into the file.
-
At the bottom left of the footer, insert the following company data:
[Partner name]
[Shop name on Zalando]
Geschäftsführer, Vertreter: [specify persons responsible]
Amtsgericht [your court of first instance], Str.-Nr. [your VAT number] -
At the bottom right, change the text Verwendungszweck: Bestellnummer to Verwendungszweck:. In other words, delete the word "Bestellnummer".
Tip: In PlentyONE. the external order number is then inserted using the option Customer reference. Find out how in the description below. -
Save the template as a PDF file.

8.1.2. Uploading personalised PDF template for Zalando DE delivery notes
Proceed as described below to upload the personalised PDF template for delivery notes to PlentyONE. The PDF file can be up to 150 kB.
Uploading personalised PDF template for delivery notes:
-
Go to Setup » Client » Select client » Locations » Location: Germany » Documents » Delivery note.
-
Click on the tab PDF template.
-
Click on Add template.
→ The editing window Upload new PDF template opens. -
From the drop-down list Payment method, select the option Zalando DE.
-
In the drop-down list Language, select the option de.
-
In the line Template, click on Choose template file.
-
Select the PDF template for Zalando DE delivery notes.
-
Click on Upload template ().
→ The template is uploaded.
8.1.3. Showing external customer number and order number on Zalando DE delivery notes
The Zalando customer number and the Zalando order number must be shown on all Zalando delivery notes. Also, the footer of the document must contain the external order number as the reason for payment. To achieve this, adjust the template settings for delivery notes.
Showing customer number and order number on delivery notes:
-
Go to Setup » Client » Standard » Locations » Germany » Documents » Invoice » Tab: Template.
-
Scroll down to the area Optional elements below stock unit table.
-
For the setting External customer number, select the option Yes from the drop-down list.
-
For the setting External customer number, select the option Yes from the drop-down list.
-
Scroll to the option Customer reference. This option allows you to insert the external order number into the footer. Customers must specify this external order number as the designated use when making their payment.
-
Select the coordinates for the option Customer reference so that the number is positioned after the text Verwendungszweck:.
-
Save () the settings.
Tip: Also add the payment note in this menu now.
8.1.4. Entering payment instructions for Zalando DE delivery notes
Zalando specifies a text containing return instructions that needs to be shown on all Zalando delivery notes. Proceed as described below to enter these payment instructions for Zalando delivery notes.
Entering payment instructions for delivery notes:
-
Expand the info box "Text: Payment instructions for Zalando DE delivery notes" below this description.
-
Copy the text to the clipboard.
-
Go to Setup » Client » Standard » Locations » Germany » Documents » Invoice » Tab: Template.
-
Navigate to the area Optional elements below stock unit table, to the setting Payment instruction.
-
Find a field that does not contain any payment instructions.
-
From the drop-down list Payment method of this field, select the option Zalando DE.
-
Paste the Zalando payment instructions into the input field.
-
Save () the settings.
Note: Solltest du die Zahlart Rechnung gewählt haben, ist dir von Zalando bereits die Bestellbestätigung mit dem Verweis auf den zu zahlenden Gesamtbetrag per E-Mail zugestellt worden.
Hast du noch Fragen zu deiner Bestellung? Besuche unsere Hilfeseiten unter www.zalando.de/faq - darüber kannst du uns auch kontaktieren.
Bitte behandle die Ware sorgsam, da diese bei Nichtgefallen nur ungetragen und unbeschädigt retourniert werden kann.
8.2. Preparing invoices for Zalando DE
Invoices for Zalando orders must contain the following information:
-
Your logo
-
Zalando Partner logo
-
External order number
-
Payment note required by Zalando
-
Footer with company details, payment information and external order number

Consult the documentation for Zalando Partners to find out more about the requirements for order documents.
Creating layout templates for order documents in PlentyONE is described in the Orders area of the manual. On this page, we only describe how to upload the PDF template and set up the delivery note document for the specific requirements of the market:
8.2.1. Personalising the PDF template for Zalando DE invoices
Zalando invoices must conform to the requirements set by Zalando. Zalando provides a DOCX template for invoices. Personalise this template before you upload this file in PlentyONE as a PDF.
Personalising DOCX template for invoices:
-
Save the DOCX template for invoices to your computer:
-
Open the template in an editor.
-
Insert your logo into the file.
-
At the bottom left of the footer, insert the following company data:
[Partner name]
[Shop name on Zalando]
[Managing director, registration court, registration number, VAT ID number] -
At the bottom right, change the text Verwendungszweck: Bestellnummer to Verwendungszweck:. In other words, delete the word “Bestellnummer”.
Tip: In PlentyONE. the external order number is then inserted using the option Customer reference. Find out how in the description below. -
Save the template as a PDF file.

8.2.2. Uploading personalised PDF template for Zalando DE invoices
Proceed as described below to upload the personalised PDF template for invoices to PlentyONE. The PDF file can be up to 150 kB.
Uploading personalised PDF template for invoices:
-
Go to Setup » Client » Select client » Locations » Location: Germany » Documents » Invoice.
-
Click on the tab PDF template.
-
Click on Add template.
→ The editing window Upload new PDF template opens. -
From the drop-down list Payment method, select the option Zalando DE.
-
In the drop-down list Language, select the option de.
-
In the line Template, click on Choose template file.
-
Select the PDF template for Zalando DE invoices.
-
Click on Upload template ().
→ The template is uploaded.
8.2.3. Showing external customer number and order number on Zalando DE invoices
The Zalando customer number and the Zalando order number must be shown on all Zalando invoices. Also, the footer of the document must contain the external order number as the reason for payment. To achieve this, adjust the template for invoices.
Showing Zalando customer number and order number on invoices:
-
Go to Setup » Client » Standard » Locations » Germany » Documents » Invoice » Tab: Template.
-
Scroll down to the area Optional elements below stock unit table.
-
For the setting External customer number, select the option Yes from the drop-down list.
-
For the setting External customer number, select the option Yes from the drop-down list.
-
Scroll to the option Customer reference. This option allows you to insert the external order number into the footer. Customers must specify this external order number as the designated use when making their payment.
-
Select the coordinates for the option Customer reference so that the number is positioned after the text Verwendungszweck:.
-
Save () the settings.
Tip: Also add the payment note in this menu now.
8.2.4. Entering payment instructions for Zalando DE invoices
Zalando specifies a text containing payment instructions that needs to be shown on all Zalando invoices. Proceed as described below to enter these payment instructions for Zalando invoices.
Entering payment instructions for invoices:
-
Expand the info box "Text: Payment instructions for Zalando DE invoices" below this description.
-
Copy the text to the clipboard.
-
Go to Setup » Client » Standard » Locations » Germany » Documents » Invoice » Tab: Template.
-
Navigate to the area Optional elements below stock unit table, to the setting Payment instruction.
-
Find a field that does not contain any payment instructions.
-
From the drop-down list Payment method of this field, select the option Zalando DE.
-
Paste the Zalando payment instructions into the input field.
-
Save () the settings.
Note: Solltest du die Zahlart Rechnung gewählt haben, ist dir von Zalando bereits die Bestellbestätigung mit dem Verweis auf den zu zahlenden Gesamtbetrag per E-Mail zugestellt worden.
Hast du noch Fragen zu deiner Bestellung? Besuche unsere Hilfeseiten unter www.zalando.de/faq - darüber kannst du uns auch kontaktieren.
Bitte überweise ausstehende Beträge ausschließlich an Zalando.
8.3. Preparing return slips for Zalando DE
Return slips for Zalando orders must contain the following information:
-
Your logo
-
Zalando Partner logo
-
External order number
-
External customer number
-
Return note required by Zalando
-
You only need the information regarding the return of cosmetics if you sell such items.

Consult the documentation for Zalando Partners to find out more about the requirements for order documents.
Creating layout templates for order documents in PlentyONE is described in the Orders area of the manual. On this page, we only describe how to upload the PDF template and set up the delivery note document for the specific requirements of the market:
8.3.1. Personalising a PDF template for return slips
Zalando return slips must conform to the requirements set by Zalando. Zalando provides a DOCX template for return slips. Personalise this template before you upload this file in PlentyONE as a PDF.
Personalising a DOCX template for return slips:
-
Save the DOCX template for Zalando return slips to your computer:
-
Open the template in an editor.
-
Insert your logo into the file.
-
Delete those parts of the documents that are inserted automatically when a return slip is generated.
Tip: To comply with Zalando’s layout requirements, we recommend that you leave the return instructions in the PDF template. Delete the instructions for returning cosmetics if you do not sell such items. -
Save the template as a PDF file.
8.3.2. Uploading personalised PDF template for return slips
Proceed as described below to upload the personalised PDF template for return slips to PlentyONE. The PDF file can be up to 150 kB.
Uploading personalised PDF template for return slips:
-
Go to Setup » Client » Select client » Locations » Location: Germany » Documents » Return slip.
-
Click on the tab PDF template.
-
Click on Add template.
→ The editing window Upload new PDF template opens. -
From the drop-down list Payment method, select the option Zalando DE.
-
In the drop-down list Language, select the option de.
-
In the line Template, click on Choose template file.
-
Select the PDF template for Zalando return slips.
-
Click on Upload template ().
→ The template is uploaded.
8.3.3. Showing customer number and order number on return slips
The Zalando customer number and the Zalando order number must be shown on all Zalando return slips. To achieve this, adjust the template for return slips.
Showing Zalando customer number and order number on return slips:
-
Go to Setup » Client » Standard » Locations » Germany » Documents » Return slip » Tab: Template.
-
Scroll down to the area Optional elements below stock unit table.
-
For the setting External customer number, select the option Yes from the drop-down list.
-
For the setting External customer number, select the option Yes from the drop-down list.
-
Save () the settings.
8.4. Preparing return flyers
In addition to return slips, orders must also contain a return flyer. The return flyer is a standard PDF document which you yourself do not need to change. As such, note the following recommendations:
-
Download the PDF templates for Zalando return slips here.
Tip: Select the PDF template that corresponds to your shipping service provider. -
Upload the PDF template to PlentyONE as described for the other order documents. Select a PlentyONE document type that you do not need for any of the markets and sales channels for this client. For example, select the document type Pick-up/delivery note.
-
In the tab Template of the document type, remove all optional fields. For mandatory fields, specify coordinates outside of the visible document area.
8.5. Special case: Preparing order documents for Austria, Belgium and/or Switzerland
You can only specify one order document for each combination of payment method and language in PlentyONE. However, Zalando requires separate mandatory details for order documents for each country. For example, there are different bank details and links to FAQs for each country. This leads to problems when the same language is spoken in several countries or when several languages are spoken in the same country.
As such, you need separate payment methods for the following countries:
-
Austria (AT)
-
Belgium (BE)
-
Switzerland (CH)
Separate payment method allow you to create separate templates for order documents for these countries.
Note the following points:
-
The payment methods for Austria, Belgium and Switzerland only become visible in the document menu after Zalando activates the platform for your Zalando account.
Important: For technical reasons, it can take up to 24 hours after activation before the payment method becomes available in the PlentyONE back end. -
The payment method is only saved for incoming orders if you have created a template for this payment method. It does not matter for which client, language or document a template is saved. If a template is saved for any document for a payment method, this payment method is assigned to incoming orders from that country.
9. Automating order processing
You can automatically notify Zalando about changes to the order status. There are two ways to do this:
-
Option 1: PlentyONE Flow (recommended)
-
Option 2: Event procedures (old method)
9.1. Option 1: PlentyONE Flow (recommended)
Create event-based flows to automatically inform Zalando about changes to the order status. The following actions are available for Zalando in the PlentyONE Flow Studio:
With PlentyONE Flow (short: "Flow"), you can automate workflows for your business processes. Flow provides you with two functions in the Automation menu:
-
In Flow Studio, you create and configure automated workflows. Depending on the trigger type, there are three flow types: event-based, time-based or manual.
-
In the Flow Tracker, you can monitor ongoing or finished workflows.
The central element in both functions is the Canvas – a graphical interface on which the workflows are visualised with Actions and Controls. In Flow Studio the canvas can be edited, in Flow Tracker it is only used for visualisation and is therefore read-only.
-
Is this your first time working with PlentyONE Flow? Then read up on the basic concept of Flow first.
9.1.1. Automatically sending shipping confirmations
A shipping confirmation can only be sent if an order meets the following conditions:
-
A package number must be saved for the order.
Note: Only one package number can be exported per order. If more than one package number is associated with an order, only the first package number is exported. -
The tracking ID of the return label must be saved for the order.
You can save the tracking ID in several different ways:
* Create a return label via the shipping centre.
* Create a return label with a process procedure.
* Add the return label via REST.
* Add the tracking ID of the return to a package at the order via REST.
Create an event-based flow to automatically inform Zalando that you have shipped the items of an order.
-
Go to Automation » Flow Studio.
-
Click Create flow (add).
→ A stepper opens and guides you through the following three steps.-
General
-
Enter a unique name and, if necessary, a description for the new flow.
-
Click Next.
-
-
Trigger
-
Select Event-based as the trigger.
-
Click Next.
-
-
Settings
-
If desired, select a UI from the optional drop-down list Flow available in.
→ The option to manually trigger the flow directly from the selected UI is added to the group functions in that UI.
Note: UIs currently selectable: Order UI. -
From the drop-down list Trigger selection, select the event according to Table 5.
Note: If the trigger event has additional settings, then these are invariably mandatory. Without performing these settings, you will not be able to save the flow. -
Save () the settings.
→ The flow is created.
→ The Flow Studio Canvas appears, on which two elements are already displayed: The trigger type and the placeholder for the next step.
Note: With some event-based flows you cannot save the flow if it consists of only a trigger. In such cases, you need to add at least one further step.
-
-
-
Configure the new flow according to Table 5.
-
Save () the settings.
Note: The selected statuses, controls and filters in Table 5 only serve as an example. Select the status, controls and filters for the flow which best suit your workflow.
| Setting | Option | Selection | |||||||||
|---|---|---|---|---|---|---|---|---|---|---|---|
Trigger selection |
Select an event, for example:
|
||||||||||
Control element |
Branch |
Note: If you want to use multiple filters, add the additional filters as conditions (playlist_add). Select AND as the relationship between the conditions.
|
|||||||||
Actions |
Plugin (Legacy) |
Zalando > Send shipping confirmation to Zalando |
9.1.2. Automatically sending cancellations
Create an event-based flow to automatically inform Zalando about cancellations.
Note: Note that orders marked as shipped can no longer be cancelled.
-
Go to Automation » Flow Studio.
-
Click Create flow (add).
→ A stepper opens and guides you through the following three steps.-
General
-
Enter a unique name and, if necessary, a description for the new flow.
-
Click Next.
-
-
Trigger
-
Select Event-based as the trigger.
-
Click Next.
-
-
Settings
-
If desired, select a UI from the optional drop-down list Flow available in.
→ The option to manually trigger the flow directly from the selected UI is added to the group functions in that UI.
Note: UIs currently selectable: Order UI. -
From the drop-down list Trigger selection, select the event according to Table 6.
Note: If the trigger event has additional settings, then these are invariably mandatory. Without performing these settings, you will not be able to save the flow. -
Save () the settings.
→ The flow is created.
→ The Flow Studio Canvas appears, on which two elements are already displayed: The trigger type and the placeholder for the next step.
Note: With some event-based flows you cannot save the flow if it consists of only a trigger. In such cases, you need to add at least one further step.
-
-
-
Configure the new flow according to Table 6.
-
Save () the settings.
Note: The selected statuses, controls and filters in Table 6 only serve as an example. Select the status, controls and filters for the flow which best suit your workflow.
| Setting | Option | Selection | |||||||||
|---|---|---|---|---|---|---|---|---|---|---|---|
Trigger selection |
Select an event, for example:
|
Select an order status, for example:
|
|||||||||
Control element |
Branch |
Note: If you want to use multiple filters, add the additional filters as conditions (playlist_add). Select AND as the relationship between the conditions.
|
|||||||||
Actions |
Plugin (Legacy) |
Zalando > Send cancellation to Zalando |
9.1.3. Automatically sending returns
Create an event-based flow to automatically inform Zalando about returns.
| Return reasons will only be transmitted if the flow is used in combination with a return order and if the return reasons were mapped in the assistant. |
-
Go to Automation » Flow Studio.
-
Click Create flow (add).
→ A stepper opens and guides you through the following three steps.-
General
-
Enter a unique name and, if necessary, a description for the new flow.
-
Click Next.
-
-
Trigger
-
Select Event-based as the trigger.
-
Click Next.
-
-
Settings
-
If desired, select a UI from the optional drop-down list Flow available in.
→ The option to manually trigger the flow directly from the selected UI is added to the group functions in that UI.
Note: UIs currently selectable: Order UI. -
From the drop-down list Trigger selection, select the event according to Table 7.
Note: If the trigger event has additional settings, then these are invariably mandatory. Without performing these settings, you will not be able to save the flow. -
Save () the settings.
→ The flow is created.
→ The Flow Studio Canvas appears, on which two elements are already displayed: The trigger type and the placeholder for the next step.
Note: With some event-based flows you cannot save the flow if it consists of only a trigger. In such cases, you need to add at least one further step.
-
-
-
Configure the new flow according to Table 7.
-
Save () the settings.
Note: The selected statuses, controls and filters in Table 7 only serve as an example. Select the status, controls and filters for the flow which best suit your workflow.
| Setting | Option | Selection | |||||||||
|---|---|---|---|---|---|---|---|---|---|---|---|
Trigger selection |
Select an event, for example:
|
For Order types, select the type Return. |
|||||||||
Control element |
Branch |
Note: If you want to use multiple filters, add the additional filters as conditions (playlist_add). Select AND as the relationship between the conditions.
|
|||||||||
Actions |
Plugin (Legacy) |
Zalando > Send return to Zalando |
9.2. Option 2: Event procedures (old method)
Set up event procedures to automatically inform Zalando about changes to the order status. The following event procedures are available for Zalando:
9.2.1. Automatically sending shipping confirmations
A shipping confirmation can only be sent if an order meets the following conditions:
-
A package number must be saved for the order.
Note: Only one package number can be exported per order. If more than one package number is associated with an order, only the first package number is exported. -
The tracking ID of the return label must be saved for the order.
You can save the tracking ID in several different ways:
* Create a return label via the shipping centre.
* Create a return label with a process procedure.
* Add the return label via REST.
* Add the tracking ID of the return to a package at the order via REST.
Set up an event procedure to automatically inform Zalando that you have shipped the items of an order.
-
Go to Setup » Orders » Events.
-
Click on Add event procedure ().
→ The Create new event procedure window opens. -
Enter a distinct name for the event procedure.
-
Select the event according to Section 9.2.1.
-
Save () the settings.
-
Carry out the additional settings according to Section 9.2.1.
-
Select the setting Active ().
-
Save () the settings.
The data is not transferred in real time when this event procedure is triggered. Instead, the data is registered in a queue. If there are several jobs in the queue, it can take several minutes for the data to be transferred. The advantage? If the target server is unavailable or throttled, several attempts are made to transfer the data.
Note: The selected statuses and filters in Section 9.2.1 only serve as an example. Select filters and statuses for the event procedure which best suit your workflow.
The data is not transferred in real time when this event procedure is triggered. Instead, the data is registered in a queue. If there are several jobs in the queue, it can take several minutes for the data to be transferred. The advantage? If the target server is unavailable or throttled, several attempts are made to transfer the data.
| Setting | Option | Selection |
|---|---|---|
Event |
Order change: Outgoing items booked |
|
Filter 1 |
Order > Order type |
Order |
Filter 2 |
Order > Referrer |
Select the order referrers for the Zalando sales channels that you want to use this flow for. |
Procedure |
Plugins |
Send shipping confirmation to Zalando |
9.2.2. Automatically sending cancellations
Set up an event procedure to automatically inform Zalando of cancellations.
Note: Note that orders marked as shipped can no longer be cancelled.
-
Go to Setup » Orders » Events.
-
Click on Add event procedure ().
→ The Create new event procedure window opens. -
Enter a distinct name for the event procedure.
-
Select the event according to Table 9.
-
Save () the settings.
-
Carry out the additional settings according to Table 9.
-
Select the setting Active ().
-
Save () the settings.
The data is not transferred in real time when this event procedure is triggered. Instead, the data is registered in a queue. If there are several jobs in the queue, it can take several minutes for the data to be transferred. The advantage? If the target server is unavailable or throttled, several attempts are made to transfer the data.
Note: The selected statuses and filters in Table 9 only serve as an example. Select filters and statuses for the event procedure which best suit your workflow.
| Setting | Option | Selection |
|---|---|---|
Event |
Order change: Status change |
Select a status, for example [8] Cancelled. |
Filter 1 |
Order > Order type |
Order |
Filter 2 |
Order > Referrer |
Select the order referrers for the Zalando sales channels that you want to use this flow for. |
Procedure |
Plugins |
Send cancellation to Zalando |
9.2.3. Automatically sending returns
Set up an event procedure to automatically inform Zalando about returns.
| Return reasons will only be transmitted if the event procedure is used in combination with a return order and if the return reasons were mapped in the assistant. |
-
Go to Setup » Orders » Events.
-
Click on Add event procedure ().
→ The Create new event procedure window opens. -
Enter a distinct name for the event procedure.
-
Select the event according to Table 10.
-
Save () the settings.
-
Carry out the additional settings according to Table 10.
-
Select the setting Active ().
-
Save () the settings.
The data is not transferred in real time when this event procedure is triggered. Instead, the data is registered in a queue. If there are several jobs in the queue, it can take several minutes for the data to be transferred. The advantage? If the target server is unavailable or throttled, several attempts are made to transfer the data.
Note: The selected statuses and filters in Table 10 only serve as an example. Select filters and statuses for the event procedure which best suit your workflow.
| Setting | Option | Selection |
|---|---|---|
Event |
Order generation: New return |
|
Filter 1 |
Order > Order type |
Return |
Filter 2 |
Order > Referrer |
Select the order referrers for the Zalando sales channels that you want to use this flow for. |
Procedure |
Plugins |
Send return to Zalando |
10. Starting data exchange: Activating the Zalando account
Have you completed all the settings? Great. Then you are ready for the next step. Activate your Zalando account in the assistant Account settings - Zalando to start exchanging data with Zalando.
Data is not exchanged with Zalando. To activate Zalando’s zDirect API interface, your Zalando account must be linked to the PlentyONE developer account. This link is established automatically during the integration. However, PlentyONE also needs to generate additional credentials for the API and then save these credentials in your system. We cannot give you access to these credentials. As such, PlentyONE is not allowed to give you access to these credentials. Ask our support staff to activate your account in this thread of the PlentyONE forum.
In the forum post, provide the following information:
-
The company/brand name you used to register with Zalando
-
Your plenty ID
-
The ID of the Zalando account (accountId) in PlentyONE that you want to activate for the Zalando interface
Note: Only one account can be linked in PlentyONE for each Zalando seller account.
Activating the Zalando account:
-
Go to Setup » Assistants » Omni-Channel.
-
Click on the assistant Account settings - Zalando.
-
Navigate to the step Account activation.
-
Activate the option Activate user account.
-
Complete the assistant.
→ The data exchange with Zalando is activated.
11. Download reports
There are a number of reports available for Zalando. Go to the Setup » Markets » Zalando » Settings » Tab: processing reports menu to download the following reports:
| Report | Explanation | ||||
|---|---|---|---|---|---|
Export-Log |
|||||
zalandoArticleExportLog.txt |
The export log zalandoArticleExportLog.txt contains log entries for variations. The export log is generated once every night. The file contains entries for variations that were exported successfully and for variations that could not be exported to Zalando. |
||||
Reports |
|||||
Product status reports |
Zalando generates the product status reports are generated once daily during the night. These reports only contain information regarding variations that were successfully exported to Zalando.
|
||||
Price reports |
Zalando generates a price report for each active channel once daily during the night. These reports contain information on the processing status of all price updates that Zalando received in the last seven days. |
||||
11.1. Downloading the export log
The export log contains PlentyONE log entries. The file contains entries for variations that were exported successfully and for variations that could not be exported to Zalando.
Downloading the export log:
-
Go to Setup » Markets » Zalando » Settings.
-
Click on the Processing reports tab.
-
In the Export log area, click on Download file ().
→ The CSV file is generated. -
Save the CSV file on your computer.
-
Filter the entries to only see the status error.
-
Check the entries. Correct any variation data in the PlentyONE back end.
Tip: You can ignore any entries with the status warning.
| Setting | Explanation |
|---|---|
specialDescriptions |
Technical data |
brand |
Characteristic Zalando » Hersteller-Code (manufacturer code) |
season |
Characteristic Zalando » Jahreszeiten-Code (season code) |
genders |
Characteristic Zalando » Geschlecht (gender) |
ageGroups |
Characteristic Zalando » Altersgruppe(n) (age groups) |
sizeRegister |
Characteristic Zalando » Größen-Register (size register) |
mainColorCode |
From the Characteristic Zalando » 1. Farbcode (Zalando » 1st colour code) |
supplierColor |
Characteristic Zalando » Hersteller-Farbe (Zalando » Manufacturer colour) or an optional 2nd attribute link |
images |
The variation must have at least one image. |
ean |
The variation needs a GTIN 13. |
lengthRegister |
Characteristic Zalando » Längen-Register (length register) |
Keywords |
Meta keywords (item tab: Texts) |
11.2. Downloading product status reports
Product status reports contain information regarding the items that were exported to Zalando. These reports are generated by Zalando. As such, these reports only contain information regarding variations that were successfully exported to Zalando. The following reports are available:
-
ProductErrorReport.csv: Contains variations that cannot be sold on Zalando since the last export. The report also contains the first five error codes and an error description. The report is generated once every night. Click on Update file () before downloading the file to get current data from Zalando.
-
ProductLiveReport.csv: Contains variations that can be sold on Zalando since the last export. The report also contains information on the stock and price of the variations on the different Zalando channels (DE, FR, etc.) at the time the file was generated. The report is generated once every night. Click on Update file () before downloading the file to get current data from Zalando.
Downloading a product status report:
-
Go to Setup » Markets » Zalando » Settings.
-
Click on the Processing reports tab.
→ The following files can be downloaded in the Product status reports - Account ID area:-
ProductErrorReport.csv contains the variations that cannot be sold on Zalando since the last export.
-
ProductLiveReport.csv contains the variations that can be sold on Zalando since the last export.
-
-
Optional: By default, the file is updated once every night. To get current data from Zalando before downloading the file, go to the Product status-reports - Account ID area and click on Update file ().
-
Go to the Product status reports - Account ID area. In the row of a processing report click on Download file ().
→ The CSV file is generated. -
Save the CSV file on your computer.
11.3. Downloading price reports
Zalando generates a price report for each active channel once daily during the night. These reports contain information on the processing status of all price updates that Zalando received in the last seven days. As such, the reports may contain several entries for the same EAN.
Downloading price reports:
-
Go to Setup » Markets » Zalando » Settings.
-
Click on the Processing reports tab.
→ In the area Price reports, files are available for all active channels. -
Optional: By default, the file is updated once every night. In the column Actions, click on Update file () to get current data from Zalando before downloading the file.
-
Go to the Price reports area. In the row of a processing report, click on Download file ().
→ The CSV file is generated. -
Save the CSV file on your computer.
Timestamp |
Corresponds to the latest timestamp from the columns Status History and Scheduled Price (1-3) - Status History. |
||||||||||||||||
EAN |
The EAN of the variation whose price has been updated. |
||||||||||||||||
Ignore Warnings? |
Corresponds to the setting Ignore Warnings in the Setup » Assistants » Omni-Channel » Zalando account settings » [Open account] » Step: Prices for [target country] menu at the time the update was transferred. |
||||||||||||||||
Regular Price |
Transferred value of the regular price. |
||||||||||||||||
Regular Price Currency |
Transferred currency of the regular price. |
||||||||||||||||
Promotional Price |
Transferred value of the reduced price. |
||||||||||||||||
Promotional Price Currency |
Transferred currency of the reduced price. |
||||||||||||||||
Status |
Status of the processing. Possible statuses:
|
||||||||||||||||
Status History |
Status change history. For each change, the cell contains a paragraph with the following pattern (placeholders in square brackets):
|
||||||||||||||||
Scheduled Price (1-3) - Start |
Start date of the scheduled price. |
||||||||||||||||
Scheduled Price (1-3) - End |
End date of the scheduled price. |
||||||||||||||||
Scheduled Price (1-3) - Regular Price |
Transferred value of the regular price for the scheduled price. |
||||||||||||||||
Scheduled Price (1-3) - Regular Price Currency |
Transferred currency of the regular price. |
||||||||||||||||
Scheduled Price (1-3) - Promotional Price |
Transferred value of the reduced price. |
||||||||||||||||
Scheduled Price (1-3) - Promotional Price Currency |
Transferred currency of the reduced price. |
||||||||||||||||
Scheduled Price (1-3) - Status |
Status of the processing of the scheduled price. Possible statuses:
|
||||||||||||||||
Scheduled Price (1-3) - Status History |
History of the status change of the scheduled price. For each change, the cell contains a paragraph with the following pattern (placeholders in square brackets):
|
12. Viewing the data log
The Data » Log menu contains a history of processes that run via the Zalando interface.
Note that integrations and identifiers are only shown in the drop-down lists as filters after the process has run at least once.
For Zalando, the following filters are recommended:
-
Identifier » Zalando
-
Go to Data » Log.
-
In the toolbar, click on tune.
-
Select appropriate filters from the drop-down lists.
-
Optional: Select filters for dates and/or times to only show entries from a specific period.
Tip: For information about the filters, refer to the Data log page of the manual. -
Click on Search ().
→ The results are shown. -
Check all entries for the levels warning and error.
Tip: Click on the entry to see details.
Use any filters listed in Table 12 to limit the search results.
| Log entries | Recommended filters | Explanation |
|---|---|---|
Price updates |
|
While the price reports are generated, an error log is also written for all entries that have been in the REJECTED, FAILED or OVERRIDDEN status since the file was last generated (minus one hour as a buffer). |
Price reports |
|
Log entries for errors during generation of price reports |
Stock synchronisation |
|
Log entries for errors during stock updates |
13. FAQ
13.1. Integration
Contact Zalando directly to join the Zalando partner program.
Contact us in the PlentyONE forum. Our support team will provide you with a CSV file. This file contains the following information:
-
Routes for items
-
User name and password
-
Login details for the PlentyONE FTP server for silhouettes Note: Zalando sends your silhouettes to this FTP server so that they can be imported into your PlentyONE system. PlentyONE imports these silhouettes every Wednesday.
We will provide the file for you in the PlentyONE forum via PM. Write us a message in this forum thread. Please also provide your PID if it differs from the PID in your forum user account.
To activate Zalando’s zDirect API interface, your Zalando account must be linked to the PlentyONE developer account. This link is established automatically during the integration. However, PlentyONE also needs to generate additional credentials for the API and then save these credentials in your PlentyONE system. As such, PlentyONE is not allowed to give you access to these credentials.
Ask our support staff to activate your account in this thread in the PlentyONE forum.
13.2. Item data export
You have to carry out the following settings so that an item can be exported to Zalando:
-
The availabilities Zalando and WEB API must be activated in the Availability tab of a variation. (How?)
-
The variation must be activated.
-
The variation has a sales price for Zalando. (How?)
-
The items are linked to all mandatory characteristics. (Which ones?)
Either you did not carry out the basic settings for the market or the mandatory fields are not filled.
The mandatory fields for Zalando are listed below:
-
1 Farbcode (colour code)
-
Altersgruppe(n) (age group(s))
-
Geschlecht (gender)
-
Größenregister (size register)
-
Hersteller-Code (manufacturer code)
-
Herstellerfarbe (manufacturer colour)
-
Jahreszeiten-Code (seasonal code)
-
Silhouetten-Typ (silhouette type)
To check whether there are errors for your variations, you can take a look at the reports. Depending on the report, you can check your variations for errors.
For Zalando, changes to item data, such as text changes, are not automatically imported afterwards. In this case it is necessary to contact Zalando directly.
13.3. Reports and error messages
13.3.1. Reports
Open the Setup » Markets » Zalando » Settings » Tab: Processing reports menu to download the reports.
The export log zalandoArticleExportLog.txt contains log entries for variations. The export log is generated once every night. The file contains entries for variations that were exported successfully and for variations that could not be exported to Zalando. Here’s how to download the export log.
Zalando generates the product status reports once during the night. These reports only contain information regarding variations that were successfully exported to Zalando. Here’s how to download the product status reports.
-
ProductErrorReport.csv contains variations that could not be sold on Zalando since the last export. The report is generated once every night.
-
ProductLiveReport.csv contains variations that could be sold on Zalando since the last export as well as stock and price of each variation on the different Zalando channels (DE, FR, etc.) at the time that the file was generated. The report is generated once every night.
13.3.2. Error messages in the report zalandoArticleExportLog.txt
The characteristic Zalando » Silhouettenname (silhouette name) for the variation ID (=ValueID) is missing.
The characteristic Zalando » Hersteller-Code (manufacturer code) for the variation ID (=ValueID) is missing.
The characteristic Zalando » Altersgruppe (age group) for the variation ID (=ValueID) is missing.
The characteristic Zalando » Größen-Register (size register) is missing or was not created correctly.
Note: This only applies if you do not use attributes to indicate sizes.
-
*Scenario 1: The characteristic is missing.
The characteristic has to be added and linked to the appropriate size register. -
*Scenario 2: The characteristic was created.
Keep in mind to comply with the format provided by Zalando. Check if the size register is correct.
Note: Size registers that were created manually cannot be used for Zalando.
The characteristic Zalando » 1. Farbcode (colour code) for the variation ID (=ValueID) is missing.
Exception: The variation has a colour attribute. In that case, attribute links are used to manage colours.
The characteristic Zalando » Hersteller-Farbe (Zalando » Manufacturer colour) or the second attribute link is missing or not properly saved for the variation ID (=ValueID).
The characteristic Zalando » Geschlecht (gender) for the variation ID (=ValueID) is missing.
The characteristic Zalando » Jahreszeiten-Code (seasonal code) for the variation ID (=ValueID) is missing.
The characteristic Zalando » Größe (size) for the variation ID (ValueID) is missing or the attribute was not linked with the characteristic. +]
Note: You can use item attributes to indicate sizes. It is mandatory to link the attributes in the size register.
Here’s how to link attributes to characteristics.
A GTIN 13 with the referrer Zalando must be saved for the variation in the variation’s Settings » Barcode tab.
You can check the settings for the referrer in the Setup » Item » Barcode menu.
At least one image with the referrer Zalando must be saved for the variation.
13.3.3. Error messages in the report ProductErrorReport.csv
If you can offer this item also in the new season, then you can map the characteristic Jahreszeiten-Code (seasonal code) with the new season. If the new season is not displayed, then contact Zalando. The new silhouettes have to be updated at Zalando afterwards.
Also take a look at The silhouettes were not updated/imported in PlentyONE.
You want to transfer a size from a size register which is not enabled for you. For example, Zalando assigned the sizes S-L to you, but you tried to list an item in XL. Contact Zalando and have the sizes in your size registers adjusted.
Also take a look at The silhouettes were not updated/imported in PlentyONE.
Characteristics are used to save information about the item’s material. Use a characteristic of the type Text to specify the item’s material composition in %.
Note: The sum must always add up to 100%. However, the material information has to be indicated in 100,00% for the export to work. Thus, if the item consists of 80% polyester and 20% cotton, you have to enter the following values:
-
polyester: “8000”
-
cotton: “2000”
For 100% cotton, the value would be “10000”.
13.4. Price synchronisation
For an overview of the price updates within the last 7 days and the corresponding processing statuses, you can download reports within the Setup » Markets » Zalando » Settings » Tab: Processing reports » Tab: Price reports menu. Note that Zalando only receives prices when they are in the status Submitted. You can update the report anytime. However, the time span is fixed.
If you notice that some prices were not updated or if you think that the values which were exported are not correct, you can also check this in the log. Go to Data » Log.
Use the following filters:
-
Integration: Plenty\Modules\Zalando\Prices\Services\PriceUpdateService
-
Identifier: Zalando
Enter the variation ID or the EAN as Reference type. To do so, enter variationID or ean as reference type and use the corresponding value as Reference value.
Afterwards, open the log entry and click on Expand all to look at the request.
Whether Zalando accepted this message can be checked in the response. The response is contained in a separate log. The following screenshot contains a jobId:
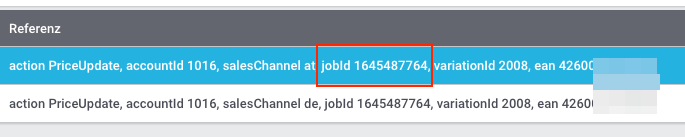
Open the Data » Log menu and filter for the jobID.
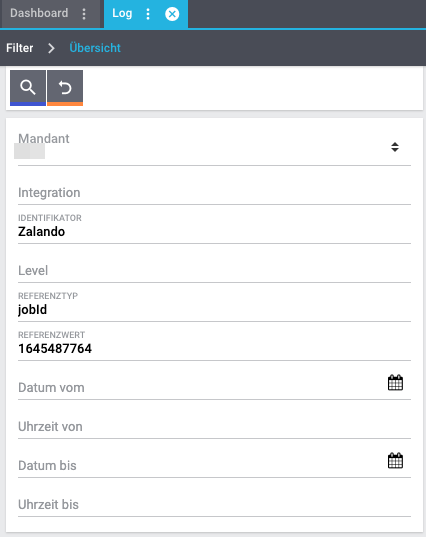
There will be messages like these:
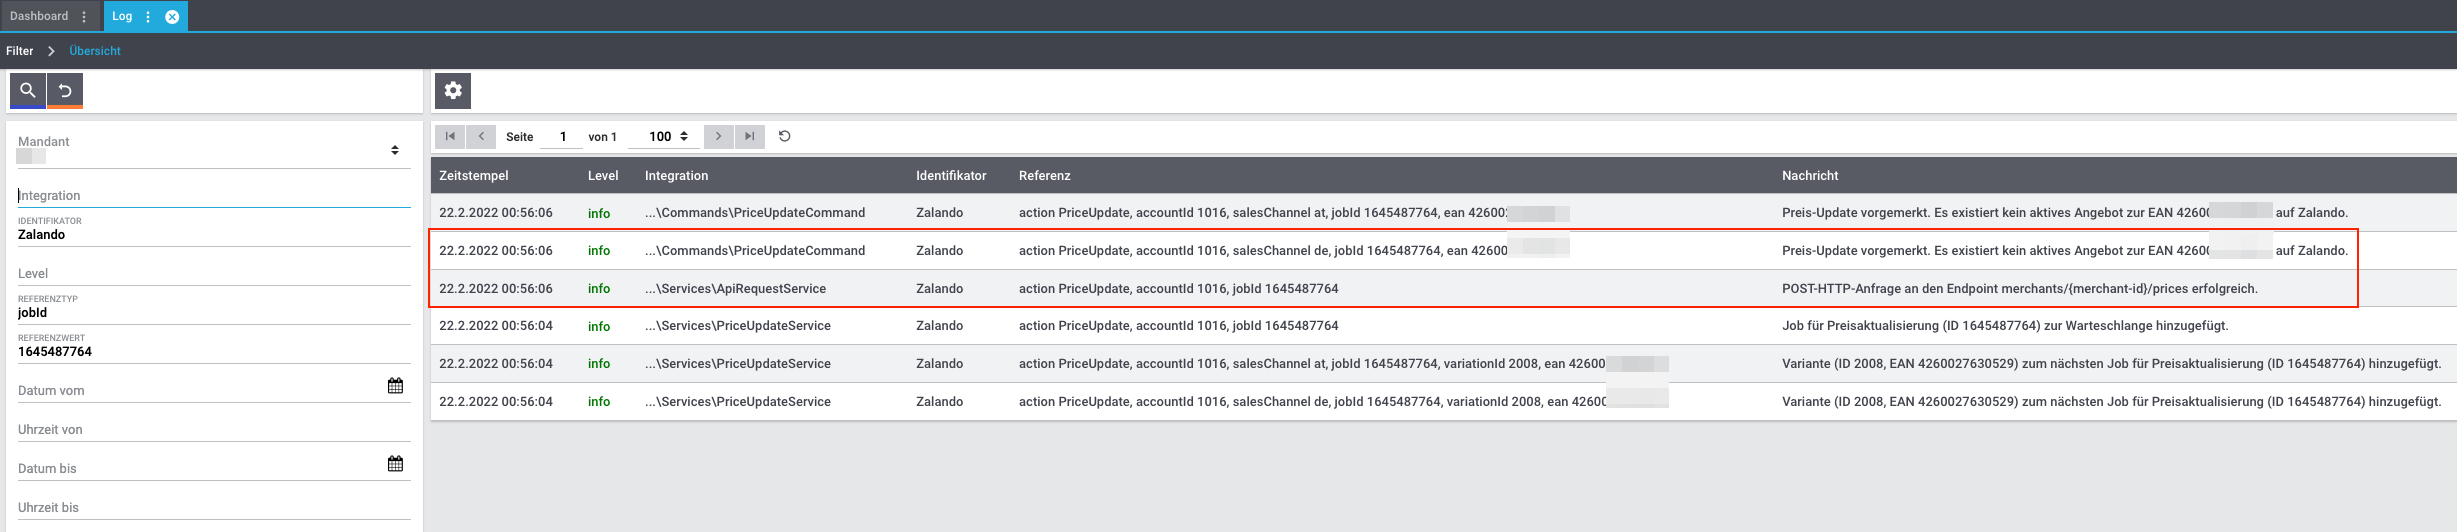
Open the log entry shown in the screenshot above:

The response is contained within the Description.
Adjust the variation’s sales price for Zalando. To do so, slightly change the price, for example change the price by + 0.01 EUR and back (- 0.01 EUR). Afterwards, the price will be exported to Zalando within 15 minutes.
You can check the export of prices in the log.
The sales price which is used as standard sales price for Zalando was defined in the assistant Account settings - Zalando.
To export all prices to Zalando again, the price synchronisation must be triggered. For example, this can be done in the assistant Account settings - Zalando in the Setup » Assistants » Omni-Channel menu. You only have to make a change in the Prices for Germany and/or Prices for Austria section. It does not matter which change you make. You can revert the change afterwards. All prices will be exported to Zalando within 15 minutes afterwards.
You can check the export of prices in the log.
Note that the export may be delayed if you transfer a lot of variations to different sales channels. This is due to the limitation of API calls set by Zalando. It can happen that data is exported in several packages, and therefore the export takes longer. Variations of one and the same item might also be exported in different packages. Each package contains up to 1000 variations, which make up one request. 20 requests can be sent per minute. Different packages can be distinguished by the jobId in the Data » Log menu.
13.5. Stock correction import
Go to Data » Log.
Use the following filters:
-
Integration: Plenty\Modules\Zalando\Stock\Services\StockUpdateService
-
Identifier: Zalando
Enter the variation ID or the EAN as reference type. To do so, enter variationID or ean as reference type and use the corresponding value as reference value.
Afterwards, open the log entry and click on Expand all to look at the request.
The stock which was exported is shown as quantity.
Whether Zalando accepted this message can be checked in the response. The response is contained in a separate log. The following screenshot contains a jobId:

Filter for it in the log again.
Check both the marked info message as well as possible error messages.
Why the stock was not exported to Zalando can be seen in the description.
The error message „Request contains duplicate combinations of stock quantities.“ is usually issued if individual variations were exported twice. To check whether one variation was exported twice, check if one and the same EAN was used multiple times. If this is the case, stock cannot be exported.
To update the stock again, you have to adjust the stock of the desired variation. For example, you can change the stock from - 1 piece to + 1 piece. Afterwards, the stock will be exported to Zalando within 15 minutes.
You can check the export of prices in the log. Also see How can I check stock updates?.
Settings for stock export are carried out when first setting up Zalando with the assistant Account settings - Zalando.
To export stock again to Zalando, the stock synchronisation must be triggered. You can use the assistant Account settings - Zalando to do so. You only have to make a change in the Stock for Germany and/or Stock for Austria section. It does not matter which change you make. You can revert the change afterwards. The stock will be exported to Zalando within 15 minutes afterwards.
You can check the export of prices in the log.
Note that the export may be delayed if you transfer a lot of variations to different sales channels. This is due to the limitation of API calls set by Zalando. It can happen that data is exported in several packages, and therefore the export takes longer. Variations of one and the same item might also be exported in different packages. Each package contains up to 1000 variations, which make up one request. 20 requests can be sent per minute. Different packages can be distinguished by the jobId.
13.6. Order processing
In some cases, errors can occur during order processing. Possible causes and frequent errors are described here.
To check whether an order was processed, you can use the following filters in the Data » Log menu.
-
Identifier: Zalando
-
Reference type: orderId / externalOrderId
-
Reference value: your order ID / your external order ID
If shipping confirmations were not reported to Zalando, open the Data » Log menu.
Use the following filters:
-
Integration: Plenty\Modules\Zalando\Orders\Procedures\OrderShippingProcedure
-
Identifier: Zalando
-
Level: error
You can also additionally use the order ID or the external order ID as filter, if required:
*Reference type*: orderId / externalOrderId
*Reference value*: your order ID / your external order ID
You probably did not create a template for order documents for the country in which the order originated. If you did not create separate order documents for a country, then the order documents are created using the template for the payment method Zalando DE.
Solution:
-
Change the order referrer in the order manually.
-
Create new order documents.
13.6.1. Error messages concerning order processing
There may be different reasons for this:
-
First: The order has a package number but no return tracking number (return label).
Analysis: Go to Orders » Shipping centre to check this. Return labels are shown in the Return labels tab of the order.
Solution: If no label exists, a label must be created and a new shipping confirmation must be sent. -
Second: The order has a return label.
Analysis: Check when the return label was created and when the shipping confirmation was reported to Zalando. If the return label already exists, it may only have been created after the shipping confirmation was reported to Zalando.
Solution: Trigger the shipping confirmation again by starting the event procedure again. Depending on the event in the event procedure, you should take different actions. If it is not possible to trigger the appropriate event, you can also create a new event procedure with another status.
13.7. General questions
Zalando sends (new) silhouettes to the PlentyONE FTP server so that they can be imported into your PlentyONE system. New silhouettes are updated every Wednesday by PlentyONE and can be converted into characteristics afterwards.
To do so, use the Converting silhouettes to characteristics function. If you try to convert silhouettes to characteristics for the first time and the backend looks like this:
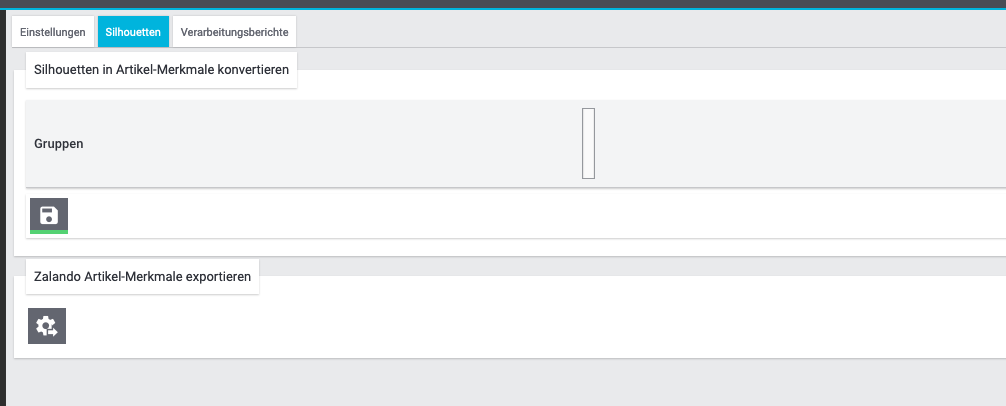
Then the reason might be that
-
Either Zalando has not yet sent any silhouettes for you or
-
PlentyONE has not yet imported your silhouettes.
If you already have silhouettes in your PlentyONE system and you want to convert them into characteristics, the backend looks like this:

Select the desired groups and click on convert to characteristics.
Tip: Only select the groups which you want to sell items in to keep the number of characteristics at a minimum.
Also see Converting silhouettes to characteristics.
Any documents requested by Zalando have to be configured according to Zalando’s requirements. The PDF templates are provided by Zalando.
Note: As Zalando has specific requirements and you can only configure the documents globally, you should create an additional client which you only use for Zalando. This prevents your present settings from being overwritten. You can individually set up the documents afterwards.
You can book an additional client in the START (PlentyONE logo) » My account » Contracts menu.
How to set up you documents is described on the Setting up documents page.
Note: The master data contains your size registers and the silhouettes that you want to use.
As in the case of silhouettes, size registers are imported every Wednesday.