Inventory
Taking stock, or taking inventory, is the process of checking how much stock is in a warehouse at a particular time. Both the target and the actual stock are analysed in the process. This is done with the help of a stock index, which lists the stock of every item.
This page explains how to take stock. Moreover, you will learn how the stocktaking mode works and how to use this mode to completely delete and rebook your entire stock.
|
Stocktaking only with import tool and export format Stocks
Stocktaking can only be performed by using the import tool and the export format Stocks. |
1. Registering stocktaking with the export and import functions
The stocktaking via data exchange requires several steps. First you need to export the current stock quantities from your system. Next you need to edit the stock quantities so that they reflect the actual quantities available in your warehouse and then you need to reimport the corrected data into your system. You can either work in the file that you exported or you can make a copy of that file to edit the actual quantities.
|
Getting to know the data format Stock and testing the data exchange
Pay attention to the notes specified on the Stock data format manual page – especially before you start to overwrite the stock quantities in your system. To test the import use a test file that only contains one variation and overwrite the stock of that variation. This way you can easily check the result and see if it turned out as desired. |
1.1. Exporting stock
In the first step, go to Data » Catalogues and use the export format Stocks to export your current stock.
|
Stock export for one warehouse only
The export format Stocks can only export the stock of one warehouse at a time. Therefore, you need to specify the Warehouse ID. You can select the warehouse in the Filters tab of the catalogue. If you do not select any warehouse, the warehouse with the lowest ID will be selected by default. |
Exporting stocks:
-
Go to Data » Catalogues.
→ The catalogue overview opens. -
Open the catalogue with the export format Stocks from which you want to export data.
-
In case there is no catalogue yet, create a new one.
-
In the catalogue, add the following data fields: Storage location ID, Storage location quantity, Variation ID, Warehouse ID, Batch (optional), BBD (optional) and Purchase price (optional).
-
On the left in the side navigation, click on the Filters (filter_alt) tab.
→ The filter overview opens. -
Select the Warehouse filter from the drop-down list.
-
Afterwards, click on Add filter (add) on the right.
→ The filter is added. -
Select a warehouse from the drop-down list.
-
Save (save) the settings.
-
Click on Download data (file_download) to start the export.
|
Difference between the data field Warehouse ID and the filter Warehouse
The Warehouse filter lets you define from which warehouse the stock will be exported. The Warehouse ID data field just contains the ID of the warehouse. However, the Warehouse ID data field has no influence on the fact, for which warehouse stock is exported. |
You will receive a CSV file which you need to edit for the import.
1.2. Editing stock quantities
You can now edit the file that you just exported. When taking stock you need to count the actual stock in your warehouse and compare it to the quantities saved as physical stock in your system. The quantities displayed in the Storage location quantity column of your Stocks export format is the physical stock which you need to edit.
Adjusting the stock file:
-
Open the exported file.
-
Enter the current physical stock into the Storage location quantity column.
-
Save the changes.
-
Import the file.
1.3. Importing stocks
The file now contains the corrected stock values and needs to be imported into your system. A CSV file or text file is used for the import.
|
The physical stock will be overwritten!
The import will overwrite the current physical stock which means that the previous stock cannot be restored. Reserved stock quantities remain untouched and will not be imported. If you do not want to import your entire stock, because you only need to add incoming stock to correct your stock quantities, you can also add incoming stock via data import. Use the special format Incoming items to add incoming stock. |
1.3.1. Importing data via the import tool
To import data via the import tool, first create an import, then determine the matching for the data and afterwards create a mapping where you map your data to the PlentyONE data fields.
Importing data via the import tool:
-
Go to Data » Import.
→ The import overview opens. -
Click on Add import ().
-
For the type, either select item or stock.
-
Carry out the additional settings. Pay attention to the explanations given in table 2.
-
Save () the settings.
→ The import is created.
→ The import settings open. -
Switch to the Matching tab.
-
Determine a matching as well as the import options.
-
Save () the settings.
-
Switch to the Mapping tab.
-
Click on Add mapping () in order to create a mapping.
→ A new window opens. -
Enter a name for the mapping.
-
Save () the settings.
→ The mapping opens. The available mapping fields differ according to the import type. -
Select a column from your file for each data field or select the option Own value.
-
On the right, select the data fields for the mapping by placing a check mark for the fields. Warehouse, storage location and quantity are mandatory fields.
→ The selected data fields are added to the mapping. -
Save () the settings.
-
On the left, activate the lines that you want to import.
-
Click on Run import ().
→ The import is processed and the data is imported.
In the Data » Status menu, you will get further information on the data import.
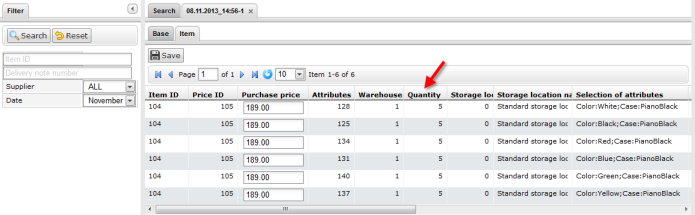
You can see the corrections that you made during the stocktaking process by opening the item and clicking on Tab: Stock » Tab: Correction. In addition, the import will be listed as an entry in the Stock » Incoming items menu. You can open the entry to see a list of the items that were changed (image 1).
2. Taking stock while stocktaking mode is active
There is an option in the warehouse settings called Stocktaking mode active. You can use it to freeze the stock of a warehouse while you are busy taking stock. While the stocktaking mode is active, the physical stock remains the same and no stock movements will be registered nor will stock be newly calculated.
Taking stock while the stocktaking mode is active can be carried out in 4 steps. First you need to activate the stocktaking mode. Next you need to export the current stock. Then you need to clear all stock and book the new stock quantities in. While the stocktaking mode is active your system will not change the stock quantities saved in a variation’s data record. Once you have booked in the new stock quantities and you deactivate the stocktaking mode, your new stock will be transferred to the variations. Thus, the previously frozen stock will be overwritten. While stocktaking mode is active your reserved stock will still be calculated correctly. This means that stock will be reserved whenever you receive a new order. When you use the stocktaking mode, you need to know the following:
-
While the stocktaking mode is active, the physical stock remains frozen and this may lead to overselling.
-
Nonetheless, you should not book out stock if the stocktaking mode is active, because the stock will not be calculated.
|
Only deactivate the stocktaking mode if you have already booked in the new stock quantities
If you deactivate the stocktaking mode while your stock is cleared, listings and offers on markets may be deactivated. Thus, you should only deactivate the stocktaking mode once the new stock has been booked in. |
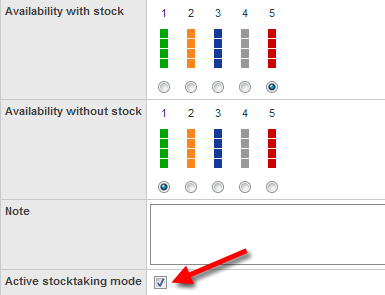
2.1. Activating the stocktaking mode
Activate the stocktaking mode for the warehouses that you want to carry out the stocktaking for. The stocktaking mode will freeze the physical stock.
Activating the stocktaking mode:
-
Go to Setup » Stock » Warehouse » Select a warehouse » Submenu: Settings.
-
Place a check mark next to the option Stocktaking mode active.
-
Save () the setting.
|
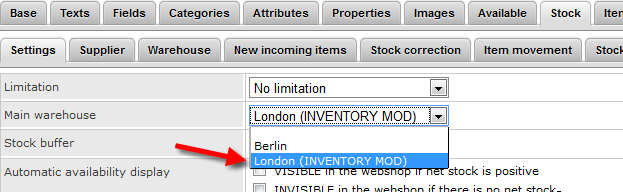
A warehouse that is in stocktaking mode will be labelled
Additional information is added to the name of your warehouse. Depending on how long the warehouse’s name is, either (INVENTORY MOD), (INVENTORY) or (I) is added to the end of the name. This way, you can tell that the warehouse is currently in stocktaking mode. |
2.2. Exporting stock
Export the stock of the warehouses for which you want to carry out stocktaking. To do so, proceed as described in the chapter Exporting stock. You need to carry out a separate export for each warehouse.
For further information on the export format Stocks, see the manual page Exporting stocks.
2.3. Clearing stock while stocktaking mode is active
As a first step, clear all your stocks and stock movements. The reserved stock is preserved. Make a copy of the file that you just exported.
|
Exporting stocks as backup before deleting them
This process deletes the entire stock! This means that the warehouse will be completely cleared of any digital stock. Therefore, be sure to copy your stock export and to leave the original without any changes until you have successfully completed the process (see chapter 2.1). This file can help you to restore your stock if an error occurs. |
In order to delete the stock, set the stock to zero and then import the actual stock.
Clearing stock with the import tool:
-
Go to Data » Import.
→ The import overview opens. -
Click on Add import ().
-
For the type, either select item or stock.
-
Carry out the additional settings. Pay attention to the explanations given in table 2.
-
Save () the settings.
→ The import is created.
→ The import settings open. -
Switch to the Matching tab.
-
Determine a matching as well as the import options.
-
Save () the settings.
-
Switch to the Mapping tab.
-
Click on Add mapping () in order to create a mapping.
→ A new window opens. -
Enter a name for the mapping.
-
Save () the settings.
→ The mapping opens. The available mapping fields differ according to the import type. -
Select a column from your file for each data field or select the option Own value.
-
On the right, select the data fields for the mapping by placing a check mark for the fields. Warehouse, storage location and quantity are mandatory fields.
→ The selected data fields are added to the mapping. -
For the Stock / Quantity field, use the Own value and enter the value 0. Thus, the stock is set to zero.
-
Tip: In case you do not use any storage locations, import the storage location ID 0.
-
Save () the settings.
-
On the left, activate the lines that you want to import.
-
Click on Run import ().
→ The import is processed and the stock is cleared.
2.4. Booking stock
Import the current stocks that you recorded during the stocktaking into your system. To do so, use the data format Stock. Enter the current physical stock of each variation into the cleared copy of your stock export and save the file with the current stocks. The physical stock has to be entered into the Stock column.
Booking stock with the import tool:
-
Open the import that you just used to clear the stock.
-
Change the Own value in the column that contains the stock.
-
For the source, select the column of the CSV file that contains the quantity.
→ The value is entered automatically. -
Save () the settings.
-
Click on Run import ().
→ The import is processed and the stock is booked.
2.5. Deactivating the stocktaking mode
In a last step, you deactivate the stocktaking mode and by doing so, the stock that you just imported will be saved for each variation.
Deactivating the stocktaking mode:
-
Go to Setup » Stock » Warehouse » Select a warehouse » Submenu: Settings.
-
Remove the check mark next to the option Stocktaking mode active.
-
Save () the setting.
→ Your physical stock will be recalculated.
Only deactivate the stocktaking mode once you have completed all steps of the stocktaking process. If you deactivate the stocktaking mode too early, errors in the stock calculation may occur and offers on marketplaces or in the online store may be ended without the intention to do so.
3. Taking stock with PlentyONE POS
You can also take stock using PlentyONE POS. Refer to the Stocktaking manual page to learn how it’s done and which settings you’ll need to configure in advance.