Creating a new template
This manual page explains how to create new template from scratch in the Setup » Documents » DocumentBuilder menu, and how to create a copy of an existing template, which you can then adjust to suit your needs. It also explains the various settings that you need to adjust when you create a template.
|
Number of user-defined templates
The number of user-defined templates you can use depends on your contract type:
|
Click on Template usage in the document template overview to see how many templates are already in use.
1. Creating a new template from scratch
If you create a new template from scratch in DocumentBuilder, the new template will be empty of content. You will therefore need to structure it, fill it with content and configure it.
Creating a new template from scratch:
-
Open the Setup » Documents » DocumentBuilder menu.
-
Click on Search (search) to list the existing templates.
-
Click at the top on New template (add).
Or: In the side navigation on the left, click onadd New template.
→ The template settings open. -
Carry out the settings. Refer to the explanations on template settings in the table Template settings.
-
Save (save) the settings.
→ The template is created and added to the overview.
→ The template view appears. -
Adjust the relevant settings in the template view. Refer to the explanations in the sub-chapter Adjusting the settings for a template.
-
Create the structure and content for the template. Refer to the explanations on manual page Designing the template using the Editor.
2. Copying a template
All templates in DocumentBuilder can be copied. If you copy a template, the copy will have the same content and settings as the original. You can then adapt these as needed.
Copying a template:
-
Open the Setup » Documents » DocumentBuilder menu.
→ The DocumentBuilder overview opens. -
Click on Search (search) to list the existing templates.
-
Find the template you want to copy and click on its context menu (more_vert), which is located on the far right of the template row.
-
Click on Copy template (file_copy).
→ The template is copied and directly opened.
Note: The new template will have the same name as the copied template, with the addition of "Copy". Copies are disabled by default. -
Adjust the settings for the template. Note the explanations in subchapter Adjusting the settings for a template.
-
Create the structure and content for the template. Refer to the explanations on manual page Designing the template using the Editor.
3. Adjusting the settings for a template
You adjust the settings for a DocumentBuilder template in the following three areas:
-
The template settings, where you specify the document type and the names for the template.
-
The order settings, where you specify the types of order that the template will be used for.
-
The output settings, where you set the format specifications for a template.
You adjust the settings in the template view. When you create a template or open an existing template in the Setup » Documents » DocumentBuilder menu, you switch to the template view, which looks like this:
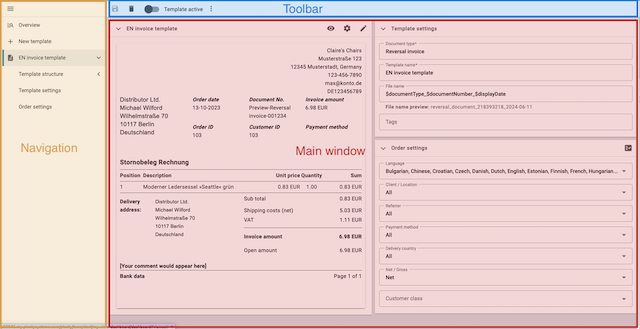
-
Navigation: Opened templates appear here for selection (description). The template currently selected for editing (highlighted in grey) is displayed in the main window on the right. Click on add New template in the navigation to create a new template. Click on menu to expand or collapse the navigation bar.
-
Toolbar: Click onsave to save changes, on delete, delete the selected template (settings), onmore_vert, to copy or export a template, and ontoggle_off, to activate or deactivate a template.
-
Main window: In the left-hand section of the main window, you see the template structure of the template currently selected. At the top of the template structure, you see three icons. Click onvisibility for a template preview and on edit, to open the Editor.
Click on settings to open and adjust the output settings.
The top right section of the main window is where you adjust the template settings.
The bottom right section of the main window is where you adjust the order settings.
|
You can only edit templates if they are in a deactivated state
Once a template has been activated, it is available for orders and cannot be edited. |
3.1. Adjusting the template settings
Use the template settings in DocumentBuilder to specify the document type, the template name and the file name format for documents generated using the template. You can also use the template settings to set tags if required.
Note: On creating a new template, you will automatically be prompted to adjust the template settings.
Adjusting the template settings:
-
Open the Setup » Documents » DocumentBuilder menu.
-
Click on Search (search) to list the existing templates.
-
Open the template that you want to adjust.
→ The template view appears. -
The template settings are in the top right section of the main window.
-
Carry out the settings. Refer to the explanations in [table-template-settings].
-
Save (save) the settings.
| Setting | Explanation | |||||||||||||||||||||||||||||||||||||||||||||||||||
|---|---|---|---|---|---|---|---|---|---|---|---|---|---|---|---|---|---|---|---|---|---|---|---|---|---|---|---|---|---|---|---|---|---|---|---|---|---|---|---|---|---|---|---|---|---|---|---|---|---|---|---|---|
Document type |
Select a document type from the drop-down list. This assigns the template to the order types and and to the number range associated with that document type. The options for the setting Document type, are divided into the following four categories:
Document types in the Order category
Note: You can find detailed information on the document types in the Order category on the manual page Order documents.
Note: For further information, refer to the Stock management page of the manual.
Note: For additional information, refer to the Booking incoming items page of the manual. |
|||||||||||||||||||||||||||||||||||||||||||||||||||
Template name |
Enter a name for the template. (this name is only
internally visible). |
|||||||||||||||||||||||||||||||||||||||||||||||||||
File name |
Define the format for the dynamic file name that each document generated via the template is automatically assigned. This name is also visible to recipients of the documents.
You can use your own information as well as variables from the drop-down list to define the name format. The variable $documentNumber is the only mandatory component for the file name. Note: You can only use alphanumeric characters and special characters such as - _ ( ) for the file name. |
|||||||||||||||||||||||||||||||||||||||||||||||||||
Tags |
If required, assign tags to the template. Tags are keywords that, for example, make it easier to identify a template in the overview. To assign a tag to a template, you must select the availability type Document template when creating the tag. To assign a tag to a document, you must select the availability type Document when creating the tag. To transfer a tag from the template to a newly generated document, you must select the availability types Document template AND Document when creating the tag. |
3.2. Adjusting the order settings
Use the drop-down lists in the order settings to specify the types of order that the template will be used for. Once the template is active, the system will only use it for orders whose parameters match the order settings defined for the template.
Adjusting the order settings:
-
Open the Setup » Documents » DocumentBuilder menu.
-
Open the template that you want to adjust.
-
The order settings are in the top right section of the main window.
-
Adjust the settings. Refer to the explanations on order settings in Table 2.
-
Save (save) the settings.
| Setting | Explanation |
|---|---|
Default setting |
|
Language |
Select the order languages for which the template is to be used. |
Client / Location |
Select the clients / locations for which the template is to be used. |
Referrer |
Select the referrers for which the template is to be used. |
Payment method |
Select the payment methods for which the template is to be used. |
Delivery country |
Select the countries of delivery for which the template is to be used. |
Net/Gross |
Select whether the template is used for net or gross orders. |
Customer class |
Select the customer classes for which the template is to be used. |
Additional order settings for the document type Custom order document |
|
Contact/Supplier |
Select the contacts/suppliers for which the template is to be used. |
Warehouse |
Select the warehouse for which the template is to be used. |
Receiving warehouse |
Select the inbound warehouse for which the template is to be used. |
Sending warehouse |
Select the outbound warehouse for which the template is to be used. |
3.3. Adjusting the output settings
You use the output settings to set the format specifications for a template.
Adjusting the output settings:
-
Open the Setup » Documents » DocumentBuilder menu.
-
Open the template that you want to adjust.
-
Click on Output settings (settings) at the top of the template structure.
→ The window containing the output settings opens. -
Adjust the settings. See the explanations in Table 3.
-
Save (save) the settings.
Note: The available output settings may differ depending on the document type. For example, the setting Integrate the invoices for the orders only appears for the document type Multi-invoice.
| Setting | Explanation | ||
|---|---|---|---|
Format |
Select the format for the template. The following formats are available: US Letter, US Legal, US Tabloid, A0, A1, A2, A3, A4, A5, A6, Custom. |
||
Orientation |
Select Portrait or Landscape orientation. |
||
Width (mm) |
Enter the width of the template in mm. |
||
Height (mm) |
Enter the height of the template in mm. |
||
Margin top (mm) |
Enter the top margin of the template in mm. |
||
Margin bottom (mm) |
Enter the bottom margin of the template in mm. |
||
Margin left (mm) |
Enter the left margin of the template in mm. |
||
Margin right (mm) |
Enter the right margin of the template in mm. |
||
Font family |
From the drop-down list, select the default font family for the template. Choose between the fonts Arial, Times New Roman, Helvetica and Courier. The font family you select here will be used automatically for all text in the template. To use a different font family only for certain sections of text, change the format settings in the corresponding text widget or address widget. |
||
Font size |
Select a font size from the drop-down list. |
||
Amount format |
Select the format in which the amount is to be displayed. The following options are available:
|
||
Date format |
Select in which format the date is to be displayed. The following options are available.
|
||
Format of currencies |
Select which currency format to use. The following options are available:
|
||
Units |
Select which unit format to use for units of measurement. The following options are available:
|
||
File format / XML format |
Select the format in which the documents are to be generated. PDF is selected as File format by default. This setting causes the documents to be generated as PDF files only. The following options are available for creating templates that generate invoices in an electronic format:
Notes:
|
||
Integrate the invoices for the orders / Integrate the credit notes for the orders |
Check the box if the individual invoices or individual credit notes should be added to the multi-invoice/multi-credit note as attachments. Note: The respective setting only appears for documents of the type multi-invoice / multi-credit note. |
||
Upload PDF background |
Use the dropdown list to select how the PDF background is to be used. The options are as follows: Repeat first page
Use continuously
Repeat last page
Use once
|
||
Upload PDF background |
Select a file (more_horiz) that you want to use as the PDF background of the template and upload it. The selected background is then displayed in the PDF preview. If necessary, you can also delete the selected background (delete). |
||
Display header |
Activate the toggle button (toggle_on) to display the header. |
||
Display footer |
Activate the toggle button (toggle_on) to display the footer. |
||
Use header/footer from existing template |
Use these drop-down lists to link the current template with the header and/or footer of another template. From the corresponding drop-down list, select the template to serve as the source for the header or footer. Detailed instructions on setting up a global header/footer
First, set up the header/footer. To do so, proceed as follows.
Then link another template to the configured header/footer. To do so, proceed as follows.
Notes:
|
|
Unsaved changes
Unsaved changes in the template settings or order settings are indicated by an asterisk next to the respective word in the side navigation. |