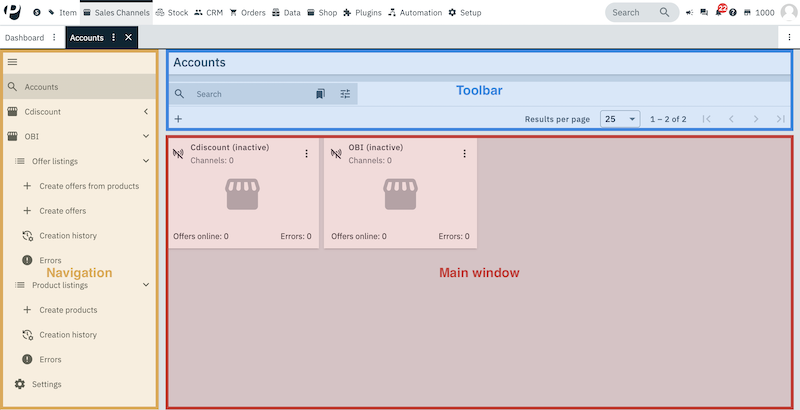
Sales Channels menu
This chapter explains the Sales Channels » Accounts menu. With the integration of new sales channels via the channel layer PlentyONE provides you with a new menu for setting up and managing your sales channels. The Sales Channels » Accounts menu allows you to manage all sales channels integrated via the channel layer in one spot and create listings for your sales channels.
|
Different kinds of listings
The marketplaces listed under the eBay / Hood / Ricardo Listings separator are not part of the sales channels integrated via the channel layer. The menu items under eBay / Hood / Ricardo Listings (e.g. Edit listings) only apply to listings for eBay, Hood and Ricardo. These listings are not identical to listings created via the Sales Channels » Accounts » [Create account] menu in order to manage and transmit products and offers via the Channel Layer. These are two different types of listings that are managed entirely separately. |
1. Getting to know the Sales Channels UI
The Sales Channels » Accounts menu is structured as follows:

-
Navigation: You can use the navigation bar on the left to navigate between the account overview and the individual accounts for the respective sales channels. The currently selected section is displayed in the main window on the right. If you have opened multiple accounts, they will be displayed sequentially in the navigation bar.
When you open the Sales Channels » Accounts menu for the first time only the Tab search Accounts will be visible in the navigation bar. Upon clicking on an account tile the name of the account will be added as a tab in the navigation bar. The tabs list Offer listings, list Product listings and settings Settings will be displayed beneath the account. This is where you can create offer and product listings and change the settings for the account.
Click search Accounts in order to navigate to an overview of all of your different accounts.
Click menu to expand or collapse the navigation bar.
Whenever any entries are moved, removed or added, the side navigation is automatically adjusted. -
Toolbar:
-
Main window: Here you can see whichever section is currently open.
-
Accounts tab: When you start a search, you’ll see the results in an overview. The overview provides all information related to the accounts found in your search at a glance.
-
2. Getting to know the account overview
The Sales Channels » Accounts menu offers you an overview of your accounts and allows you to create and manage accounts. Every account is displayed as an individual tile. You can see for each of your accounts how many listings are listed on the respective sales channel and how many of those listings produced errors.
Click on an account tile in order to open that account.
Table 1 contains an overview of the accounts in the Sales Channels » Accounts menu.
| Setting | Explanation | ||||||||||
|---|---|---|---|---|---|---|---|---|---|---|---|
bigtop_updates Connection |
Connection status of the account.
|
||||||||||
Name |
Account name. |
||||||||||
more_vert More |
Click here to display more actions.
|
||||||||||
Listings online |
Hover over Listings online to see the number of product listings and offer listings that are listed on sales channels for this account. |
||||||||||
Errors |
Hover over Errors to see the number of errors that occurred for product listings and offer listings. |
3. Creating an account
If you want to offer your items on a sales channel that is integrated via the Channel Layer you will need to create an account for this sales channel in the Sales Channels » Accounts menu. You can create product and offer listings for the sales channel via this account.
Creating an account:
-
Open the Sales Channels » Accounts menu.
-
Click Create account (add).
→ The window Create account opens. -
Select the desired platform from the Platform drop-down list.
-
Select the Client (Shop) in the drop-down list.
-
Enter a name for the account.
-
Click add CREATE.
→ The account for the selected sales channel will be created.
4. Searching for accounts
Use one of the following options to search for accounts.
Searching for accounts:
-
Open the Sales Channels » Accounts menu.
-
Option 1: Click Search () to see a list of all accounts.
-
Option 2: Enter the name part of the name of the account into the search field and click Search ().
-
Option 3: Click Filters (tune) to narrow down the search results with filters.
-
5. Filtering accounts
If you only want to take a look at certain accounts, then you can apply filters and narrow down the accounts which are displayed. To do so, click Filters (tune) at the top of the menu. Table 2 contains an overview of all available filters.
Applying filters:
-
Open the Sales Channels » Accounts menu.
-
Click Filters (tune) at the top of the menu.
-
Select one or multiple filters. All available filters are listed in Table 2.
-
Click Search (search).
→ The selected filters are applied and the appropriate accounts are displayed.
→ The filters that were applied are displayed at the top of the menu.
Tip: You can also reset (refresh) the selected filters. Then all accounts will be displayed again.
| Filter | Explanation |
|---|---|
Account name |
Enter the name of a specific account in order to search for it. |
Active |
Select Yes or No. Only active or inactive accounts will be displayed. |
Connected |
Select Connected or Disconnected. Only accounts with the matching channel status will be displayed. |