User rights and roles
In PlentyONE you assign rights by assigning roles. The roles include menu and plugin rights as well as REST-API permissions. Thus, a user has always the rights of the roles that were assigned to them. Only exception being administrators that have every right, independent of roles.
In the Set » Account management » Roles menu you can create new roles or edit existing ones. When creating or editing a role you can assign resources that should be visible for the user under access rights. Roles can be created by user that are Administrator or from user that have the necessary rights to do so.
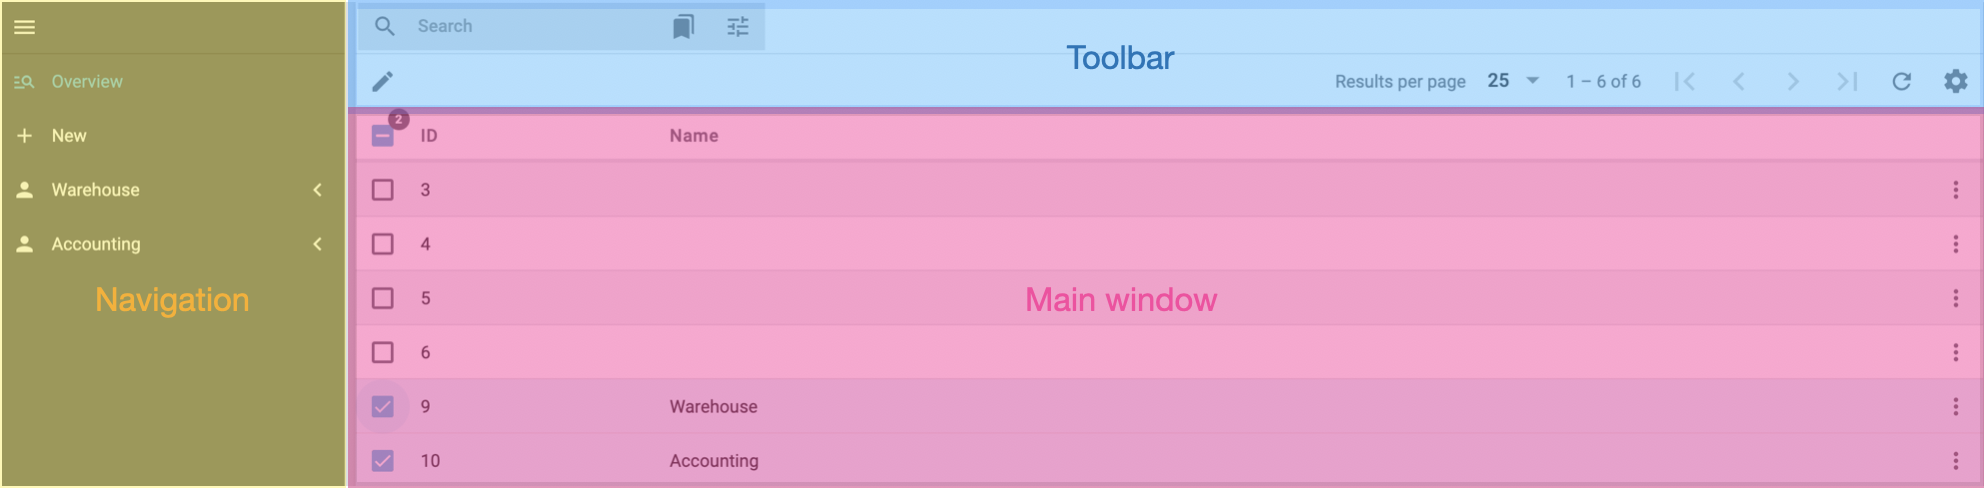
The Setup » Account management » Roles menu is structured as follows:
-
Navigation: Here you can create new roles and open roles selected in the main window. Click menu to hide or show the navigation.
-
Toolbar: Here you can search roles and apply specific filters, configure the columns of the main window and the results per page.
-
Main window: Here are all roles displayed. Via More (more_vert) in the main window you can duplicate or delete roles.
Assign every user account only those rights required for their field of work. This way, security is increased and errors can be prevented in your system.
1. Creating roles
Roles are used for grouping user accounts and assigning the same rights to multiple user accounts without making changes to every single user account.
The table of the user rights is divided in four columns. In these columns you can assign rights when checking the boxes in the*See*, Edit, Create or Delete option. Two of these four options change there name in the advanced mode: See changes to Read and*Edit* to Update.
When creating or editing a role there are two modes: the simple and the advanced mode. Which mode is relevant for which role depends on the rights you want to assign. The simple mode and advanced mode are connected. If you assign menu rights in the simple mode the corresponding rights in the advanced mode are checked. This doesnt apply to the advanced mode, if you assign rights in the advanced mode none are assigned in simple mode.+
You only have to switch to the advanced mode if you have a role that addresses the PlentyONE API by an app of your own. When you only use PlentyONE POS, you should use the simple mode.
Simple mode = In the simple mode you can assign rights for menus, plugins and PlentyONE POS. The table of the simple mode is structured the same as the navigation and also displays individual plugins.
Advanced mode = In the advanced mode you assign REST-API rights that are necessary for loading and writing data.
Creating a new role:
-
Open the menu Setup » Account management » Roles.
-
Click New (add).
→ The New Role window opens. -
Enter a Name for the role.
-
Save (save) the settings.
→ The role opens in a new tab and can be edited.
A role has to be edited in order to define rights that are assigned to user accounts with this role. Therefore, edit the role after creating it.
2. Global roles templates
When creating new roles you can use global templates.
These global role templates are provided by PlentyONE.
You choose templates from the Global Roles Templates drop down menu on the right side.
Every template has preset permissions.
You can change these permissions in your role but you cannot change the global role templates themselves.
You can choose from the following global roles templates:
-
POS Cashier
-
Warehouse Manager
-
Stock Taking Helper
-
Warehouse Worker
-
Sales & Support
-
Product Information Manager
When you select a global role template, the permissions are assigned accordingly. Whenever you create a new role, check if the selected permissions fit your needs.
3. Editing roles
After creating a role, it will open in a new tab for editing. The role is also added to the role overview so that you can open and edit it easier. Roles are listed by ID in the overview. Every role is divided into four areas. Under Settings you can change the name of the role. Under Rights you assign menu and plugin rights in the simple view and REST-API permissions in the advanced view. Under Role-defined views you can assign the available view sets. The standard view set is selected by default. Under Access rights you can assign resources the role should have access to. For further information about rights, refer to the roles and user rights page.
Editing roles
-
Open the menu Setup » Account management » Roles.
-
Open the role you want to edit.
→ The rights overview of the role opens in simple mode. -
Change the role in the different areas by checking or unchecking the boxes.
-
Save (save) the settings.
Proceed as follows to link roles to a user account:
-
Open the Setup » Account management » Accounts menu.
-
Open a user account.
-
Click the drop-down list Assigned roles.
-
Select one, several or all of the listed roles.
-
Save (save) the settings.
3.1. Activating owners
If the user account should be an owner, is determined by activating Edit and/or Create in the rights of the simple mode role view For example: if a role needs to be an owner for orders, you need to assign Edit or Create in Order.
|
Edit and Create are not available
There are rights were you can only activate See. In this case the role will be active as owner when See is activated. |
Proceed as follows to set a user as owner:
-
Open the menu Setup » Account management » Roles.
-
Open the role.
→ The rights overview of the role opens in simple mode. -
Activate Edit or Create in the column which the role should be available as an owner.
-
Save (save) the settings.
3.2. Assigning rights for role-defined views
In the detail view of the role, you can assign view sets users with this role can see and use in the area Role-defined views. The default view is always preselected. Once another view set exists, it is possible to deactivate the default view set and to assign the rights for another view set instead. Note that at least one view set needs to be assigned.
Assigning rights for role-defined view sets:
-
Open the menu Setup » Account management » Roles.
→ The overview opens. -
Click Search (search) to search for a role.
→ All existing roles are displayed. -
Select a role.
→ The detail view opens. -
Click Role-defined views.
→ All role-defined view sets are displayed. -
Assign the rights for view sets by ticking the check boxes.
-
Save (save) the settings.
→ The rights for the selected view sets are assigned to the role.
3.3. Assigning access rights
Under Setup » Account management » Roles » [Select role] you decide, which areas and settings a user can see when they a open a menu. For example: if the role does not have any rights assigned for specific warehouse or order status, no warehouse or order status is visible to them.
| Setting | Explanation |
|---|---|
Sales warehouse; |
Grant rights for warehouses to the user. Only previously created warehouse types are available. |
Visible order statuses |
Select which order statuses should be visible to the user. The user with this role only see orders that have this status. |
Selectable order statuses |
Assign order status that user with this role should see. |
Clients |
Select one, several or all clients visible to the user with this role assigned. Users with this role will only be able to see those areas. If no client is selected, then specific rights such as the right to access certain menus will not go into effect. This is because the user will not have access to any of the clients. |
Ticket status |
Select ticket status. Users with this role will be able to view and edit tickets that are in these status. |
3.4. Managing menu and REST API rights
In the advanced mode you specify which permissions for the REST API are granted to a user account with a role. User accounts of the Administrator access have all permissions.
Proceed as follows to manage menu and REST API rights:
-
Open the menu Setup » Account management » Roles.
-
Open the role.
→ Or create a new role. -
Switch to Advanced (toggle_on).
→ The table of the advanced mode is displayed. -
Assign the permissions for the respective area by ticking the check boxes. Activate entire areas or expand areas to activate individual rights that the user account should have access to.
-
Save (save) the settings.
3.5. Activating app rights
Under plentymarkets App/ PlentyONE POS in the simple view of the roles you can determine which areas and key figures should be visible for a role in PlentyONE POS.
Activating rights for mobile access:
-
Open the menu Setup » Account management » Roles.
-
Open the role.
-
Open plentymarkets App / PlentyONE POS in the simple mode.
-
Activate the functions and key figures that the role should have access to in the app.
-
Save (save) the settings.
4. Copying roles
If you need an additional role which slightly differs from an existing role, copy the existing role and make changes in respective areas of the copy.
Copying a role:
-
Open the menu Setup » Account management » Roles.
-
Select a role.
-
In the line of the role, click More (more_vert).
→ An option window appears. -
Choose Duplicate role.
→ The role will be created and named Copy of [Name of the copied role].
5. Linking roles and processes
You can also use roles for processes.
Proceed as follows to link roles and processes:
-
Go to Setup » Processes » Per Role.
-
Click the arrow in the line of a particular role. Then click New process (image 1).
-
Enter a Name for the role.
-
Select the setting Role from the Visibility drop-down list.
→ The option Role is displayed. -
Select a Role from the drop-down list.
-
Select whether you want users of this role to be able to change the settings.
-
Select the warehouse for the process and a colour.
-
Save (save) the settings.
The processes are displayed for the selected role. Due to the visibility setting, the process will be available to user accounts with the corresponding role only.
6. Assigning administrator rights
Administrator have all rights and no restrictions. When using multiple administrator accounts, these accounts all have equal rights.
Proceed as follows to assign administrator rights:
-
Go to Setup » Account Management » Accounts.
→ The account overview opens. -
Open the user account you want to assign administrator to. → The account detail view opens.
-
Click on the toggle Administrator (material:toggle_one).
-
Save (material:save) the settings.