Categories
Categories help you group your products. How do you want to structure your items in the plentyShop? Which merchandise groups match your product catalogue?
Procedure
The configuration is divided into four steps:
Step 1 |
|
Step 2 |
|
Step 3 |
|
Step 4 |
1. Defining the structure
Spend some time thinking about which categories and sub-categories match your product line. How will your customers find their way around the plentyShop? You might find it helpful to draw a category tree and visualise your product groups.
The following table shows two simplified examples of category structures.
| Example structure 1 | Example structure 2 |
|---|---|
|
|
|
Decide on a category depth
How many categories can be on the first level without overwhelming your customers? At what depth are your categories no longer visited? While setting up your plentyShop, you’ll decide how many category levels should be displayed in the header. |
2. Creating and editing categories
Have you already thought up a meaningful category structure? Then you’re ready to create the main categories and sub-categories that will group your products.
Manually creating a category:
-
Go to Item » Category.
-
Click on New category in the bottom left corner.
→ The Create new category window opens. -
Enter a name for the category.
-
If you want to create a sub-category, then click on Subcategory and select the category under which you want your new category to appear.
Tip: Click on the category’s folder icon () on the far left. This displays the subcategories within. -
Click on Create.
→ The category is created and opened for editing.
|
Other methods of creation
|
2.1. Toolbar

| Icon | Explanation |
|---|---|
Path |
At the very top of the screen, you’ll see the path of the currently open category. Click on one of the parent categories to open it too. |
Saves your changes to the category.
The symbol is greyed out if you haven’t made any changes to the category yet. |
|
ID |
The category ID is automatically assigned and cannot be changed. It uniquely identifies your categories. Do you manage the same category in several different languages or in several plentyShops? All of the client and language-versions of the category share the same ID. |
Shows you what the category looks like in your plentyShop. |
|
Simultaneously shows you what the category looks like in your plentyShop and allows you to edit the category further. |
|
|
This function is out-dated. It only applied to the old "Callisto" shop. |
Opens the category in two different languages. Which two languages do you want to see? Select them from the drop-down list at the top of the screen. You can also choose a language that doesn’t have any content yet. You do not necessarily have to open the default language. |
|
Do you manage the same category in several different languages or in several plentyShops? This symbol transfers the category’s settings to a different client or language version.
|
|
Template function |
This function is out-dated. It only applied to the old "Callisto" shop. |
Timestamp |
Displays the time when changes were last made and the person who made these changes. |
Deletes the category. You will be asked if you want to delete the entire category or only the selected combination of language and client. |
2.2. Tab: Settings
First, save some basic information about your category, e.g.:
-
what do you want to use the category for?
-
what should the URL be?
-
does the category have any meta data that is relevant for SEO?
-
should people only be able to see the category if they’ve logged in?
|
Why don’t I see some of the settings?
The settings will differ slightly depending on what you want to use the category for. Most of the settings apply to all of the category types. However, some settings are irrelevant to specific types of categories. Irrelevant settings are not displayed. |
| Setting | Explanation |
|---|---|
Type |
What do you want to use the category for? In PlentyONE, categories can be used to group products together or to create content pages for your store.
|
Name |
Enter a name for the category. Note: You can re-use category names as long as they are used in different categories or on different levels. Within one category, however, the names may only be used once per level. SEO tip: Enter different meta titles and meta descriptions for categories of the same name. |
Tags |
Select tags to assign topics to the category. |
URL name |
When you create a new category, the URL name will initially be the same as the category name. If necessary, change the name to be used for the URL. This name is used to form the category URL. Note: You can re-use URL names as long as they are used in different categories or on different levels. Within one category, however, the URL names may only be used once per level. SEO tip: Because no client (store) is selected when the category is created, the automatically created URL is not indexed by search engines. However, in terms of SEO it is best not to change the URL name after the category has been activated for a client. Important:
|
URL |
The URL of the category. The URL is generated automatically based on the complete path of the category, i.e. domain plus category levels plus URL name. |
Canonical |
If necessary, enter the URL of a category with the same content to prevent duplicate content. |
Short description |
Enter a short description of the category. Template variables are used to insert the short description into the plentyShop’s design. |
Position |
Enter a number to specify which category is displayed first, second, third, etc on this level. Tip: Enter position numbers in increments of ten. This will allow you to add new categories in between later without having to re-do all of the position numbers. |
Client (store) |
Which plentyShops should the category be visible in? Choose one, several or all of the clients in the list (). Are there sub-categories underneath this category? Then the following also applies:
|
Meta title |
Enter a meta title. The meta title is displayed in the tab title of the browser and in search engine results. If you leave this field blank, the category name is used as the title. SEO tip: Pay attention to the length of the title. Longer titles are cut off in the tabs. Currently recommended: max. 50 characters |
Meta description |
Enter a meta description (max. 350 characters). The meta description is analysed by search engines. As such, it is especially important for the homepage. The meta description should contain the most important content in one sentence. |
Meta keywords |
Enter keywords that potential customers are likely to enter into search engines and that relate to the content of the category. |
Sitemap |
Should the category be included in the sitemap?
|
Robots |
These values tell search engine crawlers how to deal with the page and any links on the page.
|
Template page |
This function is out-dated. It only applied to the old "Callisto" shop. |
Template list |
This function is out-dated. It only applied to the old "Callisto" shop. |
Template product |
This function is out-dated. It only applied to the old "Callisto" shop. |
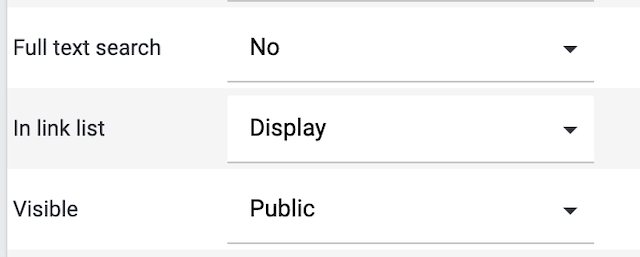
Full text search |
This function is out-dated. It only applied to the old "Callisto" shop. |
In link list |
Should the category be displayed in the plentyShop’s navigation?
Note: If a sub-category is displayed in the navigation, then the category above it must be displayed in the navigation too. In other words, if you select the option Display for a sub-category, then make sure you also selected the option Display for the category above it. |
Visible |
Should the category only be visible for users who have logged in?
|
Elmar category |
Select an Elmar category. |
Translate template variables and template functions |
Should template variables and template functions be translated?
|
2.3. Tab: Description 1 and 2
Compose one or two texts per category and decide where these texts should appear in the plentyShop.
Practical example:
-
You want to use description 1 for a category description. This description should appear at the top of the page.
-
You want to use description 2 for SEO texts, search terms and keywords. These SEO texts should appear at the bottom of the page.
Displaying category descriptions in the plentyShop:
-
Go to Item » Category.
-
Open the category.
-
Click on the tab Description 1 or Description 2.
-
Insert the text and format it as needed.
-
Save () the settings.
-
Open the assistant plentyShop LTS and navigate to the step Displayed information » Settings for the category view.
-
Use the drop-down lists to specify which description should appear above the item list and which description should appear below the item list.
-
Save () the settings.
|
Which editor do you prefer?
Do you see the drop-down list on the far right side of the tab Description 1 and Description 2? Use this drop-down list to specify which editor you prefer. |
2.4. Tab: Template
This tab is only relevant for categories of the type “Content”. Insert HTML code here to create an item template. However, this is not recommended.
2.5. Tab: Documents
Add images and files to your categories. You can upload the data formats JPEG, PNG, GIF, TIFF, PDF, DOC, ODC, OTH, XLS, XML, HTML, HTM, CSS, JavaScript, ZIP, JSON and GZIP.
Practical example:
-
You upload a pool of 10 different images for the category, e.g. regular images and seasonal images.
-
You select one or two of these images. These are the images that should currently be displayed for the category. So if you regularly switch out your category images, then it’s not necessary to delete the images that are not currently in use.
-
You use a ShopBuilder widget to display image 1 or image 2 in your plentyShop.
Displaying category images in the plentyShop:
-
Go to Item » Category.
-
Open the category.
-
Click on the Documents tab.
-
Add documents by clicking on the Upload file button or by dragging and dropping them into the tab.
-
Move your cursor over an image and select it ().
-
Click on Image 1.
→ The image is outlined in red and designated with the number 1. -
If needed, repeat the procedure to select a second category image. This time, click on Image 2.
-
Save () the settings.
-
Go to Shop » ShopBuilder.
-
Open the category’s editor view.
-
Insert the ShopBuilder widget Image » Background image.
-
Open the drop-down list Background image and select the option Category image 1 or Category image 2.
-
Save () the settings.
|
Deselecting the category image
You can remove a category image by selecting the image again () and clicking on Image 1 or Image 2. You will be able to click on the greyed out buttons in the toolbar once you have selected one or more images with a check mark. By selecting images with check marks, you can see a preview, download or delete several images at the same time. |
2.6. Tab: Note
Save helpful information about a category in the Note tab. For example, you can specify which sources your information comes from or let colleagues know that changes should not be made to specific paragraphs. The information saved in this tab is only visible in PlentyONE and is not displayed in the plentyShop.
Saving a note:
-
Go to Item » Category.
-
Open the category.
-
Click on the Note tab.
-
Enter the note in the editor.
-
Save () the note.
→ The note is saved and shown in a yellow speech bubble.
2.7. Context menu
The so-called context menu helps you manage your categories. Want to move, copy or delete a category? No problem! You can also open the context menu if you want to create new items or sub-categories.
Opening the context menu:
-
Go to Item » Category.
-
Point your cursor over a category name.
-
Click on the small triangle ().
→ The context menu is displayed.
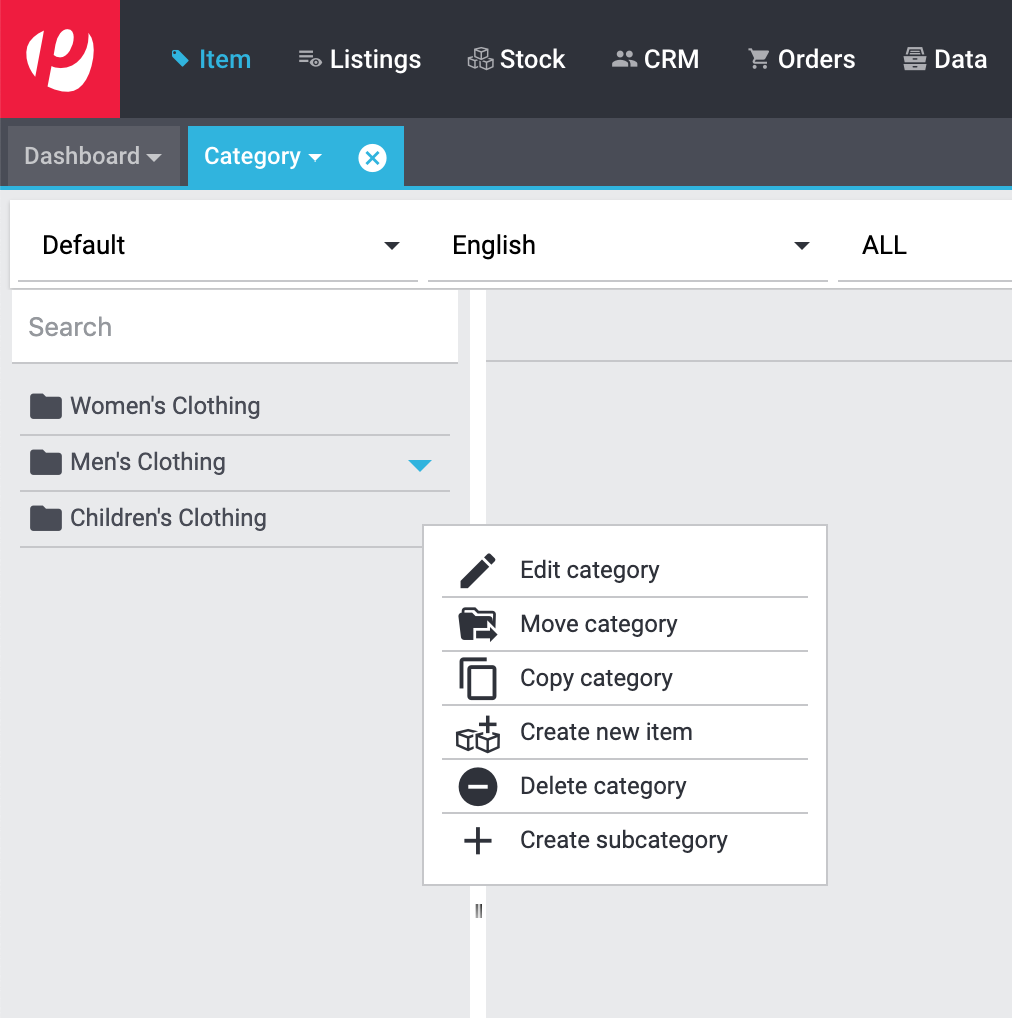
| Setting | Explanation |
|---|---|
Edit category |
Opens the category and lets you edit it further. |
Move category |
Moves the category, e.g. from a main category to a sub-category. Do you want to control which category is displayed first, second, third, etc? Simply change the position number. |
Copy category |
Creates a copy of the category. Use this function, e.g. to create a similar category somewhere else. Copy the category with all of its settings and then make changes to individual options like the name, description and position. |
Create new item |
|
Delete category |
Asks you to confirm your decision to delete the category. The category will be completely deleted. In other words, if you manage the category in several different languages or plentyShops, then all of the different client and language-versions will be deleted. If you only want to delete the category for specific language and client, then click on the delete symbol in the toolbar instead. |
Create subcategory |
Creates a new category underneath this category. |
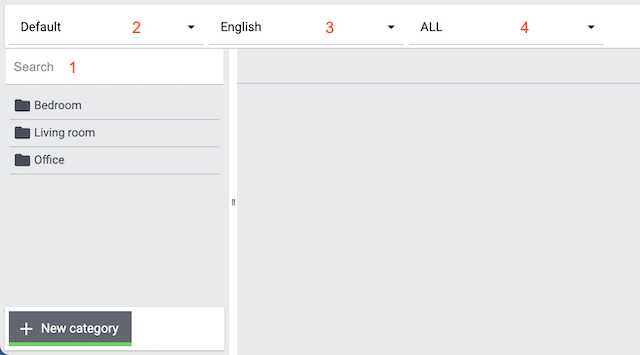
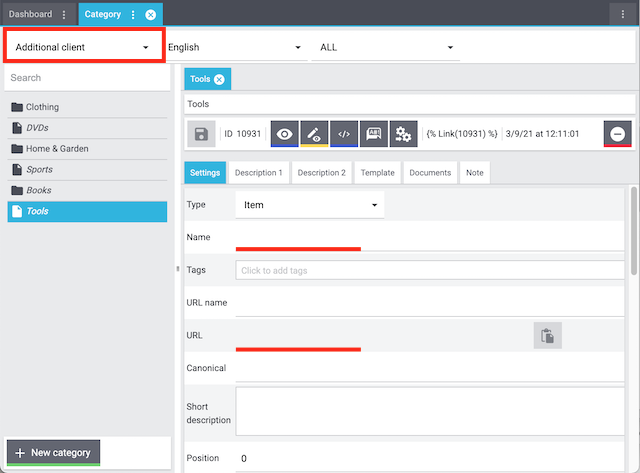
3. Searching for categories in the back end
You can find previously created categories in the menu Item » Category. They are displayed in the navigation tree on the left.
| Setting | Explanation |
|---|---|
Search (1) |
Are you looking for a specific category? Enter the name of the category into the search field in the upper left corner. Search results appear while you enter the name. |
Default (2) |
Are you responsible for multiple plentyShops? Select a client from this drop-down list. Only the categories that are linked to this client will be displayed in the navigation tree on the left. |
English (3) |
Is your plentyShop available in multiple languages? Select a language version from this drop-down list. Category names in cursive font: The font style indicates which categories are available for the selected language. If the category name is displayed in cursive font, then the category does not exist in the selected language. |
ALL (4) |
Do you see category names displayed in various colours? Don’t worry! The colour simply indicates which type of category it is. Select a category type from this drop-down list. Only this type of category will be displayed in the navigation tree on the left. |
4. Sorting items into categories
Every item must belong to a category. It’s not technically possible to create an item without a category. As such, items are sorted into categories while they are created. It doesn’t matter if you:
|
Do several categories apply?
Sometimes it makes sense to list an item in several different categories. You can manually link categories in the item data record or you can enter category IDs comma-separated in the import files. |
5. Displaying categories in the plentyShop
Categories are displayed in the plentyShop if they fulfil specific criteria. What should you do if a category isn’t visible? This checklist helps you find any possible errors that are preventing your categories from being displayed.
With PlentyONE, you can manage several online stores, i.e. several clients, with only one software. Consequently, it is possible to manage several different areas of business with one PlentyONE system. That’s a great advantage. But it also means that you’ll always need to tell PlentyONE which online store a category should appear in.
Linking a client to the category:
-
Go to Item » Category.
-
Click on the category in the directory tree on the left.
→ The category opens and the Settings tab is visible. -
Scroll down to the Client (store) option and choose whichever store () the category should appear in.
-
Save () the settings.

You can decide which categories should appear in your plentyShop’s navigation. If a category is hidden, then logically, you won’t be able to see it in the plentyShop.
Making a category visible in the link list:
-
Go to Item » Category.
-
Click on the category in the directory tree on the left.
→ The category opens and the Settings tab is visible. -
Scroll down to the In link list option and choose Display from the drop-down list.
-
Save () the settings.
|
Sub-categories
If a sub-category is displayed in the navigation, then the category above it must be displayed in the navigation too. In other words, if you select the option Display for a sub-category, then make sure you also selected the option Display for the category above it. |
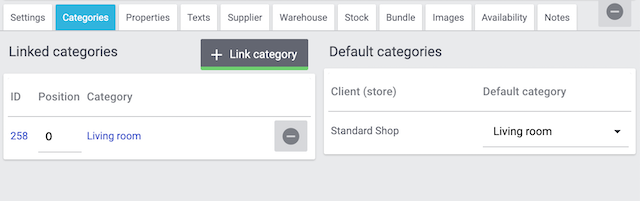
A category will only be visible if it’s linked to at least one variation that’s visible in the plentyShop.
Linking a variation to a category:
-
Go to Item » Items.
-
Search for and open the variation.
-
Switch to the Product details tab.
-
Click more_vert Further options in the Categories section.
-
Click Pick categories edit..
→ The Select category window opens. -
Select a category or subcategory.
-
Click Apply.
→ The category is linked and displayed in the * Categories* section. -
Save () the settings.
Do you work with multiple clients? If so, then make sure that you’ve correctly configured the category texts for every client, not just for the default client.
Category texts are things like the name, URL, description and keywords. Such information needs to be saved for every client separately.
Saving category texts for additional clients:
-
Go to Item » Category.
-
Select the client from the left drop-down list.
-
Click on the category in the directory tree on the left.
→ The category opens and the Settings tab is visible. -
Enter the category texts for the client (name, URL, etc.).
-
Save () the settings.
Even if the category is configured correctly, it can still take an hour before the category becomes visible in the plentyShop. This is due to the cache.
6. Other uses
6.1. Translating categories into other languages
Do you want your plentyShop to be available in multiple languages? Then you’ll need to translate the categories into all of the necessary languages.
| These instructions assume that the categories already exist in your plentyShop’s default language. |
Use the monolingual editor to edit one language version after another.
-
Go to Item » Category.
-
Open whichever category you want to create a language version for.
-
Select the desired language from the Language drop-down list, e.g. German.
-
Enter a name for the category into the field Name.
-
Save () the settings.
→ The category URL is generated. If you reload the category, you will now see entries in the fields URL name and URL. -
Configure the rest of the category settings and translate the texts and descriptions as needed.
-
Save () the settings.
Use the multilingual editor to edit two languages at once.
-
Go to Item » Category.
-
Open whichever category you want to create a language version for.
-
Click on the Multilingualism icon ().
→ The multilingual category view opens in a new tab. -
Select languages from the drop-down lists on the left and right. Example: English on the right and German on the left.
-
Enter translations of the texts and descriptions as needed.
-
Save () the settings.
→ The category is created in the selected language.
| You can also edit completely new languages with the multilingual editor, i.e. languages for which no content has been saved yet. You do not necessarily have to open the default language. |
6.2. Saving category discounts
Do you want to save volume discounts for individual item categories? You can save up to three volume discounts per category. The discounts are automatically granted when customers order at least the specified number of products in this category.
| The discounts only apply to a variation’s default category. |
Saving category discounts:
-
Go to Setup » Client » [Select client] » Categories discounts.
-
Carry out the settings.
-
Save () the settings.
→ The discount will automatically be applied when a customer orders the required number of variations in the plentyShop.
Note: These discounts only apply to the variation’s default category.
| Setting | Explanation |
|---|---|
Discount 1 (%); |
Enter the discount in percent that is to be applied when the required number of variations is reached. |
Minimum quantity |
Enter the number of variations customers need to order from this category for the discount to take effect. |