Conrad Core Integration
Conrad is a market specialised in consumer electronics, home technology, tools, and work safety.
|
Parallel use of both Conrad integrations
It is not possible to use the Conrad plugin and the Conrad Core Integration at the same time. |
|
Switch from Conrad plugin to Conrad Core Integration
If you want to switch from the Conrad plugin to the Conrad Core Integration, you can transfer your existing settings and SKUs to the new Conrad Core Integration. You can find instructions on how to do this here. |
1. Becoming a seller at Conrad
First, become a seller with Conrad to start selling items on Conrad.
After registering, you will receive login details from Conrad. You need these login details to set up Conrad in PlentyONE.
2. Frequency of data exchange
After you have set up Conrad in PlentyONE, data is exchanged with the market in the intervals described in Table 1.
| Data | Interval |
|---|---|
Item export |
once a day |
full item export (creating + and updating offers) |
once a day |
Stock synchronisation |
every 15 minutes |
Price synchronisation |
hourly |
Order import |
every 15 minutes |
Importing refunds |
every 15 minutes |
3. Workflow of an order
-
Your items are listed on Conrad. The name of your company is shown with your items.
-
Customers place an order on Conrad.
-
The incomplete order is imported into PlentyONE.
→ At this point, the invoice and delivery address for the order are still missing and the order has not yet been paid for. -
If the order is accepted, customers make their payments to Conrad.
-
With the payment confirmation, the invoice and delivery address on the order are updated in PlentyONE.
→ The order is complete. -
The order is shipped.
-
The shipping confirmation must be sent to Conrad by event procedure.
|
Tax refunds for solar panels cannot be processed via PlentyONE
Customers who buy solar panels at Conrad and have them installed by companies with a specific certification can receive a certificate to have the value added tax refunded. |
4. Setting up Conrad in PlentyONE
Now set up the market in PlentyONE.
4.1. Account overview
The Setup » Markets » Conrad » Settings menu provides an overview of your Conrad accounts. Table 2 lists the columns and available actions in the account overview.
|
Configuring columns
Click Configure columns (settings) to define which settings should be displayed in the account overview. |
Note: The account overview looks different depending on which columns you add or hide via Configure columns (settings). The following table only lists the columns which are displayed in the overview by default.
| Column | Explanation | ||
|---|---|---|---|
ID |
The ID of your Conrad account. The ID is assigned automatically when you create a new account. |
||
Name |
The name of your Conrad account. |
||
Active |
circle = The account is active and data is exchanged with Conrad. Note: Data is only exchanged with Conrad if the account is both connected with Conrad and active. In addition, an API key must be saved for the account. Click Test connection in the account settings in order to connect to Conrad. |
||
Client |
The client (shop) that orders of this Conrad account are assigned to. |
||
Order import |
done = The order import for this account is active. Orders are imported into PlentyONE every 15 minutes. close = Orders are not imported. |
||
Item export |
done = The item export for this account is active. Items are exported to Conrad once per day. close = Items are not exported. |
||
Offer export |
done = The offer export for this account is active. A full offer export is carried out once per day. This means that new offers are created and existing offers are updated. close = Offers are not exported. |
||
more_vert More |
Click here to display more actions.
|
4.2. Carrying out the basic settings
Carry out the basic settings for the market in the Setup » Markets » Conrad » Settings menu.
First, add a new account for Conrad.
Adding a new account:
-
Go to Setup » Markets » Conrad » Settings.
-
Click Add account (add).
→ The Add account window opens. -
Enter an account name.
-
Save (save) the settings.
→ A view with account settings opens. -
Carry out the additional settings. Pay attention to the explanations given in Table 3.
-
Save (save) the settings.
| Setting | Explanation | ||
|---|---|---|---|
save Save |
Save the settings. |
||
more_vert More |
Click here to display more actions.
|
||
Test connection |
Click here to test whether a connection to Conrad could be established. In this step, the API key is checked. Note: You have to test the connection again if you change the API key. |
||
General |
|||
Account |
The name of your Conrad account. You entered the name when you created the account. |
||
Active |
Activate the Conrad account. The data exchange with Conrad is started. We recommend to only activate the account after you carried out all settings. Note: The account has to be connected to a Conrad account so that data can be exchanged between PlentyONE and Conrad. The Conrad API key must be saved in PlentyONE. |
||
Conrad API key |
Enter the API key. You have received the API key from Conrad. |
||
Client |
Select a client (shop). The orders of this Conrad account will be assigned to this client. |
||
Item |
|||
Item export |
Activate to export items to Conrad once per day. |
||
Map shipping profiles |
Map your PlentyONE shipping profiles with the Conrad shipping profiles from the drop-down list. Mapping shipping profiles:
|
||
Orders |
|||
Order import |
Activate to import orders into PlentyONE. Orders are then imported every 15 minutes. |
||
Order import start date |
Enter a date in the format D.M.YYYY or select a date via the calendar (today). |
||
Allow cancellations for orders with invoice |
Should customers be able to cancel an order if an invoice was already created? |
||
Automatically cancel refunded orders until order status |
Select an order status until which orders that were fully refunded should be automatically cancelled. Orders will automatically be cancelled if they have this status or a lower status. If the order has a higher status, then it will be refunded. Tip: Select a status in which you can make sure that the item will not be shipped. Orders which have already been shipped cannot be cancelled. |
||
Status for shipped orders |
Select the order status for orders that were shipped. |
||
Status for credit notes |
Select the order status for orders that were refunded by Conrad. |
||
Status for cancelled orders |
Select the order status for orders that were cancelled. Note: Select a status higher than status 8. |
||
Offers |
|||
Offer export |
Activate to export items to Conrad once per day. Note: Offers can only be exported if an item has already been activated. If an item has not been activated by Conrad, then the offer cannot be exported. |
||
4.3. Activating the order referrer
Go to Setup » Orders » Order referrer to activate the order referrer. This ensures that orders are assigned to the correct sales channel.
An order referrer tags an order with the sales channel on which the order was generated. Sales channels can be e.g. your online shop or markets on which you sell your items. Each sales channel has an individual order referrer. Some order referrers are available by default in your PlentyONE system. Further order referrers are added e.g. if you install a new plugin. For further information about the order referrer, see the page Order referrer of the PlentyONE manual.
Activating the order referrer for Conrad:
-
Go to Setup » Orders » Order referrer.
-
Click Search (search).
-
In the list, navigate to the option Conrad with the ID 176.00.
-
On the right of the referrer’s line, click Edit (edit).
→ The window Edit referrer opens. -
Activate the option Visible in selection (toggle_on).
-
Click SAVE (save).
→ The referrer is active.
5. Preparing variations
Now, prepare your variations.
5.1. Setting the variation availability
You need to activate the variations you want to sell on Conrad and enable them for the relevant sales channel. This is done in the Item » Items » [Open variation] menu.
Making a variation available for Conrad:
-
Go to Item » Items » [Open variation].
Tip: To sell all variations of an item on Conrad, carry out the settings for the item’s main variation. If the inheritance function is active for the variations, then this activates the availability of all variations of the item. -
In the Availability and visibility section, enable the option Active (toggle_on).
-
Click the Sales channels tab.
-
In the Sales channels section, activate the sales channel Conrad in the Status column (toggle_on).
Tip: You can activate multiple sales channels at once. To do so, activate the checkboxes to the left of the desired sales channels. Then activate the toggle above the checkbox column (toggle_on). Click ACTIVATE to confirm the activation. -
Save (save) the settings.
→ The variation is available for Conrad.
Use the variation group function to edit multiple variations at once. You select the variations that you want to edit.
Making several variations available for Conrad using the variation group function:
-
Go to Item » Items.
-
Select () the variations to be edited.
-
In the toolbar, click on layers » layers Variation group function.
→ The Variation group function window opens. -
Select the action Sales channels from the drop-down list Actions.
→ The action is added to the lower part of the window. -
Select (check_box) the option Conrad from the drop-down list Sales channels.
→ The sales channel is added below the Sales channels drop-down list. -
Activate (toggle_on) the toggles to the left of the sales channels.
-
Click EXECUTE & CLOSE to apply the settings.
Batch processing allows you to edit several variations at once. You use filters to limit which variations are edited.
Making several variations available for Conrad using batch processing:
-
Navigate to the area Market availability.
-
Activate the checkbox to the left of the option Conrad.
-
Activate the checkbox to the right of the option Conrad.
-
Navigate to the area Availability.
-
Activate the checkbox to the left of the option Active.
-
Activate the checkbox to the right of the option Active.
-
Click on Apply to apply the settings to the variations.
6. Exporting product data
Product data is exported to Conrad using catalogues. Go to Data » Catalogues to create catalogues for Conrad.
Catalogues are used to export data from your PlentyONE system. There are two different catalogue formats:
-
Marketplace formats are used to export item data to markets.
-
Standard formats are used to export data from your PlentyONE system into a file.
Catalogues with marketplace formats allow you to tailor your item information exactly to the needs of the market. Because here, you assign a suitable PlentyONE data field to each of the data fields of the market. When your variation data is exported to the market, the market’s data fields are then filled with the correct PlentyONE data.
-
Is this your first time working with catalogues? Then read up on the basic concept of catalogues first.
To simplify the creation of new catalogues, you can now create Channel maps for Conrad. With Channel maps, you can create cross-category mappings for a sales channel and apply them to catalogues afterwards. All linked catalogues automatically inherit the mapping from the Channel map. This will save you a lot of time as you don’t need to carry out the mappings for each catalogue.
You can find more information on how to create Channel maps in the Channel maps section.
6.1. Adding product categories
Before you can create catalogues for Conrad, you have to add the product categories in which you want to offer your items on Conrad. This is done in the Setup » Markets » Conrad » Add catalogue templates menu.
After you added a product category in the Add catalogue templates menu, you can create a catalogue for this product category in the Data » Catalogues menu.
Adding product categories:
-
Go to Setup » Markets » Conrad » Add catalogue templates.
-
Click Add categories (add).
-
Select a category for offering your items.
Tip: You can either search the category by entering the name in the input field or you can expand the category tree to browse the available categories. -
Save (save) the settings.
→ The category was added. You can now create a catalogue for this category in the Data » Catalogues menu.
6.2. Linking variations to a Conrad product category
|
Which variations are exported to Conrad?
You can use catalogue filters in the menu Data » Catalogues » [Open catalogue] » Filters to define which variations should be exported to Conrad. The filters Conrad and Active are already set by default. This means that all variations which are active and which have the market availability for Conrad in the Availability tab will be exported to Conrad. |
You can use properties to define in which product category on Conrad a variation should be listed. For example, you can create the property Conrad product categories of the type selection and use the Conrad product categories as selection values. You can then use the filters in the catalogue and filter for the property to define into which product category on Conrad the variations should be exported.
Creating a property of the type selection:
-
Go to Setup » Settings » Properties » Configuration.
-
Click add Create property.
→ The settings for the new property are displayed. -
In the area Details, select the type selection.
-
In the area Details, select the section Items.
-
Carry out the additional settings.
→ Tip: For example, you can use Conrad product category as name for the property. -
Save (save) the settings.
→ The property is created. -
In the section Selection values, click Create selection value.
-
Enter a name for the selection value.
→ Tip: You can enter the different Conrad product categories as names for the selection values. -
Save (save) the settings.
→ The selection value is created and displayed in the overview. The value automatically receives a consecutive and unique ID that cannot be changed. You need this ID to only export specific variations in a catalogue.
Next, link the desired variations with the selection property that you created.
Link variation with property:
-
Go to Item » Items.
-
Open the variation that you want to link.
-
Click the Properties tab.
-
In the Properties section, click add Add properties.
→ The window Add properties opens. -
Select the newly created property (check_box).
Tip: Use the search (search) or the filters (tune) to search for the new property. -
Click APPLY.
→ The property is added. -
Select the desired product category from the drop-down list Value.
-
Save (save) the settings.
Afterwards, add the ID of the selection value as filter in the desired Conrad catalogue.
Tip: Open the property in the menu Setup » Settings » Properties » Configuration to see the IDs of the selection values.
Apply filters in the catalogue:
-
Go to Data » Catalogues.
-
Open the Conrad catalogue.
-
On the left-hand side, open the tab Filters.
-
In the area Custom filters, select the filter Linked to at least one property selection value.
-
Enter the ID of the selection value of the property.
Tip: Open the property in the menu Setup » Settings » Properties » Configuration to see the IDs of the selection values. -
Save (save) the settings.
6.3. Creating a product catalogue
Product data is exported to Conrad using catalogues. To export your items to Conrad, create a catalogue in the Data » Catalogue menu. Then map the Conrad data fields to product data saved in PlentyONE in the catalogue.
After you activate the catalogue, the catalogue data is automatically exported to Conrad in regular intervals.
Note: There is a separate catalogue format for each Conrad product category. Different product data is exported in the different catalogue formats, depending on which information Conrad requires for each product category.
This means that you have to create a separate catalogue for each Conrad product category that you want to sell your items in. Go to Setup » Markets » Conrad » Add catalogue templates to add product categories.
|
Create a catalogue for offers
For Conrad, you always have to create an additional catalogue for offers. The offer catalogue is required in addition to the catalogues for the different Conrad product categories so that offers can be created on Conrad. |
Creating a catalogue:
-
Go to Data » Catalogues.
-
Click Create catalogue (add).
-
Enter a name for the catalogue.
-
In the drop-down list Marketplace, select the option Conrad.
-
In the drop-down list Export type, select the option Item (new).
-
In the drop-down list Category, select a category of the sales channel.
-
Save () the settings.
→ The catalogue is created.
→ The catalogue is opened for editing.
Other catalogue settings
Other catalogue settings are optional. Once you carried out the settings described on this page, your catalogue is automatically exported to Conrad. That means you can ignore the catalogue settings for Format settings, Export settings and Download settings.
The Format settings, Export settings, and Download settings allow you to create a file with the variation data contained in the catalogue. However, this file does not contain information about whether the data export to Conrad was successful.
|
Do not change the format in the catalogue’s Format settings. To ensure that the export to the sales channel works, all required settings are already configured when you create a catalogue. If you change the settings, errors might occur during the export. |
6.3.1. Mapping data fields in the product catalogue
After you have created a catalogue, map the market’s data fields to item data saved in PlentyONE. This chapter describes how you map data fields and what particularities apply for product exports to Conrad.
-
The market expects product data that cannot be saved in the PlentyONE item menu? Then create a property for this data. Link this property with your variations. The actual values are saved as property values for this property. Is this your first time working with properties? Then read up on the principles of properties first.
| Availability | Explanation |
|---|---|
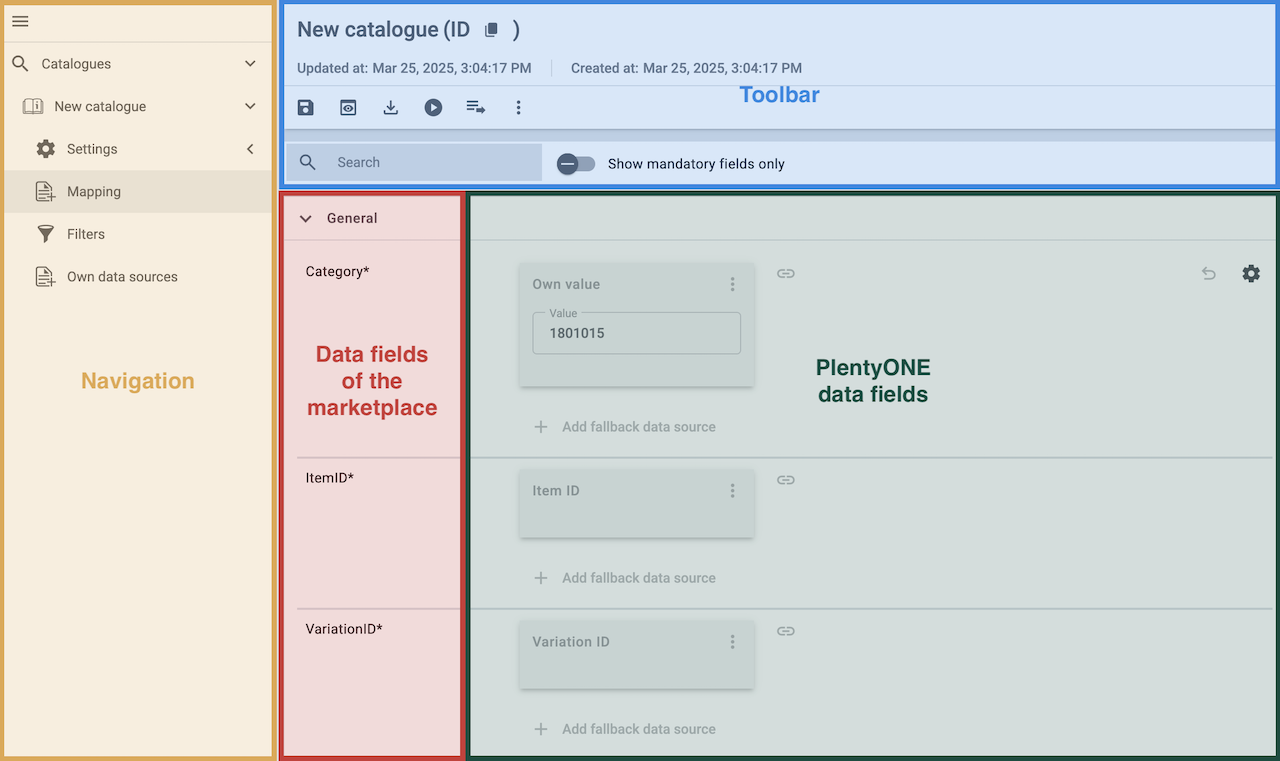
Navigation |
When you open a catalogue, the view Mapping is shown. On the very left is the navigation.
|
Toolbar |
The toolbar provides actions for the catalogue. For example, save your mappings, restore an older version of the catalogue or hide or show optional marketplace data fields. |
Marketplace data field |
To the right of the navigation, all data fields available for the market are listed. Mandatory fields are marked with an asterisk (✱). |
PlentyONE data fields |
On the right side of the catalogue, you map the marketplace data fields to appropriate PlentyONE data fields. In the screenshot above, a few of the fields are already mapped. |
Mapping catalogue fields:
-
Go to Data » Catalogues.
-
Click on the catalogue.
→ The Mapping tab opens.
→ In the left-hand column, the market’s data fields are listed.
Tip: Mandatory fields are flagged with an asterisk (*).
→ In the right column, you map the PlentyONE data fields. Any PlentyONE data fields that you already mapped are also shown in this column. -
Map suitable PlentyONE data fields to the market data fields.
For each marketplace data field, you have a number of mapping options. Expand the info boxes below to get more information about each of these mapping options.-
Simple 1:1 mapping
-
Simple 1:1 mapping with properties
-
Complex 1:1 mapping
-
1:1 mapping with fallback data fields
-
1:n mapping
-
Own value mapping
-
Mapping with mathematical calculations
-
-
Save () the catalogue.
→ The mappings are saved.
In a simple 1:1 mapping, you map a PlentyONE data field to the marketplace data field. If no suitable setting exists in PlentyONE. you can map a property instead.
As such, simple 1:1 mappings allow you to:
-
I want to fill this marketplace data field with the data from this PlentyONE setting.
-
If the data field is empty for a variation, no value is exported for this variation.
Creating a simple 1:1 mapping:
-
Next to the marketplace data field, click on + Add data field.
→ To the left, the list of available PlentyONE data fields are shown in groups. -
Click on the group you need.
→ The PlentyONE data fields of the group are shown. -
Click on the plus to the right of the PlentyONE data field you want to select.
→ The PlentyONE data field is added to the right. -
Click on Confirm.
Example: Sales price and RRP for Otto Market
This gif shows you how to map the marketplace data fields Sales price and RRP for Otto Market to PlentyONE data fields:
Reminder: In a simple 1:1 mapping, you map a PlentyONE data field to the marketplace data field. However, what can you do if PlentyONE does not offer a suitable data field? Then it’s the properties' moment to shine. Properties allow you to save any kind of information in your properties.
-
Is this your first time working with properties? Then read up on the principles of properties first.
Creating a property:
-
Create a property with the necessary values.
Tip: Find out how to do that here.
Creating a simple 1:1 mapping with properties:
-
Next to the marketplace data field, click on + Add data field.
→ To the left, the list of available PlentyONE data fields are shown in groups. -
Expand the group Property.
→ The property groups are shown. -
Expand the group you need.
-
Click on the Plus sign on the right of the property you want.
-
From the drop-down list Language, select the language in which you send the data to the market.
-
Click on Confirm.
→ The property is mapped to the marketplace data field.
Like with the simple 1:1 mappings, you map a PlentyONE setting or property to a marketplace data field. Complex mappings are necessary whenever a marketplace data field has more than one possible value. Instead of mapping data fields, for complex mappings you map individual values of these data fields. For example, you cannot simply map the PlentyONE data field Shipping profile to the marketplace data field Shipping method. Why? The market cannot know which of your shipping profiles in PlentyONE corresponds to which of their shipping methods.
| Do not enter own values for complex mappings. All values that you enter must be saved for the variations, either in a setting or as a property value. This also applies if the value Comparative value is shown. You still need to enter exactly the value of the setting or property that you mapped. |
In complex mappings, the value of the market is always exported. Only when you map an own value, the own value that you enter is exported.
You can recognise complex mappings from the field that is shown below the name of the marketplace data field. Click on the field to show the values available for the marketplace data field.

Examples for complex 1:1 mappings are:
-
Categories
-
Brands
-
Shipping setting
Important: For complex mappings, do not map own values or properties of the type None.
Creating a complex 1:1:n mapping:
-
Click on the field for the marketplace data field.
→ A list of the available values is shown. -
Select the value that you want to map a PlentyONE data field to.
→ The value is mapped. -
Next to the marketplace data field, click on + Add data field.
→ To the left, the available PlentyONE data fields are listed in groups. -
Click on a group.
→ The PlentyONE data fields of the group are shown. -
Click on the PlentyONE data field for which you want to map values.
Important: Do not map own values or properties of the type None. -
Your next steps depend on the PlentyONE data field you selected:
-
Alternative 1: The available values for the PlentyONE data value are shown on the left.
-
Next to the value you want to select, click on the plus.
→ The value is added to the field on the right. -
Click on Confirm.
-
-
Alternative 2: The PlentyONE data field is inserted and the field Comparative value is shown.
-
In the field Comparative value, enter a value that is saved in the setting or the property of the mapped PlentyONE data field.
-
Click on Confirm.
-
-
Alternative 3: The PlentyONE data field is inserted and a drop-down list is shown.
-
Select a value from the drop-down list.
-
Click on Confirm.
→ The value of the marketplace data field is exported, not the value of the PlentyONE data field.
Exception: Only when you map an own value, the own value that you enter is exported.
-
-
Example: Delivery time in days for Otto Market
This gif shows you how to map suitable PlentyONE values to the values of the marketplace data fields Delivery time in days for Otto Market:
In a 1:1 mapping with one or more fallback data fields, you map a PlentyONE data field to the marketplace data field. In addition, you specify one or more fallback data fields. This ensures that the system keeps looking if the first PlentyONE data field is missing or empty.
So this mapping specifies:
-
I want to fill the marketplace data field with the data from the selected PlentyONE setting.
-
If that data field is missing or empty for a variation, the first fallback data field is checked. The value of that fallback data field is exported instead.
-
If the first fallback data field is also missing or empty for the variation, the second fallback data field is checked. If a value is found, the value of the second fallback data field is exported for the variation etc.
Two separate fallback conditions are available:
Null (default) |
The fallback data field is used if the data field above is mapped in the catalogue but not linked to the variation. The condition "Null" is useful when you want to map fallback data fields for the following types of PlentyONE data fields:
Important: When you add a fallback data field, the fallback condition "null" is selected automatically. To apply the fallback condition "leer", you need to change the default setting. |
Empty |
The fallback data field is used if the data field above is mapped in the catalogue and linked to the variation, but is empty. The condition "Empty" is useful when you want to map fallback data fields for the following type of PlentyONE data fields:
Important: When you add a fallback data field, the fallback condition "null" is selected automatically. To apply the fallback condition "leer", you need to change the default setting. |
Note: Even if you assign one or more fallback data fields, the value of only one of those fields is exported. For each variation, the mapped PlentyONE data fields are checked in the order in which you mapped them. This means that if the first data field does not provide a value for a variation, the first fallback data field is exported etc.
Creating a 1:1 mapping with fallback data fields:
-
Next to the marketplace data field, click on + Add data field.
→ To the left, the list of available PlentyONE data fields are shown in groups. -
Click on the group you need.
→ The PlentyONE data fields of the group are shown. -
Click on the plus to the right of the PlentyONE data field you want to select.
→ The PlentyONE data field is added to the right. -
In the list of PlentyONE data fields, click on the plus icon next to the PlentyONE data field that you want to map.
→ The fallback data field is added with the fallback condition "null". -
Alternative 1: To add the fallback data field with the fallback condition "null":
-
Click on Confirm.
→ The fallback data field is exported if the data field above is not linked to the variation.
-
-
Alternative 2: To add the fallback data field with the fallback condition "empty":
-
To the left of the fallback data field, click on the cog ().
→ The window Data column settings is shown. -
For the setting Fallback condition, select the option Empty.
-
Click on Save.
→ The fallback data field is added with the fallback condition "empty". -
Click on Confirm.
→ The fallback data field is exported if the data field above is empty for the variation.
-
Example: Fallback data field for SKU for Otto Market
This GIF shows you the mapping for the OTTO Market marketplace data field SKU. The PlentyONE data field SKU is mapped to this marketplace data field. The PlentyONE data field Variation ID is mapped as the fallback data field. The fallback condition "null" is applied automatically.
Result: The fallback data field Variation ID is exported if the data field SKU is not linked to the variation.
In a 1:n mapping, you map several PlentyONE data fields to the marketplace data field. You can link these data fields with a separator.
So this mapping specifies:
-
I want to combine these PlentyONE data fields during export so that the marketplace data field is filled with the data of these two or more PlentyONE settings.
Creating a 1:n mapping:
-
Next to the marketplace data field, click on + Add data field.
→ To the left, the list of available PlentyONE data fields are shown in groups. -
Click on the group you need.
→ The PlentyONE data fields of the group are shown. -
Click on the plus to the right of the PlentyONE data field you want to select.
→ The PlentyONE data field is added to the right. -
Click on Confirm.
-
To the right of the mapped PlentyONE data field, click on Add data field ().
→ To the left, the list of available PlentyONE data fields again are shown in groups. -
Map one or several additional PlentyONE data fields to the marketplace data field as described above.
-
Click on Confirm.
-
To the very right of the row, click on Settings ().
-
Select a separator from the drop-down list Separator or add a custom separator.
-
Click on Save.
-
Save () the catalogue.
→ The mappings are saved.
→ During the export, the content of the PlentyONE data fields is combined and exported as one field.
You are sure that you want to export the same value for all variations of a catalogue for a marketplace data field? Then specify an own value. This own value is then exported for all variations.
So this mapping specifies:
-
For this marketplace data field, I want to export the value that I entered in the field Own value for all variations of this catalogue. The value you enter is always exported. The value overwrites the market value also in complex mappings where usually the value of the market is exported. As such, make sure you enter an own value that the market accepts for this marketplace data field.
Creating an own value mapping:
-
Next to the marketplace data field, click on + Add data field.
→ To the left, the list of available PlentyONE data fields are shown in groups. -
Click on the plus next to Own value at the top of the list.
→ The field for the own value is added to the view. -
Enter a value into the input field.
→ This value is exported for all variations.
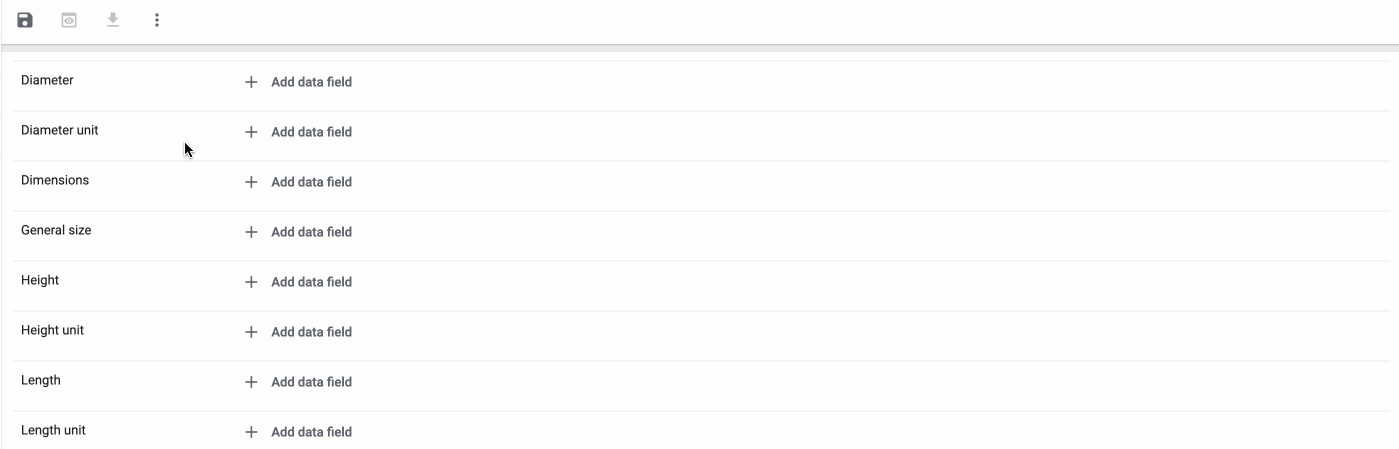
Example: Diameter information
You want to export diameter information for some of your variations. The diameter is saved in centimetres for all your variations. Instead of creating a property for the unit and linking this property to the variations, you can enter the own value cm.
This is an example of how you can map an own value for the diameter unit:
Mathematical calculations allow you to change numerical values automatically during the export.
-
This function only works for data fields that contain numerical values.
-
This functionality is new and not available for all catalogue formats.
So this mapping specifies:
-
I want the numerical value of a PlentyONE data field to be recalculated during the export. Basic arithmetic operations are available for the formulas.
Recalculating numerical values:
-
Next to the marketplace data field, click on + Add data field.
→ To the left, the list of available PlentyONE data fields are shown in groups. -
At the very top of the list, click on the plus icon next to Formula (calculate).
→ The data field Formula is added to the field on the right. -
Click into the data field.
→ The window Modify value is shown. -
Enter a numerical value or select a PlentyONE data field at the bottom right of the window to add it to the calculation (add).
Tip: Use the search function. This helps you to find data fields quickly. -
Optional: If the symbol more_vert is shown in the data field, select the correct assignment for the data field.
Tip: A number tells you how many assignments are necessary for the data field.-
Click on the icon more_vert.
-
In the window shown, select the assignments from the drop-down list.
-
Save the settings.
-
-
Enter numbers and mathematical operators with the on-screen calculator or the keyboard.
-
Save the settings.
→ The entered formula is displayed in the overview.
→ The calculation will be carried out in the next export.
6.3.2. Recommendations for data field mappings
To help you with mapping your data fields for the catalogue, we have created a list of recommended data field mappings. Note that these mappings are recommendations only. Depending on how you manage your item data, other mappings may be more appropriate than the recommendation given here.
-
Need more information about the PlentyONE data fields? All data fields are described on the manual page for the standard format Item (new).
Note: You have to create a separate catalogue for each Conrad product category that you want to offer your items in.
Catalogues for different product categories contain different data fields. This is because different product data has to be specified in each Conrad product category.
However, some data fields are the same in each category. Only the recommended mappings for those data fields are described here.
| Marketplace field | Mandatory? | Recommended PlentyONE mapping |
|---|---|---|
General |
||
Product-ID (of the seller) |
yes |
The unique item ID in the system of the seller. This ID is used to match the offers later on.
|
Product title |
yes |
|
Content units per selling unit |
yes |
Here you provide information about the content of the item, for example
|
Charging capacity (min.) |
no |
The required power for minimum charging capacity must be specified as a whole number in watts. Decimal numbers are not allowed.
Example: 20 |
Charging capacity (max.) |
no |
The required power for maximum charging capacity must be specified as a whole number in watts. Decimal numbers are not allowed.
Example: 27 |
Brandname |
||
Brandname |
yes |
Here you map manufacturers. This data field contains a complex mapping. This means that you can select from different values of the marketplace data field. In this case, the values are your manufacturers. The values are then assigned to a PlentyONE data field. Example:
|
Selling unit of measure |
||
Selling unit of measure |
yes |
Here you map the sales quantity unit. Enter the smallest amount of the item that can be sold individually. This unit is independent of the unit that you want to use to price or store the item. Example:
|
Content units |
||
Content units |
yes |
Here you map the content unit. This data field contains a complex mapping. This means that you can select from different values of the marketplace data field. In this case, the values are content units. The values are then assigned to a PlentyONE data field. Example:
|
VAT rate |
||
VAT rate |
yes |
Here you map the VAT class. This data field contains a complex mapping. This means that you can select from different values of the marketplace data field. In this case, the values are your VAT classes. The values are then assigned to a PlentyONE data field. Example:
|
Charging capacity (max.) UNIT |
||
Charging capacity (max.) UNIT |
no |
The required power for maximum charging capacity must be specified in watts.
Allowed values: |
Charging method (Power Delivery) |
||
Charging method (Power Delivery) |
no |
Is the USB Power Delivery (PD) charging protocol supported?
Allowed values: |
RED-compliant charger available |
||
RED-compliant charger available |
no |
Is a charger included in the scope of delivery?
Allowed values: |
Charging capacity (min.) UNIT |
||
Charging capacity (min.) UNIT |
no |
The required minimum charging capacity must be specified in watts.
Allowed values: |
-
You need more information on how to map items? Here is an example of item mappings for the product category PC systems. Only the mandatory fields are mapped in this example. Note that the mappings are recommendations only. Depending on how you manage your product data, other mappings may be more appropriate than the recommendations given here.
| Marketplace field | Mandatory? | Recommended PlentyONE mapping |
|---|---|---|
General |
||
Product-ID (of the seller) |
yes |
The unique item ID in the system of the seller. This ID is used to match the offers later on.
|
Product title |
yes |
|
Content units per selling unit |
yes |
Here you provide information about the content of the item, for example
|
Brandname |
||
Brandname |
yes |
Here you map manufacturers. This data field contains a complex mapping. This means that you can select from different values of the marketplace data field. In this case, the values are your manufacturers. The values are then assigned to a PlentyONE data field. Example:
|
Selling unit of measure |
||
Selling unit of measure |
yes |
Here you map the sales quantity unit. Enter the smallest amount of the item that can be sold individually. This unit is independent of the unit that you want to use to price or store the item. Example:
|
Content units |
||
Content units |
yes |
Here you map the content unit. This data field contains a complex mapping. This means that you can select from different values of the marketplace data field. In this case, the values are content units. The values are then assigned to a PlentyONE data field. Example:
|
VAT rate |
||
VAT rate |
yes |
Here you map the VAT class. This data field contains a complex mapping. This means that you can select from different values of the marketplace data field. In this case, the values are your VAT classes. The values are then assigned to a PlentyONE data field. Example:
|
6.3.3. Notes on mapping data fields
Adding a brand
If you want to map a brandname in a product catalogue for which no Conrad data field exists yet, report this brand to Conrad. Conrad then adds this brand to the data field selection.
Exporting an image list
You can export a list of item or variation images to Conrad via the data fields for images. The following data fields are available for image mapping:
-
Main Product image URL
-
Product image 2 URL
-
Product image 3 URL
-
Product image 4 URL
-
Product image 5 URL
To export an image list, select one of the above data fields and map the image list as follows:
-
Image » Variation images » Image list, image information Full image URL
or
Image » Item images » Image list, image information Full image URL -
Under Maximum number of images, enter the number of images you want to export from the image list.
The URLs of the images from the image list are automatically mapped to the next available image data fields in order.
Example: If the image list is mapped to the data field Main Product image URL and contains three images:
-
The URL of the first image is mapped to the data field Main Product image URL,
-
the URL of the second image to Product image 2 URL,
-
the URL of the third image to Product image 3 URL.
Note: If a subsequent data field is already mapped, this data field is skipped. The image URL is then mapped to the next available empty image data field instead.
Important: Only as many images are mapped as the number of available following data fields for images. Excess images from the image list are not added.
Data fields with different mapping options
In the catalogues, you will find data fields that allow both simple and complex 1:1 mapping. This selection gives you the flexibility to adapt the mapping to the nature of your data.
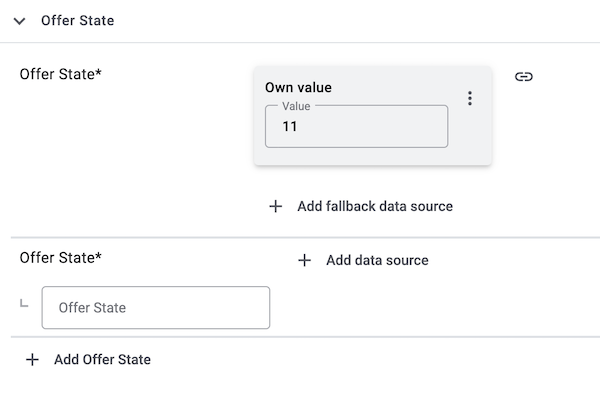
Example: The data field Offer State in the offer catalogue
For the data field Offer State, both the simple and the complex mapping are marked as mandatory. You only have to configure one of these two options.
-
Simple 1:1 mapping: Select this option if the value for the data field should be the same for all your offers in the catalogue. For example, if you only offer new products and the status New (value 11) applies to all items.
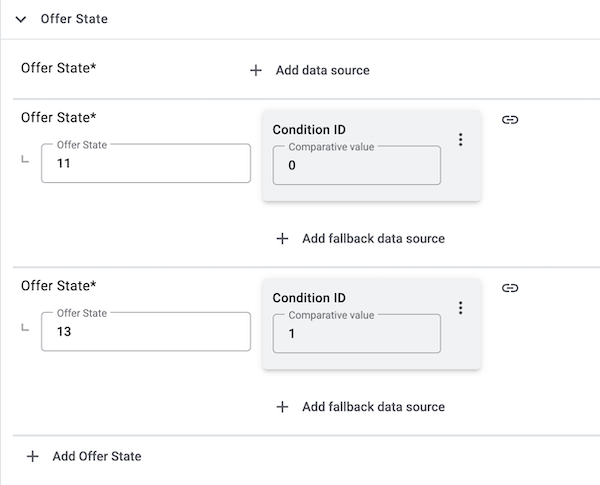
-
Complex 1:1 mapping: This option is useful if you want to transmit different values for the data field. For example, if you offer new and used products at the same time and therefore need to transmit the status New (value 11) as well as the status Very good (value 13). The complex mapping allows you to react flexibly to different values for item settings or properties.
If you want to transmit the status New for all items:
-
Next to the marketplace data field, click add Add data source.
→ To the left, the list of available PlentyONE data fields are shown in groups. -
Click on the plus next to Own value at the top of the list.
→ The field for the own value is added to the view. -
Enter the value 11 into the input field.
→ This value is exported for all variations.
Note: Make sure that the value corresponds to the marketplace standard. In this case, 11 corresponds to the status New at Conrad. You can find the list of valid values in the Mirakl backend.
If you want to transmit the condition New for some items and the condition Very good for other items:
Create mapping for new items:
-
Click on the field for Offer State.
→ A list of the available values is shown. -
Select the value New.
→ The value 11 is mapped. -
Next to the marketplace data field, click add Add data source.
→ To the left, the available PlentyONE data fields are listed in groups. -
Click Item » Condition ID.
→ The PlentyONE data field is inserted and the field Comparative value is shown. -
In the field Comparative value, enter the value that is saved in the item settings for the selected status. For example 0 for New.
-
Click Confirm.
Create mapping for used items:
-
Click add Add Offer State.
-
Click on the field for Offer State.
→ A list of the available values is shown. -
Select the value Very good.
→ The value 13 is mapped. -
Next to the marketplace data field, click add Add data source.
→ To the left, the available PlentyONE data fields are listed in groups. -
Click Item » Condition ID.
→ The PlentyONE data field is inserted and the field Comparative value is shown. -
In the field Comparative value, enter the value that is saved in the item settings for the selected status. For example 1 for Used.
-
Click Confirm.
You can find further details on the configuration of simple and complex mapping in the chapter Mapping data fields in the product catalogue.
6.3.4. Providing information and images for chargers for electrical appliances with radio frequency (FuAG)
On 23rd November 2022 the EU directive 2022/2380 on the harmonisation of charger interfaces of radio equipment was passed.
This directive was realized in German law on the 6th May 2024 by changing the Funkanlagengesetz (FuAG). The new FuAG is in effect since the 28th December 2024 and contains new labeling requirements for electrical appliances with radio frequency and chargers, such as:
-
Mobile phones
-
Tablets
-
Digital cameras (all digital cameras except: security cameras and digital cameras that are exclusively used in the audiovisual sector)
-
Headphones
-
Headsets
-
Handheld gaming consoles
-
Portable speakers
-
E-readers
-
Keyboards
-
Mice
-
Portable navigation systems
-
Earbuds
-
Laptops
The following information has to be indicated in the product details for the mentioned electrical appliances that are put into circulation from 28th December 2024 (for laptops starting 28th April 2026) on:
-
Pictogram for charger included in the scope delivery:
-
The pictogram indicates if a charger is included (charger plug is not crossed out) or not (charger plug is crossed out).
-
The mandatory pictogram is described and displayed in Appendix I Part 3 of the directive 2022/2380
-
-
Label about charging properties of compatible chargers:
-
The label offers all necessary charging properties of the charger that are compatible with the electrical appliance.
-
The mandatory label is described and displayed in Appendix I Part 4 of the directive 2022/2380.
-
Note: The labelling requirement applies to the B2B and B2C section.
Providing information and images for chargers via the product catalogue
If you export your items to Conrad via catalogues, you can add the information on chargers directly via the data field mappings for items. Conrad automatically generates the required images from your details in the following data fields and provides them on the product detail page:
-
Charging capacity (min.)
-
Charging capacity (max.)
-
Charging method (PD)
-
RED-compliant charger available
-
Charging capacity (max.) UNIT
-
Charging capacity (min.) UNIT
-
Charging method (Power Delivery)
For further information on these data fields, see the recommendations for data field mappings.
-
0611041 Action cams
-
1805010 Bluetooth® hands-free sets
-
1310040 Bluetooth® speakers
-
0417038 Camcorders
-
3620048 Digital cameras
-
0417009 Visualisers
-
0415035 eBook readers
-
0413098 eBook reader accessories
-
3620049 Disposable cameras, non-digital photography
-
1801021 EX-proof mobile phones
-
1801040 Mobile phones
-
1312021 Headphones
-
0415223 Laptop keyboards
-
0413102 Beginner’s PC
-
0411022 PC mice
-
1310038 Mini speakers
-
1407014 Portable PA speakers
-
0715024 Motorbike headsets
-
0319011 Satnavs
-
3600038 Nintendo consoles
-
0609050 Outdoor satnavs
-
0403047 Outdoor and industry-grade tablets
-
1407020 Party speakers
-
1413185 PC complete sets
-
0416010 PC speakers
-
0413178 PC systems
-
0411033 Pen displays
-
1801022 Satellite phones
-
3600016 Chess computers
-
1801050 Big button mobile phones
-
1801015 Smartphones
-
1801014 Smartphones (contract)
-
3620047 Instant cameras
-
3620020 DSLR cameras
-
3620050 System cameras
-
0403040 Tablets
-
0413122 Tablet keyboards
-
0420013 Keyboard-mouse combos (desktops)
-
0420012 Keyboards
-
1009014 Phone headset cables
-
0413047 USB-keypads, keypads
-
0601013 Wearables
-
0611046 Wildlife cameras
6.3.5. Activating the catalogue export
You have set up Conrad in PlentyONE and created a catalogue for exporting your item data? Then start the export of your item data. To do so, activate the catalogues which should be exported to Conrad in the Data » Catalogues menu.
Activating the catalogue export to Conrad:
-
Go to Data » Catalogues.
→ The catalogues are listed. -
Scroll to the Conrad catalogue.
-
In the Active column, move the toggle button to the right ().
→ The catalogue is active.
→ The catalogue data is exported to Conrad once a day.
Tip: Go to Data » Catalogue export status for information about the status of the export.
7. Exporting offer data
Offer data is exported to Conrad using catalogues. Go to Data » Catalogues to create catalogues for Conrad.
Catalogues are used to export data from your PlentyONE system. There are two different catalogue formats:
-
Marketplace formats are used to export item data to markets.
-
Standard formats are used to export data from your PlentyONE system into a file.
Catalogues with marketplace formats allow you to tailor your item information exactly to the needs of the market. Because here, you assign a suitable PlentyONE data field to each of the data fields of the market. When your variation data is exported to the market, the market’s data fields are then filled with the correct PlentyONE data.
-
Is this your first time working with catalogues? Then read up on the basic concept of catalogues first.
7.1. Creating an offer catalogue
Offer data is exported to Conrad via a catalogue. Go to Data » Catalogues to create catalogues for Conrad. Then, map the Conrad data fields to offer data saved in PlentyONE in the catalogue you created. If you have activated the catalogue, the account and the variations, the offer data is automatically exported to Conrad once a day.
Creating a catalogue:
-
Go to Data » Catalogues.
-
Click Create catalogue (add).
-
Enter a name for the catalogue.
-
In the drop-down list Marketplace, select the option Conrad.
-
In the drop-down list Export type, select the option Item (new).
-
In the drop-down list Category, select Offer.
-
Save () the settings.
→ The catalogue is created.
→ The catalogue is opened for editing.
Other catalogue settings
Other catalogue settings are optional. Once you carried out the settings described on this page, your catalogue is automatically exported to Conrad. That means you can ignore the catalogue settings for Format settings, Export settings and Download settings.
The Format settings, Export settings, and Download settings allow you to create a file with the variation data contained in the catalogue. However, this file does not contain information about whether the data export to Conrad was successful.
|
Do not change the format in the catalogue’s Format settings. To ensure that the export to the sales channel works, all required settings are already configured when you create a catalogue. If you change the settings, errors might occur during the export. |
7.1.1. Mapping data fields in the offer catalogue
After you have created an offer catalogue, map the channel’s data fields to item data saved in PlentyONE. This chapter describes how you map data fields and what particularities apply for offer exports to Conrad.
-
The market expects product data that cannot be saved in the PlentyONE item menu? Then create a property for this data. Link this property with your variations. The actual values are saved as property values for this property. Is this your first time working with properties? Then read up on the principles of properties first.
| Availability | Explanation |
|---|---|
Navigation |
When you open a catalogue, the view Mapping is shown. On the very left is the navigation.
|
Toolbar |
The toolbar provides actions for the catalogue. For example, save your mappings, restore an older version of the catalogue or hide or show optional marketplace data fields. |
Marketplace data field |
To the right of the navigation, all data fields available for the market are listed. Mandatory fields are marked with an asterisk (✱). |
PlentyONE data fields |
On the right side of the catalogue, you map the marketplace data fields to appropriate PlentyONE data fields. In the screenshot above, a few of the fields are already mapped. |
Mapping catalogue fields:
-
Go to Data » Catalogues.
-
Click on the catalogue.
→ The Mapping tab opens.
→ In the left-hand column, the market’s data fields are listed.
Tip: Mandatory fields are flagged with an asterisk (*).
→ In the right column, you map the PlentyONE data fields. Any PlentyONE data fields that you already mapped are also shown in this column. -
Map suitable PlentyONE data fields to the market data fields.
For each marketplace data field, you have a number of mapping options. Expand the info boxes below to get more information about each of these mapping options.-
Simple 1:1 mapping
-
Simple 1:1 mapping with properties
-
Complex 1:1 mapping
-
1:1 mapping with fallback data fields
-
1:n mapping
-
Own value mapping
-
Mapping with mathematical calculations
-
-
Save () the catalogue.
→ The mappings are saved.
In a simple 1:1 mapping, you map a PlentyONE data field to the marketplace data field. If no suitable setting exists in PlentyONE. you can map a property instead.
As such, simple 1:1 mappings allow you to:
-
I want to fill this marketplace data field with the data from this PlentyONE setting.
-
If the data field is empty for a variation, no value is exported for this variation.
Creating a simple 1:1 mapping:
-
Next to the marketplace data field, click on + Add data field.
→ To the left, the list of available PlentyONE data fields are shown in groups. -
Click on the group you need.
→ The PlentyONE data fields of the group are shown. -
Click on the plus to the right of the PlentyONE data field you want to select.
→ The PlentyONE data field is added to the right. -
Click on Confirm.
Example: Sales price and RRP for Otto Market
This gif shows you how to map the marketplace data fields Sales price and RRP for Otto Market to PlentyONE data fields:
Reminder: In a simple 1:1 mapping, you map a PlentyONE data field to the marketplace data field. However, what can you do if PlentyONE does not offer a suitable data field? Then it’s the properties' moment to shine. Properties allow you to save any kind of information in your properties.
-
Is this your first time working with properties? Then read up on the principles of properties first.
Creating a property:
-
Create a property with the necessary values.
Tip: Find out how to do that here.
Creating a simple 1:1 mapping with properties:
-
Next to the marketplace data field, click on + Add data field.
→ To the left, the list of available PlentyONE data fields are shown in groups. -
Expand the group Property.
→ The property groups are shown. -
Expand the group you need.
-
Click on the Plus sign on the right of the property you want.
-
From the drop-down list Language, select the language in which you send the data to the market.
-
Click on Confirm.
→ The property is mapped to the marketplace data field.
Like with the simple 1:1 mappings, you map a PlentyONE setting or property to a marketplace data field. Complex mappings are necessary whenever a marketplace data field has more than one possible value. Instead of mapping data fields, for complex mappings you map individual values of these data fields. For example, you cannot simply map the PlentyONE data field Shipping profile to the marketplace data field Shipping method. Why? The market cannot know which of your shipping profiles in PlentyONE corresponds to which of their shipping methods.
| Do not enter own values for complex mappings. All values that you enter must be saved for the variations, either in a setting or as a property value. This also applies if the value Comparative value is shown. You still need to enter exactly the value of the setting or property that you mapped. |
In complex mappings, the value of the market is always exported. Only when you map an own value, the own value that you enter is exported.
You can recognise complex mappings from the field that is shown below the name of the marketplace data field. Click on the field to show the values available for the marketplace data field.
Examples for complex 1:1 mappings are:
-
Categories
-
Brands
-
Shipping setting
Important: For complex mappings, do not map own values or properties of the type None.
Creating a complex 1:1:n mapping:
-
Click on the field for the marketplace data field.
→ A list of the available values is shown. -
Select the value that you want to map a PlentyONE data field to.
→ The value is mapped. -
Next to the marketplace data field, click on + Add data field.
→ To the left, the available PlentyONE data fields are listed in groups. -
Click on a group.
→ The PlentyONE data fields of the group are shown. -
Click on the PlentyONE data field for which you want to map values.
Important: Do not map own values or properties of the type None. -
Your next steps depend on the PlentyONE data field you selected:
-
Alternative 1: The available values for the PlentyONE data value are shown on the left.
-
Next to the value you want to select, click on the plus.
→ The value is added to the field on the right. -
Click on Confirm.
-
-
Alternative 2: The PlentyONE data field is inserted and the field Comparative value is shown.
-
In the field Comparative value, enter a value that is saved in the setting or the property of the mapped PlentyONE data field.
-
Click on Confirm.
-
-
Alternative 3: The PlentyONE data field is inserted and a drop-down list is shown.
-
Select a value from the drop-down list.
-
Click on Confirm.
→ The value of the marketplace data field is exported, not the value of the PlentyONE data field.
Exception: Only when you map an own value, the own value that you enter is exported.
-
-
Example: Delivery time in days for Otto Market
This gif shows you how to map suitable PlentyONE values to the values of the marketplace data fields Delivery time in days for Otto Market:
In a 1:1 mapping with one or more fallback data fields, you map a PlentyONE data field to the marketplace data field. In addition, you specify one or more fallback data fields. This ensures that the system keeps looking if the first PlentyONE data field is missing or empty.
So this mapping specifies:
-
I want to fill the marketplace data field with the data from the selected PlentyONE setting.
-
If that data field is missing or empty for a variation, the first fallback data field is checked. The value of that fallback data field is exported instead.
-
If the first fallback data field is also missing or empty for the variation, the second fallback data field is checked. If a value is found, the value of the second fallback data field is exported for the variation etc.
Two separate fallback conditions are available:
Null (default) |
The fallback data field is used if the data field above is mapped in the catalogue but not linked to the variation. The condition "Null" is useful when you want to map fallback data fields for the following types of PlentyONE data fields:
Important: When you add a fallback data field, the fallback condition "null" is selected automatically. To apply the fallback condition "leer", you need to change the default setting. |
Empty |
The fallback data field is used if the data field above is mapped in the catalogue and linked to the variation, but is empty. The condition "Empty" is useful when you want to map fallback data fields for the following type of PlentyONE data fields:
Important: When you add a fallback data field, the fallback condition "null" is selected automatically. To apply the fallback condition "leer", you need to change the default setting. |
Note: Even if you assign one or more fallback data fields, the value of only one of those fields is exported. For each variation, the mapped PlentyONE data fields are checked in the order in which you mapped them. This means that if the first data field does not provide a value for a variation, the first fallback data field is exported etc.
Creating a 1:1 mapping with fallback data fields:
-
Next to the marketplace data field, click on + Add data field.
→ To the left, the list of available PlentyONE data fields are shown in groups. -
Click on the group you need.
→ The PlentyONE data fields of the group are shown. -
Click on the plus to the right of the PlentyONE data field you want to select.
→ The PlentyONE data field is added to the right. -
In the list of PlentyONE data fields, click on the plus icon next to the PlentyONE data field that you want to map.
→ The fallback data field is added with the fallback condition "null". -
Alternative 1: To add the fallback data field with the fallback condition "null":
-
Click on Confirm.
→ The fallback data field is exported if the data field above is not linked to the variation.
-
-
Alternative 2: To add the fallback data field with the fallback condition "empty":
-
To the left of the fallback data field, click on the cog ().
→ The window Data column settings is shown. -
For the setting Fallback condition, select the option Empty.
-
Click on Save.
→ The fallback data field is added with the fallback condition "empty". -
Click on Confirm.
→ The fallback data field is exported if the data field above is empty for the variation.
-
Example: Fallback data field for SKU for Otto Market
This GIF shows you the mapping for the OTTO Market marketplace data field SKU. The PlentyONE data field SKU is mapped to this marketplace data field. The PlentyONE data field Variation ID is mapped as the fallback data field. The fallback condition "null" is applied automatically.
Result: The fallback data field Variation ID is exported if the data field SKU is not linked to the variation.
In a 1:n mapping, you map several PlentyONE data fields to the marketplace data field. You can link these data fields with a separator.
So this mapping specifies:
-
I want to combine these PlentyONE data fields during export so that the marketplace data field is filled with the data of these two or more PlentyONE settings.
Creating a 1:n mapping:
-
Next to the marketplace data field, click on + Add data field.
→ To the left, the list of available PlentyONE data fields are shown in groups. -
Click on the group you need.
→ The PlentyONE data fields of the group are shown. -
Click on the plus to the right of the PlentyONE data field you want to select.
→ The PlentyONE data field is added to the right. -
Click on Confirm.
-
To the right of the mapped PlentyONE data field, click on Add data field ().
→ To the left, the list of available PlentyONE data fields again are shown in groups. -
Map one or several additional PlentyONE data fields to the marketplace data field as described above.
-
Click on Confirm.
-
To the very right of the row, click on Settings ().
-
Select a separator from the drop-down list Separator or add a custom separator.
-
Click on Save.
-
Save () the catalogue.
→ The mappings are saved.
→ During the export, the content of the PlentyONE data fields is combined and exported as one field.
You are sure that you want to export the same value for all variations of a catalogue for a marketplace data field? Then specify an own value. This own value is then exported for all variations.
So this mapping specifies:
-
For this marketplace data field, I want to export the value that I entered in the field Own value for all variations of this catalogue. The value you enter is always exported. The value overwrites the market value also in complex mappings where usually the value of the market is exported. As such, make sure you enter an own value that the market accepts for this marketplace data field.
Creating an own value mapping:
-
Next to the marketplace data field, click on + Add data field.
→ To the left, the list of available PlentyONE data fields are shown in groups. -
Click on the plus next to Own value at the top of the list.
→ The field for the own value is added to the view. -
Enter a value into the input field.
→ This value is exported for all variations.
Example: Diameter information
You want to export diameter information for some of your variations. The diameter is saved in centimetres for all your variations. Instead of creating a property for the unit and linking this property to the variations, you can enter the own value cm.
This is an example of how you can map an own value for the diameter unit:
Mathematical calculations allow you to change numerical values automatically during the export.
-
This function only works for data fields that contain numerical values.
-
This functionality is new and not available for all catalogue formats.
So this mapping specifies:
-
I want the numerical value of a PlentyONE data field to be recalculated during the export. Basic arithmetic operations are available for the formulas.
Recalculating numerical values:
-
Next to the marketplace data field, click on + Add data field.
→ To the left, the list of available PlentyONE data fields are shown in groups. -
At the very top of the list, click on the plus icon next to Formula (calculate).
→ The data field Formula is added to the field on the right. -
Click into the data field.
→ The window Modify value is shown. -
Enter a numerical value or select a PlentyONE data field at the bottom right of the window to add it to the calculation (add).
Tip: Use the search function. This helps you to find data fields quickly. -
Optional: If the symbol more_vert is shown in the data field, select the correct assignment for the data field.
Tip: A number tells you how many assignments are necessary for the data field.-
Click on the icon more_vert.
-
In the window shown, select the assignments from the drop-down list.
-
Save the settings.
-
-
Enter numbers and mathematical operators with the on-screen calculator or the keyboard.
-
Save the settings.
→ The entered formula is displayed in the overview.
→ The calculation will be carried out in the next export.
7.1.2. Recommendations for data field mappings
To help you with mapping your data fields for the catalogue, we have created a list of recommended data field mappings. Note that these mappings are recommendations only. Depending on how you manage your item data, other mappings may be more appropriate than the recommendation given here.
-
Need more information about the PlentyONE data fields? All data fields are described on the manual page for the standard format Item (new).
| Marketplace field | Mandatory? | Recommended PlentyONE mapping |
|---|---|---|
Offer SKU |
yes |
This data field is assigned automatically. |
Offer SKU status |
no |
This data field is assigned automatically. |
Offer SKU base |
no |
|
ItemID |
no |
This data field is assigned automatically. |
VariationID |
no |
This data field is assigned automatically. |
Offer description |
no |
|
Offer internal description |
no |
The internal offer description. This description will not be shown on Conrad.
|
Offer price |
yes |
The sales price of the item.
|
Offer price additional info |
no |
Additional information about the sales price. |
Offer quantity |
no |
The stock of the variation.
Tip: Use the data fields in the group Virtual warehouse to export the stock quantity sum of all sales warehouses. |
Minimum quantity alert |
no |
You will be informed via email when the stock reaches the defined minimum quantity. If you do not enter a quantity here, then you will not receive an email. |
Availability start date |
no |
When will the item be available?
|
Availability end date |
no |
Until when will the item be available?
|
Discount price |
no |
The offer price. |
Discount start date |
no |
When will the discount start? |
Discount end date |
no |
When will the discount end? |
Lead time to ship (in days) |
no |
The processing time in days until the item can be shipped.
|
Update/delete |
no |
This data field is automatically mapped with UPDATE so that items can be updated on Conrad. |
Active channels |
no |
This data field is assigned automatically. |
Product ID Type |
||
Product ID Type |
yes |
Preferably use the EAN as the identifier, as Conrad can uniquely identify the product based on the EAN. If the product already exists at Conrad, the system will automatically link the product to its corresponding Conrad SKU. If you use EAN as the Product ID Type, map the data source Barcode » GTIN13 to Product ID.
The SKU at Conrad is different from the PlentyONE SKU. The Conrad SKU is a unique identifier assigned by Conrad to each product. If you want to add items to existing offers with content provided by Conrad, you can map the relevant Conrad SKU. If you use SKU as the Product ID Type, map a property of the type Text or Selection to Product ID. The value of this property must exactly match the Conrad SKU of the product.
Instead of the EAN, you can also use the SHOP_SKU as the identifier. If you use SHOP_SKU as the Product ID Type, make sure that you use the same mapping for Product ID as in the item catalogue. Example: If you have mapped the Variation ID to Product ID in the item catalogue, also use the Variation ID for Product ID here. |
Offer state |
||
Offer state |
yes |
The item’s condition, for example new or used.
|
Logistics class |
||
Logistics class |
no |
Conrad calculates the shipping costs of an item with the item’s logistic class. |
Free return |
||
Free return |
no |
Can the item be returned free of charge?
Allowed values: |
Return costs |
||
Return costs |
yes |
|
7.1.3. Notes on mapping data fields
Data fields with different mapping options
In the catalogues, you will find data fields that allow both simple and complex 1:1 mapping. This selection gives you the flexibility to adapt the mapping to the nature of your data.
Example: The data field Offer State in the offer catalogue
For the data field Offer State, both the simple and the complex mapping are marked as mandatory. You only have to configure one of these two options.
-
Simple 1:1 mapping: Select this option if the value for the data field should be the same for all your offers in the catalogue. For example, if you only offer new products and the status New (value 11) applies to all items.
-
Complex 1:1 mapping: This option is useful if you want to transmit different values for the data field. For example, if you offer new and used products at the same time and therefore need to transmit the status New (value 11) as well as the status Very good (value 13). The complex mapping allows you to react flexibly to different values for item settings or properties.
If you want to transmit the status New for all items:
-
Next to the marketplace data field, click add Add data source.
→ To the left, the list of available PlentyONE data fields are shown in groups. -
Click on the plus next to Own value at the top of the list.
→ The field for the own value is added to the view. -
Enter the value 11 into the input field.
→ This value is exported for all variations.
Note: Make sure that the value corresponds to the marketplace standard. In this case, 11 corresponds to the status New at Conrad. You can find the list of valid values in the Mirakl backend.
If you want to transmit the condition New for some items and the condition Very good for other items:
Create mapping for new items:
-
Click on the field for Offer State.
→ A list of the available values is shown. -
Select the value New.
→ The value 11 is mapped. -
Next to the marketplace data field, click add Add data source.
→ To the left, the available PlentyONE data fields are listed in groups. -
Click Item » Condition ID.
→ The PlentyONE data field is inserted and the field Comparative value is shown. -
In the field Comparative value, enter the value that is saved in the item settings for the selected status. For example 0 for New.
-
Click Confirm.
Create mapping for used items:
-
Click add Add Offer State.
-
Click on the field for Offer State.
→ A list of the available values is shown. -
Select the value Very good.
→ The value 13 is mapped. -
Next to the marketplace data field, click add Add data source.
→ To the left, the available PlentyONE data fields are listed in groups. -
Click Item » Condition ID.
→ The PlentyONE data field is inserted and the field Comparative value is shown. -
In the field Comparative value, enter the value that is saved in the item settings for the selected status. For example 1 for Used.
-
Click Confirm.
You can find further details on the configuration of simple and complex mapping in the chapter Mapping data fields in the offer catalogue.
7.1.4. Activating the catalogue export
You have set up Conrad in PlentyONE and created a catalogue for exporting your offer data? Then start the export of your offer data. To do so, activate the catalogues which should be exported to Conrad in the Data » Catalogues menu.
Activating the catalogue export to Conrad:
-
Go to Data » Catalogues.
→ The catalogues are listed. -
Scroll to the Conrad catalogue.
-
In the Active column, move the toggle button to the right ().
→ The catalogue is active.
→ The catalogue data is exported to Conrad once a day.
Tip: Go to Data » Catalogue export status for information about the status of the export.
8. Manually managing the data exchange
In the menu Setup » Markets » Conrad » Data exchange you can import and export data manually. This menu is mainly meant to test the export. For example, you can only export specific product and offer data or only import individual orders to PlentyONE. This can be helpful if you want to test the export or if you have to import missing orders.
8.1. Manually exporting product and offer data
In the Setup » Markets » Conrad » Data exchange » Data export menu, you can export individual items and offers to Conrad. For example, this can be helpful if you want to test the export to Conrad or if you only want to export individual items.
Note: In the Data export menu, you can already export data even if the account has not been activated yet. This way, you can test the export with individual items and offers before you activate the account and exchange data with Conrad.
Manually exporting an item:
-
Go to Setup » Markets » Conrad » Data exchange » Data export.
-
Select the Account from the drop-down list.
-
Select a Catalogue from the drop-down list.
-
Enter one or more Item IDs separated by comma. Those items will then be exported to Conrad.
-
Click file_upload Export.
Note: You can run this process every 30 minutes. Items cannot be exported manually between 24.00 - 6.00 CET.
Tip: Click Preview to generate e preview of the export.
Manually exporting offers:
-
Go to Setup » Markets » Conrad » Data exchange » Data export.
-
Select the Account from the drop-down list.
-
Select a Catalogue from the drop-down list.
-
Enter one or more Item IDs separated by comma. The offers for those items will then be exported to Conrad.
-
Click file_upload Export.
Note: You can run this process every 15 minutes.
Tip: Click Preview to generate e preview of the export.
8.2. Manually importing orders
In the Setup » Markets » Conrad » Data exchange » Order import menu, you can manually import individual orders into PlentyONE.
You can either enter the order IDs of the orders you want to import, or you can import orders from a specific time frame.
Note: You can run this process every 15 minutes.
Import orders by ID:
-
Go to Setup » Markets » Conrad » Data exchange » Order import.
-
Click the tab Import orders by order ID.
-
Enter one or more order IDs into the input field Order IDs. Separate the IDs by comma if you enter more than one ID.
-
Click Import.
→ The orders are imported into PlentyONE.
Import orders by date:
-
Go to Setup » Markets » Conrad » Data exchange » Order import.
-
Click the tab Import orders by date.
-
Enter a start date in the format D.M.YYYY or select a date via the calendar (today).
-
Enter an end date in the format D.M.YYYY or select a date via the calendar (today).
-
Click Import.
→ Orders from the selected time frame are imported into PlentyONE.
9. Automating order processing
You can automatically inform Conrad about changes to the order status by using one of the following options:
-
Option 1: PlentyONE Flow (recommended)
-
Option 2: Event procedures (old method)
9.1. Option 1: PlentyONE Flow (recommended)
Create event-based flows to automatically inform Conrad about changes to the order status. The following actions are available for Conrad in the PlentyONE Flow Studio:
-
Automatically inform Conrad that the order was confirmed. (How?)
-
Automatically inform Conrad that the order was rejected. (How?)
-
Automatically inform Conrad that the items have been shipped. (How?)
-
Automatically inform Conrad about cancellations. (How?)
-
Automatically inform Conrad about refunds. (How?)
With PlentyONE Flow (short: "Flow"), you can automate workflows for your business processes. Flow provides you with two functions in the Automation menu:
-
In Flow Studio, you create and configure automated workflows. Depending on the trigger type, there are three flow types: event-based, time-based or manual.
-
In the Flow Tracker, you can monitor running or completed workflows.
The central element in both functions is the Canvas – a graphical interface on which the workflows are visualised with Actions and Controls. In Flow Studio the canvas can be edited, in Flow Tracker it is only used for visualisation and is therefore read-only.
-
Is this your first time working with PlentyONE Flow? Then read up on the basic concept of Flow first.
9.1.1. Reporting order confirmation to Conrad
Create an event-based flow to automatically inform Conrad about the order confirmation.
-
Go to Automation » Flow Studio.
-
Click Create flow (add).
→ A stepper opens and guides you through the following three steps.-
General
-
Enter a unique name and, if necessary, a description for the new flow.
-
Click Next.
-
-
Trigger
-
Select Event-based as the trigger.
-
Click Next.
-
-
Settings
-
If desired, select a UI from the optional drop-down list Flow available in.
→ The option to manually trigger the flow directly from the selected UI is added to the group functions in that UI.
Note: UIs currently selectable: Order UI. -
From the drop-down list Trigger selection, select the event according to Table 4.
Note: If the trigger event has additional settings, then these are invariably mandatory. Without performing these settings, you will not be able to save the flow. -
Save () the settings.
→ The flow is created.
→ The Flow Studio Canvas appears, on which two elements are already displayed: The trigger type and the placeholder for the next step.
Note: With some event-based flows you cannot save the flow if it consists of only a trigger. In such cases, you need to add at least one further step.
-
-
-
Configure the new flow according to Table 4.
-
Save () the settings.
Note: The selected statuses, controls and filters in Table 4 only serve as an example. Select the statuses, controls and filters for the flow which best suit your workflow.
| Setting | Option | Selection | |||||||||
|---|---|---|---|---|---|---|---|---|---|---|---|
Trigger selection |
Select a trigger, for example:
|
For Order types, select the type Incomplete order. |
|||||||||
Controls |
Branch |
|
|||||||||
Actions |
Plugin (Legacy) > Conrad |
Accept incomplete order on Conrad |
9.1.2. Reporting order rejection to Conrad
Create an event-based flow to automatically inform Conrad about the rejection of an order.
-
Go to Automation » Flow Studio.
-
Click Create flow (add).
→ A stepper opens and guides you through the following three steps.-
General
-
Enter a unique name and, if necessary, a description for the new flow.
-
Click Next.
-
-
Trigger
-
Select Event-based as the trigger.
-
Click Next.
-
-
Settings
-
If desired, select a UI from the optional drop-down list Flow available in.
→ The option to manually trigger the flow directly from the selected UI is added to the group functions in that UI.
Note: UIs currently selectable: Order UI. -
From the drop-down list Trigger selection, select the event according to Table 5.
Note: If the trigger event has additional settings, then these are invariably mandatory. Without performing these settings, you will not be able to save the flow. -
Save () the settings.
→ The flow is created.
→ The Flow Studio Canvas appears, on which two elements are already displayed: The trigger type and the placeholder for the next step.
Note: With some event-based flows you cannot save the flow if it consists of only a trigger. In such cases, you need to add at least one further step.
-
-
-
Configure the new flow according to Table 5.
-
Save () the settings.
Note: The selected statuses, controls and filters in Table 5 only serve as an example. Select the statuses, controls and filters for the flow which best suit your workflow.
| Setting | Option | Selection | |||||||||
|---|---|---|---|---|---|---|---|---|---|---|---|
Trigger selection |
Select a trigger, for example:
|
For Order types, select the type Incomplete order. |
|||||||||
Controls |
Branch |
|
|||||||||
Actions |
Plugin (Legacy) > Conrad |
Reject incomplete order on Conrad |
9.1.3. Reporting shipping confirmation to Conrad
Create an event-based flow to automatically inform Conrad when you have shipped the items of an order.
-
Go to Automation » Flow Studio.
-
Click Create flow (add).
→ A stepper opens and guides you through the following three steps.-
General
-
Enter a unique name and, if necessary, a description for the new flow.
-
Click Next.
-
-
Trigger
-
Select Event-based as the trigger.
-
Click Next.
-
-
Settings
-
If desired, select a UI from the optional drop-down list Flow available in.
→ The option to manually trigger the flow directly from the selected UI is added to the group functions in that UI.
Note: UIs currently selectable: Order UI. -
From the drop-down list Trigger selection, select the event according to Table 6.
Note: If the trigger event has additional settings, then these are invariably mandatory. Without performing these settings, you will not be able to save the flow. -
Save () the settings.
→ The flow is created.
→ The Flow Studio Canvas appears, on which two elements are already displayed: The trigger type and the placeholder for the next step.
Note: With some event-based flows you cannot save the flow if it consists of only a trigger. In such cases, you need to add at least one further step.
-
-
-
Configure the new flow according to Table 6.
-
Save () the settings.
Note: The selected statuses, controls and filters in Table 6 only serve as an example. Select the statuses, controls and filters for the flow which best suit your workflow.
| Setting | Option | Selection | ||||||
|---|---|---|---|---|---|---|---|---|
Trigger selection |
Select a trigger, for example:
or
|
Select an order status, for example:
|
||||||
Controls |
Branch |
|
||||||
Actions |
Plugin (Legacy) > Conrad |
Report shipping confirmation to Conrad |
9.1.4. Automatically reporting cancellations
Create an event-based flow to automatically inform Conrad about cancellations. Note that orders marked as shipped can no longer be cancelled.
Different flows can be created, depending on the reason for the cancellation. The following actions are available for Conrad to report a cancellation:
-
Report cancellation to Conrad: Item no longer available
-
Report cancellation to Conrad: Content error
-
Report cancellation to Conrad: Cancelled by the client prior to shipping
-
Report cancellation to Conrad: Customer complaint
-
Report cancellation to Conrad: Delivery address undeliverable / goods returned
-
Report cancellation to Conrad: Return
-
Report cancellation to Conrad: Cancellation request of the customer
-
Report cancellation to Conrad: Wrong payment term
-
Report cancellation to Conrad: Agreement reached between buyer and seller
-
Report cancellation to Conrad: Too long shipping time
-
Send cancellation to Conrad
-
Go to Automation » Flow Studio.
-
Click Create flow (add).
→ A stepper opens and guides you through the following three steps.-
General
-
Enter a unique name and, if necessary, a description for the new flow.
-
Click Next.
-
-
Trigger
-
Select Event-based as the trigger.
-
Click Next.
-
-
Settings
-
If desired, select a UI from the optional drop-down list Flow available in.
→ The option to manually trigger the flow directly from the selected UI is added to the group functions in that UI.
Note: UIs currently selectable: Order UI. -
From the drop-down list Trigger selection, select the event according to Table 7.
Note: If the trigger event has additional settings, then these are invariably mandatory. Without performing these settings, you will not be able to save the flow. -
Save () the settings.
→ The flow is created.
→ The Flow Studio Canvas appears, on which two elements are already displayed: The trigger type and the placeholder for the next step.
Note: With some event-based flows you cannot save the flow if it consists of only a trigger. In such cases, you need to add at least one further step.
-
-
-
Configure the new flow according to Table 7.
-
Save () the settings.
Note: The selected statuses, controls and filters in Table 7 only serve as an example. Select the statuses, controls and filters for the flow which best suit your workflow.
| Setting | Option | Selection | ||||||
|---|---|---|---|---|---|---|---|---|
Trigger selection |
Select a trigger, for example:
|
Select a status, for example:
or
|
||||||
Controls |
Branch |
|
||||||
Actions |
Plugin (Legacy) > Conrad |
or
|
9.1.5. Reporting refunds to Conrad
Create an event-based flow to automatically inform Conrad about refunds.
Different flows can be created, depending on the reason for the refund request. The following actions are available for Conrad to report a refund:
-
Report refund to Conrad: Item not received
-
Report refund to Conrad: Item returned
-
Report refund to Conrad: Agreement with vendor
-
Report refund to Conrad: Out of stock
-
Report refund to Conrad: Cancelled before shipping
-
Go to Automation » Flow Studio.
-
Click Create flow (add).
→ A stepper opens and guides you through the following three steps.-
General
-
Enter a unique name and, if necessary, a description for the new flow.
-
Click Next.
-
-
Trigger
-
Select Event-based as the trigger.
-
Click Next.
-
-
Settings
-
If desired, select a UI from the optional drop-down list Flow available in.
→ The option to manually trigger the flow directly from the selected UI is added to the group functions in that UI.
Note: UIs currently selectable: Order UI. -
From the drop-down list Trigger selection, select the event according to Table 8.
Note: If the trigger event has additional settings, then these are invariably mandatory. Without performing these settings, you will not be able to save the flow. -
Save () the settings.
→ The flow is created.
→ The Flow Studio Canvas appears, on which two elements are already displayed: The trigger type and the placeholder for the next step.
Note: With some event-based flows you cannot save the flow if it consists of only a trigger. In such cases, you need to add at least one further step.
-
-
-
Configure the new flow according to Table 8.
-
Save () the settings.
Note: The selected statuses, controls and filters in Table 8 only serve as an example. Select the statuses, controls and filters for the flow which best suit your workflow.
| Setting | Option | Selection | ||||||
|---|---|---|---|---|---|---|---|---|
Trigger selection |
Select a trigger, for example:
|
Select an order type, for example:
|
||||||
Controls |
Branch |
|
||||||
Actions |
Plugin (Legacy) > Conrad |
|
9.2. Option 2: Event procedures (old method)
Set up event procedures to automatically inform Conrad about changes to the order status. The following event procedures are available for Conrad:
-
Automatically inform Conrad that the order was confirmed. (How?)
-
Automatically inform Conrad that the order was rejected. (How?)
-
Automatically inform Conrad that the items have been shipped. (How?)
-
Automatically inform Conrad about cancellations. (How?)
-
Automatically inform Conrad that an item was refunded. (How?)
9.2.1. Reporting order confirmation to Conrad
Set up an event procedure to automatically inform Conrad about the order confirmation.
-
Go to Setup » Orders » Events.
-
Click on Add event procedure ().
→ The Create new event procedure window opens. -
Enter a distinct name for the event procedure.
-
Select the event according to Table 9.
-
Save () the settings.
-
Carry out the additional settings according to Table 9.
-
Select the setting Active ().
-
Save () the settings.
Note: The selected statuses and filters in Table 9 only serve as an example. Select filters and statuses for the event procedure which best suit your workflow.
| Setting | Option | Selection |
|---|---|---|
Event |
Select an event, for example:
|
|
Filter 1 |
Order > Order type |
Order |
Filter 2 |
Order > Referrer |
Conrad |
Procedure |
Plugin |
Accept incomplete order on Conrad |
9.2.2. Reporting order rejection to Conrad
Set up an event procedure to automatically inform Conrad about the rejection of an order.
-
Go to Setup » Orders » Events.
-
Click on Add event procedure ().
→ The Create new event procedure window opens. -
Enter a distinct name for the event procedure.
-
Select the event according to Table 10.
-
Save () the settings.
-
Carry out the additional settings according to Table 10.
-
Select the setting Active ().
-
Save () the settings.
Note: The selected statuses and filters in Table 10 only serve as an example. Select filters and statuses for the event procedure which best suit your workflow.
| Setting | Option | Selection |
|---|---|---|
Event |
Select an event, for example:
|
|
Filter 1 |
Order > Order type |
Order |
Filter 2 |
Order > Referrer |
Conrad |
Procedure |
Plugin |
Reject incomplete order on Conrad |
9.2.3. Automatically sending shipping confirmations
Set up an event procedure to automatically inform Conrad when you have shipped the items of an order.
-
Go to Setup » Orders » Events.
-
Click on Add event procedure ().
→ The Create new event procedure window opens. -
Enter a distinct name for the event procedure.
-
Select the event according to Table 11.
-
Save () the settings.
-
Carry out the additional settings according to Table 11.
-
Select the setting Active ().
-
Save () the settings.
Note: The selected statuses and filters in Table 11 only serve as an example. Select filters and statuses for the event procedure which best suit your workflow.
| Setting | Option | Selection |
|---|---|---|
Event |
Select an event, for example:
|
Select an event, for example [7] Shipped. |
Filter 1 |
Order > Order type |
Order |
Filter 2 |
Order > Referrer |
Conrad |
Procedure |
Plugin |
Report shipping confirmation to Conrad |
9.2.4. Reporting cancellations to Conrad
Set up an event procedure to automatically inform Conrad of cancellations. Note that orders marked as shipped can no longer be cancelled.
Different event procedures can be created, depending on the reason for the cancellation. The following event procedures are available for Conrad to report a cancellation:
-
Report cancellation to Conrad: Cancelled by the client prior to shipping
-
Report cancellation to Conrad: Cancellation: Wrong payment term
-
Report cancellation to Conrad: Cancellation: Too long shipping time
-
Report cancellation to Conrad: Cancellation: Agreement reached between buyer and seller
-
Report cancellation to Conrad: Item no longer available
-
Report cancellation to Conrad: Cancellation request of the customer
-
Report cancellation to Conrad: Return
-
Report cancellation to Conrad: Customer complaint
-
Report cancellation to Conrad: Content error
-
Report cancellation to Conrad: Delivery address undeliverable / goods returned
-
Report cancellation to Conrad: Photovoltaic systems or accessories
-
Go to Setup » Orders » Events.
-
Click on Add event procedure ().
→ The Create new event procedure window opens. -
Enter a distinct name for the event procedure.
-
Select the event according to Table 12.
-
Save () the settings.
-
Carry out the additional settings according to Table 12.
-
Select the setting Active ().
-
Save () the settings.
| Setting | Option | Selection |
|---|---|---|
Event |
Order change: Status change |
Select a status, for example [8] Cancelled. |
Filter |
Order > Referrer |
Conrad |
Procedure |
Plugin |
Select an event procedure for Report cancellation to Conrad with the appropriate reason. |
9.2.5. Reporting refunds to Conrad
Set up an event procedure to automatically inform Conrad that an item was refunded.
Different event procedures can be created, depending on the reason for the refund. The following event procedures are available for Conrad to report a refund:
-
Report refund to Conrad: Agreement with vendor
-
Report refund to Conrad: Cancelled before shipping
-
Report refund to Conrad: Item not received
-
Report refund to Conrad: Item returned
-
Report refund to Conrad: Out of stock
-
Go to Setup » Orders » Events.
-
Click on Add event procedure ().
→ The Create new event procedure window opens. -
Enter a distinct name for the event procedure.
-
Select the event according to Table 13.
-
Save () the settings.
-
Carry out the additional settings according to Table 13.
-
Select the setting Active ().
-
Save () the settings.
Note: The selected statuses and filters in Table 13 only serve as an example. Select filters and statuses for the event procedure which best suit your workflow.
| Setting | Option | Selection |
|---|---|---|
Event |
Select an event, for example: Order generation: New credit note |
|
Filter |
Order > Referrer |
Conrad |
Procedure |
Plugin |
Select an event procedure for Report refund to Conrad with the appropriate reason. |
10. Download reports
In the Setup » Markets » Conrad » Reports menu, you can download reports for offer export and item export. These reports are generated after an offer or item export to Conrad.
Table 14 contains an overview of the reports in the Setup » Markets » Conrad » Reports menu.
| Column | Explanation |
|---|---|
Date |
Creation date of the report in the format YYYY.MM.DD hh:mm:ss |
Status |
The processing status of the report.
|
Integration Details |
The number of imported products or offers. |
Transform Lines |
The number of rows in the report in which no errors occurred and the number of rows in which errors occurred. |
Download |
Download report (file_download): The report is downloaded. |
Downloading a report:
-
Go to Setup » Markets » Conrad » Reports.
-
Click Filters (tune) at the top of the menu.
-
Select a report type. The available report types are listed in Table 15.
-
Click Search (search).
→ The selected filter is applied and the appropriate reports are displayed.
→ The active filter is displayed at the top of the menu.
Tip: If you want to change the filter, you can reset (refresh) it. Then select the desired filter as described above. -
Click Download report (file_download).
→ The report is downloaded.
| Report type | Explanation |
|---|---|
Offers |
The offer report contains information on the offer export to Conrad. |
Products |
The product report contains information on the item export to Conrad. |
11. Switching from the Conrad plugin to the Conrad Core Integration
If you are using the Conrad plugin, you can transfer your settings and SKUs to the new Conrad Core Integration.
11.1. Transferring settings to the Core Integration
To migrate your settings from the Conrad plugin, you have to manually configure them in the Conrad Core Integration. The following table shows which settings from the plugin assistant need to be transferred, along with their corresponding locations in the Conrad Core Integration.
| Settings in the plugin assistant | Settings section of the Conrad Core Integration |
|---|---|
Authentication |
|
API key |
Setup » Markets » Conrad » Settings » [Open account]
|
Data exchange |
|
Configuration for automated order import, item and offer export |
Setup » Markets » Conrad » Settings » [Open account]
|
Options for the offer export |
The setting for the offer export is omitted. |
Refunds |
|
Mapping of refund reasons |
You don’t need to map refund reasons. Instead, event procedures with different refund reasons are used. |
Cancellations |
|
Mapping of cancellation reasons |
You don’t need to map cancellation reasons. Instead, event procedures with different cancellation reasons are used. |
Warehouse selection |
|
Warehouse selection |
You directly map your warehouses via the offer quantity data field in the corresponding offer catalogue. Pay attention to the recommendations for data field mappings. |
Shipping profiles |
|
Shipping profile mapping |
Setup » Markets » Conrad » Settings » [Open account]
|
Offer properties |
|
Offer properties mapping |
You specify which offer data is transferred via the data field mapping in the corresponding offer catalogue. |
11.2. Transferring SKUs
Follow the steps below to transfer the SKUs from your Conrad plugin account to your Conrad Core Integration account.
Transferring SKUs for product catalogues:
Important: This process can only be carried out once per account. Therefore, you should only transfer your SKUs when you know that you will no longer be creating new products on Conrad via the Conrad plugin.
-
Go to Setup » Markets » Conrad » Settings » [Open account].
-
Click Migrate plugin SKUs in the Offers section.
→ The plugin SKUs will be transferred to your Conrad Core Integration account.
→ You can now manage your existing products and offers via the Conrad Core Integration catalogues.
Note: Your plugin product catalogues cannot be migrated to the Core Integration product catalogues. Instead, create new product catalogues and then map the data fields accordingly.
To manage your offers, no SKU transfer is required. Instead, you manage your offers via offer catalogues. In these catalogues you map the data fields from Conrad to the corresponding fields in your system. Pay attention to the recommendations for data field mappings.