DocumentBuilder
|
Instructional video and guided tours available
|
PlentyONE’s DocumentBuilder enables you to create document templates, tailor them to your needs, and manage them centrally. It also contains a range of preconfigured default templates for certain document types, which you can use directly or adapt as required. To access DocumentBuilder, open the Settings » Documents » DocumentBuilder menu.
1. DocumentBuilder overview
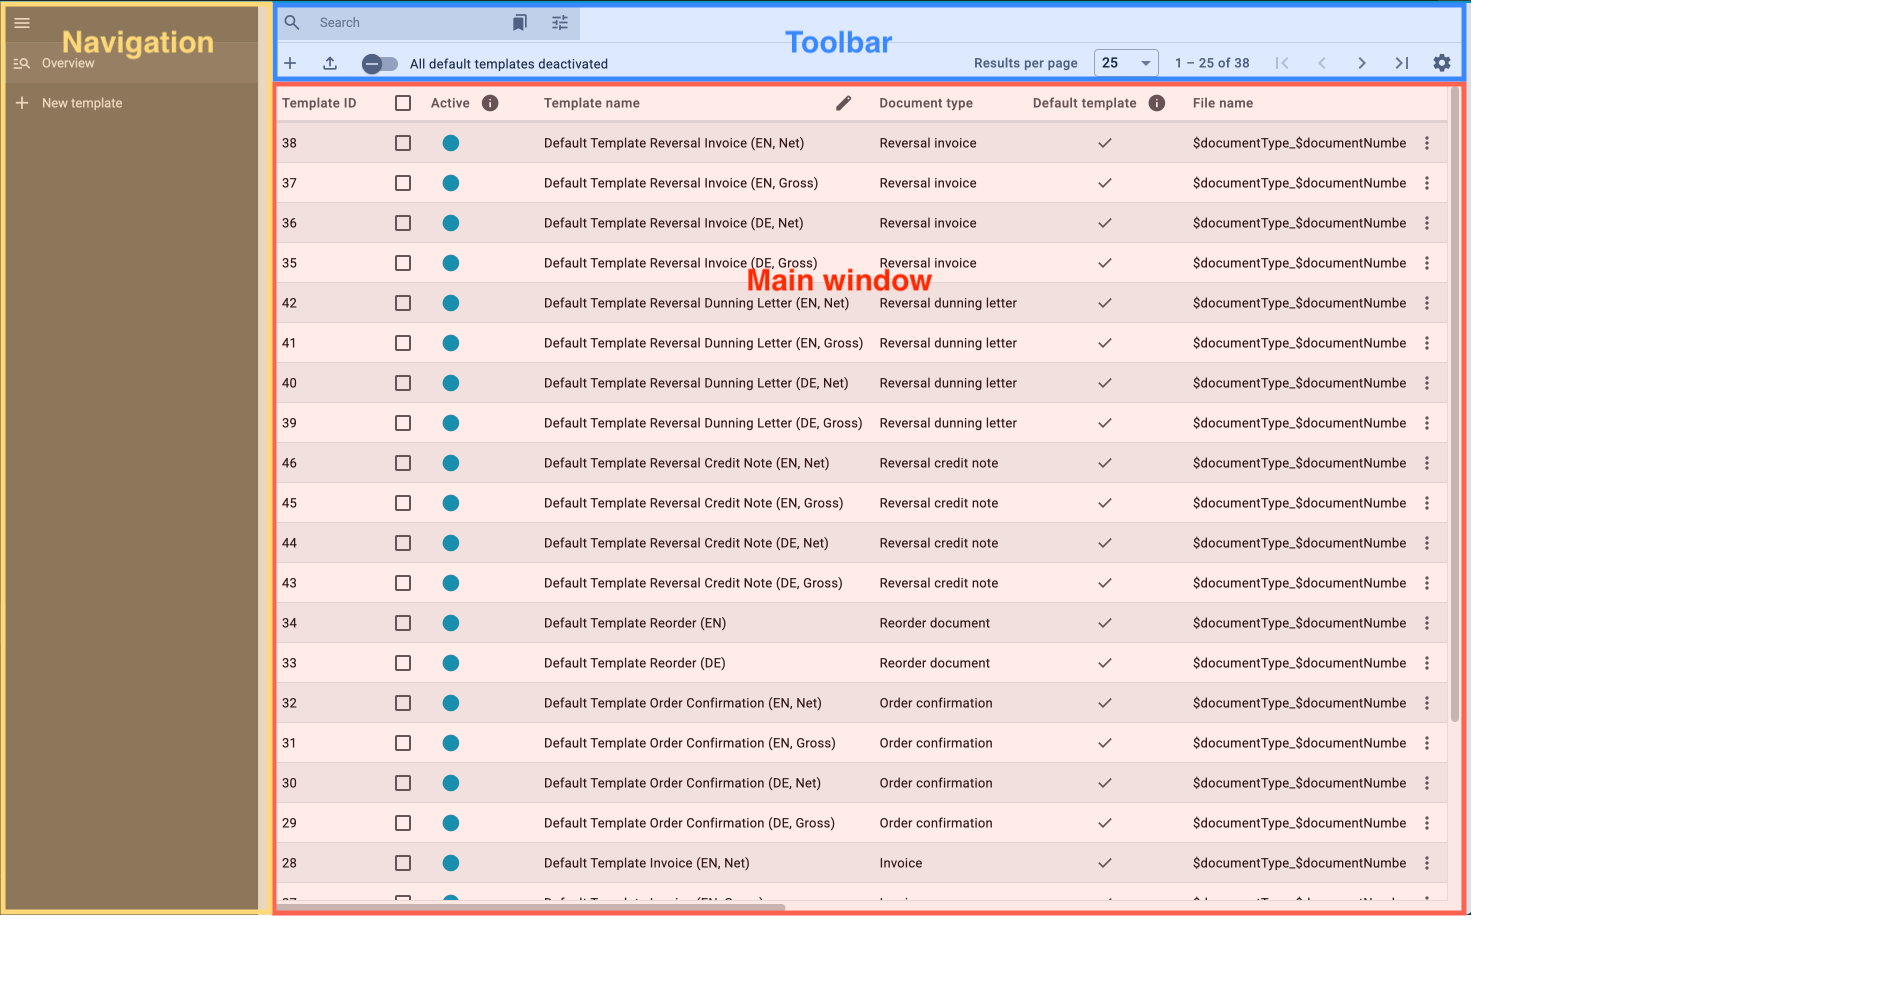
When you open the Settings » Documents » DocumentBuilder menu, the DocumentBuilder overview shown below appears.
Note: To have the overview list all existing templates, click on Search (manage_search) at the top of the toolbar.
-
Navigation: Use to navigate between the template overview (manage_search) and the templates currently opened (description). The area currently selected (grey background) is displayed in the main window on the right. Click on add New template in the navigation to create a new template. Click on menu to expand or collapse the navigation bar.
-
Toolbar: Use to:
-
configure the columns in the main window (settings),
-
search for templates and having them displayed in the overview (search),
-
set, save and use filters (bookmarks),
-
import templates (upload),
-
select all the templates displayed in the overview in order to collectively open or delete them (check_box_outline_blank).
-
-
Main window: This window displays one of the two following views, depending on what is currently selected in the navigation column:
-
Overview: If you click on search (manage_search), the templates found are listed in the overview, with template-specific information provided in the various columns. At the far right end of each template row is the context menu (more_vert). Use it to activate or deactivate a template, and to delete, copy or export a template. Use check_box_outline_blank to select templates in order to open or delete them.
-
Template view: If you open a template in the overview or in the navigation column, it appears here for you to view or edit.
-
2. Instructions for the functions in the overview screen
This sub-chapter contains instructions for the functions available in the DocumentBuilder overview, as outlined in sub-chapter 1 .
|
Quick access to the other DocumentBuilder manual pages:
To open one of the other DocumentBuilder manual pages, click on the corresponding link below: |
2.1. Configuring columns in the DocumentBuilder overview
You can define which columns to display in the overview, and which order to display them in.
Configuring columns in the overview:
-
Open the Setup » Documents » DocumentBuilder menu.
-
At the top right, click on Configure columns (settings).
→ The window Configure columns opens. -
Select (check_box) the columns to be displayed. Pay attention to the explanations given in Table 1.
-
Move (drag_indicator) the columns via drag-and-drop to the desired position until they are displayed in the desired order.
-
Add (check_box) or remove (check_box_outline_blank) columns as needed.
-
Click on Confirm.
→ The settings are saved.
| Column | Explanation |
|---|---|
Active |
Shows whether the template is active (circle) or inactive (circle). Note: Only if a template is active can it be used to generate documents. |
Template name |
Shows the name of the template. The names of custom templates are assigned by the users. |
Document type |
Shows the type of document (e.g. invoice, credit note, etc.). |
Default template |
Indicates whether the template is a standard template. Standard templates have a (done). |
File name |
Shows the name of the document. |
Tags |
Shows the template’s tags. |
Last (de)activation |
Shows the date on which the template was last deactivated. |
Header is used in other templates / Footer is used in other templates |
Indicates that the header/footer in the template is a global header/footer and therefore used in other templates. |
Header from template / Footer from template |
Displays the name of the referrer template from which the header / footer is taken. |
3. Edit fields directly in the DocumentBuilder overview
You can edit some fields directly in the DocumentBuilder overview. This is called inline editing.
This feature is currently available for the following columns:
-
Template
-
File name
-
Tags
Proceed as follows to edit the fields in the overview.
Edit fields directly in the DocumentBuilder overview:
-
Go to *Setup » Documents » DocumentBuilder *.
→ The DocumentBuilder overview opens. -
Perform a Search (search) to display the available templates.
-
Click on edit in the header of the column for which you want to activate inline editing mode.
→ The fields in that column become editable. → Above the header several icons specific to inline editing mode appear. Note the explanations for these in Table 2.

| Symbol | Element | Explanation |
|---|---|---|
save |
Save |
Saves the changes. |
undo |
Undo |
Undoes the last change, unless this change has already been saved. |
redo |
Redo |
Restores the previously undone change. |
app_registration |
Activate the editing mode for all columns |
If you click on edit at a field that has editing mode available, you can click on app_registration to activate the editing mode for all columns. |
playlist_remove |
Deactivate the editing mode for all columns |
Click on playlist_remove to deactivate the editing mode for all columns and return to the overview. |
3.1. Creating a template
To find out how to create a template in DocumentBuilder, go to the manual page Creating a new template, where you will find detailed instructions on creating and copying templates, and on adjusting the different template settings.
3.2. Searching templates
Use the search function in the DocumentBuilder to list all existing templates or to search for specific templates using search terms or filter settings.
Searching templates:
-
Open the Setup » Documents » DocumentBuilder menu.
-
Option 1: Click on search for a list of all templates.
-
Option 2: Enter a search term into the search field and click on search to list all templates containing the search term in their name.
-
Option 3: Click on tune to filter the search results. Table 3 lists all available filters.
-
| Filter | Explanation | |
|---|---|---|
Template name |
Enter the name of the template to filter for templates with that name. |
|
Document type |
Select one or more document types from the drop-down list to filter for templates assigned to these document types. The following document types are available:
Important: You can only use the document type Incoming items receipt if you use the PlentyONE Warehouse app. For additional information, refer to the Booking incoming items page of the manual. |
|
Delivery country |
Select one or more delivery countries from the drop-down list to filter for templates with these delivery countries. |
|
Net/Gross |
Select whether the template has gross or net values to filter for templates with these values. |
|
Payment method |
Select one or more payment methods from the drop-down list to filter for templates with these payment methods. |
|
Tags |
Enter the name of one or more tags to filter for templates with these tags. All tags that exist for the type of document template are displayed here for selection. |
|
Referrer |
Select one or more referrers from the drop-down list to filter for templates with that referrer. |
|
Language |
Select one or more languages from the drop-down list to filter for templates with that language. |
|
Customer class |
Select one or more customer classes from the drop-down list to filter for templates with that customer class. |
|
Activate |
Choose whether you want to filter by inactive or active templates. |
|
Default template |
Choose whether you want to filter according to whether the templates are default templates. |
|
Location |
Select one or more client locations from the drop-down list to filter for templates with these locations. |
|
Warehouse |
Select one or several warehouses from the drop-down list. You can choose between different warehouse types, such as Distribution or Repair warehouses. |
|
Supplier ID |
Enter the ID of the supplier to filter by. |
|
Inbound warehouse |
Enter the ID of the inbound warehouse to filter by. |
|
Outbound warehouse |
Enter the ID of the outbound warehouse to filter by. |
|
Header referrer |
Select one or more referrers from the drop-down list to filter for templates that use the selected header referrer/s. |
|
Footer referrer |
Select one or more referrers from the drop-down list to filter for templates that use the selected footer referrer/s. |
|
Contains global header |
Select this option to filter templates according to whether they contain a global header. |
|
Contains global footer |
Select this option to filter templates according to whether they contain a global footer. |
| Element | Explanation |
|---|---|
replay |
Resets the selected filter criteria. |
search SEARCH |
Starts the search. |
3.3. Saving the current filter
If you narrow a template search in DocumentBuilder using a search term or the filter settings, you can save those search settings to create a custom filter. This way, you can perform the same search quickly and easily in future.
Saving the current filter:
-
Adjust the settings accordingly and click on Search (search).
-
Click on Saved filters (bookmarks).
-
Click on bookmark_border Save current filter.
-
Enter a name and toggle the optional settings as needed (toggle_on).
-
Click on Save.
→ The new custom filter now appears under Saved filters. (bookmarks).
3.4. Applying saved filters
-
Click on Saved filters (bookmarks).
→ A window appears containing the names of the custom filters saved so far. -
Click on the custom filter that you require.
→ The search results appear and the filter settings are displayed in the top section of the overview as chips.
3.5. Activating/deactivating templates
Activating/deactivating templates:
-
Open the Setup » Documents » DocumentBuilder menu.
→ The DocumentBuilder overview opens. -
Click on Search (search) to display document templates.
-
Click on the context menu (more_vert) on the far right side of the template row.
-
Click on task Activate template or task Deactivate template.
-
Confirm your decision.
Or: Open a template and use the toggle button (toggle_on) at the top on the screen to activate or deactivate the template. (toggle_off).
→ The template is activated/deactivated and the date in column Last (de)activation is updated.
Note: You can only activate a template if no other template in DocumentBuilder has exactly the same settings. Moreover, if a template is in an activated state, you cannot make changes to it (except to the name).
|
Only deactivated templates can be edited
Once a template has been activated, it is available for orders and cannot be edited. |
3.6. Copying a template
To find out how to copy a template in DocumentBuilder, go to the manual page Creating a new template, where you will find detailed instructions on creating and copying templates, and on adjusting the different template settings.
3.7. Exporting templates
Exporting DocumentBuilder templates is quick and easy.
Note: In current systems, the template export function is only available for Scale and Ultimate contract types. The function is not available for Lite, Lite+, and Expand contract types. Contact our sales team to upgrade your contract if necessary.
Exporting templates:
-
Open the Setup » Documents » DocumentBuilder menu.
→ The DocumentBuilder overview opens. -
Click on Search (search) to display document templates.
-
Click on the context menu (more_vert) on the far right side of the corresponding template row.
-
Click on file_downloadExport template.
Or: Open the template you want to export. -
Click on Export template (file_download) at the top.
→ The template is exported in .tpl format.
3.8. Importing templates
Use the import function to reimport exported DocumentBuilder templates.
Note: Templates that require extensive customisation can be exported, adapted as necessary in an external system, then reimported to DocumentBuilder.
Importing templates:
-
Open the Setup » Documents » DocumentBuilder menu.
→ The DocumentBuilder overview opens. -
In the top left corner, click on file_upload (Import template).
-
From the files on your computer, select the template you want to import.
-
Click on Open.
→ The template is imported.
3.9. Deleting a template
|
The option to delete a template* is not available for default templates or active templates
To delete active custom templates, you first need to deactivate them. Default templates cannot be deleted. |
Deleting a template:
-
Open the Setup » Documents » DocumentBuilder menu.
→ The DocumentBuilder overview opens. -
Click on Search (search) to display document templates.
-
Click on the context menu (more_vert) on the far right side of the template row.
-
Click on Delete template.
-
Confirm your decision.
→ The template is deleted.