Planning your warehouse
This page provides information about the different options for editing warehouses and other related settings. Here, you learn how to create a new warehouse that replicates your real-life warehouse 1:1 in your system. Furthermore, you learn how to set up box storage racks that can be used as interim storage for multi order picking.
-
Setting up your warehouse effectively is a crucial step for the shipping process and helps you save a lot of time. Thus, take enough time beforehand to consider how to replicate your warehouse effectively and establish optimal picking routes.
-
To make optimal use of all tools, such as plentyBase, assign a label with a barcode to each storage location.
|
To register stock and book incoming orders, you need at least one warehouse.
Your system comes with 2 sample warehouses: one distribution warehouse (KS Sales) and one repair warehouse (KS Repair). You can either rename and continue using these warehouses or delete them and set up your own ones. To register stock and book incoming items, your system needs at least one warehouse. Consequently, you cannot manage your stock without a warehouse. Incoming orders are assigned to a warehouse according to item availability. |
Assigning rights for back end users
Users with roles that are not of the type Administrator can only see certain sections and menus in PlentyONE. This means they only have limited access to the system. If employees work with warehouses, they need at least the following rights:
-
Stock > Warehouses > Edit
Note that only users with roles of the type Administrator can grant rights.
Assigning rights:
-
Open the menu Setup » Account management » Roles.
→ The roles overview opens. -
Click on New (add).
→ The role creation menu opens. -
Enter a name for the role.
-
Switch to the advanced mode by toggling Advanced (toggle_on) slider.
-
Assign the rights for the respective section by ticking the check boxes indicated above.
Note: You can either grant rights for complete sections or limit the rights you grant the user. To only grant limited rights in a certain section, expand the section. -
Save (save) the settings.
|
The simple mode and advanced mode are connected. If you check menu visibilities in the simple mode the corresponding permissions in the advanced mode will be checked automatically. The connection only exists in this direction. If you check permissions in the advanced mode no menu or plugin visibilities will be checked automatically. |
1. Planning a warehouse
Warehouses consist of dimensions, such as storage buildings, racks or shelves. All dimensions together constitute the layout of your warehouse. These dimensions can be freely defined. When defining the dimensions, start with the smallest dimension and then continue with all further dimensions in ascending order.
|
Applying sample dimensions
The layout of sample warehouses and newly-created warehouses alike always provides 2 sample dimensions. These dimensions are not saved. You can apply, rename or delete dimensions. However, you need at least one dimension to create a storage location. |
| Setting | Explanation |
|---|---|
Dimension |
Dimensions are the basic structuring units of your warehouse. Later on, the dimensions function as a basis for the actual levels of a warehouse. Levels are the concrete applications of a dimension. For example, if you define a storage building as a dimension in your layout, storage buildings 1, 2 and 3 are its concrete applications. |
Storage location |
In PlentyONE, storage locations are no dimensions. Storage locations are the actual places in which you keep your products. You need at least one dimension to create a storage location. Dimensions are superior to storage locations. |
A pick list with optimal picking routes depends on the position of the storage locations. Your settings determine if a dimension influences the position of storage locations. A pick list begins with the lowest position and is sorted in ascending order.
2. Setting up a warehouse
The process of setting up a warehouse consists of 3 basic steps. First, enter general information such as the name and the purpose of the warehouse. Then add further general information, such as the address of the warehouse. In step 2, you create dimensions that subdivide your warehouse. In a last step, you create the storage locations.
2.1. Managing general warehouse data
You have to manage the following data for each warehouse, no matter if you edit and continue working with sample warehouses or if you create new warehouses.
Creating a new warehouse:
-
Go to Setup » Stock » Warehouse.
-
Click on New warehouse.
→ The view for creating warehouses opens. -
Enter a name.
-
Select a Warehouse type.
-
Select a Logistics type.
-
Save () the settings to create the warehouse.
→ The warehouse settings for managing further general data open.
The new warehouse is added to the warehouse list in alphabetical order. In order to add further data for your warehouse, proceed as follows.
Managing general warehouse data:
-
Go to Setup » Stock » Warehouse.
-
Select a warehouse.
-
Click on Settings.
-
Carry out the settings according to Table 2.
-
Save () the settings.
| Setting | Explanation |
|---|---|
Warehouse ID |
ID of the warehouse. It is automatically assigned by the system and cannot be edited. |
Warehouse name |
Name of the warehouse |
Warehouse type |
Selecting a warehouse type according to purpose: |
Logistics type |
Information about the party managing the warehouse |
Warehouse assigned for repairs |
Here, you can select Repair warehouses. This selection links a warehouse to a repair warehouse, in which e.g. returned items can be stored for repairs. This way, faulty items are not mixed up with regular stock. Once the items have been repaired or replaced, re-assign them to the sales warehouse. |
Priority |
Determine the priority of the warehouse. From + (lowest priority) to +++++ (highest priority). |
Split up according to shipping profile |
Determine whether you want to split by shipping profile. In case you are working with Delivery orders select Yes here. |
Location |
Location of the warehouse. |
Warehouse keeper name |
The name of the warehouse keeper. You can change the name here if required. Note: When restocking Amazon FBA goods, you need a SSCC label containing the sender address. If the Warehouse keeper name is entered, the Warehouse keeper name will be displayed in the sender address instead of the Warehouse name. |
Steet; |
Location of the warehouse. |
Standard storage location type |
The standard storage location type which should be set as default in the warehouse settings, such as in the Warehouse tab of the item settings. |
Average price |
Choose how the average price for the warehouse is calculated. |
Choose between active and inactive. |
|
Availability with stock and |
These options determine which availability is displayed if stock exists or does not exist. This setting takes priority over the symbol selected to represent Availability in the Settings tab of a variation. It is however important that the options Show in online store: Available automatically if net stock is positive; Not available automatically if net stock is 0 or negative have also been selected in the variation’s Settings tab. |
Available for order referrers (with automatic warehouse selection) |
Here, you select the order referrers for which the warehouse should be preferred. If an order comes in via one of the selected referrers, this warehouse is selected during the process of automatic warehouse assignment. |
Note |
Here you can enter notes that you want to save as additional information for the warehouse. |
Stocktaking mode active |
The stocktaking mode freezes the stock of the warehouse while you are taking stock. |
|
Automatic processes only for warehouse type Sales warehouse
Automatic processes, such as for reserving stock, displaying stock availability in the online store, showing status changes in orders, creating pick and packing lists as well as for calculating the average sale are only available for the warehouse type Sales warehouse. These automatic processes cannot be applied to any of the other warehouse types. Therefore, make sure to book items for sale into a sales warehouse. |
2.2. Creating dimensions
Create dimensions in order to divide your warehouse into basic elements. At least one dimension is needed to create storage locations. For example, a dimension can be a storeroom. You can create up to 10 dimensions for each warehouse. The dimensions are the actual levels of a warehouse.
Consider in advance which dimensions you want to create, and start with the smallest one (e.g. shelf). This one will receive the highest level (e.g. when creating 4 dimensions, it will have level 4). Thus, note that the dimension with the highest level will be the smallest one in the warehouse. Therefore, create the dimensions in ascending order of size (e.g. shelf (level 4) > rack (level 3) > zone (level 2) > storage building (level 1).
|
Applying or deleting sample dimensions
The layout of each warehouse contains 2 sample dimensions. These dimensions are not saved. You can apply, rename or delete them. However, you need at least one dimension to create a storage location. |
Creating a dimension:
-
Go to Setup » Stock » Warehouse.
-
Select a warehouse.
-
Click on Dimensions.
→ The overview opens. -
Enter a name for the dimension.
-
Carry out further optional settings. Pay attention to the explanations given in Table 3.
-
On the right, click on Add new dimension ().
→ You can now add another dimension. To do so, repeat steps 4 to 6. -
Save () the settings.
→ The dimensions are created.
A new dimension is automatically added as the biggest one. If you add further dimensions, they take priority, i.e. they are bigger. Thus, you should begin with the smallest dimension.
|
At least one dimension required for storage location
As long as there are no storage locations, it is possible to delete all dimensions. If storage locations exist, there has to be at least one dimension. |
| Setting | Explanation |
|---|---|
Name |
Name is a mandatory field. Do not use more than 56 characters. You may use numbers, letters and special characters. |
Prefix |
Enter a prefix. Up to 3 characters are possible. You may use numbers, letters and special characters. The prefix is placed before the level numbering. If the dimension is included in the name of the storage location, the prefix is displayed in the name of the storage location as well. |
Separator |
Choose a separator that will be displayed after the dimension. |
Include position for pick path |
Determine whether the position of the dimension should be considered in the pick path. |
Display in name |
Decide whether the dimension should be included in storage location names. |
2.3. Creating storage locations
Create storage locations to indicate the actual areas for storing your items. Variations can only be booked in actual storage locations, not in dimensions. Creating multiple storage locations at once is also really easy. As soon as storage locations are created, they are sorted by pick path.
Assigning rights for back end users
Users with roles that are not of the type Administrator can only see certain sections and menus in PlentyONE. This means they only have limited access to the system. If employees work with storage locations, they need at least the following rights:
-
Stock > Warehouses > Warehouse location > Update
-
Stock > Warehouses > Warehouse location > Show
-
Stock > Warehouses > Warehouse location > Create
Note that only users with roles of the type Administrator can grant rights.
Assigning rights:
-
Open the menu Setup » Account management » Roles.
→ The roles overview opens. -
Click on New (add).
→ The role creation menu opens. -
Enter a name for the role.
-
Switch to the advanced mode by toggling Advanced (toggle_on) slider.
-
Assign the rights for the respective section by ticking the check boxes indicated above.
Note: You can either grant rights for complete sections or limit the rights you grant the user. To only grant limited rights in a certain section, expand the section. -
Save (save) the settings.
|
The simple mode and advanced mode are connected. If you check menu visibilities in the simple mode the corresponding permissions in the advanced mode will be checked automatically. The connection only exists in this direction. If you check permissions in the advanced mode no menu or plugin visibilities will be checked automatically. |
Creating storage locations:
-
Go to Setup » Stock » Warehouse.
-
Select a warehouse.
-
Click on Storage locations.
-
At the top, click on Add storage location ().
-
Carry out the settings. Pay attention to the explanations given in Table 4.
-
Save () the settings.
→ A preview containing sample storage location names is displayed. -
Click on Generate to create storage locations.
The storage locations are generated continuously in the background. Although the first storage locations are already displayed, the process is not finished yet. A notification is displayed once all storage locations have been created.
| Setting | Explanation |
|---|---|
Dimensions |
|
Prefix |
The prefix is automatically assigned on the basis of the dimension’s settings and can be entered there. It is displayed here. |
From |
Enter the starting value and the end value for the dimension. Letters, numbers and some combinations of letters and numbers are allowed.
The following combinations and values are not allowed:
|
Starting position |
The starting position is only visible if you want the dimension to be considered for the position of the storage locations. |
Display in name |
Here, it is displayed whether the dimension is included in the storage location name or not. This is determined in the settings of the dimension. |
Storage location |
|
Prefix |
Enter the prefix for storage locations. The default setting is SL for storage location. The prefix is no mandatory field. |
Create storage locations from |
Enter a starting value and an end value for storage locations. Letters, numbers and some combinations of letters and numbers are allowed.
The following combinations are not allowed:
|
Starting position |
Enter the starting position. Only numbers are allowed. |
Display in name |
Storage locations are always displayed in the name. |
Details |
|
Purpose |
Select the purpose of the storage location. The following purposes are available:
Use the purpose Box for mobile picking. Note: The purpose does not have any impact on other menus in the PlentyONE back end yet. |
Status |
Select a status. The default setting is Active. |
Notes |
Here you can leave notes regarding the storage location. |
Storage location type |
Select the type of the storage location. Here you can decide, whether you want to select another storage location type than the one that has already been defined as standard storage location type in the warehouse settings. |
Properties |
|
Property |
Select the property of the storage location. Properties have to be created in advance. |
Value |
Select a value. This field is only available, if the property is a selection property. |
|
Blocking stock with status Locked in status 4
Use the status Locked in status 4 in order to block items in a storage location and to lock them for removal. If orders have stock in a locked storage location, they do not automatically switch from status 4 (In preparation for shipping) to status 5 (Cleared for shipping) anymore. To make this work, go to the Setup » Orders » Settings menu and activate the option Status changes to 4 instead of 5 if stock is missing. To ensure that orders still go into status 5, it is recommended to rebook the stock into active storage locations. |
2.4. Limitations
When creating dimensions or generating storage locations there are some limitations that need to be considered. Moreover, specific letter and number combinations should be used for inputs into the generator.
| Setting | Limitation |
|---|---|
Maximum number of dimensions that can be created |
10 |
Minimum number of dimensions required |
1 |
Number of characters for the name |
56 |
Number of characters for the prefix (no numbers) |
3 |
| Setting | Limitation |
|---|---|
Maximum number of storage locations per dimension |
200 |
Maximum number of storage locations per generation |
100,000 |
Only letters or numbers, but no special characters like *!% |
|
No decimals |
|
No letters for the start position |
|
Maximum number of characters in the note box |
500 |
Can be used |
A to C |
Cannot be used |
A1 to B1 |
3. Changing the warehouse structure
You can change the structure of your warehouse after it’s been created. For example, you can modify existing dimensions or add new dimensions.
3.1. Changing the name of a dimension
-
Go to Setup » Stock » Warehouse » [Select warehouse] » Storage locations.
-
Click on account_tree Structure.
-
Click on the dimension that you want to change, for example a storage rack, shelf or a storage location.
→ Information about the dimension is displayed on the right. -
Change the name as needed.
-
Save () the settings.
3.2. Moving a dimension
-
Go to Setup » Stock » Warehouse » [Select warehouse] » Storage locations.
-
Click on account_tree Structure.
-
Click on the dimension that you want to change, for example a storage rack, shelf or a storage location.
→ Information about the dimension is displayed on the right. -
Click on Move (compare_arrows).
→ Further settings become visible. -
Open the drop-down list Placement and select Insert in front of… or Insert behind….
-
Use the drop-down list Target to specify which element the dimension should be placed before or after.
-
Click on Select (done).
-
Save () the settings.
|
Positions will be re-assigned
The position numbers will automatically be updated when you move an element. For example, if you move storage location D between A and B, then its position will change from 4 to 2. The other storage locations will be repositioned accordingly.
|
3.3. Adding a new dimension
-
Go to Setup » Stock » Warehouse » [Select warehouse] » Storage locations.
-
Click on account_tree Structure.
-
Navigate to the appropriate level and click on New [Dimension name].
→ Settings are displayed on the right. -
Carry out the settings.
-
Save () the settings.
| Setting | Explanation |
|---|---|
Name |
Enter a name for the new dimension. |
Placement |
Decide where the new dimension should be situated.
Note: Either use this setting or the position. If you use this setting for placing the new dimension, then it will not be possible to enter a position number. |
Position |
Decide where the new dimension should be situated. Do so by entering a position number. Note: Either use this setting or the placement. If you use this setting for positioning the new dimension, then it will not be possible to select a placement. |
Purpose |
Select the purpose of the storage location. The following purposes are available:
Use the purpose Box for mobile picking. Note: The purpose does not have any impact on other menus in the PlentyONE back end yet. |
Status |
Select a status. The default setting is Active. |
Notes |
Here you can leave notes regarding the storage location. |
3.4. Deleting a dimension
-
Go to Setup » Stock » Warehouse » [Select warehouse] » Storage locations.
-
Click on account_tree Structure.
-
Click on the dimension that you want to delete, for example a storage rack, shelf or a storage location.
→ Information about the dimension is displayed on the right. -
Click on remove in the upper right corner.
|
Before you delete storage locations or dimensions
|
4. Deleting stocks and warehouses
You can either delete the stocks of a warehouse or a complete warehouse including all stocks. In both cases, the stock movements are deleted as well.
|
Stocks cannot be restored.
It does not matter whether you only delete stocks and corresponding stock movements or the warehouse including all stocks and stock movements. Stocks and stock movements cannot be restored. In any case, use the delete function carefully, since it is linked to a variety of other menus, such as Listings. Deleting stocks may deactivate your offers on marketplaces. |
4.1. Deleting stocks
Deleting stocks completely empties a warehouse. Stock movements are deleted as well. However, dimensions and storage locations remain unchanged.
Deleting stocks of a warehouse:
-
Go to Setup » Stock » Warehouse.
-
Select a warehouse.
-
Click on Settings.
→ The warehouse settings open. -
Click on Delete ().
→ A window for deleting the storage location opens. -
To transfer pending orders to another warehouse, select a new warehouse via the drop-down list Change warehouse to.
-
Click on Delete () once again.
→ The warehouse and all its stocks are deleted.
Note: It is not recommended to delete stocks that way, as this is not GoBD compliant (German guidelines for bookkeeping). Instead, it is advised to export stocks via the catalogue format Stocks, to adapt the CSV file by setting the stocks to zero and to reimport the zeroed stocks afterwards. Thus, the stock movements don’t get lost and legally compliant working is guaranteed.
4.2. Deleting a warehouse
By deleting a warehouse, you remove all stocks, stock movements, storage locations and dimensions of the warehouse.
Deleting a warehouse:
-
Go to Setup » Stock » Warehouse.
-
Select a warehouse.
-
Click on Settings.
→ The warehouse settings open. -
At the top, click on Delete stock and stock movements completely.
→ You are asked to confirm your decision. -
Click on OK to delete the stocks and stock movements.
Note: Deleting the stock also deletes the stock movements. Thus, they can’t be restored, which is not GoBD compliant.
5. Creating box storage racks for packing
Box storage racks are used as interim storage for multi order picking. Box storage racks are only available in processes.
|
Maximum number of box storage racks
You can set up a maximum of 100 boxes for each box storage rack. |
Setting up a box storage rack:
-
Go to Setup » Stock » Warehouse » [select a warehouse] » submenu: Box storage racks.
-
Click on New box rack.
-
Carry out the settings. Pay attention to the explanations given in Table 8.
-
Save () the settings.
→ The box storage rack is created.
| Setting | Explanation |
|---|---|
Name |
Enter a name for the box storage rack. |
Start box |
Enter the number of the first box of the box storage rack. |
End box |
Enter the number of the last box of the box storage rack. |
6. Labelling storage locations
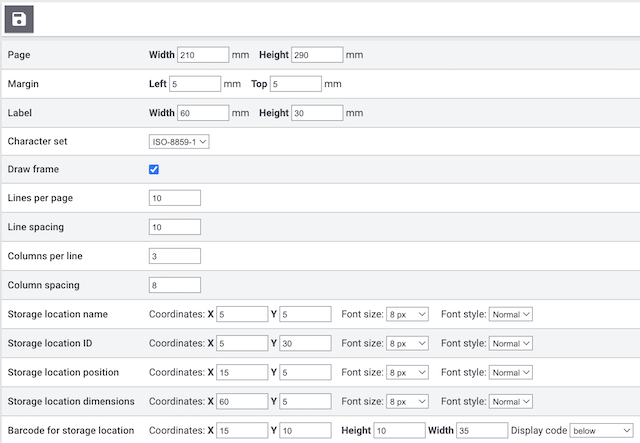
Scanning your items and the storage location in which they should be stored helps you to book items in quickly. Therefore, add scannable labels to your storage locations. Image 1 shows example settings for a label that is as wide as the page:
Creating labels for storage locations:
-
Go to Setup » Stock » Warehouse » [select a warehouse] » submenu: Label
-
Carry out the settings. Pay attention to the explanations given in Table 9.
-
Save () the settings.
→ The label is created.
|
Zero point of the coordinate system
The zero point of the coordinate system is located in the top left corner. The x-axis goes from left to right and the y-axis from top to bottom. Experiment with the settings until the label meets your requirements. |
| Setting | Explanation |
|---|---|
Page |
Enter the width and height (in mm) of the paper used for printing. |
Margin |
Enter the desired margins. They define where the label will be placed on the page. |
Label |
Enter the width and height (in mm) of the storage location label. |
Character set |
Select a character set from the drop-down list. |
Draw frame |
Activate the checkbox in order to frame the label. |
Lines per page |
Enter the number of lines to be printed per page. This number defines how many labels are printed one below the other on a page. The height of a single label also affects the number of labels that can be printed one below the other. |
Line spacing |
Enter the line spacing (in mm). It defines the space between two labels positioned one below the other. |
Columns per line |
Enter the number of columns to be printed per line. This number defines how many labels are printed side by side in a line. Make sure that the width of the labels allows positioning the labels next to each other according to their number. |
Column spacing |
Enter the column spacing. It defines the space between two labels that are next to each other. |
Storage location name |
Enter the coordinates for printing the storage location name. |
Storage location ID |
Enter the coordinates for printing the storage location ID. |
Storage location position |
Enter the coordinates for printing the storage location position. |
Storage location dimensions |
Enter the coordinates for printing the warehouse dimensions. This can for example be the name of a shelf or a rack. |
Barcode for storage location |
Enter the coordinates as well as the width and height (in mm) for printing the barcode of the storage location. |
Your warehouse is now set up and you completed the most important steps. In order to have stock available in your system, assign variations to storage locations and book the first incoming items of a variation.
7. Exporting storage locations
Proceed as follows, to export your storage locations as a CSV file:
-
Open the Setup » Item » Sales prices.
-
Click Download data as CSV [matsymbol:download].
-
Select which pages of the table you want to export.
-
Click matsymbol:download EXPORT DATA.
Your selected storage locations will be downloaded as a CSV file.
Export either specific storage locations or whole pages. See Table 10 for more information.
| Option | Explanation |
|---|---|
All pages |
All storage locations on all pages are exported. |
Current page |
Only storage locations on the current page are exported. Set the amount of storage locations per page via Results per page. |
Selected rows |
Only storage locations you selected are exported. Can only be selected, if rows are selected. |
Set the range of table pages |
Enter the range of pages that you want to export. |
8. FAQ
You will find the IDs of your warehouses in the menu Setup » Stock » Warehouse » [select warehouse] » Settings and the IDs of your storage locations in the menu Setup » Stock » Warehouse » [Select warehouse] » Storage locations.
|
ID of standard storage location
The ID of the standard storage location is 0. However, the ID of the standard storage location is only a kind of placeholder. It is sensible to create own storage locations in order to indicate the actual storage location. |
First of all, the mapping of a storage location depends on the stock. In case no stock is available on the regular storage locations, the standard storage location - which always serves as fallback - is mapped.
The mapping of the storage location automatically takes place in Status 5 of the order and is also influenced by the pick path in the warehouse.
In order to ensure that storage locations are assigned when stock is available, enable the setting Status change to 4 instead of 5 if stock is missing by selecting Yes. You can find this setting under Setup » Orders » Settings. Do not move orders manually from status 4 to status 5, as this can cause overselling.
For further information on the mapping of warehouses, take a look at this page which includes details on the order settings.