Carrying out the preparatory settings
To use the Messenger, you first need to carry out some preparatory settings. In this chapter, we will guide you through the most important preparatory settings for Messenger.
1. Overview
Here you can see the following content for preparatory settings for Messenger:
-
General settings
Below you see general settings for Messenger. We recommend that you carry out these settings directly so that you can use Messenger without any problems. -
Groups, types and statuses
Groups, types, and statuses are used to enhance mapping and provide a better overall overview in Messenger. Groups, types and statuses are necessary for many automations and can significantly streamline your processes. By default, groups, types and statuses are preconfigured in PlentyONE for the largest marketplaces (including Amazon, eBay, Kaufland, OTTO) and only need to be set to visible and assigned to a channel. -
Tags
You can use tags to individually match conversations in Messenger according to your wishes. Tags also allow you to use various automations. -
Roles and owners
You can create different roles for your employees in PlentyONE. Conversations can be assigned to an owner. -
Setting up the channels/marketplaces
To set up the different marketplaces, navigate to Setup » CRM » Messenger » Channels and create a new channel. Before doing so, make sure the corresponding group (including type and status) has been created and made visible. This is necessary to assign the group to the channel during the creation process.
2. Messenger setup for marketplaces
In this chapter we will explain how you can set up the Messenger to receive messages from various channels like Amazon, eBay, Kaufland and OTTO. The different marketplaces place specific requirements on the content of the messages. These requirements must always be observed to ensure smooth communication.
|
One email address per marketplace
To set up the Messenger for the various marketplaces, we recommend using a separate email address for each marketplace. |
| Marketplace | Setup | Requirements |
|---|---|---|
Amazon |
You are using the PlentyONE group Amazon. |
|
bol |
Create a new General channel in the Setup » CRM » Messenger » Channels menu. |
No specific requirements. |
eBay |
You are using the PlentyONE group eBay. |
|
Kaufland |
You are using the PlentyONE group Kaufland. |
|
limango |
Create a new General channel in the Setup » CRM » Messenger » Channels menu. |
No specific requirements. |
Netto |
Create a new General channel in the Setup » CRM » Messenger » Channels menu. |
No specific requirements. |
OTTO |
You are using the PlentyONE group OTTO. |
|
Shopify |
Create a new General channel in the Setup » CRM » Messenger » Channels menu. |
No specific requirements. |
WooCommerce |
Create a new General channel in the Setup » CRM » Messenger » Channels menu. |
No specific requirements. |
Zalando |
Create a new General channel in the Setup » CRM » Messenger » Channels menu. |
No specific requirements. |
If users without admin rights should be able to work with the Messenger, a person with Admin access has to assign rights to those users. Moreover, you have to create tags in order that these are available for the Messenger. You also have to grant certain rights for the tags.
2.1. Assigning rights
Users with roles that are not of the type Administrator can only see certain sections and menus in PlentyONE. This means they only have limited access to the system. If employees see and create messages in the messenger, they need at least the following rights:
-
CRM > Message > Read
-
CRM > Message > Create
-
CRM > Messenger > Read
-
CRM > Messenger > Update
-
CRM > Messenger > Create
-
Comments > Read
-
Comments > Create
-
Setup > Tag > Read
-
Setup > Tag > Create
Note that only users with roles of the type Administrator can grant rights.
Assigning rights:
-
Open the menu Setup » Account management » Roles.
→ The roles overview opens. -
Click on New (add).
→ The role creation menu opens. -
Enter a name for the role.
-
Switch to the advanced mode by toggling Advanced (toggle_on) slider.
-
Assign the rights for the respective section by ticking the check boxes indicated above.
Note: You can either grant rights for complete sections or limit the rights you grant the user. To only grant limited rights in a certain section, expand the section. -
Save (save) the settings.
|
The simple mode and advanced mode are connected. If you check menu visibilities in the simple mode the corresponding permissions in the advanced mode will be checked automatically. The connection only exists in this direction. If you check permissions in the advanced mode no menu or plugin visibilities will be checked automatically. |
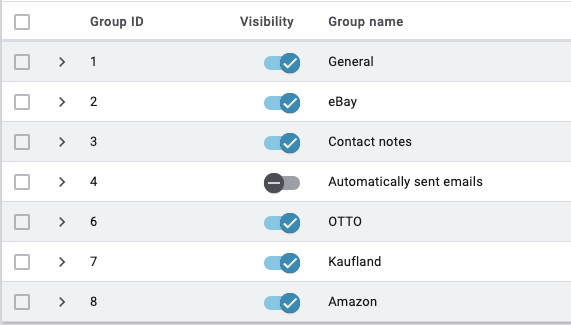
3. Managing groups, types and statuses
In the Messenger, there are groups available. This allows you to obtain a good overview over the individual marketplaces and also to process different types and statuses for individual marketplaces separately from each other, for example.
By clicking on the corresponding group, you can switch between the different groups and the corresponding conversations in the Messenger.
By default, the groups All and General are available and activated in your system.
The groups Amazon, eBay, OTTO, Kaufland, Contact notes and Automatically sent emails are also available in your system but you have to set them to visible, so they are displayed in the Messenger. It is possible to rename the groups.
-
The eBay group contains all eBay messages from your linked eBay account. The messages will be directly retrieved from eBay and imported in your system.
-
The Amazon , OTTO and Kaufland groups are preset to receive emails via the corresponding marketplace.
-
The group Automatically sent emails is used by default when automatic emails are collected in the Messenger.
-
In the contact notes group all internal contacts notes are displayed that were created for the contacts in the contact notes area.
|
Assigning a group to a channel
For optimal use of the Messenger, we recommend using one channel per marketplace so that incoming and outgoing messages can be grouped accordingly. Make sure that you have assigned the correct group when configuring the respective channel. |
Furthermore, add types and statuses for each group so that you can display your conversations even more clearly depending on the group.
3.1. Creating a group
Proceed as described below to create a new group for the Messenger. Note that only a person with Admin rights is able to create groups.
Creating a group:
-
Go to Setup » CRM » Messenger » Groups, types and statuses.
Or: If you are already in the Messenger menu, click on the left side below the settings Settings area onchecklist_rtl Groups, types and statuses. -
Click on addAdd group.
-
Enter a position number.
-
Enter the German name for the group.
-
Click on add (Add language) to add the group name also in English.
-
Click on save.
→ The group is created and the area Types is automatically opened. -
Carry out the settings as described in the chapter Adding types and statuses.
3.2. Setting a group to visible
Proceed as described below to create a group for the Messenger.
Setting a group to visible:
-
Go to Setup » CRM » Messenger » Groups, types and statuses.
Or: If you are already in the Messenger menu, click on the left side below the settings Settings area onchecklist_rtl Groups, types and statuses. -
In the line of the group that you want to set to visible, click on toggle_on Visible.
-
Expand the group and carry out further settings for the types and statuses, if desired.
-
Save (save) the settings.
3.3. Renaming the group
Proceed as described below to rename a Messenger group.
Renaming the group:
-
Go to Setup » CRM » Messenger » Groups, types and statuses.
Or: If you are already in the Messenger menu, click on the left side below the settings Settings area onchecklist_rtl Groups, types and statuses. -
Click in the line of the group that you want to rename to open the group’s detail view.
-
In the Name area, enter a new name in the corresponding language or remove the language by clicking on delete Remove language.
-
Save (save) the settings.
3.4. Selecting the default group
In the Email accounts menu in the Messenger integration section, select a default group in the Groups area. This group will be assigned to new conversations in this inbox. You can find the section in the Setup » Client » Global » Email accounts menu.
For further information, refer to the EmailBuilder page.
|
Tip: One channel per marketplace
Create one channel for each marketplace and select the corresponding default group. |
3.5. Adding types and statuses
Proceed as described below to add types and statuses to a group. Note that only a person with Admin rights is able to create types and statuses.
3.5.1. Adding a type and status
You can create as many different types for a Messenger group as you want, e.g. Customer inquiry or Complaint. In the next step, you can add a status for the type with a colour and a progress indicator in percent. You can create groups, types and statuses in German and English.
|
Creating standard types and statuses within a group
In new systems, default types and statuses already exist for the preset groups. To add the default types and statuses to a group in an existing system, navigate to Setup » CRM » Messenger » Groups, types and statuses, open a group and click on list. |
The following describes how to create a status and a type directly one after the other. If you would like to add further statuses to an existing type at a later stage, the description in the Adding a new status to an existing type chapter will help you.
Adding a type:
-
Go to Setup » CRM » Messenger » Groups, types and statuses.
Or: If you are already in the Messenger menu, click on the left side below the settings Settings area onchecklist_rtl Groups, types and statuses. -
Open the group.
-
In the Types area, click on add Add type.
-
In the Details area, enter a number for the position.
-
In the Names area, enter a name for the type.
-
Enter a name for the type.
Optional: Click on addAdd language to add the type name also in English. -
Save (save) the settings.
→ The type opens and the Status area appears. -
In the Status area, click on add Add status.
-
In the Details area, select a percentage value from the Progress drop-down list.
-
In the Colour field, enter the Hex code of the colour or select the colour by clicking on rectangle.
-
In the Position area, enter a number for the position.
-
Save (save) the settings.
-
In the Names area, enter a name for the status.
Optional: Click on add Add language to add the status name also in English. -
Save (save) the settings.
3.5.2. Adding a new status to an existing type
For each type in the Messenger, determine one or multiple statuses with percentage indicator and colour to track the processing progress of your conversations.
Adding a new status to an existing type:
-
Go to Setup » CRM » Messenger » Groups, types and statuses.
Or: If you are already in the Messenger menu, click on the left side below the settings Settings area onchecklist_rtl Groups, types and statuses. -
Open the group.
-
In the Types area, click in the line of the type that you want to add a status to.
-
In the Status area, click on add Add status.
-
In the Details area, select a percentage value from the Progress drop-down list.
-
In the Colour field, enter the Hex code of the colour or select the colour by clicking on rectangle.
-
In the Position area, enter a number for the position.
-
Save (save) the settings.
-
In the Names area, enter a name for the status.
Optional: Click on add Add language to add the status name also in English. -
Save (save) the settings.
The selected type and the selected status are then shown in the open conversation next to the tags. You can also search for conversations with certain types and statuses and sort the conversations in the overview in ascending and descending order by the type and status (arrow_upward and arrow_downward).
3.6. Creating tags for the Messenger
You can assign tags to the messages in the Messenger and filter them in the overview. Tags are keywords that make grouping messages very easy.
Which user rights are required and how to create tags is explained below.
3.6.1. Assigning rights
Users with roles that are not of the type Administrator can only see certain sections and menus in PlentyONE. This means they only have limited access to the system. If employees be able to work with tags, they need at least the following rights:
-
Setup > Tag
Note that only users with roles of the type Administrator can grant rights.
Assigning rights:
-
Open the menu Setup » Account management » Roles.
→ The roles overview opens. -
Click on New (add).
→ The role creation menu opens. -
Enter a name for the role.
-
Switch to the advanced mode by toggling Advanced (toggle_on) slider.
-
Assign the rights for the respective section by ticking the check boxes indicated above.
Note: You can either grant rights for complete sections or limit the rights you grant the user. To only grant limited rights in a certain section, expand the section. -
Save (save) the settings.
|
The simple mode and advanced mode are connected. If you check menu visibilities in the simple mode the corresponding permissions in the advanced mode will be checked automatically. The connection only exists in this direction. If you check permissions in the advanced mode no menu or plugin visibilities will be checked automatically. |
3.6.2. Creating tags
Tags are texts, like keywords or phrases. First, create all of the necessary tags.
-
Go to Setup » Settings » Tags.
-
Click on .
→ A pop-up window opens. This window is divided into several steps. -
Carry out the settings in each step.
|
Tags can not be created via import
Tags can only be created manually, as described here in the instructions. It is not possible to create tags with the import tool. |
Step: Name
| Setting | Explanation |
|---|---|
Tag name |
Enter a name for the tag. The name is the keyword or phrase that highlights the data record. Tip: The name can include spaces. As such, tag names can consist of multiple words. Note: Once you’ve created the tag, you can translate the name into other languages. |
Tag colour |
What background colour should the tag text have? Click on square and choose the colour. How do I choose a colour?
|
Step: Availabilities
| Setting | Explanation | ||||||||||||||||
|---|---|---|---|---|---|---|---|---|---|---|---|---|---|---|---|---|---|
Availability type |
What do you want to use the tag for? In other words, what types of data records will you link to the tag? Select all of the appropriate availabilities ().
|
Step: Done
| Setting | Explanation | ||||||
|---|---|---|---|---|---|---|---|
Summary |
Here you can see a summary of the settings that you selected. Click on Create tag if you are satisfied with the settings. Afterwards, you will have the following options:
|
| Setting | Explanation |
|---|---|
ID |
The tag ID is automatically assigned and cannot be changed. It is used to uniquely identify your tags. Use case: Tag links can be imported. For example, while you import item and variation data, you can also directly link the appropriate tags. This is done, e.g. by specifying the tag ID. |
Client |
In which plentyShops should the tag be visible to customers? Select all of the appropriate webshops (). Note: This option only appears if you selected the availability Variation. |
Name DE |
Is your plentyShop available in multiple languages? Variation tags can be made visible to customers in the online store. If your online store is available in multiple languages, then the tag names should also appear in these languages.
|
3.6.3. Searching for tags
Use the search function to find your tags and edit them further.
-
Go to Setup » Settings » Tags.
-
Option 1: Click on to see a list of all tags.
-
Option 2: Enter a number or text into the search field and click on one of the automatic suggestions. Then click on to start the search.
-
Option 3: Click on tune to narrow down the search results with filters. See the table below.
-
| Filter | Explanation |
|---|---|
ID |
Enter the ID for a tag. Note: The tag ID can not be changed. It serves to uniquely identify a tag. This search field is useful if you want to find a specific tag. |
Name |
Enter the name of a tag. Note: This is a fuzzy search. The search results will also include tags whose names are similar to the text that you entered. Example: If you enter "collect", then the search results will also include the tags "collectors item" and "collection". |
Availability |
Select one or more availabilities. Note: This is an “or” search. If you select the availabilities "Category" and "Variation", then the search results will include tags that were activated for categories or for variations. |
| Element | Explanation |
|---|---|
Resets the selected filter criteria. |
|
SEARCH |
Starts the search. |
When you start a search, your search settings are displayed up top as so-called “chips”. You can save these search settings to apply them again more quickly and easily in the future.
Saving the current filters:
-
Start a search.
-
Click on Saved filters (bookmarks).
-
Click on bookmark_border Save current filter.
-
Enter a name and toggle the optional settings as needed (toggle_on).
-
Click on Save.
→ The filter settings now appear under Saved filters (bookmarks).
| Element | Explanation |
|---|---|
Set as default |
toggle_on = When you open the menu Setup » Settings » Tags, the filter settings will already be selected and the search will automatically start with these settings. toggle_off = The filter settings will not already be selected. |
Create filter for all users |
toggle_on = The filter preset will be visible for all user accounts. toggle_off = The filter preset will only be visible for your own user account. |
Applying saved filters:
-
Click on Saved filters (bookmarks).
-
Click on an existing filter preset.
→ The search is started and the search settings are displayed up top as so-called “chips”.
When you start the search, you’ll see the results in an overview.
-
Option 1: Click on a tag to open it and edit its settings further.
-
Option 2: Select multiple tags () and click on the pencil icon (). This opens all of the selected tags at once and you can edit their settings further.
3.6.4. Exporting tags
Proceed as follows, to export your tags as a CSV file:
-
Open the Setup » Settings » Tags.
-
Click Download data as CSV [matsymbol:download].
-
Select which pages of the table you want to export.
-
Click matsymbol:download EXPORT DATA.
Your selected tags will be downloaded as a CSV file.
Export either specific tags or whole pages. See Table 4 for more information.
| Option | Explanation |
|---|---|
All pages |
All tags on all pages are exported. |
Current page |
Only tags on the current page are exported. Set the amount of tags per page via Results per page. |
Selected rows |
Only tags you selected are exported. Can only be selected, if rows are selected. |
Set the range of table pages |
Enter the range of pages that you want to export. |
3.7. Creating roles for owners
A role provides information about the members of your staff involved in handling a conversation. Roles can be individually assigned for each conversation.
A conversation can be assigned to multiple owners. This requires you to define different roles for the Messenger. You can individually assign these roles to an owner.
| Creating a role is a prerequisite for being able to add an owner to the conversation. |
3.7.1. Creating a role
Proceed as described below to create a role. Later, you first select a role in the conversation and can then assign an owner.
Creating a role:
-
Go to Setup » CRM » Messenger » Roles.
Or: If you are already in the Messenger menu, click on the left side below the settings Settings area on group Roles. -
Click on add New role.
-
Enter a position number, if needed.
-
Enter the German and English names for the role.
-
Click on save (Save).
3.7.2. Assigning a role and owner to a conversation
After you have created the role, you can assign an owner to Messenger conversations.
You can assign a role and an owner in two ways:
|
Ownership only for persons with admin rights as default
Note, that as default only persons with admin rights are visible as owner. |
3.8. Setting up channels
You can set up the channels for the various marketplaces in the Setup » CRM » Messenger » Channels menu. Click on add to create a new channel. A setup window opens.
|
Complete setup only for sending and receiving emails via Messenger
If you want to use Messenger to send and receive emails, you must set up a channel in the Setup » CRM » Messenger » Channels menu. |
| You can assign tags to each channel to be able to filter for these tags later. |
3.8.1. Activate channel
Activate channel activates the Messenger service for this channel. If the button is blue (toggle_on), the service is activated. If the button is grey (toggle_off), the service is not activated.
If you have activated several channels later, i.e. you have carried out the setup several times for the individual channels, you can deactivate the respective channel again here.
3.8.2. Login details
Save the login details of the email inbox here that you want to use to send emails from. This is necessary to make sure that your system is able to send and receive emails via the Messenger. After having entered the login details, select the encryption method and enter the sender email address and the sender name. This email address and this name will be shown to the recipients of your emails from this channel.
|
Live mode in the Email accounts menu has to be activated
The Live mode option has to be activated in the Email accounts menu. This ensures that the test mode will be deactivated and all emails sent to the respective recipients. Activating the live mode applies globally for the entire email dispatch in PlentyONE. Thus, it also applies for the email dispatch via the Messenger. |
3.8.3. General
In the Receiving emails section, enter a name for the channel.
You can also activate the option Set as default channel for outgoing messages (check_box) so that this channel is preselected when writing new conversations from Messenger.
If you activate (check_box) the option Activate notifications for incoming messages in the last section, you will be informed in your PlentyONE backend next to the notifications symbol as soon as you receive a new message in the Messenger.
3.8.4. Receiving emails
Also select one or multiple tags that should be assigned to the messages when these messages are received from and sent to the forwarded addresses.
In the Owners and roles section, you can add owners and roles for this channel.
In the Group, type and status area, select a default group, a default type and a default status that will be assigned to new messages in this inbox.
The Match email addresses option allows you to match the email addresses of incoming messages with your orders. This ensures that all conversations in Messenger are correctly linked to the appropriate order, if available.
Also, select one or more subscribers from the list to ensure they are notified when a new message is received in the channel.
3.8.4.1. Email forwarding
In the Receiving emails section, a unique, system-generated email address (target address) is automatically created. This address serves as the forwarding address for incoming emails. Copy this target address and set up an email forwarding to this email address with your email provider. This way, you ensure that your emails will be forwarded automatically. Note that you cannot change this cryptic email address.
|
Setting up an email forwarding with common providers
How to set up an email forwarding with common providers, is described on the user manual page Practical example:Setting up email forwarding for the Messenger. |
3.8.5. Sending emails
With Skip sending you can decide for which relations the email dispatch will be skipped:
-
Skip orders: Order relations will be ignored
-
Skip contacts: contact relations will be ignored
-
Skip emails: Enter a regular expression in the new field Regular expression. Recipients that match this regular expression are ignored.
Here, you can also select email templates for the email dispatch - a template for new conversations and a template for new replies.
|
Use the default template Messenger default NEW
We recommend to use the default template Messenger default NEW for the Messenger. This template is already available in your system in the CRM » EmailBuilder menu in the Default templates folder. You can, of course, adjust this template according to your needs. This template will be automatically preselected when you write a new conversation. The template contains the following variables:
|
Of course, you can select a template here that you have created yourself in the CRM » EmailBuilder menu.
3.9. Collecting messages in the Messenger
In the Messenger integration section of the Setup » Client » Global » Email accounts menu, you can determine whether all sent emails and attachments will be collected in the Messenger. Furthermore, you can decide in which channel the emails will be collected and which tags will be assigned to the conversations.
If you activate the service to collect the emails, the emails from the following PlentyONE areas will be saved and shown in the Messenger:
-
Automatic dispatch
-
Order events
-
Order procedures
-
Group function in the contact data record
-
Orders » Orders
-
Group function in the order
For further information about collecting the emails, refer to the Messenger integration chapter on the EmailBuilder page.