Order properties (personalised item)
With PlentyONE, you can sell personalised items in your plentyShop. For example, your end customers could:
-
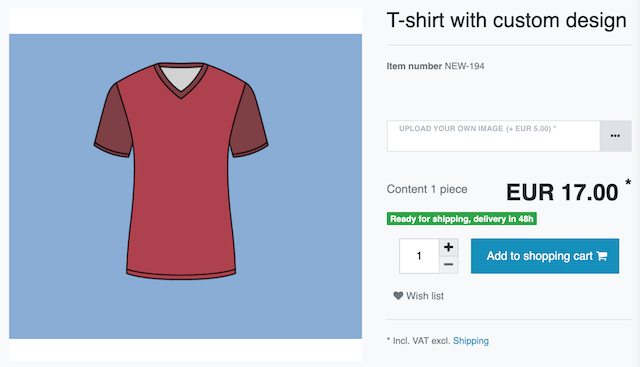
upload an image that should be printed on a t-shirt.
-
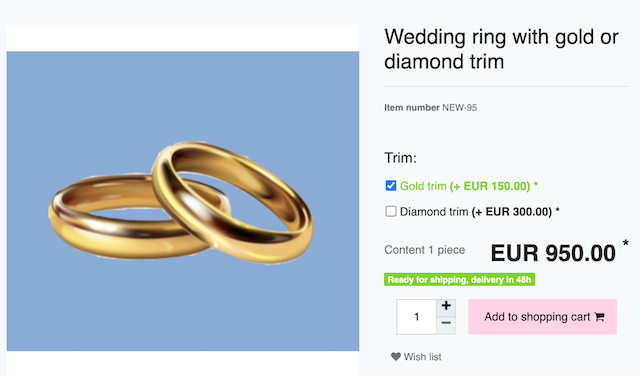
choose additional options, e.g. gold or diamond trim for a wedding ring.
Order properties vs. Order characteristics
In PlentyONE, personalised items are sold with the help of order properties or order characteristics. You can use either method in your plentyShop. However, you can not use both at the same time.
| Method | Explanation |
|---|---|
Order properties |
|
Order characteristics |
|
1. Order properties
|
From plentyShop LTS version 5.0.4040
plentyShop LTS supports order properties starting from version 5.0.40.40\. Lower versions of plentyShop do not support this function. To use order properties:
|
1.1. Example: Uploading an image
Imagine you sell t-shirts. Your customers should be able to upload their own images and have them printed on t-shirts. The procedure is as follows:
1.1.1. Creating an order property
First create all of the necessary order properties. For example, the ability to upload a custom image.
Creating a new order property:
-
Go to Setup » Settings » Properties » Configuration.
-
Click on Create property.
-
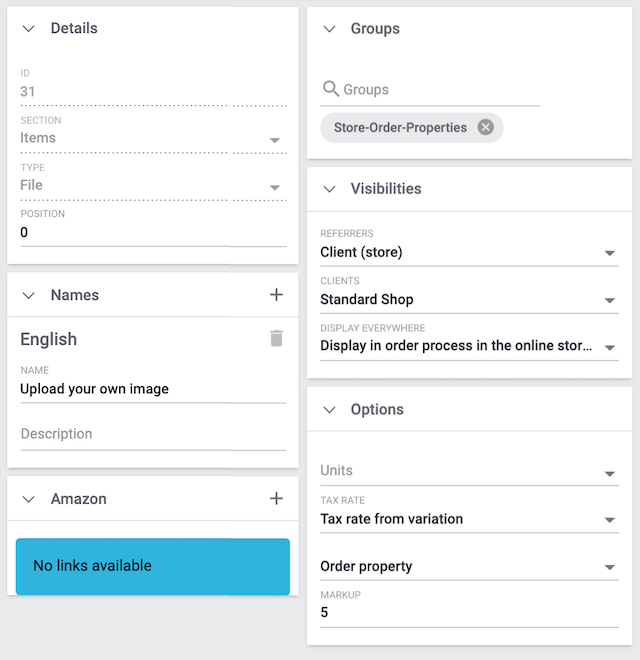
Carry out the settings as follows:
-
General settings:
-
Details » Section: Select the option Items.
-
Details » Type: Select the option File.
-
Name: Enter a front end name for the property.
-
Groups: Assign the property to an existing group.
→ You haven’t created any groups yet? Follow these instructions. -
Options » Drop-down without a title: Select the option Order property.
-
-
Where should the property appear?
-
Visibilities » Referrers: Select the option Client (store).
-
Visibilities » Clients: Select the store in which the order property should appear.
-
Visibilities » Display everywhere: Where should the property appear within the shop? Select all of the appropriate areas.
-
-
Should the property only be available for a surcharge?
-
Options » Markup: Enter the value here.
-
Options » Tax rate: How should the surcharge be taxed? Select the appropriate option.
-
-
-
Save () the settings.
|
Learn more about properties
Further information about the individual options can be found here. |
1.1.2. Linking the order property with variations
Next, link the order property with all of the appropriate variations.
-
Go to Item » Edit item » [Open variation] » Tab: Properties.
-
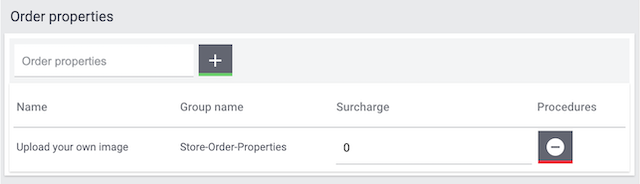
Click on the Order properties field.
→ A drop-down list of available variation properties opens. -
Select the appropriate properties ().
-
Click on Add ().
→ The properties will be added. -
If necessary, enter a variation-specific surcharge. See the info-box below for further information.
-
Save () the settings.
|
Variation-specific surcharge
You might have already saved a surcharge while creating the property. But what should you do if not every variation should be given the same surcharge? Once you’ve linked the property to a variation, you can enter a variation-specific surcharge, which overwrites the surcharge that was saved for the property as a whole. |
1.1.3. Checking the result
Open the variation in your plentyShop and make sure the settings match your needs. Modify the settings further as needed.
Use the widget Order characteristics / order properties to display order properties in the plentyShop. In the widget settings, you can control e.g. the colour and spacing of the order properties.
1.2. Example: Selecting additional options
Imagine you sell wedding rings. You want to let customers design the rings themselves. Specifically, customers should be able to choose an optional gold or diamond trim for an additional fee. The procedure is as follows:
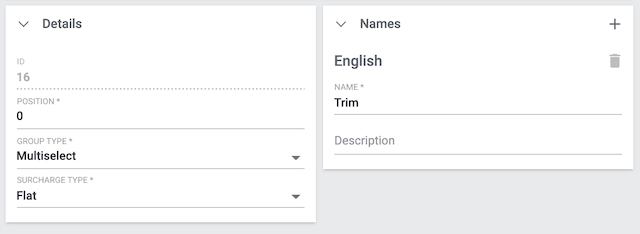
1.2.1. Creating a group
You can use property groups to sort the additional options and services that you offer under one heading. Let’s stick with the example that you sell wedding rings and you want to let customers choose an optional gold or diamond trim. You can create a property group called "Trim" to clearly display these options. Within this group, customers can choose the options “Gold trim” or “Diamond trim”.
Creating a new property group:
-
Go to Setup » Settings » Properties » Groups.
-
Click on Create group.
-
Carry out the settings as follows:
-
Details » Group type: This option only applies to order properties of the type None. How many additional options or services should your customers be able to choose from the group?
-
None = Your customers will see the order properties in the plentyShop. However, they will not be able to choose anything.
-
Select = Your customers will see a drop-down list in the plentyShop. They will be able to select one option only from the list.
-
Multiselect = Your customers will see check boxes in the plentyShop. They will be able to select multiple options.
-
-
Details » Surcharge type: Do you plan on offering extra services or options for an additional fee? If so, then decide whether the surcharge should be treated as a percentage or as a fixed price, e.g. 5% or 5 EUR.
-
Name: Enter a name for the property group. This name can be made visible to customers in the plentyShop. It depends on how you design the layout with ShopBuilder.
-
-
Save () the settings.
|
Learn more about properties
Further information about the individual options can be found here. |
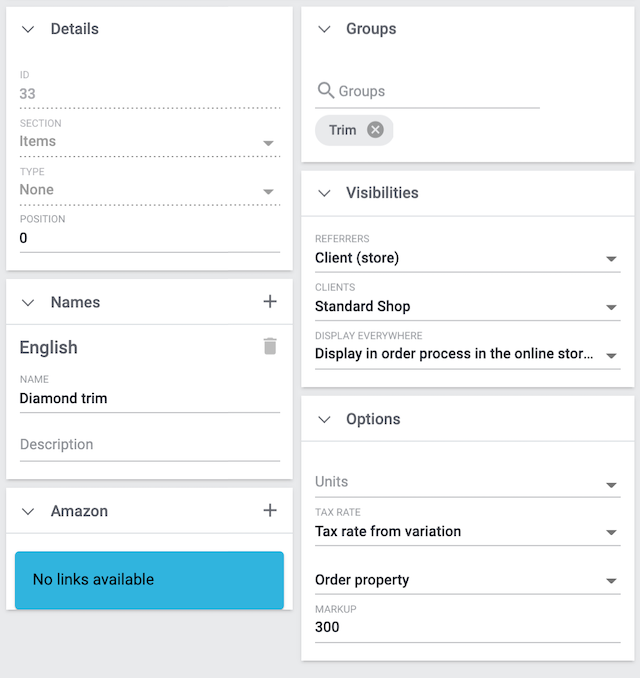
1.2.2. Creating an order property
First create all of the necessary order properties. For example, the gold trim and the diamond trim.
Creating a new order property:
-
Go to Setup » Settings » Properties » Configuration.
-
Click on Create property.
-
Carry out the settings as follows:
-
General settings:
-
Details » Section: Select the option Items.
-
Details » Type: Select the option None.
-
Name: Enter a front end name for the property.
-
Groups: Select the group that this property should be sorted into.
-
Options » Drop-down without a title: Select the option Order property.
-
-
Where should the property appear?
-
Visibilities » Referrers: Select the option Client (store).
-
Visibilities » Clients: Select the store in which the order property should appear.
-
Visibilities » Display everywhere: Where should the property appear within the shop? Select all of the appropriate areas.
-
-
Should the property only be available for a surcharge?
-
Options » Markup: Enter the value here.
-
Options » Tax rate: How should the surcharge be taxed? Select the appropriate option.
-
-
-
Save () the settings.
|
Learn more about properties
Further information about the individual options can be found here. |
1.2.3. Linking the order property with variations
Next, link the order property with all of the appropriate variations.
-
Go to Item » Edit item » [Open variation] » Tab: Properties.
-
Click on the Order properties field.
→ A drop-down list of available variation properties opens. -
Select the appropriate properties ().
-
Click on Add ().
→ The properties will be added. -
If necessary, enter a variation-specific surcharge. See the info-box below for further information.
-
Save () the settings.
|
Variation-specific surcharge
You might have already saved a surcharge while creating the property. But what should you do if not every variation should be given the same surcharge? Once you’ve linked the property to a variation, you can enter a variation-specific surcharge, which overwrites the surcharge that was saved for the property as a whole. |
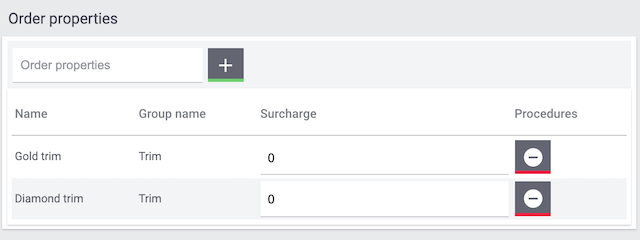
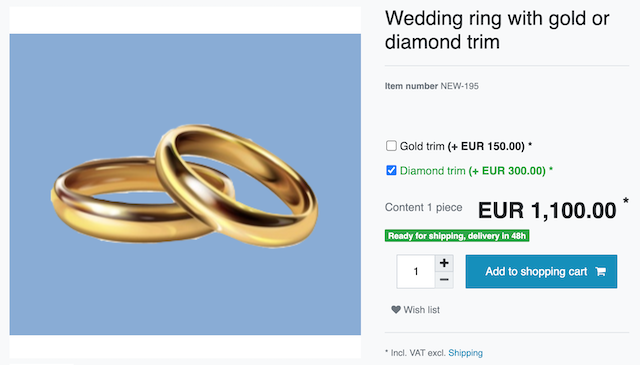
1.2.4. Checking the result
Open the variation in your plentyShop and make sure the settings match your needs. Modify the settings further as needed.
Use the widget Order characteristics / order properties to display order properties in the plentyShop. In the widget settings, you can control e.g. the colour and spacing of the order properties.
1.3. Example: Mandatory and preselected order property (Deposit)
Unresolved include directive in modules/item/pages/personalised-items.adoc - include::partial$scenario-required-preselected.adoc[]
1.3.1. Creating an order property
First create all of the necessary order properties. For example incurring costs.
Creating a new order property:
-
Go to Setup » Settings » Properties » Configuration.
-
Click on Create property.
-
Carry out the settings as follows:
-
General settings:
-
Details » Section: Select the option Items.
-
Details » Type: Select the option None.
-
Name: Enter a front end name for the property.
-
Groups: Assign the property to an existing group.
→ You haven’t created any groups yet? Follow these instructions. -
Options » Drop-down without a title: Select the option Order property.
-
Options » Drop-down without a title: Select the option Mandatory.
-
Options » Drop-down without a title: Select the option Preselected).
-
Options » Drop-down without a title: Select the option Display additional costs.
-
-
Where should the property appear?
-
Visibilities » Referrers: Select the option Client (store).
-
Visibilities » Clients: Select the store in which the order property should appear.
-
Visibilities » Display everywhere: Where should the property appear within the shop? Select all of the appropriate areas.
-
-
Which surcharge should be calculated for the property?
-
Options » Markup: Enter the value here.
-
-
-
Save () the settings.
1.3.2. Linking the order property with variations
Next, link the order property with all of the appropriate variations.
-
Go to Item » Edit item » [Open variation] » Tab: Properties.
-
Click on the Order properties field.
→ A drop-down list of available variation properties opens. -
Select the appropriate properties ().
-
Click on Add ().
→ The properties will be added. -
If necessary, enter a variation-specific surcharge. See the info-box below for further information.
-
Save () the settings.
|
Variation-specific surcharge
You might have already saved a surcharge while creating the property. But what should you do if not every variation should be given the same surcharge? Once you’ve linked the property to a variation, you can enter a variation-specific surcharge, which overwrites the surcharge that was saved for the property as a whole. |
1.3.3. Checking the result
Open the variation in your plentyShop and make sure the settings match your needs. Modify the settings further as needed.
Use the widget Order characteristics / order properties to display order properties in the plentyShop. In the widget settings, you can control e.g. the colour and spacing of the order properties.
2. Order characteristics
2.1. Example: Uploading an image
Imagine you sell t-shirts. Your customers should be able to upload their own images and have them printed on t-shirts. The procedure is as follows:
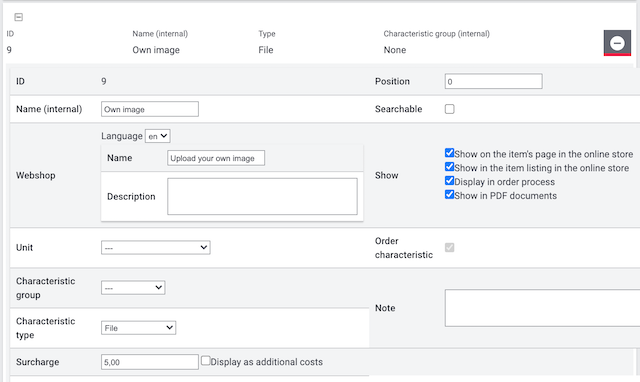
2.1.1. Creating an order characteristic
First create all of the necessary order characteristics. For example, the ability to upload a custom image.
Creating a new order characteristic:
-
Go to Setup » Item » Characteristics.
-
Switch to the New characteristic tab.
-
Carry out the settings as follows:
-
Use the options Name (internal) and Webshop to save a back end and front end name for the characteristic.
-
Then select File as the Characteristic type.
-
Enter a value if a surcharge is to be added for the characteristic.
-
Where should the characteristic be displayed? Use the Show option to select all of the appropriate areas ().
-
Select the Order characteristic option ().
-
-
Save () the settings.
|
Learn more about characteristics
Further information about the individual options can be found here. |
2.1.2. Linking an order characteristic to items
Next, link the order characteristic with all of the appropriate items.
Linking a characteristic with an item:
-
Go to Item » Edit item.
-
Search for and open the item.
-
Click on the Characteristics tab. The screen is divided into two areas:
-
Characteristics that have already been linked to the item are displayed in the upper area called Characteristics,
-
Characteristics that have not yet been linked are displayed in the lower area called Activate further characteristics. Here, the characteristics are sorted into their groups.
-
-
Expand the characteristic group in the lower area if needed () and select the characteristic ().
-
Save () the settings.
→ The characteristic is now linked to the item and displayed in the upper area.
|
Item-specific surcharge
You might have already saved a surcharge while creating the characteristic. But what should you do if not every item should be given the same surcharge? Once you’ve linked the characteristic to an item, you can enter an item-specific surcharge, which overwrites the surcharge that was saved for the characteristic as a whole. |
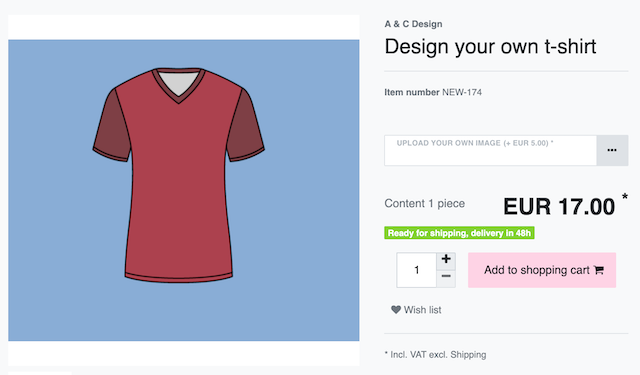
2.1.3. Checking the result
Open the item in your plentyShop and make sure the settings match your needs. Modify the settings further as needed.
Use the widget Order characteristics / order properties to display order characteristics in the plentyShop. In the widget settings, you can control e.g. the colour and spacing of the order characteristics.
2.2. Example: Selecting additional options
Imagine you sell wedding rings. You want to let customers design the rings themselves. Specifically, customers should be able to choose an optional gold or diamond trim for an additional fee. The procedure is as follows:
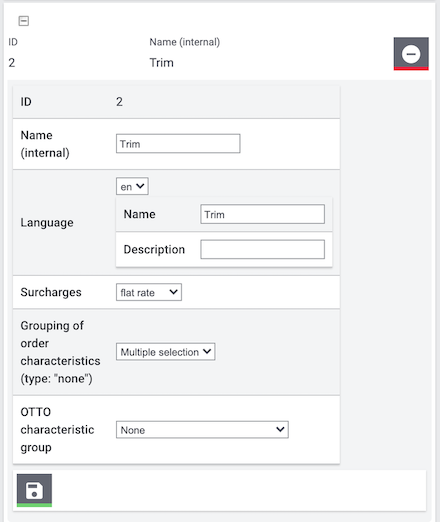
2.2.1. Creating a characteristic group
You can use characteristic groups to sort the additional options and services that you offer under one heading. Let’s stick with the example that you sell wedding rings and you want to let customers choose an optional gold or diamond trim. You can create a characteristic group called "Trim" to clearly display these options. Within this group, customers can choose the options “Gold trim” or “Diamond trim”.
Creating a new characteristic group:
-
Go to Setup » Item » Characteristics.
-
Click on the New characteristic group tab.
-
Carry out the settings as follows:
-
Use the options Name (internal) and Language to save a back end and front end name for the characteristic group.
-
Do you plan on offering the characteristics within this group for a Surcharge? If so, decide whether it should be a percentage or a fixed price.
-
Should customers be able to choose one or multiple characteristics from the group? Make your decision with the option Grouping of order characteristics.
-
-
Save () the settings.
|
Learn more about characteristics
Further information about the individual options can be found here. |
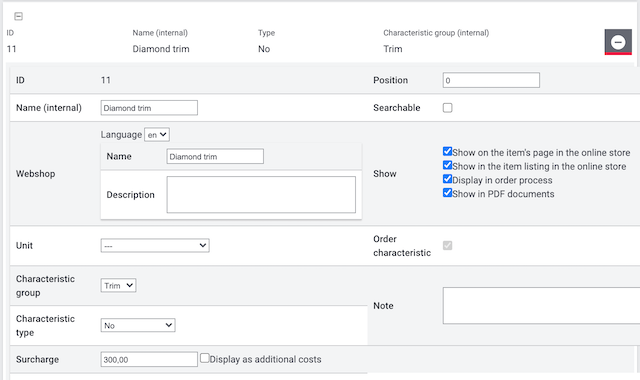
2.2.2. Creating an order characteristic
First create all of the necessary order characteristics. For example, the gold trim and the diamond trim.
Creating a new order characteristic:
-
Go to Setup » Item » Characteristics.
-
Switch to the New characteristic tab.
-
Carry out the settings as follows:
-
Use the options Name (internal) and Webshop to save a back end and front end name for the characteristic.
-
Choose the Characteristic group into which you want to sort this characteristic.
-
Select No as the Characteristic type.
-
Enter a value if a surcharge is to be added for the characteristic.
-
Where should the characteristic be displayed? Use the Show option to select all of the appropriate areas ().
-
Select the Order characteristic option ().
-
-
Save () the settings.
|
Learn more about characteristics
Further information about the individual options can be found here. |
2.2.3. Linking an order characteristic to items
Next, link the order characteristic with all of the appropriate items.
Linking a characteristic with an item:
-
Go to Item » Edit item.
-
Search for and open the item.
-
Click on the Characteristics tab. The screen is divided into two areas:
-
Characteristics that have already been linked to the item are displayed in the upper area called Characteristics,
-
Characteristics that have not yet been linked are displayed in the lower area called Activate further characteristics. Here, the characteristics are sorted into their groups.
-
-
Expand the characteristic group in the lower area if needed () and select the characteristic ().
-
Save () the settings.
→ The characteristic is now linked to the item and displayed in the upper area.
|
Item-specific surcharge
You might have already saved a surcharge while creating the characteristic. But what should you do if not every item should be given the same surcharge? Once you’ve linked the characteristic to an item, you can enter an item-specific surcharge, which overwrites the surcharge that was saved for the characteristic as a whole. |
2.2.4. Checking the result
Open the item in your plentyShop and make sure the settings match your needs. Modify the settings further as needed.
Use the widget Order characteristics / order properties to display order characteristics in the plentyShop. In the widget settings, you can control e.g. the colour and spacing of the order characteristics.