Creating a contact
Do you want to easily and quickly create new contacts with an individually adjustable user interface, for example during a phone call? First of all, set up a new view according to your needs.
1. Creating a view
The user interface to create a new contact allows a high degree of flexibility for positioning content and data. This works by intuitively positioning sections for content and elements on the dashboard via drag-and-drop. Each section and each element can be further edited by clicking on Edit view () in the top right of the contact data record. Table 1 contains an overview on the functions available in the editing mode of the contact data record.
Element |
Symbol |
Explanation |
Edit view |
Opens the contact data record for editing. |
|
Undo |
undo |
Undoes the last change, unless this change has already been saved. |
Redo |
redo |
Restores the previously undone change. |
Default view |
This section displays the view that is currently opened. Click on to switch to another view or to create a new view. |
|
Restoring the previously saved state |
restore |
Resets the contact data record to the state that was last saved. |
Save |
save |
Saves the changes made to the contact data record. By doing so, you can save as many different views as you like. |
more_vert |
Click on this symbol between the components to add or remove columns and lines or to reduce or enlarge the column sizes. |
|
Edit |
edit |
When you edit the component, you can see in the Elements section on the right side which elements have not been used yet and are therefore still available. Elements that are already in use are disabled and cannot be used a second time. |
Delete |
delete |
Deletes the component. |
Close |
close |
Closes the editing mode. If you have not saved the changes yet, a security inquiry appears. |
2. Creating a contact
Proceed as described below to create a new contact.
| The following instruction describes the default view with the 3 components Company, Address details and Contact details with all available fields. Depending on how you later adapt your user interface, the settings described in Table 2 may vary from the view in your system. |
Creating a contact:
-
Go to CRM » Contacts.
-
Click on add New contact.
→ The default view appears. The default view consists of 3 sections: Company, address details and contact details. -
Carry out the settings. Note Table 2 and the information about the fields that are already preselected.
-
Save (save) the settings.
→ The contact is created.
|
Once the contact has been created, you will be forwarded to the contact data record. You are then able to further edit the contact. Note also the information about the logic for unsaved changes. In the contact data record in the side navigation on the bottom left, you can click on the contact ID (content_copy) to copy the ID of the contact to the clipboard. |
| Setting | Explanation |
|---|---|
Toolbar |
|
Save |
Click on save to save the settings. |
Reset |
Click on undo to remove all previous entries before saving. The automatically preselected fields will remain. |
Company |
|
Address details |
|
Invoice address / Delivery address |
Select (check_box) whether the address is an invoice address or a delivery address or both. |
Form of address |
What’s the contact’s form of address? |
Company (Name 1) |
What’s the name of the company? This is a mandatory field if there is no entry for First name (Name 2) and Last name (Name 3). |
First name (Name 2) |
What’s the first name of the contact? This is a mandatory field if there is no entry for Company (Name 1) and Last name (Name 3). |
Last name (Name 3) |
What’s the last name of the contact? This is a mandatory field if there is no entry for Company (Name 1) and First name (Name 2). |
Address 1 (Street) |
What’s the street of the contact? This is a mandatory field if you don’t enter values in the Address 2 (House number) and Address 3 (Additional address information) fields. |
Address 2 (House number) |
What’s the house number of the contact? This is a mandatory field if you don’t enter values in the Address 1 (Street) and Address 3 (Additional address information) fields. |
Address 3 (Additional address information) |
Do you want to enter an additional address information? For example: Apartment 12a. This is a mandatory field if you don’t enter values in the Address 1 (Street) and Address 2 (House number) fields. |
Address 4 (Free) |
You can enter whatever you want. |
Email address |
What’s the contact’s private email address? |
Phone |
What’s the contact’s telephone number? |
VAT number |
Do you want to save a VAT number for the contact? |
Contact person |
Do you want to save a contact person for the contact? |
Personal number |
Does the contact have a personal number? |
Post number |
Does the contact have a post number? |
Date of birth |
What’s the contact’s date of birth? |
Postcode / Town |
What’s the postcode and town of the contact? Town is a mandatory field. |
Country |
Select the values from the drop-down list. |
Contact details |
|
Form of address |
What’s the contact’s form of address? |
Title |
What’s the title of the contact? |
First name |
What’s the first name of the contact? |
Last name |
What’s the last name of the contact? |
Email private |
What’s the contact’s private email address? |
Email business |
What’s the contact’s business email address? |
Phone private |
What’s the contact’s private phone number? |
Phone business |
What’s the contact’s business telephone number? |
Mobil private |
What’s the contact’s private mobile phone number? |
Mobile business |
What’s the contact’s business mobile phone number? |
Fax private |
What’s the contact’s private fax number? |
Fax business |
What’s the contact’s business fax number? |
Web page private |
What’s the contact’s private web page? |
Web page business |
What’s the contact’s business web page? |
eBay user name |
What’s the contact’s eBay user name? |
Customer number |
Do you want to save a customer number for the contact? Customer numbers can be assigned for internal purposes. They are not saved automatically. You decide whether and how you would like to use customer numbers. |
External number |
Do you want to save an external number for the contact? External numbers can be used for internal purposes and are not saved automatically. |
Rating |
Do you already want to save a rating for this contact? This settings serves for internal purposes only. |
Guest account |
You don’t want to create a contact data record, but a guest order instead? If so, select (check_box) this option. |
Debtor account |
Do you want to save more separate customer numbers? Generally, this number corresponds to the customer number or the debtor number in your financial accounting. It can be helpful to you or your tax accountant when further processing your receipts. This field can also be filled in automatically, if required. For further information about the debtor account, refer to the Accounting page of the manual. |
Date of birth |
What’s the contact’s date of birth? |
Type |
Which type should be assigned to the contact? |
Class |
Which class should be assigned to the contact? |
Client |
Which client should be assigned to the contact? |
Language |
Which language does the contact speak? |
Sales representative that is assigned to the contact |
Here, you can assign a sales representative to the contact. Enter the first 3 characters of the name to see a suggestion list of all sales representatives that are already saved in your system. By clicking on the name or the ID of the sales representative, the sales representative is assigned to the contact. |
Block contact |
Select whether or not the contact should be blocked for the specific client. |
Owner |
Which owner should be assigned to the contact? |
Tags |
Do you want to assign tags to the contact? Select the tags from the suggestion list. |
Allow invoice / Allow debit |
If you have already allowed the two payment methods Invoice and Debit in the class, you don’t need to carry out any settings here. Because: The settings in the class have priority over the settings in the contact data record. check_box = The contact can pay using this payment method, even if you do not offer this payment method in your plentyShop. Example: A contact who has bought in your online shop multiple times, should be allowed to buy items on invoice. Necessary settings: - The payment method Invoice or Debit has to be available in at least one shipping profile, i.e. the payment method may not be blocked in the shipping profile. - Activate the shipping profile for the items. Check the necessary settings that are listed here and activate (check_box) the payment method. This allows the contact to use the payment method. |
3. Automatically preselected fields
When you create a new contact, some fields are already preselected. You can of course adjust these fields before saving the new contact data record. The following lists the preselected fields:
-
In the address details:
-
the address type Invoice address
-
the country that you saved as default location in the Setup » Client » [Select client] » Settings
-
-
In the contact details:
-
the type Customer (this is the type with the lowest ID in the Setup » CRM » Types menu)
-
the class with the lowest position that you saved in the Setup » CRM » Classes menu
-
the default client (shop)
-
the language German (this depends on the selected default setting in the system)
-
4. Duplicate check for contact data records with identical email address
When creating new and updating existing contact data records, the email address is checked in order to avoid duplicate entries in the system.
The logic works in the following way:
-
When creating a new contact, the system searches for an existing regular contact with identical private email address. If a contact is found, an error message is displayed. If no contact is found, a new regular contact is created.
-
When updating the private email address of an existing regular contact, the system searches if another regular contact with the same private email address exists. If this is the case, the private email address of the current contact is not updated.
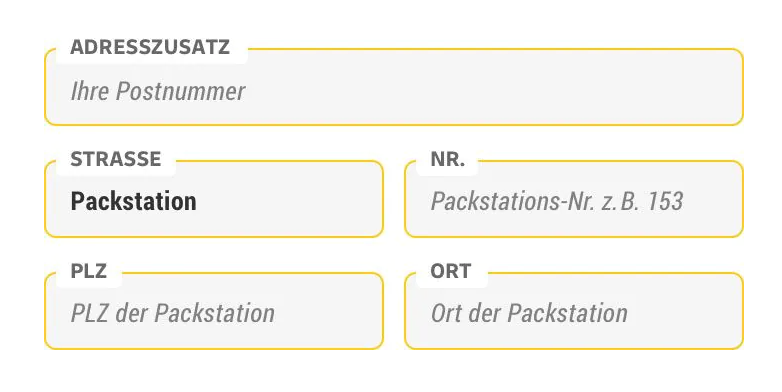
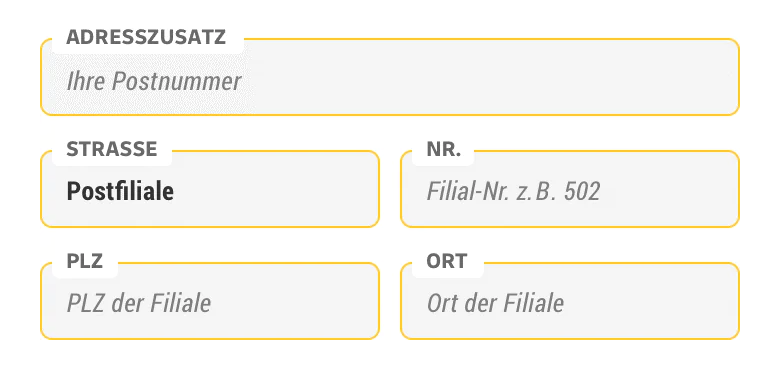
5. DHL Packstation or DHL post office as delivery address
Should the delivery address be a DHL Packstation or DHL post office? If so, note which information you have to enter into which fields in this case to ensure that the parcel can be correctly delivered to your customers.
For further information, refer to the following DHL pages: