Setting up limango
limango, a member of the Otto Group, is the number one platform for young families. In addition to its private Shopping Club, limango also operates the online shop which is accessible without registration. Since the market was launched in 2017, end users also take advantage of a broad and permanent product range that is now provided by more than 500 partners.
1. Becoming a limango partner
Join the leading platform for family shopping and click here for more information on the limango marketplace and their partner program and to send your registration request (please note: information is only available in German).
Alternatively, you can also contact our team of partner managers by sending an email to marketplace@limango.de. A partner manager will get in touch with you soon and will work with you to evaluate the potential on limango.de and talk about your next steps.
After registering, you will receive login details from limango. You need these login details to set up limango in PlentyONE.
2. Frequency of data exchange
After installing and setting up the plugin, the automatic processes described in Table 1 become available.
| Data | Interval |
|---|---|
Item export |
daily at 7 a.m., 11 a.m., 3 p.m. and 7 p.m. |
Stock synchronisation |
hourly |
Price synchronisation |
hourly |
Order import |
Every 15 minutes |
Deletion of items |
once a day during the night |
3. Workflow of a limango order
-
Your products are listed in the limango marketplace. The name of your company is shown with your products.
-
Customers place an order on limango.
-
Customers make their payments to limango.
-
The order is imported into PlentyONE.
Note: Customers make their payments to limango. Nevertheless, orders are imported with the status [3] Waiting for payment. -
When you receive the order, you ship the products (drop shipping).
4. Installing the plugin
Note: limango is a closed market. If you want to sell your items on limango, first register for the limango partner program. For further information, see Becoming a limango partner.
In order to set up limango in PlentyONE, you have to install the limango plugin in your PlentyONE system. You will receive the link for installing the plugin after you have registered for the limango partner program.
Important: Install the plugin in the plugin set of the main client.
Adding plugin to the system:
-
Go to Plugins » plentyMarketplace.
→ The marketplace opens in a new tab. -
Navigate to the plugin limango.
Tip: Either use the search function or open the category Plugins » Sales » Marketplaces. -
Open the detail view of the plugin.
-
In the column to the right, click Go to checkout.
→ The Checkout window opens. -
Read and accept the General Terms and Conditions.
-
Click Order now.
→ Wait a few minutes before installing the plugin.
Installing plugins:
-
Go to Plugins » Plugin set overview.
-
Click on the plugin set of your main client.
Important: In other words: The plugin set must be linked to the main client.
→ The plugin set opens. -
Click add Add plugin.
-
Select limango from the plugin list.
-
Click Install.
→ The plugin is installed.
→ The plugin set is shown. -
Switch the plugin to active (toggle_on).
-
Save (save) the plugin set.
Tip: Problems saving the plugin set? Click Open details to show additional information.
5. Setting up the market in PlentyONE
Installed the limango plugin? Great. Now, set up the market in PlentyONE.
5.1. Carrying out the basic settings
First, carry out the basic settings in the plugin settings. Keep the login details at hand that you received from limango.
Carrying out the basic settings:
-
Go to Plugins » Plugin set overview.
→ The list of plugin sets is shown. -
Click on the plugin set in which you have installed the limango plugin.
→ The plugin set opens. -
Click on the plugin limango.
→ The plugin settings open. -
Carry out the settings. Pay attention to the information given in Table 2.
-
Save () the settings in each section in which you made changes.
| Setting | Explanation |
|---|---|
SFTP credentials |
|
Host |
Enter |
Port |
Enter port |
User name; |
You will receive these credentials from limango. |
Stock export |
|
Stock buffer |
By default, the stock of all warehouses for which you entered for the option Warehouse IDs (comma separated) is added up and exported to limango. Enter a whole number to reduce the exported stock quantity by the entered amount. |
Time of last successful stock export |
The timestamp of the last successful stock export |
Warehouse IDs (separated by commas) |
Enter the ID of the warehouses from which you want to export stock details to limango. Enter several ID separated by commas. |
Information |
|
Order referrer ID created by plugin |
The ID of the order referrer limango that is created automatically when you install the plugin. The ID is filled in automatically. |
Status of last price export |
|
Time of last successful price export |
The timestamp of the last successful price export. |
Order status |
|
Order status for orders without shipping carrier mapping (> 5 - < 7) |
Which status is assigned to orders if the shipping service provider in the order is not linked to a shipping service provider in PlentyONE? The selected status must be:
After correcting the shipping carrier mapping, move orders with this status into the status for Order status for orders with shipping carrier mapping (> 5 - < 7). |
Order status for orders with shipping carrier mapping (> 5 - < 7) |
Which status is assigned to orders if the shipping service provider in the order is linked to a shipping service provider in PlentyONE? The selected status must be:
|
Shipping service provider |
|
DHL; |
For each shipping service provider that you want to offer for limango orders, enter the PlentyONE ID of the shipping service provider in PlentyONE. |
Speditionsversand - doorstep; |
To offer freight shipping for your products, enter the appropriate PlentyONE shipping profile ID for each of these shipping options. |
Client selection |
|
Plenty ID |
Enter the plenty ID of a client. limango orders are imported for this client. |
Image source |
|
Export item images when no variation images are linked |
Option activated: If no images are linked to the variations, the first 10 images activated for the referrer limango of the item are exported. |
5.2. Activating the order referrer
Go to Setup » Orders » Order referrer to activate the order referrer. This ensures that orders are assigned to the correct sales channel.
An order referrer tags an order with the sales channel on which the order was generated. Sales channels can be e.g. your online shop or markets on which you sell your items. Each sales channel has an individual order referrer. Some order referrers are available by default in your PlentyONE system. Further order referrers are added e.g. if you install a new plugin. For further information about the order referrer, see the page Order referrer of the PlentyONE manual.
Activating the order referrer for limango:
-
Go to Setup » Orders » Order referrer.
-
Click Search (search).
-
In the list, navigate to the option limango.
-
On the right of the referrer’s line, click Edit (edit).
→ The window Edit referrer opens. -
Activate the option Visible in selection (toggle_on).
-
Click SAVE (save).
→ The referrer is active.
5.3. Permitting the payment method in a customer class
The payment method limango is automatically available in your PlentyONE system as soon as an active limango account exists. No separate configurations are needed for this. You just need to permit the payment method in one or more customer classes.
Customer classes allow you to divide your customer base according to specific criteria. Examples of use for customer classes are:
-
Create two separate customer classes for end customers (B2C) and business customers (B2B) respectively. Depending on the customer class, customers either see net prices or gross prices in your plentyShop.
-
Give discounts to specific customer classes.
For more information about customer classes, head over to the to the Managing contacts page.
Permitting the payment method in a customer class:
-
Go to Setup » CRM » Customer classes.
-
Open the customer class for which you want to permit the payment method.
-
For the setting Allowed payment methods, activate the option limango.
-
Save () the settings.
5.4. Defining a sales price
To sell variations on limango, you need a sales price in which the order referrer limango is activated. The price that you save for this sales price is the price that will be shown on limango.
Sales prices define the conditions under which a variation is sold at a specific price and on a specific sales channel. For example, you can sell your items at a lower price in your webshop than on Amazon. Or you can sell products cheaper to B2B customers than to B2C customers.
Two default sales prices are already configured in your PlentyONE system. However, you can also create new sales prices and edit them individually. In addition to default sales prices, you can also create RRPs, special offers, and set prices.
Defining a sales price for limango:
-
Go to Setup » Item » Sales prices » [Open sales price].
Tip: No sales prices? Then create a sales price first. -
Activate the referrer limango.
-
Save () the settings.
5.5. Activating the referrer in shipping profiles
Now activate limango in the shipping profiles that you want to offer for this market.
Activating referrer limango in the shipping profile:
-
Go to Setup » Orders » Shipping » Settings.
-
Click on the Shipping profiles tab.
-
Click on the shipping profile.
Tip: No shipping profiles? Learn how to create shipping profiles here. -
For the setting Order referrer, activate the option limango.
-
Save () the settings.
→ The shipping profile is available for orders with the referrer limango. -
If desired, activate the referrer in additional shipping profiles.
6. Preparing variations
Now, prepare your variations.
6.1. Setting the variation availability
You need to activate the variations you want to sell on limango and enable them for the relevant sales channel. This is done in the Item » Items » [Open variation] menu.
During the first export, variations with the stock 0 will also be exported to limango. Therefore you should only activate the variation availability for those variations that you actually want to export.
Making a variation available for limango:
-
Go to Item » Items » [Open variation].
Tip: To sell all variations of an item on limango, carry out the settings for the item’s main variation. If the inheritance function is active for the variations, then this activates the availability of all variations of the item. -
In the Availability and visibility section, enable the option Active (toggle_on).
-
Click the Sales channels tab.
-
In the Sales channels section, activate the sales channel limango in the Status column (toggle_on).
Tip: You can activate multiple sales channels at once. To do so, activate the checkboxes to the left of the desired sales channels. Then activate the toggle above the checkbox column (toggle_on). Click ACTIVATE to confirm the activation. -
Save (save) the settings.
→ The variation is available for limango.
Use the variation group function to edit multiple variations at once. You select the variations that you want to edit.
Making several variations available for limango using the variation group function:
-
Go to Item » Items.
-
Select () the variations to be edited.
-
In the toolbar, click on layers » layers Variation group function.
→ The Variation group function window opens. -
Select the action Sales channels from the drop-down list Actions.
→ The action is added to the lower part of the window. -
Select (check_box) the option limango from the drop-down list Sales channels.
→ The sales channel is added below the Sales channels drop-down list. -
Activate (toggle_on) the toggles to the left of the sales channels.
-
Click EXECUTE & CLOSE to apply the settings.
Batch processing allows you to edit several variations at once. You use filters to limit which variations are edited.
Making several variations available for limango using batch processing:
-
Navigate to the area Market availability.
-
Activate the checkbox to the left of the option limango.
-
Activate the checkbox to the right of the option limango.
-
Navigate to the area Availability.
-
Activate the checkbox to the left of the option Active.
-
Activate the checkbox to the right of the option Active.
-
Click on Apply to apply the settings to the variations.
6.2. Saving mandatory variation information
As a minimum, you need to save the mandatory variation information to export your item data to limango. The following table shows the marketplace data fields that are mandatory for limango and how you save the necessary information in PlentyONE.
| Required | Setting in PlentyONE/explanation |
|---|---|
Product name |
Field Name 1, Name 2, or Name 3 and either an attribute for colours or a property for colours The following rules apply to product names:
|
Description |
PlentyONE data field Item text + additional product information in a property of the type Text for some categories. Background: For some categories, limango expects additional product information. Depending on the category, this could for example be technical data or the scope of delivery. There is no default variation input field for this information. As such, we recommend that you save this product information in a property of the type Text. You could name this property The following rules apply to descriptions:
|
Image URL |
Important: Images must be in JPG format. Other formats cannot be processed. |
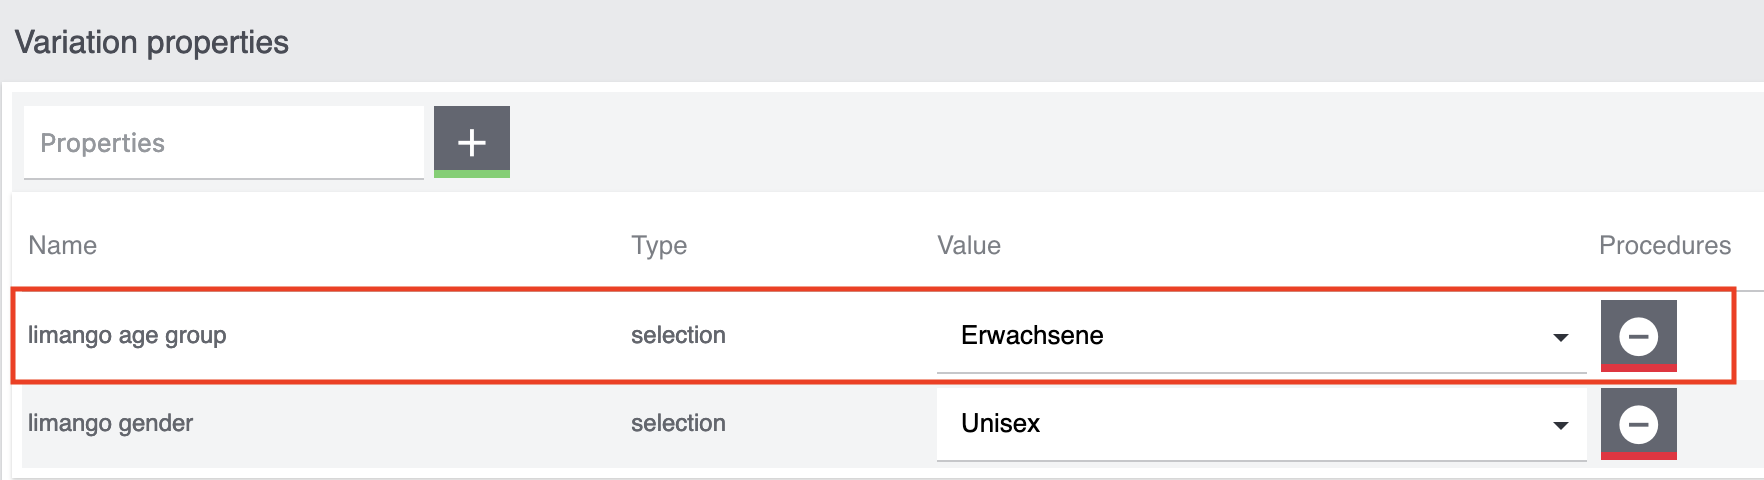
Material composition |
If textile fibres make up at least 80% of the weight of a product, you need to specify the material composition. Material information is exported to limango using a property of the type Text. Create a separate property for each marketplace data field. Link the properties to the main variation of the item and save all components of a material mix in this property. If the variations of the same item have different material mixes, deactivate the inheritance function for properties and save the material mixes separately for each variation. However, note that this deactivates the inheritance for all properties for the item. As such, you also need to manually manage all other properties for each variation. Specify the individual materials in descending order based on the percentage value. As such, the first material is the one with the highest percentage value, the last one that with the lowest percentage value. The sum of all percentages must be 100. You can specify as many materials as you need. Enter the material composition in the following format:
The values for material types must be identical to the values that limango allows: Example: Exporting material information for a blazer to limango
The following example shows you how to save material information for a blazer for the limango export. Mapping outer fabric and saving material mix for a variation:
Mapping lining and saving material mix for a variation:
|
Shoes: Upper shoe materials |
For shoes, only the following materials can be specified:
|
Shoes: Lining shoe materials |
For shoes, only the following material values are allowed:
|
Shoes: Insole shoe materials |
For shoes, only the following material values are allowed:
|
Shoes: Outsole shoe materials |
For shoes, only the following material values are allowed:
|
RRP |
Specify the RRP based on the following logic:
|
Gross sales price |
|
Category |
PlentyONE categories |
Brand |
Tip: Contact the limango partner management if you wan to list a new brand. |
Gender |

|
Age group |
|
Colour |
The colour is used to create a unique product. As such, the colour must be a unique value, for example the manufacturer colour. To create the item number, the colour is added to the SKU. If your variations were created without an attribute for colours, you need a property:
or
|
Size |
If your variations were created without an attribute for sizes, you need a property. Note: Products without a size have the size value
|
Measurements |
Only specify measurements for products with no size variations, i.e. for single size products such as furniture. Background: In the limango shop, the measurements can only be shown at the product level. No measurements are shown at the variation level. Measurements must be exported to limango with the format [numeric value];[unit]. Due to the limango product structure, the normal PlentyONE data fields for measurements cannot be mapped. Instead, create two properties:
Combine these two properties, separated by a semicolon. Example: Exporting the length to limango
Example: Exporting the volume to limango
Imagine that you want to export the volume of variations to limango. To do so, proceed like this:
|
Energy label URL |
Lamps and luminaires with light sources not intended to be removed by the end-user must be labelled. As such, a URL of the energy label must be exported for these products. Recommendation: Create a property of the type Text in which you save the URL to the energy label of a variation. |
Energy data sheet URL |
You need to provide an energy data sheet for all products that are subject to energy labelling law. As such, a URL of the energy data sheet must be exported for these products. Recommendation: Create a property of the type Text in which you save the URL to the energy data sheet of a variation. |
Taking back old appliances according to ElektroG3 |
Since 1st of January 2022, new regulations are in force in Germany requiring you to take back old electronic devices. For devices that require you to take back old devices, the value DE must be exported to limango. As such, the value DE means yes. No value means no. Recommendation:
|
7. Setting up item data export
Item data is exported to limango via a catalogue format. Go to Data » Catalogues to create catalogues.
Catalogues are used to export data from your PlentyONE system. There are two different catalogue formats:
-
Marketplace formats are used to export item data to markets.
-
Standard formats are used to export data from your PlentyONE system into a file.
Catalogues with marketplace formats allow you to tailor your item information exactly to the needs of the market. Because here, you assign a suitable PlentyONE data field to each of the data fields of the market. When your variation data is exported to the market, the market’s data fields are then filled with the correct PlentyONE data.
-
Is this your first time working with catalogues? Then read up on the basic concept of catalogues first.
To export your item data to limango, you need to create a catalogue. Link the limango data fields with the item data saved in PlentyONE in the marketplace format afterwards. After you activate the catalogue, the catalogue data is automatically exported to limango in regular intervals.
7.1. Notes on the limango item data structure
The structure of limango item data differs from the structure in PlentyONE. The limango item data is categorised into three levels:
| Level | Explanation |
|---|---|
Product group |
All products of the same model that are available in different colours. |
Product |
A colour version of the product. As such, each product group has as many products as there are colours. |
Variation |
Variation at the size/EAN/SKU level |
|
Use the parent-SKU
Do you sell products in different colours but manage these different colours in separate items? The parent SKU allows you to link these separate items. Parent SKUs can be saved for both items and individual variations. The manual maintenance of SKUs allows you to assign the Parent SKU of entirely different item variations to variations of an item.
|
7.2. Creating a catalogue
Item data is exported to limango via catalogue using the marketplace format limango. Create a catalogue in the Data » Catalogue menu to export your items to limango. Map the limango data fields to item data saved in PlentyONE in the marketplace format afterwards.
Important: Select the format limango new, not the old format limango.
| You can create only one catalogue for limango. limango does not support multiple catalogues. |
Creating a catalogue:
-
Go to Data » Catalogues.
-
Click Create catalogue (add).
-
Enter a name for the catalogue.
-
In the drop-down list Marketplace, select the option limango.
-
In the drop-down list Export type, select the option Item.
-
In the drop-down list Category, select the option limango new.
Tip: You can only create one catalogue for this sales channel, which is why only one category is selectable.
Note: Select the category limango new, not the old format limango.
Note: The category limango new is only shown if the plugin limango is installed. -
Save () the settings.
→ The catalogue is created.
→ The catalogue is opened for editing.
Other catalogue settings
Other catalogue settings are optional. Once you carried out the settings described on this page, your catalogue is automatically exported to limango. That means you can ignore the catalogue settings for Format settings, Export settings and Download settings.
The Format settings, Export settings, and Download settings allow you to create a file with the variation data contained in the catalogue. However, this file does not contain information about whether the data export to limango was successful.
|
Do not change the format in the catalogue’s Format settings. To ensure that the export to the sales channel works, all required settings are already configured when you create a catalogue. If you change the settings, errors might occur during the export. |
7.3. Mapping catalogue fields
After you have created a catalogue, map the market’s data fields to item data saved in PlentyONE. This chapter describes how you map data fields and what particularities apply for item exports to limango. In addition, we provide recommendations for suitable mappings. This information is structured like this:
7.3.1. Mapping data fields in the catalogue
Now, map the limango data fields to the item data saved in PlentyONE.
-
The market expects product data that cannot be saved in the PlentyONE item menu? Then create a property for this data. Link this property with your variations. The actual values are saved as property values for this property. Is this your first time working with properties? Then read up on the principles of properties first.
| Availability | Explanation |
|---|---|
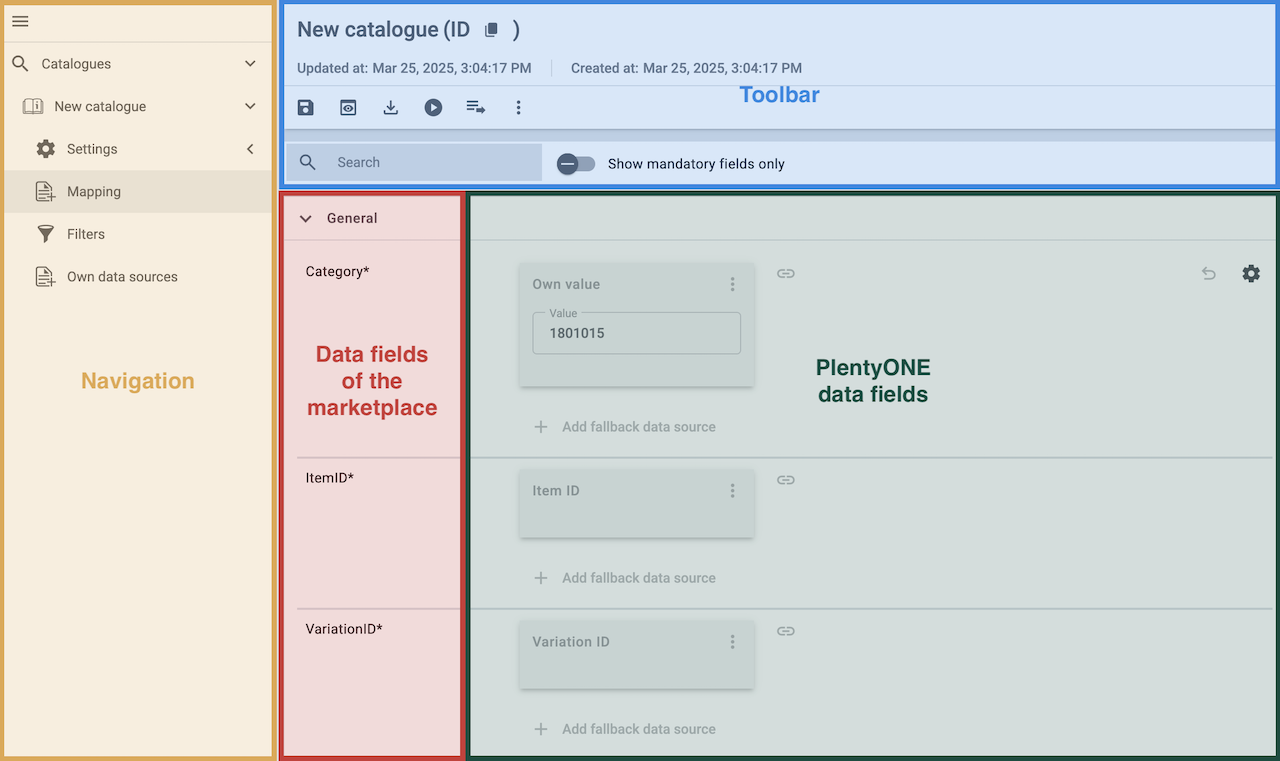
Navigation |
When you open a catalogue, the view Mapping is shown. On the very left is the navigation.
|
Toolbar |
The toolbar provides actions for the catalogue. For example, save your mappings, restore an older version of the catalogue or hide or show optional marketplace data fields. |
Marketplace data field |
To the right of the navigation, all data fields available for the market are listed. Mandatory fields are marked with an asterisk (✱). |
PlentyONE data fields |
On the right side of the catalogue, you map the marketplace data fields to appropriate PlentyONE data fields. In the screenshot above, a few of the fields are already mapped. |
Mapping catalogue fields:
-
Go to Data » Catalogues.
-
Click on the catalogue.
→ The Mapping tab opens.
→ In the left-hand column, the market’s data fields are listed.
Tip: Mandatory fields are flagged with an asterisk (*).
→ In the right column, you map the PlentyONE data fields. Any PlentyONE data fields that you already mapped are also shown in this column. -
Map suitable PlentyONE data fields to the market data fields.
For each marketplace data field, you have a number of mapping options. Expand the info boxes below to get more information about each of these mapping options.-
Simple 1:1 mapping
-
Simple 1:1 mapping with properties
-
Complex 1:1 mapping
-
1:1 mapping with fallback data fields
-
1:n mapping
-
Own value mapping
-
Mapping with mathematical calculations
-
-
Save () the catalogue.
→ The mappings are saved.
In a simple 1:1 mapping, you map a PlentyONE data field to the marketplace data field. If no suitable setting exists in PlentyONE. you can map a property instead.
As such, simple 1:1 mappings allow you to:
-
I want to fill this marketplace data field with the data from this PlentyONE setting.
-
If the data field is empty for a variation, no value is exported for this variation.
Creating a simple 1:1 mapping:
-
Next to the marketplace data field, click on + Add data field.
→ To the left, the list of available PlentyONE data fields are shown in groups. -
Click on the group you need.
→ The PlentyONE data fields of the group are shown. -
Click on the plus to the right of the PlentyONE data field you want to select.
→ The PlentyONE data field is added to the right. -
Click on Confirm.
Example: Sales price and RRP for Otto Market
This gif shows you how to map the marketplace data fields Sales price and RRP for Otto Market to PlentyONE data fields:
Reminder: In a simple 1:1 mapping, you map a PlentyONE data field to the marketplace data field. However, what can you do if PlentyONE does not offer a suitable data field? Then it’s the properties' moment to shine. Properties allow you to save any kind of information in your properties.
-
Is this your first time working with properties? Then read up on the principles of properties first.
Creating a property:
-
Create a property with the necessary values.
Tip: Find out how to do that here.
Creating a simple 1:1 mapping with properties:
-
Next to the marketplace data field, click on + Add data field.
→ To the left, the list of available PlentyONE data fields are shown in groups. -
Expand the group Property.
→ The property groups are shown. -
Expand the group you need.
-
Click on the Plus sign on the right of the property you want.
-
From the drop-down list Language, select the language in which you send the data to the market.
-
Click on Confirm.
→ The property is mapped to the marketplace data field.
Like with the simple 1:1 mappings, you map a PlentyONE setting or property to a marketplace data field. Complex mappings are necessary whenever a marketplace data field has more than one possible value. Instead of mapping data fields, for complex mappings you map individual values of these data fields. For example, you cannot simply map the PlentyONE data field Shipping profile to the marketplace data field Shipping method. Why? The market cannot know which of your shipping profiles in PlentyONE corresponds to which of their shipping methods.
| Do not enter own values for complex mappings. All values that you enter must be saved for the variations, either in a setting or as a property value. This also applies if the value Comparative value is shown. You still need to enter exactly the value of the setting or property that you mapped. |
In complex mappings, the value of the market is always exported. Only when you map an own value, the own value that you enter is exported.
You can recognise complex mappings from the field that is shown below the name of the marketplace data field. Click on the field to show the values available for the marketplace data field.

Examples for complex 1:1 mappings are:
-
Categories
-
Brands
-
Shipping setting
Important: For complex mappings, do not map own values or properties of the type None.
Creating a complex 1:1:n mapping:
-
Click on the field for the marketplace data field.
→ A list of the available values is shown. -
Select the value that you want to map a PlentyONE data field to.
→ The value is mapped. -
Next to the marketplace data field, click on + Add data field.
→ To the left, the available PlentyONE data fields are listed in groups. -
Click on a group.
→ The PlentyONE data fields of the group are shown. -
Click on the PlentyONE data field for which you want to map values.
Important: Do not map own values or properties of the type None. -
Your next steps depend on the PlentyONE data field you selected:
-
Alternative 1: The available values for the PlentyONE data value are shown on the left.
-
Next to the value you want to select, click on the plus.
→ The value is added to the field on the right. -
Click on Confirm.
-
-
Alternative 2: The PlentyONE data field is inserted and the field Comparative value is shown.
-
In the field Comparative value, enter a value that is saved in the setting or the property of the mapped PlentyONE data field.
-
Click on Confirm.
-
-
Alternative 3: The PlentyONE data field is inserted and a drop-down list is shown.
-
Select a value from the drop-down list.
-
Click on Confirm.
→ The value of the marketplace data field is exported, not the value of the PlentyONE data field.
Exception: Only when you map an own value, the own value that you enter is exported.
-
-
Example: Delivery time in days for Otto Market
This gif shows you how to map suitable PlentyONE values to the values of the marketplace data fields Delivery time in days for Otto Market:
In a 1:1 mapping with one or more fallback data fields, you map a PlentyONE data field to the marketplace data field. In addition, you specify one or more fallback data fields. This ensures that the system keeps looking if the first PlentyONE data field is missing or empty.
So this mapping specifies:
-
I want to fill the marketplace data field with the data from the selected PlentyONE setting.
-
If that data field is missing or empty for a variation, the first fallback data field is checked. The value of that fallback data field is exported instead.
-
If the first fallback data field is also missing or empty for the variation, the second fallback data field is checked. If a value is found, the value of the second fallback data field is exported for the variation etc.
Two separate fallback conditions are available:
Null (default) |
The fallback data field is used if the data field above is mapped in the catalogue but not linked to the variation. The condition "Null" is useful when you want to map fallback data fields for the following types of PlentyONE data fields:
Important: When you add a fallback data field, the fallback condition "null" is selected automatically. To apply the fallback condition "leer", you need to change the default setting. |
Empty |
The fallback data field is used if the data field above is mapped in the catalogue and linked to the variation, but is empty. The condition "Empty" is useful when you want to map fallback data fields for the following type of PlentyONE data fields:
Important: When you add a fallback data field, the fallback condition "null" is selected automatically. To apply the fallback condition "leer", you need to change the default setting. |
Note: Even if you assign one or more fallback data fields, the value of only one of those fields is exported. For each variation, the mapped PlentyONE data fields are checked in the order in which you mapped them. This means that if the first data field does not provide a value for a variation, the first fallback data field is exported etc.
Creating a 1:1 mapping with fallback data fields:
-
Next to the marketplace data field, click on + Add data field.
→ To the left, the list of available PlentyONE data fields are shown in groups. -
Click on the group you need.
→ The PlentyONE data fields of the group are shown. -
Click on the plus to the right of the PlentyONE data field you want to select.
→ The PlentyONE data field is added to the right. -
In the list of PlentyONE data fields, click on the plus icon next to the PlentyONE data field that you want to map.
→ The fallback data field is added with the fallback condition "null". -
Alternative 1: To add the fallback data field with the fallback condition "null":
-
Click on Confirm.
→ The fallback data field is exported if the data field above is not linked to the variation.
-
-
Alternative 2: To add the fallback data field with the fallback condition "empty":
-
To the left of the fallback data field, click on the cog ().
→ The window Data column settings is shown. -
For the setting Fallback condition, select the option Empty.
-
Click on Save.
→ The fallback data field is added with the fallback condition "empty". -
Click on Confirm.
→ The fallback data field is exported if the data field above is empty for the variation.
-
Example: Fallback data field for SKU for Otto Market
This GIF shows you the mapping for the OTTO Market marketplace data field SKU. The PlentyONE data field SKU is mapped to this marketplace data field. The PlentyONE data field Variation ID is mapped as the fallback data field. The fallback condition "null" is applied automatically.
Result: The fallback data field Variation ID is exported if the data field SKU is not linked to the variation.
In a 1:n mapping, you map several PlentyONE data fields to the marketplace data field. You can link these data fields with a separator.
So this mapping specifies:
-
I want to combine these PlentyONE data fields during export so that the marketplace data field is filled with the data of these two or more PlentyONE settings.
Creating a 1:n mapping:
-
Next to the marketplace data field, click on + Add data field.
→ To the left, the list of available PlentyONE data fields are shown in groups. -
Click on the group you need.
→ The PlentyONE data fields of the group are shown. -
Click on the plus to the right of the PlentyONE data field you want to select.
→ The PlentyONE data field is added to the right. -
Click on Confirm.
-
To the right of the mapped PlentyONE data field, click on Add data field ().
→ To the left, the list of available PlentyONE data fields again are shown in groups. -
Map one or several additional PlentyONE data fields to the marketplace data field as described above.
-
Click on Confirm.
-
To the very right of the row, click on Settings ().
-
Select a separator from the drop-down list Separator or add a custom separator.
-
Click on Save.
-
Save () the catalogue.
→ The mappings are saved.
→ During the export, the content of the PlentyONE data fields is combined and exported as one field.
You are sure that you want to export the same value for all variations of a catalogue for a marketplace data field? Then specify an own value. This own value is then exported for all variations.
So this mapping specifies:
-
For this marketplace data field, I want to export the value that I entered in the field Own value for all variations of this catalogue. The value you enter is always exported. The value overwrites the market value also in complex mappings where usually the value of the market is exported. As such, make sure you enter an own value that the market accepts for this marketplace data field.
Creating an own value mapping:
-
Next to the marketplace data field, click on + Add data field.
→ To the left, the list of available PlentyONE data fields are shown in groups. -
Click on the plus next to Own value at the top of the list.
→ The field for the own value is added to the view. -
Enter a value into the input field.
→ This value is exported for all variations.
Example: Diameter information
You want to export diameter information for some of your variations. The diameter is saved in centimetres for all your variations. Instead of creating a property for the unit and linking this property to the variations, you can enter the own value cm.
This is an example of how you can map an own value for the diameter unit:
Mathematical calculations allow you to change numerical values automatically during the export.
-
This function only works for data fields that contain numerical values.
-
This functionality is new and not available for all catalogue formats.
So this mapping specifies:
-
I want the numerical value of a PlentyONE data field to be recalculated during the export. Basic arithmetic operations are available for the formulas.
Recalculating numerical values:
-
Next to the marketplace data field, click on + Add data field.
→ To the left, the list of available PlentyONE data fields are shown in groups. -
At the very top of the list, click on the plus icon next to Formula (calculate).
→ The data field Formula is added to the field on the right. -
Click into the data field.
→ The window Modify value is shown. -
Enter a numerical value or select a PlentyONE data field at the bottom right of the window to add it to the calculation (add).
Tip: Use the search function. This helps you to find data fields quickly. -
Optional: If the symbol more_vert is shown in the data field, select the correct assignment for the data field.
Tip: A number tells you how many assignments are necessary for the data field.-
Click on the icon more_vert.
-
In the window shown, select the assignments from the drop-down list.
-
Save the settings.
-
-
Enter numbers and mathematical operators with the on-screen calculator or the keyboard.
-
Save the settings.
→ The entered formula is displayed in the overview.
→ The calculation will be carried out in the next export.
7.3.2. Recommendations for limango data field mapping
To help you with mapping your data fields for the catalogue, we have created a list of recommended data field mappings. Note that these mappings are recommendations only. Depending on how you manage your item data, other mappings may be more appropriate than the recommendation given here.
-
Need more information about the PlentyONE data fields? All data fields are described on the manual page for the standard format Item (new).
| limango field | Recommended mapping / notes | limango product level |
|---|---|---|
Product name (for categories with "[Product name] in [colour]") |
||
Product name |
or
or
or
Tip: During the export, the data fields Product name and Color value of this group are combined. The word Note: Does your property for Product name contain both product type and colour? Then do not map a PlentyONE data field to the data field Color value. Otherwise, the colour will be duplicated in the product name. In addition, map the same property to the data field Product name that you mapped to the data field Product name in the section Product. At some point, the second data field Product name will be removed. |
Product |
Color value |
or
Tip: During the export, the data fields Product name and Color value of this group are combined. The word Note: Does your property for Product name contain both product type and colour? Then do not map a PlentyONE data field to the data field Color value. Otherwise, the colour will be duplicated in the product name. In addition, map the same property to the data field Product name that you mapped to the data field Product name in the section Product. At some point, the second data field Product name will be removed. |
Product |
Products |
||
Merchant product ID |
Is automatically created from Parent SKU + Color. |
Product group |
Product group ID |
Note: You can assign any product group ID to your variations. The ID is not shown in the limango store. |
Product group |
Product group name |
Note: You can assign any product group name to your variations. The name is not shown in the limango store. |
Product group |
Product name |
or
or
or
|
Product |
Short description |
|
Product |
Description |
|
Product |
Manufacturer item number |
|
Product |
Energy label URL |
|
Product |
Energy data sheet URL |
|
Product |
Bild-URL |
The following rules apply to the image export:
|
Product |
Color |
or
Tip: This field tells limango which attribute or which property you use for colours. To create the item number, the colour is added to the SKU. As such, the colour must be a unique value, for example the manufacturer colour. |
Product |
Material composition |
||
Material composition |
|
Product |
Shoes |
||
Material composition for shoes |
Valid values:
|
Product |
Freight shipping for Germany |
||
2-Man Handling service |
Valid values:
|
Product |
Product variations |
||
Variation ID |
This is assigned automatically. |
Variation |
Manufacturer variation number |
|
Variation |
Variation status |
|
Variation |
Min. delivery time |
Minimum delivery time in working days
or
Tip: The delivery time indicates when the order will arrive at the customer’s. |
Variation |
Max. delivery time |
Maximum delivery time in working days
or
Tip: The delivery time indicates when the order will arrive at the customer’s. |
Variation |
EAN / GTIN |
|
Variation |
Measurements |
||
Length |
|
Variation |
Width |
|
Variation |
Weight |
|
Variation |
Height |
|
Variation |
Depth |
|
Variation |
Volume |
Note: Only the units ml (for millilitres) and l (for litres) can be exported. |
Variation |
Diameter |
|
Variation |
Leg height |
|
Variation |
Hight of bootleg |
|
Variation |
Heel height |
|
Variation |
Width of bootleg |
|
Variation |
Sales prices |
||
RRP |
|
Variation |
Gross sales price |
|
Variation |
Category |
||
Category |
Only one category is exported per product. However, due to technical reasons, the default category of a variation cannot be determined during the export. If more than one category is linked to a main variation, a check is run to determine which of these categories is mapped to a limango data field in the catalogue. If more than one category is mapped in the catalogue, the first mapped category in the catalogue’s category list is exported. If you want to export a different category, change the order of the mappings in the catalogue. |
Product group |
Care instructions |
||
Care instructions |
|
Product |
Brand |
||
Brand |
Tip: Cannot find a brand that you want to sell in the brand list? Contact the limango partner managers. They will add the brand to the list. |
Product group |
Gender |
||
Gender |
Valid values:

|
Product |
Altersgruppe |
||
Altersgruppe |
Valid values:
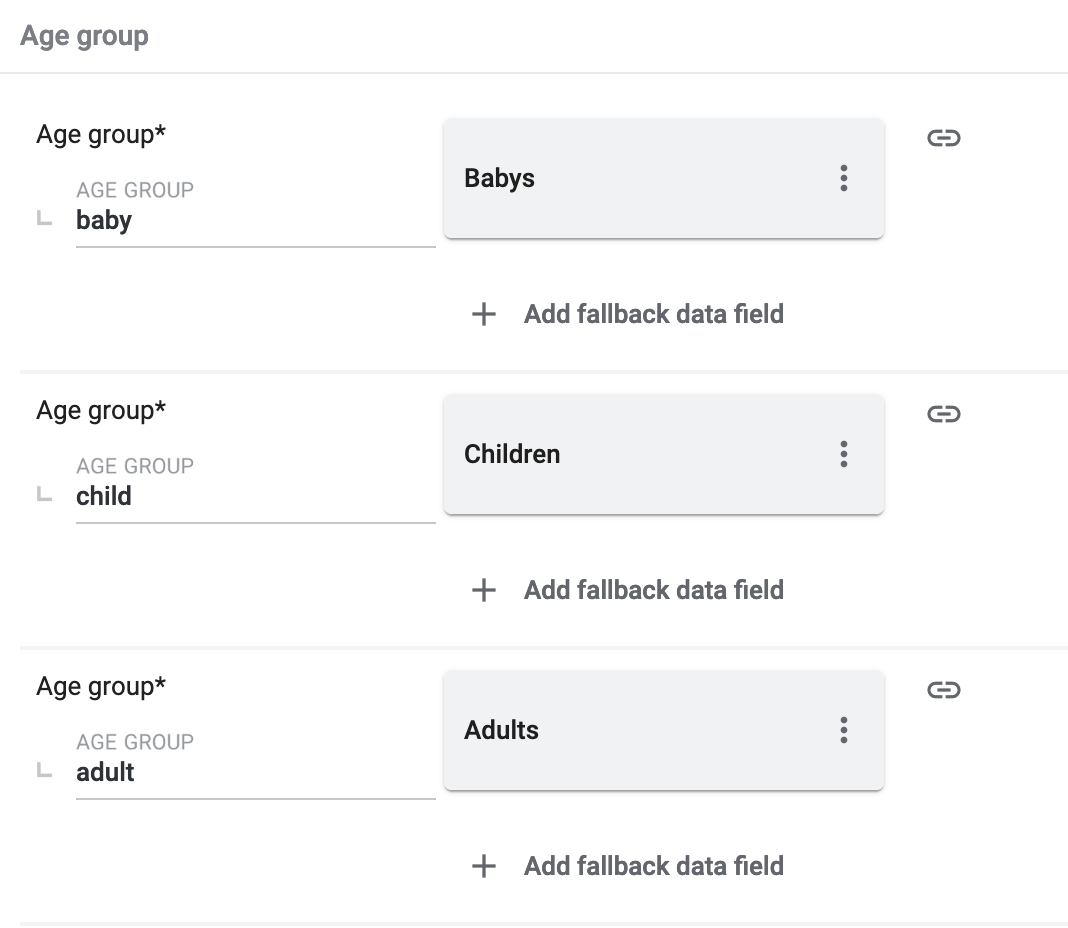
|
Product |
Taking back old appliances according to ElektroG3 |
||
Taking back old appliances according to ElektroG3 |
|
Product |
Season |
||
Season |
|
Product |
Energy efficiency class |
||
Energy efficiency class |
|
Product |
Color value Limango mapping |
||
Color value |
or
If necessary, add different shades of the same colour as fallback data fields: The colour value is equivalent to the colour filter of the limango shop. However, limango only distinguishes by colour, not by colour shades. To ensure that separate products are created for variations in different shades of the same colour, the colour value saved in PlentyONE is exported as part of the merchant product ID and the product name. In other words, the limango colour value is not exported. Example: Mapping different shades of green to the colour value green
Imagine that you want to map your own shades of green to the limango colour green. Assumed scenario: You want to map all your shades of green to the limango colour value green. Some shades of green are saved as values of the attribute Colour:
Other shades of green are saved as property values:
Mapping different shades of green to the colour value "green":
|
Product |
Material composition |
||
Material |
or For variations with different material mixes:
|
Product |
Size |
||
Size |
or
Note: The value onesize must be exported for products without a specific size. Therefore, also assign a value to the limango value onesize. |
Variation |
VAT class |
||
VAT class normal |
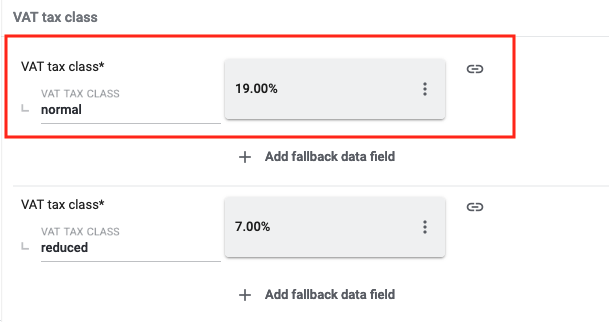
Add a fallback data field if necessary. |
Variation |
VAT class reduced |
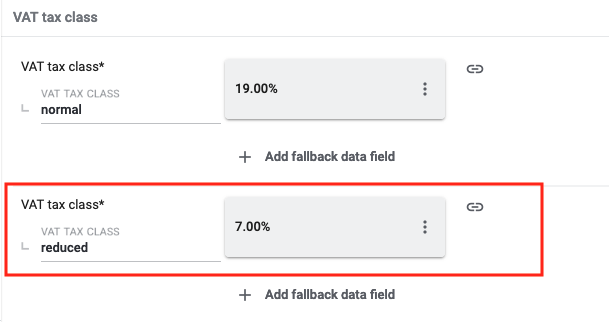
Add a fallback data field if necessary. |
Variation |
Intrastat measurements |
||
Length in cm |
What is this?
If your warehouse is outside of Germany, you need to specify information for Intrastat notifications. |
Variation |
Weight in kg |
What is this?
If your warehouse is outside of Germany, you need to specify information for Intrastat notifications. |
Variation |
EU Responsible Contact Information |
||
EU Responsible Person Or Company |
|
Product |
EU Responsible Person Or Company Second Line |
Tip: If you entered a contact person under EU Responsible Person Or Company, you can enter a company name here. |
Product |
EU Responsible Email |
|
Product |
EU Responsible Street |
|
Product |
EU Responsible House Number |
|
Product |
EU Responsible Address Second Line |
|
Product |
EU Responsible Postal Code |
|
Product |
EU Responsible City |
|
Product |
EU Responsible Country |
|
Product |
Fields that are exported without a mapping |
||
Merchant product ID |
The merchant product ID is automatically created from Parent SKU + Color. |
Product |
Image alternative text |
|
Product |
Product status |
Based on the status of the variations |
Product |
Variation ID |
The SKU is exported |
Variation |
Unit price |
The unit price is calculated based on the content |
Variation |
7.3.3. NEW: Exporting specific items (optional)
Add filters to only export specific items. You can find the filters in the side navigation of the Data » Catalogues » [Open catalogue] » Filters menu.
For catalogues with marketplace formats, both template filters and user-defined filters are available. Template filters are applied automatically and cannot be deselected. User-defined filters can be set as needed to only export specific items.
Adding a filter:
-
Go to Data » Catalogues.
→ The catalogue overview opens. -
Open the catalogue.
-
On the left in the side navigation, click on the Filters (filter_alt) tab.
-
Select a filter from the Select filter drop-down list.
-
On the right, click on Add filter (add).
→ The filter is added.
→ Depending on the filter, either a drop-down list or an input field is displayed. -
Select a value from the drop-down list.
Or: Enter the desired value in the field of the filter you added. -
Save (save) the settings.
→ The filter is saved. -
Add additional filters as necessary.
→ Only data sets that meet all filter criteria are exported.
Tip: The number next to the word Filter shows how many filters have been set. The template filters are not included in this number.
For limango, the filters explained in Table 3 are available.
| User-defined filters | |
|---|---|
Has a SKU |
Add the filter and select the Account ID, Order referrer and Status. |
Item IDs |
Enter one or more item IDs. Separate multiple IDs using commas. Only variations with these item IDs are exported. |
Variation is active |
Add the filter and select Active or Inactive.
|
Visible for at least one market |
Add the filter and select one or multiple sales channels. |
Has tags |
Add the filter and select one or multiple tags. |
Has at least one barcode |
Add the filter and select one or multiple barcodes. |
Has barcode |
Add the filter and select one or multiple barcodes. |
Without tags |
Only variations without tags are exported. |
Linked to at least one property selection value |
Add the filter and enter one or multiple values of a selection property. |
At least one availability |
Add the filter and select one or multiple availabilities. |
Item has images |
Add the filter and select an option. Has item images = Only items for which at least one image is saved in the Images section of the Item » Items » [Open item] menu will be exported. |
Currencies |
Add the filter and select one or multiple currencies. |
Variation has sales price |
Add the filter and select one or multiple sales prices. |
Price value |
Add filter and select the sales price, operator, and the sales price value. |
Has flag 1 |
Add the filter and select one or multiple flags. |
Has flag 2 |
Add the filter and select one or multiple flags. |
Item created at |
Add the filter, select a value and enter a date or time span if needed.
|
Item updated at |
Add the filter, select a value and enter a date or time span if needed.
|
Variation created at |
Add the filter, select a value and enter a date or time span if needed.
|
Variation updated at |
Add the filter, select a value and enter a date or time span if needed.
|
Belongs to at least one Amazon product category |
Add the filter and select one or multiple Amazon product categories. |
Item type |
Add the filter and select Default, Set, or Multi-Pack. |
Variation is main variation |
|
Variation has an image |
|
Variation is in categories |
Add the filter and select one or multiple categories. Note: Enter the category IDs. |
Variation is in one of these categories |
Add the filter and select one or multiple categories. Note: Enter the category IDs. |
Item has manufacturers |
Add the filter and select one or multiple manufacturers. |
Item has no manufacturers |
Only items for which the option None is saved for the Manufacturer setting in the Settings section of the Item » Items »[Open item] menu are exported. |
Visible for markets |
Add the filter and add one or multiple sales channels. |
Bundle type |
Add the filter and select the bundle type.
|
Visible for a client |
Add the filter and select one or multiple clients. |
Visible for clients |
Add the filter and select one or multiple clients. |
Linked to property selection values |
Add the filter and enter one or multiple values of a selection property. |
Has at least one tag |
Add the filter and select one or multiple tags. |
Variation has child variations |
|
Variation IDs |
Enter one or more variation IDs. Separate multiple IDs using commas. Only variations with these variation IDs are exported. |
Sales price updated at |
Add the filter, select a value and enter a date or time span if needed.
|
Stock updated at |
Add the filter, select a value and enter a date or time span if needed.
|
7.4. Providing information on manufacturer and EU-responsible person (GPSR)
The General Product Safety Regulation of the EU (GPSR) requires manufacturers and sellers to ensure the product safety of certain goods and to provide certain information for this purpose. This information includes details about the manufacturer and, in the case of manufacturers without an establishment in the EU, details about the responsible person within the EU. The GPSR regulation ensures that products are safe and comply with consumer protection requirements before being placed on the market.
In this chapter, you will learn how to add information on the manufacturer and the responsible person within the EU in PlentyONE to comply with the GPSR regulation.
If you export your items to limango via catalogues, you can add the information on the manufacturer and the EU-responsible person directly via the data field mappings.
7.5. Previewing item export data (optional)
When you have finished mapping all data fields, you can check the first five products of the export using the preview function.
Creating a preview in the catalogue:
-
Go to Data » Catalogues.
→ The catalogue overview opens. -
Open the catalogue.
-
In the toolbar at the top, click on Preview (preview).
→ In the Preview window, a preview of the first 5 products of the export is shown. -
Check the data. Was the data mapped as you expected?
-
Optional: Click on Download data (file_download).
→ You can save a file with the first 5 products on your computer.
7.6. Activating the catalogue
You have set up limango in PlentyONE and created a catalogue for exporting your item data? Then start the export of your item data. To do so, activate the catalogues which should be exported to limango in the Data » Catalogues menu.
Activating the catalogue export to limango:
-
Go to Data » Catalogues.
→ The catalogues are listed. -
Scroll to the limango catalogue.
-
In the Active column, move the toggle button to the right ().
→ The catalogue is active.
→ The catalogue data is exported to limango once a day during the night.
Note: Only variations that were modified within the last 4 hours will be exported to limango.
Tip: Go to Data » Catalogue export status for information about the status of the export.
8. Deleting items on limango
If you do not want to offer a variation on limango any longer, then you can either delete the market availability for limango or deactivate the variation. The variation will then be excluded from the nightly item export to limango and it will be deleted on limango.
Note: Variations will also be excluded from the item export and be deleted on limango if they cannot be validated. To find out why a variation could not be exported, check the validation file in the Data » Log menu.
Deleting items on limango:
Alternative 1:
Deleting the market availability:
-
Go to Item » Edit item » [Open item] » [Open variation] » Variation tab: Availability.
-
Delete () the availability Limango.
-
Save () the settings.
Alternative 2:
Deactivating the variation:
-
Go to Item » Edit item » [Open item] » [Open variation] » Variation tab: Settings.
-
In the Availability section, remove the checkmark for the option Active.
Note: Note that the variation can possibly not be sold on other markets either if it is deactivated. -
Save () the settings.
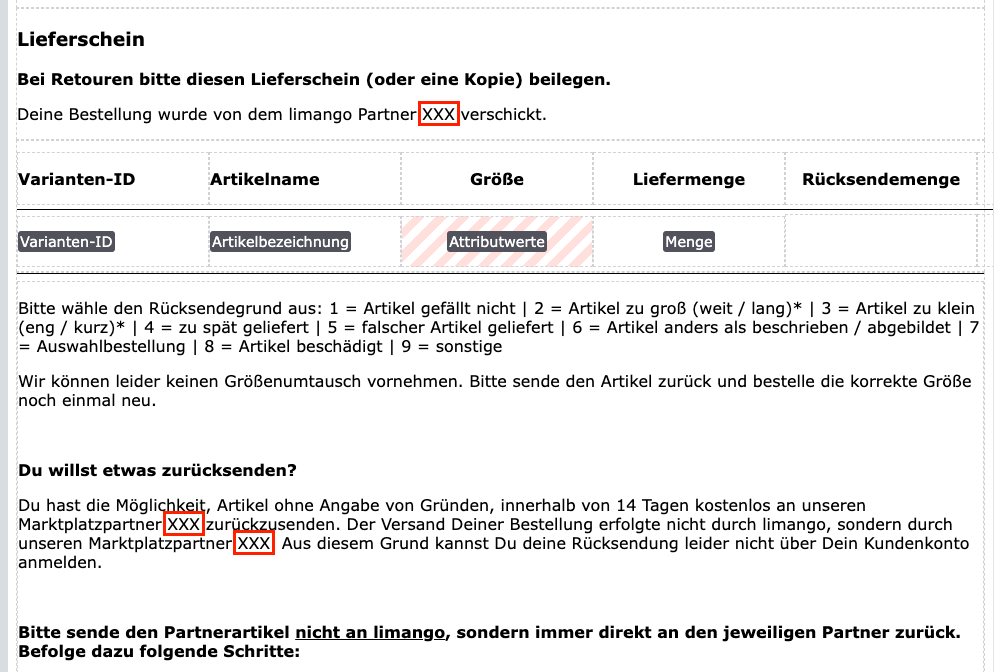
9. Preparing delivery notes for limango
Delivery notes for limango orders also serve as return slips. Delivery notes for limango orders must contain the following information:
-
limango letterhead
-
Your company details
-
Return note required by limango
-
limango customer number
-
limango order number
For limango delivery notes, a DocumentBuilder template is available that already contains the limango logo and the return note required by limango. The customer number and order number are automatically inserted via variables.
Creating document templates with the DocumentBuilder is described in the DocumentBuilder manual section. We only explain how you upload and personalise the DocumentBuilder template here:
Note: After personalising the template for limango delivery notes, you must activate it before you can use it.
9.1. Uploading the DocumentBuilder template
Proceed as described below to upload the DocumentBuilder template for delivery notes to PlentyONE.
Uploading the DocumentBuilder template
-
Save the DocumentBuilder template for delivery notes to your computer:
-
Open the Setup » Documents » DocumentBuilder menu.
→ The DocumentBuilder overview opens. -
In the top left corner, click file_upload (Import template).
-
Select the Lieferschein_DE_Limango.tpl template from your computer.
-
Click Open.
→ The template is imported.
9.2. Personalising the DocumentBuilder template
Before you can use the DocumentBuilder template for delivery notes, you need to add your company data.
Personalising the DocumentBuilder template for delivery notes:
-
Open the Setup » Documents » DocumentBuilder menu.
→ The DocumentBuilder overview opens. -
Click Search (search) to list the existing templates.
-
Click the Lieferscheine (DE) Limango template.
→ The template opens. -
Click Open Editor (edit).
→ The editor opens and the widgets are loaded. -
Click the section with Firma Partner,Straße, PLZ Ort below the header.
-
Click Text (edit).
→ The text editor opens. -
Replace the placeholder text "Firma Partner,Straße, PLZ Ort" with the following company data:
[your company name],[the street and house number of your company],[the postcode and city of your company] -
After entering your data, click on the greyed-out area below the input field.
→ The text editor is closed. -
Click the section with the heading Lieferschein.
-
Click Text (edit).
→ The text editor opens. -
Replace the placeholder "xxx" with the name of your company.
-
After entering your data, click on the greyed-out area below the input field.
→ The text editor is closed. -
Click the section with the heading Du willst etwas zurücksenden?.
-
Click Text (edit).
→ The text editor opens. -
Replace the two placeholders "xxx" with the name of your company.
-
After entering your data, click on the greyed-out area below the input field.
→ The text editor is closed. -
Click on the Footer section below.
→ The text Load and edit content is displayed. -
Click Load and edit content.
→ The content of the footer is displayed. -
Click the section Firma Partner, Amtsgericht/HRB, Ust.-IdNr at the bottom left.
-
Click Text (edit).
→ The text editor opens. -
Replace the placeholder text "Firma Partner, Amtsgericht/HRB, Ust.-IdNr" with the following company data:
[your company name]
Amtsgericht [your court of first instance]/HRB [your HRB]
USt.-IdNr. [your VAT no.] -
After entering your data, click on the greyed-out area below the input field.
→ The text editor is closed. -
Save (save) the DocumentBuilder template.
_Tip:Before you activate the template for delivery notes, you can display a *preview (visibility) of the template.

10. Automating order processing
You can automatically inform limango about changes to the order status. Two options are available for this purpose:
-
Option 1: PlentyONE Flow (recommended)
-
Option 2: Event procedures (old method)
10.1. Option 1: PlentyONE Flow (recommended)
Create event-based flows to automatically inform limango about changes to the order status. The following actions are available for limango in the PlentyONE Flow Studio:
With PlentyONE Flow (short: “Flow”), you can automate workflows for your business processes. Flow provides you with two functions in the Automation menu:
-
In Flow Studio you create and configure automated workflows. Depending on the trigger type, there are three types of flows: event-based, time-based or manual.
-
In the Flow Tracker, you can monitor running or completed workflows.
The central element in both functions is the Canvas – a graphical interface on which the workflows are visualised with Actions and Controls. In Flow Studio, the canvas can be edited, in Flow Tracker, it is only used for visualisation and is therefore read-only.
-
Is this your first time working with PlentyONE Flow? Then read up on the basic concept of Flow first.
10.1.1. Notify limango about cancellations
Create an event-based flow to automatically inform limango of cancellations.
Note: An order cannot be cancelled any longer after it was shipped and a shipping confirmation was sent.
-
Go to Automation » Flow Studio.
-
Click Create flow (add).
→ A stepper opens and guides you through the following three steps.-
General
-
Enter a unique name and, if necessary, a description for the new flow.
-
Click Next.
-
-
Trigger
-
Select Event-based as the trigger.
-
Click Next.
-
-
Settings
-
If desired, select a UI from the optional drop-down list Flow available in.
→ The option to manually trigger the flow directly from the selected UI is added to the group functions in that UI.
Note: UIs currently selectable: Order UI. -
From the drop-down list Trigger selection, select the event according to Table 4.
Note: If the trigger event has additional settings, then these are invariably mandatory. Without performing these settings, you will not be able to save the flow. -
Save () the settings.
→ The flow is created.
→ The Flow Studio Canvas appears, on which two elements are already displayed: The trigger type and the placeholder for the next step.
Note: With some event-based flows you cannot save the flow if it consists of only a trigger. In such cases, you need to add at least one further step.
-
-
-
Configure the new flow according to Table 4.
-
Save () the settings.
Note: The selected statuses, controls and filters in Table 4 only serve as an example. Select the statuses, controls and filters for the flow which best suit your workflow.
| Setting | Option | Selection | ||||||
|---|---|---|---|---|---|---|---|---|
Trigger selection |
Select a trigger, for example:
|
Select an order status, for example:
|
||||||
Controls |
Branch |
Note: If there is more than one filter, add the others as condition (playlist_add). Select AND as the relationship between the conditions.
|
||||||
Actions |
Plugin (Legacy) > Limango |
Send order cancellation to limango |
10.1.2. Sending shipping confirmations to limango
Shipping confirmations for limango must contain a tracking number. In addition, the shipping service provider of the order must be linked to the limango shipping service provider correctly in the plugin settings.
Create two event-based flows to automatically confirm the shipping to limango:
10.1.2.1. Workflow for automatic order confirmations
The workflow for automated shipping confirmations depends on whether or not the order’s shipping service provider is correctly linked to the limango shipping service provider in the plugin settings.
| Case | Procedure |
|---|---|
Shipping service provider linked |
|
Shipping service provider linked correctly |
|
10.1.2.2. Sending shipping confirmations to limango (flow 1)
For flow 1 for shipping confirmations, create the event-based flow described in Table 5.
-
Go to Automation » Flow Studio.
-
Click Create flow (add).
→ A stepper opens and guides you through the following three steps.-
General
-
Enter a unique name and, if necessary, a description for the new flow.
-
Click Next.
-
-
Trigger
-
Select Event-based as the trigger.
-
Click Next.
-
-
Settings
-
If desired, select a UI from the optional drop-down list Flow available in.
→ The option to manually trigger the flow directly from the selected UI is added to the group functions in that UI.
Note: UIs currently selectable: Order UI. -
From the drop-down list Trigger selection, select the event according to Table 5.
Note: If the trigger event has additional settings, then these are invariably mandatory. Without performing these settings, you will not be able to save the flow. -
Save () the settings.
→ The flow is created.
→ The Flow Studio Canvas appears, on which two elements are already displayed: The trigger type and the placeholder for the next step.
Note: With some event-based flows you cannot save the flow if it consists of only a trigger. In such cases, you need to add at least one further step.
-
-
-
Configure the new flow according to Table 5.
-
Save () the settings.
Note: The selected statuses, controls and filters in Table 5 only serve as an example. Select the statuses, controls and filters for the flow which best suit your workflow.
| Setting | Option | Selection | |||||||||
|---|---|---|---|---|---|---|---|---|---|---|---|
Trigger selection |
Select a trigger, for example:
|
||||||||||
Controls |
Branch |
Note: If there is more than one filter, add the others as condition (playlist_add). Select AND as the relationship between the conditions.
|
|||||||||
Actions |
Plugin (Legacy) > Limango |
Send shipping confirmation to limango |
10.1.2.3. Booking outgoing items (flow 2)
For flow 2 for shipping confirmations, create the event-based flow described in Table 6.
-
Go to Automation » Flow Studio.
-
Click Create flow (add).
→ A stepper opens and guides you through the following three steps.-
General
-
Enter a unique name and, if necessary, a description for the new flow.
-
Click Next.
-
-
Trigger
-
Select Event-based as the trigger.
-
Click Next.
-
-
Settings
-
If desired, select a UI from the optional drop-down list Flow available in.
→ The option to manually trigger the flow directly from the selected UI is added to the group functions in that UI.
Note: UIs currently selectable: Order UI. -
From the drop-down list Trigger selection, select the event according to Table 6.
Note: If the trigger event has additional settings, then these are invariably mandatory. Without performing these settings, you will not be able to save the flow. -
Save () the settings.
→ The flow is created.
→ The Flow Studio Canvas appears, on which two elements are already displayed: The trigger type and the placeholder for the next step.
Note: With some event-based flows you cannot save the flow if it consists of only a trigger. In such cases, you need to add at least one further step.
-
-
-
Configure the new flow according to Table 6.
-
Save () the settings.
Note: The selected statuses, controls and filters in Table 6 only serve as an example. Select the statuses, controls and filters for the flow which best suit your workflow.
| Setting | Option | Selection | |||||||||
|---|---|---|---|---|---|---|---|---|---|---|---|
Trigger selection |
Select a trigger, for example:
|
Select the status for Order status for orders with shipping carrier mapping (> 5 - < 7) |
|||||||||
Controls |
Branch |
Note: If there is more than one filter, add the others as condition (playlist_add). Select AND as the relationship between the conditions.
|
|||||||||
Action 1 |
Order item |
Book outgoing items |
|||||||||
Action 1 |
Plugin (Legacy) > Limango |
Send shipping confirmation to limango |
10.1.2.4. Adding return tracking information
You can add return tracking information, including return shipping service provider and return tracking number, to the shipping confirmation. limango will use this information to track returns and to streamline return processes.
You can save the return tracking number in several different ways:
|
Information on adding return tracking information
|
Requirements for adding return tracking information
Depending on whether you send shipping confirmations for orders or for delivery orders, return tracking information will be sent to limango if the following requirements are met:
Alternative 1: Shipping confirmations are sent for orders
-
If the return tracking number is saved at the order itself, then the return tracking number will be included in the shipping confirmation.
-
If no return tracking information is saved at the order, your PlentyONE system will check whether a return order exists for this order. If a return order exists und if this return order contains the return shipping service provider and the return tracking number, then the return tracking information will be sent to limango.
Alternative 2: Shipping confirmations are sent for delivery orders
-
If you work with delivery orders, then return tracking information will be included for the individual order items.
-
Your PlentyONE system first checks whether the delivery order contains return tracking information. If the delivery order does not contain return tracking information, the system checks whether a return order exists for the original order. If a return order exists, then the order items from the return order will be aligned with the order items from the delivery order.
10.1.3. Setting up return management
Now set up the processing of returns for limango.
10.1.3.1. Workflow for returns
The delivery note also functions as the return form. The workflow of limango returns is as follows:
-
Customers return the items to you.
-
You process the return in PlentyONE.
Note: A return can only be issued if the order was shipped and a shipping confirmation was sent. -
You notify limango when you have received the items.
-
limango reimburses the customer.
Note: When you notify limango that the return is completed, limango triggers a credit note and the buyer receives a refund. As such, only notify limango about completing the return after you have received and checked the returned items.
10.1.3.2. Notify limango about completed returns
Create an event-based flow to automatically inform limango when you have completed processing a return.
-
Go to Automation » Flow Studio.
-
Click Create flow (add).
→ A stepper opens and guides you through the following three steps.-
General
-
Enter a unique name and, if necessary, a description for the new flow.
-
Click Next.
-
-
Trigger
-
Select Event-based as the trigger.
-
Click Next.
-
-
Settings
-
If desired, select a UI from the optional drop-down list Flow available in.
→ The option to manually trigger the flow directly from the selected UI is added to the group functions in that UI.
Note: UIs currently selectable: Order UI. -
From the drop-down list Trigger selection, select the event according to Table 7.
Note: If the trigger event has additional settings, then these are invariably mandatory. Without performing these settings, you will not be able to save the flow. -
Save () the settings.
→ The flow is created.
→ The Flow Studio Canvas appears, on which two elements are already displayed: The trigger type and the placeholder for the next step.
Note: With some event-based flows you cannot save the flow if it consists of only a trigger. In such cases, you need to add at least one further step.
-
-
-
Configure the new flow according to Table 7.
-
Save () the settings.
Note: The selected statuses, controls and filters in Table 7 only serve as an example. Select the statuses, controls and filters for the flow which best suit your workflow.
| Setting | Option | Selection | |||||||||
|---|---|---|---|---|---|---|---|---|---|---|---|
Trigger selection |
Select a trigger, for example:
|
For Order types, select the type Return. |
|||||||||
Controls |
Branch |
Note: If there is more than one filter, add the others as condition (playlist_add). Select AND as the relationship between the conditions.
|
|||||||||
Actions |
Plugin (Legacy) > Limango |
Send return notification to limango |
10.2. Option 2: Event procedures (old method)
Set up event procedures to automatically inform limango about changes to the order status. The following event procedures are available for limango:
10.2.1. Notify limango about cancellations
Set up an event procedure to automatically inform limango of cancellations.
Note: An order cannot be cancelled any longer after it was shipped and a shipping confirmation was sent.
-
Go to Setup » Orders » Events.
-
Click on Add event procedure ().
→ The Create new event procedure window opens. -
Enter a distinct name for the event procedure.
-
Select the event according to Table 8.
-
Save () the settings.
-
Carry out the additional settings according to Table 8.
-
Select the setting Active ().
-
Save () the settings.
Note: The selected statuses and filters in Table 8 only serve as an example. Select the filters and statuses for the event procedure which best suit your workflow.
| Setting | Option | Selection |
|---|---|---|
Event |
Order change: Status change |
Select a status, for example [8] Cancelled. |
Filter |
Order > Referrer |
limango |
Procedure |
Plugins |
limango: Send order cancellation to limango |
10.2.2. Sending shipping confirmations to limango
Shipping confirmations for limango must contain a tracking number. In addition, the shipping service provider of the order must be linked to the limango shipping service provider correctly in the plugin settings.
Create two event procedures to automatically confirm the shipping to limango:
10.2.2.1. Workflow for automatic order confirmations
The workflow for automated shipping confirmations depends on whether or not the order’s shipping service provider is correctly linked to the limango shipping service provider in the plugin settings.
| Case | Procedure |
|---|---|
Shipping service provider linked |
|
Shipping service provider linked correctly |
|
10.2.2.2. Sending shipping confirmations to limango (event procedure 1)
For event procedure 1 for shipping confirmations, set up the event procedure described in Table 9.
-
Go to Setup » Orders » Events.
-
Click on Add event procedure ().
→ The Create new event procedure window opens. -
Enter a distinct name for the event procedure.
-
Select the event according to Table 9.
-
Save () the settings.
-
Carry out the additional settings according to Table 9.
-
Select the setting Active ().
-
Save () the settings.
Note: The selected statuses and filters in Table 9 only serve as an example. Select the filters and statuses for the event procedure which best suit your workflow.
| Setting | Option | Selection |
|---|---|---|
Event |
Order change > Package number |
|
Filter 1 |
Order > Order type |
Order |
Filter 2 |
Order > Referrer |
limango |
Procedure |
Plugins |
Send shipping confirmation to limango |
10.2.2.3. Booking outgoing items (event procedure 2)
For event procedure 2 for shipping confirmations, set up the event procedure described in Table 10.
-
Go to Setup » Orders » Events.
-
Click on Add event procedure ().
→ The Create new event procedure window opens. -
Enter a distinct name for the event procedure.
-
Select the event according to Table 10.
-
Save () the settings.
-
Carry out the additional settings according to Table 10.
-
Select the setting Active ().
-
Save () the settings.
Note: The selected statuses and filters in Table 10 only serve as an example. Select the filters and statuses for the event procedure which best suit your workflow.
| Setting | Option | Selection |
|---|---|---|
Event |
Order change: Status change |
Select the status for Order status for orders with shipping carrier mapping (> 5 - < 7) |
Filter 1 |
Order > Order type |
Order |
Filter 2 |
Order > Referrer |
limango |
Procedure 1 |
Order |
Book outgoing items |
Procedure 2 |
Plugins |
Send shipping confirmation to limango |
10.2.2.4. Adding return tracking information
You can add return tracking information, including return shipping service provider and return tracking number, to the shipping confirmation. limango will use this information to track returns and to streamline return processes.
You can save the return tracking number in several different ways:
|
Information on adding return tracking information
|
Requirements for adding return tracking information
Depending on whether you send shipping confirmations for orders or for delivery orders, return tracking information will be sent to limango if the following requirements are met:
Alternative 1: Shipping confirmations are sent for orders
-
If the return tracking number is saved at the order itself, then the return tracking number will be included in the shipping confirmation.
-
If no return tracking information is saved at the order, your PlentyONE system will check whether a return order exists for this order. If a return order exists und if this return order contains the return shipping service provider and the return tracking number, then the return tracking information will be sent to limango.
Alternative 2: Shipping confirmations are sent for delivery orders
-
If you work with delivery orders, then return tracking information will be included for the individual order items.
-
Your PlentyONE system first checks whether the delivery order contains return tracking information. If the delivery order does not contain return tracking information, the system checks whether a return order exists for the original order. If a return order exists, then the order items from the return order will be aligned with the order items from the delivery order.
10.2.3. Setting up return management
Now set up the processing of returns for limango.
10.2.3.1. Workflow for returns
The delivery note also functions as the return form. The workflow of limango returns is as follows:
-
Customers return the items to you.
-
You process the return in PlentyONE.
Note: A return can only be issued if the order was shipped and a shipping confirmation was sent. -
You notify limango when you have received the items.
-
limango reimburses the customer.
Note: When you notify limango that the return is completed, limango triggers a credit note and the buyer receives a refund. As such, only notify limango about completing the return after you have received and checked the returned items.
10.2.3.2. Notify limango about completed returns
Set up an event procedure to automatically inform limango when you have completed processing a return.
-
Go to Setup » Orders » Events.
-
Click on Add event procedure ().
→ The Create new event procedure window opens. -
Enter a distinct name for the event procedure.
-
Select the event according to Table 11.
-
Save () the settings.
-
Carry out the additional settings according to Table 11.
-
Select the setting Active ().
-
Save () the settings.
Note: The selected statuses and filters in Table 11 only serve as an example. Select the filters and statuses for the event procedure which best suit your workflow.
| Setting | Option | Selection |
|---|---|---|
Event |
Order generation: New return |
|
Filter 1 |
Order > Order type |
Return |
Filter 2 |
Order > Referrer |
limango |
Procedure |
Plugins |
Send return notification to limango |
11. Shipping costs
The shipping costs are defined in your contract with limango. limango then saves it in the limango backend. As such, you need to contact your limango partner manager if you want to change the shipping costs. As such, there are no settings for the shipping costs in PlentyONE.
12. Freight shipping service
If you want to offer freight shipping for your products, you have to enter the appropriate PlentyONE shipping profile ID for each shipping option in the plugin settings under Shipping carriers. This mapping is required to correctly import orders with freight shipping into your PlentyONE system.
In addition, you have to map the 2-Man Handling service data field in the limango item data catalogue according to the specifications in the recommendations for data field mapping.
13. Troubleshooting and FAQ
Did something go wrong? This chapter provides troubleshooting information. (last updated 30/07/2022)
13.1. Error messages in the catalogue
Problem:
-
You probably copied a limango catalogue with the old format limango and changed the format to the new format limango new. Now, the error message Select a valid export format is shown and you cannot save the catalogue.
Solution:
-
Open the Settings view.
-
Navigate to the section Format settings.
-
For the setting Format, select the option XML.
-
Save the catalogue.
Background: From plugin version 1.4.3., the new format limango new is used. This format is based on XML and not on CSV like the old format.
13.2. Viewing log entries
The Data » Log menu contains a history of processes that run via the limango interface.
Note that integrations and identifiers are only shown in the drop-down lists as filters after the process has run at least once.
For limango, the following filters are recommended:
-
Integration » limango
-
Go to Data » Log.
-
In the toolbar, click on tune.
-
Select appropriate filters from the drop-down lists.
-
Optional: Select filters for dates and/or times to only show entries from a specific period.
Tip: For information about the filters, refer to the Data log page of the manual. -
Click on Search ().
→ The results are shown. -
Check all entries for the levels warning and error.
Tip: Click on the entry to see details.
13.3. Item export: Error messages in the log
When this error occurs, variation data is still exported to limango. Only variations with this error are not exported.
Problem:
-
The variation must be linked with at least one image.
Solution:
-
Check that the variation is linked with at least one image.
Tip: How to link images to variations.
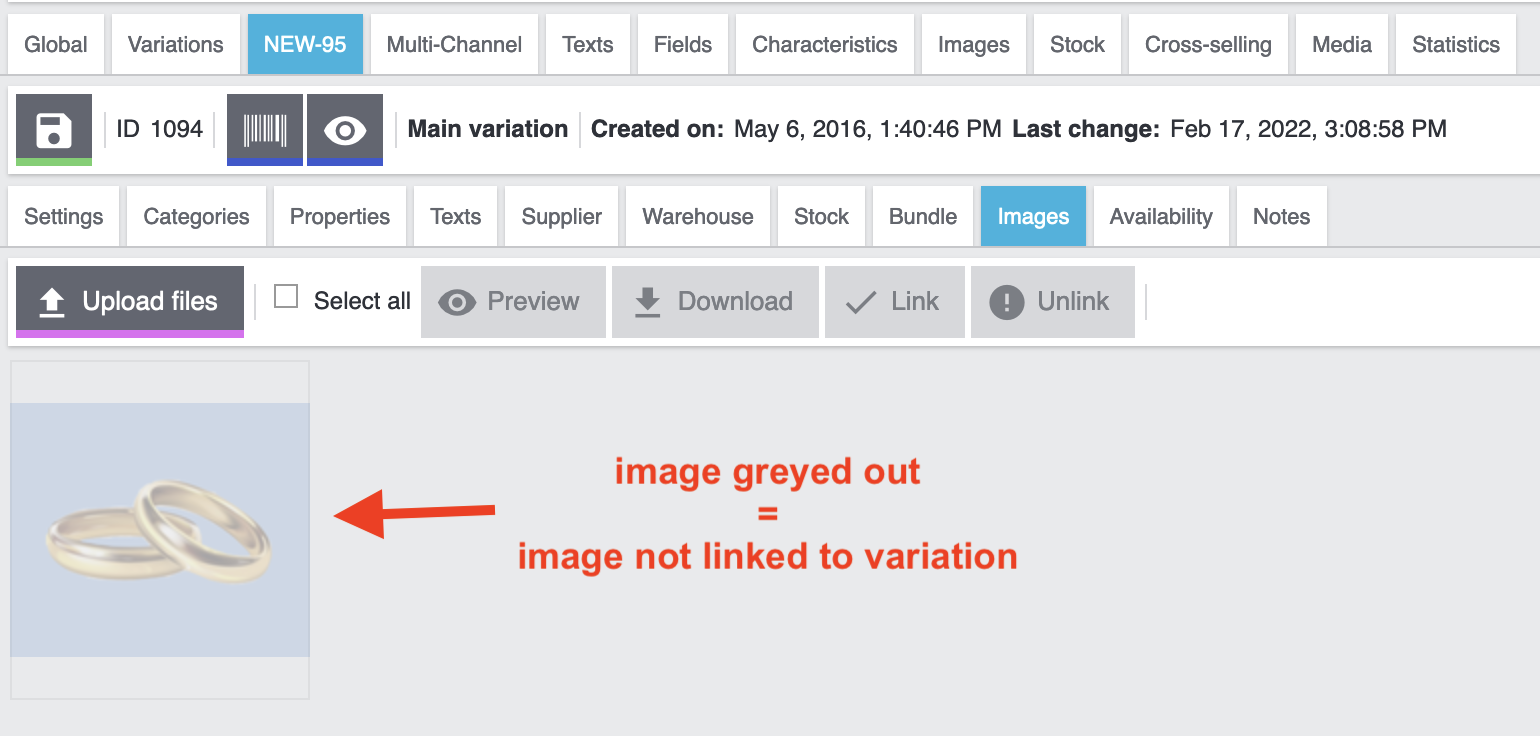
Problem:
-
The referrer limango is not activated for the images.
Solution:
-
Activate the referrer limango for the images of the variation that you want to export to limango.
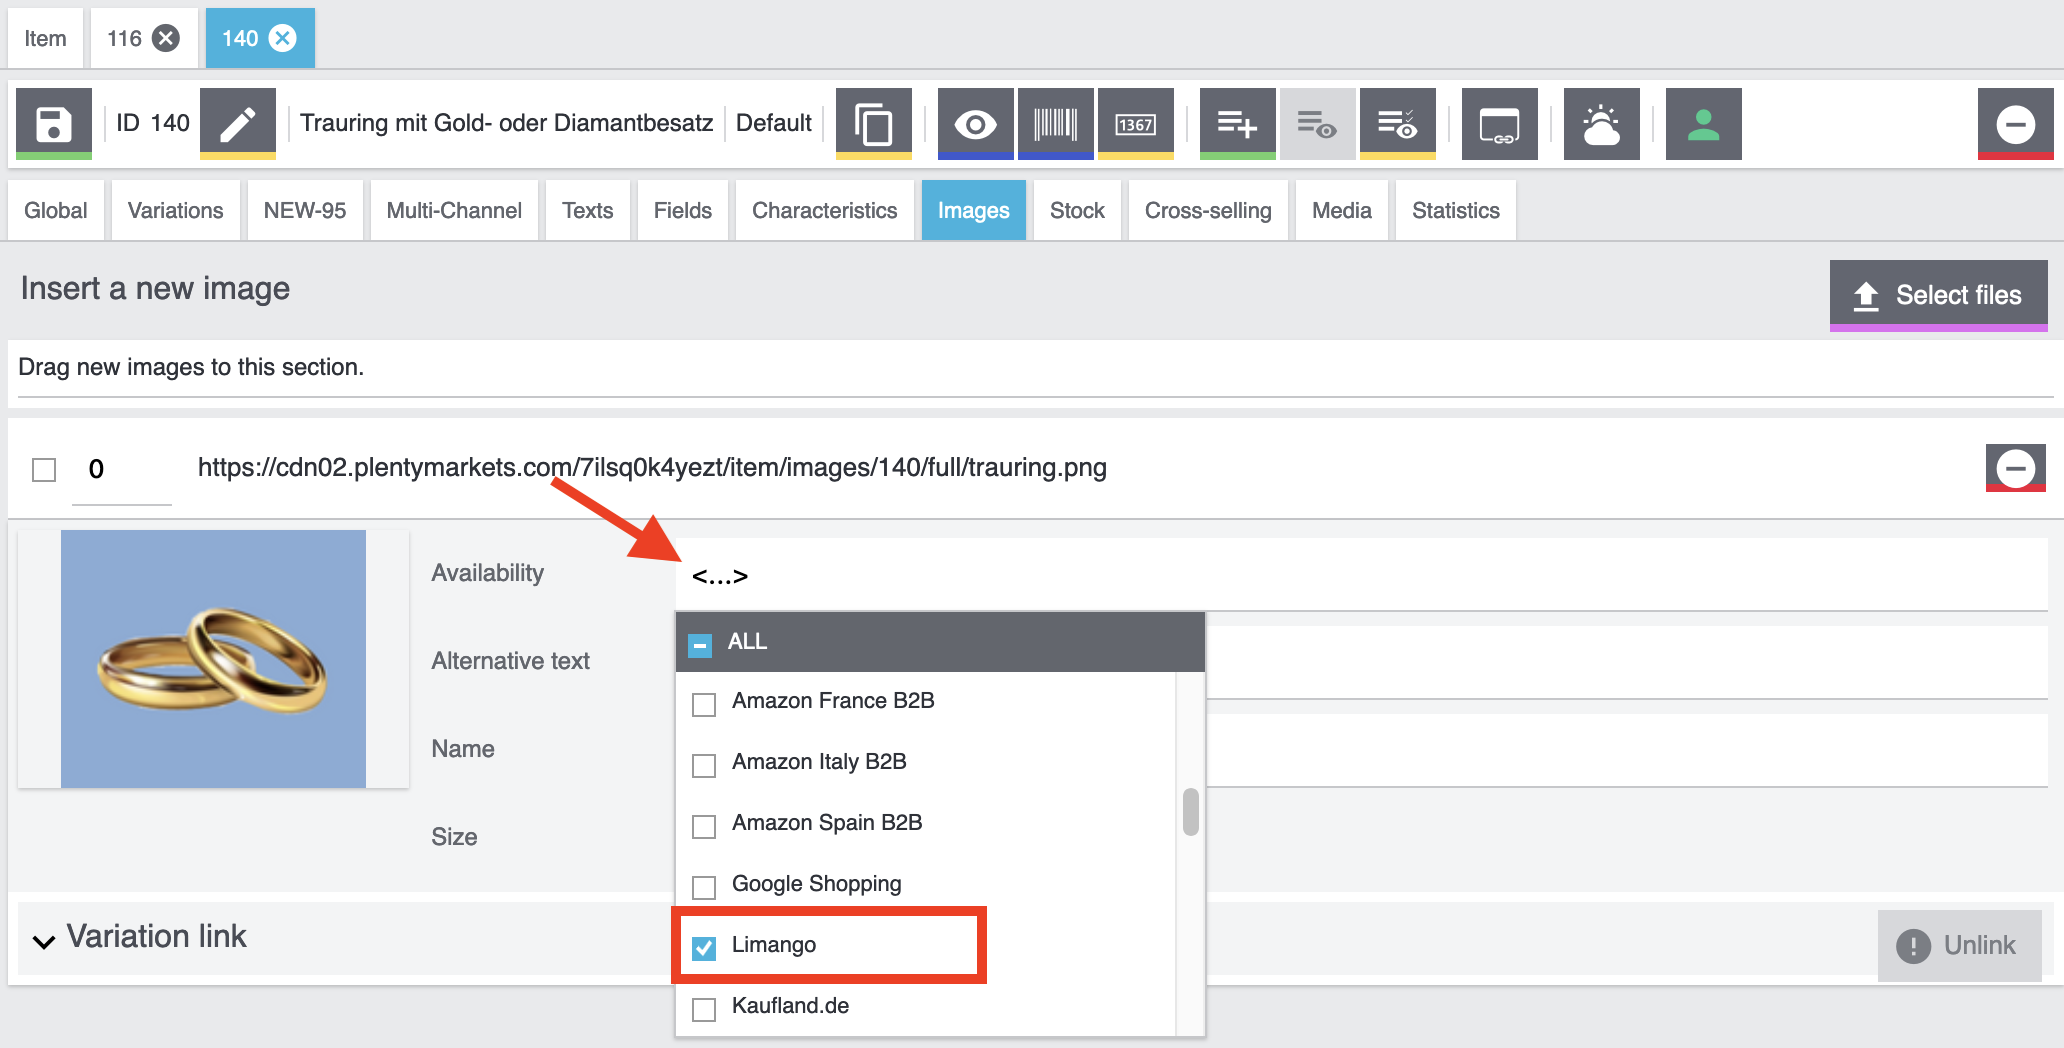
Problem:
-
No valid size was found for this variation. Most likely, the sizes of the variation do not match the data fields mapped in the catalogue.
Solution:
-
Open the variation and check the following:
-
What size does the variation have? Is the size defined with an attribute or a property?
-
-
Open the catalogue and check the following:
-
Which PlentyONE data field have you mapped to this size for the marketplace data field Size?
-
Is the value of the attribute or property that you mapped also saved for the variation?
-
Tip: The value onesize must be exported for products without a specific size. Did you do that correctly?
Problem:
The stock can only be specified as whole numbers. However, you probably exported the stock information for the variation as a decimal number.
Solution:
-
Check the variation. Deactivate the referrer limango or specify the stock in whole numbers.
13.4. Check list: Why is my variation not exported?
To export a variation to limango, this variation has to meet the following requirements:
-
Go to Setup » Orders » Order referrer.
-
Is the option limango active?
-
If necessary, activate this order referrer.
-
Click Save (save).
-
Go to Item » Items » [Open variation].
-
In the Availability and visibility section of the General tab, activate the option Active.
-
Click Save (save).
The variation must be available for the sales channel.
-
Go to Item » Items » [Open variation].
-
Switch to the Sales channels tab.
-
In the section Sales channels, select the option limango (check_box).
-
Activate the toggle button Activate sales channel (toggle_on).
-
Confirm the pop-up by clicking ACTIVATE.
-
Click Save (save).
→ The variation is available for limango.
-
Go to Item » Items » [Open variation].
-
Switch to the Stock tab.
-
Expand the Stock (arrow_forward_ios) section.
→ The net stock per warehouse is shown in the Net stock column.
Check the sales price:
-
Go to Setup » Item » Sales prices.
-
For the filter Referrer, select limango.
-
Click Search (search).
→ The sales price that is active for the referrer is shown. -
Check the settings of the sales price.
-
Make any necessary corrections.
Check the price:
-
Go to Item » Items » [Open variation].
→ The sales prices are listed in the tab Pricing. -
Check the following settings:
-
Is the sales price for the referrer linked?
-
Does the price for the referrer have the correct price?
-
-
Make any necessary corrections.
At the least the mandatory fields for the sales channel have to be mapped to PlentyONE data fields. In the catalogue, mandatory fields are marked with an asterisk.
In the menu Data » Catalogues » [Open catalogue] » Filter, you can set filters to export only specific variations. If any filters are active, only records that meet all the filter criteria are exported. So when the export does not behave as expected it’s worth checking the filter settings.
Important: Template filters are required by the sales channel and set automatically. You cannot remove these template filters.
Checking filters:
-
Go to Data » Catalogues » [Open catalogue].
-
On the left in the side navigation, click on the tab Filters (filter_alt).
Tip: The number next to the word Filter shows how many filters have been set. The template filters are not included in this number.
→ The filter overview opens. -
Check the logic of the filters.
-
If necessary, remove one or more filters.
-
Click Save (save).
Problem:
Only variations that were updated in the last 24 ours are exported.
Solution:
-
For one variation: Change the variation. For example, add a new sales channel and save the variation. Then delete the sales channel and save the variation again. By doing this, the time stamp of the variation is updated. The variation is included in the next export.
-
For a lot of variations: For example, use the group function or batch processing to add a new sales channel for all variations with the referrer limango. Then delete the sales channel again. By doing this, the time stamps of the variations is updated. The variations are included in the next export.
The catalogue that the variation is associated with must be activated.
-
Go to Data » Catalogues.
→ The catalogues are listed. -
Scroll to the limango catalogue.
-
In the column Active, activate the toggle (toggle_on).
You have confirmed that the above settings are correct but the variation is still not exported? Then check the data log.
-
Go to Data » Log.
-
Use the following filters:
-
limango
-
Reference type » variationId
-
-
Click Search (search).
-
Check all entries for the levels warning and error.
-
Open the logs containing the message Variation invalid.
→ The the variation ID and the reason for the rejection or the missing characteristic are shown. -
Correct the variation data.
If none of the errors listed above applies to your variation, then check the validation file in the log. This file can be downloaded in the Data » Log menu. You will find the file under Validation log. The validation file contains a table which lists variations and the corresponding errors.
-
Go to Data » Log.
-
Use the following filters:
-
Integration: Limango
-
-
Click on Search ().
-
Check all entries with the level error.
-
Open the log entry with the message Validation log.
→ The log entry contains a link to the validation file. Click on the link to open the file.
→ The validation file contains a list of all variations and the corresponding error messages. -
Check and correct the variation data.