Amazon: Switch to new catalogue-based integration
On this page, we will inform you about the catalogue-based Amazon integration and provide you with useful tips for a smooth transition.
1. Overview of the catalogue-based Amazon integration
With the new Amazon interface in PlentyONE, data exchange for creating and updating Amazon listings takes place via two clearly separated catalogue types:
-
Item data is transferred to Amazon via a product catalogue.
-
Offer data is transferred to Amazon via an offer catalogue.
Both catalogue types are based on Amazon-compliant structures and replace the previous flat file system. The aim of the new integration is to ensure a stable, transparent and future-proof export process. The catalogue technology also provides maximum flexibility through extended configuration options.
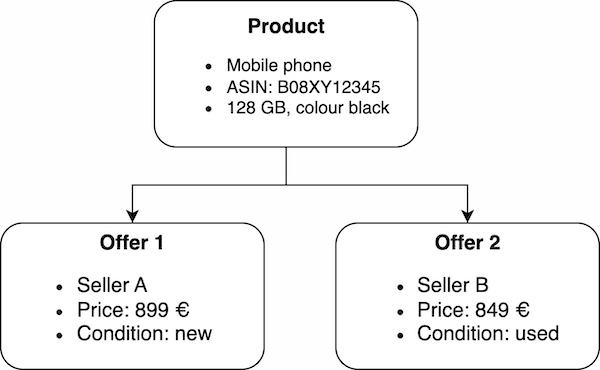
1.1. What is an Amazon listing?
An Amazon listing is the complete representation of an item on the Amazon sales channel. It contains all the relevant information that Amazon needs to display and sell the item, such as title, description, images, price, stock, and shipping information.
A listing consists of two clearly separated components:
-
Item data (e.g. title, brand, bullet points, technical details) describes the item itself. This data is ASIN-related and therefore the same for all sellers. It is transferred to Amazon via a product catalogue.
-
Offer data (e.g. price, stock, delivery time, condition) is specific to each seller and can differ. It is transferred to Amazon via an offer catalogue.
1.2. When do I need product catalogues and offer catalogues?
-
Create a product catalogue if the item you want to offer is not yet listed on Amazon or if you want to update existing product information. With the product catalogue, you transfer item data to Amazon so that the item can be listed.
To actually sell the item on Amazon, you also need to create an offer catalogue containing seller-specific data such as price and stock. With a product catalogue, you can list an item that is not yet available on Amazon, but to sell the item on Amazon, you also need an offer catalogue for this item. -
Create an offer catalogue if the item you want to sell is already listed on Amazon. With the offer catalogue, you transfer your offer data, such as price, stock, shipping costs, etc., to Amazon.
1.3. Impact on existing business processes
Switching to the catalogue-based integration has an impact on the following processes:
-
Price update
-
Stock update
-
Offer creation
-
Item creation
Price update
With the catalogue-based integration, prices are transferred to Amazon via the offer catalogue. For this, you must create and activate a corresponding offer catalogue in the Data » Catalogues menu.
To update prices for offers, the following additional settings are required:
-
Under Setup » Markets » Amazon » Settings » [Open account] » Tab: Item settings, the option 15 minutes or Hourly must be selected for Price changes.
-
The existing price synchronisation settings must still be configured.
Stock update
With the catalogue-based integration, stock levels are transferred to Amazon every 15 minutes and also together with the offer catalogue. The stock is not mapped in the offer catalogue, but is automatically transferred in parallel with each export of the offer catalogue. For this, you must create and activate a corresponding offer catalogue in the Data » Catalogues menu.
To update stock levels for offers, the following additional settings are required:
-
Under Setup » Markets » Amazon » Settings » [Open account] » Tab: Item settings, the option 15 minutes or Hourly must be selected for Stock changes.
-
The existing stock synchronisation settings must still be configured.
Offer creation
With the catalogue-based integration, offers are created and updated via the offer catalogue in the Data » Catalogues menu. If you select the option 15 minutes or Hourly for Stock changes in the Setup » Markets » Amazon » Settings » [Open account] » Tab: Item settings menu, the current stock for the offer is automatically transferred to Amazon together with each offer catalogue export.
Item creation
With the catalogue-based integration, items are created and updated via product catalogues in the Data » Catalogues menu. A separate product catalogue must be created for each product type and sales channel (Amazon.de, Amazon.fr).
Important: Catalogues do not support free text fields or characteristics. Existing characteristics must be migrated to properties.
1.4. Overview of the transition
The following table shows how data is transmitted for the affected processes when using catalogues. It also explains which settings are required and which alternatives are available.
Tip: Start the migration to catalogues as early as possible. Some alternatives are only temporarily available and also require configuration.
Legend for the table:
-
Export via catalogues: Describes how data is transferred when using catalogues and what settings are required.
-
Alternative: Explains how to perform the same process without catalogues and until when this alternative is available.
|
| Process | Export via catalogues | Alternative | ||
|---|---|---|---|---|
Price update |
Frequency of data exchange:
Required settings:
|
|
||
Stock update |
Frequency of data exchange:
Required settings:
|
|
||
Offer creation |
Frequency of data exchange:
Required settings:
|
|
||
Item creation |
Frequency of data exchange:
Required settings:
|
|
1.5. Should I use the adapter or create catalogues?
-
You can use the adapter to export item data to Amazon. Using the adapter can be helpful if you still use a lot of free text fields and characteristics and if you still need to create properties in order to use catalogues. Hence, the adapter can give you more time to create product catalogues for Amazon.
To use the adapter, go to Setup » Markets » Amazon » Data exchange » Data export and activate the option Activating the item export via the adapter (without test mode) in the section Item export - Adapter. More information about the adapter can be found here.
The adapter only transfers item data, but not offer data. Even if you use the adapter as a temporary solution, it is mandatory to create offer catalogues for Amazon.
| The adapter is only a temporary solution for the transition to product catalogues. We therefore recommend that you no longer use the adapter solution and switch to product catalogues instead. |
-
Catalogues are the long-term solution to export item data and offer data to Amazon. If you already create product catalogues for Amazon and do not use the adapter, you will not need to carry out any additional settings when the adapter solution is discontinued.
-
If you only export offer data to Amazon and do not want to create new products on Amazon, then you already have to create offer catalogues now. Offer data cannot be exported via the adapter.
2. Variation Family: Parent products and child products on Amazon
A variation family on Amazon is a combination of a parent product, under which various variations (child products) of this product are grouped, for example, a T-shirt in red, green, and blue. The parent product serves as a higher-level placeholder under which the variations are grouped. The parent product cannot be bought. The child products, i.e. the variations of the product, are the products which can actually be bought.
This structure allows customers on Amazon to compare and select different variations of a product on a single product page without having to leave the product page.
variation themes are the attributes in which the child products differ from each other, for example, the different colours of a T-shirt. Child products can have more than one variation theme. Possible variation themes for a T-shirt are colour or size, for example. Variation themes can be combined, for example colour and size.
2.1. Overview: parent products and child products on Amazon
Parent product:
-
Grouping of child products (grouping of different variations of a product)
-
serves as a placeholder and cannot be bought
-
Example: T-shirt
Child product:
-
Variation of the parent product
-
actual purchasable product
-
different child products differ in at least one property, such as size or colour
-
Examples: blue T-shirt in size 12, red T-shirt in size 8
Variation theme:
-
property that distinguishes child products from one another, for example colour or size
-
child products can have more than one variation theme
-
Examples: colour, size
2.2. What do I need to consider when offering an item with variations on Amazon?
-
Parent products and child products should have the same item name. For example, if you sell a T-shirt, then the parent product and the child product should both be called “T-shirt”. The child product’s attributes, such as “size 10”, should not be included in the name. Amazon automatically displays the correct attributes, such as colour or size, on the product page if you have correctly mapped variation themes and associated attributes in the product catalogue.
-
The item name is mapped in the product catalogue. To do so, you can use a property or map the data field Item text » Name 1. How to map the item name is described here.
-
-
To display your variations in different colours and sizes on a product page on Amazon, you must map variation themes in the product catalogue. How to do this is described here.
-
If an error occurs during the item export and a variation cannot be created, this variation is skipped during the export and the item export continues. The corresponding item will continue to be listed on Amazon if it was created previously.
3. Carrying out item settings
With the new Amazon integration, items are transferred to Amazon via offer and product catalogues. Because many settings are already made in the catalogues, some item settings in the menu Setup » Markets » Amazon » Settings » [Open Amazon account] » Tab: Item settings are no longer necessary.
Important: Some item settings still need to be configured, even if items are transferred to Amazon via product and offer catalogues.
Which item settings in the menu Setup » Markets » Amazon » Settings » [Open Amazon account] » Tab: Item settings are still required for the catalogue-based Amazon integration is described in Table 2.
| Setting | Required for catalogue integration? | Explanation |
|---|---|---|
Tab: Item settings |
||
Automatic processes |
||
Item export |
No |
The item export is activated via the Active toggle of the respective catalogue in the Data » Catalogues menu. |
Price changes |
Yes |
Specifies whether a price should be transferred when offers are updated (regardless of whether the SKU is known to Amazon). |
Stock changes |
Yes |
Specifies whether stock should be transferred when offers are updated (regardless of whether the SKU is known to Amazon). |
Export filter |
||
Item availability |
No |
This setting is only used in combination with catalogues to determine the maximum shipping time, but not as a filter. |
Export categories |
No |
Which product categories are used is defined via the activated product catalogues. The product category must be added in the Setup » Markets » Amazon » Add catalogue templates menu and a product catalogue for this product category must be created and activated in the Data » Catalogues menu . |
BMVD export categories |
No |
Which product categories are used is defined via the activated product catalogues. The product category must be added in the Setup » Markets » Amazon » Add catalogue templates menu and a product catalogue for this product category must be created and activated in the Data » Catalogues menu . |
Flag 1 |
Yes |
Only variations with the selected flags are exported. |
Flag 2 |
Yes |
Only variations with the selected flags are exported. |
Tags |
Yes |
Only items with at least one of the selected tags are exported. |
Store items |
No |
|
Export settings |
||
Item name |
No |
The item name is assigned in the product catalogue. |
Item description |
No |
The item description is assigned in the product catalogue. |
Allow HTML tags |
Yes |
|
Warehouse selection |
Yes |
This setting is required because the stock is not assigned in the catalogue. |
Stock buffer |
Yes |
This setting is required because the stock is not assigned in the catalogue. |
Maximum stock |
Yes |
This setting is required because the stock is not assigned in the catalogue. |
Quantity for items that are not limited to the stock |
Yes |
This setting is required because the stock is not assigned in the catalogue. |
Average delivery period |
Yes |
This setting is required because the stock is not assigned in the catalogue. |
Handling time |
Yes |
This setting is required because the stock is not assigned in the catalogue. |
Activate long lead time |
Yes |
This setting is required because the stock is not assigned in the catalogue. |
Manufacturer part number |
No |
The manufacturer part number is assigned in the product catalogue. |
Additional SKU |
Yes |
Variations linked to additional SKUs are transferred. No new additional SKUs are created. |
4. Mandatory attributes for Amazon
With the transition to catalogues, some optional attributes have now become mandatory for specific product types. You can no longer list new items or update existing items which are linked to the listed product types on Amazon if the mandatory attributes are not linked. We therefore recommend to check which Amazon product types you use.
4.1. Overview of new Amazon product types
Here you can download a list of the mandatory attributes for Amazon:
This list shows you which attributes are required for the respective product type. Here’s how the list is structured:
| Column | Explanation |
|---|---|
Product Type |
The Amazon product type, for example ABDOMINAL_EXERCISER, ABIS_BOOK, ACCESSORY. |
MP |
The Amazon marketplace code (= the Amazon platform), for example DE = amazon.de. |
Attribute Name |
The technical name of the attribute. |
Attribute Label |
A user-friendly label for a better understanding of the attribute. |
Additionally, the Amazon product types were renamed. With the transition to catalogues, the new Amazon product types will also be available in PlentyONE. The old Amazon product types will automatically be migrated to the new product types. Here is an overview of the old and corresponding new product types:
|
Use new Amazon product types for item import
If you use the import tool to import items into PlentyONE via a CSV file, then you have to add a new column for the new Amazon product types in the import file. |
4.2. Check Amazon product types and Amazon platforms
In order to prepare your PlentyONE system for the transition to catalogues, first check which Amazon product types you use and on which Amazon platforms you list your items. You can then check the list of mandatory attributes to find out which attributes are mandatory for which product type.
Check which Amazon product types you use in your PlentyONE system. There are several ways to do this:
-
Open the item within Item » Items and check which product type is linked in the Amazon section.
-
Go to Item » Edit item and use the filter Product type with the selection Type selected to display the Amazon product types which you use.
-
Check your Amazon flatfiles.
Tip: You can filter the list of mandatory attributes by Amazon product types and only display the product types that you use. To do so, use the filter in the Product type column.
Tip: If you only offer your items on specific Amazon platforms, then you can filter the list of mandatory attributes by Amazon platforms. To do so, use the filter in the MP column.
4.3. Check your properties in PlentyONE
After you have checked which Amazon product types you use and which attributes are mandatory for those product types, next check whether you already created properties for those attributes.
-
Go to Setup » Settings » Properties » Configuration and check whether you already created properties corresponding to the mandatory attributes. Create new properties, if necessary.
5. Creating properties
Characteristics and free text fields cannot be used for the catalogue export. Therefore, you must create properties for all characteristics and free text fields that you use to describe your items in more detail on Amazon.
First, check which characteristics you use to describe your items on Amazon and then create a property for each characteristic. For further information, refer to the Characteristics and properties page.
Creating a property:
-
Go to Setup » Settings » Properties » Configuration.
-
Click on Create property.
-
Customise the settings to meet your needs.
-
Save () the settings.
5.1. Requirements for exporting properties to Amazon
In order for a property to be transferred to Amazon, it must be linked to the desired variation and assigned in the offer or product catalogue for Amazon.
-
Open the variation in the Item » Items » [Open variation] menu.
-
Open the Properties tab in the navigation bar on the left-hand side.
-
Click Add properties (add).
→ The window Add properties opens.
Tip: Use the search to search for the property. -
Place a check mark next to the desired property.
-
Click APPLY.
-
Enter additional information depending on the property type. If the property is a selection property, for example, you must also select a suitable value from the drop-down list.
-
Save () the settings.
-
Go to Data » Catalogues.
-
Open the Amazon catalogue for which the property is to be used.
-
Assign the property to the desired Amazon data field.
-
Save () the settings.
6. Creating catalogues
With the new integration, item and offer data will be exported to Amazon via catalogues. Go to Data » Catalogues to create catalogues for Amazon. Afterwards, link the Amazon data fields with item data saved in PlentyONE in the catalogue.
After you activate the catalogue, the catalogue data is automatically exported to Amazon in regular intervals.
There are two types of catalogues for Amazon:
-
Item data is transferred to Amazon via a product catalogue.
-
Offer data is transferred to Amazon via an offer catalogue.
Tip: For more information on the difference between products and offers and useful tips when to use an offer or a product catalogue, check out the overview.
Catalogues are used to export data from your PlentyONE system. There are two different catalogue formats:
-
Marketplace formats are used to export item data to markets.
-
Standard formats are used to export data from your PlentyONE system into a file.
Catalogues with marketplace formats allow you to tailor your item information exactly to the needs of the market. Because here, you assign a suitable PlentyONE data field to each of the data fields of the market. When your variation data is exported to the market, the market’s data fields are then filled with the correct PlentyONE data.
-
Is this your first time working with catalogues? Then read up on the basic concept of catalogues first.
|
Data is exported to Amazon if the catalogue is activated
As soon as you activate an offer or a product catalogue and do not use the Test mode any longer, the data in this catalogue is exported to Amazon. This may lead to data being overwritten on Amazon. |
6.1. Creating product catalogues
|
If you only want to offer items that already exist on Amazon, you do not need to create a product catalogue beforehand. In this best practice you will learn how to create offers for existing Amazon items and what to consider during the process. |
You have to add the Amazon product types (= product categories) that you use for Amazon before you create product catalogues. This is done in the Setup » Markets » Amazon » Add catalogue templates menu. After adding the product types, you can create product catalogues for the product types that you added.
|
Gradual transition to item export via product catalogues
We recommend to gradually switch to the item export via catalogues. To do so, proceed as follows:
|
6.1.1. Adding Amazon product types
Go to Setup » Markets » Amazon » Add catalogue templates to add product categories.
Note: Your Amazon account must be connected to Amazon and must be active. Otherwise, you cannot add product types.
Adding Amazon product types:
-
Go to Setup » Markets » Amazon » Add catalogue templates.
-
Click Add product types (add).
→ The Add product types window opens. -
Enter the Seller ID of your Amazon account.
-
Select the Amazon product type from the Product types drop-down list.
-
Save () the settings.
→ The product type is added. You can now create a product catalogue for this Amazon product type in the Data » Catalogues menu.
Note: You don’t need to add the product type separately for each sales channel (e.g. Amazon.de, Amazon.fr). The product type is automatically available for all sales channels using the selected seller ID.
Note: The product types which you already used before switching to the catalogue-based Amazon integration are already added here by default.
6.1.2. Creating a product catalogue
Item data is exported to Amazon using catalogues. To export your items to Amazon, create a product catalogue in the Data » Catalogues menu. Afterwards, link the Amazon data fields with item data saved in PlentyONE in the catalogue.
After you activate the product catalogue, the catalogue data is automatically exported to Amazon within 24 hours after a value has been changed on the variation.
To simplify the creation of new catalogues, you can now create Channel maps for Amazon. With Channel maps, you can create cross-category mappings for a marketplace and apply them to catalogues afterwards. All linked catalogues automatically inherit the mapping from the Channel map. This will save you a lot of time as you don’t need to carry out the mappings for each catalogue.
You can find more information on how to create Channel maps in the Channel maps section.
Note: There is a separate catalogue format for each Amazon product type. Different item data is exported in each format, depending on which information Amazon requires for a product category.
Product catalogues are also account-specific. This means that you have to create a separate catalogue for each product type and each sales channel (Amazon.de, Amazon.fr) that you want to sell your items on.
Creating a catalogue:
-
Go to Data » Catalogues.
-
Click Create catalogue (add).
-
Enter a name for the catalogue.
-
In the drop-down list Marketplace, select the option Amazon.
-
In the drop-down list Export type, select the option Listing.
-
In the drop-down list Amazon Account, select the Amazon account for which the catalogue is to be created.
-
In the drop-down list Sales Channel, select the Amazon sales channel.
-
In the drop-down list Category, select the Amazon product type.
-
Save () the settings.
→ The catalogue is created.
→ The catalogue is opened for editing.
Other catalogue settings
Other catalogue settings are optional. Once you carried out the settings described on this page, your catalogue is automatically exported to Amazon. That means you can ignore the catalogue settings for Format settings, Export settings and Download settings.
The Format settings, Export settings, and Download settings allow you to create a file with the variation data contained in the catalogue. However, this file does not contain information about whether the data export to Amazon was successful.
|
Do not change the format in the catalogue’s Format settings. To ensure that the export to the sales channel works, all required settings are already configured when you create a catalogue. If you change the settings, errors might occur during the export. |
6.1.3. Mapping data fields in the product catalogue
After you have created a catalogue, map the sales channel’s data fields to item data saved in PlentyONE. This chapter describes how you map data fields and what particularities apply for item exports to Amazon.
-
The market expects product data that cannot be saved in the PlentyONE item menu? Then create a property for this data. Link this property with your variations. The actual values are saved as property values for this property. Is this your first time working with properties? Then read up on the principles of properties first.
| Availability | Explanation |
|---|---|
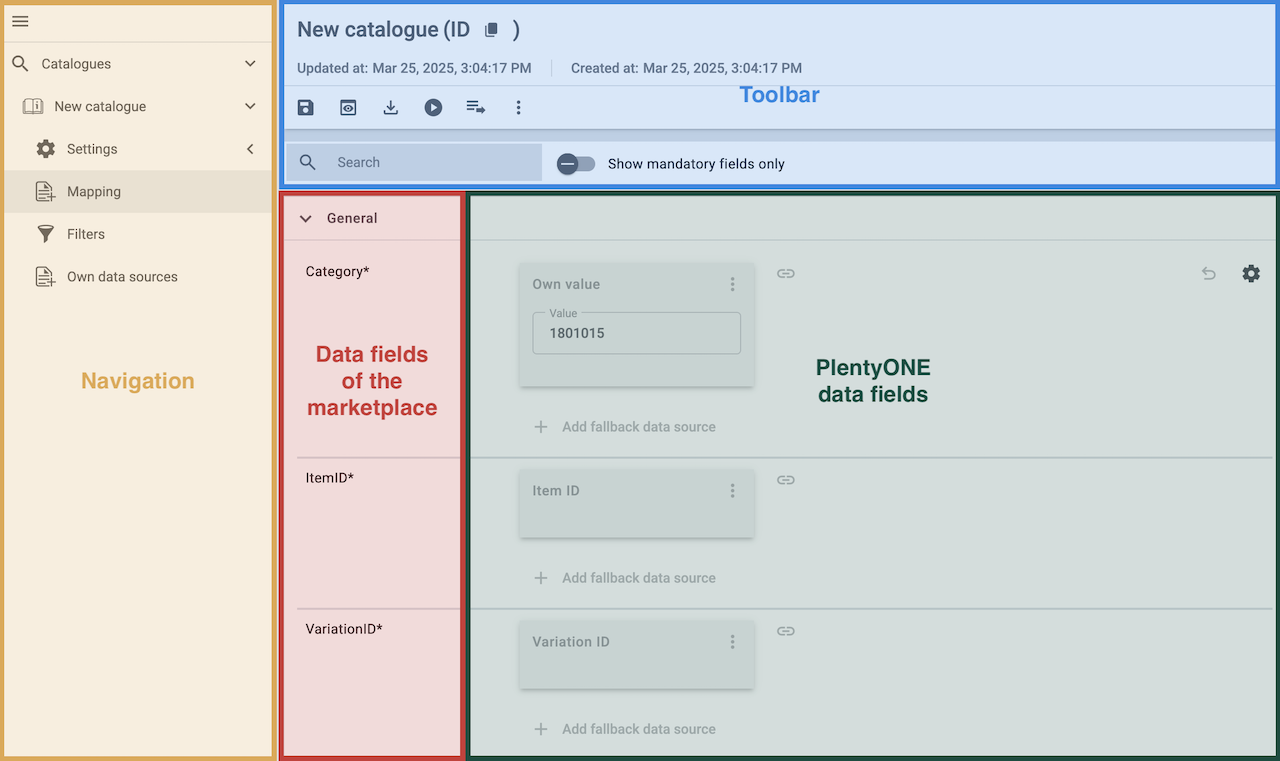
Navigation |
When you open a catalogue, the view Mapping is shown. On the very left is the navigation.
|
Toolbar |
The toolbar provides actions for the catalogue. For example, save your mappings, restore an older version of the catalogue or hide or show optional marketplace data fields. |
Marketplace data field |
To the right of the navigation, all data fields available for the market are listed. Mandatory fields are marked with an asterisk (✱). |
PlentyONE data fields |
On the right side of the catalogue, you map the marketplace data fields to appropriate PlentyONE data fields. In the screenshot above, a few of the fields are already mapped. |
Mapping catalogue fields:
-
Go to Data » Catalogues.
-
Click on the catalogue.
→ The Mapping tab opens.
→ In the left-hand column, the market’s data fields are listed.
Tip: Mandatory fields are flagged with an asterisk (*).
→ In the right column, you map the PlentyONE data fields. Any PlentyONE data fields that you already mapped are also shown in this column. -
Map suitable PlentyONE data fields to the market data fields.
For each marketplace data field, you have a number of mapping options. Expand the info boxes below to get more information about each of these mapping options.-
Simple 1:1 mapping
-
Simple 1:1 mapping with properties
-
Complex 1:1 mapping
-
1:1 mapping with fallback data fields
-
1:n mapping
-
Own value mapping
-
Mapping with mathematical calculations
-
-
Save () the catalogue.
→ The mappings are saved.
In a simple 1:1 mapping, you map a PlentyONE data field to the marketplace data field. If no suitable setting exists in PlentyONE. you can map a property instead.
As such, simple 1:1 mappings allow you to:
-
I want to fill this marketplace data field with the data from this PlentyONE setting.
-
If the data field is empty for a variation, no value is exported for this variation.
Creating a simple 1:1 mapping:
-
Next to the marketplace data field, click on + Add data field.
→ To the left, the list of available PlentyONE data fields are shown in groups. -
Click on the group you need.
→ The PlentyONE data fields of the group are shown. -
Click on the plus to the right of the PlentyONE data field you want to select.
→ The PlentyONE data field is added to the right. -
Click on Confirm.
Example: Sales price and RRP for Otto Market
This gif shows you how to map the marketplace data fields Sales price and RRP for Otto Market to PlentyONE data fields:
Reminder: In a simple 1:1 mapping, you map a PlentyONE data field to the marketplace data field. However, what can you do if PlentyONE does not offer a suitable data field? Then it’s the properties' moment to shine. Properties allow you to save any kind of information in your properties.
-
Is this your first time working with properties? Then read up on the principles of properties first.
Creating a property:
-
Create a property with the necessary values.
Tip: Find out how to do that here.
Creating a simple 1:1 mapping with properties:
-
Next to the marketplace data field, click on + Add data field.
→ To the left, the list of available PlentyONE data fields are shown in groups. -
Expand the group Property.
→ The property groups are shown. -
Expand the group you need.
-
Click on the Plus sign on the right of the property you want.
-
From the drop-down list Language, select the language in which you send the data to the market.
-
Click on Confirm.
→ The property is mapped to the marketplace data field.
Like with the simple 1:1 mappings, you map a PlentyONE setting or property to a marketplace data field. Complex mappings are necessary whenever a marketplace data field has more than one possible value. Instead of mapping data fields, for complex mappings you map individual values of these data fields. For example, you cannot simply map the PlentyONE data field Shipping profile to the marketplace data field Shipping method. Why? The market cannot know which of your shipping profiles in PlentyONE corresponds to which of their shipping methods.
| Do not enter own values for complex mappings. All values that you enter must be saved for the variations, either in a setting or as a property value. This also applies if the value Comparative value is shown. You still need to enter exactly the value of the setting or property that you mapped. |
In complex mappings, the value of the market is always exported. Only when you map an own value, the own value that you enter is exported.
You can recognise complex mappings from the field that is shown below the name of the marketplace data field. Click on the field to show the values available for the marketplace data field.

Examples for complex 1:1 mappings are:
-
Categories
-
Brands
-
Shipping setting
Important: For complex mappings, do not map own values or properties of the type None.
Creating a complex 1:1:n mapping:
-
Click on the field for the marketplace data field.
→ A list of the available values is shown. -
Select the value that you want to map a PlentyONE data field to.
→ The value is mapped. -
Next to the marketplace data field, click on + Add data field.
→ To the left, the available PlentyONE data fields are listed in groups. -
Click on a group.
→ The PlentyONE data fields of the group are shown. -
Click on the PlentyONE data field for which you want to map values.
Important: Do not map own values or properties of the type None. -
Your next steps depend on the PlentyONE data field you selected:
-
Alternative 1: The available values for the PlentyONE data value are shown on the left.
-
Next to the value you want to select, click on the plus.
→ The value is added to the field on the right. -
Click on Confirm.
-
-
Alternative 2: The PlentyONE data field is inserted and the field Comparative value is shown.
-
In the field Comparative value, enter a value that is saved in the setting or the property of the mapped PlentyONE data field.
-
Click on Confirm.
-
-
Alternative 3: The PlentyONE data field is inserted and a drop-down list is shown.
-
Select a value from the drop-down list.
-
Click on Confirm.
→ The value of the marketplace data field is exported, not the value of the PlentyONE data field.
Exception: Only when you map an own value, the own value that you enter is exported.
-
-
Example: Delivery time in days for Otto Market
This gif shows you how to map suitable PlentyONE values to the values of the marketplace data fields Delivery time in days for Otto Market:
In a 1:1 mapping with one or more fallback data fields, you map a PlentyONE data field to the marketplace data field. In addition, you specify one or more fallback data fields. This ensures that the system keeps looking if the first PlentyONE data field is missing or empty.
So this mapping specifies:
-
I want to fill the marketplace data field with the data from the selected PlentyONE setting.
-
If that data field is missing or empty for a variation, the first fallback data field is checked. The value of that fallback data field is exported instead.
-
If the first fallback data field is also missing or empty for the variation, the second fallback data field is checked. If a value is found, the value of the second fallback data field is exported for the variation etc.
Two separate fallback conditions are available:
Null (default) |
The fallback data field is used if the data field above is mapped in the catalogue but not linked to the variation. The condition "Null" is useful when you want to map fallback data fields for the following types of PlentyONE data fields:
Important: When you add a fallback data field, the fallback condition "null" is selected automatically. To apply the fallback condition "leer", you need to change the default setting. |
Empty |
The fallback data field is used if the data field above is mapped in the catalogue and linked to the variation, but is empty. The condition "Empty" is useful when you want to map fallback data fields for the following type of PlentyONE data fields:
Important: When you add a fallback data field, the fallback condition "null" is selected automatically. To apply the fallback condition "leer", you need to change the default setting. |
Note: Even if you assign one or more fallback data fields, the value of only one of those fields is exported. For each variation, the mapped PlentyONE data fields are checked in the order in which you mapped them. This means that if the first data field does not provide a value for a variation, the first fallback data field is exported etc.
Creating a 1:1 mapping with fallback data fields:
-
Next to the marketplace data field, click on + Add data field.
→ To the left, the list of available PlentyONE data fields are shown in groups. -
Click on the group you need.
→ The PlentyONE data fields of the group are shown. -
Click on the plus to the right of the PlentyONE data field you want to select.
→ The PlentyONE data field is added to the right. -
In the list of PlentyONE data fields, click on the plus icon next to the PlentyONE data field that you want to map.
→ The fallback data field is added with the fallback condition "null". -
Alternative 1: To add the fallback data field with the fallback condition "null":
-
Click on Confirm.
→ The fallback data field is exported if the data field above is not linked to the variation.
-
-
Alternative 2: To add the fallback data field with the fallback condition "empty":
-
To the left of the fallback data field, click on the cog ().
→ The window Data column settings is shown. -
For the setting Fallback condition, select the option Empty.
-
Click on Save.
→ The fallback data field is added with the fallback condition "empty". -
Click on Confirm.
→ The fallback data field is exported if the data field above is empty for the variation.
-
Example: Fallback data field for SKU for Otto Market
This GIF shows you the mapping for the OTTO Market marketplace data field SKU. The PlentyONE data field SKU is mapped to this marketplace data field. The PlentyONE data field Variation ID is mapped as the fallback data field. The fallback condition "null" is applied automatically.
Result: The fallback data field Variation ID is exported if the data field SKU is not linked to the variation.
In a 1:n mapping, you map several PlentyONE data fields to the marketplace data field. You can link these data fields with a separator.
So this mapping specifies:
-
I want to combine these PlentyONE data fields during export so that the marketplace data field is filled with the data of these two or more PlentyONE settings.
Creating a 1:n mapping:
-
Next to the marketplace data field, click on + Add data field.
→ To the left, the list of available PlentyONE data fields are shown in groups. -
Click on the group you need.
→ The PlentyONE data fields of the group are shown. -
Click on the plus to the right of the PlentyONE data field you want to select.
→ The PlentyONE data field is added to the right. -
Click on Confirm.
-
To the right of the mapped PlentyONE data field, click on Add data field ().
→ To the left, the list of available PlentyONE data fields again are shown in groups. -
Map one or several additional PlentyONE data fields to the marketplace data field as described above.
-
Click on Confirm.
-
To the very right of the row, click on Settings ().
-
Select a separator from the drop-down list Separator or add a custom separator.
-
Click on Save.
-
Save () the catalogue.
→ The mappings are saved.
→ During the export, the content of the PlentyONE data fields is combined and exported as one field.
You are sure that you want to export the same value for all variations of a catalogue for a marketplace data field? Then specify an own value. This own value is then exported for all variations.
So this mapping specifies:
-
For this marketplace data field, I want to export the value that I entered in the field Own value for all variations of this catalogue. The value you enter is always exported. The value overwrites the market value also in complex mappings where usually the value of the market is exported. As such, make sure you enter an own value that the market accepts for this marketplace data field.
Creating an own value mapping:
-
Next to the marketplace data field, click on + Add data field.
→ To the left, the list of available PlentyONE data fields are shown in groups. -
Click on the plus next to Own value at the top of the list.
→ The field for the own value is added to the view. -
Enter a value into the input field.
→ This value is exported for all variations.
Example: Diameter information
You want to export diameter information for some of your variations. The diameter is saved in centimetres for all your variations. Instead of creating a property for the unit and linking this property to the variations, you can enter the own value cm.
This is an example of how you can map an own value for the diameter unit:
Mathematical calculations allow you to change numerical values automatically during the export.
-
This function only works for data fields that contain numerical values.
-
This functionality is new and not available for all catalogue formats.
So this mapping specifies:
-
I want the numerical value of a PlentyONE data field to be recalculated during the export. Basic arithmetic operations are available for the formulas.
Recalculating numerical values:
-
Next to the marketplace data field, click on + Add data field.
→ To the left, the list of available PlentyONE data fields are shown in groups. -
At the very top of the list, click on the plus icon next to Formula (calculate).
→ The data field Formula is added to the field on the right. -
Click into the data field.
→ The window Modify value is shown. -
Enter a numerical value or select a PlentyONE data field at the bottom right of the window to add it to the calculation (add).
Tip: Use the search function. This helps you to find data fields quickly. -
Optional: If the symbol more_vert is shown in the data field, select the correct assignment for the data field.
Tip: A number tells you how many assignments are necessary for the data field.-
Click on the icon more_vert.
-
In the window shown, select the assignments from the drop-down list.
-
Save the settings.
-
-
Enter numbers and mathematical operators with the on-screen calculator or the keyboard.
-
Save the settings.
→ The entered formula is displayed in the overview.
→ The calculation will be carried out in the next export.
6.1.4. Particularities for mapping data fields in the product catalogue
Every market structures item data differently. As such, there are some particularities for each market when mapping data fields. This chapter contains mapping information for important data fields for Amazon.
6.1.4.1. Updates required: Amazon product metadata changes
| Amazon makes changes to product metadata at irregular intervals. |
These changes include new or updated mandatory attributes, adjustments to product types, and changes to the data fields available in product catalogues. Such changes may require existing product catalogues to be updated or additional data fields to be mapped.
Amazon publishes information about these updates on an official documentation page:
We recommend checking the SP-API product metadata updates and your product catalogues regularly and adjusting your product catalogues as necessary to ensure that all required data continues to be transferred to Amazon correctly.
6.1.4.2. Mapping the item name
The item name is mapped in the Amazon product catalogues using the data field Item name (item_name.value) within the group item_name.
Note: If you offer variations of an item on Amazon, use a generic item name that can be used for all variations. A variation’s attributes, such as the colour of a T-shirt, should not be included in the item name. The attributes of a variation will be automatically added by Amazon. More information on variation families on Amazon can be found here.
The following mappings are possible for the item name. Note that the mappings are recommendations only. Depending on how you manage your item data, other mappings may be more appropriate than the recommendations given here.
-
Item text » Name 1, Name 2, or Name 3
-
Property of the type Text

6.1.4.3. Mapping bullet points
Use the data field bullet_point in the Amazon product catalogues to add short descriptive texts to your items which will be shown as bullet points next to the product image.
To export multiple bullet points to Amazon, click add Add fallback data source and add more bullet points. Those bullet points are not treated as a fallback data source, but also exported to Amazon and listed as bullet points.
6.1.4.4. Exporting an image list
You can export a list of item or variation images to Amazon via the data field main_product_image_locator. To do this, map the image list as follows:
-
Image » Variation images » Image list, image information Full image URL
Note: If you map the data field Variation images, then only images that are linked with at least one variation will be exported.
or
-
Image » Item images » Image list, image information Full image URL
Note: If you map the data field Item images, then only images that are not linked with any variation will be exported.
or
-
Image » All images » Image list, image information Full image URL
Note: If you map the data field All images, then all images will be exported, regardless of whether the images are linked to a variation or not. -
Under Maximum number of images, enter the number of images you want to export from the image list.
The image URLs from the image list are automatically mapped to the next available data fields other_product_image_locator_1 to other_product_image_locator_8.
Example: The image list is mapped to the data field main_product_image_locator and contains three images:
-
The URL of the first image is mapped to the data field main_product_image_locator,
-
the URL of the second image to other_product_image_locator_1,
-
the URL of the third image to other_product_image_locator_2.
Note: If a subsequent data field is already mapped, this data field is skipped. The image URL is then mapped to the next available empty other_product_image_locator data field instead.
Important: Only as many images are mapped as the number of available following other_product_image_locator data fields. Excess images from the image list are not added.
Tip: If you map another image list in the fallback data source in addition to the image list in the main data source, both image lists are combined into a single list. From this combined list, as many images are transferred to Amazon as the number of available following other_product_image_locator data fields in the catalogue. Excess images are not transferred.
Single images from the fallback data source are not combined with the image list from the main data source. They are only transferred if no mapped single image or image list is found in the main data source.
6.1.4.5. Linking categories
You can map suitable Amazon browse categories to your items using the recommended_browse_nodes data field. This ensures your items appear in the relevant category when customers browse this category on Amazon.
If you don’t map this data field, the category links from the menu Setup » Markets » Amazon » Category link will be used for your item instead.
Note: Browse categories are mapped using so-called Browse Node IDs. Each category path has its own unique Browse Node ID. You can find an up-to-date list of these IDs in the
Browse Tree Guides (BTG) in the Amazon Seller Central.
For data field mapping in the product catalogue, we recommend creating a property of the type Selection for browse categories. Add the required Browse Node IDs as individual selection values.
6.1.4.6. Assigning variation themes
With variation themes, you can display multiple product variations, such as different sizes or colours, on a single product detail page. This allows your customers to see all the available options at a glance. The variation themes available depend on the respective product category.
You assign variation themes in the data field group variation_theme as follows:
Mapping a variation theme with a single attribute:
-
Go to Data » Catalogues.
-
Open the product catalogue for Amazon.
-
Scroll to the data field group variation_theme.
-
For the data field Variation Theme Name, select the appropriate variation theme from the drop-down list under Export as.
Example:COLOUR_NAME
Note: After selecting the variation theme, the field Export as may display a different label. This is normal. The options in the drop-down list are primarily for better orientation and usually show a translation of the actual value. The data field displays the actual value transmitted. -
Click add Add data source.
-
Select the appropriate attribute with the addition is linked.
Example: Attribute » Colour » Attribute Colour is linked.
Note: The selected variation theme is only transmitted if the corresponding attribute is linked to your variation. -
Save (save) the settings.

Note that you must also link the data fields in the product catalogue that correspond to the variation theme so that the data can be transferred to Amazon. For example, if you use the variation them COLOUR_NAME, then you also have to map the data field for COLOUR.
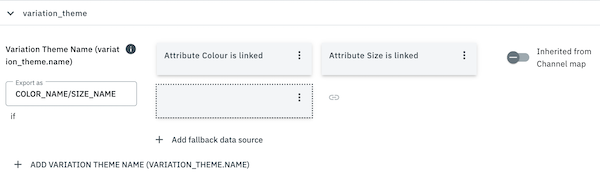
You can also select a variation theme that combines multiple attributes. These are indicated by a forward slash separating the individual attribute names.
Example: COLOUR_NAME/SIZE_NAME
Mapping a variation theme with multiple attributes:
-
Go to Data » Catalogues.
-
Open the product catalogue for Amazon.
-
Scroll to the data field group variation_theme.
-
For the data field Variation Theme Name, select the appropriate combination of attributes from the drop-down list under Export as.
Example:COLOUR_NAME/SIZE_NAME
Note: After selecting the variation theme, the field Export as may display a different label. This is normal. The options in the drop-down list are primarily for better orientation and usually show a translation of the actual value. The data field displays the actual value transmitted. -
Click add Add data source.
-
Select the appropriate attribute with the addition is linked for the first attribute of the variation theme.
Example: Attribute » Colour » Attribute Colour is linked forCOLOUR_NAME. -
Click link Add data source.
-
Select the appropriate attribute with the addition is linked for the second attribute of the variation theme.
Example: Attribute » Size » Attribute Size is linked forSIZE_NAME. -
Repeat steps 7–8 if the variation theme includes additional attributes.
Important:-
The variation theme is only transmitted if all of its attributes are linked to the variation.
-
Do not add the second and all subsequent attributes via Add fallback data source.
-
If you map multiple variation themes with a different number of attributes, arrange them in order of their attribute count. Start with the variation theme that contains the most attributes and continue to the theme with the fewest attributes.
-
-
Save (save) the settings.
Note that you must also link the data fields in the product catalogue that correspond to the variation theme so that the data can be transferred to Amazon. For example, if you use the variation themes COLOUR_NAME and SIZE_NAME, then you also have to map the data fields for COLOUR and SIZE.
6.1.5. Optional: Setting export filters
Go to Setup » Markets » Amazon » Settings and open your Amazon account. In the Tab: Item settings » Section: Export filter, you can use filters to narrow down which items are exported to Amazon via product catalogues and for which items offer catalogues are exported. The export filters apply globally to your Amazon account and affect both product and offer catalogues.
The export filters shown in this menu originate from the previous Amazon flat file integration. In the new catalogue-based integration, only certain filters continue to be supported.
Supported filters
The following filters are still functional and can be used to narrow down the export as needed:
-
Flag 1
-
Flag 2
-
Tags
Only items that have the selected flags or at least one of the selected tags will be exported to Amazon.
No longer supported filters
The following filters are no longer supported in the catalogue-based Amazon integration:
-
Item availability
-
Export categories
-
BMVD export categories
-
Store items
Note: For the new integration, the categories exported to Amazon are defined via catalogue templates.
6.1.6. Activating the catalogue export
|
Deactivate export categories in the Amazon item settings
To prevent conflicts with the old flatfile export and/or the adapter, we recommend to deactivate the respective Amazon product type in the Setup » Markets » Amazon » [Open account] » Settings » Tab: Item settings menu in the section Export categories. |
You have set up Amazon in PlentyONE and created a catalogue for exporting your item data? Then start the export of your item data. To do so, activate the catalogues which should be exported to Amazon in the Data » Catalogues menu.
Activating the catalogue export to Amazon:
-
Go to Data » Catalogues.
→ The catalogues are listed. -
Scroll to the Amazon catalogue.
-
In the Active column, move the toggle button to the right ().
→ The catalogue is active.
→ The catalogue data is exported to Amazon once a day.
Tip: In the chapter Retrieving (error) reports you can find information on where to access export reports for Amazon. Note that reports for test mode and for live export are located in different menus.
6.2. Creating an offer catalogue
Offer data is exported to Amazon using catalogues. To export your items to Amazon, create an offer catalogue in the Data » Catalogue menu. Afterwards, link the Amazon data fields with item data saved in PlentyONE in the catalogue.
After you activate the offer catalogue, the catalogue data is automatically exported to Amazon within 15 minutes after a value has been changed on the variation.
To simplify the creation of new catalogues, you can now create Channel maps for Amazon. With Channel maps, you can create cross-category mappings for a marketplace and apply them to catalogues afterwards. All linked catalogues automatically inherit the mapping from the Channel map. This will save you a lot of time as you don’t need to carry out the mappings for each catalogue.
You can find more information on how to create Channel maps in the Channel maps section.
Creating a catalogue:
-
Go to Data » Catalogues.
-
Click Create catalogue (add).
-
Enter a name for the catalogue.
-
In the drop-down list Marketplace, select the option Amazon.
-
In the drop-down list Export type, select the option Listing.
-
In the drop-down list Amazon Account, select the Amazon account for which the catalogue is to be created.
-
In the drop-down list Sales Channel, select the Amazon sales channel.
-
In the drop-down list Category, select Offer.
-
Save () the settings.
→ The catalogue is created.
→ The catalogue is opened for editing.
Other catalogue settings
Other catalogue settings are optional. Once you carried out the settings described on this page, your catalogue is automatically exported to Amazon. That means you can ignore the catalogue settings for Format settings, Export settings and Download settings.
The Format settings, Export settings, and Download settings allow you to create a file with the variation data contained in the catalogue. However, this file does not contain information about whether the data export to Amazon was successful.
|
Do not change the format in the catalogue’s Format settings. To ensure that the export to the sales channel works, all required settings are already configured when you create a catalogue. If you change the settings, errors might occur during the export. |
6.2.1. Mapping data fields in the offer catalogue
After you have created a catalogue, map the sales channel’s data fields to item data saved in PlentyONE. This chapter describes how you map data fields and what particularities apply for item exports to Amazon.
|
Not all mandatory fields are marked in the offer catalogue
At the moment, not all mandatory fields and dependencies between data fields can be displayed in the offer catalogue for Amazon. |
-
The market expects product data that cannot be saved in the PlentyONE item menu? Then create a property for this data. Link this property with your variations. The actual values are saved as property values for this property. Is this your first time working with properties? Then read up on the principles of properties first.
| Availability | Explanation |
|---|---|
Navigation |
When you open a catalogue, the view Mapping is shown. On the very left is the navigation.
|
Toolbar |
The toolbar provides actions for the catalogue. For example, save your mappings, restore an older version of the catalogue or hide or show optional marketplace data fields. |
Marketplace data field |
To the right of the navigation, all data fields available for the market are listed. Mandatory fields are marked with an asterisk (✱). |
PlentyONE data fields |
On the right side of the catalogue, you map the marketplace data fields to appropriate PlentyONE data fields. In the screenshot above, a few of the fields are already mapped. |
Mapping catalogue fields:
-
Go to Data » Catalogues.
-
Click on the catalogue.
→ The Mapping tab opens.
→ In the left-hand column, the market’s data fields are listed.
Tip: Mandatory fields are flagged with an asterisk (*).
→ In the right column, you map the PlentyONE data fields. Any PlentyONE data fields that you already mapped are also shown in this column. -
Map suitable PlentyONE data fields to the market data fields.
For each marketplace data field, you have a number of mapping options. Expand the info boxes below to get more information about each of these mapping options.-
Simple 1:1 mapping
-
Simple 1:1 mapping with properties
-
Complex 1:1 mapping
-
1:1 mapping with fallback data fields
-
1:n mapping
-
Own value mapping
-
Mapping with mathematical calculations
-
-
Save () the catalogue.
→ The mappings are saved.
In a simple 1:1 mapping, you map a PlentyONE data field to the marketplace data field. If no suitable setting exists in PlentyONE. you can map a property instead.
As such, simple 1:1 mappings allow you to:
-
I want to fill this marketplace data field with the data from this PlentyONE setting.
-
If the data field is empty for a variation, no value is exported for this variation.
Creating a simple 1:1 mapping:
-
Next to the marketplace data field, click on + Add data field.
→ To the left, the list of available PlentyONE data fields are shown in groups. -
Click on the group you need.
→ The PlentyONE data fields of the group are shown. -
Click on the plus to the right of the PlentyONE data field you want to select.
→ The PlentyONE data field is added to the right. -
Click on Confirm.
Example: Sales price and RRP for Otto Market
This gif shows you how to map the marketplace data fields Sales price and RRP for Otto Market to PlentyONE data fields:
Reminder: In a simple 1:1 mapping, you map a PlentyONE data field to the marketplace data field. However, what can you do if PlentyONE does not offer a suitable data field? Then it’s the properties' moment to shine. Properties allow you to save any kind of information in your properties.
-
Is this your first time working with properties? Then read up on the principles of properties first.
Creating a property:
-
Create a property with the necessary values.
Tip: Find out how to do that here.
Creating a simple 1:1 mapping with properties:
-
Next to the marketplace data field, click on + Add data field.
→ To the left, the list of available PlentyONE data fields are shown in groups. -
Expand the group Property.
→ The property groups are shown. -
Expand the group you need.
-
Click on the Plus sign on the right of the property you want.
-
From the drop-down list Language, select the language in which you send the data to the market.
-
Click on Confirm.
→ The property is mapped to the marketplace data field.
Like with the simple 1:1 mappings, you map a PlentyONE setting or property to a marketplace data field. Complex mappings are necessary whenever a marketplace data field has more than one possible value. Instead of mapping data fields, for complex mappings you map individual values of these data fields. For example, you cannot simply map the PlentyONE data field Shipping profile to the marketplace data field Shipping method. Why? The market cannot know which of your shipping profiles in PlentyONE corresponds to which of their shipping methods.
| Do not enter own values for complex mappings. All values that you enter must be saved for the variations, either in a setting or as a property value. This also applies if the value Comparative value is shown. You still need to enter exactly the value of the setting or property that you mapped. |
In complex mappings, the value of the market is always exported. Only when you map an own value, the own value that you enter is exported.
You can recognise complex mappings from the field that is shown below the name of the marketplace data field. Click on the field to show the values available for the marketplace data field.
Examples for complex 1:1 mappings are:
-
Categories
-
Brands
-
Shipping setting
Important: For complex mappings, do not map own values or properties of the type None.
Creating a complex 1:1:n mapping:
-
Click on the field for the marketplace data field.
→ A list of the available values is shown. -
Select the value that you want to map a PlentyONE data field to.
→ The value is mapped. -
Next to the marketplace data field, click on + Add data field.
→ To the left, the available PlentyONE data fields are listed in groups. -
Click on a group.
→ The PlentyONE data fields of the group are shown. -
Click on the PlentyONE data field for which you want to map values.
Important: Do not map own values or properties of the type None. -
Your next steps depend on the PlentyONE data field you selected:
-
Alternative 1: The available values for the PlentyONE data value are shown on the left.
-
Next to the value you want to select, click on the plus.
→ The value is added to the field on the right. -
Click on Confirm.
-
-
Alternative 2: The PlentyONE data field is inserted and the field Comparative value is shown.
-
In the field Comparative value, enter a value that is saved in the setting or the property of the mapped PlentyONE data field.
-
Click on Confirm.
-
-
Alternative 3: The PlentyONE data field is inserted and a drop-down list is shown.
-
Select a value from the drop-down list.
-
Click on Confirm.
→ The value of the marketplace data field is exported, not the value of the PlentyONE data field.
Exception: Only when you map an own value, the own value that you enter is exported.
-
-
Example: Delivery time in days for Otto Market
This gif shows you how to map suitable PlentyONE values to the values of the marketplace data fields Delivery time in days for Otto Market:
In a 1:1 mapping with one or more fallback data fields, you map a PlentyONE data field to the marketplace data field. In addition, you specify one or more fallback data fields. This ensures that the system keeps looking if the first PlentyONE data field is missing or empty.
So this mapping specifies:
-
I want to fill the marketplace data field with the data from the selected PlentyONE setting.
-
If that data field is missing or empty for a variation, the first fallback data field is checked. The value of that fallback data field is exported instead.
-
If the first fallback data field is also missing or empty for the variation, the second fallback data field is checked. If a value is found, the value of the second fallback data field is exported for the variation etc.
Two separate fallback conditions are available:
Null (default) |
The fallback data field is used if the data field above is mapped in the catalogue but not linked to the variation. The condition "Null" is useful when you want to map fallback data fields for the following types of PlentyONE data fields:
Important: When you add a fallback data field, the fallback condition "null" is selected automatically. To apply the fallback condition "leer", you need to change the default setting. |
Empty |
The fallback data field is used if the data field above is mapped in the catalogue and linked to the variation, but is empty. The condition "Empty" is useful when you want to map fallback data fields for the following type of PlentyONE data fields:
Important: When you add a fallback data field, the fallback condition "null" is selected automatically. To apply the fallback condition "leer", you need to change the default setting. |
Note: Even if you assign one or more fallback data fields, the value of only one of those fields is exported. For each variation, the mapped PlentyONE data fields are checked in the order in which you mapped them. This means that if the first data field does not provide a value for a variation, the first fallback data field is exported etc.
Creating a 1:1 mapping with fallback data fields:
-
Next to the marketplace data field, click on + Add data field.
→ To the left, the list of available PlentyONE data fields are shown in groups. -
Click on the group you need.
→ The PlentyONE data fields of the group are shown. -
Click on the plus to the right of the PlentyONE data field you want to select.
→ The PlentyONE data field is added to the right. -
In the list of PlentyONE data fields, click on the plus icon next to the PlentyONE data field that you want to map.
→ The fallback data field is added with the fallback condition "null". -
Alternative 1: To add the fallback data field with the fallback condition "null":
-
Click on Confirm.
→ The fallback data field is exported if the data field above is not linked to the variation.
-
-
Alternative 2: To add the fallback data field with the fallback condition "empty":
-
To the left of the fallback data field, click on the cog ().
→ The window Data column settings is shown. -
For the setting Fallback condition, select the option Empty.
-
Click on Save.
→ The fallback data field is added with the fallback condition "empty". -
Click on Confirm.
→ The fallback data field is exported if the data field above is empty for the variation.
-
Example: Fallback data field for SKU for Otto Market
This GIF shows you the mapping for the OTTO Market marketplace data field SKU. The PlentyONE data field SKU is mapped to this marketplace data field. The PlentyONE data field Variation ID is mapped as the fallback data field. The fallback condition "null" is applied automatically.
Result: The fallback data field Variation ID is exported if the data field SKU is not linked to the variation.
In a 1:n mapping, you map several PlentyONE data fields to the marketplace data field. You can link these data fields with a separator.
So this mapping specifies:
-
I want to combine these PlentyONE data fields during export so that the marketplace data field is filled with the data of these two or more PlentyONE settings.
Creating a 1:n mapping:
-
Next to the marketplace data field, click on + Add data field.
→ To the left, the list of available PlentyONE data fields are shown in groups. -
Click on the group you need.
→ The PlentyONE data fields of the group are shown. -
Click on the plus to the right of the PlentyONE data field you want to select.
→ The PlentyONE data field is added to the right. -
Click on Confirm.
-
To the right of the mapped PlentyONE data field, click on Add data field ().
→ To the left, the list of available PlentyONE data fields again are shown in groups. -
Map one or several additional PlentyONE data fields to the marketplace data field as described above.
-
Click on Confirm.
-
To the very right of the row, click on Settings ().
-
Select a separator from the drop-down list Separator or add a custom separator.
-
Click on Save.
-
Save () the catalogue.
→ The mappings are saved.
→ During the export, the content of the PlentyONE data fields is combined and exported as one field.
You are sure that you want to export the same value for all variations of a catalogue for a marketplace data field? Then specify an own value. This own value is then exported for all variations.
So this mapping specifies:
-
For this marketplace data field, I want to export the value that I entered in the field Own value for all variations of this catalogue. The value you enter is always exported. The value overwrites the market value also in complex mappings where usually the value of the market is exported. As such, make sure you enter an own value that the market accepts for this marketplace data field.
Creating an own value mapping:
-
Next to the marketplace data field, click on + Add data field.
→ To the left, the list of available PlentyONE data fields are shown in groups. -
Click on the plus next to Own value at the top of the list.
→ The field for the own value is added to the view. -
Enter a value into the input field.
→ This value is exported for all variations.
Example: Diameter information
You want to export diameter information for some of your variations. The diameter is saved in centimetres for all your variations. Instead of creating a property for the unit and linking this property to the variations, you can enter the own value cm.
This is an example of how you can map an own value for the diameter unit:
Mathematical calculations allow you to change numerical values automatically during the export.
-
This function only works for data fields that contain numerical values.
-
This functionality is new and not available for all catalogue formats.
So this mapping specifies:
-
I want the numerical value of a PlentyONE data field to be recalculated during the export. Basic arithmetic operations are available for the formulas.
Recalculating numerical values:
-
Next to the marketplace data field, click on + Add data field.
→ To the left, the list of available PlentyONE data fields are shown in groups. -
At the very top of the list, click on the plus icon next to Formula (calculate).
→ The data field Formula is added to the field on the right. -
Click into the data field.
→ The window Modify value is shown. -
Enter a numerical value or select a PlentyONE data field at the bottom right of the window to add it to the calculation (add).
Tip: Use the search function. This helps you to find data fields quickly. -
Optional: If the symbol more_vert is shown in the data field, select the correct assignment for the data field.
Tip: A number tells you how many assignments are necessary for the data field.-
Click on the icon more_vert.
-
In the window shown, select the assignments from the drop-down list.
-
Save the settings.
-
-
Enter numbers and mathematical operators with the on-screen calculator or the keyboard.
-
Save the settings.
→ The entered formula is displayed in the overview.
→ The calculation will be carried out in the next export.
6.2.2. Particularities for mapping data fields in the offer catalogue
Every market structures item data differently. As such, there are some particularities for each market when mapping data fields. This chapter contains mapping information for important data fields for Amazon.
6.2.2.1. Behaviour of unassigned data fields in the offer catalogue
With the setting Delete data fields that are not mapped in the offer catalogue for Amazon, you can define whether data fields that are not mapped in the offer catalogue should be exported to Amazon as “Delete”. If you activate this setting, then all data fields that are not mapped will be deleted on Amazon.
Note: This setting is deactivated by default.
6.2.2.2. Deleting mappings for complex data fields in the Amazon offer catalogue
Some data fields with complex mappings in the Amazon offer catalogue have to be mapped with an empty own value to delete the data on Amazon.
The following data fields with complex mappings in the Amazon offer catalogue have to be mapped with an empty own value to delete the data on Amazon.
| Group | Data field |
|---|---|
epr_product_packaging |
EPR Product Packaging Main Material |
externally_assigned_product_identifier |
External Product ID Type |
ghs_chemical_h_code |
GHS Chemical H Code |
hazmat |
Hazmat Aspect |
merchant_suggested_asin |
Merchant Suggested ASIN |
num_batteries |
Battery Type |
purchasable_offer |
Audience |
uvp_list_price |
UVP List Price Currency |
|
Do not delete data field mappings
For the data fields listed above, the mapped value of the complex mapping in the Export as field must not be deleted. Otherwise, Amazon will not know which data should be deleted. For these data fields, you have to map an empty own value to delete the data on Amazon. |
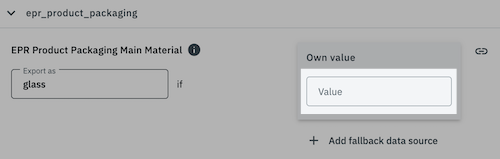
An example of how to map the data field EPR Product Packaging Main Material in the group epr_product_packaging with an empty own value is provided below. This data field will then be exported to Amazon as “Delete”.
Mapping an empty own value:
-
Go to Data » Catalogues.
-
Open the offer catalogue for Amazon.
-
Expand the group epr_product_packaging (chevron_right).
-
Navigate to the data field EPR Product Packaging Main Material.
Note: The value within the field Export as has to be mapped and must not be deleted. Otherwise, Amazon will not know which data to delete. -
Click add Add data source.
-
Add the data source Own value (add). Leave the field Value empty.
-
Save the settings.
→ The data field will be deleted on Amazon during the next export.
6.2.2.3. Mapping the target group
Use the data field Audience in the Amazon offer catalogue to define a target group for the catalogue. The data field Audience can be mapped in the following groups within the offer catalogue:
-
purchasable_offer (offer for all customers on Amazon)
-
purchasable_offer_fba (offer for all customers on Amazon with FBA)
-
purchasable_offer_mfn_b2b (offer for Amazon Business customers / B2B)
-
purchasable_offer_fba_b2b (offer for Amazon Business customers / B2B with FBA)
Note: These data fields are automatically mapped with the correct values.
The following values are pre-mapped:
-
The data fields purchasable_offer_mfn_b2b and purchasable_offer_fba_b2b are mapped with this value:
-
Own value with the value B2B
-
-
The data fields purchasable_offer und purchasable_offer_fba are mapped with this value:
-
Own value with the value ALL
-
6.2.2.4. Mapping the manufacturing country
The data field Country of origin within the group country_of_origin in the Amazon offer catalogue indicates the manufacturing country of an item. You can use those data sources to map the manufacturing country:
-
Map the Manufacturing country ID.
or
-
Map the Manufacturing country ISO-code.
Note: PlentyONE recommends to map the Manufacturing country ID, as this mapping is less prone to errors.
Mapping the manufacturing country ID:
-
Go to Data » Catalogues.
-
Open the offer catalogue for Amazon.
-
Expand the group country_of_origin (chevron_right).
-
In the field Export as, select the manufacturing country from the drop-down list.
-
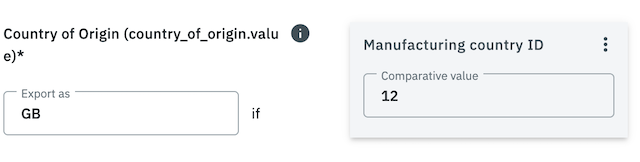
Click add Add data source and add the data source Item » Manufacturing country ID.
→ The data source Manufacturing country ID is added. -
Enter the ID of the manufacturing country as Comparative value for Manufacturing country ID, for example
12for the United Kingdom.
Tip: Use the country IDs in PlentyONE. The list of PlentyONE country IDs is available here. -
Save () the settings.
Mapping the manufacturing country ISO code:
-
Go to Data » Catalogues.
-
Open the offer catalogue for Amazon.
-
Expand the group country_of_origin (chevron_right).
-
In the field Export as, select the manufacturing country from the drop-down list.
-
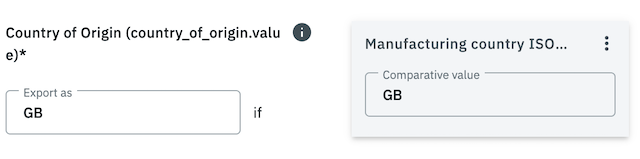
Click add Add data source and add the data source Item » Manufacturing country ISO-code.
→ The data source Manufacturing country ISO-code is added. -
Enter the ISO code of the manufacturing country as Comparative value for Manufacturing country ISO-code, for example
GBfor the United Kingdom. -
Save () the settings.
6.2.3. Deactivating the creation of new offers on Amazon
In the offer catalogues for Amazon, you can define that existing offers on Amazon should only be updated and no new offers should be created on Amazon. This is done with the setting Deactivate creation of new offers (existing offers will continue to be updated) in the settings of an offer catalogue. This setting must be activated or deactivated separately for each offer catalogue.
Note: This setting is deactivated by default.
| If you activate the setting Deactivate creation of new offers (existing offers will continue to be updated) in an offer catalogue, then no new offers will be created on Amazon. This means that if your offer catalogue contains an offer which does not yet exist on Amazon, the offer will not be created, even if the offer catalogue is activated. |
Deactivating the creation of new offers on Amazon:
-
Go to Data » Catalogues.
-
Open the offer catalogue for Amazon (export type Listing).
-
Open the settings Settings tab of the catalogue.
-
Check the setting Deactivate creation of new offers (existing offers will continue to be updated.
-
If offers should only be updated on Amazon and no new offers should be created, then this setting must be activated.
-
If new offers should be created on Amazon, this setting must be deactivated.
-
-
Save () the settings.
|
Price and stock updates are not affected
The processes for updating prices and stock (the settings Price changes and Stock changes in the Setup » Markets » Amazon » [Open account] » Settings » Tab: Item settings menu) are not affected by the setting for deactivating the creation of new offers on Amazon. If those settings are activated, then prices and stock will continue to be updated on Amazon. |
6.2.4. Optional: Setting export filters
Go to Setup » Markets » Amazon » Settings and open your Amazon account. In the Tab: Item settings » Section: Export filter, you can use filters to narrow down which items are exported to Amazon via product catalogues and for which items offer catalogues are exported. The export filters apply globally to your Amazon account and affect both product and offer catalogues.
The export filters shown in this menu originate from the previous Amazon flat file integration. In the new catalogue-based integration, only certain filters continue to be supported.
Supported filters
The following filters are still functional and can be used to narrow down the export as needed:
-
Flag 1
-
Flag 2
-
Tags
Only items that have the selected flags or at least one of the selected tags will be exported to Amazon.
No longer supported filters
The following filters are no longer supported in the catalogue-based Amazon integration:
-
Item availability
-
Export categories
-
BMVD export categories
-
Store items
Note: For the new integration, the categories exported to Amazon are defined via catalogue templates.
6.2.5. Activating the offer export
You have set up Amazon in PlentyONE and created a catalogue for exporting your item data? Then start the export of your item data. To do so, activate the catalogues which should be exported to Amazon in the Data » Catalogues menu.
Activating the catalogue export to Amazon:
-
Go to Data » Catalogues.
→ The catalogues are listed. -
Scroll to the Amazon catalogue.
-
In the Active column, move the toggle button to the right ().
→ The catalogue is active.
→ The catalogue data is exported to Amazon 15 minutes after the price change at a variation.
Tip: In the chapter Retrieving (error) reports you can find information on where to access export reports for Amazon. Note that reports for test mode and for live export are located in different menus.
7. Creating a preview of the export data
Once you have created a catalogue for Amazon and mapped the data fields in the catalogue, you can create and download a preview of the export data. You have the option of narrowing down the displayed export data with filters.
Important: The filters only affect the preview of the export data and have no influence on the actual catalogue export to Amazon. If you want to narrow down which data is actually exported, use the export filters described here. They apply to both product and offer catalogues.
Applying filters for the preview:
-
Go to Data » Catalogues.
-
Open the catalogue for Amazon.
-
Open the filter_alt Filter tab in the navigation bar on the left.
-
In the Custom filters section, select the desired filters from the Select filter drop-down list.
-
Click add Add filter. The available filters are explained in Table 5.
→ The filter is added. -
Depending on the filter, enter the desired IDs or select options from the drop-down list.
-
Save () the settings.
| Filter | Explanation |
|---|---|
Variation IDs |
Enter one or more Variation IDs to filter for items with this variation ID. Separate multiple IDs using commas. |
Item IDs |
Enter one or more Item IDs to filter for items with this item ID. Separate multiple IDs using commas. |
Has tags |
Select one or more tags from the drop-down list to filter for items with this tag. |
Without tags |
Select one or more tags from the drop-down list to filter for variations without this tag. |
Creating and downloading a preview of the export data:
-
Go to Data » Catalogues.
-
Open the catalogue for Amazon.
-
In the toolbar at the top, click on Preview (preview).
→ A window with the preview of the export data opens. -
Optional: Click Download () in the preview window to save the preview as a file.
→ The preview of the export data is downloaded.
8. Testing the catalogue export
After you have created a catalogue for Amazon and mapped the data fields in the catalogue, you can test the catalogue export. To do so, open the catalogue’s settings.
After testing the export you can check the reports in the menus Setup » Markets » Amazon » Data exchange » Data export and Data » Log to identify why a catalogue was not accepted by Amazon and if you need to map more data fields in the catalogue.
Note: However, note that the test mode only includes a technical validation and no content check.
Prerequisites
-
The new product type for the variation is linked at item level in the menu Item » Items » [Open item] » Section: Amazon.
-
For product catalogues:
-
You have added the Amazon product types for which you want to create product catalogues under Setup » Markets » Amazon » Add catalogue templates.
-
You have created a product catalogue for the corresponding product type.
-
-
For offer catalogues:
-
You have created an offer catalogue.
-
Testing the catalogue export:
-
Go to Data » Catalogues.
-
Open the catalogue for Amazon.
-
Open the settings Settings tab in the navigation bar on the left.
-
Activate the option Test mode in the section Amazon settings.
-
Click Save (save).
-
Go to Data » Catalogues.
→ The catalogues are listed. -
Scroll to the Amazon catalogue.
-
In the Active column, move the toggle button to the right (toggle_on).
→ The catalogue is active.
→ A test export is sent to Amazon within 15 minutes. The test export includes all updates since the last export.
You can view and download the reports for the test export in either of these menus:
-
In the menu Setup » Markets » Amazon » Data exchange » Data export » Section: Reports for catalogue export.
-
In the menu Data » Log.
Retrieving test export reports in the Data » Log menu:
-
Go to Data » Log.
-
Click settings Configure Logs.
→ The Log Configuration window opens. -
Click Plenty » Modules » Amazon » Item » Listings » Services » HTTPDateSenderService.
-
In the Log level drop-down list, select the option Debug (check).
-
Click SAVE.
→ The log level is enabled.
→ The Log Configuration window closes.
Important: Only activate the Debug log level temporarily. Deactivate it again after you have carried out the test export and reviewed the required log entries. Depending on the amount of data, debug logs can become very large and may affect system performance. -
Click tune Filter.
-
Apply the following filters:
-
Integration Plenty\\Modules\\Amazon\\Item\\Listings\\Services\\HTTPDataSenderService
-
Identifier DataSenderService
-
-
Click search SEARCH.
9. Manually managing the data exchange
In the menu Setup » Markets » Amazon » Data exchange you can export data manually. For example, you can only export specific product and offer catalogues, or manually trigger a price and stock update.
9.1. Manually exporting catalogues
In the Setup » Markets » Amazon » Data exchange » Data export menu, you can manually export product catalogues and offer catalogues to Amazon. This can be helpful if you have created a new catalogue which you want to export to Amazon immediately without having to wait for the automatic offer or product export.
Note: The same catalogue can only be exported every 5 minutes.
Manually exporting a catalogue:
-
Go to Setup » Markets » Amazon » Data exchange » Data export.
-
In the section Export catalogue to Amazon, select the catalogue that should be exported to Amazon from the drop-down list. You can export product catalogues and offer catalogues.
-
If you want to export an offer catalogue, then select from the drop-down list Export type (offer) whether you want to create offers or update existing offers.
Note: If you want to export a product catalogue, then do not select anything here. Products are always created and updated automatically. -
Click Export catalogue (settings_b_roll).
→ The catalogue is exported to Amazon.
9.2. Manually triggering price and stock updates
In the Setup » Markets » Amazon » Data exchange » Self-Service menu, you can manually trigger a price and stock update for specific SKUs. This bypasses the regular intervals for price and stock changes (every 15 minutes or hourly). Instead, the current price and stock data from the relevant offer catalogue is prioritised and transmitted to Amazon.
This can be useful, for example, if you need to update stock levels for fast-selling items or correct prices as quickly as possible.
Important:
-
To manually trigger a price and stock update, you need a correctly configured and activated offer catalogue for the relevant SKUs.
-
A maximum of 50 SKUs can be processed per request.
-
A manual price and stock update can only be triggered once per minute. After execution, the EXECUTE button is disabled for 60 seconds.
Manually triggering a price and stock update:
-
Go to Setup » Markets » Amazon » Data exchange » Self-Service.
-
Select the option Offer export from the Action drop-down list.
-
Select your Amazon account from the Account drop-down list.
-
Enter up to 50 comma-separated SKUs in the SKUs input field.
-
Click EXECUTE.
→ The system maps the specified SKUs to the corresponding variation IDs and automatically extends the request to include all linked variations (e.g. MFN, FBA or Multi-ASIN).
→ The current price and stock data for the specified SKUs is prioritised and transmitted to Amazon.
Important: Execution is asynchronous. This means that the price and stock update is not transmitted to Amazon immediately but is instead processed with priority during the next few minutes.
Tip: Once the update has been triggered, a status message is displayed. You can check the status of the transmission and the price and stock data sent to Amazon in the Price and stock export log.
10. Temporary solution: The adapter
The adapter facilitates an automated transition from the old item data export using flatfiles to the new item data export using catalogues. Hence, the adapter acts as a “bridge” between the old flatfile logic and the new catalogue export in order to facilitate a gradual migration to the new catalogue-based Amazon integration.
|
The adapter only serves as a temporary solution
The adapter is only a temporary solution to allow you more time to create product catalogues for Amazon and to create properties for your characteristics. |
What is the adapter?
The adapter’s purpose is to correctly transfer item data to Amazon without having to immediately transfer all characteristics and free text fields into properties. Thus, the adapter can serve as a temporary solution if you cannot directly switch to the catalogue export, for example if you still use many characteristics and free text fields.
Important: The adapter only transfers item data, but not offer data. To export offer data, you additionally have to create an offer catalogue. Hence, the adapter can serve as a replacement for the product data catalogue. As the adapter only serves as a temporary solution, we highly recommend to create product catalogues for Amazon instead.
| You only need to employ the adapter if you export item data to Amazon via PlentyONE; hence, if you selected Yes for the setting Item export in the Setup » Markets » Amazon » Settings » Tab: Item Settings menu. If you do not export item data to Amazon via PlentyONE, then you do not have to employ the adapter. |
10.1. Working with the adapter
There is no separate menu for the adapter in PlentyONE and you do not have to carry out any specific settings in order to use the adapter. The adapter’s functions can be found in the Setup » Markets » Amazon » Data exchange » Data export menu within the sections Item export - Adapter and Processing results of item export via the adapter. Here you can download error reports on the item data export and you can start a manual item data export.
| With the adapter, item data is export to Amazon once per day. In addition, you can trigger a manual export. A CSV file is generated after every export. This CSV file contains errors which occurred during the export. |
|
Activating the adapter for productive use
Until now, the adapter has only been available in validation mode. In validation mode, item data is not sent to Amazon’s productive environment, but is still transmitted in parallel via flat files. This allows you to test your adapter settings safely and without risk. |
10.1.1. Manually exporting item data
In the Setup » Markets » Amazon » Data exchange » Data export menu, you can manually export item data using the adapter. This can be useful if you have updated your items or if you have created new items.
Manually exporting item data:
-
Go to Setup » Markets » Amazon » Data exchange » Data export.
-
In the section Item export - Adapter, click on Start export (folder).
→ The item data is exported to Amazon.
After the export was carried out, you can download a CSV file with the exported items. This file is available in the section Processing results of item export via the adapter. This file contains errors that occurred during the export.
10.1.2. Linking properties with Amazon
Properties that you want to export to Amazon using the adapter are linked with Amazon in the Setup » Settings » Properties » Configuration menu.
| The properties in PlentyONE still contain the old Amazon product types. The error reports, which are generated by Amazon, already contain the new product types. Click here for an overview of old and new product types. |
Linking properties with Amazon:
-
Go to Setup » Settings » Properties » Configuration.
-
In the Amazon area, click on Add link.
-
Select the Amazon platform.
-
Select the category (= the Amazon product type).
Note: The old Amazon product types are displayed in PlentyONE. -
Select the field.
Example: If the error report shows “Bullet point is missing”, then select the field bullet_point. -
Save () the settings.
| Only properties that are linked with Amazon in the Setup » Settings » Properties » Configuration menu are exported via the adapter. |
|
You can still link fields (= attributes) that are used in the old flatfiles. The old fields will automatically be matched with the new fields during the export. Further information on the new fields (=attributes) is available here. |
10.1.3. Exporting variation themes using the adapter
With variation themes, you can display multiple product variations, such as different sizes or colours, on a single product detail page. This allows your customers to see all the available options at a glance. The variation themes available depend on the respective product category.
If you are using the adapter, you must create a property for variation themes so that the information can be correctly transmitted to Amazon. To do this, proceed as follows:
-
Create a new property in the menu Setup » Settings » Properties » Configuration.
-
In the drop-down list Section, select the option Items.
-
In the drop-down list Type, select the option Selection.
-
In the Name field, enter a unique name, for example Amazon variation themes.
-
-
Link the property with Amazon.
-
Add links for all Categories (= the Amazon product types) for which you want to use variation themes.
-
-
Save (save) the settings.
→ The Selection values section appears under the Names section. -
Add selection values for the property.
-
Enter the exact name of the valid values for the variation theme on Amazon as the Name for each selection value.
Important: The variation theme will only be transferred correctly to Amazon if the name of the selection value exactly matches the name of the valid value.
Tip: You do not need to add all possible valid values for a variation theme as selection values. Just create selection values for the values you actually use for your variation themes.
-
-
Save (save) the settings.
You can find the valid values in your reports within Amazon Seller Central.
-
Log into Amazon Seller Central.
-
Go to Reports » Inventory Reports.
-
Select the report type Category Listings Report from the drop-down list Select Report Type.
-
Open the inventory report for the respective category.
-
Switch to the Valid Values tab.
-
Scroll to the Variations section.
-
In the first column, you will find the variation theme name, for example Variation Theme Name - [ TABLE ].
-
The adjacent columns contain the valid values that you must enter as selection values for the property in PlentyONE, for example
NUMBER_OF_ITEMSandCOLOUR/NUMBER_OF_ITEMS.
Note: Do not use any values marked as (Deprecated: Do not use).
-
10.2. Adapter: Troubleshooting
In this chapter, you will learn how to interpret the error reports for the item data export and how you can adjust your items so that they will be accepted by Amazon.
10.2.1. Understanding the error reports
Amazon generates a CSV file which contains errors after each item export via the adapter. Those error reports help you to adjust your items.
-
The file is saved in the section Processing results of item export via the adapter in the Setup » Markets » Amazon » Data exchange » Data export menu.
-
If the file is empty or if no file was generated after the export, then no errors occurred during the export.
-
The file contains errors of individual SKUs or missing attributes, for example “Bullet point is missing”. If information is missing (for example bullet points), then you have to create a property for the missing information and link the property with Amazon.
10.2.2. Troubleshooting tips
If the error report shows that an attribute is missing, then you can follow these steps to adjust your item:
Step 1: Check whether the property exists in your PlentyONE system.
Step 2: Check whether the property is linked with the item.
-
Is the property linked with the item in the Item » Items » [Open item] » [Open variation] menu?
-
If the property is not linked: Link the property with the respective items.
Step 3: Check whether the property’s content is correct.
-
Does the property in the Setup » Settings » Properties » Configuration menu meet the requirements by Amazon?
-
If the property does not meet Amazon’s requirements, then adjust the property.
11. Retrieving (error) reports
Events in your system are logged in (error) reports. If something does not work as expected, you can use these reports to identify the issue yourself without relying on our support.
Depending on the process you are using (catalogue export, item export via the adapter or updating prices and stock) and whether you are working in test mode, the (error) reports are located in different menus.
Table 6 provides an overview of where to find each (error) report:
| Process | Test mode activated? | (Error) reports |
|---|---|---|
Catalogue export |
yes |
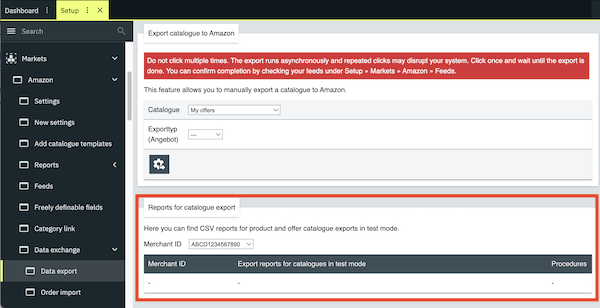
|
Export of a newly created offer catalogue |
no |
|
Offer catalogue update (including price update) |
no |
|
Product catalogue export |
no |
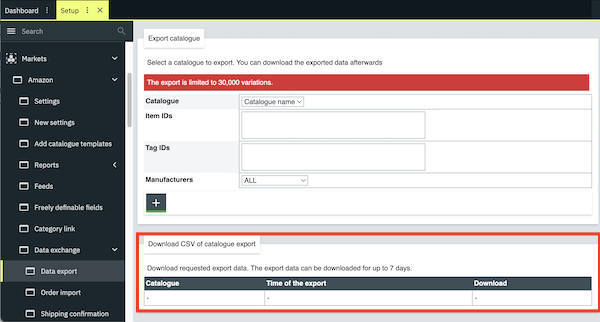
|
Item export via adapter |
yes |

|
Item export via adapter |
no |
|
Price update (without catalogue) |
no |
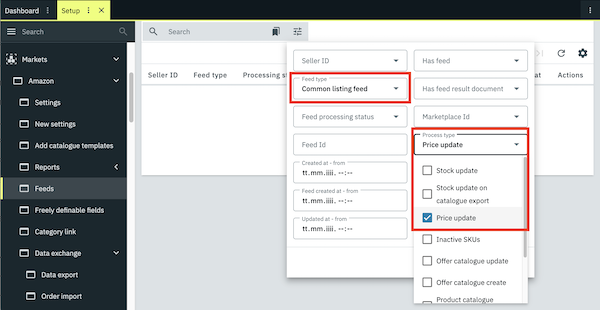
|
Stock update |
no |
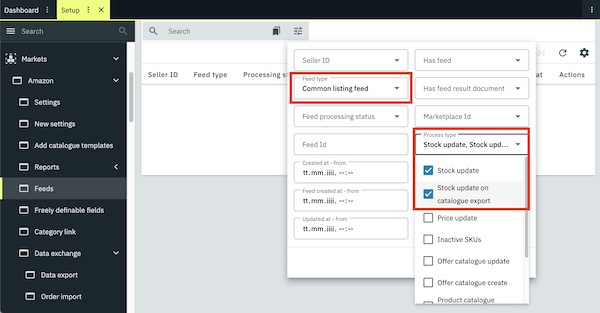
|
Price and stock export |
no |
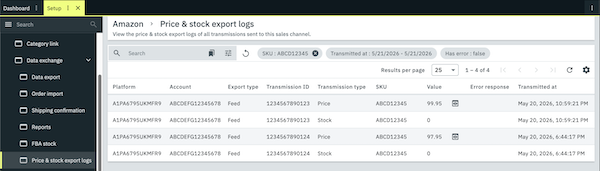
|
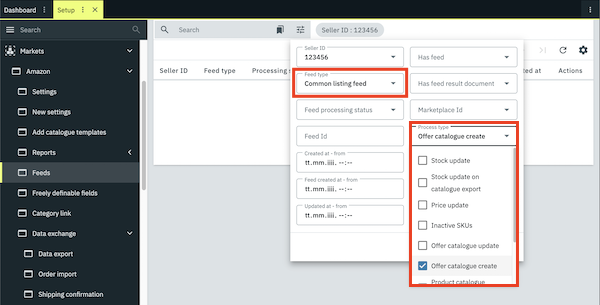
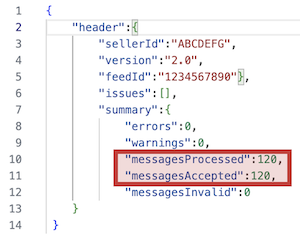
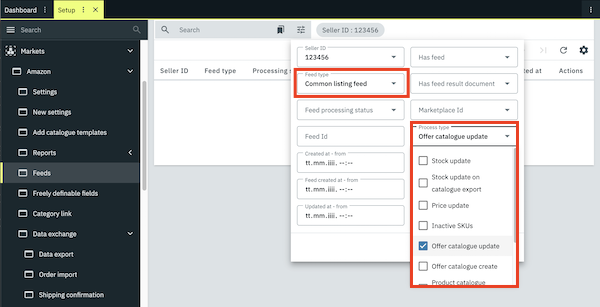
12. Price and stock export logs
In the menu Setup » Markets » Amazon » Data exchange » Price & stock export logs, you can find the logs for price and stock export. The overview shows whether price and stock updates were successfully sent from PlentyONE to Amazon or whether errors occurred during data transmission. You can use Filters (tune) to search the log specifically for a certain time period, a specific transmission type (e.g. price or stock), entries with errors or a specific SKU.
Unlike the data log in the Data » Log menu, this overview not only shows whether the processes in PlentyONE were executed successfully. It also directly displays the price and stock values transferred to Amazon, as well as additional information about the data transmission. This means you don’t need to open the log files and extract the information from the JSON file.
Important: This log only shows whether the data was transferred to Amazon. The log does not contain any information on whether Amazon accepted the price or stock updates or has already applied them to your offers.
Table 7 contains an overview of the price and stock export logs.
| Column | Explanation |
|---|---|
Platform |
The marketplace ID of the Amazon platform to which the data was transferred. |
Account |
The seller ID of your Amazon seller account. |
Export type |
The type of data transmission. Possible values:
|
Transmission ID |
The unique ID of the data transmission. A separate transmission ID is generated for each data transmission to Amazon. |
Transmission type |
The type of transferred data. Possible values:
|
SKU |
The SKU of the variation for which data was transferred. |
Value |
The value transferred to Amazon for the stock or price. |
Error response |
The error message, if an error occurred during data transmission. |
Transmitted at |
Date and time of the data transmission. |
Retrieving the price and stock export logs:
-
Go to Setup » Markets » Amazon » Data exchange » Price & stock export logs.
-
Optional: Narrow down the search using Filters (tune).
-
Click Search (search).
→ The log entries are displayed.
13. FAQ for the new Amazon integration
13.1. Catalogue
Item settings in the menu Item » Items » [Open item]:
-
Link product type: Link a current product type for the item In the Amazon section.
Variation settings in the menu Item » Items » [Open variation]:
-
Activate variation: In the Availability and visibility section, enable the option Active (toggle_on).
-
Add order referrer: Add the option Web API and the desired Amazon referrer in the Sales channels section.
-
Positive net stock: The variation must have a positive net stock in the Stock section.
-
Consider the Store items export filter: If you have selected Only items visible in online store for the Store items export filter in the Setup » Markets » Amazon » Settings » [Open account] » Tab: Item settings menu, make sure that the variation is also activated for the online store in the Client (store) section.
Optional: If you only want to export variations with certain flags and tags, also configure the following settings:
-
Select flags: In the menu Setup » Markets » Amazon » Settings » [Open account] » Tab: Item settings » Section: Export filter, select the desired flags from the drop-down lists Flag 1 and/or Flag 2.
-
Add tags: Add the desired tags from the drop-down list in the Setup » Markets » Amazon » Settings » [Open account] » Tab: Item settings » Section: Export filter menu.
Note: If multiple tags are selected, they are interpreted as an OR condition. This means a variation is exported as soon as at least one of the selected tags has been assigned to it.
Offer catalogue settings:
-
Create catalogue: You have created an offer catalogue.
-
Map data fields: You have mapped the required data fields in the offer catalogue.
-
Activate catalogue: You have activated the offer catalogue.
Note: The offer catalogue is exported within 15 minutes after a value has been changed on the variation.
Item settings in the menu Item » Items » [Open item]:
-
Link product type: Link a current product type for the item In the Amazon section.
Variation settings in the menu Item » Items » [Open variation]:
-
Activate variation: In the Availability and visibility section, enable the option Active (toggle_on).
-
Add order referrer: Add the option Web API and the desired Amazon referrer in the Sales channels section.
Price and stock update settings in the menu Setup » Markets » Amazon » Settings » [Open account] » Tab: Item settings:
-
Activate price updates: Select the option 15 minutes or Hourly for Price changes .
-
Optional: If you also want to update stock, then select the option 15 minutes or hourly for Stock changes.
Offer catalogue settings:
-
Create catalogue: You have created an offer catalogue.
-
Map data fields: You have mapped the required data fields in the offer catalogue.
-
Activate catalogue: You have activated the offer catalogue.
Note: The updated offer is transmitted to Amazon at the following intervals:
-
Within 15 minutes if the price of the variation has been changed.
Item settings in the menu Item » Items » [Open item]:
-
Link product type: Link the current product type for the item In the Amazon section.
Variation settings in the menu Item » Items » [Open variation]:
-
Activate variation: In the Availability and visibility section, enable the option Active (toggle_on).
-
Add order referrer: Add the option Web API and the desired Amazon referrer in the Sales channels section.
Product catalogue settings:
-
Add catalogue template: You have added the Amazon product type for which you want to create a product catalogue under Setup » Markets » Amazon » Add catalogue templates.
-
Create catalogue: You have created a product catalogue for the corresponding product type.
-
Map data fields: You have mapped the required data fields in the product catalogue.
-
Activate catalogue: You have activated the offer catalogue.
Note: The product catalogue is exported to Amazon once per day (at night) after a value has been changed on the variation.
The barcode is mapped with the data field External product ID (group: externally_assigned_product_identifier).
There is no data field for stock because stock is not mapped in the offer catalogue.
Instead, stock updates are transferred to Amazon with the setting Stock changes in the Setup » Markets » Amazon » Settings menu. If this setting is activated, the information from this setting is automatically added during the catalogue export.
Use the data fields Main Image Location (group: main_offer_image_locator) and Other Image Location (group: other_offer_image_locator_1-5) in the offer catalogue to map offer-specific images, for example if you sell a used item and want to show the item’s condition.
These data fields are not mandatory, but they are recommended if you sell used items.
13.2. Other
If you use a third-party repricing tool, then go to Setup » Markets » Amazon » Settings and make sure that Never is selected for the setting Price changes and that no price is mapped in the catalogue.