Using marketplace formats
Use the marketplace formats of the catalogue to export variation data and stock data to many markets and price portals. PlentyONE is working on moving all markets to catalogue formats.
On this page, find out how to export variation data to markets using catalogues. Only the general workflow is explained. When you are ready to set up catalogues for individual markets, head over to the manual page of the market to find out how you create and structure the catalogues.
| This page is new and we always want to improve. Couldn’t find what you are looking for or do you think something could be explained better? Then let us know by using the feedback function at the bottom of this page. The more details you provide, the easier it is for us to improve this page. |
1. Understanding the catalogue menu for marketplace formats
When you open the menu Data » Catalogues, the first thing you see is the catalogue overview. You can get to know this catalogue overview here.
The catalogue menu for marketplace formats is what you see when you open a catalogue with marketplace format.
The catalogue menu is the same for all marketplace formats:
Tip: Your catalogue still looks different? Then you probably opened a catalogue with a default format. That is used to export data to a file. Also useful and interesting. However, working with standard formats is described elsewhere.
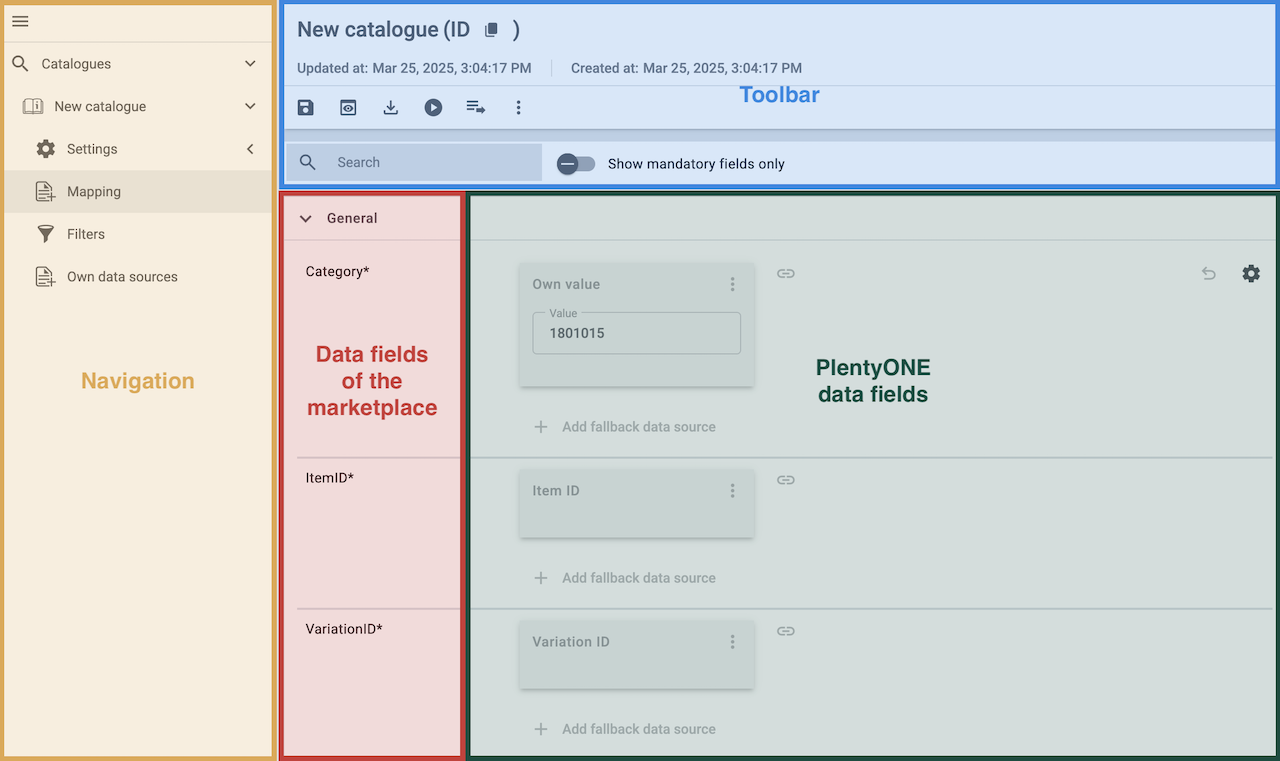
1.1. Navigation
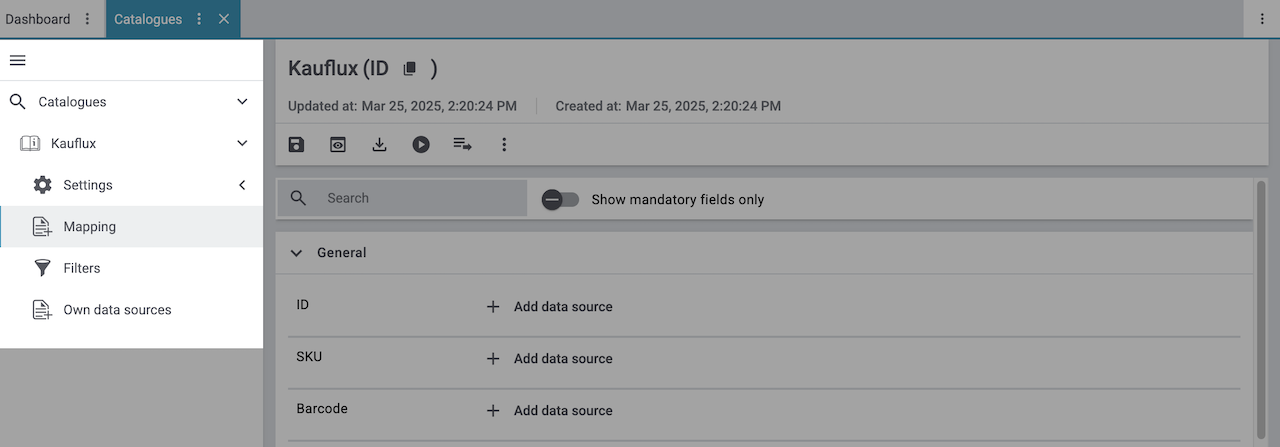
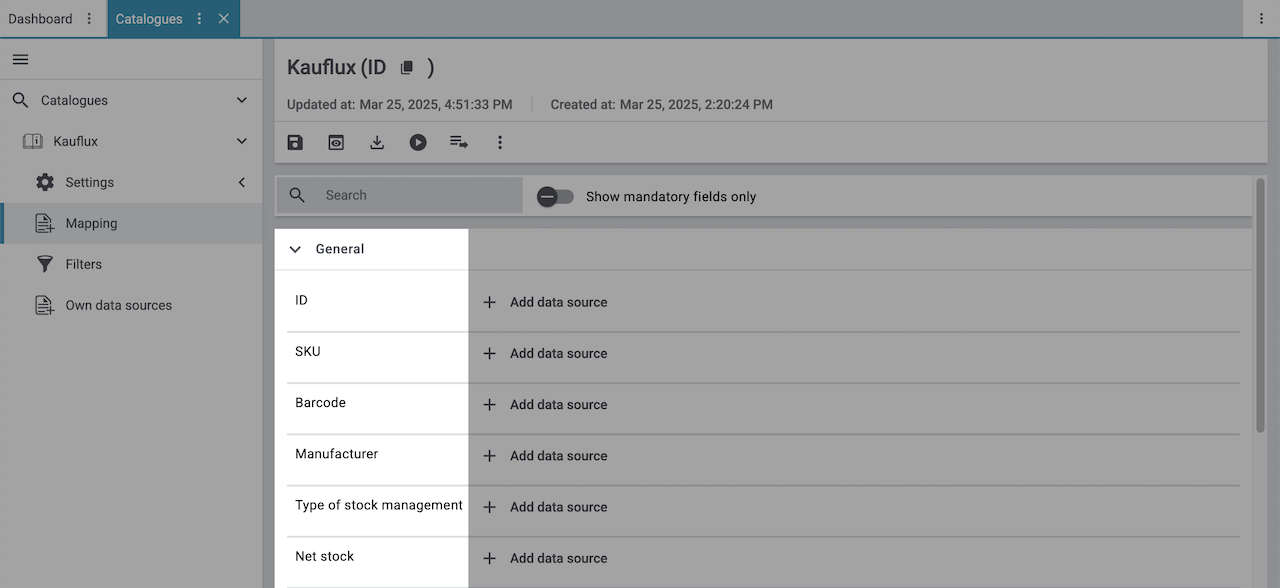
When you open a catalogue, the view Mapping is shown by default. Use the navigation to switch to other views of the catalogue.
Catalogues |
Go back to the catalogue overview, that is to the list of catalogues. |
List of opened catalogues |
The navigation shows all catalogues that you accessed during your current session. This allows you to quickly switch between the catalogues you are currently working on. The catalogue that is currently on view is shown in blue. The names of the other catalogues are shown in grey. Tip: You can remove a catalogue or channel map from the navigation by hovering over it with your cursor and clicking on the X that appears. |
Settings |
This menu contains all settings for the catalogue. The settings consist of four sections:
These sections also appear in the navigation bar, but do not need to be accessed separately. Important: You do not need these settings for most markets. These settings are only relevant if you want to export data to a file. |
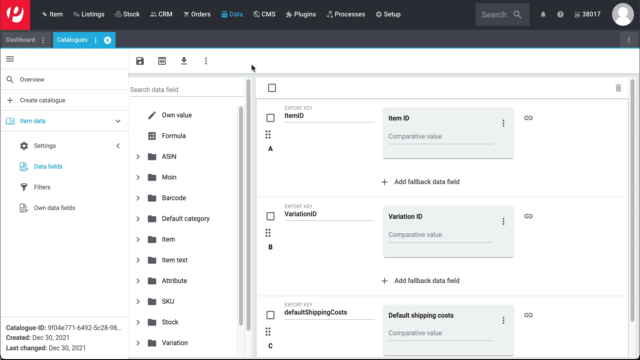
Mapping |
This menu is shown when you open the catalogue. Here, you map suitable PlentyONE data fields to the marketplace data fields. |
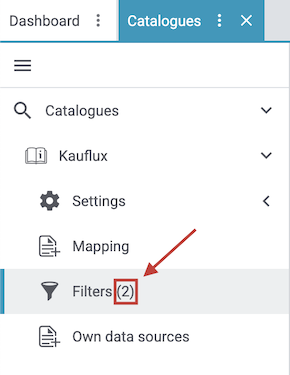
filter_alt Filter |
Add filters to only export specific records. Tip: The number of filters that you activated for a catalogue is always shown. Template filters, i.e. filters that are applied by default, are not included in the count.
|
Own data sources |
Own data sources are currently not available for most exports. |
1.2. Toolbar
The toolbar provides actions for the catalogue.
save Save |
Saves the catalogue settings. |
||||
preview Preview |
Creates a preview of the export data. The preview contains the first 5 data rows of the export file. Important: The preview function is not available for all catalogue formats. |
||||
Asynchronous download |
Starts a manual download of the catalogue data. Important: This option starts a manual export. The data is not exported to the market. |
||||
play_circle Live download |
Downloads the catalogue data as a file. The download starts immediately. The file is automatically saved on your computer when the export is done. Important: This option downloads the catalogue data to your computer. The data is not exported to the market. |
||||
playlist_play Status |
Opens the menu Data » Catalogue export status and filters the list for this catalogue. Shows information about the status of the catalogue. |
||||
more_vert More |
Shows additional actions.
|
||||
search Search |
You can search for the names of marketplace data fields and the values that you have selected in marketplace fields with an input field. |
||||
toggle_off Show mandatory fields only |
Use the toggle button in order to decide whether you want to display all fields (toggle_off) or mandatory fields only (toggle_on). |
||||
All / Mapped / Unmapped |
Select one of the three tabs depending on whether you want to see all fields (default), only mapped fields or only unmapped fields. Note that the tab selection also affects the search. |
1.3. Marketplace data field
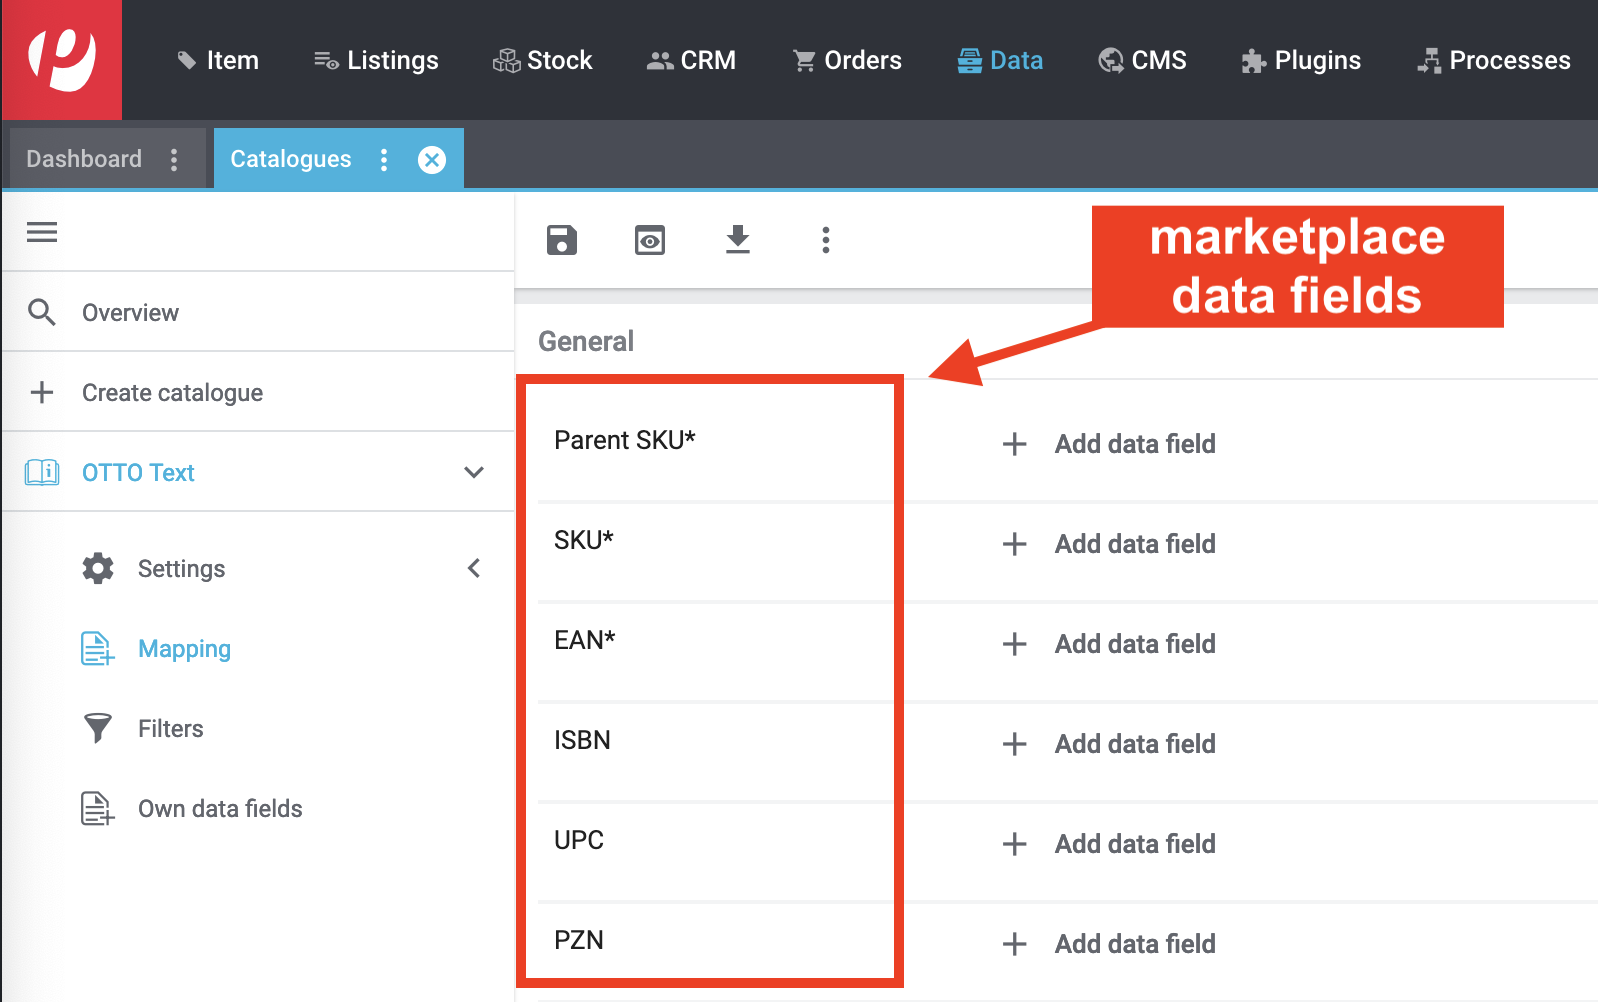
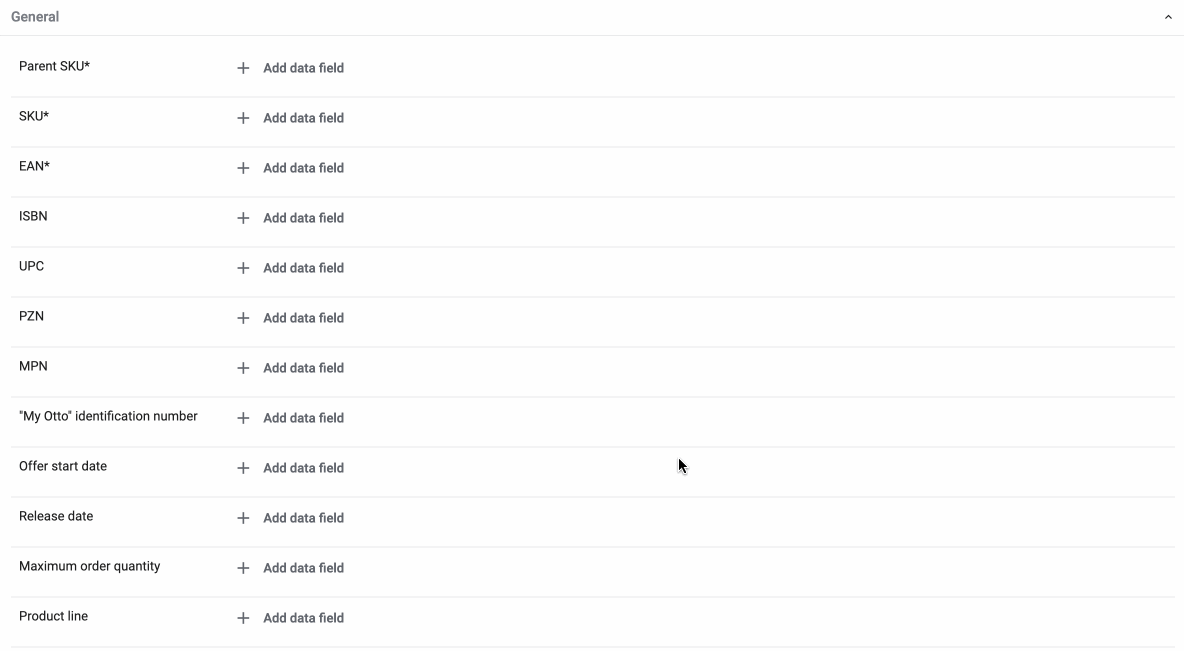
To the right of the navigation, all data fields available for the market are listed. Mandatory fields are marked with an asterisk (✱).
Tip: In the toolbar, click on the further actions (more_vert) to show or hide optional data fields.
1.4. PlentyONE data fields
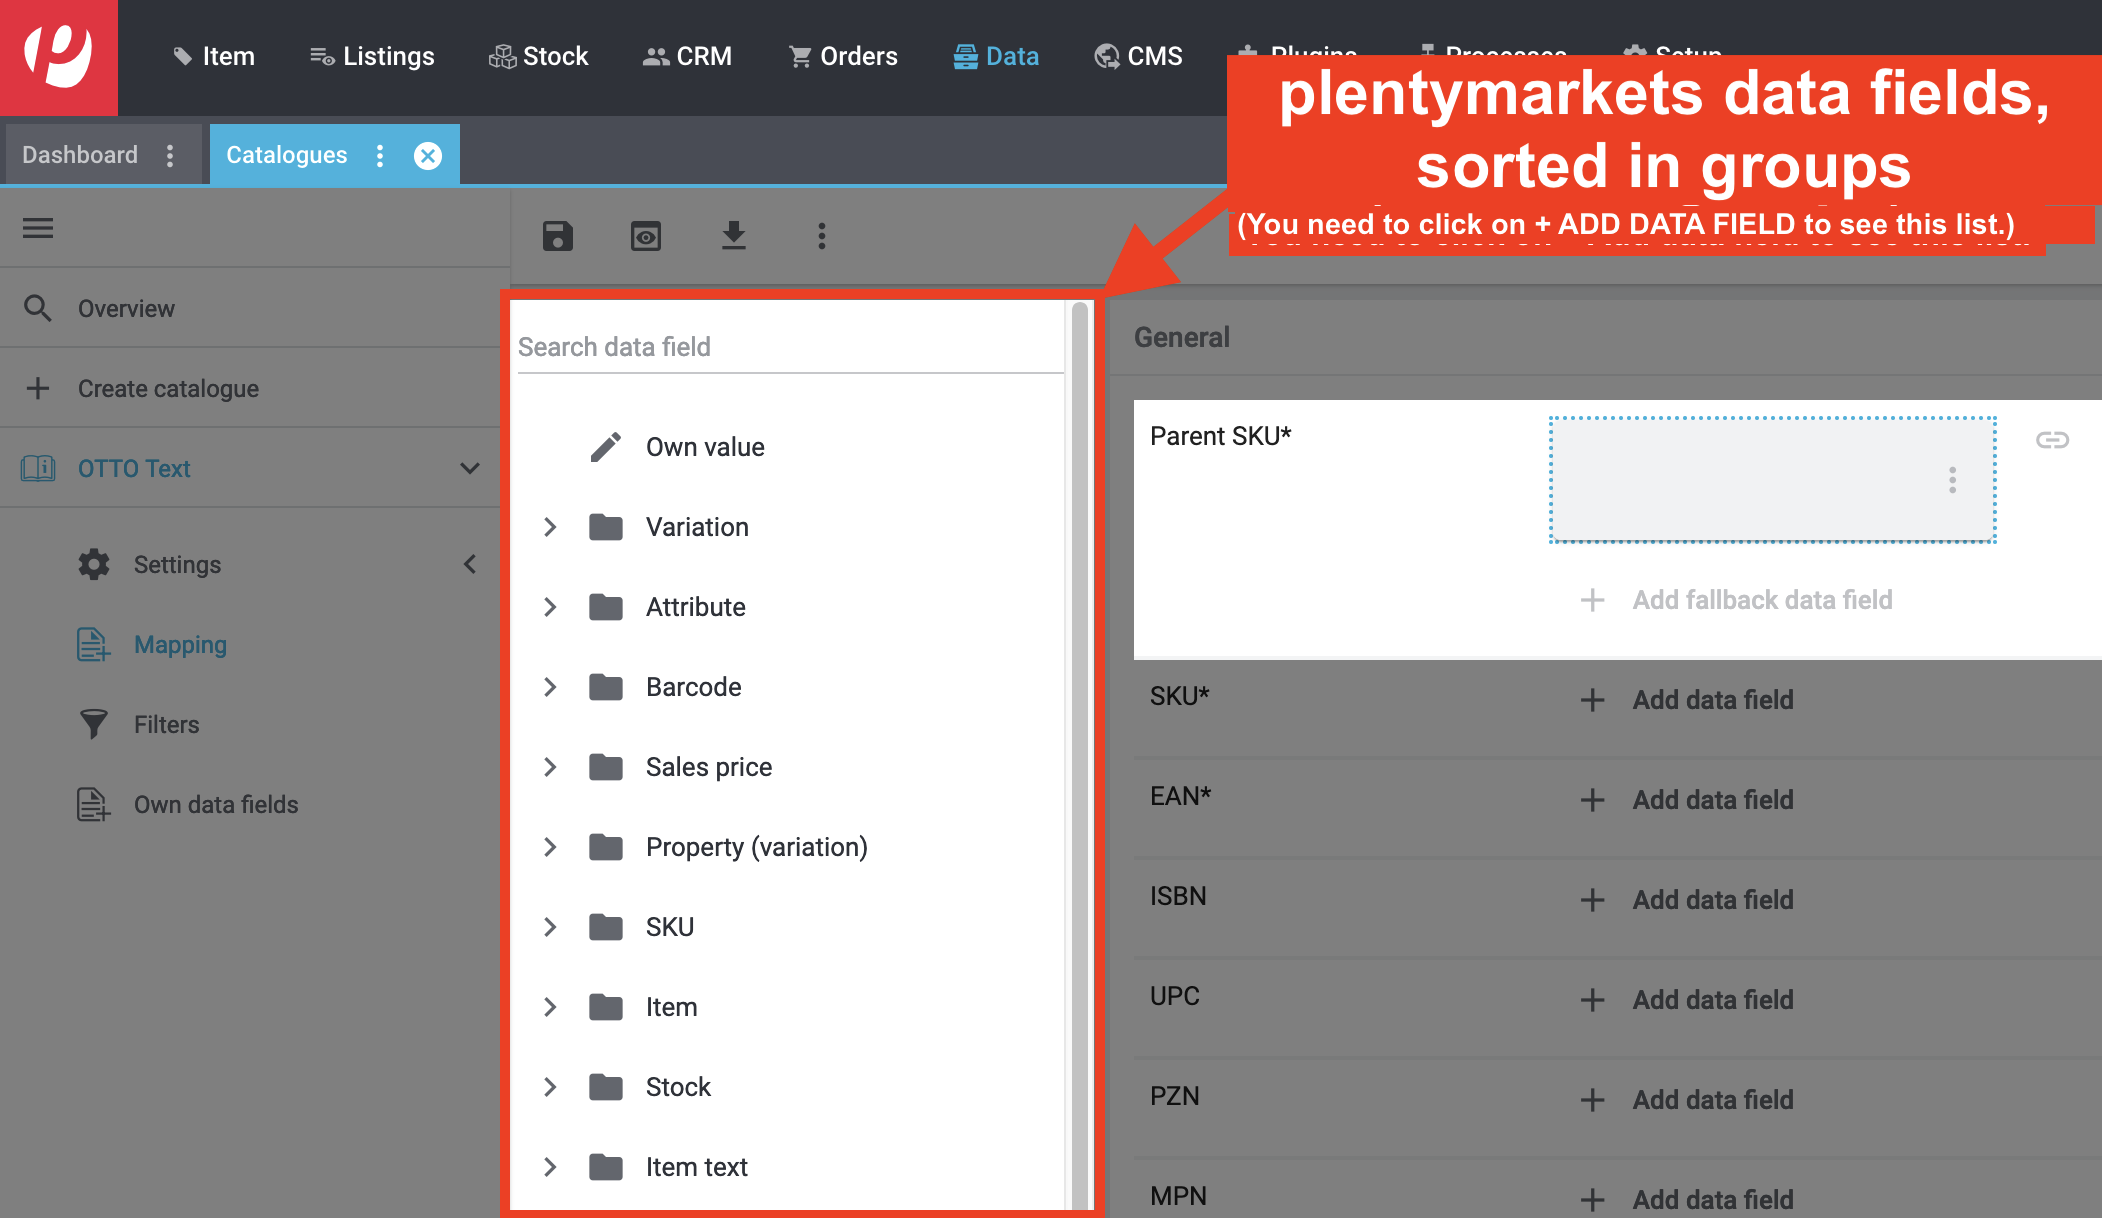
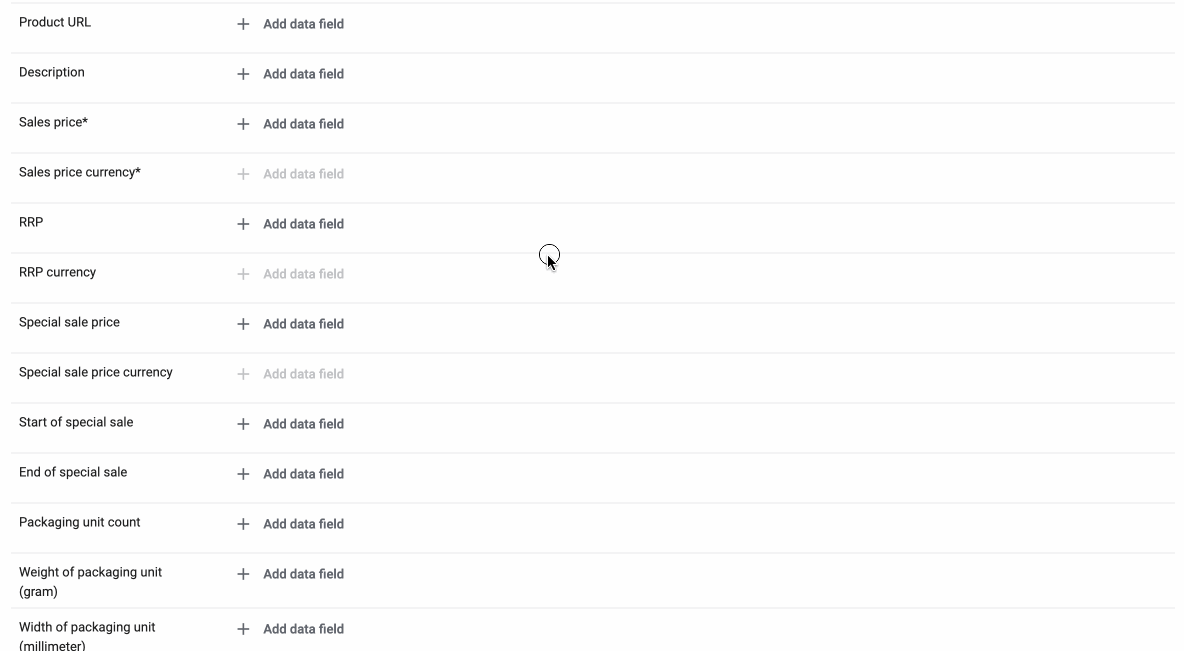
On the right side of the catalogue, you map the marketplace data fields to appropriate PlentyONE data fields. Before you map the first data field, all you can see here is a whole lot of Add data field buttons. That’s normal and as it should be.
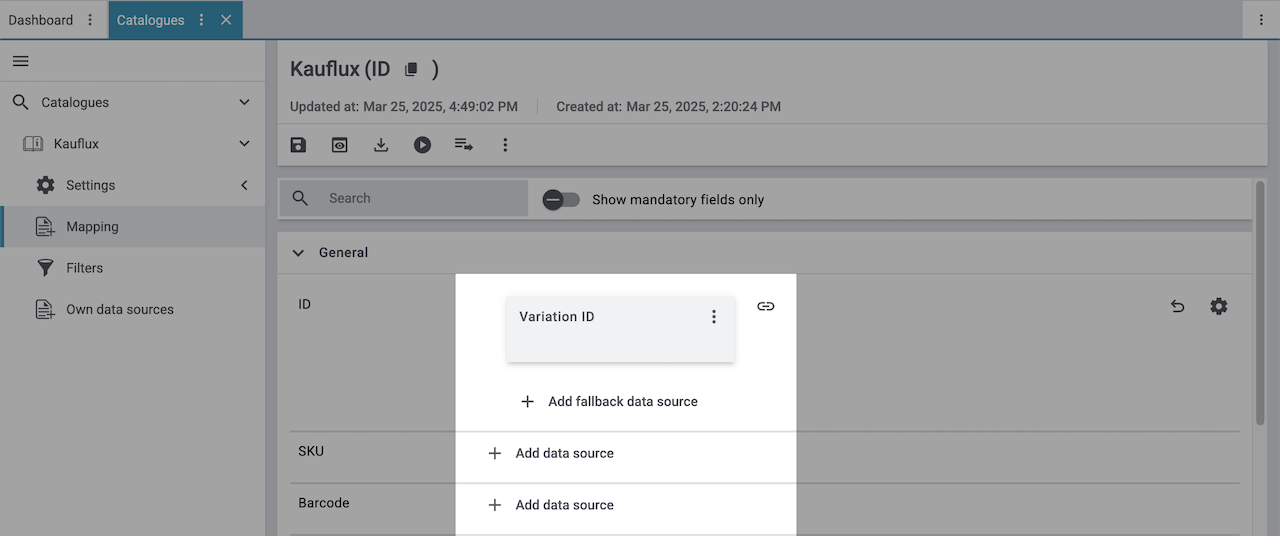
Tip: One field was already mapped in the screenshot.
2. What are catalogues with marketplace formats?
Every market structures product data differently. Often, you even need different product information for different product categories of the same market. For example, your product data for shoes will be different from that for cat food. For shoes, you specify the shoe size and the material. For cat food, you need to specify the base price, a list of ingredients and so on.
Catalogues with marketplace formats allow you to tailor your item information exactly to the needs of the market. Because here, you assign a suitable PlentyONE data field to each of the data fields of the market. When your variation data is exported to the market, the market’s data fields are then filled with the correct PlentyONE data.
-
A marketplace format contains a matrix of the data fields that a market can process. As such, marketplace formats tell you what data can be exported to the market. The asterisks also help you to see straight away which data is obligatory and which is option.
-
One market can offer several marketplace formats. For example, there might be different formats for different product categories (pet food, food, non-food, etc.) or for different languages. However, for some market you export all item data in a single catalogue. An example for this is Etsy.
What are the advantages of these catalogues?
-
Every format is based on the data structure of a specific market. As such, you know exactly which variation data is necessary to sell your products on the market.
-
You choose for each market and sometimes even for each market category which variation data is going to be published on the market. For example, you can use properties to export different variation names and descriptions to different markets.
-
You can easily copy and adjust well configured catalogues.
Let’s be honest: Are there any disadvantages?
It really depends. The catalogues give you maximum flexibility. You can map data fields any way you like. However, that also means that mappings are not checked on whether or not they make any sense. As an example, the system will not prevent you from mapping the variation ID as the price. You might only notice such a mistake when your variations are either not exported to the market or when your t-shirts suddenly cost a few thousand bucks. However, this is only a disadvantage if you don’t work carefully. The more familiar you are with the catalogues, the easier it will be for you to map the data fields. You can always copy and adjust well configured catalogues. That also makes your work easier.
3. Which data fields are available?
Great question!
The following applies:
3.1. Marketplace data field
Marketplace data fields, I barely know you
Marketplace data fields are the fields for which you can export data to the market. Because every market structures and processes item data differently, each market also has different marketplace data fields.
What you should know about marketplace data fields:
-
The marketplace data fields are shown on the left side of the catalogue.
-
In the catalogue, mandatory fields are flagged with an asterisk. You definitely need to map PlentyONE data fields for these mandatory fields. In addition, values must be saved for these data fields for each variation. Otherwise, the variation will not be exported to the market.
-
All other data fields are optional but will likely increase your sales performance. If no data is saved for one or more of these optional fields is saved for a variation, the variation is still exported to the market.
-
The best information about marketplace data fields is provided by the market itself. Read the market’s documentation to find out exactly what data is expected. When in doubt, ask your contact person at the market. If everything else fails, you might want to lean on aunt G**gle: Try searching for the name of the marketplace in combination with “data feed”, “data specification” or just enter the name of the marketplace data field and see what happens.
3.2. PlentyONE data fields
The PlentyONE data fields in the catalogue are the same settings as the ones you can select for your items and variations in the Item » Edit item » [Open item] » [Open variation]. In addition to these settings, you can also select the properties that are saved in your PlentyONE system.
What you should know about PlentyONE data fields:
-
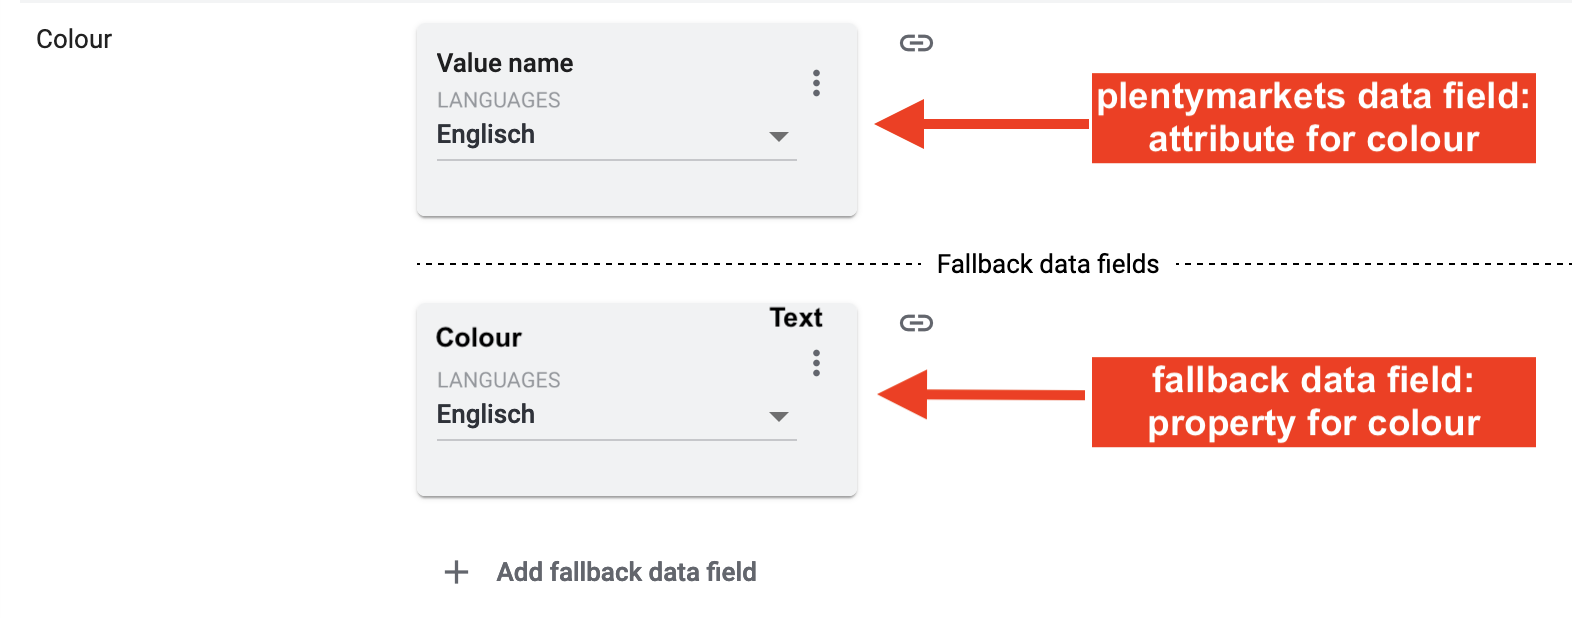
A market expects product data that cannot be saved for a variation directly? Create a property. Then, link this property with your variations. Save product data as the values for this property.
-
Check out the manual page for the standard format Item (new) to find out which data is exported with which PlentyONE data fields.
-
You can map a fallback data field in addition to a PlentyONE data field. All PlentyONE data field are again available as fallback data fields. The difference is that the content of the fallback data field is only exported if the first mapped PlentyONE data field does not return a value.
4. Which mappings are available?
In this chapter, we give you the lowdown of the available mappings.
This information is structured like this:
|
Simplify mappings with Channel maps
With Channel maps, you can create cross-category mappings for a marketplace and apply them to your catalogues afterwards. All linked catalogues will automatically inherit the mapping from the Channel map. For more information, refer to the Channel maps manual page. |
4.1. What does “mapping” mean?
Mapping means that you link a marketplace data field with a PlentyONE data field. Slightly simplified and just to get you started: You do that by clicking on Add data field next to the marketplace data field.
However, what happens when you map these fields?
-
For this one marketplace data field, I want to export the data to the market that is saved in this PlentyONE data field for the variation.
Example:
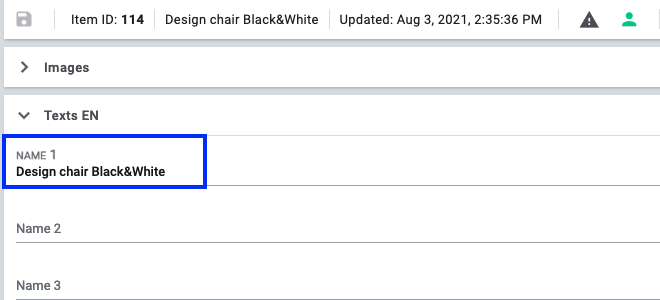
You map the PlentyONE data field Item text » Name 1 to the marketplace data field Name:

As such, the name that is saved in the menu Item » Edit item » [Open item] » [Open variation] » Tab: Settings for the setting Name 1 is exported to the market for all variations.
For the variation you can see in the screenshot below, that means that the name Design armchair Black&White is exported to the market.
4.2. Simple 1:1 mappings
Map 1 marketplace data field to the PlentyONE data field
In a 1:1 mapping, you map a PlentyONE data field to the marketplace data field. If no suitable setting exists in PlentyONE. you can map a property instead.
So this mapping specifies:
-
I want to fill this marketplace data field with the data from this PlentyONE setting.
-
If the PlentyONE data field does not return a value, no value is exported for this variation.
-
Next to the marketplace data field, click on + Add data field.
→ To the left, the list of available PlentyONE data fields are shown in groups. -
Click on the group you need.
→ The PlentyONE data fields of the group are shown. -
Click on the plus to the right of the PlentyONE data field you want to select.
→ The PlentyONE data field is added to the right. -
Click on Confirm.
Example: Sales price and RRP for Otto Market
This gif shows you how to map the marketplace data fields Sales price and RRP for Otto Market to PlentyONE data fields:
4.3. Complex 1:1 mappings
Map the value of one marketplace data field to the value of 1 PlentyONE data field
Like with the simple 1:1 mappings, you map a PlentyONE setting or property to a marketplace data field. Complex mappings are necessary whenever a marketplace data field has more than one possible value. Instead of mapping data fields, for complex mappings you map individual values of these data fields. For example, you cannot simply map the PlentyONE data field Shipping profile to the marketplace data field Shipping method. Why? The market cannot know which of your shipping profiles in PlentyONE corresponds to which of their shipping methods.
| Do not enter own values for complex mappings. All values that you enter must be saved for the variations, either in a setting or as a property value. This also applies if the value Comparative value is shown. You still need to enter exactly the value of the setting or property that you mapped. |
In complex mappings, the value of the market is always exported. Only when you map an own value, the own value that you enter is exported.
You can recognise complex mappings from the field that is shown below the name of the marketplace data field. Click on the field to show the values available for the marketplace data field.

Examples for complex 1:1 mappings are:
-
Categories
-
Brands
-
Shipping setting
Important: For complex mappings, do not map own values or properties of the type None.
-
Click on the field for the marketplace data field.
→ A list of the available values is shown. -
Select the value that you want to map a PlentyONE data field to.
→ The value is mapped. -
Next to the marketplace data field, click on + Add data field.
→ To the left, the available PlentyONE data fields are listed in groups. -
Click on a group.
→ The PlentyONE data fields of the group are shown. -
Click on the PlentyONE data field for which you want to map values.
Important: Do not map own values or properties of the type None. -
Your next steps depend on the PlentyONE data field you selected:
-
Alternative 1: The available values for the PlentyONE data value are shown on the left.
-
Next to the value you want to select, click on the plus.
→ The value is added to the field on the right. -
Click on Confirm.
-
-
Alternative 2: The PlentyONE data field is inserted and the field Comparative value is shown.
-
In the field Comparative value, enter a value that is saved in the setting or the property of the mapped PlentyONE data field.
-
Click on Confirm.
-
-
Alternative 3: The PlentyONE data field is inserted and a drop-down list is shown.
-
Select a value from the drop-down list.
-
Click on Confirm.
→ The value of the marketplace data field is exported, not the value of the PlentyONE data field.
Exception: Only when you map an own value, the own value that you enter is exported.
-
-
Example: Delivery time in days for Otto Market
This gif shows you how to map suitable PlentyONE values to the values of the marketplace data fields Delivery time in days for Otto Market:
4.4. 1:1 mappings with fallback data fields
Map 1 marketplace data field to the PlentyONE data field and specify an alternative
You specify:
-
I want to fill this marketplace data field with the data from this PlentyONE setting.
-
If the PlentyONE data field does not return a value for a variation, the fallback data field is checked and the value of that fallback data field is exported instead.
All PlentyONE data field are available as fallback data fields. However, the content of the fallback data field is only exported if the first mapped PlentyONE data field does not return a value.
Workflow for fallback data fields:
-
During the export, the mapped PlentyONE data field of each variation is checked for content.
-
If data is saved for a variation for that PlentyONE data field, then this data is exported.
-
If the PlentyONE data field does not return any data, the system jumps to the first fallback data field and checks if this returns any data.
-
Example 1: You mapped Name 3 as the first PlentyONE data field. However, in the variation date a name is only saved in the field Name 1. The field Name 3 is empty.
-
Example 2: You mapped a property as the first PlentyONE data field. However, this property is not linked to the variation.
-
-
If the fallback data field also does not contain data for the variation, the second fallback data field is checked and so on.
-
If no data is found for a marketplace data field for a variation, what happens next depends on whether or not the data field is mandatory or not. If so, the variation is not exported. If not, the variation is exported. The variation is exported but the marketplace data field is not filled on the market.
-
Next to the marketplace data field, click on + Add data field.
→ To the left, the list of available PlentyONE data fields are shown in groups. -
Click on the group you need.
→ The PlentyONE data fields of the group are shown. -
Click on the plus to the right of the PlentyONE data field you want to select.
→ The PlentyONE data field is added to the right. -
In the list of PlentyONE data fields, click on the plus icon next to the PlentyONE data field that you want to map.
→ The fallback data field is added with the fallback condition "null". -
Alternative 1: To add the fallback data field with the fallback condition "null":
-
Click on Confirm.
→ The fallback data field is exported if the data field above is not linked to the variation.
-
-
Alternative 2: To add the fallback data field with the fallback condition "empty":
-
To the left of the fallback data field, click on the cog ().
→ The window Data column settings is shown. -
For the setting Fallback condition, select the option Empty.
-
Click on Save.
→ The fallback data field is added with the fallback condition "empty". -
Click on Confirm.
→ The fallback data field is exported if the data field above is empty for the variation.
-
Example: Fallback data field for SKU for Otto Market
This GIF shows you the mapping for the OTTO Market marketplace data field SKU. The PlentyONE data field SKU is mapped to this marketplace data field. The PlentyONE data field Variation ID is mapped as the fallback data field. The fallback condition "null" is applied automatically.
Result: The fallback data field Variation ID is exported if the data field SKU is not linked to the variation.
4.5. 1:n mappings
Map SEVERAL PlentyONE data fields to the marketplace data field
In a 1:n mapping, you map several PlentyONE data fields to the marketplace data field. You can link these settings with a separator.
So this mapping specifies:
-
I want to combine these PlentyONE data fields during export so that the marketplace data field is filled with the data of these two or more PlentyONE settings.
-
Next to the marketplace data field, click on + Add data field.
→ To the left, the list of available PlentyONE data fields are shown in groups. -
Click on the group you need.
→ The PlentyONE data fields of the group are shown. -
Click on the plus to the right of the PlentyONE data field you want to select.
→ The PlentyONE data field is added to the right. -
Click on Confirm.
-
To the right of the mapped PlentyONE data field, click on Add data field ().
→ To the left, the list of available PlentyONE data fields again are shown in groups. -
Map one or several additional PlentyONE data fields to the marketplace data field as described above.
-
Click on Confirm.
-
To the very right of the row, click on Settings ().
-
Select a separator from the drop-down list Separator or add a custom separator.
-
Click on Save.
-
Save () the catalogue.
→ The mappings are saved.
→ During the export, the content of the PlentyONE data fields is combined and exported as one field.
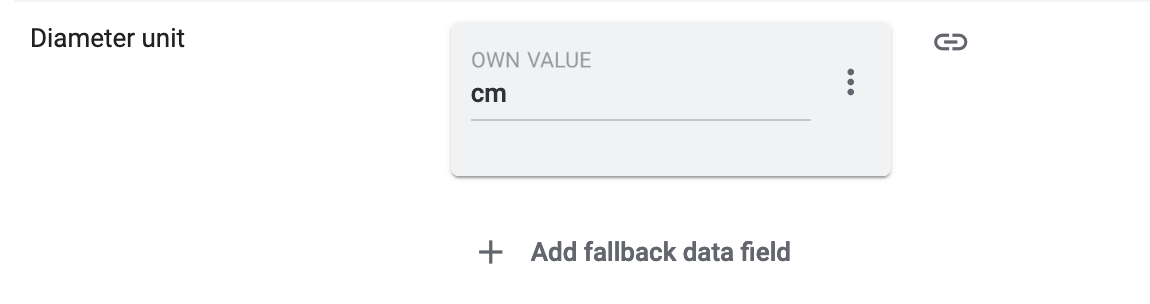
4.6. Own value mappings
Map the same value for all variations to the marketplace data field
You are sure that you want to export the same value for all variations of a catalogue for a marketplace data field? Then specify an own value. This own value is then exported for all variations.
So this mapping specifies:
-
I want to export the value that I entered in the field Own value for all variations of this catalogue.
Example:
You want to export diameter information for some of your variations. The diameter is saved in centimetres for all your variations. Instead of creating a property for the unit and linking this property to every variations, you can enter the own value cm.
-
Next to the marketplace data field, click on + Add data field.
→ To the left, the list of available PlentyONE data fields are shown in groups. -
Click on the plus next to Own value at the top of the list.
→ The field for the own value is added to the view. -
Enter a value into the input field.
→ This value is exported for all variations.
Example: Diameter information
You want to export diameter information for some of your variations. The diameter is saved in centimetres for all your variations. Instead of creating a property for the unit and linking this property to the variations, you can enter the own value cm.
This is an example of how you can map an own value for the diameter unit:
4.7. Recalculating numerical values (Formula)
You save a mathematical formula. This formula is applied to numerical values during the export.
Mathematical calculations allow you to change numerical values automatically during the export.
-
This function is new and has not been implemented for all marketplace formats yet.
-
This function only works for data fields that contain numerical values.
So this mapping specifies:
-
I want the numerical value of a PlentyONE data field to be recalculated during the export. Basic arithmetic operations are available for the formulas.
Mathematical calculations allow you to change numerical values automatically during the export.
-
This function only works for data fields that contain numerical values.
-
This functionality is new and not available for all catalogue formats.
So this mapping specifies:
-
I want the numerical value of a PlentyONE data field to be recalculated during the export. Basic arithmetic operations are available for the formulas.
Recalculating numerical values:
-
Next to the marketplace data field, click on + Add data field.
→ To the left, the list of available PlentyONE data fields are shown in groups. -
At the very top of the list, click on the plus icon next to Formula (calculate).
→ The data field Formula is added to the field on the right. -
Click into the data field.
→ The window Modify value is shown. -
Enter a numerical value or select a PlentyONE data field at the bottom right of the window to add it to the calculation (add).
Tip: Use the search function. This helps you to find data fields quickly. -
Optional: If the symbol more_vert is shown in the data field, select the correct assignment for the data field.
Tip: A number tells you how many assignments are necessary for the data field.-
Click on the icon more_vert.
-
In the window shown, select the assignments from the drop-down list.
-
Save the settings.
-
-
Enter numbers and mathematical operators with the on-screen calculator or the keyboard.
-
Save the settings.
→ The entered formula is displayed in the overview.
→ The calculation will be carried out in the next export.
5. Optional: File export (no market export)
Catalogues with marketplace formats are automatically exported to markets if all your settings are correct. That means you can ignore the catalogue settings for Format settings, Export settings and Download settings.
However, you can also export a file that contains the data that is also exported to the market.
5.1. One-time catalogue export to a file
Use these instructions to create a one-time export of the catalogue data. The catalogue data is not exported to the market.
There are two ways to manually export the catalogue data:
Asynchronous download |
The export runs in the background. Once the download is completed, you download the export file from the Notifications (notifications). |
Live download |
The file is downloaded to your computer automatically. You can follow the export progress in real time.
|
For asynchronous downloads, the export runs in the background. So note that there will be no window for downloading the file straight away. Even exporting small amounts of data will take around 30 minutes. When the export is completed, you can download the export file from the Notifications (notifications).
Starting an asynchronous download:
-
Go to Data » Catalogues.
→ The catalogue overview opens. -
Open the catalogue.
-
In the toolbar at the top, click on Download data (file_download).
Or: Even quicker: Start the download from the Additional actions (more_vert) in the catalogue overview.
→ The export starts.
Important: The export runs in the background. Note that there will be no window for downloading the file straight away. Even exporting small amounts of data will take around 30 minutes.
Once the export is finished, you will be notified (notifications_none) that the export file can be downloaded. -
In the notification centre, click on link Download.
Tip: The notification is no longer shown? Use the URL shown in the Download settings to access the file at any time. -
Save the file on your computer.
The live download creates the file and automatically downloads it to your computer. In the tab Data export, you can follow the download progress in real time. However:
-
When you start the live download, a new browser tab opens. In this browser tab, the PlentyONE tab Data export is shown. Do not close or reload the browser tab and the PlentyONE tab Data export while the export is in progress. If you do, the export stops and is cancelled.
-
You can start live downloads for several catalogues at the same time. However, you can only start a new live download for the same catalogue once the current export is complete.
-
The import can run into a timeout if you try to import large amounts of data. If that happens, the download is cancelled. For lots of data or if a timeout occurs, use the asynchronous download instead.
Starting a live download:
-
Go to Data » Catalogues.
→ The catalogue overview opens. -
Open the catalogue.
-
In the toolbar at the top, click on Live download (play_circle_outline).
Or: Even quicker: Start the download from the Additional actions (more_vert) in the catalogue overview.
→ A new browser tab opens. PlentyONE and the tab Data export are shown.
No new tab? Then you are probably using a pop-up blocker. Allow pop-ups for your system to continue.
→ The export starts.
Important: Do not close or reload the browser tab or the PlentyONE tab Data export while the export is in progress. If you do, the export stops and is cancelled.
→ The progress is shown in real time.
→ The file is automatically saved on your computer when the export is done.
|
Stopping a live download
Do you want to stop a live download? No problem:
|
5.2. Regular catalogue export to a file
Use these instructions to save the variation data of the catalogue regularly to a specified storage location. It is also up to you to decide what “regularly” means. The catalogue data is not exported to the market.
Setting up regular file exports:
-
Go to Data » Catalogues.
→ The catalogue overview opens. -
Click on the catalogue.
→ The catalogue opens. -
Click on the Settings tab () on the left.
→ The different settings options are shown. -
Carry out the settings. Note Table 1.
-
Save () the settings.
→ The catalogue data is exported to a file in the specified intervals.
→ The file is saved at the specified storage location.
| Setting | Explanation | ||||||||||||||||||||||||||||||||||||||||||||
|---|---|---|---|---|---|---|---|---|---|---|---|---|---|---|---|---|---|---|---|---|---|---|---|---|---|---|---|---|---|---|---|---|---|---|---|---|---|---|---|---|---|---|---|---|---|
Format settings |
|||||||||||||||||||||||||||||||||||||||||||||
File name |
Enter a file name. The exported file is saved with this name. Tip: Use placeholders: Placeholders automatically add additional information to the file name during export. List of available placeholders
The following placeholders are available:
Examples for using placeholders:
|
||||||||||||||||||||||||||||||||||||||||||||
Format |
Select the file format for the export. Possible values:
|
||||||||||||||||||||||||||||||||||||||||||||
Field separator |
Which field delimiter should separate the individual records from each other? Possible values:
|
||||||||||||||||||||||||||||||||||||||||||||
Text delimiter |
Which text delimiter should separate the individual records from each other? Possible values:
|
||||||||||||||||||||||||||||||||||||||||||||
Encode special characters () |
If you activate this option, unicode characters (e.g. umlauts: ä, ö, ü) will be exported in encrypted form. |
||||||||||||||||||||||||||||||||||||||||||||
Decimal separator |
Select the character that is used for decimal values. Possible values:
|
||||||||||||||||||||||||||||||||||||||||||||
Line break |
How do you want to handle line brakes in the export file? Possible values:
|
||||||||||||||||||||||||||||||||||||||||||||
Header is included |
Activate the option if you want the export file to contain a header line. The export keys are used as headings for the columns. |
||||||||||||||||||||||||||||||||||||||||||||
Export settings |
|||||||||||||||||||||||||||||||||||||||||||||
Limit |
Do you want to limit the number of records that is exported? |
||||||||||||||||||||||||||||||||||||||||||||
Provisioning |
Where do you want to save the export?
|
||||||||||||||||||||||||||||||||||||||||||||
Server |
Enter the server where you want to save the export. |
||||||||||||||||||||||||||||||||||||||||||||
Port |
Enter a port or use the default setting. Recommended port settings:
|
||||||||||||||||||||||||||||||||||||||||||||
User name |
Enter the user name for the server. |
||||||||||||||||||||||||||||||||||||||||||||
Password |
Enter the password for the server. |
||||||||||||||||||||||||||||||||||||||||||||
Path |
Where should the export be saved? Enter the path to a storage location. |
||||||||||||||||||||||||||||||||||||||||||||
Test connection |
Tests the server settings that you entered:
Tip: A test file is saved at the storage location. This test file is called Note: This only tests if a file export is possible with the current export settings. The option does not check if a connection can be established to a market. |
||||||||||||||||||||||||||||||||||||||||||||
Transfer |
When do you want to start the export?
|
||||||||||||||||||||||||||||||||||||||||||||
Schedule: times |
Click into the field. In the drop-down list shown, select one or more points in time. The export starts at these times. |
||||||||||||||||||||||||||||||||||||||||||||
Weekdays |
By default, all weekdays are selected. To deactivate exports for specific days of the week:
Tip: The setting Weekdays is only shown if you select an interval or schedule for the setting Transfer. |
||||||||||||||||||||||||||||||||||||||||||||
6. FAQ: Questions and answers
Users with back end access rights can only see catalogues if an admin gave them access.
-
Find someone who has administrator rights for the PlentyONE system.
-
This person will open the menu Setup » Settings » User » Rights » User.
-
Then they will open your user account and activate the necessary rights:
-
Data > Data exchange > Export > Catalogue > Show
-
-
Save () the settings.
-
If the problem persists, ask our support team for help in the forum.