CHECK24
CHECK24.de is an online comparison portal that helps consumers find the right price/performance package for them. The range at CHECK24 includes, among others, the following product categories: furniture, lighting, home textiles, decoration, household supplies, and selected outdoor toys.
On this page, you will find information on setting up the CHECK24 marketplace in PlentyONE. You will learn how to set up the interface, export items to Check24 and how to define sales prices.
1. Registering with Check24
You need to register with Check24 before setting up Check24 in PlentyONE.CHECK24.de/register[CHECK24^] register.
2. Setting up the market in PlentyONE
Carry out the following settings in order to set up the market in PlentyONE.
Setting up the market:
-
Go to Setup » Markets » Check24.
-
Place a check mark next to the Activate automatic data exchange option.
-
Select an FTP server.
-
Log in to the FTP server:
-
Enter your partner login as the username.
-
Enter your FTP password.
-
-
Save () the settings.
3. Frequency of data exchange
After you have set up Check24 in PlentyONE, data is exchanged with the market in the intervals described in Table 1.
| Data | Interval |
|---|---|
Order import |
every 15 minutes |
Item export |
Check24 retrieves item data via an URL. Note: The interval for the data exchange is defined in the catalogue settings. |
3.1. Activating the order referrer
Go to Setup » Orders » Order referrer to activate the order referrer. This ensures that orders are assigned to the correct sales channel.
An order referrer tags an order with the sales channel on which the order was generated. Sales channels can be e.g. your online shop or markets on which you sell your items. Each sales channel has an individual order referrer. Some order referrers are available by default in your PlentyONE system. Further order referrers are added e.g. if you install a new plugin. For further information about the order referrer, see the page Order referrer of the PlentyONE manual.
Activating the order referrer for CHECK24:
-
Go to Setup » Orders » Order referrer.
-
Click Search (search).
-
In the list, navigate to the option Check24 with ID 150.
-
On the right of the referrer’s line, click Edit (edit).
→ The window Edit referrer opens. -
Activate the option Visible in selection (toggle_on).
-
Click SAVE (save).
→ The referrer is active.
3.2. Setting the variation availability
Use the catalogue filters to specify which variations are exported to CHECK24.
3.3. Optional: Saving SKU
SKU are generated automatically when your variations are exported. However, you can also save market specific SKU for variations that you want to sell on this market instead.
-
Go to Item » Items » [Open variation].
→ The General tab opens. -
Switch to the Sales channels tab.
-
Expand the section SKU (chevron_right).
-
Click Add SKU (add).
→ The Add SKU window opens. -
Select the referrer Check24 from the drop-down list.
-
Select the corresponding Account.
-
Click Apply.
-
Enter the SKU.
-
Enter the Parent SKU, if necessary.
-
Click Save (save).
| Only the most important settings for the import are described here. Is this your first time working with the import tool? Then get familiar with how data imports work in PlentyONE first. |
| Column in CSV file | Explanation | PlentyONE data field for mapping |
|---|---|---|
Variation ID |
Enter the variation ID in this column. |
Variation ID |
Marketplace ID |
Enter the referrer ID 150 in this column. |
SKU > Marketplace ID |
Account ID |
This market does not require a marketplace account. As such, enter the number 0 in this column. |
SKU > Account-ID |
SKU |
Enter the SKU that you want to save for the variation for this market in this column. |
SKU > SKU |
3.4. Defining a sales price
To sell variations on CHECK24, you need a sales price in which the order referrer CHECK24 is activated. The price that you save for this sales price is the price that will be shown on CHECK24.
Sales prices define the conditions under which a variation is sold at a specific price and on a specific sales channel. For example, you can sell your items at a lower price in your webshop than on Amazon. Or you can sell products cheaper to B2B customers than to B2C customers.
Two default sales prices are already configured in your PlentyONE system. However, you can also create new sales prices and edit them individually. In addition to default sales prices, you can also create RRPs, special offers, and set prices.
Defining a sales price for CHECK24:
-
Go to Setup » Item » Sales prices » [Open sales price].
Tip: No sales prices? Then create a sales price first. -
Activate the referrer CHECK24.
-
Save () the settings.
3.5. Permitting the payment method in a customer class
The payment method CHECK24 is automatically available in your PlentyONE system as soon as an active CHECK24 account exists. No separate configurations are needed for this. You just need to permit the payment method in one or more customer classes.
Customer classes allow you to divide your customer base according to specific criteria. Examples of use for customer classes are:
-
Create two separate customer classes for end customers (B2C) and business customers (B2B) respectively. Depending on the customer class, customers either see net prices or gross prices in your plentyShop.
-
Give discounts to specific customer classes.
For more information about customer classes, head over to the to the Managing contacts page.
Permitting the payment method in a customer class:
-
Go to Setup » CRM » Customer classes.
-
Open the customer class for which you want to permit the payment method.
-
For the setting Allowed payment methods, activate the option CHECK24.
-
Save () the settings.
4. Exporting item data
Depending on whether you still use the deprecated elastic export or if you already export your item data to CHECK24 using catalogues, you have to carry out different settings in PlentyONE:
4.1. Alternative 1: Catalogue export (recommended method)
We recommend to export item data to CHECK24 using catalogue formats. Go to Data » Catalogues to create catalogues.
Catalogues are used to export data from your PlentyONE system. There are two different catalogue formats:
-
Marketplace formats are used to export item data to markets.
-
Standard formats are used to export data from your PlentyONE system into a file.
Catalogues with marketplace formats allow you to tailor your item information exactly to the needs of the market. Because here, you assign a suitable PlentyONE data field to each of the data fields of the market. When your variation data is exported to the market, the market’s data fields are then filled with the correct PlentyONE data.
-
Is this your first time working with catalogues? Then read up on the basic concept of catalogues first.
4.1.1. Creating a catalogue
Item data is exported to CHECK24 via catalogue formats. To export your items to CHECK24, create a catalogue in the Data » Catalogues menu. Link the Check24 data fields with item data saved in PlentyONE in the marketplace format afterwards.
Note: CHECK24 retrieves item data via an URL. You will find this URL in your Check24 catalogue in the Data » Catalogues menu. After you created the catalogue, you have to copy the URL and save it at CHECK24 so that item data can be exported to Check24.
Creating a catalogue:
-
Go to Data » Catalogues.
-
Click Create catalogue (add).
-
Enter a name for the catalogue.
-
In the drop-down list Marketplace, select the option CHECK24.
-
In the drop-down list Export type, select the option Item (new).
-
In the drop-down list Category, select a category of the sales channel.
Tip: You can create a catalogue for CHECK24 (general product data), a catalogue for CHECK24 Offer (offer data), and a catalogue for CHECK24 Furniture (product data for the category Furniture). For further information on the different formats, see catalogue formats for CHECK24. -
Save () the settings.
→ The catalogue is created.
→ The catalogue is opened for editing.
Other catalogue settings
Other catalogue settings are optional. Once you carried out the settings described on this page, your catalogue is automatically exported to CHECK24. That means you can ignore the catalogue settings for Format settings, Export settings and Download settings.
The Format settings, Export settings, and Download settings allow you to create a file with the variation data contained in the catalogue. However, this file does not contain information about whether the data export to CHECK24 was successful.
|
Do not change the format in the catalogue’s Format settings. To ensure that the export to the sales channel works, all required settings are already configured when you create a catalogue. If you change the settings, errors might occur during the export. |
4.1.2. Catalogue formats for CHECK24
CHECK24 differentiates between offer data and product data. Three export formats are available for the item data export via catalogues:
-
CHECK24: This catalogue format contains product data.
-
CHECK24 Offer: This catalogue format contains offer data.
-
CHECK24 Furniture: This catalogue format contains item data for the CHECK24 product category Furniture.
-
Use a combination of the catalogue formats CHECK24 and CHECK24 Offer if you want to offer products on CHECK24 that have not been listed on CHECK24 before. The format CHECK24 contains general product data, such as title and description. The format CHECK24 Offer contains seller-specific offer data, such as prices and stock, which is required to create the offer.
-
Use the catalogue format CHECK24 Offer if you only want to offer products on CHECK24 that are already listed there. The format CHECK24 Offer only contains data which is required to create the offer, such as prices and stock.
-
Use the catalogue format CHECK24 Furniture if you only want to offer furniture on CHECK24.
|
Save the URL at Check24
Check24 retrieves item data via an URL. You will find this URL in your CHECK24 catalogue in the Data » Catalogues menu. You need to save the URL in the CHECK24 backend so that item data can be exported to CHECK24. If you export both the catalogue formats CHECK24 Offer and CHECK24 to CHECK24, then you have to generate two URLs. To ensure CHECK24 can retrieve all product information, provide both URLs to CHECK24:
|
4.1.3. Mapping data fields in the catalogue
Now, map the Check24 data fields to the item data saved in PlentyONE.
-
The market expects product data that cannot be saved in the PlentyONE item menu? Then create a property for this data. Link this property with your variations. The actual values are saved as property values for this property. Is this your first time working with properties? Then read up on the principles of properties first.
| Availability | Explanation |
|---|---|
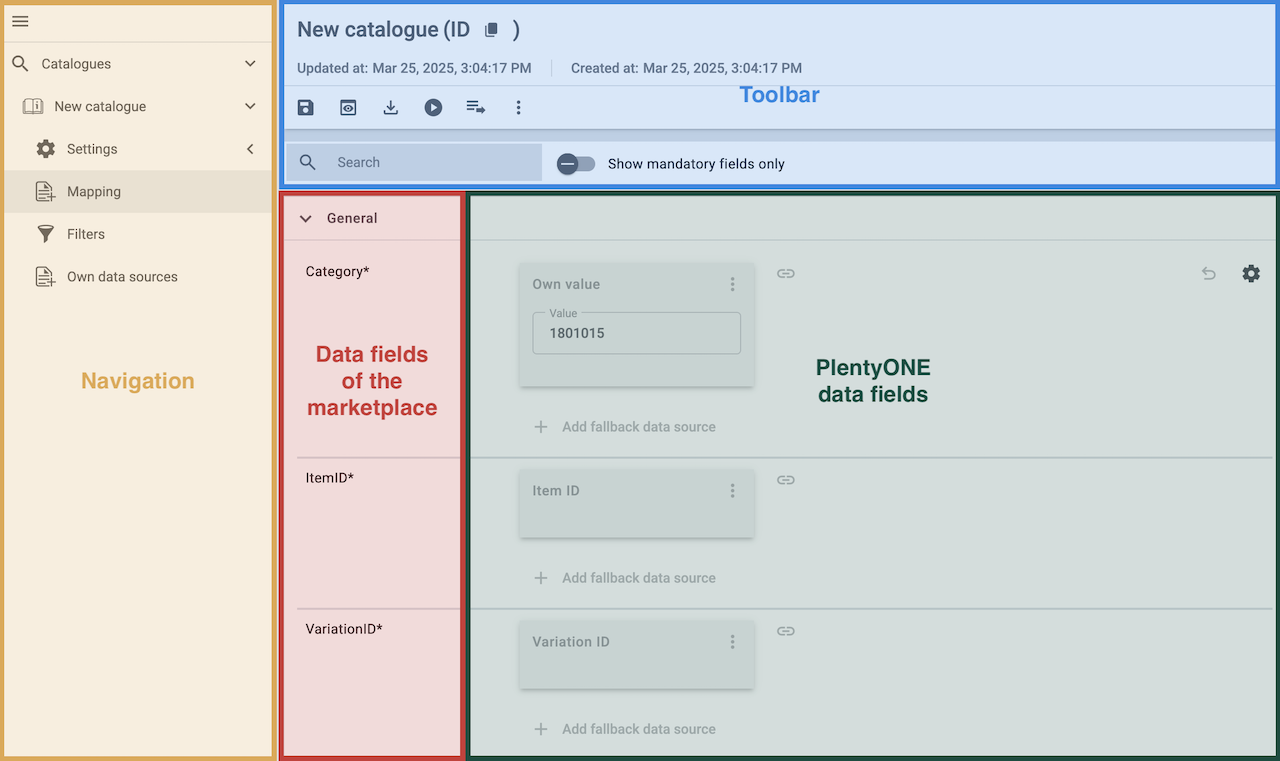
Navigation |
When you open a catalogue, the view Mapping is shown. On the very left is the navigation.
|
Toolbar |
The toolbar provides actions for the catalogue. For example, save your mappings, restore an older version of the catalogue or hide or show optional marketplace data fields. |
Marketplace data field |
To the right of the navigation, all data fields available for the market are listed. Mandatory fields are marked with an asterisk (✱). |
PlentyONE data fields |
On the right side of the catalogue, you map the marketplace data fields to appropriate PlentyONE data fields. In the screenshot above, a few of the fields are already mapped. |
Mapping catalogue fields:
-
Go to Data » Catalogues.
-
Click on the catalogue.
→ The Mapping tab opens.
→ In the left-hand column, the market’s data fields are listed.
Tip: Mandatory fields are flagged with an asterisk (*).
→ In the right column, you map the PlentyONE data fields. Any PlentyONE data fields that you already mapped are also shown in this column. -
Map suitable PlentyONE data fields to the market data fields.
For each marketplace data field, you have a number of mapping options. Expand the info boxes below to get more information about each of these mapping options.-
Simple 1:1 mapping
-
Simple 1:1 mapping with properties
-
Complex 1:1 mapping
-
1:1 mapping with fallback data fields
-
1:n mapping
-
Own value mapping
-
Mapping with mathematical calculations
-
-
Save () the catalogue.
→ The mappings are saved.
In a simple 1:1 mapping, you map a PlentyONE data field to the marketplace data field. If no suitable setting exists in PlentyONE. you can map a property instead.
As such, simple 1:1 mappings allow you to:
-
I want to fill this marketplace data field with the data from this PlentyONE setting.
-
If the data field is empty for a variation, no value is exported for this variation.
Creating a simple 1:1 mapping:
-
Next to the marketplace data field, click on + Add data field.
→ To the left, the list of available PlentyONE data fields are shown in groups. -
Click on the group you need.
→ The PlentyONE data fields of the group are shown. -
Click on the plus to the right of the PlentyONE data field you want to select.
→ The PlentyONE data field is added to the right. -
Click on Confirm.
Example: Sales price and RRP for Otto Market
This gif shows you how to map the marketplace data fields Sales price and RRP for Otto Market to PlentyONE data fields:
Reminder: In a simple 1:1 mapping, you map a PlentyONE data field to the marketplace data field. However, what can you do if PlentyONE does not offer a suitable data field? Then it’s the properties' moment to shine. Properties allow you to save any kind of information in your properties.
-
Is this your first time working with properties? Then read up on the principles of properties first.
Creating a property:
-
Create a property with the necessary values.
Tip: Find out how to do that here.
Creating a simple 1:1 mapping with properties:
-
Next to the marketplace data field, click on + Add data field.
→ To the left, the list of available PlentyONE data fields are shown in groups. -
Expand the group Property.
→ The property groups are shown. -
Expand the group you need.
-
Click on the Plus sign on the right of the property you want.
-
From the drop-down list Language, select the language in which you send the data to the market.
-
Click on Confirm.
→ The property is mapped to the marketplace data field.
Like with the simple 1:1 mappings, you map a PlentyONE setting or property to a marketplace data field. Complex mappings are necessary whenever a marketplace data field has more than one possible value. Instead of mapping data fields, for complex mappings you map individual values of these data fields. For example, you cannot simply map the PlentyONE data field Shipping profile to the marketplace data field Shipping method. Why? The market cannot know which of your shipping profiles in PlentyONE corresponds to which of their shipping methods.
| Do not enter own values for complex mappings. All values that you enter must be saved for the variations, either in a setting or as a property value. This also applies if the value Comparative value is shown. You still need to enter exactly the value of the setting or property that you mapped. |
In complex mappings, the value of the market is always exported. Only when you map an own value, the own value that you enter is exported.
You can recognise complex mappings from the field that is shown below the name of the marketplace data field. Click on the field to show the values available for the marketplace data field.

Examples for complex 1:1 mappings are:
-
Categories
-
Brands
-
Shipping setting
Important: For complex mappings, do not map own values or properties of the type None.
Creating a complex 1:1:n mapping:
-
Click on the field for the marketplace data field.
→ A list of the available values is shown. -
Select the value that you want to map a PlentyONE data field to.
→ The value is mapped. -
Next to the marketplace data field, click on + Add data field.
→ To the left, the available PlentyONE data fields are listed in groups. -
Click on a group.
→ The PlentyONE data fields of the group are shown. -
Click on the PlentyONE data field for which you want to map values.
Important: Do not map own values or properties of the type None. -
Your next steps depend on the PlentyONE data field you selected:
-
Alternative 1: The available values for the PlentyONE data value are shown on the left.
-
Next to the value you want to select, click on the plus.
→ The value is added to the field on the right. -
Click on Confirm.
-
-
Alternative 2: The PlentyONE data field is inserted and the field Comparative value is shown.
-
In the field Comparative value, enter a value that is saved in the setting or the property of the mapped PlentyONE data field.
-
Click on Confirm.
-
-
Alternative 3: The PlentyONE data field is inserted and a drop-down list is shown.
-
Select a value from the drop-down list.
-
Click on Confirm.
→ The value of the marketplace data field is exported, not the value of the PlentyONE data field.
Exception: Only when you map an own value, the own value that you enter is exported.
-
-
Example: Delivery time in days for Otto Market
This gif shows you how to map suitable PlentyONE values to the values of the marketplace data fields Delivery time in days for Otto Market:
In a 1:1 mapping with one or more fallback data fields, you map a PlentyONE data field to the marketplace data field. In addition, you specify one or more fallback data fields. This ensures that the system keeps looking if the first PlentyONE data field is missing or empty.
So this mapping specifies:
-
I want to fill the marketplace data field with the data from the selected PlentyONE setting.
-
If that data field is missing or empty for a variation, the first fallback data field is checked. The value of that fallback data field is exported instead.
-
If the first fallback data field is also missing or empty for the variation, the second fallback data field is checked. If a value is found, the value of the second fallback data field is exported for the variation etc.
Two separate fallback conditions are available:
Null (default) |
The fallback data field is used if the data field above is mapped in the catalogue but not linked to the variation. The condition "Null" is useful when you want to map fallback data fields for the following types of PlentyONE data fields:
Important: When you add a fallback data field, the fallback condition "null" is selected automatically. To apply the fallback condition "leer", you need to change the default setting. |
Empty |
The fallback data field is used if the data field above is mapped in the catalogue and linked to the variation, but is empty. The condition "Empty" is useful when you want to map fallback data fields for the following type of PlentyONE data fields:
Important: When you add a fallback data field, the fallback condition "null" is selected automatically. To apply the fallback condition "leer", you need to change the default setting. |
Note: Even if you assign one or more fallback data fields, the value of only one of those fields is exported. For each variation, the mapped PlentyONE data fields are checked in the order in which you mapped them. This means that if the first data field does not provide a value for a variation, the first fallback data field is exported etc.
Creating a 1:1 mapping with fallback data fields:
-
Next to the marketplace data field, click on + Add data field.
→ To the left, the list of available PlentyONE data fields are shown in groups. -
Click on the group you need.
→ The PlentyONE data fields of the group are shown. -
Click on the plus to the right of the PlentyONE data field you want to select.
→ The PlentyONE data field is added to the right. -
In the list of PlentyONE data fields, click on the plus icon next to the PlentyONE data field that you want to map.
→ The fallback data field is added with the fallback condition "null". -
Alternative 1: To add the fallback data field with the fallback condition "null":
-
Click on Confirm.
→ The fallback data field is exported if the data field above is not linked to the variation.
-
-
Alternative 2: To add the fallback data field with the fallback condition "empty":
-
To the left of the fallback data field, click on the cog ().
→ The window Data column settings is shown. -
For the setting Fallback condition, select the option Empty.
-
Click on Save.
→ The fallback data field is added with the fallback condition "empty". -
Click on Confirm.
→ The fallback data field is exported if the data field above is empty for the variation.
-
Example: Fallback data field for SKU for Otto Market
This GIF shows you the mapping for the OTTO Market marketplace data field SKU. The PlentyONE data field SKU is mapped to this marketplace data field. The PlentyONE data field Variation ID is mapped as the fallback data field. The fallback condition "null" is applied automatically.
Result: The fallback data field Variation ID is exported if the data field SKU is not linked to the variation.
In a 1:n mapping, you map several PlentyONE data fields to the marketplace data field. You can link these data fields with a separator.
So this mapping specifies:
-
I want to combine these PlentyONE data fields during export so that the marketplace data field is filled with the data of these two or more PlentyONE settings.
Creating a 1:n mapping:
-
Next to the marketplace data field, click on + Add data field.
→ To the left, the list of available PlentyONE data fields are shown in groups. -
Click on the group you need.
→ The PlentyONE data fields of the group are shown. -
Click on the plus to the right of the PlentyONE data field you want to select.
→ The PlentyONE data field is added to the right. -
Click on Confirm.
-
To the right of the mapped PlentyONE data field, click on Add data field ().
→ To the left, the list of available PlentyONE data fields again are shown in groups. -
Map one or several additional PlentyONE data fields to the marketplace data field as described above.
-
Click on Confirm.
-
To the very right of the row, click on Settings ().
-
Select a separator from the drop-down list Separator or add a custom separator.
-
Click on Save.
-
Save () the catalogue.
→ The mappings are saved.
→ During the export, the content of the PlentyONE data fields is combined and exported as one field.
You are sure that you want to export the same value for all variations of a catalogue for a marketplace data field? Then specify an own value. This own value is then exported for all variations.
So this mapping specifies:
-
For this marketplace data field, I want to export the value that I entered in the field Own value for all variations of this catalogue. The value you enter is always exported. The value overwrites the market value also in complex mappings where usually the value of the market is exported. As such, make sure you enter an own value that the market accepts for this marketplace data field.
Creating an own value mapping:
-
Next to the marketplace data field, click on + Add data field.
→ To the left, the list of available PlentyONE data fields are shown in groups. -
Click on the plus next to Own value at the top of the list.
→ The field for the own value is added to the view. -
Enter a value into the input field.
→ This value is exported for all variations.
Example: Diameter information
You want to export diameter information for some of your variations. The diameter is saved in centimetres for all your variations. Instead of creating a property for the unit and linking this property to the variations, you can enter the own value cm.
This is an example of how you can map an own value for the diameter unit:
Mathematical calculations allow you to change numerical values automatically during the export.
-
This function only works for data fields that contain numerical values.
-
This functionality is new and not available for all catalogue formats.
So this mapping specifies:
-
I want the numerical value of a PlentyONE data field to be recalculated during the export. Basic arithmetic operations are available for the formulas.
Recalculating numerical values:
-
Next to the marketplace data field, click on + Add data field.
→ To the left, the list of available PlentyONE data fields are shown in groups. -
At the very top of the list, click on the plus icon next to Formula (calculate).
→ The data field Formula is added to the field on the right. -
Click into the data field.
→ The window Modify value is shown. -
Enter a numerical value or select a PlentyONE data field at the bottom right of the window to add it to the calculation (add).
Tip: Use the search function. This helps you to find data fields quickly. -
Optional: If the symbol more_vert is shown in the data field, select the correct assignment for the data field.
Tip: A number tells you how many assignments are necessary for the data field.-
Click on the icon more_vert.
-
In the window shown, select the assignments from the drop-down list.
-
Save the settings.
-
-
Enter numbers and mathematical operators with the on-screen calculator or the keyboard.
-
Save the settings.
→ The entered formula is displayed in the overview.
→ The calculation will be carried out in the next export.
4.1.4. Recommendations for data field mappings
To help you with mapping your data fields for the catalogue, we have created a list of recommended data field mappings. Note that these mappings are recommendations only. Depending on how you manage your item data, other mappings may be more appropriate than the recommendation given here.
-
Need more information about the PlentyONE data fields? All data fields are described on the manual page for the standard format Item (new).
| Marketplace field | Mandatory? | Recommended PlentyONE mapping |
|---|---|---|
Item number/SKU |
yes |
Item number of the product in the shop.
|
Manufacturer number |
no |
|
Deeplink |
yes |
Direct link to the product. The link is not displayed to the customer, but helps the CHECK24 content team with the product creation.
Note: Only map this field if you have a Ceres shop. or
|
EAN |
yes |
European Article Number (EAN) with 14 characters.
|
Brand |
yes |
|
Item name |
yes |
Distinct product title that clearly identifies the variation. No restriction on the number of characters.
or
or
or
|
Item description |
yes |
The item’s description.
or
Note: Description texts using HTML formatting cannot be exported to Check24. If the description contains HTML formatting, then use a property to export the description. |
Category path |
yes |
|
Sales price |
yes |
Price incl. VAT.
|
Delivery time |
yes |
Delivery time ideally in working days.
or
or
|
Variation images |
yes |
|
Item images |
no |
|
Item colour |
yes |
The item’s colour(s).
|
Material |
yes |
|
Size of the item |
yes |
Size specification of the item.
|
Depth in mm or cm |
no |
The item’s depth in mm or cm.
|
Height in mm or cm |
no |
The item’s height in mm or cm.
|
Width in mm or cm |
no |
The item’s width in mm or cm.
|
Diameter in mm or cm |
no |
The item’s diameter in mm or cm.
|
Weight in g or kg |
no |
Weight in g or kg.
|
Maximum capacity (g/kg) |
no |
The item’s maximum capacity in g or kg.
|
Care instructions |
no |
|
Scope of supply |
no |
|
Delivery condition |
no |
|
Style |
no |
The item’s style, for example “cottage style” or “Scandinavian”.
|
Model |
no |
|
Series |
no |
The series of the item, for example for children’s rooms.
|
Energy efficiency class (A-G) |
no |
The energy efficiency class according to EU regulations.
Allowed values: |
Energy efficiency label |
no |
Allowed file types: PDF, JPG |
Product data sheet (PDF) |
no |
Allowed file types: PDF |
Assembly instruction (PDF) |
no |
Allowed file types: PDF |
Manufacturer email address |
no |
|
Manufacturer address |
no |
Combine the following data fields via Add data source (link):
Additionally select the separator Space in the Settings (settings ).
|
EPREL number |
no |
All energy-related products that carry an energy label must be registered in the EU product database EPREL before they can be placed on the European market. They will then receive an EPREL registration number.
|

| Marketplace field | Mandatory? | Recommended PlentyONE mapping |
|---|---|---|
Variation ID |
yes |
This data field is assigned automatically. |
Availability |
no |
The product’s availability status.
allowed values: |
Stock |
yes |
Stock in units.
|
Category path |
no |
|
Deeplink |
no |
Direct link to the product. The link is not displayed to the customer, but helps the CHECK24 content team with the product creation.
Note: Only map this field if you have a Ceres shop. or
|
Delivery time |
yes |
Delivery time ideally in working days.
or
or
|
Item description |
yes |
The item’s description.
or
|
EAN |
yes |
European Article Number (EAN) with 14 characters.
|
Item name |
yes |
Distinct product title that clearly identifies the variation. No restriction on the number of characters.
or
or
or
|
Item number/SKU |
yes |
Item number of the product in the shop.
|
Sales price |
yes |
Price incl. VAT.
|
Minimum price |
no |
The minimum price defines the lowest price which you are willing to accept.
|
Delivery mode |
yes |
Delivery mode of the item.
possible values:
|
Shipping costs |
no |
Amount of shipping costs per item incl. VAT
|
Brand |
no |
|
Item color |
yes |
The item’s colour(s).
|
Variation images |
yes |
|
Item images |
no |
|
Carrier details |
no |
Property of the type Text or Selection possible values: Tip: For shipping goods: If delivery is not automatically made to the installation site, enter |
2 men handling |
no |
For shipping goods: price for delivery to the installation site.
possible values:
|
Installation service |
no |
possible values:
|
Removal of old item |
no |
possible values:
|
Removal of packaging |
no |
possible values:
|
Available service product ids |
no |
Do not map a PlentyONE data field. |
Logistics provider |
no |
|
Customs tariff number |
no |
|
Return shipping costs |
no |
|
RRP |
no |
|
Weight in g or kg |
no |
|
Manufacturer name |
no |
|
Manufacturer email address |
no |
|
Manufacturer address |
no |
Combine the following data fields via Add data source (link):
Additionally select the separator Space in the Settings (settings ).
|
EPREL number |
no |
All energy-related products that carry an energy label must be registered in the EU product database EPREL before they can be placed on the European market. They will then receive an EPREL registration number.
|
Item material |
yes |
|
Item size |
yes |
Size specification of the item.
|
| Marketplace field | Mandatory? | Recommended PlentyONE mapping |
|---|---|---|
Item number/SKU |
yes |
Item number of the product in the shop.
|
Manufacturer number |
no |
|
Deeplink |
yes |
Direct link to the product. The link is not displayed to the customer, but helps the CHECK24 content team with the product creation.
Note: Only map this field if you have a Ceres shop. or
|
EAN |
yes |
European Article Number (EAN) with 14 characters.
|
Brand |
yes |
|
Item name |
yes |
Distinct product title that clearly identifies the variation. No restriction on the number of characters.
or
or
or
|
Item description |
yes |
The item’s description.
or
Note: Description texts using HTML formatting cannot be exported to Check24. If the description contains HTML formatting, then use a property to export the description. |
Category path |
yes |
|
Sales price |
yes |
Price incl. VAT.
|
Delivery time |
yes |
Delivery time ideally in working days.
or
or
|
Variation images |
yes |
|
Item images |
no |
|
Item colour |
yes |
|
Cover colour |
no |
|
Material |
yes |
|
Cover material |
no |
|
Wood type |
no |
The wood type of the processed wood, for example “Oak” or “Pine”.
|
Wood quality |
no |
The quality of the processed wood, for example “solid wood”, “MDF” etc.
|
Surface treatment |
no |
The surface treatment of the material, for example “varnished”, “oiled”, “waxed” etc.
|
Frame material |
no |
|
Frame colour |
no |
|
Filling material |
no |
|
Size of the item |
yes |
Size specification of the item.
|
Depth in mm or cm |
no |
The item’s depth in mm or cm.
|
Height in mm or cm |
no |
The item’s height in mm or cm.
|
Width in mm or cm |
no |
The item’s width in mm or cm.
|
Diameter in mm or cm |
no |
The item’s diameter in mm or cm.
|
Seat height in mm or cm |
no |
The item’s seat height in mm or cm.
|
Seat width in mm or cm |
no |
The item’s seat width in mm or cm.
|
Seat depth in mm or cm |
no |
The item’s seat depth in mm or cm.
|
Lying surface |
no |
The lying surface of beds or sofas with sleeping function.
|
Weight in g or kg |
no |
Weight in g or kg.
|
Maximum capacity in g or kg |
no |
The item’s maximum capacity in g or kg.
|
Filling weight in g |
no |
The filling weight in g.
|
Temper |
no |
The degree of hardness for mattresses.
|
Removable cover? |
no |
Allowed values: |
Washable cover? |
no |
Allowed values: |
Suitable for allergy sufferers? |
no |
Allowed values: |
Lamps included? |
no |
Allowed values: |
Energy efficiency class (A-G) |
no |
The energy efficiency class according to EU regulations.
Allowed values: |
Lamp socket |
no |
|
Lifespan in h |
no |
|
Light colour |
no |
|
Brightness in lumen |
no |
|
Dimmable? |
no |
Allowed values: |
Orientation of corner sofa |
no |
Is the sofa’s ottoman located on the left or on the right?
Allowed values: |
Care instructions |
no |
|
Scope of supply |
no |
|
Delivery condition |
no |
|
Style |
no |
The item’s style, for example “cottage style” or “Scandinavian”.
|
Model |
no |
|
Series |
no |
The series of the item, for example for children’s rooms.
|
Energy efficiency label |
no |
Allowed file types: PDF, JPG |
Product data sheet (PDF) |
no |
Allowed file types: PDF |
Assembly instruction (PDF) |
no |
Allowed file types: PDF |
Manufacturer email address |
no |
|
Manufacturer address |
no |
Combine the following data fields via Add data source (link):
Additionally select the separator Space in the Settings (settings ).
|
EPREL number |
no |
All energy-related products that carry an energy label must be registered in the EU product database EPREL before they can be placed on the European market. They will then receive an EPREL registration number.
|

4.1.5. Providing information on manufacturer and EU-responsible person (GPSR)
The General Product Safety Regulation of the EU (GPSR) requires manufacturers and sellers to ensure the product safety of certain goods and to provide certain information for this purpose. This information includes details about the manufacturer and, in the case of manufacturers without an establishment in the EU, details about the responsible person within the EU. The GPSR regulation ensures that products are safe and comply with consumer protection requirements before being placed on the market.
In this chapter, you will learn how to add information on the manufacturer and the responsible person within the EU in PlentyONE to comply with the GPSR regulation.
If you export your items to CHECK24 via catalogues, you can add the information on the manufacturer and the EU-responsible person directly via the data field mappings.
4.1.6. Optional: Exporting specific items
Add filters to only export specific items. You can find the filters in the side navigation of the Data » Catalogues » [Open catalogue] » Filters menu.
For catalogues with marketplace formats, both template filters and user-defined filters are available. Template filters are applied automatically and cannot be deselected. User-defined filters can be set as needed to only export specific items.
Adding a filter:
-
Go to Data » Catalogues.
→ The catalogue overview opens. -
Open the catalogue.
-
On the left in the side navigation, click on the Filters (filter_alt) tab.
-
Select a filter from the Select filter drop-down list.
-
On the right, click on Add filter (add).
→ The filter is added.
→ Depending on the filter, either a drop-down list or an input field is displayed. -
Select a value from the drop-down list.
Or: Enter the desired value in the field of the filter you added. -
Save (save) the settings.
→ The filter is saved. -
Add additional filters as necessary.
→ Only data sets that meet all filter criteria are exported.
Tip: The number next to the word Filter shows how many filters have been set. The template filters are not included in this number.
For CHECK24, the filters explained in Table 3 are available.
| User-defined filters | |
|---|---|
Has a SKU |
Add the filter and select the Account ID, Order referrer and Status. |
Item IDs |
Enter one or more item IDs. Separate multiple IDs using commas. Only variations with these item IDs are exported. |
Variation is active |
Add the filter and select Active or Inactive.
|
Visible for at least one market |
Add the filter and select one or multiple sales channels. |
Has tags |
Add the filter and select one or multiple tags. |
Has at least one barcode |
Add the filter and select one or multiple barcodes. |
Has barcode |
Add the filter and select one or multiple barcodes. |
Without tags |
Only variations without tags are exported. |
Linked to at least one property selection value |
Add the filter and enter one or multiple values of a selection property. |
At least one availability |
Add the filter and select one or multiple availabilities. |
Item has images |
Add the filter and select an option. Has item images = Only items for which at least one image is saved in the Images section of the Item » Items » [Open item] menu will be exported. |
Currencies |
Add the filter and select one or multiple currencies. |
Variation has sales price |
Add the filter and select one or multiple sales prices. |
Price value |
Add filter and select the sales price, operator, and the sales price value. |
Has flag 1 |
Add the filter and select one or multiple flags. |
Has flag 2 |
Add the filter and select one or multiple flags. |
Item created at |
Add the filter, select a value and enter a date or time span if needed.
|
Item updated at |
Add the filter, select a value and enter a date or time span if needed.
|
Variation created at |
Add the filter, select a value and enter a date or time span if needed.
|
Variation updated at |
Add the filter, select a value and enter a date or time span if needed.
|
Belongs to at least one Amazon product category |
Add the filter and select one or multiple Amazon product categories. |
Item type |
Add the filter and select Default, Set, or Multi-Pack. |
Variation is main variation |
|
Variation has an image |
|
Variation is in categories |
Add the filter and select one or multiple categories. Note: Enter the category IDs. |
Variation is in one of these categories |
Add the filter and select one or multiple categories. Note: Enter the category IDs. |
Item has manufacturers |
Add the filter and select one or multiple manufacturers. |
Item has no manufacturers |
Only items for which the option None is saved for the Manufacturer setting in the Settings section of the Item » Items »[Open item] menu are exported. |
Visible for markets |
Add the filter and add one or multiple sales channels. |
Bundle type |
Add the filter and select the bundle type.
|
Visible for a client |
Add the filter and select one or multiple clients. |
Visible for clients |
Add the filter and select one or multiple clients. |
Linked to property selection values |
Add the filter and enter one or multiple values of a selection property. |
Has at least one tag |
Add the filter and select one or multiple tags. |
Variation has child variations |
|
Variation IDs |
Enter one or more variation IDs. Separate multiple IDs using commas. Only variations with these variation IDs are exported. |
Sales price updated at |
Add the filter, select a value and enter a date or time span if needed.
|
Stock updated at |
Add the filter, select a value and enter a date or time span if needed.
|
4.1.7. Setting up catalogue export
Setting up catalogue export:
-
Go to Data » Catalogues.
-
Open the catalogue for CHECK24.
-
In the navigation on the left, open the tab Settings (settings).
-
Carry out the settings described in Table 4.
-
Save the settings.
| Setting | Explanation |
|---|---|
Basic settings |
|
Catalogue name; |
These settings are saved automatically when you create the catalogue. |
Format settings |
|
File name |
Enter a name for the file. |
Format |
Select the option CSV. |
Field separator |
Select the option Pipe. |
Text delimiter |
Select the option ”. |
Line break |
Select the option Carriage return. |
Header is included |
This setting is not required for price search engines. |
Decimal separator |
Select the option Dot. |
Export settings |
|
Limit |
Enter a number in order to determine a maximum number of lines for the export. |
Skip empty files |
Activate to skip the export to the FTP server if the export file is empty. |
Provisioning |
This setting is not required for price search engines. |
Transfer |
For exports to sales channels and price search engines, select the interval Every 20 minutes. This is to ensure that the export is always up-to-date. |
Download settings |
|
Shop URL |
Select the client to be used for creating the URL. |
Receive notifications |
This setting is not required for price search engines. |
Options for admin link |
|
Use version |
If you activate this option, the public link is updated every time you make changes to the catalogue. As such, you need to save the new URL in the CHECK24 back end. |
Options for public link |
|
Activate options |
Activate the option to generate a public link. |
Use version |
If you activate this option, the public link is updated every time you make changes to the catalogue. As such, you need to save the new URL in the CHECK24 back end. |
Use token |
Activate the option to add a token to the download URL. The file is then only accessible if the token is known. |
Security token |
Click on the symbol on the right () to generate a new token. |
4.1.8. Activating the catalogue
You have set up CHECK24 in PlentyONE and created a catalogue for exporting your item data? Then start the export of your item data. To do so, activate the catalogues which should be exported to CHECK24 in the Data » Catalogues menu.
Activating the catalogue export to CHECK24:
-
Go to Data » Catalogues.
→ The catalogues are listed. -
Scroll to the CHECK24 catalogue.
-
In the Active column, move the toggle button to the right ().
→ The catalogue is active.
→ The catalogue data is exported to CHECK24 once a day during the night.
Tip: Go to Data » Catalogue export status for information about the status of the export.
4.1.9. Saving the URL at Check24
Check24 retrieves item data via an URL. You have to save a URL in the Check24 backend so that item data can be exported to Check24. Item data will then automatically be retrieved by Check24 at regular intervals.
Copy the URL of the catalogue in the Data » Catalogues menu and save it in the CHECK24 backend afterwards.
|
Save the URL for CHECK24 Offer
You have to save the URL of the catalogue format CHECK24 Offer for the offer export at CHECK24. |
Copying the URL:
-
Go to Data » Catalogues.
→ The catalogue overview opens. -
Click the catalogue for the format CHECK24 Offer.
→ The catalogue opens. -
In the navigation on the left, open the tab Settings (settings).
-
Under Download settings in the Options for public link section, click on Copy URL (content_copy).
→ The URL is copied to the clipboard. -
Save the URL in the CHECK24 back end.
4.2. Alternative 2: Item export with the Elastic Export (old method)
This section explains how to transfer your items to CHECK24. In the deprecated plugin, the item export is carried out by the elastic export. The data format CHECK24-Plugin is used for this.
| No new features are planned for the Elastic Export and the export format for CHECK24. As such, we recommend that you create catalogues for CHECK24 instead. |
4.2.1. Installing plugins for the Elastic Export
To export item data to to CHECK24 with the Elastic Export using the Elastic Export, you need the following plugins:
You can download the plugins in the plentyMarketplace.
Adding plugin to the system:
-
Go to Plugins » plentyMarketplace.
→ The marketplace opens in a new tab. -
Navigate to the plugin Elastic Export.
Tip: Either use the search function or open the category Plugins » Sales » Marketplaces. -
Open the detail view of the plugin.
-
In the column to the right, click Go to checkout.
→ The Checkout window opens. -
Read and accept the General Terms and Conditions.
-
Click Order now.
→ Wait a few minutes before installing the plugin.
Installing plugins:
-
Go to Plugins » Plugin set overview.
-
Click on the plugin set in which you want to install the plugin.
→ The plugin set opens. -
Click add Add plugin.
-
Select Elastic Export from the plugin list.
-
Click Install.
→ The plugin is installed.
→ The plugin set is shown. -
Switch the plugin to active (toggle_on).
-
Save (save) the plugin set.
Tip: Problems saving the plugin set? Click Open details to show additional information.
Adding plugin to the system:
-
Go to Plugins » plentyMarketplace.
→ The marketplace opens in a new tab. -
Navigate to the plugin CHECK24.
Tip: Either use the search function or open the category Plugins » Sales » Marketplaces. -
Open the detail view of the plugin.
-
In the column to the right, click Go to checkout.
→ The Checkout window opens. -
Read and accept the General Terms and Conditions.
-
Click Order now.
→ Wait a few minutes before installing the plugin.
Installing plugins:
-
Go to Plugins » Plugin set overview.
-
Click on the plugin set in which you want to install the plugin.
→ The plugin set opens. -
Click add Add plugin.
-
Select CHECK24 from the plugin list.
-
Click Install.
→ The plugin is installed.
→ The plugin set is shown. -
Switch the plugin to active (toggle_on).
-
Save (save) the plugin set.
Tip: Problems saving the plugin set? Click Open details to show additional information.
First, create the export format CHECK24DE Plugin. Then transfer the URL to CHECK24.
4.2.2. Exportformat CHECK24DE
Create the export format CHECK24DE Plugin as described below. Note the following points:
-
If you change one or more settings, then you will have to transfer the new link to CHECK24.
-
A maximum of 4000 items is exported at once. If you export more items, then a second export is automatically carried out. To display the second export process, set the parameter &Page = in the export link to 2.
-
Technical data is transferred to CHECK24 in the last column of the export file.
-
Go to Data » Elastic export.
-
Click on New export.
-
Carry out the settings. Pay attention to the explanation given in Table 5.
Important: If you change one or more settings, you have to provide CHECK24 with the new link. -
Save the settings.
→ The export format is given an ID.
→ The export format is shown in the Exports overview.
| Setting | Explanation |
|---|---|
Settings |
|
Name |
Enter a name. The export format is listed by this name in the overview within the Exports tab. |
Type |
Select the type item from the drop-down list. |
Format |
Select CHECK24DE-Plugin. |
Limit |
Enter a number. If you want to transfer more than 9999 data records, then the output file is not generated again for another 24 hours. This is to save resources. If more than 9999 data records are necessary, the setting Generate cache file has to be active. |
Generate cache file |
Place a check mark if you want to transfer more than 9999 data records to the price search engine. We recommend that you do not activate this setting for more than 20 export formats. This is to ensure a high performance of the elastic export. |
Provisioning |
Select URL. Use this option to generate a token for authentication in order to allow external access. |
Token, URL |
If you selected the option URL under Provisioning, click on Generate token. The token is entered automatically. The URL is entered automatically if the token has been generated under Token. |
File name |
The file name must end in .csv or .txt. Otherwise, the file cannot be imported by CHECK24. |
Item filter |
|
Add item filters |
Select one or more item filters from the drop-down list and click on Add. There are no filters set by default. It is possible to add all item filters listed below from the drop-down list one after the other.
|
Format settings |
|
Product URL |
Select the URL that you wish to transfer to the price search engine. You can either send the item’s URL and the variation’s URL. URLs of variations can only be transferred in combination with plentyShop LTS. |
Client |
Select a client. This setting is used for the URL structure and to filter valid sales prices. |
URL parameter |
Enter a suffix for the product URL if this is required for the export. If you activated the transfer option for the product URL further up, then this character string is added to the product URL. |
Order referrer |
Select the order referrer that should be assigned during the order import from the drop-down list. The order referrer is also used to filter valid sales prices and images. The selected referrer is added to the product URL so that sales can be analysed later. |
Marketplace account |
Select the marketplace account from the drop-down list. |
Language |
Select the language from the drop-down list. |
Item name |
Select Name 1, Name 2 or Name 3. The names are saved in the Texts tab of the item. Enter a number into the Maximum number of characters (def. text) field if desired. This specifies how many characters are exported for the item name. |
Preview text |
This option does not affect this format. |
Description |
Select the text that you want to transfer as description. Enter a number into the Maximum number of characters (def. text) field if desired. This specifies how many characters are exported for the description. Activate the option Remove HTML tags if you want HTML tags to be removed during the export. If you only want to allow specific HTML tags to be exported, then enter these tags into the field * Permitted HTML tags, separated by comma (def. text)* field. Use commas to separate multiple tags. |
Target country |
Select the target country from the drop-down list. |
Barcode |
Select the ASIN, ISBN or an EAN from the drop-down list. The barcode has to be linked to the order referrer selected above. Otherwise, the barcode will not be exported. |
Image |
Select Position 0 or First image to export this image.
|
Image position of the energy label |
This option does not affect this format. |
Stock buffer |
The stock buffer for variations with limitation to the net stock. |
Stock for variations without stock limitation |
The stock for variations without stock limitation. |
Stock for variations without stock administration |
The stock for variations without stock administration. |
Live currency conversion |
Activate this option to convert the price into the currency of the selected country of delivery. The price has to be released for the corresponding currency. |
Sales price |
Select gross price or net price from the drop-down list. |
Offer price |
This option does not affect this format. |
RRP |
This option does not affect this format. |
Shipping costs |
Activate this option if you want to use the shipping costs that are saved in a configuration. If this option is activated, then you are able to select the configuration and the payment method from the drop-down lists. Activate the option Transfer flat rate shipping charge if you want to use a flat rate shipping charge. If this option is activated, a value has to be entered in the line underneath. |
VAT note |
This option does not affect this format. |
Item availability |
Activate the overwrite option and enter item availabilities into the fields 1 to 10. The fields represent the IDs of the availabilities. This overwrites the item availabilities that are saved in the Setup » Item » Availability menu. |
4.2.3. Check24DE: Available columns for the export file CHECK24DE Plugin
Open the export format CHECK24DE Plugin in the Data » Elastic export menu to download and edit the export file.
Downloading the export file:
-
Go to Data » Elastic export.
-
In the line of the format CHECK24DE Plugin, click on Download ().
→ The file is downloaded and saved on your computer. -
Open the export file with an appropriate program.
| Column header | Explanation |
|---|---|
id |
The SKU of the variation for check24.de. |
manufacturer |
The name of the manufacturer of the item. The external name saved in the Setup » Item » Manufacturers menu is preferred if existing. |
mpnr |
The model of the variation. |
ean |
According to the format setting Barcode. |
name |
According to the format setting Item name. |
description |
According to the format setting Description. |
category_path |
The category path of the default category for the Client configured in the format settings. |
price |
The sales price. |
price_per_unit |
The base price information in the format "price / unit". |
link |
The URL path of the item. This depends on the client selected in the format settings. |
image_url |
The URL path of the first item image according to the format setting Image. Variation images will be prioritised over item images. |
delivery_time |
The name of the item availability saved in the Setup » Item » Availability menu or the translation according to the format setting Overwrite item availability. |
delivery_cost |
According to the format setting Shipping costs. |
pzn |
Empty |
stock |
The net stock of the variation. If a variation is not limited to its net stock, the stock is set to 999. |
weight |
The Weight as set in the menu Item » Edit item » [Open item] »[Open variation] » Tab: Settings » Dimensions. |
4.2.4. Saving the URL at Check24
Check24 retrieves item data via an URL. You have to save the URL of the export format CHECK24-Plugin in the CHECK24 backend so that item data can be exported to CHECK24. Item data will then automatically be retrieved by Check24 at regular intervals.
Copy the URL of the export format in the Data » Elastic export menu and save it in the CHECK24 backend afterwards.
Copying the URL:
-
Go to Data » Elastic export.
→ The export format overview opens. -
Select the export format CHECK24DE-Plugin:
→ The export format is opened. -
Copy the URL in the Settings section.
-
Save the URL in the CHECK24 back end.
4.3. Alternative 3: Changing from elastic export to catalogue
Do you already export item data to CHECK24 with the elastic export and want to change to the catalogue export? To do so, create a catalogue as described in the chapter Catalogue export.
|
Exactly recreate elastic export
To make sure that the item export still works after you switched from the elastic export to the catalogue, you need to exactly recreate your elastic export in the catalogue. That means that you need to map the same data fields in the export that are currently exported to the price search engine with the elastic export. If you map different data fields than in the elastic export, new items my be created during the export. |
To ensure a smooth transition, we recommend the following steps:
-
Check which characteristics you currently use for CHECK24. Characteristics and free text fields cannot be used for the catalogue export. So create properties for all characteristics that you still need.
Important: The values of the new properties must be identical to the values of the old characteristics. Otherwise, new items may be created during the export to CHECK24. -
Create a catalogue for CHECK24. (How?)
-
Map the same PlentyONE data fields to the CHECK24 marketplace data fields that are currently exported to CHECK24 with the elastic export. (How?)
Tip: Table 7 shows which columns in the elastic export are the equivalent marketplace data fields in the catalogue. -
Did you filter item data in the elastic export? If so, use the same filters in the catalogue. (How?)
-
Carry out the export settings. This allows you to create a URL for CHECK24. (How?)
-
Activate the catalogue (How?)
-
Save the URL of the catalogue at Check24\. (How?)
Table 7 shows which columns in the elastic export are the equivalent marketplace data fields in the catalogue.
Note: The format CHECK24 Offer is new. As such, there is no equivalent format available in the elastic export.
| Column in elastic export | Marketplace data field in catalogue |
|---|---|
CHECK24 |
|
id |
ID |
manufacturer |
Manufacturer |
mpnr |
MPNR |
ean |
EAN |
name |
Name |
description |
Description |
category_path |
Kategorie-Pfad |
price |
Price |
price_per_unit |
Unit price: Price per unit of measure |
link |
Link |
image_url |
Bild-URL |
delivery_time |
Delivery time |
delivery_cost |
Shipping costs |
pzn |
PZN |
stock |
Stock |
weight |
Weight |
5. Removing items from CHECK24
Offers will only be visible on CHECK24 if a variation has at least one active offer. If a variation is not contained in the offer export or is exported to CHECK24 with a stock of 0, then there will be no offer for this variation on CHECK24.
CHECK24 recommends that you remove variations from the offer export rather than export a stock of 0 if you do not want to sell a variation on CHECK24 any more. In order to remove variations from the offer export, remove the sales channel Check24 from the variation as described below.
Thus, variations cannot be sold on CHECK24 if they’re not in stock in PlentyONE. The offer for the variation on CHECK24 will be removed from CHECK24 if a stock of 0 is exported. The interval for the data exchange is defined in the catalogue settings.
If the variation is in stock again, it will also be offered on Check24 after the next item data export.
If you do not want to sell a variation which is in stock in PlentyONE on CHECK24, remove the sales channel Check24 from the variation.
Removing a sales channel:
-
Go to Item » Items » [Open item] » [Open variation].
-
Expand the Sales channels section (chevron_right).
-
Remove (delete) the sales channel Check24.
-
Save () the settings.
→ The variation will not be offered on CHECK24 any longer.
6. Order import
After the order import, the order is set to status [5] cleared for shipping. The invoice address is always CHECK24. The customer’s address is the delivery address.
7. Automatically sending shipping confirmations
You can automatically inform CHECK24 when you have shipped the items of an order by using one of the following options:
-
Option 1: PlentyONE Flow (recommended)
-
Option 2: Event procedure (old method)
7.1. Option 1: PlentyONE Flow (recommended)
Create an event-based flow to automatically inform CHECK24 when you have shipped the items of an order.
With PlentyONE Flow (short: "Flow"), you can automate workflows for your business processes. Flow provides you with two functions in the Automation menu:
-
In Flow Studio you create and configure automated workflows. Depending on the trigger type, there are three types of flows: event- based, time-based or manual.
-
In the Flow Tracker, you can monitor running or completed workflows.
The central element in both functions is the Canvas – a graphical interface on which the workflows are visualised with Actions and Controls. In Flow Studio the canvas can be edited, in Flow Tracker it is only used for visualisation and is therefore read-only.
-
Is this your first time working with PlentyONE Flow? Then read up on the basic concept of Flow first.
-
Go to Automation » Flow Studio.
-
Click Create flow (add).
→ A stepper opens and guides you through the following three steps.-
General
-
Enter a unique name and, if necessary, a description for the new flow.
-
Click Next.
-
-
Trigger
-
Select Event-based as the trigger.
-
Click Next.
-
-
Settings
-
If desired, select a UI from the optional drop-down list Flow available in.
→ The option to manually trigger the flow directly from the selected UI is added to the group functions in that UI.
Note: UIs currently selectable: Order UI. -
From the drop-down list Trigger selection, select the event according to Table 8.
Note: If the trigger event has additional settings, then these are invariably mandatory. Without performing these settings, you will not be able to save the flow. -
Save () the settings.
→ The flow is created.
→ The Flow Studio Canvas appears, on which two elements are already displayed: The trigger type and the placeholder for the next step.
Note: With some event-based flows you cannot save the flow if it consists of only a trigger. In such cases, you need to add at least one further step.
-
-
-
Configure the new flow according to Table 8.
-
Save () the settings.
Note: The selected statuses, controls and filters in Table 8 only serve as an example. Select the statuses, controls and filters for the flow which best suit your workflow.
| Setting | Option | Selection | ||||||
|---|---|---|---|---|---|---|---|---|
Trigger selection |
Select a trigger, for example:
|
Select a document type, for example:
|
||||||
Controls |
Branch |
|
||||||
Actions |
Order |
Send email |
7.2. Option 2: Event procedure (old method)
Set up an event procedure to automatically inform CHECK24 when you have shipped the items of an order.
-
Go to Setup » Orders » Events.
-
Click on Add event procedure ().
→ The Create new event procedure window opens. -
Enter a distinct name for the event procedure.
-
Select the event according to Table 9.
-
Save () the settings.
-
Carry out the additional settings according to Table 9.
-
Select the setting Active ().
-
Save () the settings.
Note: The selected statuses and filters in Table 9 only serve as an example. Select filters and statuses for the event procedure which best suit your workflow.
| Setting | Option | Selection |
|---|---|---|
Event |
Select an event, for example:
|
Select a document, for example:
|
Filter |
Order > Referrer |
Check24 |
Procedure |
Customer |
Send email |
8. Viewing the log
The Data » Log menu contains a history of processes that run via the CHECK24 interface.
Note that integrations and identifiers are only shown in the drop-down lists as filters after the process has run at least once.
For CHECK24, the following filters are recommended:
-
Identifier » CHECK24ORDERIMPORT
-
Go to Data » Log.
-
In the toolbar, click on tune.
-
Select appropriate filters from the drop-down lists.
-
Optional: Select filters for dates and/or times to only show entries from a specific period.
Tip: For information about the filters, refer to the Data log page of the manual. -
Click on Search ().
→ The results are shown. -
Check all entries for the levels warning and error.
Tip: Click on the entry to see details.
9. Final information for your onboarding with CHECK24
Before your products can be listed on CHECK24, CHECK24 will conduct a test order with you.
Note: Do not transmit the order.
Once CHECK24 has received all emails (shipping and cancellation confirmations) and has received feedback from you, CHECK24 will remove the order from the system.
9.1. Edit test order
Before activating your account, CHECK24 will place a test order. This test order will automatically generate two emails (shipping confirmation and cancellation confirmation). CHECK24 requires these shipping and cancellation confirmations from you.
To ensure CHECK24 can verify if the shipping status is updated correctly, proceed as follows:
Editing the test order
-
Mark the test order as shipped.
-
Cancel the test order.
The shipping confirmation must contain a tracking link or a shipment number. If neither a tracking link nor a shipment number is available, provide CHECK24 with the shipment information from another order.
9.2. Questions
To successfully complete your onboarding, CHECK24 needs your answers to the following questions. Send your answers to your contact person at CHECK24.
-
Which prices do you transmit to CHECK24 (shop prices, shop prices and commission, etc.)?
-
Will the feed be expanded in the future?
-
Which items are your bestsellers?
-
Is the stock in the feed accurate?
-
How often is the feed updated?
-
How often are orders retrieved?