belboon.com
The affiliate network belboon specialises in the implementation of performance marketing measures.
1. Creating an order referrer
An order referrer tags an order with the sales channel on which the order was generated.
For belboon, no order referrer is preconfigured in your PlentyONE system. Therefore, you have to create the order referrer for belboon manually in the Setup » Orders » Order referrer menu.
An order referrer tags an order with the sales channel on which the order was generated. Sales channels can be e.g. your online shop or markets on which you sell your items. Each sales channel has an individual order referrer. Some order referrers are available by default in your PlentyONE system. Further order referrers are added e.g. if you install a new plugin. For further information about the order referrer, see the page Order referrer of the PlentyONE manual.
The IDs 1 through 8 and IDs from 101 upwards are reserved for order referrers saved in the system. For referrers that you create manually the IDs 9-100 are available.
Creating an order referrer:
-
Go to Setup » Orders » Order referrer.
-
Click on New ().
Note: When all available IDs are assigned to manually created order referrers, the button New () can no longer be selected.
→ The Create new referrer window opens.
→ An available ID is automatically assigned. You can change this ID now. However, once you have created the referrer, you can no longer change the ID. -
Enter a name for the order referrer.
Tip: For example, you can enter the name of the price search engine here. -
Activate the option Visible in selection (toggle_on).
-
Click Create.
→ The referrer is active.
2. Exporting item data
Item data is exported to belboon using catalogues.
2.1. Creating a catalogue
Item data is exported using a marketplace format. To export your items to a price search engine, create a catalogue in the Data » Catalogue menu. Link the data fields in the catalogue with item data saved in PlentyONE in the marketplace format afterwards.
Catalogues are used to export data from your PlentyONE system. There are two different catalogue formats:
-
Marketplace formats are used to export item data to markets.
-
Standard formats are used to export data from your PlentyONE system into a file.
Catalogues with marketplace formats allow you to tailor your item information exactly to the needs of the market. Because here, you assign a suitable PlentyONE data field to each of the data fields of the market. When your variation data is exported to the market, the market’s data fields are then filled with the correct PlentyONE data.
-
Is this your first time working with catalogues? Then read up on the basic concept of catalogues first.
Creating a catalogue:
-
Go to Data » Catalogues.
-
Click Create catalogue (add).
-
Enter a name for the catalogue.
-
In the drop-down list Marketplace, select the option belboon.
-
In the drop-down list Export type, select the option Item (new).
-
In the drop-down list Category, select the option belboon.
Tip: You can only create one catalogue for this sales channel, which is why only one category is selectable. -
Save () the settings.
→ The catalogue is created.
→ The catalogue is opened for editing.
|
Do not change the format in the catalogue’s Format settings. To ensure that the export to the sales channel works, all required settings are already configured when you create a catalogue. If you change the settings, errors might occur during the export. |
2.2. Mapping data fields in the catalogue
Now, map the data fields in the catalogue to the item data saved in PlentyONE.
-
The market expects product data that cannot be saved in the PlentyONE item menu? Then create a property for this data. Link this property with your variations. The actual values are saved as property values for this property. Is this your first time working with properties? Then read up on the principles of properties first.
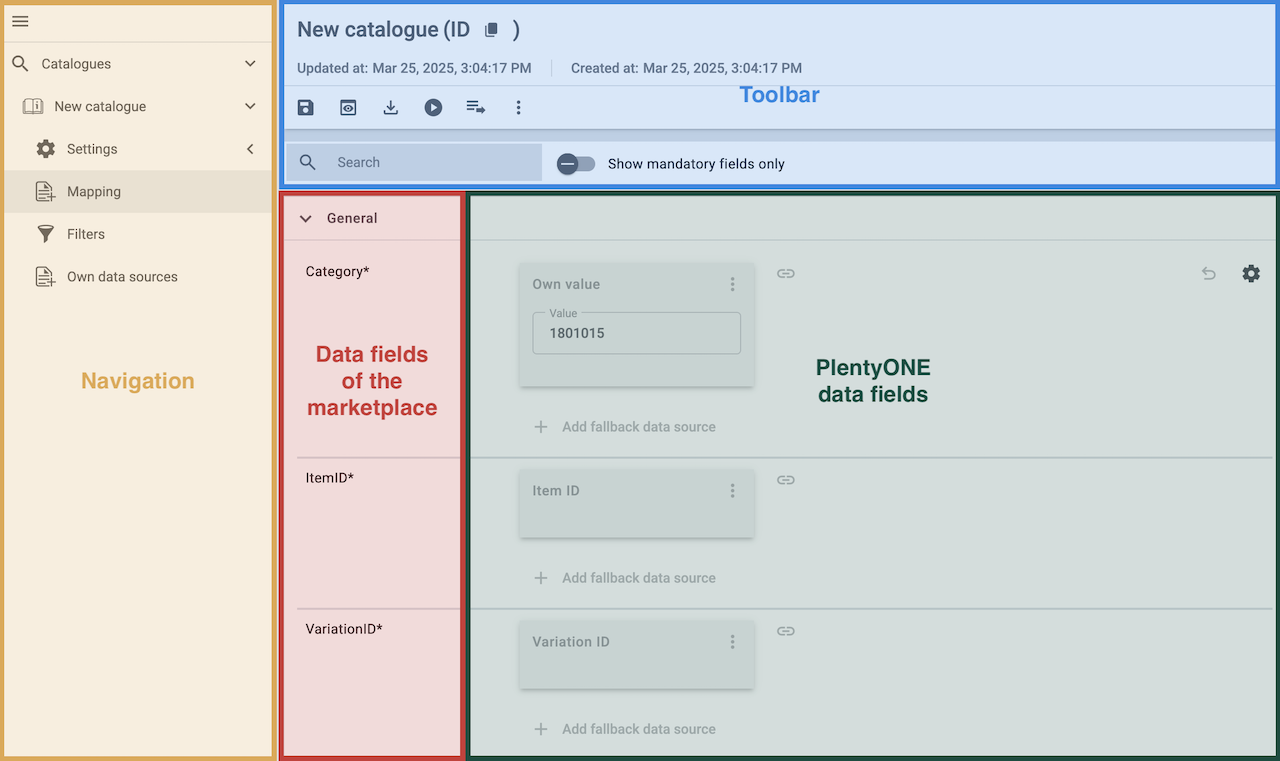
| Availability | Explanation |
|---|---|
Navigation |
When you open a catalogue, the view Mapping is shown. On the very left is the navigation.
|
Toolbar |
The toolbar provides actions for the catalogue. For example, save your mappings, restore an older version of the catalogue or hide or show optional marketplace data fields. |
Live preview |
You can use the Live preview feature to display which values of a given variation would be exported to the marketplace by each mapping. Simply activate the toggle and enter the ID of the variation you want to use in order to show live previews for that variation. |
Marketplace data field |
To the right of the navigation, all data fields available for the market are listed. Mandatory fields are marked with an asterisk (✱). |
PlentyONE data sources |
On the right side of the catalogue, you map the marketplace data fields to appropriate PlentyONE data sources. In the screenshot above, a few of the fields are already mapped. |
Mapping catalogue fields:
-
Go to Data » Catalogues.
-
Click on the catalogue.
→ The Mapping tab opens.
→ In the left-hand column, the market’s data fields are listed.
Tip: Mandatory fields are flagged with an asterisk (*).
→ In the right-hand column, you can map your PlentyONE data sources. Any PlentyONE data sources that you already mapped are also shown in this column. -
Map suitable PlentyONE data sources to the market data fields.
For each marketplace data field, you have a number of mapping options. Expand the info boxes below to get more information about each of these mapping options.-
Simple 1:1 mapping
-
Simple 1:1 mapping with properties
-
Complex 1:1 mapping
-
1:1 mapping with fallback data sources
-
1:n mapping
-
Own value mapping
-
Mapping with mathematical calculations
-
-
Save () the catalogue.
→ The mappings are saved.
In a simple 1:1 mapping, you map a PlentyONE data source to the marketplace data field. If no suitable setting exists in PlentyONE. you can map a property instead.
As such, simple 1:1 mappings are useful if you want to achieve the following:
-
I want to fill this marketplace data field with the data from this PlentyONE setting.
-
If the data field is empty for a variation, no value is exported for this variation.
Creating a simple 1:1 mapping:
-
Next to the marketplace data field, click on + Add data source.
→ To the left, the list of available PlentyONE data sources are shown in groups. -
Select a PlentyONE data source in the list.
→ The data source is added to the right, but not yet confirmed or saved. -
Click on Confirm.
In a simple 1:1 mapping, you map a PlentyONE data source to the marketplace data field. But PlentyONE does not always offer a suitable data source. In such cases you can create the data source in your system yourself by setting up a property. Properties allow you to save any kind of information in your properties.
-
Is this your first time working with properties? Then read up on the principles of properties first.
Creating a simple 1:1 mapping with properties:
-
Next to the marketplace data field, click on + Add data source.
→ To the left, the list of available PlentyONE data sources are shown in groups. -
Expand the group Property.
→ The property groups are shown. -
Expand the group you need.
-
Click on the Plus sign on the right of the property you want. → The property is added as a data source, but not yet confirmed or saved.
-
From the drop-down list Language, select the language in which you send the data to the market.
-
Click on Confirm.
→ The property is mapped to the marketplace data field.
Complex mappings are necessary whenever a marketplace data field only has a select number of possible values. Like the name implies, they cannot be resolved by simply mapping the whole data field to one of your PlentyONE data sources. Instead, you map the individual values that can be entered in the data field to PlentyONE data sources.
For example, a marketplace may only allow for the color of an item to be described using a limited selection of terms such as "Blue", while the variations saved in your system may use more distinct terms such as "Sky blue" or "Royal blue". In such cases the marketplace data field for item colors will be a complex mapping that allows you to map the colors "Sky blue" and "Royal blue" saved in your variations to the value "Blue" used by the marketplace.
| Do not enter own values for complex mappings. All values that you enter must be saved for the variations, either in a setting or as a property value. This also applies if the value Comparative value is shown. You still need to enter exactly the value of the setting or property that you mapped. |
A complex mapping will always export the value selected for the marketplace data field, regardless of what kind of data source you mapped it to. The only exception are own values, which will be exported as-is.
You can recognise complex mappings from the field that is shown below the name of the marketplace data field. Click on the field to show the values available for the marketplace data field.

Examples for complex 1:1 mappings are:
-
Categories
-
Brands
-
Shipping settings
Important: For complex mappings, do not map own values or properties of the type None.
Creating a complex 1:1:n mapping:
-
Click on the field for the marketplace data field.
→ A list of the available values is shown. -
Select the value that you want to map a PlentyONE data source to.
→ The value is added as a mappable field. -
Next to the added field, click on + Add data source.
→ To the left, the available PlentyONE data sources are listed in groups. -
Select the PlentyONE data source you want to map tho the marketplace value.
Important: Do not map own values or properties of the type None. -
Your next steps depend on the PlentyONE data source you selected:
-
Alternative 1: The available values for the PlentyONE data value are shown on the left.
-
Next to the value you want to select, click on the plus.
→ The value is added to the field on the right. -
Click on Confirm.
-
-
Alternative 2: The PlentyONE data source is inserted and the field Comparative value is shown.
-
In the field Comparative value, enter a value that is saved in the setting or the property of the mapped PlentyONE data source.
-
Click on Confirm.
-
-
Alternative 3: The PlentyONE data source is inserted and a drop-down list is shown.
-
Select a value from the drop-down list.
-
Click on Confirm.
→ The value of the marketplace data field is exported, not the value of the PlentyONE data source.
Exception: If you map an own value to a marketplace data field, the own value that you enter is exported directly.
-
-
You can use fallback data sources in a 1:1 mapping to ensure that a value is provided for a marketplace data field even when the preferred data source is missing or empty.
In other words, this mapping specifies:
-
I want to fill the marketplace data field with the data from the selected primary PlentyONE data source.
-
If that data source is missing or empty for a variation, then the first fallback data source for this field is checked. If this fallback data source contains usable data, then that data is used to fill the marketplace data field.
-
If the first fallback data source is also missing or empty and other fallback data sources are mapped to this data field, then this process is repeated for the other fallback data sources in sequence until either usable data is found or all fallback data sources have been checked.
Two separate fallback conditions are available:
Null (default) |
The fallback data source is used if the data field above is mapped in the catalogue but not linked to the variation. The condition "Null" is useful when you want to map fallback data sources for the following types of PlentyONE data sources:
|
Empty |
The fallback data source is used if the data field above is mapped in the catalogue and linked to the variation, but is empty. The condition "Empty" is useful when you want to map fallback data sources for the following type of PlentyONE data sources:
Important: When you add a fallback data source, the fallback condition "Null" is selected automatically. To apply the fallback condition "Empty", you need to change the default setting. |
Note: If you assign multiple fallback data sources to a single data field, the value of only one of those fallback data sources is exported, i.e. the first mapped fallback data source that provides a usable value.
Creating a 1:1 mapping with fallback data sources:
-
Next to the marketplace data field, click on + Add data source.
→ To the left, the list of available PlentyONE data sources are shown in groups. -
Click on the plus to the right of the PlentyONE data source you want to use as the primary data source.
→ The PlentyONE data source is added to the right. -
Click on + Add fallback data source below the primary data source.
→ The fallback data source is added with the fallback condition Null. -
(Optional) If you want to use the fallback condition Empty instead:
-
Hover over the fallback data source with your cursor and click on the Settings () option that appears to the right.
→ The window Data column settings is shown. -
For the setting Fallback condition, select the option Empty.
-
Click on Save.
→ The fallback data source’s fallback condition is changed to Empty.
-
-
Click on Confirm.
→ The fallback data source is exported if the fallback condition is fulfilled.
In a 1:n mapping, you map several PlentyONE data sources to the same marketplace data field. Unlike fallback data sources, these data sources are combined using a specified separator and used as a single value.
In other words, this mapping specifies:
-
I want to combine these PlentyONE data sources during export so that the marketplace data field is filled with the data of these two or more PlentyONE settings.
Creating a 1:n mapping:
-
Next to the marketplace data field, click on + Add data source.
→ To the left, the list of available PlentyONE data sources are shown in groups. -
Click on the plus to the right of the PlentyONE data source you want to select.
→ The PlentyONE data source is added to the right. -
Click on Confirm.
-
To the right of the mapped PlentyONE data source, click on Add data source ().
→ To the left, the list of available PlentyONE data sources again are shown in groups. -
Map the desired number of additional PlentyONE data sources to the marketplace data field as described above.
-
Click on Confirm.
-
To the very right of the row, click on Settings ().
-
Select a separator from the drop-down list Separator or add a custom separator.
-
Click on Save.
-
Save () the catalogue.
→ The mappings are saved.
→ During the export, the content of the PlentyONE data sources is combined and exported as one field.
If you want to export the exact same value for all of your variations to a particular marketplace data field, then you can map this value to the data field using the Own value data source.
This kind of mapping specifies:
-
For this marketplace data field, I want to export the value that I entered in the data source Own value for all variations of this catalogue.
Creating an own value mapping:
-
Next to the marketplace data field, click on + Add data source.
→ To the left, the list of available PlentyONE data sources are shown in groups. -
Select the Own value option at the top of the list.
→ The data source Own value is mapped to the data field. -
Enter a value into the input field in the Own value.
-
Click on Confirm.
→ The entered value is exported for all variations.
|
Be especially careful when using Own value mappings
The value you enter in an Own value mapping is always exported for every variation tied to the catalogue. The value also overwrites the market value in complex mappings where usually the value of the market would be exported. As such, only use an Own value mapping for a marketplace data field when you are certain that the value you entered will be accepted for that data field by the marketplace for all of your variations in order to ensure that your variations are exported to the marketplace successfully. |
Mathematical formulas allow you to change numerical values automatically during the export. In other words, this mapping specifies:
-
I want the numerical value of a PlentyONE data source to be recalculated during the export. Basic arithmetic operations are available for the formulas.
Recalculating numerical values:
-
Next to the marketplace data field, click on + Add data source.
→ To the left, the list of available PlentyONE data sources are shown in groups. -
At the very top of the list, click on the + icon next to Formula (calculate).
→ The data field Formula is added to the field on the right. -
Click into the data field.
→ The window Modify value is shown. -
Enter a numerical value or select a PlentyONE data source at the bottom right of the window to add it to the calculation (add).
Tip: Use the search function. This helps you to find data fields quickly. -
Optional: If the symbol more_vert is shown in the data field, select the correct assignment for the data field.
Tip: A number tells you how many assignments are necessary for the data field.-
Click on the icon more_vert.
-
In the window shown, select the assignments from the drop-down list.
-
Save the settings.
-
-
Enter numbers and mathematical operators with the on-screen calculator or the keyboard.
-
Save the settings.
→ The entered formula is displayed in the overview.
→ When an export is carried out, the formula is used to calculate the value that is exported for each variation.
Keep in mind that this mapping type only works with PlentyONE data sources that provide numerical values and for marketplace data fields that accept numerical values. Additionally, this mapping type is relatively new and not available for all catalogue formats yet.
2.3. Recommendations for data field mappings
To help you with mapping your data fields for the catalogue, we have created a list of recommended data field mappings. Note that these mappings are recommendations only. Depending on how you manage your item data, other mappings may be more appropriate than the recommendations given here.
-
Need more information about the PlentyONE data fields? All data fields are described on the manual page for the standard format Item (new).
| Marketplace field | Mandatory? | Recommended PlentyONE mapping |
|---|---|---|
External product ID |
yes |
This data field is assigned automatically. |
GTIN |
recommended |
|
Product title |
yes |
or
or
|
Brand |
no |
|
Price |
yes |
|
Old price |
no |
|
Currency |
yes |
ISO code of the currency. |
Valid from |
no |
|
Valid to |
no |
|
Product URL |
yes |
|
Small image: URL |
yes |
|
Small image: width |
yes |
Width of the preview image in pixels. |
Small image: height |
yes |
Height of the preview image in pixels. |
Image: URL |
yes |
|
Image: width |
yes |
Image width in pixels. |
Image: height |
yes |
Image height in pixels. |
Product category |
no |
|
Keywords |
no |
|
Short description |
yes |
|
Description |
no |
|
Last updated |
no |
The date of the last update of the variation. |
Shipping costs |
yes |
|
Availability |
yes |
|
Unit price |
no |
|
2.4. Optional: Exporting specific items
Add filters to only export specific items. You can find the filters in the side navigation of the Data » Catalogues » [Open catalogue] » Filters menu.
For catalogues with marketplace formats, both template filters and user-defined filters are available. Template filters are applied automatically and cannot be deselected. User-defined filters can be set as needed to only export specific items.
Adding a filter:
-
Go to Data » Catalogues.
→ The catalogue overview opens. -
Open the catalogue.
-
On the left in the side navigation, click on the Filters (filter_alt) tab.
-
Select a filter from the Select filter drop-down list.
-
On the right, click on Add filter (add).
→ The filter is added.
→ Depending on the filter, either a drop-down list or an input field is displayed. -
Select a value from the drop-down list.
Or: Enter the desired value in the field of the filter you added. -
Save (save) the settings.
→ The filter is saved. -
Add additional filters as necessary.
→ Only data sets that meet all filter criteria are exported.
Tip: The number next to the word Filter shows how many filters have been set. The template filters are not included in this number.
For belboon, the filters explained in Table 1 are available.
| User-defined filters | |
|---|---|
Has a SKU |
Add the filter and select the Account ID, Order referrer and Status. |
Item IDs |
Enter one or more item IDs. Separate multiple IDs using commas. Only variations with these item IDs are exported. |
Variation is active |
Add the filter and select Active or Inactive.
|
Visible for at least one market |
Add the filter and select one or multiple sales channels. |
Has tags |
Add the filter and select one or multiple tags. |
Has at least one barcode |
Add the filter and select one or multiple barcodes. |
Has barcode |
Add the filter and select one or multiple barcodes. |
Without tags |
Only variations without tags are exported. |
Linked to at least one property selection value |
Add the filter and enter one or multiple values of a selection property. |
At least one availability |
Add the filter and select one or multiple availabilities. |
Item has images |
Add the filter and select an option. Has item images = Only items for which at least one image is saved in the Images section of the Item » Items » [Open item] menu will be exported. |
Currencies |
Add the filter and select one or multiple currencies. |
Variation has sales price |
Add the filter and select one or multiple sales prices. |
Price value |
Add filter and select the sales price, operator, and the sales price value. |
Has flag 1 |
Add the filter and select one or multiple flags. |
Has flag 2 |
Add the filter and select one or multiple flags. |
Item created at |
Add the filter, select a value and enter a date or time span if needed.
|
Item updated at |
Add the filter, select a value and enter a date or time span if needed.
|
Variation created at |
Add the filter, select a value and enter a date or time span if needed.
|
Variation updated at |
Add the filter, select a value and enter a date or time span if needed.
|
Belongs to at least one Amazon product category |
Add the filter and select one or multiple Amazon product categories. |
Item type |
Add the filter and select Default, Set, or Multi-Pack. |
Variation is main variation |
|
Variation has an image |
|
Variation is in categories |
Add the filter and select one or multiple categories. Note: Enter the category IDs. |
Variation is in one of these categories |
Add the filter and select one or multiple categories. Note: Enter the category IDs. |
Item has manufacturers |
Add the filter and select one or multiple manufacturers. |
Item has no manufacturers |
Only items for which the option None is saved for the Manufacturer setting in the Settings section of the Item » Items »[Open item] menu are exported. |
Visible for markets |
Add the filter and add one or multiple sales channels. |
Bundle type |
Add the filter and select the bundle type.
|
Visible for a client |
Add the filter and select one or multiple clients. |
Visible for clients |
Add the filter and select one or multiple clients. |
Linked to property selection values |
Add the filter and enter one or multiple values of a selection property. |
Has at least one tag |
Add the filter and select one or multiple tags. |
Variation has child variations |
|
Variation IDs |
Enter one or more variation IDs. Separate multiple IDs using commas. Only variations with these variation IDs are exported. |
Sales price updated at |
Add the filter, select a value and enter a date or time span if needed.
|
Stock updated at |
Add the filter, select a value and enter a date or time span if needed.
|
2.5. Setting up catalogue export
Setting up catalogue export:
-
Go to Data » Catalogues.
-
Open the catalogue for belboon.
-
In the navigation on the left, open the tab Settings (settings).
-
Carry out the settings described in Table 2.
-
Save the settings.
| Setting | Explanation |
|---|---|
Basic settings |
|
Catalogue name; |
These settings are saved automatically when you create the catalogue. |
Format settings |
|
File name |
Enter a name for the file. |
Format |
Select the option CSV or the option TXT. |
Field separator |
Select the option expected by belboon. |
Text delimiter |
Select the option expected by belboon. |
Line break |
Select the option expected by belboon. |
Header is included |
This setting is not required for price search engines. |
Decimal separator |
Select the option expected by belboon. |
Export settings |
|
Limit |
Enter a number in order to determine a maximum number of lines for the export. |
Skip empty files |
Activate to skip the export to the FTP server if the export file is empty. |
Provisioning |
This setting is not required for price search engines. |
Transfer |
For exports to sales channels and price search engines, select the interval Every 20 minutes. This is to ensure that the export is always up-to-date. |
Download settings |
|
Shop URL |
Select the client to be used for creating the URL. |
Receive notifications |
This setting is not required for price search engines. |
Options for admin link |
|
Use version |
If you activate this option, the public link is updated every time you make changes to the catalogue. As such, you need to save the new URL in the belboon back end. |
Options for public link |
|
Activate options |
Activate the option to generate a public link. |
Use version |
If you activate this option, the public link is updated every time you make changes to the catalogue. As such, you need to save the new URL in the belboon back end. |
Use token |
Activate the option to add a token to the download URL. The file is then only accessible if the token is known. |
Security token |
Click on the symbol on the right () to generate a new token. |
2.6. Activating the catalogue
You have set up belboon in PlentyONE and created a catalogue for exporting your item data? Then start the export of your item data. To do so, activate the catalogues which should be exported to belboon in the Data » Catalogues menu.
Activating the catalogue export to belboon:
-
Go to Data » Catalogues.
→ The catalogues are listed. -
Scroll to the belboon catalogue.
-
In the Active column, move the toggle button to the right (toggle_on).
→ The catalogue is active.
Tip: Go to Data » Catalogue export status for information about the status of the export.
2.7. Exporting catalogue data to belboon
belboon retrieves item data via an URL. The data that is available with the URL is updated every 24 hours.
Copying URL for download:
-
Go to Data » Catalogues.
-
Open the catalogue for belboon.
-
In the navigation on the left, open the tab Settings (settings).
-
Click on the area Download settings.
→ The settings for generating the URL are displayed. -
Next to the option Public link, click on the symbol to the right (content_copy).
→ The URL is copied to the clipboard. -
Save the URL in the belboon back end.