billiger.de
billiger.de is a German price comparison portal certified by TÜV. The platform also offers test reports and customer reviews. This website is currently only available in German.
1. Registering with billiger.de
In order to set up billiger.de in PlentyONE you first need to register as a seller on billiger.de. You can do so here. Once you have completed the registration process you can get started on exporting your item data to billiger.de.
Note: The registration form is only available in German.
2. Setting up billiger.de in PlentyONE
First, add billiger.de as a sales channel in the Channel Control Centre. To do so, proceed as described in the following chapters.
2.1. Sales channel overview
In the Channel Control Centre you can find an overview of the sales channels set up in your system.
Table 1 explains the different tiles visible in the Sales channels » Channel Control Centre menu.
| Component | Explanation | ||||||
|---|---|---|---|---|---|---|---|
Name |
The name of the sales channel. |
||||||
more_vert More |
Click here to display more actions for a sales channel.
|
2.2. Adding the sales channel
First, add billiger.de as a sales channel in the Channel Control Centre.
Adding a sales channel:
-
Open the Sales channels » Channel Control Centre menu.
-
Click Add sales channel (add).
→ The menu Add sales channel opens. -
Click Continue in the tile of billiger.de.
-
Enter a name for the sales channel.
-
If asked to, select the Client (Shop) from the drop-down list.
-
Click add Add billiger.de.
→ The sales channel for billiger.de is added.
2.3. Adjusting the general settings
In the menu General settings you can rename the sales channel. To do so, proceed as follows.
Renaming a sales channel:
-
Go to Sales channels » Channel Control Centre.
-
Open the sales channel for billiger.de.
→ The Settings menu opens. -
Switch to the menu General settings.
-
Enter a new Channel name.
-
Click Save (save).
→ The new channel name is saved.
3. Exporting item data
Item data is exported to billiger.de using catalogues. Catalogues are usually managed via the Data » Catalogues menu. However, you can also manage catalogues for billiger.de directly in the Channel Control Centre.
Catalogues are used to export data from your PlentyONE system. There are two different catalogue formats:
-
Marketplace formats are used to export item data to markets.
-
Standard formats are used to export data from your PlentyONE system into a file.
Catalogues with marketplace formats allow you to tailor your item information exactly to the needs of the market. Because here, you assign a suitable PlentyONE data field to each of the data fields of the market. When your variation data is exported to the market, the market’s data fields are then filled with the correct PlentyONE data.
-
Is this your first time working with catalogues? Then read up on the basic concept of catalogues first.
3.1. Creating an offer catalogue
Item data is exported to billiger.de using a marketplace format. In order to export your items to a price search engine you need to create a catalogue. Then, link the data fields in the catalogue with item data saved in PlentyONE in the marketplace format.
Creating a catalogue:
-
Go to Sales channels » Channel Control Centre.
-
Click on the billiger.de tile.
-
Go to Mapping » Offer mapping.
-
Click Create catalogue (add).
-
Enter a name for the catalogue.
-
In the drop-down list Marketplace, select the option Billiger.
-
In the drop-down list Export type, select the option Item (New).
-
In the drop-down list Category, select the option Billiger.de.
-
Save () the settings.
→ The catalogue is created.
→ The catalogue is opened for editing.
|
Do not change the format in the catalogue’s Format settings. To ensure that the export to the sales channel works, all required settings are already configured when you create a catalogue. If you change the settings, errors might occur during the export. |
3.2. Mapping data fields in the catalogue
After you have created a catalogue, map the sales channel’s data fields to item data saved in PlentyONE. This chapter describes how you map data fields and what particularities apply for item exports to billiger.de.
-
The market expects product data that cannot be saved in the PlentyONE item menu? Then create a property for this data. Link this property with your variations. The actual values are saved as property values for this property. Is this your first time working with properties? Then read up on the principles of properties first.
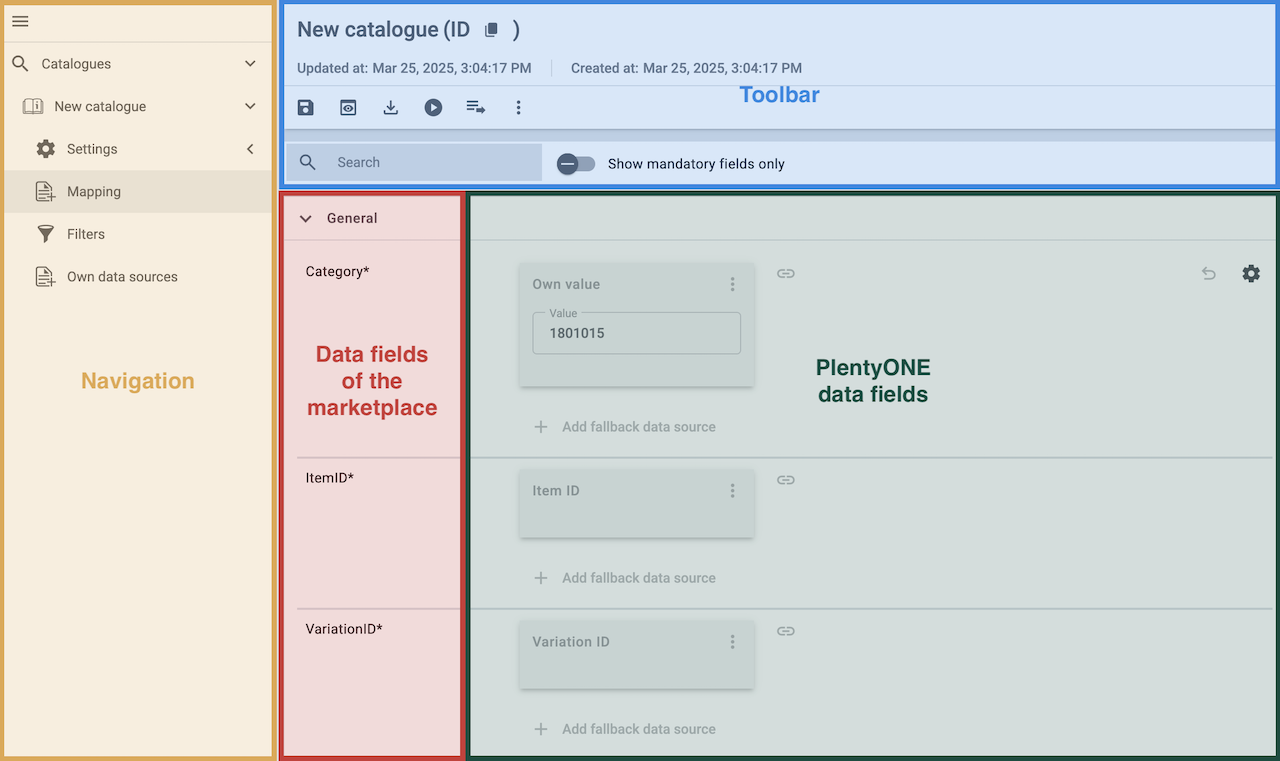
| Availability | Explanation |
|---|---|
Navigation |
When you open a catalogue, the view Mapping is shown. On the very left is the navigation.
|
Toolbar |
The toolbar provides actions for the catalogue. For example, save your mappings, restore an older version of the catalogue or hide or show optional marketplace data fields. |
Marketplace data field |
To the right of the navigation, all data fields available for the market are listed. Mandatory fields are marked with an asterisk (✱). |
PlentyONE data fields |
On the right side of the catalogue, you map the marketplace data fields to appropriate PlentyONE data fields. In the screenshot above, a few of the fields are already mapped. |
Mapping catalogue fields:
-
Go to Sales channels » Channel Control Centre.
-
Click on the tile of your billiger.de sales channel.
-
Navigate to Mapping » Offer mapping.
-
Click on the catalogue you want to edit.
→ The Mapping tab opens.
→ In the left-hand column, the market’s data fields are listed.
Tip: Mandatory fields are flagged with an asterisk (*).
→ In the right column, you map the PlentyONE data fields. Any PlentyONE data fields that you already mapped are also shown in this column. -
Map suitable PlentyONE data fields to the market data fields.
For each marketplace data field, you have a number of mapping options. Expand the info boxes below to get more information about each of these mapping options.-
Simple 1:1 mapping
-
Simple 1:1 mapping with properties
-
Complex 1:1 mapping
-
1:1 mapping with fallback data fields
-
1:n mapping
-
Own value mapping
-
Mapping with mathematical calculations
-
-
Save () the catalogue.
→ The mappings are saved.
In a simple 1:1 mapping, you map a PlentyONE data field to the marketplace data field. If no suitable setting exists in PlentyONE, you can map a property instead.
As such, simple 1:1 mappings allow you to:
-
I want to fill this marketplace data field with the data from this PlentyONE setting.
-
If the data field is empty for a variation, no value is exported for this variation.
Creating a simple 1:1 mapping:
-
Next to the marketplace data field, click on + Add data field.
→ To the left, the list of available PlentyONE data fields are shown in groups. -
Click on the group you need.
→ The PlentyONE data fields of the group are shown. -
Click on the plus to the right of the PlentyONE data field you want to select.
→ The PlentyONE data field is added to the right. -
Click on Confirm.
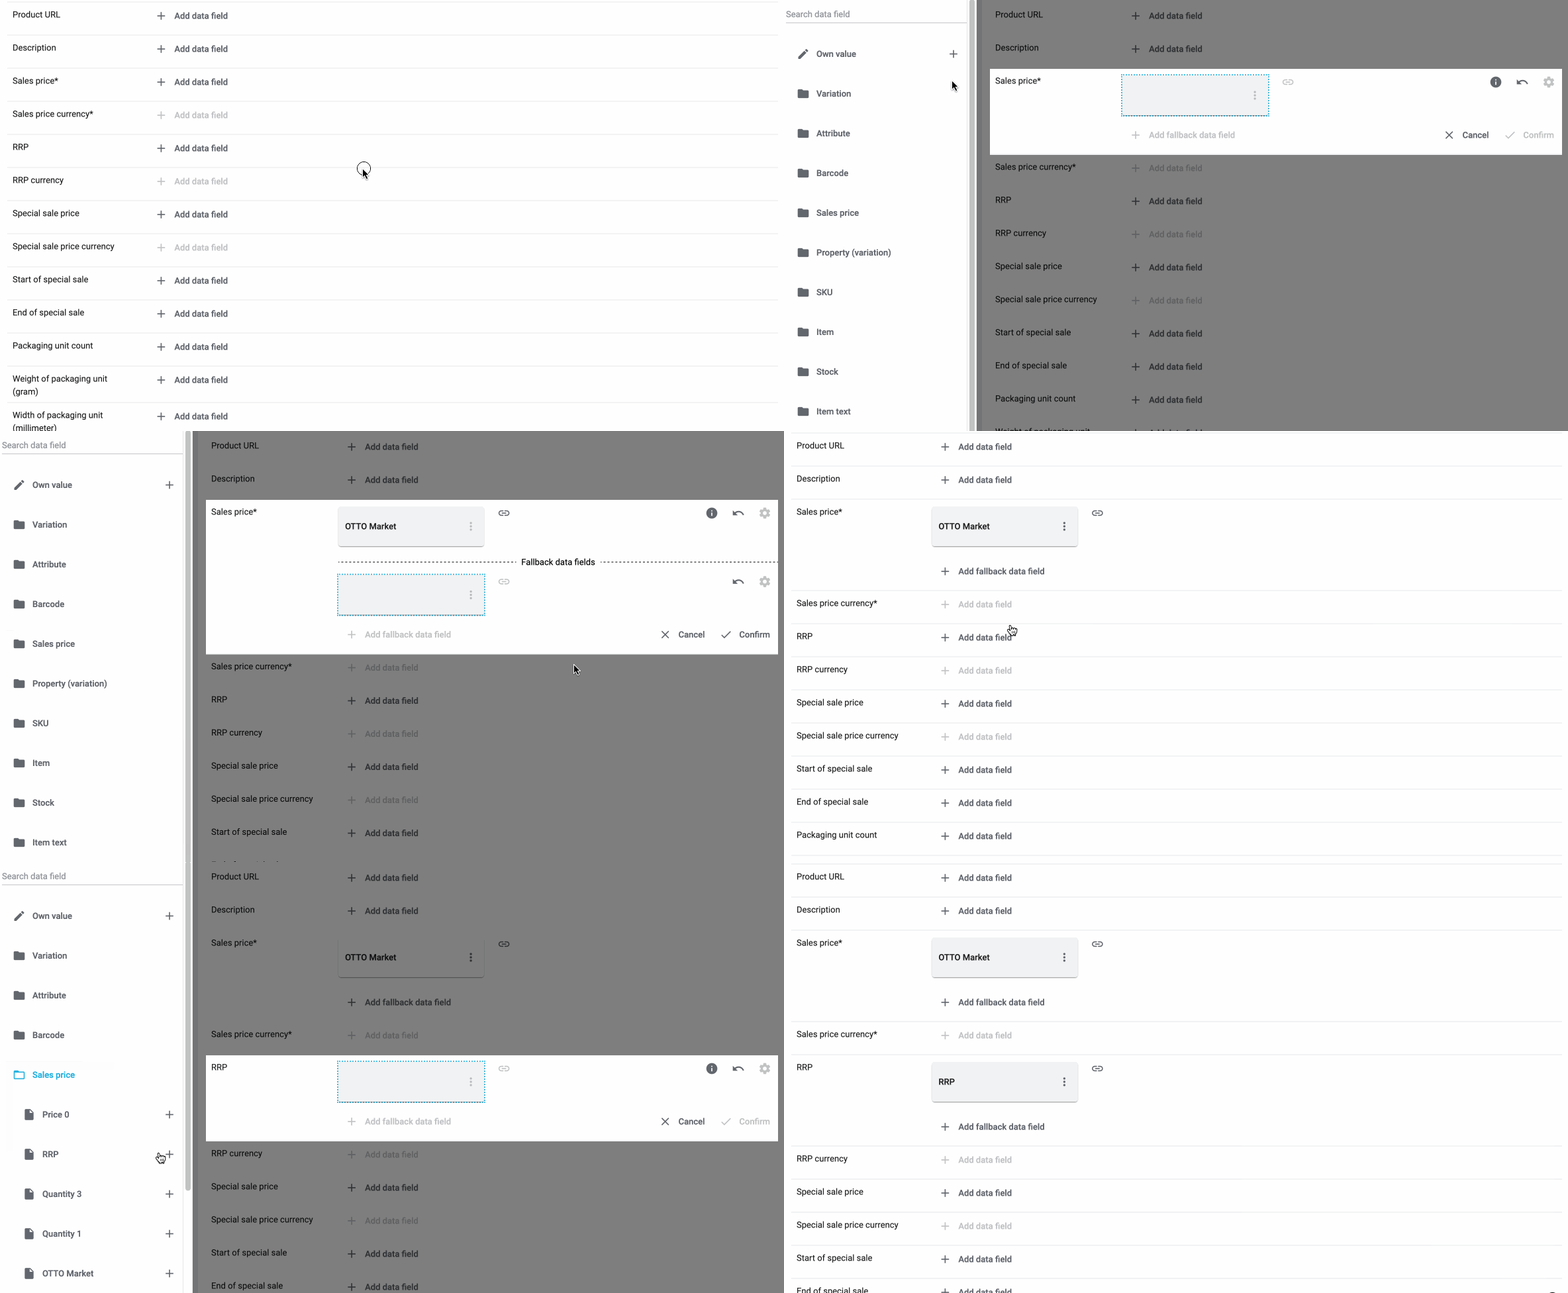
Example: Sales price and RRP for Otto Market
This gif shows you how to map the marketplace data fields Sales price and RRP for Otto Market to PlentyONE data fields:
Reminder: In a simple 1:1 mapping, you map a PlentyONE data field to the marketplace data field. However, what can you do if PlentyONE does not offer a suitable data field? Then it’s the properties' moment to shine. Properties allow you to save any kind of information in your properties.
-
Is this your first time working with properties? Then read up on the principles of properties first.
Creating a property:
-
Create a property with the necessary values.
Tip: Find out how to do that here.
Creating a simple 1:1 mapping with properties:
-
Next to the marketplace data field, click on + Add data field.
→ To the left, the list of available PlentyONE data fields are shown in groups. -
Expand the group Property.
→ The property groups are shown. -
Expand the group you need.
-
Click on the Plus sign on the right of the property you want.
-
From the drop-down list Language, select the language in which you send the data to the market.
-
Click on Confirm.
→ The property is mapped to the marketplace data field.
Like with the simple 1:1 mappings, you map a PlentyONE setting or property to a marketplace data field. Complex mappings are necessary whenever a marketplace data field has more than one possible value. Instead of mapping data fields, for complex mappings you map individual values of these data fields. For example, you cannot simply map the PlentyONE data field Shipping profile to the marketplace data field Shipping method. Why? The market cannot know which of your shipping profiles in PlentyONE corresponds to which of their shipping methods.
| Do not enter own values for complex mappings. All values that you enter must be saved for the variations, either in a setting or as a property value. This also applies if the value Comparative value is shown. You still need to enter exactly the value of the setting or property that you mapped. |
In complex mappings, the value of the market is always exported. Only when you map an own value, the own value that you enter is exported.
You can recognise complex mappings from the field that is shown below the name of the marketplace data field. Click on the field to show the values available for the marketplace data field.

Examples for complex 1:1 mappings are:
-
Categories
-
Brands
-
Shipping setting
Important: For complex mappings, do not map own values or properties of the type None.
Creating a complex 1:1:n mapping:
-
Click on the field for the marketplace data field.
→ A list of the available values is shown. -
Select the value that you want to map a PlentyONE data field to.
→ The value is mapped. -
Next to the marketplace data field, click on + Add data field.
→ To the left, the available PlentyONE data fields are listed in groups. -
Click on a group.
→ The PlentyONE data fields of the group are shown. -
Click on the PlentyONE data field for which you want to map values.
Important: Do not map own values or properties of the type None. -
Your next steps depend on the PlentyONE data field you selected:
-
Alternative 1: The available values for the PlentyONE data value are shown on the left.
-
Next to the value you want to select, click on the plus.
→ The value is added to the field on the right. -
Click on Confirm.
-
-
Alternative 2: The PlentyONE data field is inserted and the field Comparative value is shown.
-
In the field Comparative value, enter a value that is saved in the setting or the property of the mapped PlentyONE data field.
-
Click on Confirm.
-
-
Alternative 3: The PlentyONE data field is inserted and a drop-down list is shown.
-
Select a value from the drop-down list.
-
Click on Confirm.
→ The value of the marketplace data field is exported, not the value of the PlentyONE data field.
Exception: Only when you map an own value, the own value that you enter is exported.
-
-
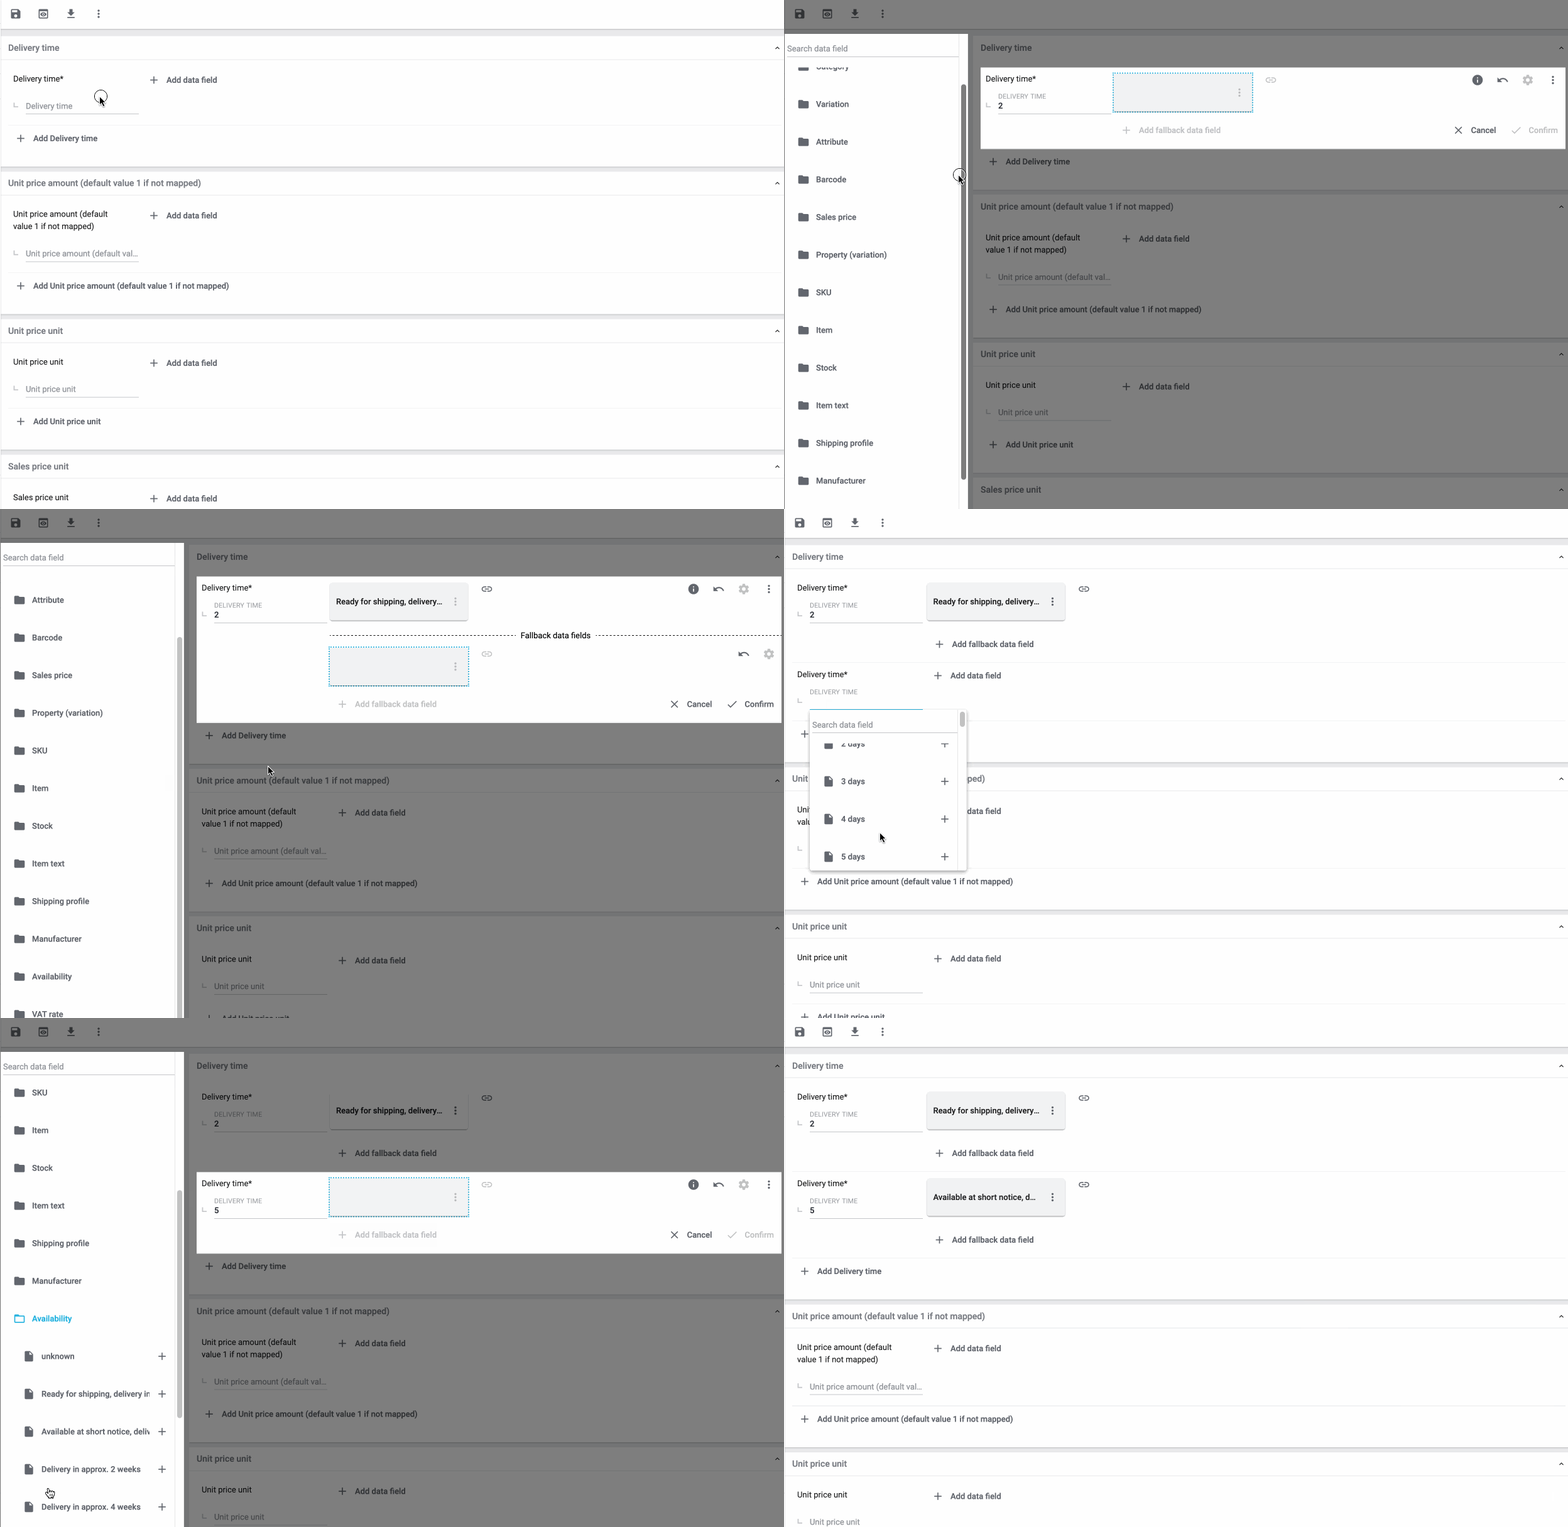
Example: Delivery time in days for Otto Market
This gif shows you how to map suitable PlentyONE values to the values of the marketplace data fields Delivery time in days for Otto Market:
In a 1:1 mapping with one or more fallback data fields, you map a PlentyONE data field to the marketplace data field. In addition, you specify one or more fallback data fields. This ensures that the system keeps looking if the first PlentyONE data field is missing or empty.
So this mapping specifies:
-
I want to fill the marketplace data field with the data from the selected PlentyONE setting.
-
If that data field is missing or empty for a variation, the first fallback data field is checked. The value of that fallback data field is exported instead.
-
If the first fallback data field is also missing or empty for the variation, the second fallback data field is checked. If a value is found, the value of the second fallback data field is exported for the variation etc.
Two separate fallback conditions are available:
Null (default) |
The fallback data field is used if the data field above is mapped in the catalogue but not linked to the variation. The condition "Null" is useful when you want to map fallback data fields for the following types of PlentyONE data fields:
Important: When you add a fallback data field, the fallback condition "null" is selected automatically. To apply the fallback condition "leer", you need to change the default setting. |
Empty |
The fallback data field is used if the data field above is mapped in the catalogue and linked to the variation, but is empty. The condition "Empty" is useful when you want to map fallback data fields for the following type of PlentyONE data fields:
Important: When you add a fallback data field, the fallback condition "null" is selected automatically. To apply the fallback condition "leer", you need to change the default setting. |
Note: Even if you assign one or more fallback data fields, the value of only one of those fields is exported. For each variation, the mapped PlentyONE data fields are checked in the order in which you mapped them. This means that if the first data field does not provide a value for a variation, the first fallback data field is exported etc.
Creating a 1:1 mapping with fallback data fields:
-
Next to the marketplace data field, click on + Add data field.
→ To the left, the list of available PlentyONE data fields are shown in groups. -
Click on the group you need.
→ The PlentyONE data fields of the group are shown. -
Click on the plus to the right of the PlentyONE data field you want to select.
→ The PlentyONE data field is added to the right. -
In the list of PlentyONE data fields, click on the plus icon next to the PlentyONE data field that you want to map.
→ The fallback data field is added with the fallback condition "null". -
Alternative 1: To add the fallback data field with the fallback condition "null":
-
Click on Confirm.
→ The fallback data field is exported if the data field above is not linked to the variation.
-
-
Alternative 2: To add the fallback data field with the fallback condition "empty":
-
To the left of the fallback data field, click on the cog ().
→ The window Data column settings is shown. -
For the setting Fallback condition, select the option Empty.
-
Click on Save.
→ The fallback data field is added with the fallback condition "empty". -
Click on Confirm.
→ The fallback data field is exported if the data field above is empty for the variation.
-
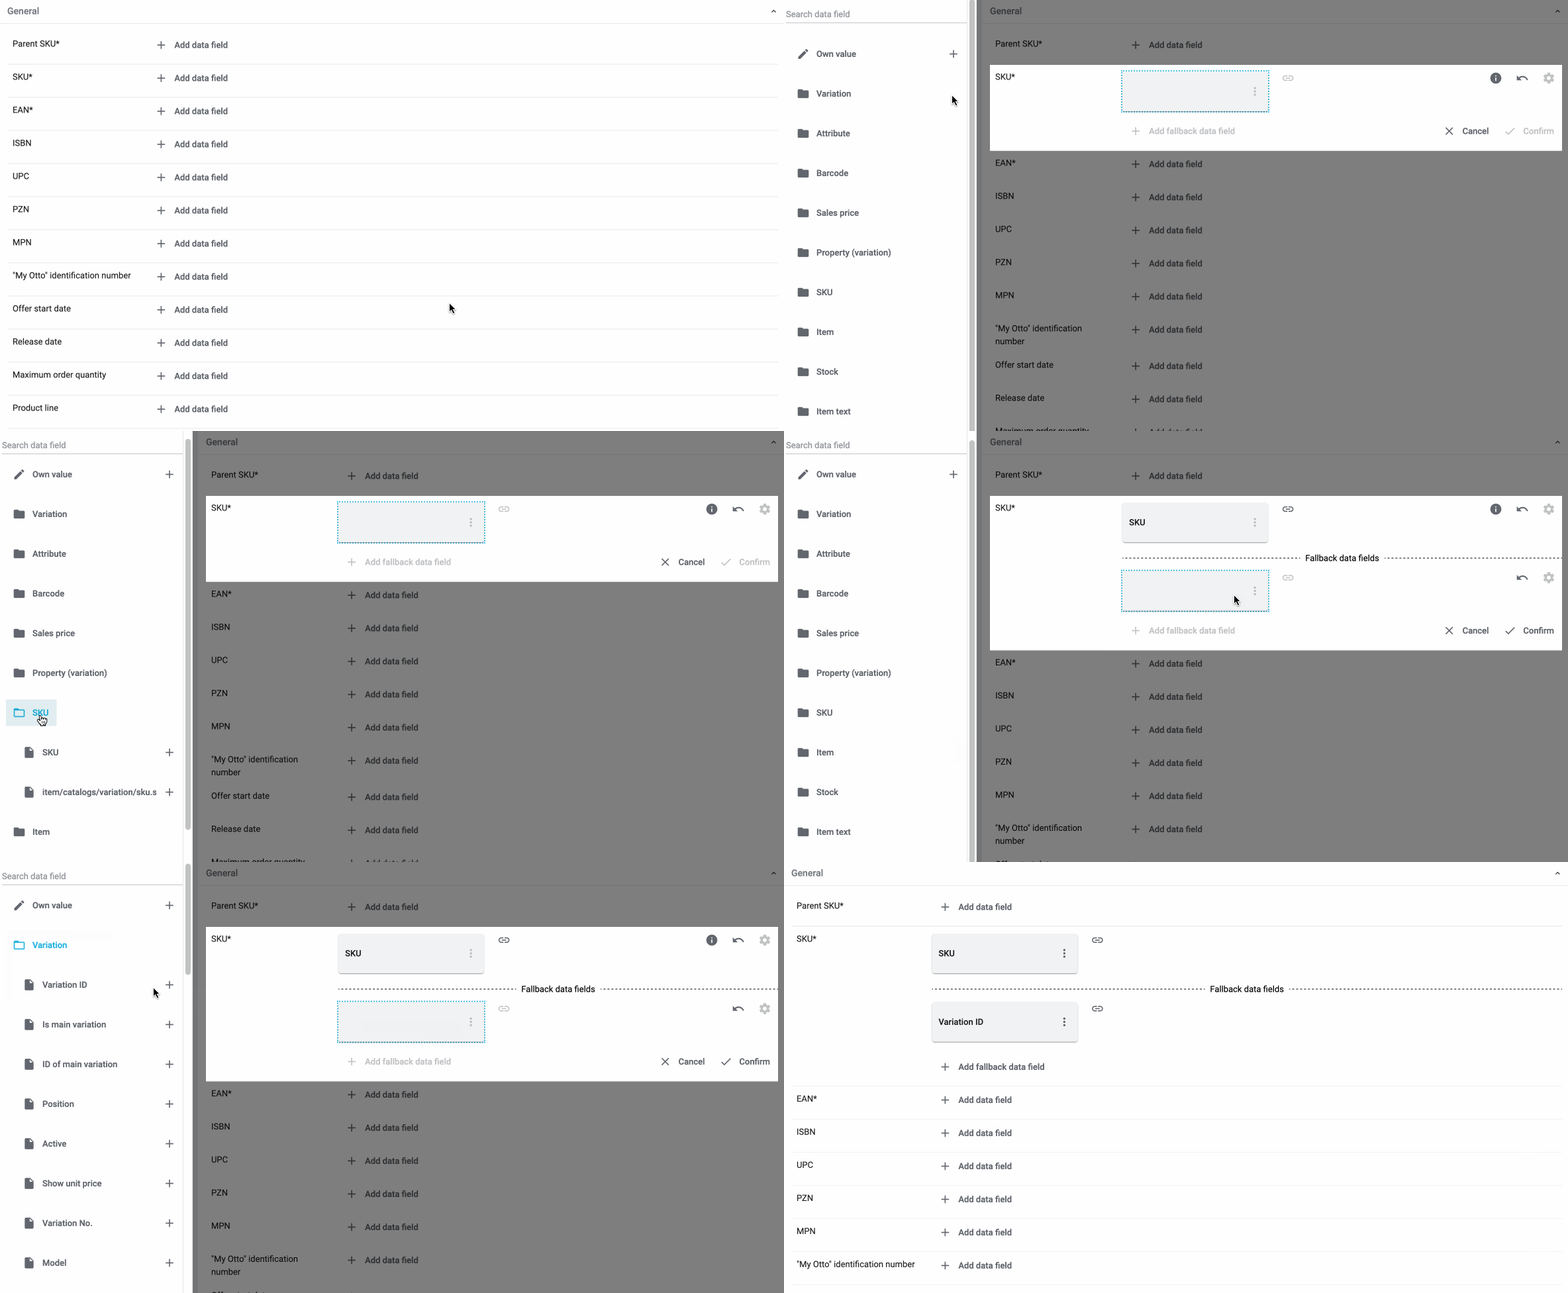
Example: Fallback data field for SKU for Otto Market
This GIF shows you the mapping for the OTTO Market marketplace data field SKU. The PlentyONE data field SKU is mapped to this marketplace data field. The PlentyONE data field Variation ID is mapped as the fallback data field. The fallback condition "null" is applied automatically.
Result: The fallback data field Variation ID is exported if the data field SKU is not linked to the variation.
In a 1:n mapping, you map several PlentyONE data fields to the marketplace data field. You can link these data fields with a separator.
So this mapping specifies:
-
I want to combine these PlentyONE data fields during export so that the marketplace data field is filled with the data of these two or more PlentyONE settings.
Creating a 1:n mapping:
-
Next to the marketplace data field, click on + Add data field.
→ To the left, the list of available PlentyONE data fields are shown in groups. -
Click on the group you need.
→ The PlentyONE data fields of the group are shown. -
Click on the plus to the right of the PlentyONE data field you want to select.
→ The PlentyONE data field is added to the right. -
Click on Confirm.
-
To the right of the mapped PlentyONE data field, click on Add data field ().
→ To the left, the list of available PlentyONE data fields again are shown in groups. -
Map one or several additional PlentyONE data fields to the marketplace data field as described above.
-
Click on Confirm.
-
To the very right of the row, click on Settings ().
-
Select a separator from the drop-down list Separator or add a custom separator.
-
Click on Save.
-
Save () the catalogue.
→ The mappings are saved.
→ During the export, the content of the PlentyONE data fields is combined and exported as one field.
You are sure that you want to export the same value for all variations of a catalogue for a marketplace data field? Then specify an own value. This own value is then exported for all variations.
So this mapping specifies:
-
For this marketplace data field, I want to export the value that I entered in the field Own value for all variations of this catalogue. The value you enter is always exported. The value overwrites the market value also in complex mappings where usually the value of the market is exported. As such, make sure you enter an own value that the market accepts for this marketplace data field.
Creating an own value mapping:
-
Next to the marketplace data field, click on + Add data field.
→ To the left, the list of available PlentyONE data fields are shown in groups. -
Click on the plus next to Own value at the top of the list.
→ The field for the own value is added to the view. -
Enter a value into the input field.
→ This value is exported for all variations.
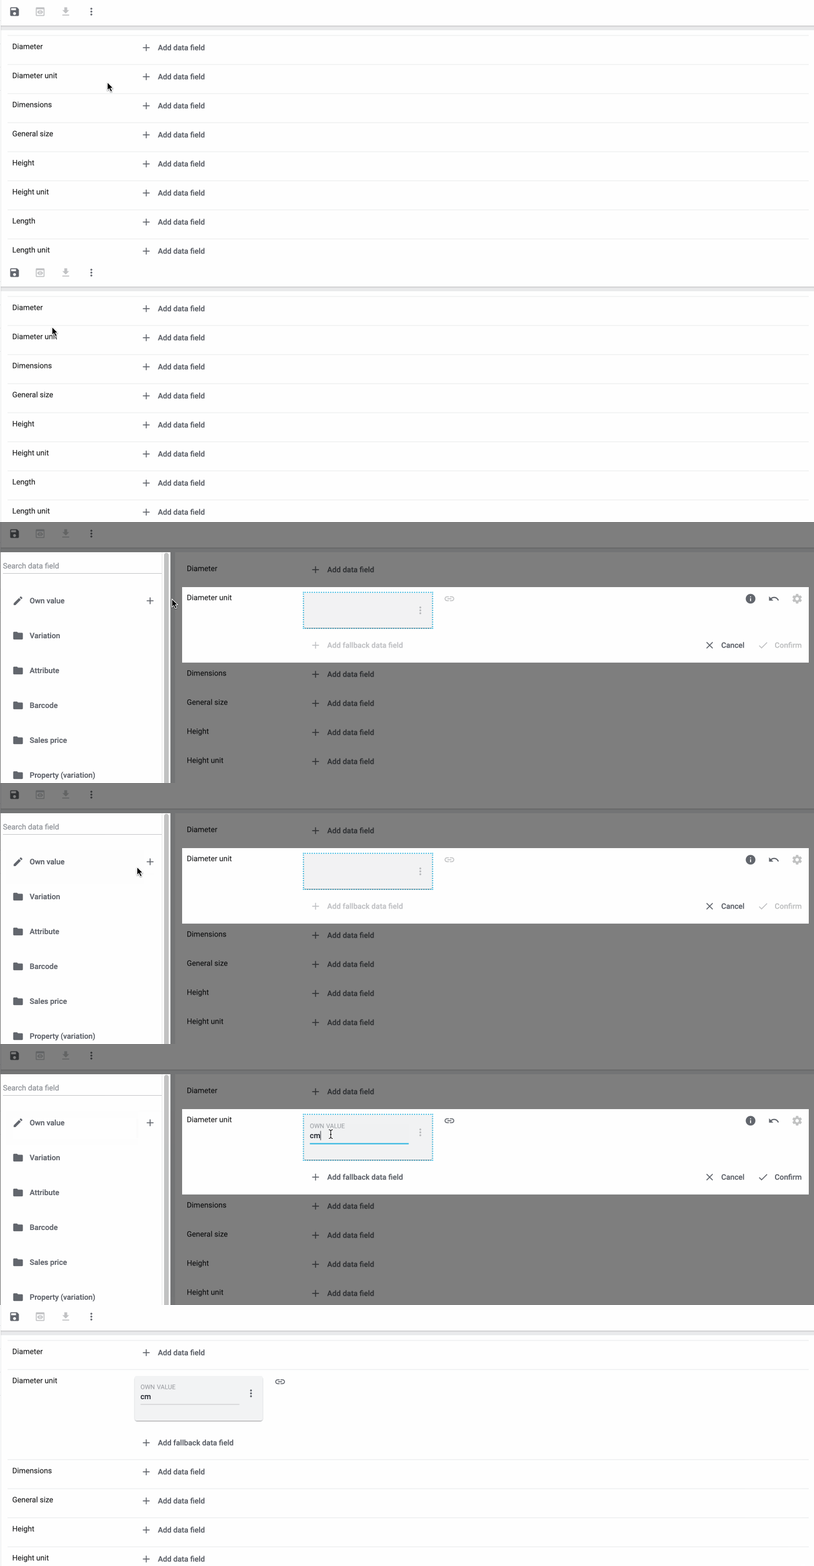
Example: Diameter information
You want to export diameter information for some of your variations. The diameter is saved in centimetres for all your variations. Instead of creating a property for the unit and linking this property to the variations, you can enter the own value cm.
This is an example of how you can map an own value for the diameter unit:
Mathematical calculations allow you to change numerical values automatically during the export.
-
This function only works for data fields that contain numerical values.
-
This functionality is new and not available for all catalogue formats.
So this mapping specifies:
-
I want the numerical value of a PlentyONE data field to be recalculated during the export. Basic arithmetic operations are available for the formulas.
Recalculating numerical values:
-
Next to the marketplace data field, click on + Add data field.
→ To the left, the list of available PlentyONE data fields are shown in groups. -
At the very top of the list, click on the plus icon next to Formula (calculate).
→ The data field Formula is added to the field on the right. -
Click into the data field.
→ The window Modify value is shown. -
Enter a numerical value or select a PlentyONE data field at the bottom right of the window to add it to the calculation (add).
Tip: Use the search function. This helps you to find data fields quickly. -
Optional: If the symbol more_vert is shown in the data field, select the correct assignment for the data field.
Tip: A number tells you how many assignments are necessary for the data field.-
Click on the icon more_vert.
-
In the window shown, select the assignments from the drop-down list.
-
Save the settings.
-
-
Enter numbers and mathematical operators with the on-screen calculator or the keyboard.
-
Save the settings.
→ The entered formula is displayed in the overview.
→ The calculation will be carried out in the next export.
3.3. Recommendations for data field mappings
To help you with mapping your data fields for the catalogue, we have created a list of recommended data field mappings. Note that these mappings are recommendations only. Depending on how you manage your item data, other mappings may be more appropriate than the recommendations given here.
-
Need more information about the PlentyONE data fields? All data fields are described on the manual page for the standard format Item (new).
Unresolved include directive in modules/sales-channels/pages/billiger-de-centralised.adoc - include::maerkte:partial$billiger-de-recommended-mappings.adoc[]
3.4. Optional: Exporting specific items
Unresolved include directive in modules/sales-channels/pages/billiger-de-centralised.adoc - include::markets:partial$centralised-catalogue-filters.adoc[]
3.5. Setting up catalogue export
PlentyONE does not export your item data to billiger.de directly. Instead, your system exports the data to a file and then makes this file available via a link that billiger.de checks in regular intervals. In order to ensure that this process can be carried out without any issues you will need to adjust a few additional settings for the catalogue you want to export to billiger.de. To do so, proceed as follows:
Setting up catalogue export:
-
Open the menu Sales Channels » Channel Control Centre » [Your billiger.de sales channel] » Mapping » Offer mapping.
→ An overview of all Offer catalogues for billiger.de is displayed. -
Open the catalogue you want to adjust.
-
In the navigation on the left, open the tab Settings (settings).
-
Carry out the settings described in Table 2.
-
Save the settings.
| Setting | Explanation |
|---|---|
Basic settings |
|
Catalogue name; |
These settings are saved automatically when you create the catalogue. |
Format settings |
|
File name |
Enter a name for the file. |
Format |
Select the option CSV or the option TXT. |
Field separator |
Select the option expected by billiger.de. |
Text delimiter |
Select the option expected by billiger.de. |
Line break |
Select the option expected by billiger.de. |
Header is included |
This setting is not required for price search engines. |
Decimal separator |
Select the option expected by billiger.de. |
Export settings |
|
Limit |
Enter a number in order to determine a maximum number of lines for the export. |
Skip empty files |
Activate to skip the export to the FTP server if the export file is empty. |
Provisioning |
This setting is not required for price search engines. |
Transfer |
For exports to sales channels and price search engines, select the interval Every 20 minutes. This is to ensure that the export is always up-to-date. |
Download settings |
|
Shop URL |
Select the client to be used for creating the URL. |
Receive notifications |
This setting is not required for price search engines. |
Options for admin link |
|
Use version |
If you activate this option, the public link is updated every time you make changes to the catalogue. As such, you need to save the new URL in the billiger.de back end. |
Options for public link |
|
Activate options |
Activate the option to generate a public link. |
Use version |
If you activate this option, the public link is updated every time you make changes to the catalogue. As such, you need to save the new URL in the billiger.de back end. |
Use token |
Activate the option to add a token to the download URL. The file is then only accessible if the token is known. |
Security token |
Click on the symbol on the right () to generate a new token. |
3.6. Activating the catalogue
You have set up billiger.de in PlentyONE and created a catalogue for exporting your item data? Then start the export of your item data. To do so, activate the catalogues which should be exported to billiger.de in the Data » Catalogues menu.
Activating the catalogue export to billiger.de:
-
Go to Data » Catalogues.
→ The catalogues are listed. -
Scroll to the billiger.de catalogue.
-
In the Active column, move the toggle button to the right ().
→ The catalogue is active.
Tip: Go to Data & Plugins » Catalogue export status for information about the status of the export.
3.7. Exporting catalogue data to billiger.de
Once you have fully prepared a catalogue for the export to billiger.de you can save the URL for the export file in the backend of billiger.de. To do so, proceed as follows:
Copying URL for download:
-
Open the menu Sales Channels » Channel Control Centre » [Your billiger.de sales channel] » Mapping » Offer mapping.
→ An overview of all Offer catalogues for billiger.de is displayed. -
Open the catalogue you want to export.
-
In the navigation on the left, open the tab Settings (settings).
-
Click on the area Download settings.
→ The settings for generating the URL are displayed. -
Next to the option Public link, click on the symbol to the right (content_copy).
→ The URL is copied to the clipboard. -
Save the URL in the billiger.de back end.
The data that is available via the URL is updated every 24 hours.