The Automation menu
Automate your daily tasks! In the Automation menu, PlentyONE offers two different tools for automating your routine business processes:
-
PlentyONE Flow
-
Processes
1. PlentyONE Flow
With PlentyONE Flow (short: "Flow"), you can automate workflows for your business processes. Flow provides you with two functions in the Automation menu:
-
In Flow Studio you create and configure automated workflows. Depending on the trigger type, there are three flow types:
-
Event-based Here, the occurence of a defined event in an order (e.g., a status change) triggers a flow run for that particular order.
-
Time-based: Here, the arrival of a specific point in time (e.g., Tuesday at 9 AM) triggers a flow run for all orders that match the set filter criteria.
-
Manual: Here, a user manually triggers a flow run for selected orders.
-
-
In the Flow Tracker, you can monitor ongoing or finished workflows.
The central element in both functions is the Canvas – a graphical interface on which the workflows are visualised with Actions and Controls. In Flow Studio the canvas can be edited, in Flow Tracker it is only used for visualisation and is therefore read-only.
1.1. The Flow Studio overview
To access plentyONE Flow Studio, open the menu Automation » Flow Studio. The following overview appears:
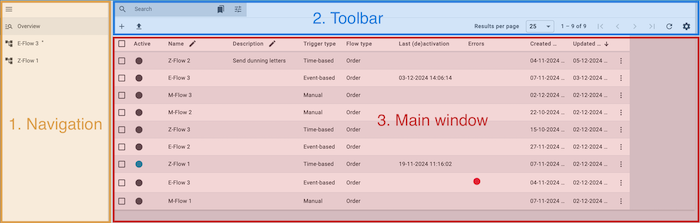
Here, you navigate between the Flow overview (manage_search) and any flows you have opened for editing (description). The currently selected area (highlighted in grey) is displayed in the main window on the right. Click on menu to expand or collapse the navigation bar.
The following functions are available in the toolbar:
-
Create a flow (add)
-
Configuring the columns in the main window (settings)
-
Searching for a flow * and displaying it in the overview (search)
-
Setting filters for the search (bookmarks)
-
Saving and applying filters (bookmarks)
When the overview (manage_search) is selected in the navigation and you perform a search (search), you will see the list of found flows in the main window.
-
Use the context menu (more_vert on the right of a flow row) to activate/deactivate, copy, export, delete or manually run a flow. You can also use the context menu to switch directly to Flow Tracker.
-
Use Select all (check_box_outline_blank in the top row of the overview) to select all found flows, and Select flow (check_box_outline_blank in the respective flow row) to select individual flows to open or delete.
-
Use Enable edit mode (edit in the top row of the overview) to edit the content of the fields in the respective columns directly in Flow Studio.
1.2. The Canvas view in Flow Studio
The Canvas view appears after you select the trigger type and configure the necessary settings when creating a new flow, or when you open an existing flow. It is structured as follows:
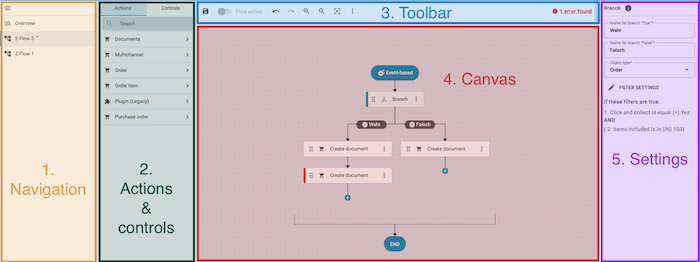
Here, you navigate between the Flow overview (manage_search) and the Canvas view (description). The currently selected area (highlighted in grey) is displayed in the main window on the right. Click on menu to expand or collapse the navigation bar.
The following functions are available in the toolbar:
-
Save flow (save)
-
Enable/disable a flow (toggle_on and toggle_off)
-
Undo/redo configuration steps (undo and redo)
Note: This function applies only to steps that take place on the canvas, not to any settings made within an action or control. -
Zoom in/out on the Canvas (zoom_in and zoom_out)
-
Centre Canvas (filter_center_focus)
-
Functions behind the context menu: (more_vert)
-
Run flow (play_circle)
-
Go to Flow Tracker (open_in_new)
-
-
Number of flow steps / Maximum number of flow steps
-
Error messages regarding the flow *(possible error messages: *No errors found, [Number] errors/warnings found)
-
Click on the error message, and information about the found errors/warnings will appear in the column on the right. On the Canvas, faulty flow steps are marked with a red bar.
-
Note: Error messages refer to missing or incorrect mandatory fields. It is the responsibility of the users to ensure that the flow itself is fit for purpose.
When a flow is selected in the navigation, you will see the corresponding flow steps displayed on the canvas.
The following elements can appear on the Canvas:
-
Trigger type (always the first rounded element). Possible trigger types: Event-based, Time-based, and Manual
-
Controls of the type Search
-
Controls of the type Branch
-
Controls of the type Start
-
Controls of the type Adapter
-
Plus signs (add_circle), which indicate possible locations for additional flow steps.
-
Lines and arrows, which show the connections between the elements as well as the flow direction.
-
Collectors (arrow_and_edge), which represent the end of a flow branch .
Click on a specific flow step, and the input fields and configuration details for the step will appear in this column.
Here, you can also directly edit the flow name, description as well as the trigger.
The following fields and information can appear in the column:
-
Input fields for configuring the flow step.
-
The Filter Settings button, to open the filter settings for the step.
-
Explanations of the filter settings that have already been configured for the step.
-
For interactive flow steps, a message indicating that the flow step requires manual input.
-
Information about trigger selection, object type and order type
2. Processes
Similar to PlentyONE Flow, processes help you to automate complex workflows in your PlentyONE system. However, processes allow you to automatically print order documents or shipping labels and, depending on the workflow at hand, include user dialogues including different options. To use the processes, the tool PlentyONE Base has to be installed and running on your local computer.
Go to Setup » Processes » New process to set up a new process. Refer to the setting up processes page of the manual for more information on how to set up processes.
You can access and run the processes you have already set up any time by clicking Processes in the upper menu bar of the PlentyONE back end. The manual page on running processes describes the necessary steps to run processes.