Warehouse pick lists
In PlentyONE. you can generate warehouse pick lists as PDF files, for example if you want to print them or import them into another software. In contrast to the regular pick list, a warehouse pick list displays the relevant order items for a specific warehouse. If you use several warehouses, you can use the warehouse pick list to improve the efficiency of the picking process.
1. Displaying item data
Use the menu Setup » Orders » Documents » Warehouse pick list to determine which item data should be displayed on your warehouse pick lists, such as Item ID, Quantity, Storage location or Invoice number. In addition, you can determine at which positions and in which order those data are displayed on the warehouse pick list.
You can carry out individual settings for most of the fields described in Table 1 concerning the parameters width, font size and font weight that allow you to choose an individual layout for the warehouse pick list. Use the Preview () to check the results of the settings while preparing the document template. To display the fields on the warehouse pick list in the order of your choice, assign the position numbers 1 to 14 from the respective drop-down list to them. Select the option Pos for fields that should not be displayed on the warehouse pick list.
|
Mandatory setting
At least one of the fields Order ID or Invoice number has to be activated. This is done by assigning a Position to those fields on the warehouse pick list. Make sure to select a position number that is not already being used. |

Displaying item data:
-
Go to Setup » Orders » Documents » Warehouse pick list.
-
Carry out the settings according to Table 1.
-
Save () the settings.
| Setting | Explanation |
|---|---|
Top margin |
Enter a value (in mm) for the top margin of the page. Adjust this value, if you use a PDF template containing the company information and the logo at the top of the page and you want to position this "header" above the warehouse pick list. |
Character set |
Select a character set that should be used for coding the warehouse pick list. |
Storage location |
Determine how the Storage location should be displayed on the warehouse pick list. For example, only the storage location name or a combination of warehouse information can be displayed, such as Dimension/storage location name. |
Quantity |
Determine how the quantity of items should be displayed on the warehouse pick list. |
Item ID |
Determine how the item ID should be displayed on the warehouse pick list. |
Variation No. |
Determine how the variation number should be displayed on the warehouse pick list. |
GTIN |
Determine how the GTIN of the item should be displayed on the warehouse pick list. |
Free text |
Select one of the Free text fields 1-20 from the drop-down list. |
Item description |
Determine which information should be included in the item description on the warehouse pick list. The Item name is always displayed in this field. It is also possible to include further information, such as the item ID, external item ID, item number and EAN. Deactivate the check box for the parameters that should not be displayed on the warehouse pick list. The selection is also valid for variations. |
Order ID |
Determine how the order ID should be displayed on the warehouse pick list. |
Invoice number |
Determine how the invoice number should be displayed on the warehouse pick list. |
Delivery note No. |
Determine how the delivery note number should be displayed on the warehouse pick list. |
Manufacturer |
Determine how the manufacturer should be displayed on the warehouse pick list. |
Item price |
Determine how the item price should be displayed on the warehouse pick list. |
BBD |
Determine how the best before date should be displayed on the warehouse pick list. |
Batch |
Determine how the batch number should be displayed on the warehouse pick list. |
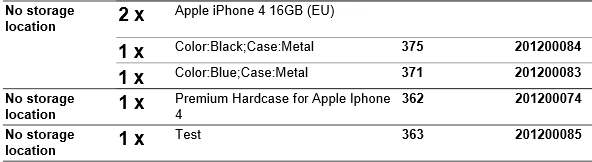
A warehouse pick list based on the settings shown in image 1 looks as follows:
2. Uploading a PDF template
A template is needed for displaying your online shop’s letter paper, i.e. a page containing your company information, logo and layout elements according to your corporate design. This template needs to be in PDF format. In PlentyONE. it is possible to use a document template in PDF format to create the warehouse pick list. Proceed as described below to upload a PDF template.
Uploading the PDF template:
-
Go to Setup » Orders » Documents » Warehouse pick list.
-
Open the PDF template tab.
-
Click on the New template tab.
-
Click on Choose file.
-
Select a PDF file as template.
-
Save () the settings.
→ The PDF template appears in the Templates tab. In this tab, you can preview or delete the PDF template.
|
Tip
If you use a PDF template including a header that you would like to position above the warehouse pick list, you might have to change the value saved as top margin. |
Fur further information, refer to the Order documents page of the manual.
3. Changing a warehouse pick list
Use the menu Orders » Fulfilment » Warehouse pick list to generate a warehouse pick list and initiate automatic status changes. The warehouse pick list is generated as a PDF file. Before generating a warehouse pick list, check the settings of the document template in the settings menu of the warehouse pick list. The link Change warehouse pick list in the warehouse pick list menu takes you to the settings in the menu Setup » Orders » Documents » warehouse pick list, in which the document settings and the PDF template for the warehouse pick list are configured. The following is an example of a warehouse pick list indicating the order ID and the invoice number. We recommend activating the order ID in all cases, since an invoice is not always available yet, as becomes clear in the example.

4. Generating a warehouse pick list
After having carried out the settings according to Table 1 , you can determine which orders should be included in the warehouse pick list in the Orders » Fulfillment menu. In this menu, a Search filter allows you to select the orders and to determine how they are sorted on the warehouse pick list.
To generate a warehouse pick list, proceed as follows.
Generating a warehouse pick list:
-
Go to Orders » Fulfilment.
-
In the line Warehouse pick list click on the small plus.
-
Carry out the settings according to the information given in Table 2.
Note that the settings comprise Search filters as well as Procedures. -
Click on the gear-wheel () to generate the warehouse pick list.
| Setting | Explanation |
|---|---|
Search filter |
|
Order status |
Select the status of the orders for which the warehouse pick list should be generated from the drop-down list. |
Owner |
Select the owner of the orders from the drop-down list for which the warehouse pick lists should be generated or select ALL if warehouse pick lists should be generated for all owners. |
Client (store) |
Standard = only standard shop |
Warehouse |
Select a warehouse for which the warehouse pick lists should be generated or select ALL if warehouse pick lists should be generated for all warehouses. |
Order limit |
Select how many orders should be handled at a time. Set a value between 5 and 300. |
Attach invoices |
Select the option Yes to sort existing invoices according to their order ID and attach them to the warehouse pick list. |
Invoices per grouping |
Select how many invoices should be exported per grouping. |
Procedure |
|
Change order status |
Select the status that orders should receive after generating the warehouse pick list. |