User accounts and access
Create accounts for new users and edit existing user accounts in the user menu. Furthermore, assign roles and accesses to users.
-
You use roles to group user accounts, assigning the same rights to several accounts.
-
Within the roles you assign menu and plugin visibilities as well as REST-API permissions.
Five free CUL user licences are included in every plentysystem system. If you need additional user accounts, book them in the configurator.
|
What is a CUL user licence?
CUL stands for concurrent user licencing. This license determines how many user accounts can access the PlentyONE back end, REST-API as well as PlentyONE POS. As such, we limit simultaneous use and not the number of user accounts you can create. |
1. User accounts
Under Setup » Account management » Accounts you find all user accounts, you can open them from here, send Emails, see the user status or edit them with the more function.
The Setup » Account management » Accounts menu is structured as follows:
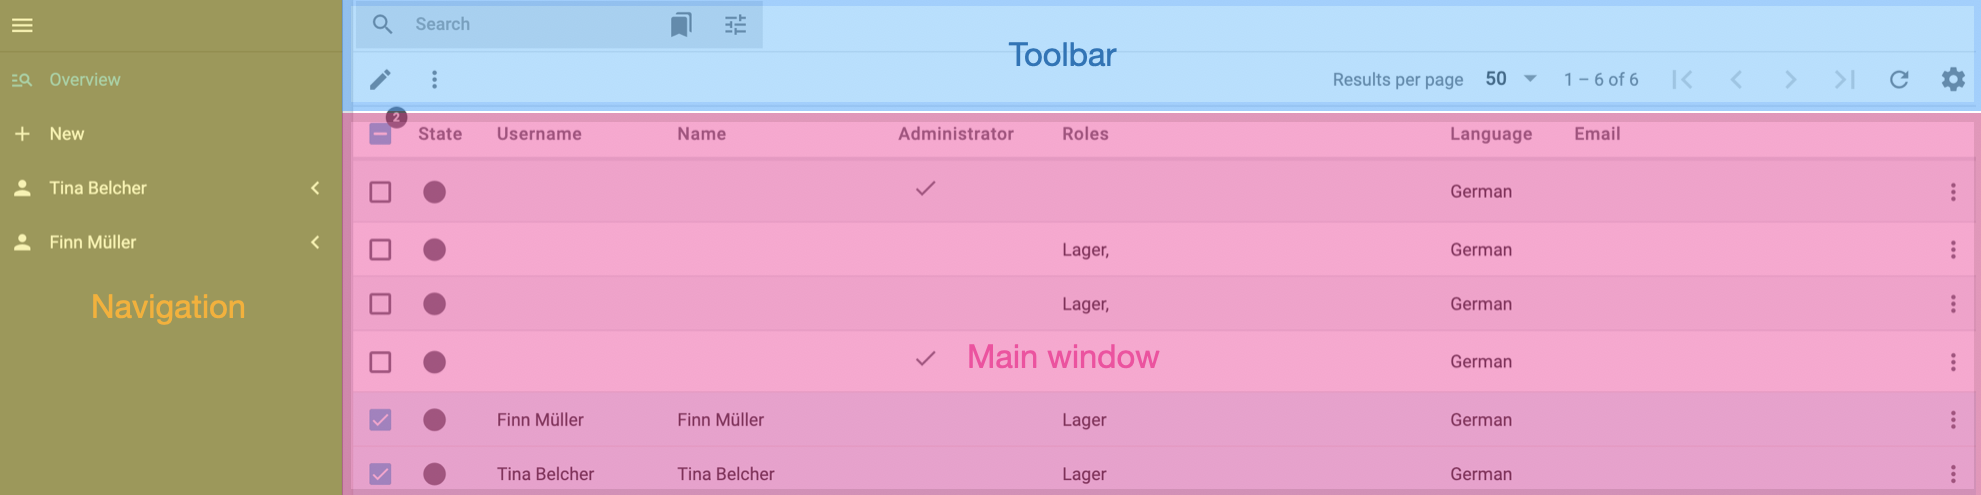
-
Navigation: Here you can create new user accounts or open up user accounts that are selected in the main window. Click menu to hide or show the navigation.
-
Toolbar: Here you can search user accounts and apply specific filters, configure the columns of the main window and the results per page. If you select one or more user accounts, you can open them with Open selected users (edit) or edit them by clicking on More (more_vert). Via More (more_vert) you can assign roles to user accounts or remove roles from them, send Emails, reset previously started box picking and log out selected user accounts.
-
Main window: In the main window you find all user accounts and their status, name, roles and other columns whose position you can change over the toolbar. Via More (more_vert) in the main window you can send Emails to user accounts, deactivate user accounts, log out user accounts or delete them.
Column |
Beschreibung |
ID |
Unique ID of the user account. |
Status |
Displays if the user is logged in, logged out or deactivated. |
Invitation status |
Invitation status of user accounts. |
User |
Name of the user account or e-mail address that is connected with the PlentyONE account. |
Name |
Name of the person the user account is assigned to. |
Administrator |
Indicates if the user account is administrator. |
Roles |
Roles that were assigned to the user account. |
Email address that is used for Send Email |
|
Language |
Language of the backend that the user account uses. You can switch between German and English. |
1.1. Creating user accounts and connecting them with a PlentyONE account
When using your PlentyONE System for the first time, a default user account of the access type Administrator with administrative rights is already set up in the system. You need at least one administrator user account. Either create a new user account with the access type Administrator and delete the default user account afterwards or edit the existing user account. Proceed as described below to create a new user of any access type.
You have the option to create an user account and simultaneously connect it to a PlentyONE account in the menu Setup » Account management » Accounts.
To do this, proceed as follows:
Creating user accounts and connecting them with a PlentyONE account:
-
Open the Setup » Account management » Accounts menu.
-
Click Invite new user (send).
→ The invite detail view opens. -
Enter the email address that you want to send the invitation to.
-
Carry out the additional settings. Note Table 2.
-
Save (save) the settings.
The user account is created and the invitation is send to the email address you entered.
Create a user account without PlentyONE account
-
Open the menu Setup » Account management » Accounts.
-
Click on New (add).
-
Enter the*User name*.
-
Enter the real name under Name.
-
Enter the user’s email address. This allows the user to receive messages from the system.
-
Enter the Password.
-
Repeat the password. .{User access} Pay attention to the information given in Table 2.
-
Save the settings.
The user name must not contain any spaces and must have at least 5 characters.
The user accesses are preset and the accesses' settings cannot be changed. In this table you find which permissions are preset for which access:
| Access | Explanation |
|---|---|
Administrator |
Access with all rights and no restrictions. Has to be assigned to at least one user account because only an administrator can create, edit and manage user accounts without any restrictions. When using multiple administrator accounts, these accounts all have equal rights. |
Only API user |
Access for REST calls that can be assigned in the user account. REST calls are activated individually. REST calls are not assigned to user accounts by default. Attention: Users with this user access are not allowed to access the back end. |
| The access types Call centre, Logistics, Blog and Newsletter2Go do not exist anymore and have been migrated to the standard user account. |
1.2. Editing a user account
After creating a user account, the new account is displayed in the user account overview. Select a user account to edit the account settings. You may not be able to see all of the settings. The settings that are visible depend on your own user access and on the user access of the user account that is being edited.
Editing a user account:
-
Open the Setup » Account management » Accounts menu.
-
Click Search (search).
→ All user accounts are displayed. -
Take the changes according to Table 3
-
Save (save) the settings.
|
Password is saved
The password you entered when creating your user account will not be visible in the editing mode later on, but it is saved. You do not have to re-enter the password when editing the user account. |
1.2.1. Entering user data
In the user account you enter information and change the settings of a user account. Only users with administrative rights can edit the user name, IP restriction, user access and roles. All other user data can also be changed by a user in their own account. In this tab, it is also possible to block a user account.
| Setting | Explanation |
|---|---|
General |
|
User* |
User names can’t contain spaces and must be at least five characters long. *Only available for users that log in via PID and user name. |
Name |
Actual name of the user displayed in the title bar of the back end. |
Enter the user account’s email address. The email address is important for system notifications, notifications from event procedures and group communication within the system. |
|
Time zone |
Select the user’s time zone. |
Language |
Select the language for the admin area. This is the default language that is used when logging in. |
Login data |
|
Password |
Enter a new password to give the user account this password. |
Repeat password |
Enter the password again. |
App Pin |
You can enter a 4 to 12 digit PIN for employees who work with PlentyONE POS. If you save a PIN, it will be possible to quickly switch from one user account to another in the PlentyONE App. However, users can also log into PlentyONE POS with their password. |
Repeat App Pin |
Re-enter the PIN. |
Restrict IP |
Enter the IP address of the user’s computer. The user will only be allowed to log into the system with this IP address. |
User deactivated |
Activate to deactivate the user account. Deactivated users will no longer be able to log into the system. |
Rights |
|
User accounts access |
Select the user access for the user account. You can choose between*Administrator* and Only API user. |
Assigned roles |
Select roles for the user account. roles have to be created beforehand so they can be selected here. |
Signature |
Text that is automatically attached to messages in the Messenger. |
1.2.2. Assign roles to user accounts
To assign a role, proceed as follows:
-
Open the menu Setup » Account management » Accounts.
→ The detail view opens. -
Select an Account.
→ The account detail view opens. -
Click Assigned roles in the Rights area.
→ The dropdown menu expands. -
Choose an existing role.
Or: Create a new role. Therefore, click Create new role (add).
→ The user account is assigned the rights of the role.
Example of use
The administrator of the company MyStore creates multiple roles. All the rights to be assigned to every user account are included in the Employee role. With this role, it is no longer necessary to assign these rights to every single user. Also, changes to rights concerning all user accounts can be made in the Employee role. In addition to this role, the administrator creates the Warehouse technician and Accounting roles - specific roles for a small group of users only.
| Role | Authorisations | Menu visibilities |
|---|---|---|
Employees |
Clients (stores) » Standard |
Start » Webmail |
Warehouse technician |
Warehouse |
Setup » Stock » Warehouse |
Accounting |
Start » Vacation |
Mr. Doe is a logistics specialist at MyStore and receives the Employee and Warehouse technician roles. If a user account has several roles, the user rights are added up. Therefore, Mr. Doe receives the rights Clients (stores), Webmail from the Employee role as well as the rights Warehouse, Stock and Fulfilment from the Warehouse technician role. However, he doesn’t have the Vacation and Accounting rights because the Accounting role wasn’t assigned to his user account.
1.2.3. Personal settings
You find the personal settings either under PlentyONE logo on the top left or under your profile picture in the top right. In this area, you can change the settings of the user account currently logged into the system. Therefore, you can only see this tab in your own user account. The personal settings are separated in the tabs General and Shortcuts that only affect you.
1.3. Connecting an existing user account with a PlentyONE account
Proceed as follows to connect an existing user account in your system withe a PlentyONE account:
-
Open the Setup » Account management » Accounts menu.
-
Click Search (search).
-
Click More (more_vert) in the row of the user account you want to connect with a PlentyONE account.
-
Click Invite user.
-
Enter an unique email address.
-
Click Add.
This email address will receive an automated invitation email (expires after 14 days) to connect the existing user account with a PlentyONE account.
The detail view of an existing user account changes, once you connected it with a PlentyONE account. You will find the following fields in the account settings of your PlentyONE account: Name, Timezone, Language, Password and Repeat Password.
1.4. Searching user accounts
Filters help you to search for user accounts. If no filters are used, all user accounts are displayed in the overview.
Searching user accounts
-
Open the Setup » Account management » Accounts menu.
-
Put in the necessary filter under Filter.
-
Click Search (search).
→ The filtered user accounts show up.
| Setting | Explanation |
|---|---|
Search |
Perform a search. Select appropriate filter options for the search beforehand. |
Reset (refresh) |
Reset the filters to their original settings. |
ID |
Enter an ID to search for the user account that has this ID. |
Name |
Enter the name to search for the user accounts with this real name. |
User |
Enter the user name to search for the user accounts with this real name. |
Type in the Email address to search for user accounts with this specific Email address. |
1.5. Editing multiple user accounts
Edit multiple user accounts with the More (more_vert) in the User menu. Here, previously selected user accounts are edited.
Using the group function:
-
Open the Setup » Account management » Accounts menu.
-
Select the users that you want to edit.
-
Click More (more_vert).
-
Adjust the settings. Note the explanations in Table 6.
-
Click Apply.
→ The user accounts are updated.
| Setting | Explanation |
|---|---|
Assign roles |
Activate to assign one or more roles to selected user accounts. → A dialog window opens. Select one or more roles in the drop-down list. Confirm your selection by clicking on Assign roles. The roles are assigned to the selected user accounts. |
Remove roles |
Activate to remove one or more roles from selected user accounts. → A dialog window opens. Select one or more roles in the drop-down list. Confirm your selection by clicking on Remove roles. The roles are removed from the selected user accounts. |
Send email |
Activate to send an email to the selected user accounts. The email programme opens. The email addresses of the user accounts are entered in the recipient field. |
Reset previously started box picking |
Activate to reset previously started box picking of selected users. |
Logout |
Activate to log out selected users. |