Working with the Messenger
Find out on this manual page how you can use Messenger for your everyday tasks in the best way.
|
Configuring Messenger
Would you like to customise Messenger for your individual needs? Information on configuring the Messenger can be found on the manual page Configuring Messenger. |
1. Overview
2. Structure of Messenger
The CRM » Messenger menu is structured as follows:

-
Navigation: Here you can navigate through different parts of the menu. The currently selected area (blue bar) is displayed in the main window on the right. Click on menu to expand or collapse the navigation bar.
-
Available sections in the navigation:
-
Settings:Navigates to the menu Setup » CRM » Messenger.
-
-
Toolbar: Here you can search for conversations, adjust the columns in the overview, set the results to be shown per page and click through the pages with the conversations.
-
Main window: Here you can see whichever area is currently open.
-
Overview: When you start a search, you’ll see the results in an overview. The overview provides information about the conversations found at a glance. You see, for example, the email addresses of the senders, the subject, the date when the message was received, the assigned tags and by means of the icon attach_file, you can see whether the message has an attachment.
-
Detail view: When you open a message, the details will become visible below the main window. Click on Reply to open the editor in which you can write your reply.
-
3. Inbox
In the navigation on the left side of the Messenger, you can find the folder inbox Inbox. You can see the number of new messages behind it. This information is updated in real-time.
Click in the Inbox folder in the top right on Configure columns (settings) and activate (check_box) the columns that you want to see in the overview. You can also deactivate (check_box_outline_blank) activated columns again. Click on drag_indicator and hold down the symbol to change the order of the columns with drag-and-drop. The following table lists the available columns in the Inbox folder.
Save time and use the group function to carry out certain functions for the conversations in this folder at once.
|
Individually adjusting the width of the table columns
You can adjust the columns’ width in this Messenger view according to your needs. When hovering over the respective table columns, blue lines appear which allow you to adjust the size as desired. |
| Column | Explanation |
|---|---|
Selection |
Shows the checkbox for the group function (check_box_outline_blank) in the overview. |
Done |
Shows with the icon circle that the conversation has not been marked as done. Shows with the icon circle that the conversation has been marked as done. |
Short ID |
Right next to the title bar, click on arrow_upward or arrow_downward to sort the table in ascending or descending order by the ID. |
Referrer |
Shows with a symbol the referrer of the conversation’s first message.
|
Relations |
The conversation relations are shown here, for example:
Notes: You can remove relations in the overview. To do this, move the mouse pointer over a relation until an X appears on the right and click on it. Here you have the option to delete the relation from the list of recipients as well. |
Subject |
Shows the subject of the first message within the conversation. |
Preview |
Shows the preview of the latest message within the conversation. |
Created on |
Shows the date and the time when the conversation was created. Right next to the title bar, click on arrow_upward or arrow_downward to sort the table in ascending or descending order by the date. |
Updated on |
Shows the date and the time when the conversation was updated. Right next to the title bar, click on arrow_upward or arrow_downward to sort the table in ascending or descending order by the date. |
Tags |
Shows the tags that are assigned to the conversation. |
Attachments |
The symbol attach_file in the Number of attachments (attach_file) columns shows whether the conversation has attachments. When you hover with your cursor over the symbol, you can see how many attachments the conversation has. Right next to the title bar, click onarrow_upward to sort the table by the number of attachments. |
Priority |
In the Priority column, the symbols show the priority of the conversation. Right next to the title bar, click on arrow_upward or arrow_downward to sort the table in ascending or descending order by the selected priority. |
Follow-up date |
Shows the follow-up date that has been saved for the conversation.
The follow-up date is the scheduled time for re-establishing contact or following up on a conversation. Note: You can also adjust the follow-up date directly in the overview. How this works, is described in the Editing fields directly in the Messenger overview chapter. This function is available for all views except the trash. |
Folder |
Shows in which folder the conversation has been saved. |
Deadline |
Shows the deadline that was saved for the conversation. Right next to the title bar, click on arrow_downward or arrow_upward to sort the table in ascending or descending order by the deadline. |
Type |
Shows the type of the conversation. |
Status |
Shows the status of the conversation in the selected colour and with the selected progress in percent in brackets. |
Owner |
Shows the owner of the conversation in the overview. |
Subscribed |
The symbol done in the column notifications shows whether you have subscribed for the conversation. |
Subscribers |
Shows all subscribers of the conversation in the overview. |
Actions |
Allows to edit the conversation in the overview. |
4. New messages
In the navigation on the left side of the Messenger, you can find the folder mark_chat_unread New messages below the folder inbox Inbox.
Click in the New messages folder in the top right on Configure columns (settings) and activate (check_box) the columns that you want to see in the overview. You can also deactivate (check_box_outline_blank) activated columns again. Click on drag_indicator and hold down the symbol to change the order of the columns with drag-and-drop. The following table lists the available columns in the New messages folder.
Save time and use the group function to carry out certain functions for the conversations in this folder at once.
|
Individually adjusting the width of the table columns
You can adjust the columns’ width in this Messenger view according to your needs. When hovering over the respective table columns, blue lines appear which allow you to adjust the size as desired. |
| Column | Explanation |
|---|---|
Selection |
Shows the checkbox for the group function (check_box_outline_blank) in the overview. |
Done |
Shows with the icon circle that the conversation has not been marked as done. Shows with the icon circle that the conversation has been marked as done. |
Short ID |
Right next to the title bar, click on arrow_upward or arrow_downward to sort the table in ascending or descending order by the ID. |
Referrer |
Shows with a symbol the referrer of the conversation’s first message.
|
Relations |
The conversation relations are shown here, for example:
Notes: You can remove relations in the overview. To do this, move the mouse pointer over a relation until an X appears on the right and click on it. Here you have the option to delete the relation from the list of recipients as well. |
Subject |
Shows the subject of the first message within the conversation. |
Preview |
Shows the preview of the latest message within the conversation. |
Created on |
Shows the date and the time when the conversation was created. Right next to the title bar, click on arrow_upward or arrow_downward to sort the table in ascending or descending order by the date. |
Updated on |
Shows the date and the time when the conversation was updated. Right next to the title bar, click on arrow_upward or arrow_downward to sort the table in ascending or descending order by the date. |
Tags |
Shows the tags that are assigned to the conversation. |
Attachments |
The symbol attach_file in the Number of attachments (attach_file) columns shows whether the conversation has attachments. When you hover with your cursor over the symbol, you can see how many attachments the conversation has. Right next to the title bar, click onarrow_upward to sort the table by the number of attachments. |
Priority |
In the Priority column, the symbols show the priority of the conversation. Right next to the title bar, click on arrow_upward or arrow_downward to sort the table in ascending or descending order by the selected priority. |
Follow-up date |
Shows the follow-up date that has been saved for the conversation.
The follow-up date is the scheduled time for re-establishing contact or following up on a conversation. Note: You can also adjust the follow-up date directly in the overview. How this works, is described in the Editing fields directly in the Messenger overview chapter. This function is available for all views except the trash. |
Folder |
Shows in which folder the conversation has been saved. |
Deadline |
Shows the deadline that was saved for the conversation. Right next to the title bar, click on arrow_downward or arrow_upward to sort the table in ascending or descending order by the deadline. |
Type |
Shows the type of the conversation. |
Status |
Shows the status of the conversation in the selected colour and with the selected progress in percent in brackets. |
Owner |
Shows the owner of the conversation in the overview. |
Subscribed |
The symbol done in the column notifications shows whether you have subscribed for the conversation. |
Subscribers |
Shows all subscribers of the conversation in the overview. |
Actions |
Allows to edit the conversation in the overview. |
5. My messages
In the navigation on the left side of the Messenger, you can find the folder 3pMy messages below the folder inboxInbox. You can see all conversations here that you subscribed for.
Click in the My messages folder in the top right on Configure columns (settings) and activate (check_box) the columns that you want to see in the overview. You can also deactivate (check_box_outline_blank) activated columns again. Click on drag_indicator and hold down the symbol to change the order of the columns with drag-and-drop. The following table lists the available columns in the My messages folder.
Save time and use the group function to carry out certain functions for the conversations in this folder at once.
|
Individually adjusting the width of the table columns
You can adjust the columns’ width in this Messenger view according to your needs. When hovering over the respective table columns, blue lines appear which allow you to adjust the size as desired. |
| You will learn how to add a new folder below this table. |
| Column | Explanation |
|---|---|
Selection |
Shows the checkbox for the group function (check_box_outline_blank) in the overview. |
Done |
Shows with the icon circle that the conversation has not been marked as done. Shows with the icon circle that the conversation has been marked as done. |
Short ID |
Right next to the title bar, click on arrow_upward or arrow_downward to sort the table in ascending or descending order by the ID. |
Referrer |
Shows with a symbol the referrer of the conversation’s first message.
|
Relations |
The conversation relations are shown here, for example:
Notes: You can remove relations in the overview. To do this, move the mouse pointer over a relation until an X appears on the right and click on it. Here you have the option to delete the relation from the list of recipients as well. |
Subject |
Shows the subject of the first message within the conversation. |
Preview |
Shows the preview of the latest message within the conversation. |
Created on |
Shows the date and the time when the conversation was created. Right next to the title bar, click on arrow_upward or arrow_downward to sort the table in ascending or descending order by the date. |
Updated on |
Shows the date and the time when the conversation was updated. Right next to the title bar, click on arrow_upward or arrow_downward to sort the table in ascending or descending order by the date. |
Tags |
Shows the tags that are assigned to the conversation. |
Attachments |
The symbol attach_file in the Number of attachments (attach_file) columns shows whether the conversation has attachments. When you hover with your cursor over the symbol, you can see how many attachments the conversation has. Right next to the title bar, click onarrow_upward to sort the table by the number of attachments. |
Priority |
In the Priority column, the symbols show the priority of the conversation. Right next to the title bar, click on arrow_upward or arrow_downward to sort the table in ascending or descending order by the selected priority. |
Follow-up date |
Shows the follow-up date that has been saved for the conversation.
The follow-up date is the scheduled time for re-establishing contact or following up on a conversation. Note: You can also adjust the follow-up date directly in the overview. How this works, is described in the Editing fields directly in the Messenger overview chapter. This function is available for all views except the trash. |
Folder |
Shows in which folder the conversation has been saved. |
Deadline |
Shows the deadline that was saved for the conversation. Right next to the title bar, click on arrow_downward or arrow_upward to sort the table in ascending or descending order by the deadline. |
Type |
Shows the type of the conversation. |
Status |
Shows the status of the conversation in the selected colour and with the selected progress in percent in brackets. |
Owner |
Shows the owner of the conversation in the overview. |
Subscribed |
The symbol done in the column notifications shows whether you have subscribed for the conversation. |
Subscribers |
Shows all subscribers of the conversation in the overview. |
Actions |
Allows to edit the conversation in the overview. |
6. My folders
To have a better overview and structure in your conversations, you can create as many folders as you like. The folders you created will then be shown within the folder 3p My folders.
The folders then work like a filter. Click on one of the folders and all conversations will be shown in the overview that are assigned to this folder.
6.1. Adding a new folder
Proceed as described below to add a new folder.
Adding a new folder:
-
Go to CRM » Messenger.
-
In the side navigation on the left, click in the line 3pMy folders on more_vert (More options) and then on addAdd new folder.
→ The Add new folder window opens. -
Enter a name for the folder.
-
Click Save.
→ The folder is created. You can find the folder under 3p My folders.
By clicking on the folder, only the conversations contained in this folder are shown in the overview.
6.2. Renaming the folder
Do you want to save another name for the folder? To do so, proceed as follows.
Renaming the folder:
-
Go to CRM » Messenger.
-
On the left side, expand 3pMy folders.
-
In the line of the folder that you want to rename, click on more_vert (More options).
-
Click on edit Rename.
→ The Rename folder window opens. -
Enter an other name for the folder.
-
Click Save.
6.3. Deleting a folder
Proceed as described below to delete a new folder.
Important: When deleting the folder, only the relation is deleted, but not the conversations within the folder. If you delete a folder, the conversation are moved to the Inbox folder.
Deleting a folder:
-
Go to CRM » Messenger.
-
On the left side, expand 3pMy folders.
-
In the line of the folder that you want to delete, click on more_vert (More options).
-
Click on delete Delete.
→ The Delete folder window opens. -
Click on delete DELETE.
→ The folder is deleted and the conversations contained in it are moved to the Inbox folder.
8. Archive
In the navigation on the left side of the Messenger, you can find the folder archive Archive. All archived conversations are stored here.
|
Better performance through use of the archive
We recommend using the archive if you have a high number of conversations (over 1000). This allows you to improve the performance of the Messenger. |
|
Automatically archiving conversations
How to set that conversations will automatically be moved to the archive after a certain number of days, is described in the Automatically archiving conversations chapter. |
Click in the archive folder in the top right on Configure columns (settings) and activate (check_box) the columns that you want to see in the overview. You can also deactivate (check_box_outline_blank) activated columns again. Click on drag_indicator and hold down the symbol to change the order of the columns with drag-and-drop. The following table lists the available columns in the archive.
Save time and use the group function to carry out certain functions for the conversations in this folder at once.
|
Individually adjusting the width of the table columns
You can adjust the columns’ width in this Messenger view according to your needs. When hovering over the respective table columns, blue lines appear which allow you to adjust the size as desired. |
| Column | Explanation |
|---|---|
Selection |
Shows the checkbox for the group function (check_box_outline_blank) in the overview. |
Done |
Shows with the icon circle that the conversation has not been marked as done. Shows with the icon circle that the conversation has been marked as done. |
Short ID |
Right next to the title bar, click on arrow_upward or arrow_downward to sort the table in ascending or descending order by the ID. |
Referrer |
Shows with a symbol the referrer of the conversation’s first message.
|
Relations |
The conversation relations are shown here, for example:
Notes: You can remove relations in the overview. To do this, move the mouse pointer over a relation until an X appears on the right and click on it. Here you have the option to delete the relation from the list of recipients as well. |
Subject |
Shows the subject of the first message within the conversation. |
Preview |
Shows the preview of the latest message within the conversation. |
Created on |
Shows the date and the time when the conversation was created. Right next to the title bar, click on arrow_upward or arrow_downward to sort the table in ascending or descending order by the date. |
Updated on |
Shows the date and the time when the conversation was updated. Right next to the title bar, click on arrow_upward or arrow_downward to sort the table in ascending or descending order by the date. |
Tags |
Shows the tags that are assigned to the conversation. |
Attachments |
The symbol attach_file in the Number of attachments (attach_file) columns shows whether the conversation has attachments. When you hover with your cursor over the symbol, you can see how many attachments the conversation has. Right next to the title bar, click onarrow_upward to sort the table by the number of attachments. |
Priority |
In the Priority column, the symbols show the priority of the conversation. Right next to the title bar, click on arrow_upward or arrow_downward to sort the table in ascending or descending order by the selected priority. |
Follow-up date |
Shows the follow-up date that has been saved for the conversation.
The follow-up date is the scheduled time for re-establishing contact or following up on a conversation. Note: You can also adjust the follow-up date directly in the overview. How this works, is described in the Editing fields directly in the Messenger overview chapter. This function is available for all views except the trash. |
Folder |
Shows in which folder the conversation has been saved. |
Deadline |
Shows the deadline that was saved for the conversation. Right next to the title bar, click on arrow_downward or arrow_upward to sort the table in ascending or descending order by the deadline. |
Type |
Shows the type of the conversation. |
Status |
Shows the status of the conversation in the selected colour and with the selected progress in percent in brackets. |
Owner |
Shows the owner of the conversation in the overview. |
Subscribed |
The symbol done in the column notifications shows whether you have subscribed for the conversation. |
Subscribers |
Shows all subscribers of the conversation in the overview. |
Actions |
Allows to edit the conversation in the overview. |
9. Automatically archiving conversations
Set the number of days after which conversations should be automatically moved to the archive. To do so, proceed as described below. Note that only a person with Admin rights is able to carry out this setting.
Automatically archiving conversations:
-
Go to Setup » CRM » Messenger » General.
Or: If you are already in the Messenger menu, click on the left side below the settings Settings area on folder_open General. -
In the Automatically archive conversations area, activate (toggle_on) the option Activate “Automatically archive conversations” function.
-
In the Number of days (max. 5 years) area, enter a number.
-
Save (save) the settings.
→ All conversations will be automatically moved to the archived after the number of days entered here.
10. Trash
In the navigation on the left side of the Messenger, you can find the folder delete Trash. Here you can find all deleted conversations and all deleted messages.
|
Automatically removing deleted messages
Refer to the Automatically emptying trash chapter to learn how to automatically remove deleted messages and conversations from trash after a certain number of days. |
Click in the trash folder in the top right on Configure columns (settings) and activate (check_box) the columns that you want to see in the overview. You can also deactivate (check_box_outline_blank) activated columns again. Click on drag_indicator and hold down the symbol to change the order of the columns with drag-and-drop. The following table lists the available columns in the trash folder.
Save time and use the group function to carry out certain functions for the conversations in this folder at once.
|
Individually adjusting the width of the table columns
You can adjust the columns’ width in this Messenger view according to your needs. When hovering over the respective table columns, blue lines appear which allow you to adjust the size as desired. |
| Column | Explanation |
|---|---|
Selection |
Shows the checkbox for the group function (check_box_outline_blank) in the overview. |
Done |
Shows with the icon circle that the conversation has not been marked as done. Shows with the icon circle that the conversation has been marked as done. |
Short ID |
Right next to the title bar, click on arrow_upward or arrow_downward to sort the table in ascending or descending order by the ID. |
Referrer |
Shows with a symbol the referrer of the conversation’s first message.
|
Relations |
The conversation relations are shown here, for example:
Notes: You can remove relations in the overview. To do this, move the mouse pointer over a relation until an X appears on the right and click on it. Here you have the option to delete the relation from the list of recipients as well. |
Subject |
Shows the subject of the first message within the conversation. |
Preview |
Shows the preview of the latest message within the conversation. |
Created on |
Shows the date and the time when the conversation was created. Right next to the title bar, click on arrow_upward or arrow_downward to sort the table in ascending or descending order by the date. |
Updated on |
Shows the date and the time when the conversation was updated. Right next to the title bar, click on arrow_upward or arrow_downward to sort the table in ascending or descending order by the date. |
Tags |
Shows the tags that are assigned to the conversation. |
Attachments |
The symbol attach_file in the Number of attachments (attach_file) columns shows whether the conversation has attachments. When you hover with your cursor over the symbol, you can see how many attachments the conversation has. Right next to the title bar, click onarrow_upward to sort the table by the number of attachments. |
Priority |
In the Priority column, the symbols show the priority of the conversation. Right next to the title bar, click on arrow_upward or arrow_downward to sort the table in ascending or descending order by the selected priority. |
Follow-up date |
Shows the follow-up date that has been saved for the conversation.
The follow-up date is the scheduled time for re-establishing contact or following up on a conversation. Note: You can also adjust the follow-up date directly in the overview. How this works, is described in the Editing fields directly in the Messenger overview chapter. This function is available for all views except the trash. |
Folder |
Shows in which folder the conversation has been saved. |
Deadline |
Shows the deadline that was saved for the conversation. Right next to the title bar, click on arrow_downward or arrow_upward to sort the table in ascending or descending order by the deadline. |
Type |
Shows the type of the conversation. |
Status |
Shows the status of the conversation in the selected colour and with the selected progress in percent in brackets. |
Owner |
Shows the owner of the conversation in the overview. |
Subscribed |
The symbol done in the column notifications shows whether you have subscribed for the conversation. |
Subscribers |
Shows all subscribers of the conversation in the overview. |
Actions |
Allows to edit the conversation in the overview. |
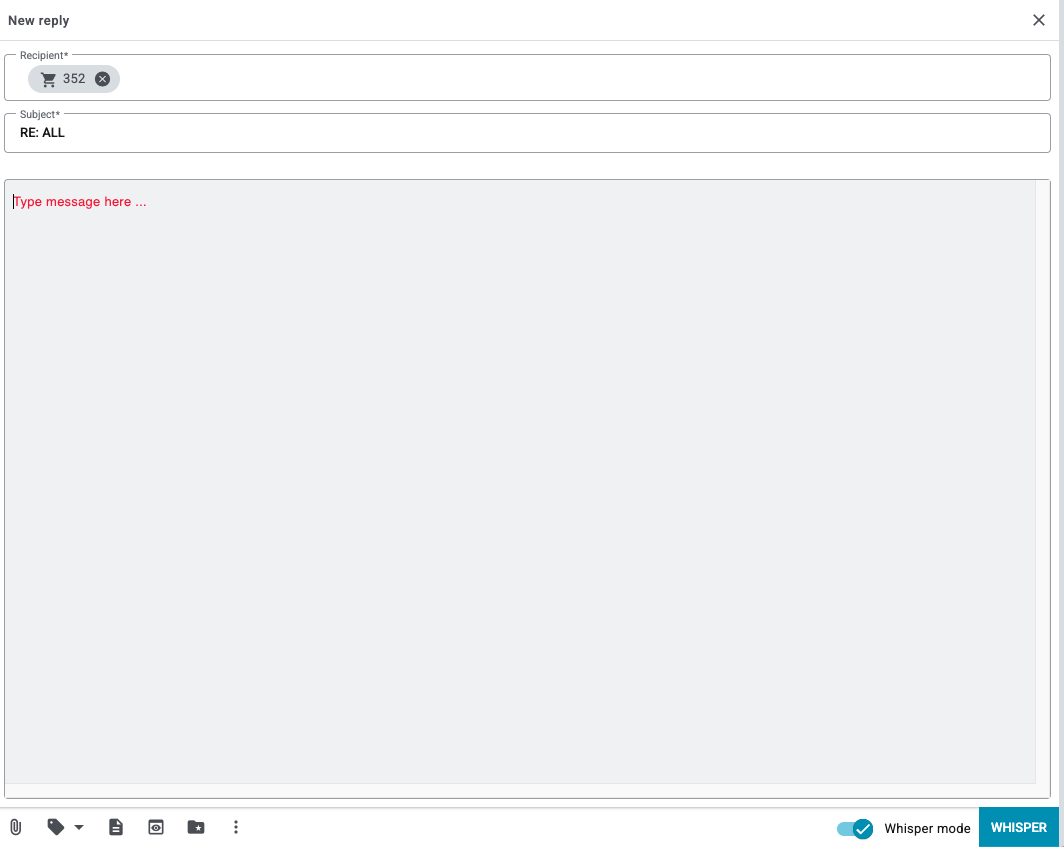
11. Creating a new conversation
Proceed as described below to create a new conversation in the Messenger.
Creating a conversation:
-
Go to CRM » Messenger.
-
In the top left corner, click on addNew conversation.
→ The New conversation section opens on the right side of the screen. -
Enter a value in the Recipient field and select the appropriate value from the suggestion list.
Example: If you enter a number, possible receivers with this order ID or contact ID will be suggested. Also the external order ID and the external number that is saved in the contact details will be taken into account here. -
Select a group from the drop-down list.
-
Enter the subject of the message in the Subject field.
-
optionally Click on New Conversation, in the header to expand a section with further properties of the new conversation.
-
optionally Select the properties of the new conversation like Owner, Priority and Deadline.
-
Enter the message in the text field.
-
Use the editor’s formatting options, if desired.
Note: To do so, double-click on the word that you want to format to open the editor. For example, you can centre the text or pin it flush left or right and change the font and background colour. -
Click on Add attachments (attach_file) to add attachments to the message.
-
Click on Assign tags to message (local_offer) to assign tags for the message.
-
Select further options, if needed, by clicking on more_vert. Note Table 6.
-
Click on forward_to_inbox SEND.
| Setting | Explanation |
|---|---|
Assign owner |
Here you search for owners and select already existing owners for the conversation (check_box). |
Set type and status |
Here you search for type and status and select an existing type and status for the conversation (check_box). |
Set priority |
Select a priority for the conversation. |
Manage folders |
Select a folder for the conversation (check_box). |
Set deadline |
Set a deadline for the conversation. |
Follow-up date |
Set a follow-up date for the conversation. |
Assign tags |
Here you can search for tags and select existing tags for the conversation (check_box). |
Mark as done |
Marks the conversation as done. |
Recipient |
Enter a name or ID here and select the appropriate value from the suggestion list. You can add more recipients. |
Group |
Select a group from the drop-down list. The list shows the names of the default groups and the groups you have created. |
Subject |
Enter the subject. This is a mandatory field. |
Text field |
Enter the content of the message here. |
Add attachments (attach_file) |
Click on attach_file to add attachments to your message. Select as many attachments as you like from your computer. |
Whisper mode (visibility / visibility_off) |
You can whisper messages to make these messages only visible for internal purposes but not for your contacts. To do so, click on Whisper mode (visibility). |
Text blocks (description) |
With a click on description all text blocks you created are displayed. |
Template overview (preview) |
By clicking on preview, the Emaill service window opens. Note the explanations in the chapter using the email service in a new conversation under the table. |
Template favourites (folder_special) |
By clicking on folder_special you see all templates that you marked as favourite. Here you can also search for templates. Select the language to load the template’s content in the text field. AI tools (stars_2) |
The AI tools of the messenger offer you the following features to edit your message: Translate message: translate your message automatically into on of the selected languages. You can add more questions to the selection via settings Manage languages If you don’t find the target language in the selection. Display the source text in the source language by clicking Show original. Following languages are available: Bulgarian, Chinese, Czech, Danish, Dutch, English, French, German, Italian, Norwegian, Polish, Portuguese, Romanian, Russian, Slovak, Spanish, Swedish, Turkish, Vietnamese Suggest reply: An answer is generated by the information in the receives message and the contact data. Placeholder might get generated, if there is no contact data. The answer uses a formal tone. This tool is only visible if you reply to a message, not when creating one. expand Expand: your message gets rewritten and expanded by paragraphs. Sentences tend to be longer and a formal tone is used. Via Show original the source text is displayed and you can compare the changes to the original. |
Show timer (more_vert) |
You can start a timer for every message. To do so, click on more_vert first. If you then activate the Show timer button (toggle_on), the timer next to the button forward_to_inbox SEND will start running automatically. |
Text blocks (more_vert) |
You can deactivate the text blocks in the toolbar. First, click on more_vert then on toggle_on so that the toggle button beside Text blocks is grey. |
Templates (more_vert) |
You deactivate the display of the templates and template favourites in the toolbar. First, click on more_vert then on toggle_on so that the toggle button beside Templates is grey. |
SEND |
12. Using the email service in a new conversation
Use the email service to send an email template in a new Messenger conversation. To do so, proceed as follows.
Using the email service in a new Messenger conversation:
-
Go to CRM » Messenger.
-
In the top left corner, click on addNew conversation.
-
Enter a value in the Recipient field and select the appropriate value from the suggestion list.
Example: If you enter a number, possible receivers with this order ID or contact ID will be suggested. Also the external order ID and the external number that is saved in the contact details will be taken into account here. -
Select a group from the drop-down list.
-
Enter the subject of the message in the Subject field.
-
Select a channel from the drop-down list.
-
Click on preview (Template overview) at the bottom of the toolbar.
→ The Email service window opens. -
Select a language from the drop-down list Template language.
-
Use the filters to search for the appropriate EmailBuilder template. Note the explanations about the filters in the Filter options in the email service chapter.
→ The templates that correspond to the search criteria entered are shown. Or: The folders that contain the templates that correspond to the search criteria entered are shown. -
Click on the template.
-
Click on preview LOAD TEMPLATE.
→ The template is loaded in the text field. -
Use the editor’s formatting options, if desired. Click on code (Code view) to edit the template’s content in HTML source code.
-
Click on forward_to_inbox SEND at the bottom right.
13. Replying to a message
Search for the conversation that contains the message you want to reply to. Click on the message and click on Reply to open the reply editor.
If you would like to reply to a message and one of your colleagues is replying to that message exactly at the same time, this is shown in the upper part of the message: User XY is writing a message….
|
When replying to an existing message, you can see all recipients that will receive this message. You can add more recipients. Enter either a part of the name or the ID. When entering an ID, also the contact ID, the order ID, the external order ID and the external number from the contact details are taken into account.
You can see the following icons below the reply editor:
-
Behind the context menu more_vert, you can find the following functions:
If the option Subject is activated (toggle_on), you can adjust the subject line. If you have not activated the Subject option (toggle_off), the Subject field is not visible when replying to the message. The currently selected subject is then automatically transferred when replying to the message.
Use the formatting options of the editor in the message you want to answer with. To do so, double-click on the word that you want to format to open the editor. For example, you can centre the text or pin it flush left or right and change the font and background colour.
14. Searching for a conversation in the Messenger
Open all conversations in a list or select filters (tune) to narrow down the search results in the Messenger overview.
Once you have found the desired conversation, you can open the single messages that are contained in the conversation.
Searching for a conversation in the Messenger:
-
Go to CRM » Messenger.
-
Option 1: Click on search to see a list of all conversations.
-
Option 2: Enter a value in the search field and select the appropriate filter from the suggestion list. The following search parameters are available: Subject, Contact ID, Email, Message content, Short ID and Order ID.
-
Option 3: Click on tune to narrow down the search results with filters.
-
-
Note the explanations about the filters in Table 7.
| Filter | Explanation | ||||||||
|---|---|---|---|---|---|---|---|---|---|
Subject |
Enter a word to only search for conversations containing this word in their subject line. |
||||||||
Message content |
Enter a word to only search for contents within the message body. |
||||||||
From / To |
Enter a date or select the dates from the calendars (today) to search for conversations within a certain time period. |
||||||||
Type |
Select (check_box) one or multiple types from the list to only search for conversations with this type. |
||||||||
Status |
Select (check_box) one or multiple statuses from the list to only search for conversations with this type. |
||||||||
Referrer |
Select a referrer to only search for conversations with this referrer.
|
||||||||
Short ID |
Enter the ID of the conversation to only search for the conversation with this ID. |
||||||||
Sender |
Select a sender from the list to only search for conversations from this sender. |
||||||||
Done |
Select Yes to only search for conversations that have been marked as done. Select No to only search for conversations that are not done yet. |
||||||||
Has attachments |
Select Yes to only search for conversations with attached files. Select No to only search for conversations that have no files attached. |
||||||||
Contact ID |
Enter an ID to only search for conversations that are linked with this contact ID. Available operators
|
||||||||
Order ID |
Enter an ID to only search for conversations that are linked with this order ID. Available operators
|
||||||||
Enter an email address to only search for conversations that contain this email address. Available operators
|
|||||||||
Tags |
Select (check_box) tags to only search for conversations with these tags. Click on check_box_outline_blank Select all to select all available tags. Click on check_box Deselect all to cancel the selection again. Available operators
|
||||||||
Payment ID |
Enter an ID to only search for conversations that are linked with this payment ID. |
||||||||
Deadline |
Select a value from the list to only search for conversations with a deadline in this range.
|
||||||||
Priority |
Select a priority from the list to only search for conversations with this priority.
|
||||||||
Follow-up date |
Select a value from the list to only search for conversations with a follow-up date in this range.
|
||||||||
Subscriber |
Select a name from the list to only search for conversations with this subscriber. |
||||||||
Owner |
Select an owner from the list to only search for conversations with this owner. Choose No owner to search for conversations that don’t have an owner. |
||||||||
Channel |
Select a channel from the list to only search for conversations from this channel. |
||||||||
replay |
Resets the selected filter criteria. |
||||||||
search SEARCH |
Starts the search. The conversations found are listed in the overview. |
14.1. Saving the current filter
When you start a search, your selected filters are displayed up top as so-called “chips”. You can save these filters to apply them again more quickly and easily in the future.
Saving the current filter:
-
Start a search.
-
Click on Saved filters (bookmarks).
-
Click on bookmark_border Save current filter.
-
Enter a name for the filter.
-
Decide whether
-
this filter should be set as default filter (toggle_on)
-
this filter should be created for all users (toggle_on).
-
-
Click SAVE.
→ The filter now appears under Saved filters (bookmarks).
| Use drag-and-drop to arrange the filters in a specific order by clicking on Move (drag_indicator). Click on delete to delete a filter. |
14.2. Applying saved filters
Proceed as follows to apply an already saved filter for the search.
Applying saved filters:
-
Click on Saved filters (bookmarks).
-
Click on a filter that you have already created.
→ The search is started and the filter settings are displayed up top as so-called “chips”.
| Once you apply a saved filter, the folder bookmarks My filters becomes visible in the side navigation on the left side. The folder My filters contains all saved filters. By clicking on the corresponding filter, the filter settings are applied to the folder that you have currently opened. |
14.3. Setting a default filter
To make sure that you don’t have to select a filter that you use quite often from the list of your saved filters every time when opening the CRM » Messenger menu, you can set a created filter as default filter. Every time when you open the Messenger, this filter will be automatically applied.
You can set the filter as default filter directly when creating it as described in Saving the current filter or you can set the filter as default in the overview afterwards.
In the line of the saved filter, click on star Set as default. If you want to set another filter as default filter, deactivate the currently selected default filter by clicking on star_outline Do not use as default.
15. Editing a conversation in the overview
|
Carrying out the group function
Use the group function in the Messenger to edit several conversations at once. For further information, refer to the Using the group function chapter. |
You can already customise many properties of the conversation in the overview using inline editing, including:
Click on settings to customise the column configuration of the table after your preferences.
Following features are available to you by clicking more_vert in the Messenger overview
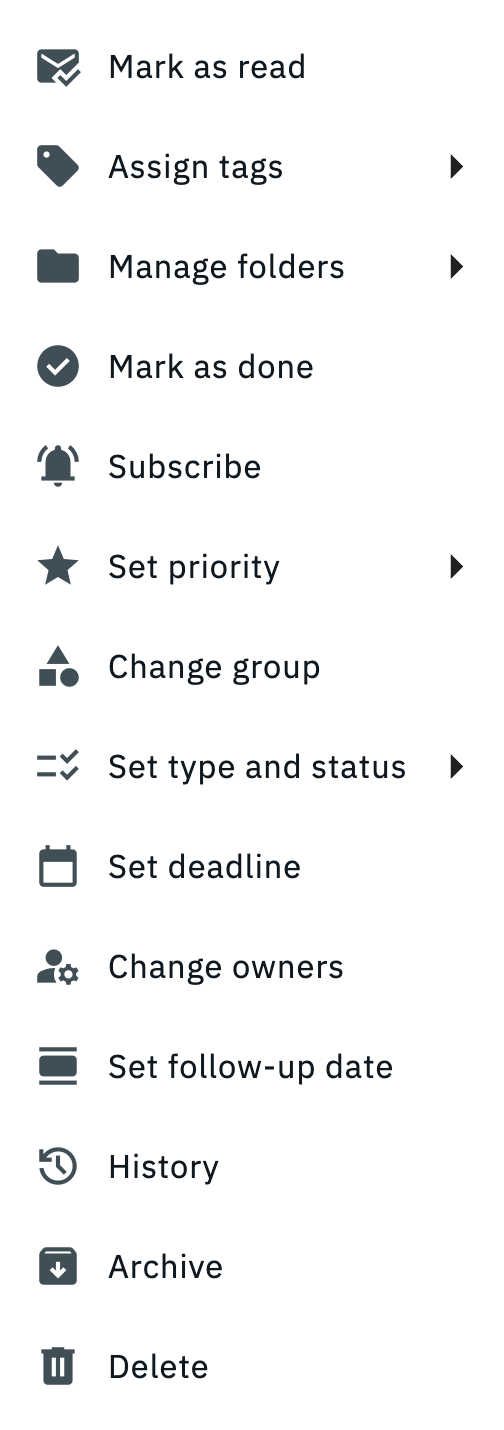
15.1. Marking a conversation as read / unread
15.1.1. Marking a conversation as read
Proceed as described below to mark a conversation in the overview as read.
Marking a conversation as read:
-
Go to CRM » Messenger.
-
Search for the conversation by means of the filter settings. Note the explanations about the filters in the Searching for a conversation in the Messenger chapter.
-
In the line of the conversation that you want to mark as read, click on more_vert.
-
Click on mark_email_read Mark conversation as read.
→ The line of the conversation is no longer shown in bold and the blue circle circle at the beginning of the line disappears.
15.1.2. Marking a conversation as unread
Proceed as described below to mark a conversation in the overview as unread.
Marking a conversation as unread:
-
Go to CRM » Messenger.
-
Search for the conversation by means of the filter settings. Note the explanations about the filters in the Searching for a conversation in the Messenger chapter.
-
In the line of the conversation that you want to mark as unread, click on more_vert.
-
Click on mark_email_unread Mark conversation as unread.
→ The line of the conversation will be in bold and blue circle circle appears.
15.2. Assigning tags to a conversation
Proceed as described below to assign a tag to a conversation. You can also search for tags that are available for the Messenger. This might also be useful if you really created a lot of tags for the Messenger conversations or Messenger: Billable messages areas.
Assigning tags to a conversation:
-
Go to CRM » Messenger.
-
Search for the conversation by means of the filter settings. Note the explanations about the filters in the Searching for a conversation in the Messenger chapter.
-
In the line of the conversation, click on more_vert.
-
Click on local_offer Assign tags to conversation to see a list of all tags that you have already created for the areas Messenger conversation and Messenger: Billable messages.
Tip: If you have created a lot of tags for the Messenger conversations or Messenger: Billable messages areas, enter the name of the tag in the search field Search for tag. -
Select (check_box) the tags that you want to assign to the conversation.
→ The tag is assigned to the conversation and you see the tag in the overview in the Tags column.
15.2.1. Adding a tag
If you could not find the tag you were looking for as described in the Assigning tags to a conversation chapter, you can create a new tag from the Messenger overview. To do so, proceed as described below.
Creating a new tag:
-
Go to CRM » Messenger.
-
In the line of the conversation, click on more_vert.
-
Click on local_offer Assign tags to conversation.
-
Click on add Add tag to create a new tag.
→ You will automatically be redirected to the Setup » Settings » Tags menu. Create more tags for the areas Messenger conversation or Messenger: Billable messages.
15.2.2. Editing a tag
Proceed as described below to edit a tag from the Messenger overview.
Editing a tag:
-
Go to CRM » Messenger.
-
In the line of the conversation, click on more_vert.
-
Click on local_offer Assign tags to conversation.
-
Click on edit Edit tag to edit an existing tag.
→ You will automatically be redirected to the Setup » Settings » Tags menu. There, you can edit the tags.
15.3. Managing folders
Proceed as described below to manage the folders from the conversation. Note that you have to create a folder in advance.
-
Go to CRM » Messenger.
-
Search for the conversation by means of the filter settings. Note the explanations about the filters in the Searching for a conversation in the Messenger chapter.
-
In the line of the conversation that you want to move to a folder, click on more_vert.
-
Click on folder Manage folders.
-
Select (check_box) one or multiple folders from the list.
→ Note: If you activated the Folder option via the Configure columns function, you can see in the overview in which folder the conversation is saved.
Removing a conversation from a folder
You can remove a conversation from a folder at any time.
Removing a conversation from a folder:
-
Go to CRM » Messenger.
-
Search for the conversation by means of the filter settings. Note the explanations about the filters in the Searching for a conversation in the Messenger chapter.
-
In the line of the conversation that you want to remove from a folder, click on more_vert.
-
Click on folder Manage folders.
-
Click on the activated (check_box) folder to remove the selection (check_box_outline_blank).
|
Removing a conversation from all folders
If you want to remove the conversation from all folders, click on folder_off Remove from all folders. |
15.4. Marking a conversation as done / not done
15.4.1. Marking a conversation as done
Proceed as described below to mark a conversation in the overview as done.
Marking a conversation as done:
-
Go to CRM » Messenger.
-
Search for the conversation by means of the filter settings. Note the explanations about the filters in the Searching for a conversation in the Messenger chapter.
-
In the line of the conversation that you want to mark as done, click on more_vert.
-
Click on circle Mark conversation as done.
→ The circle icon is displayed.
15.4.2. Marking a conversation as not done
Proceed as described below to mark a conversation in the overview as not done.
Marking a conversation as not done:
-
Go to CRM » Messenger.
-
Search for the conversation by means of the filter settings. Note the explanations about the filters in the Searching for a conversation in the Messenger chapter.
-
In the line of the conversation that you want to mark as not done, click on more_vert.
-
Click on radio_button_unchecked Mark conversation as not done.
→ The circle icon will be removed.
15.5. Subscribing for / Unsubscribing from a conversation
You can subscribe for conversations where you are not directly part of so that you will be informed in case of new messages within this conversation. Not being directly part of it means that you are neither a recipient nor a sender of a message within this conversation. Of course, you can unsubscribe from a conversation’s subscriber list any time with just one click.
15.5.1. Subscribing for conversations
Proceed as follows to subscribe for a conversation.
Subscribing for a conversation:
-
Go to CRM » Messenger.
-
Search for the conversation by means of the filter settings. Note the explanations about the filters in the Searching for a conversation in the Messenger chapter.
-
In the line of the conversation that you want to subscribe for, click on more_vert.
-
Click on notifications_active Subscribe for conversation.
→ In the column notifications Subscribed, the symbol done is shown.
15.5.2. Unsubscribing from a conversation
Proceed as described below to unsubscribe from a conversation.
Unsubscribing from a conversation:
-
Go to CRM » Messenger.
-
Search for the conversation by means of the filter settings. Note the explanations about the filters in the Searching for a conversation in the Messenger chapter.
-
In the line of the conversation that you want to unsubscribe from, click on more_vert.
-
Click on notifications_off Unsubscribe from conversation.
→ In the column notifications Subscribed, the symbol done is no longer shown.
→ From now on, you will no longer receive notifications when a new message arrives in this conversation.
15.6. Setting a priority
Proceed as described below to set a priority for the conversation.
Setting a priority:
-
Go to CRM » Messenger.
-
Search for the conversation by means of the filter settings. Note the explanations about the filters in the Searching for a conversation in the Messenger chapter.
-
In the line of the conversation that you want to set a priority for, click on more_vert.
-
Click on star Set priority.
-
Select a priority from the list.
You can save the following priorities for the conversation:
-
keyboard_double_arrow_up Very high
-
arrow_upward High
-
Medium
-
arrow_downward Low
-
keyboard_double_arrow_down Very low
The selected priority is then shown next to the tags in the opened conversation. You can also search for conversations with a certain priority and sort the conversations in the overview in ascending and descending order by the priority (arrow_upward and arrow_downward).
Removing the priority
You don’t want to show a priority for the conversation any longer? Proceed as described below to remove the priority from the conversation.
Removing the priority:
-
Go to CRM » Messenger.
-
Search for the conversation by means of the filter settings. Note the explanations about the filters in the Searching for a conversation in the Messenger chapter.
-
In the line of the conversation that you want to remove the priority from, click on more_vert.
-
Click on star Set priority.
-
Click on remove_circle_outline Remove priority.
15.7. Changing the group of a conversation
Proceed as described below to change the group of a conversation.
Changing the group of a conversation:
-
Go to CRM » Messenger.
-
Search for the conversation by means of the filter settings. Note the explanations about the filters in the Searching for a conversation in the Messenger chapter.
-
In the line of the conversation that you want to change the group for, click on more_vert.
-
Click on category Change group.
-
Select the corresponding group.
-
Click on save Save.
15.8. Setting a type and status
Proceed as described below to set a type and status for the conversation. Make sure you have previously created a type and status.
Setting a type and status:
-
Go to CRM » Messenger.
-
Search for the conversation by means of the filter settings. Note the explanations about the filters in the Searching for a conversation in the Messenger chapter.
-
In the line of the conversation that you want to set a type and status for, click on more_vert.
-
Click on checklist_rtl Set type and status.
-
First, select the type and then the desired status from the list.
|
Default type and default status are overwritten
The type and the corresponding status that you select here for the conversation will overwrite the default type and default status that you selected in the Messenger configuration assistant in the Settings for receiving emails step. |
The selected type and the selected status are then shown in the open conversation next to the tags. You can also search for conversations with certain types and statuses and sort the conversations in the overview in ascending and descending order by the type and status (arrow_upward and arrow_downward).
15.9. Setting a deadline
Proceed as follows to set a deadline for a conversation.
Setting a deadline:
-
Go to CRM » Messenger.
-
Search for the conversation by means of the filter settings. Note the explanations about the filters in the Searching for a conversation in the Messenger chapter.
-
In the line of the conversation that you want to set a deadline for, click on more_vert.
-
Click on calendar_today Set deadline.
→ The window Set deadline opens. -
Select the date from the calendar (today).
-
Click on calendar_today Set deadline.
→ The deadline for the conversation is now set.
You can also search for conversations with certain deadlines and sort the conversations in the overview (arrow_upward and arrow_downward) in ascending and descending order by the deadline.
15.10. Change owner
Proceed as follows to change the owner for a conversation.
Changing the owner:
-
Go to CRM » Messenger.
-
Search for the conversation by means of the filter settings. Note the explanations about the filters in the Searching for a conversation in the Messenger chapter.
-
In the line of the conversation that you want to change the owner for, click on more_vert.
-
Click on manage_accounts Change owner.
→ The Change owner window opens. -
Select a role from the first drop-down list.
-
Select an owner from the second drop-down list.
-
Click Save.
15.11. Setting the follow-up date
Proceed as follows to set a follow-up date for a conversation. The follow-up date is like a resubmission.
Setting the follow-up date:
-
Go to CRM » Messenger.
-
Search for the conversation by means of the filter settings. Note the explanations about the filters in the Searching for a conversation in the Messenger chapter.
-
In the line of the conversation that you want to set a follow-up date for, click on more_vert.
-
Click on calendar_view_day Set follow-up date.
→ The Set follow-up date opens. -
Select the date from the calendar (today).
-
Click on calendar_view_day Set follow-up date.
→ The follow-up date for the conversation is now set.
You can also search for conversations with certain follow-up dates and sort the conversations in the overview (arrow_upward and arrow_downward) in ascending and descending order by the follow-up date.
15.12. Conversation history
Proceed as follows to open the conversation history. The history shows, for example, which user has changed the type and status of the conversation and when or which user has restored a conversation from the archive.
Opening the conversation history:
-
Go to CRM » Messenger.
-
Search for the conversation by means of the filter settings. Note the explanations about the filters in the Searching for a conversation in the Messenger chapter.
-
In the line of the conversation that you want to open the history for, click on more_vert.
-
Click on historyConversation history.
→ The window Conversation history opens.
You can also open the history from the opened conversation.
15.13. Archiving a conversation
Proceed as described below to archive a conversation.
|
Automatically archiving conversations
How to set that conversations will automatically be moved to the archive after a certain number of days, is described in the Automatically archiving conversations chapter. |
Archiving a conversation:
-
Go to CRM » Messenger.
-
Search for the conversation by means of the filter settings. Note the explanations about the filters in the Searching for a conversation in the Messenger chapter.
-
In the line of the conversation that you want to archive, click on more_vert.
-
Click on archiveArchive conversation.
→ The conversation is moved to the archive.
15.14. Deleting a conversation
Proceed as described below to delete a conversation in the overview.
|
Automatically removing deleted conversations
Refer to the Automatically emptying trash chapter to learn how to automatically remove deleted messages and conversations from trash after a certain number of days. |
Deleting a conversation:
-
Go to CRM » Messenger.
-
Search for the conversation by means of the filter settings. Note the explanations about the filters in the Searching for a conversation in the Messenger chapter.
-
In the line of the conversation that you want to delete, click on more_vert.
-
Click on deleteDelete conversation.
→ A window opens and you need to confirm your decision. -
Click Yes.
→ The conversation is deleted and moved to trash.
16. Pinning conversations
You can pin conversations in the Messenger to simply and quickly switch between these conversations. To do so, proceed as described below.
Pinning a conversation:
-
Go to CRM » Messenger.
-
Search for the conversation by means of the filter settings. Note the explanations about the filters in the Searching for a conversation in the Messenger chapter.
-
Open the conversation.
-
In the top right of the opened conversation, click on push_pin (Pin conversation).
→ The folder Pinned conversations that contains all pinned conversations appears in the side navigation.
16.1. Unpinning an individual conversation
There are two ways to unpin a pinned conversation:
-
via the side navigation
-
To do so, click in the folder Pinned conversations in the line of the conversation that you would like to unpin on bookmark_remove (Unpin conversation).
-
-
via the opened conversation
-
In the top right of the opened conversation, click on bookmark_remove (Unpin conversation).
-
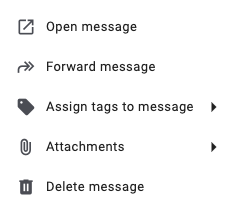
17. Editing a single message
You already know the different actions for the conversation that is described earlier on this page. Of course, you can also edit single messages. Proceed as described in the following sub-chapters.
Within the conversation, you can see the individual messages with the basic formatting as a preview without having to open the entire message. Behind the subject of the opened conversation, you can see the number of messages that are contained in the conversation in brackets.
17.2. Forwarding a message
To forward a message, open the context menu in the line of the message by clicking on more_vert and then on forward Forward message. Then enter the e-mail address of the person to whom you want to forward the message. Recipients of a forwarded message are not automatically added to the relations.
17.3. Assigning tags to the message
Proceed as described below to assign a tag to a single message.
Assigning tags to the message:
-
Go to CRM » Messenger.
-
Open the conversation that contains the message you want to assign a tag for.
-
Open the message by clicking in the line of the message.
-
In the top right of the message, click on more_vert and then on local_offerAssign tags to conversation to see a list of all tags that you have already created for the areas Messenger conversation and Messenger: Billable messages.
Tip: If you have created a lot of tags for the Messenger conversations or Messenger: Billable messages areas, enter the name of the tag in the search field Search for tag. -
Select (check_box) the tags that you want to assign to the message.
17.4. Downloading attachments
You can either download the attachments of the message one by one or download all attachments of the message as a ZIP file to your computer.
Downloading attachments:
-
Go to CRM » Messenger.
-
Open the conversation that contains the message whose attachment(s) you want to download.
-
Open the message by clicking in the line of the message.
-
In the top right of the message, click on more_vert and then on attach_file Attachments.
-
Click on one attachment or on file_download Download all files.
→ A window opens and you can choose a location on your computer where to save the file(s).
17.5. Deleting a message
Proceed as described below to delete a single message.
|
Automatically removing deleted messages
Refer to the Automatically emptying trash chapter to learn how to automatically remove deleted messages from trash after a certain number of days. |
Deleting a message:
-
Go to CRM » Messenger.
-
Open the conversation that contains the message you want to delete.
-
Open the message by clicking in the line of the message.
-
Click on more_vert.
-
Click on delete Delete.
→ A window opens and you need to confirm your decision. -
Click Yes.
→ The message is deleted.
18. Using text blocks in the Messenger
Text blocks are ready-to-use texts that you create in the CRM » EmailBuilder menu to implement it in your messages.
This saves you a lot of time and effort, particularly if you often answer the same questions or deal with the same problems. You can also enter long texts here and save a lot of time when working with your messages.
Think about a useful structure of folders, sub-folders and questions in advance.
Carry out the settings described below to create a text block and use it in the Messenger.
18.1. Creating a folder for the text block
Create a folder structure with the topics for that you want to create text blocks.
Creating a folder for the text block:
-
Go to CRM » EmailBuilder.
-
In the bottom left corner, click on add Add play_arrow.
-
Click on folder Folder.
→ The Add new folder window opens. -
Enter the name for the folder.
-
Click Save.
→ The new folder is added to the folder list.
18.2. Creating a text block
Create now the new text block and select the folder in which you want to save the text block.
Creating a text block:
-
Go to CRM » EmailBuilder.
-
Search for the folder that you have just created and click on more_vert.
-
Click on add Add play_arrow and then on text_fields Text blocks.
→ The Add new text block window opens. -
Enter the name.
-
Click Save.
→ The text block is created and opened. -
Click on add (Add).
-
Select a language from the list.
-
In the Content area, click on edit.
-
Enter the text block’s content in the editor.
-
Use the editor’s formatting options, if desired.
Note: To do so, double-click on the word that you want to format to open the editor. For example, you can centre the text or pin it flush left or right and change the font and background colour. -
Click Save.
18.3. Editing a text block
Proceed as described below to edit a text block.
Editing a text block:
-
Go to CRM » Messenger.
-
Search for the conversation by means of the filter settings. Note the explanations about the filters in the Searching for a conversation in the Messenger chapter.
-
Click on the conversation to open it.
-
Click on Reply.
-
Click on more_vert below the editor reply field.
-
Activate (toggle_on) the option Text blocks.
→ The entry Text blocks becomes visible in the editing bar at the bottom. -
Click on description (Add text blocks).
-
Click on edit Edit text blocks.
→ You get redirected to the CRM » EmailBuilder menu. The filter type Text block is preselected. -
Click on the desired text block and make your changes.
| If you have been using PlentyONE for a long time and have already created text blocks or FAQs in the old menu CRM » Text blocks / FAQ, you will see the folder Text blocks (migrated) in the CRM » EmailBuilder menu. This folder contains all folders, sub-folders and FAQs that you created in the old menu. |
18.4. Searching and sorting text blocks
You can sort and search for text blocks in the overview.
-
Click on the filter icon (tune).
-
Select the desired filters. Available filters are: Language, Owner, Client, ID, Name, as well as the option Sort by.
-
The text blocks are displayed according to the filters.
18.5. Marking a text block as favourite
Proceed as follows to mark a text block as favourite.
Marking a text block as favourite:
-
Go to CRM » Messenger.
-
Search for the conversation by means of the filter settings. Note the explanations about the filters in the Searching for a conversation in the Messenger chapter.
-
Click on the conversation to open it.
-
Click on Reply.
-
Click on more_vert below the editor reply field.
-
Activate (toggle_on) the option Text blocks.
→ The entry Text blocks becomes visible in the editing bar at the bottom. -
Click on description (Add text blocks).
-
Click on preview Text block overview to open all text blocks in an overview.
→ You will see the folders that you have created for the text blocks on the left-hand side. -
Expand the folder.
-
Move your cursor over the text block.
-
Click on star (Add to favourites).
→ The text block is added to the favourites (star) and now appears in the list of text blocks, which you can then insert directly into the message.
|
Removing a text block from favourites
If you want to remove a text block from favourites so that it won’t be shown in the text block list within a message, click on star (Remove from favourites) in the Text block overview. |
18.6. Inserting a text block into a message
Proceed as described below to insert a created text block into your message.
Inserting a text block into a message:
-
Go to CRM » Messenger.
-
Search for the conversation by means of the filter settings. Note the explanations about the filters in the Searching for a conversation in the Messenger chapter.
-
Click on the conversation to open it.
-
Click on Reply.
-
Click on more_vert below the editor reply field.
-
Activate (toggle_on) the option Text blocks.
→ The entry Text blocks becomes visible in the editing bar at the bottom. -
Click on description (Add text blocks).
-
Click on the desired text block in the list to insert it.
Note: You can see all text blocks here that you marked as favourite.
Tip: If you have marked a large number of text blocks as favourites, use the search function and enter the name of the text block in the search Search text block field to narrow down the search. -
Click on preview Text block overview to open all text blocks in an overview.
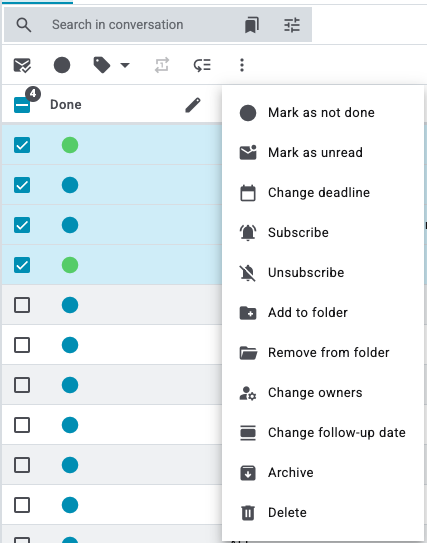
19. Carrying out the group function
Instead of editing each conversation individually, you can save time and edit multiple conversations at once using the group function.
Once you have selected (check_box) at least one conversation in the overview of one of the folders Inbox, New messages, My messages or Trash, the different buttons become visible (see Figure 5). Table 8 lists the elements from the group functions as well as their explanations.
| Element | Symbol | Explanation |
|---|---|---|
Mark conversations as read |
mark_email_read |
Marks all selected conversations as read. |
Mark conversations as done |
circle |
Marks all selected conversations as done (circle). |
Change type and status of conversations |
repeat_one |
Changes the type and status for all selected conversations. |
Change priority of conversations |
low_priority |
Changes the priority for all selected conversations. |
Assign tags to conversations |
local_offer |
Assigns the desired tag to all selected conversations. |
Mark conversations as not done |
radio_button_unchecked |
Marks all selected conversations as not done. |
Mark conversations as unread |
mark_email_unread |
Marks all selected conversations as unread (circle). The conversations are displayed in bold. |
Change deadline of conversations |
calendar_today |
Changes the deadline for all selected conversations. |
Subscribe for conversations |
notifications_active |
Subscribes for all selected conversations. |
Unsubscribe from conversations |
notifications_off |
Unsubscribes from all selected conversations. |
Add to folder |
create_new_folder |
Adds all selected conversations to the selected folders. |
Remove from folder |
folder_open |
Removes all selected conversations from the selected folders. |
Change owner |
manage_accounts |
Changes the owner of all selected conversations. |
Change follow-up date |
calendar_view_day |
Changes the follow-up date for all selected conversations. |
Archive conversations |
archive |
Moves all selected conversations to the archive. |
Delete conversations |
delete |
Deletes all selected conversations after having confirmed your decision. |
20. Edit fields directly in the Messenger overview
You can edit some fields directly in the Messenger overview. This is called inline editing.
Proceed as follows to edit the fields in the overview.
Edit fields directly in the Messenger overview:
-
Go to CRM » Messenger.
-
Search for the conversation by means of the filter settings. Note the explanations about the filters in the Searching for a conversation in the Messenger chapter.
-
Click on edit in the overview header beside the field you want to edit.
→ Above the header several icons are shown in the editing mode. Note Table 9.

| Symbol | Element | Explanation |
|---|---|---|
save |
Save |
Saves the changes. |
undo |
Undo |
Undoes the last change, unless this change has already been saved. |
redo |
Redo |
Restores the previously undone change. |
app_registration |
Activate the editing mode for all columns |
If you click on edit at a field that has editing mode available, you can click on app_registration to activate the editing mode for all columns. |
playlist_remove |
Deactivate the editing mode for all columns |
Click on playlist_remove to deactivate the editing mode for all columns and return to the overview. |
21. Assigning messages in the Messenger
Messages in the Messenger are assigned with the help of keywords or text parameters that are automatically recognised by your system.
Note the keywords that are used for the assignment as listed in Table 10. Both upper and lower case letters can be used.
| Assignment parameters | Alternative spellings | Permitted symbols | Examples |
|---|---|---|---|
Conversation |
+ Number |
Space, period, colon, minus, equals sign, hash key |
|
Conversation UUID |
+ Value of the UUID |
Space, period, colon, minus, equals sign, hash key |
|
Customer data |
+ Number Or:
+ Number |
Space, period, colon, minus, equals sign, hash key |
|
Order |
+ Number |
Space, period, colon, minus, equals sign, hash key |
|
Order |
+ Number |
Space, colon, hash key, minus |
|
Invoice number |
+ Number Or:
+ Number |
Space, period, colon, minus, equals sign, hash key |
|
22. Use AI tools
AI tools are available in PlentyONE to make your customer communication even faster and more efficient. Important information regarding the use of the messenger AI Tools.
|
Activating AI Tools
Activate toggle_on the option Messenger in the advanced AI features area in the Setup » AI settings menu This menu is only available for new PlentyONE plans. |
AI tools for incoming messages
Open a conversation and click on translate AI TRANSLATE above the last message, then select a target language to have the entire conversation translated using AI.
Open a conversation and click on stars_2 AI SUMMARISE above the last message to create an AI-generated summary for the entire conversation. The summary will be removed when you leave the conversation.

22.1. AI tools for self-composed messages
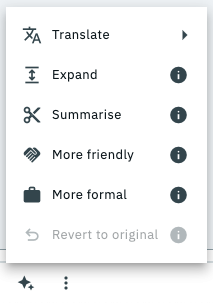
Click AI tools (auto_awesome) under the self-composed message to access following AI tools:
-
Translate = Select the target language into which you want your message to be translated.
-
Expand = Expand your message via AI. Your message is expanded with formal sentences.
-
Summarise = Shorten your message with AI so that the most important information shines through.
-
More friendly = Your message will be rewritten with more friendly voice, using a more informal language.
-
More formal = Your message will be rewritten with a more formal voice, ideal to bring serious topics or issues across.
-
Revert to original = If you are not pleased with the result, you can revert to the original version of the text.
22.2. Important information regarding the use of the messenger AI Tools
The AI tools in Messenger are based on Amazon Nova Micro.
Amazon Nova Micro is a generative AI platform from AWS and is a pure text model that delivers responses with the lowest latency. Amazon Nova Micro may only be used within the scope of legal and contractual requirements. The AI may only be used for the purposes agreed upon with the third party (e.g., platform or provider). No personal data may be entered or processed without a legal basis (e.g., consent, contract fulfillment).
22.2.1. Information obligations of the merchant
Merchants must make the following clear to end customers:
-
Transparency: That AI (Amazon Nova Micro) is used in the provision of the service.
-
Data Protection: What data is processed, on what legal basis, and for what purpose.
-
Rights of data subjects: Reference to rights of access, erasure, and objection under the GDPR.
-
Restriction: AI results are supportive and should not be understood as legally binding or guaranteed statements.
As a merchant, you are obliged to inform your employees about the use of Nova Micro:
-
Permissible and impermissible data entries (e.g., no sensitive personal data without a legal basis).
-
Employees' responsibility when using the system (e.g., obligation to review the results manually).
-
Reporting channels for anomalies or data protection incidents.
Employees must be regularly trained and made aware of how to use AI correctly, safely, and lawfully.
22.2.2. What steps does AWS take to protect privacy?
AWS employs comprehensive technical, organizational, and contractual measures to ensure the security and protection of confidential data. These include international standards such as ISO 27018 (data protection in the cloud) and SOC 2 Type II (auditing of data protection controls by independent bodies). As part of these certifications, AWS processes and protects personal data in accordance with recognized security and privacy guidelines.
22.2.3. Security
Security and compliance are a shared responsibility between AWS and us as AWS customers. The shared responsibility model describes this as cloud security and security in the cloud:
-
Cloud security: AWS is responsible for protecting the infrastructure on which AWS services run in the AWS Cloud. According to AWS, external auditors regularly test and verify the effectiveness of security measures. Further information on the compliance programs that apply to Amazon Nova can be found under AWS Services in the “AWS Compliance Program” section.
-
Security in the cloud: Our responsibility as a provider depends on the AWS service we use. We are also responsible for other factors, such as the confidentiality of our data, our company’s requirements, and compliance with applicable laws and regulations.
For more information on security, see:
https://docs.aws.amazon.com/bedrock/latest/userguide/security.html.
22.2.4. Requirements for the responsible use of AI
We as providers and you as users are responsible for all decisions, recommendations, actions, and omissions relating to the use of the service. The results generated by the AI must always be verified by you as part of a human review for accuracy, completeness, and suitability for the respective application.
For more information, see:
https://d1.awsstatic.com/legal/ai-responsible-ai-policy/AWS_Responsible_AI_Policy_2023.09.28_DE.pdf.